CALDERA软件安装指导
- 格式:pptx
- 大小:10.08 MB
- 文档页数:53
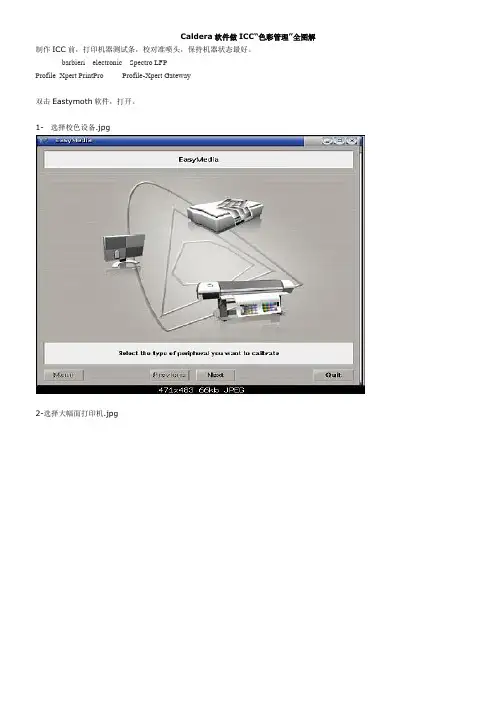
Caldera软件做ICC“色彩管理”全图解制作ICC前,打印机器测试条,校对准喷头,保持机器状态最好。
barbieri electronic Spectro LFPProfile_Xpert PrintPro Profile-Xpert Gateway双击Eastymoth软件,打开。
1-选择校色设备.jpg2-选择大幅面打印机.jpg2-选择打印材质后确定打印分辨率.jpg打印模式:CMYK 分辨率:?Pass 质量:直线/羽化/可变/不变选项含义:Fix:不可变墨滴,Var:可变墨滴,Fuzz:羽化,Fine & Ware:好品质(水平,直线),Fine & Fuzz:好品质(羽化),Superfine & Ware:超级好品质,很慢。
Ware1:水平/直线,Wow:一般4-开始色彩校正项目(iCC曲线、PPC曲线暂时为空).jpg5-墨水饱和度检测.jpg6-最大输出墨量设置调整7-创建线性化曲线.jpg8-eyeone线性化前测量.jpg9-线性化曲线调整.jpg10-最大总输出墨量检测与设置.jpg11-创建ICC曲线.jpg12-eyeone色靶测量(校色关键).jpg13-eyeone色靶扫描.jpg14-曲线生成前设置.jpg15-灰平衡曲线设置.jpg16-输出生成曲线及其评价.jpg综合评分:95%以上的ICC才OK。
17-校色结束-曲线已嵌入对应设备.jpg打印做ICC图:在桌面找:3sq –Images — cmyk-03 –加载拉进打印机,--icc 校准线性化--- 输出:不要选启用管理颜色,不要选启用曲线。
用8Pass单向打印,四色打灯的材料:200%墨量,四色不打灯的材料:100%墨量。
调入曲线:PPC文件新建:输入名称—下一个创建新的曲线,加载/导入现在文件—下一个--- 线性曲线与线性化:(油墨限制:没有,ICC:没有,墨量限制:300)-- 下一个加载导入现有文件---浏览---选择---配置处理---选择浏览—完成。
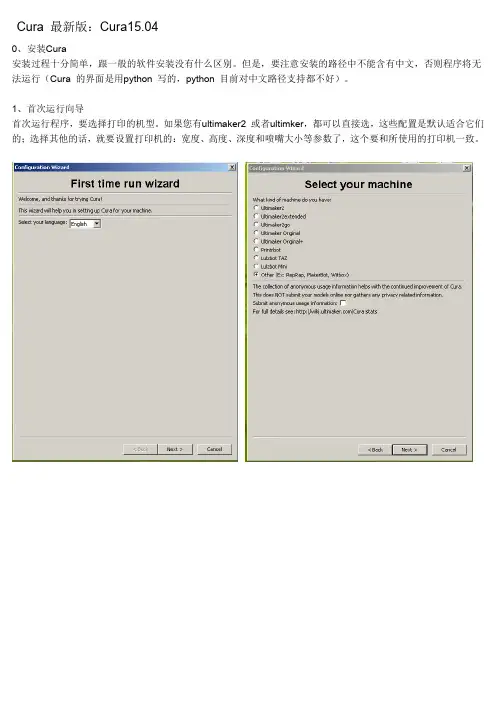
Cura 最新版:Cura15.040、安装Cura安装过程十分简单,跟一般的软件安装没有什么区别。
但是,要注意安装的路径中不能含有中文,否则程序将无法运行(Cura 的界面是用python 写的,python 目前对中文路径支持都不好)。
1、首次运行向导首次运行程序,要选择打印的机型。
如果您有ultimaker2 或者ultimker,都可以直接选,这些配置是默认适合它们的;选择其他的话,就要设置打印机的:宽度、高度、深度和喷嘴大小等参数了,这个要和所使用的打印机一致。
2、Cura 使用方法先将SD Card 内resources.py文件复制到Cura安装目录C:\Program Files (x86)\Cura_15.04\Cura\util\ 内,覆盖原始文件;打开Cura,在File>preferences…中可以看到language下拉菜单,在其中选择chinese,并点击Ok保存配置;重启Cura,即可看到中文界面; 再选“打开配置文件”, 选择附上的SD Card 内“cura.ini”文件打配置本打印机基础界面第一次打开程序会自动载入一个机器人,程序会自动进行切片计算,每当你改变了一个参数,它也会自动重新计算。
模型界面的左上角,有三个按钮,功能分别是:打开模型/GCode 文件,保存GCode 文件,打开阿巴赛3D 网站。
而“保存”按钮的下方,在每次计算时会显示进度条,计算完毕后会显示打印消耗时间、材料长度、和材料质量。
如图显示,打印将消耗52 分钟,消耗的材料0.48 米长,4 克重。
左边的是基础面板。
质量:首先是“层高”,它是计算机生成每一层切面的层高。
如果需要打精细模型,可设成0.1mm;如果对打印质量要求一般,可以设成0.2mm 或更高(毕竟打印越精细,花费的时间会越多)。
然后是“壳厚”(也叫“壁厚”),即最外层壁的厚度,一般设置成喷嘴直径的倍数。
如果需要做成双层壁厚,0.4mm的喷嘴要设成0.8mm。
Dynavista9.2安装说明
安装CATIA V5R18SP3必须在D盘,然后升级到SP8 否则Dynavista会有BUG
Dynavista9.2安装时必须是D盘因为Dynavista覆盖包是D盘信息
虚拟电脑网卡号
拷贝许可证到指定安装目录下覆盖原文件
Dynavista可以可实现绿色安装,直接拷贝Dynavista覆盖包到D盘根目录,发送启动图标到桌面
上添加注册表信息
将Dynavista9.2覆盖包直接拷贝到(D盘)根目录,并发送启动图标到桌面上
拷贝许可证到指定路径下覆盖原文件!
然后启动注册表启动文件,添加Dynavista9.2注册表信息
装过程用户修改用户网卡号,也就是虚拟网卡号需要把许可证虚拟指定的网卡号
修改虚拟网卡号方法
方法一、在桌面上的“网上邻居”图标上单击右键,选择“属性”
,在弹出的“网络连接”的对话框中,在“本地连接”图标上单击右键,选择“属性”,
会弹出一个“本地连接属性”的对话框,单击“配置”按钮,选择“高级”,选中左栏“属性”中“Network Address”
(其实,并非所有的网卡,对物理地址的描述都用“Network Address”,如Intel的网卡便用“Locally Administered Address”来描述
,只要在右栏框中可以找到“值”这个选项就可以了),
然后选中右栏框“值”中的上面一个单选项(非“不存在”),此时便可在右边的框中输入想改的网卡MAC地址,形式如“000B6AF6F4F9”。
点击“确定”按钮,修改就完成了。
不过,有一些网卡没有这个选项,不要着急,
可以先更新网卡的驱动程序试试,一般情况下,更新驱动之后都会出现这个选项。

scade suite 使用手册(原创实用版)目录1.SCADE Suite 简介2.安装 SCADE Suite3.使用 SCADE Suite4.常见问题5.总结正文1.SCADE Suite 简介SCADE(Software Component and Dataset Environment)Suite 是一款集成了多种软件组件和数据集环境的工具。
该套件主要用于软件开发、测试和验证等领域,能够提供用户友好的界面以及强大的功能。
通过使用SCADE Suite,用户可以轻松地管理数据集、创建仿真、进行模型验证等。
2.安装 SCADE Suite在安装 SCADE Suite 之前,请确保您的计算机满足系统要求。
安装过程分为以下几个步骤:(1)下载 SCADE Suite 安装程序。
(2)运行安装程序,按照向导完成安装。
(3)安装完成后,启动 SCADE Suite 并按照向导进行初始化设置。
3.使用 SCADE SuiteSCADE Suite 主要包括以下几个模块:(1)Dataverse:用于管理数据集,可以创建、编辑、导入和导出数据集。
(2)Builder:用于创建仿真模型,可以添加、删除和修改组件。
(3)Simulation:用于运行仿真模型,可以观察模型的性能和行为。
(4)Visualization:用于可视化仿真结果,可以查看模型的统计数据和图形表示。
4.常见问题在使用 SCADE Suite 过程中,可能会遇到以下常见问题:(1)安装过程中出现错误:请检查计算机是否满足系统要求,并确保安装程序和补丁程序已正确安装。
(2)无法启动 SCADE Suite:请检查是否已正确安装,并尝试重新启动计算机。
(3)数据集无法导入:请检查数据集的格式是否正确,并尝试重新导入。
5.总结SCADE Suite 是一款功能强大的软件工具,可以帮助用户轻松地管理和使用数据集,创建和验证仿真模型。
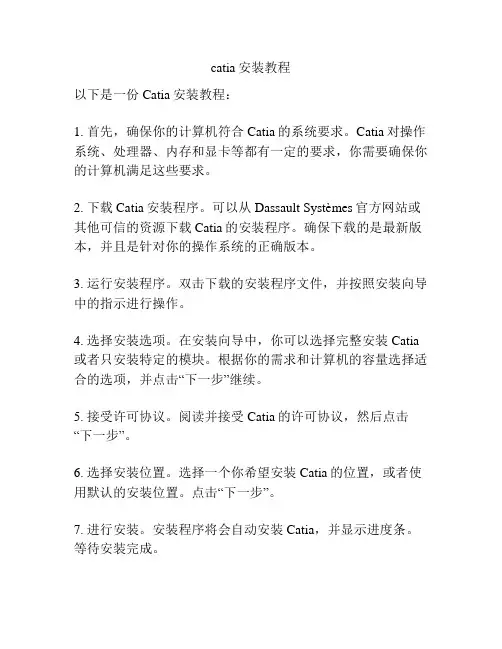
catia安装教程
以下是一份Catia安装教程:
1. 首先,确保你的计算机符合Catia的系统要求。
Catia对操作系统、处理器、内存和显卡等都有一定的要求,你需要确保你的计算机满足这些要求。
2. 下载Catia安装程序。
可以从Dassault Systèmes官方网站或其他可信的资源下载Catia的安装程序。
确保下载的是最新版本,并且是针对你的操作系统的正确版本。
3. 运行安装程序。
双击下载的安装程序文件,并按照安装向导中的指示进行操作。
4. 选择安装选项。
在安装向导中,你可以选择完整安装Catia 或者只安装特定的模块。
根据你的需求和计算机的容量选择适合的选项,并点击“下一步”继续。
5. 接受许可协议。
阅读并接受Catia的许可协议,然后点击“下一步”。
6. 选择安装位置。
选择一个你希望安装Catia的位置,或者使用默认的安装位置。
点击“下一步”。
7. 进行安装。
安装程序将会自动安装Catia,并显示进度条。
等待安装完成。
8. 安装许可管理工具。
安装完成后,你需要安装Catia的许可管理工具。
按照安装向导提示进行操作。
9. 完成安装。
安装完成后,你可以选择立即启动Catia或之后再启动。
点击“完成”退出安装程序。
注意:以上教程是针对一般情况下的Catia安装过程,具体步骤可能会因版本和个人需求而有所不同。
请根据实际情况进行操作,并参考附带的安装指南或Catia官方文档获取更详细的安装信息。
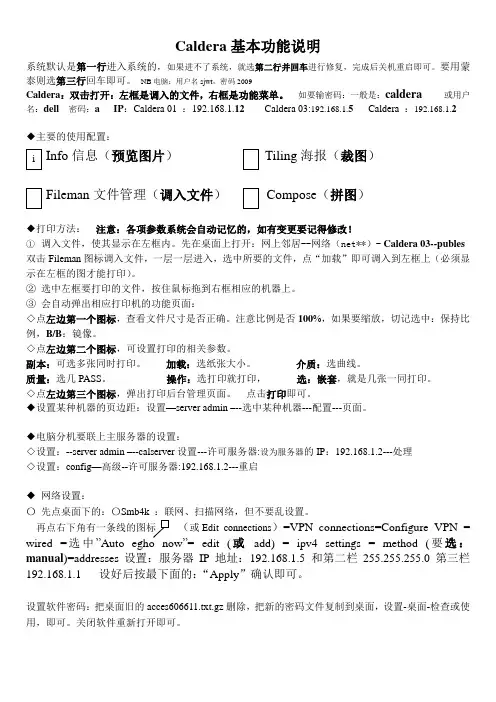
Caldera基本功能说明系统默认是第一行进入系统的,如果进不了系统,就选第二行并回车进行修复,完成后关机重启即可。
要用蒙泰则选第三行回车即可。
NB电脑:用户名sjwt,密码2009Caldera:双击打开:左框是调入的文件,右框是功能菜单。
如要输密码:一般是:caldera或用户名:dell 密码:a IP:Caldera 01 :192.168.1.12 Caldera 03:192.168.1.5Caldera :192.168.1.2◆主要的使用配置:Info信息(预览图片)Tiling海报(裁图)Fileman文件管理(调入文件)Compose(拼图)◆打印方法:注意:各项参数系统会自动记忆的,如有变更要记得修改!①调入文件,使其显示在左框内。
先在桌面上打开:网上邻居--网络(net**)- Caldera 03--publes 双击Fileman图标调入文件,一层一层进入,选中所要的文件,点“加载”即可调入到左框上(必须显示在左框的图才能打印)。
②选中左框要打印的文件,按住鼠标拖到右框相应的机器上。
③会自动弹出相应打印机的功能页面:◇点左边第一个图标,查看文件尺寸是否正确。
注意比例是否100%,如果要缩放,切记选中:保持比例,B/B:镜像。
◇点左边第二个图标,可设置打印的相关参数。
副本:可选多张同时打印。
加载:选纸张大小。
介质:选曲线。
质量:选几PASS。
操作:选打印就打印,选:嵌套,就是几张一同打印。
◇点左边第三个图标,弹出打印后台管理页面。
点击打印即可。
◆设置某种机器的页边距:设置—server admin –--选中某种机器---配置---页面。
◆电脑分机要联上主服务器的设置:◇设置:--server admin –--calserver设置---许可服务器:设为服务器的IP:192.168.1.2---处理◇设置:config—高级--许可服务器:192.168.1.2---重启◆网络设置:〇先点桌面下的:〇Smb4k :联网、扫描网络,但不要乱设置。
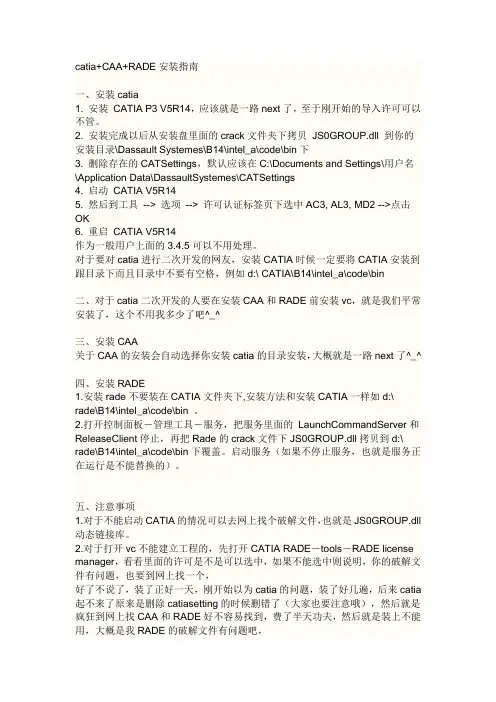
catia+CAA+RADE安装指南一、安装catia1. 安装CATIA P3 V5R14,应该就是一路next了,至于刚开始的导入许可可以不管。
2. 安装完成以后从安装盘里面的crack文件夹下拷贝JS0GROUP.dll 到你的安装目录\Dassault Systemes\B14\intel_a\code\bin下3. 删除存在的CATSettings,默认应该在C:\Documents and Settings\用户名\Application Data\DassaultSystemes\CATSettings4. 启动CATIA V5R145. 然后到工具--> 选项--> 许可认证标签页下选中AC3, AL3, MD2 -->点击OK6. 重启CATIA V5R14作为一般用户上面的3.4.5可以不用处理。
对于要对catia进行二次开发的网友,安装CATIA时候一定要将CATIA安装到跟目录下而且目录中不要有空格,例如d:\ CATIA\B14\intel_a\code\bin二、对于catia二次开发的人要在安装CAA和RADE前安装vc,就是我们平常安装了,这个不用我多少了吧^_^三、安装CAA关于CAA的安装会自动选择你安装catia的目录安装,大概就是一路next了^_^四、安装RADE1.安装rade不要装在CATIA文件夹下,安装方法和安装CATIA一样如d:\rade\B14\intel_a\code\bin 。
2.打开控制面板-管理工具-服务,把服务里面的LaunchCommandServer和ReleaseClient停止,再把Rade的crack文件下JS0GROUP.dll拷贝到d:\ rade\B14\intel_a\code\bin下覆盖。
启动服务(如果不停止服务,也就是服务正在运行是不能替换的)。
五、注意事项1.对于不能启动CATIA的情况可以去网上找个破解文件,也就是JS0GROUP.dll 动态链接库。
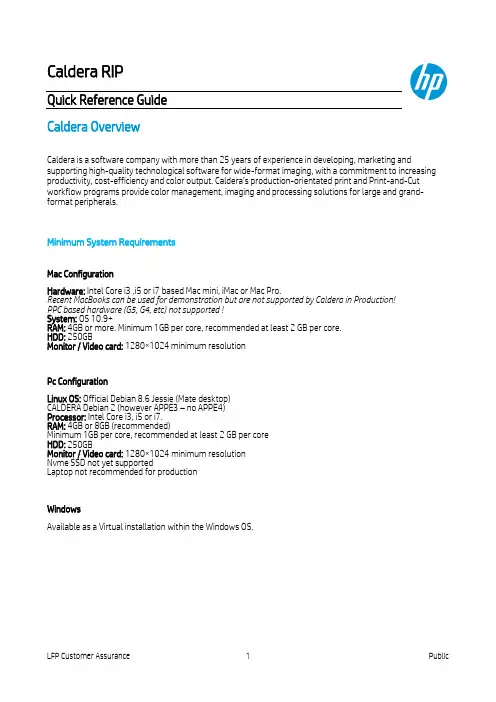
Caldera RIPQuick Reference GuideCaldera OverviewCaldera is a software company with more than 25 years of experience in developing, marketing and supporting high-quality technological software for wide-format imaging, with a commitment to increasing productivity, cost-efficiency and color output. Caldera’s production-orientated print and Print-and-Cut workflow programs provide color management, imaging and processing solutions for large and grand-format peripherals.Minimum System RequirementsMac ConfigurationHardware: Intel Core i3 ,i5 or i7 based Mac mini, iMac or Mac Pro.Recent MacBooks can be used for demonstration but are not supported by Caldera in Production!PPC based hardware (G5, G4, etc) not supported !System: OS 10.9+RAM: 4GB or more. Minimum 1GB per core, recommended at least 2 GB per core.HDD: 250GBMonitor / Video card: 1280×1024 minimum resolutionPc ConfigurationLinux OS: Official Debian 8.6 Jessie (Mate desktop)CALDERA Debian 2 (however APPE3 – no APPE4)Processor: Intel Core i3, i5 or i7.RAM: 4GB or 8GB (recommended)Minimum 1GB per core, recommended at least 2 GB per coreHDD: 250GBMonitor / Video card: 1280×1024 minimum resolutionNvme SSD not yet supportedLaptop not recommended for productionWindowsAvailable as a Virtual installation within the Windows OS.Personal Account with CalderaIn order to access tools, support, and downloads, create your own personal user account with Caldera. Go HERE to create your account.Useful linksInstallation & Setup•Install Caldera with HP Latex 360•License Installation & WorkSpace Registration•RIP OverviewRunning Jobs•Print workflow to Latex360•Configuration for Latex360 (sizing, rotation, finishing marks, exc.)•Step & Repeat Nesting•Mount and use a shared folder, create Hotfolder•Spot Color Module•Print & Cut workflows•Fabricating bleeds when rippingTools from Workspace (your personal Caldera login)•Caldera Test Print File•Mount File Share Tool for Linux installations•Mount ISO Tool for LinuxSyncing Medias from Printer to RIPMedia Sync – New InstallationMedia Sync – Update for New Media AdditionRestarting Printer “Driver”Simply closing and restarting Caldera’s interface does not shut down the printer driver. To do so, you do not need to close any aspects of the rip. You can even be printing to other printers simultaneously as you restart the offending driver.Color Management InputsThese are conservative color inputs that should work well for the vast majority of users.Nesting via AutonestLeft click on “Autonest” to select, then right click to control the number of nested groups and behavior within the nest.On the Main tab, for normalworkflow choose “Ripped filethen Printer” and the number ofnested groups you need.The Nest-O-Matic tab allowcontrol of the gap betweenobjects in the nest.For hand cutting, check ON“Independent rows”.For cutting by an automatedcutter, Uncheck “independentrows” to allow for more compactnesting.。
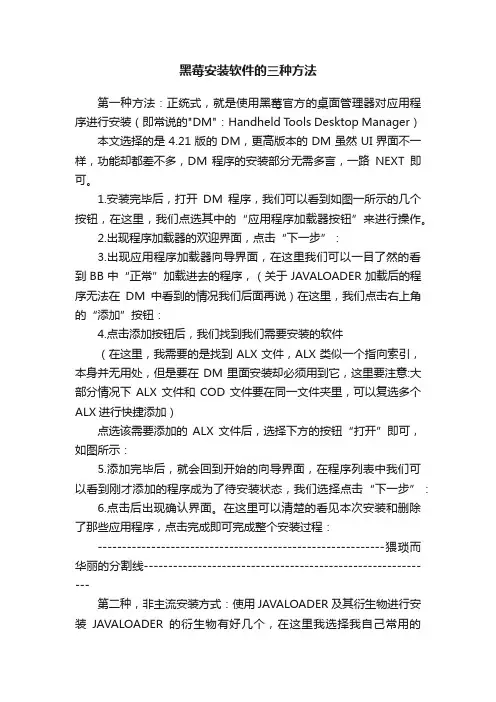
黑莓安装软件的三种方法第一种方法:正统式,就是使用黑莓官方的桌面管理器对应用程序进行安装(即常说的"DM":Handheld Tools Desktop Manager)本文选择的是4.21版的DM,更高版本的DM虽然UI界面不一样,功能却都差不多,DM 程序的安装部分无需多言,一路NEXT即可。
1.安装完毕后,打开DM程序,我们可以看到如图一所示的几个按钮,在这里,我们点选其中的“应用程序加载器按钮”来进行操作。
2.出现程序加载器的欢迎界面,点击“下一步”:3.出现应用程序加载器向导界面,在这里我们可以一目了然的看到BB中“正常”加载进去的程序,(关于JAVALOADER加载后的程序无法在DM中看到的情况我们后面再说)在这里,我们点击右上角的“添加”按钮:4.点击添加按钮后,我们找到我们需要安装的软件(在这里,我需要的是找到ALX文件,ALX类似一个指向索引,本身并无用处,但是要在DM里面安装却必须用到它,这里要注意:大部分情况下ALX文件和COD文件要在同一文件夹里,可以复选多个ALX进行快捷添加)点选该需要添加的ALX文件后,选择下方的按钮“打开”即可,如图所示:5.添加完毕后,就会回到开始的向导界面,在程序列表中我们可以看到刚才添加的程序成为了待安装状态,我们选择点击“下一步”:6.点击后出现确认界面。
在这里可以清楚的看见本次安装和删除了那些应用程序,点击完成即可完成整个安装过程:-----------------------------------------------------------猥琐而华丽的分割线------------------------------------------------------------第二种,非主流安装方式:使用JAVALOADER及其衍生物进行安装JAVALOADER的衍生物有好几个,在这里我选择我自己常用的Winloader来进行演示。
Pilot Pioneer 和Navigator 安装和操作 (UMTS)1、PioneerSetup4.1.0.1安装和其他软件安装是一样的,具体不进行演示。
提示点:有的电脑如果安装完后无法使用,提示认证无效(invalid license),就需要把[(3)GSM.GPRS.WCDMA]文件夹下的 pioneer .lcf 文件需要复制到Pilot Pioneer4.1.0.1安装目录下,同样方法Navigator .LCF 文件需要复制到Navigator 4.1.0安装目录下,主要是LCF 文件与软件狗要对应,否则根本无法使用。
2、连接N85有的电脑无法无法安装调制解调器,无法安装就无法映射出端口,需如下操作解决。
使用Ghost 系统,Nokia PC 软件套装提示无法安装这个硬件”“INF 中的服务安装段落无效”、windows 无法安装调制解调器等错误。
大家只要下载按下面的方法做就可以了:将mdmcpq.inf 复制到c:\windows\inf将usbser.sys 复制到c:\windows\system32\drivers小技巧:比如要打开c:\windows\inf,只要在地址栏(IE 输入网址的地址栏和我的电脑里的地址栏都一样),输入c:\windows\inf 即可打开然后把文件复制进去,再重新安装驱动就OK 拉。
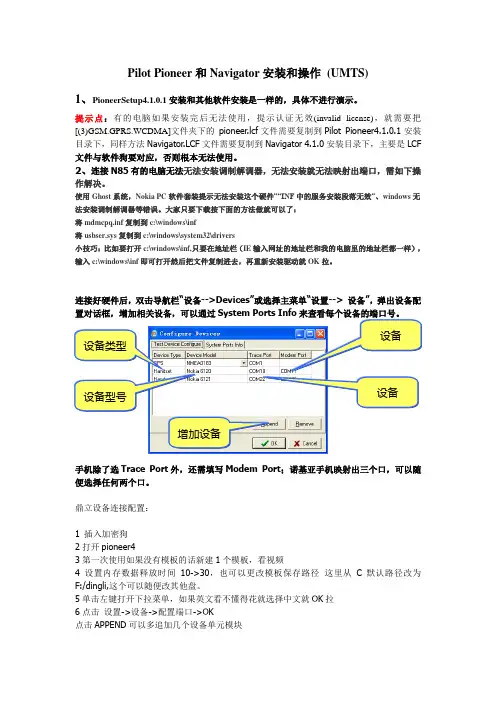
连接好硬件后,双击导航栏“设备-->Devices ”或选择主菜单“设置--> 设备”,弹出设备配手机除了选Trace Port 外,还需填写Modem Port ;诺基亚手机映射出三个口,可以随便选择任何两个口。
鼎立设备连接配置:1 插入加密狗2打开pioneer43第一次使用如果没有模板的话新建1个模板,看视频4设置内存数据释放时间10->30,也可以更改模板保存路径 这里从C 默认路径改为F:/dingli,这个可以随便改其他盘。
5单击左键打开下拉菜单,如果英文看不懂得花就选择中文就OK 拉6点击 设置->设备->配置端口->OK点击APPEND 可以多追加几个设备单元模块设备类型 设备型号设备设备增加设备去掉的话点击REMOVE7导入做好的基站和地图点击设置-测试模板->输入名字->设置DUration(s)-90或者填-CALL Numbers-019->点击OK,、FTP模板设置dial-up设置你建立的网络连接这个和TEMS设置都一样(填*99#)APN:3GNETHOST:10.116.255.81User Nmame:fzltPassword:fzlt123Download file:/DTTEST/1G.rar 勾上DOWNLOAD上传设置也差不多这样9点击连接或者按F6 ->点击保存LOG10其他自己看录像字段设置这里可以设置统计数据字段Navigator安装和操作(UMTS)安装Navigator请看录像1 很多个文件的时候先合并后再进行分析写报告以下无正文仅供个人用于学习、研究;不得用于商业用途。
jade安装教程
MDI Jade是一款XRD分析软件,可以分析X射线衍射,分析出衍射图谱,获得材料的成分、材料内部原子或分子的结构或形态等信息的研究手段。
MDI Jade可以对X射线衍射进行分析,通过分析得到的结果,软件可以判断分辨出材料的构造,知道材料的成分、内部原子、分子的结构形态等等,是一款对XRD的研究软件,对于刚走上科研的用户来说,是非常不错的选择。
MDI Jade还拥有数据分析的能力,可以对分析出来的数据进行衍射峰的指标化、进行晶格参数的计算等独特功能,能轻松计算峰的面积、质心,你还可以在图上进行更加随意的编辑,出图更加方便。
安装步骤:
1.解压下载的压缩包到任意位置
2.打开解压的文件夹
3.找到setup.exe 文件,右键以管理员身份运行
4.点击下一步
5.同意,点击下一步
6.更改安装的位置,这里安装在D盘
7.选择X射线安装位置,点击下一步
8.点击下一步
9.正在安装
10.点击确定
11.点击确定
12.点击确定
13.点击完成
14.找到桌面图标,右键点击属性
15.找到兼容性,勾选以管理员身份运行,点击确定
16.双击打开软件,任意点击一个文件
17.在主界面中找到PDF ----》setup,点击
18.点击全选按钮(Select All)
19.接着点击创建(Create)
20.点击NO(问你要不要注销电脑,选择不要)
21.耐心等待创建完成
22. 文件创建完成,点击OK
23.点击关闭
24. OK,安装完毕!。
CATIA的安装、破解方法及升级方法一、catia的安装方法1.先按一般软件安装方法安装,安装完后打开会提示没有许可!所以需要破解,2.下面教你破解方法:情况一:如果破解后的文件(不是安装文件)里有一个solidSQUAD文件件把他打开,里面就是破解文件JS0GROUP.dll,然后把他放在%InstallDir%\B20\intel_a\code\bin中(%InstallDir%这个就是你的安装位置,如C:\Program Files\Dassault Systeme如安装在C盘就按则是C:\Program Files\Dassault Systemes\B20\intel_a\code\bin)再打开即可进入情况二:如果破解后的文件里有个crack文件夹,或者readme文件夹,里面也会会给你一个JS0GROUP.dll。
然后把这个文件或者文件替换器拷贝到楼下说的%安装位置%\intel_a\code\bin文件夹,替换原来的文件,或者运行文件替换器,即可。
注意安装时要先把catia关掉。
二、catia的升级方法(以为例)1.首先安装DSS_CATIA_P3_V5R20_GA(SP0)_Win32_SSQ,方法见达索系统DSS_CATIA_P3_V5R20_GA(SP0)_Win32_SSQ软件的安装(注意:安装好DSS_CATIA_P3_V5R20_GA(SP0)_Win32_SSQ后,不要用DSS_CATIA_P3_V5R20_GA(SP0)_Win32_SSQ 的SP0破解文件夹破解,如果破解了,SP5安装包就不能安装成功。
)2.解压升级包DSS_CATIA_P3_V5R20_GA(SP5)_Win323.打开其中的SP52005----INTEL----双击其中的StartSPK.exe应用程序进行SP5升级包的安装。
4.SP5升级包安装完成后,再用SP5的破解文件来解密CATIA_P3_V5R20,破解文件是catia_v5r20sp5_win32.Crack.SSQ5.复制其中的JS0GROUP.dll到C:\Program Files\DS SYSTEM\intel_a\code\bin中6.OK,CATIA_P3_V5R20_SP5软件升级成功。
以lsi 8708 raid卡为例介绍windows下监控软件的使用1、监控软件的安装,默认选择complete安装(安装介质下载路径)/storage_home/products_home/internal_raid/megaraid_sas/megaraid_sas_8708 elp/index.html?remote=1&locale=EN版本MegaRAID Storage Manager - Windows (MegaRAID Release 4.1.2)2、软件运行界面,双击运行raid卡型号即可(选择下面的connect to romote可远程连接局域网内另一台机器进行远程操作(在服务器上完全安装,本机上只安装客户端即可(custom installion安装方式),也可完全安装))3、此软件的使用需要两个tcp 端口3071,否则监控软件无法使用(下图中3389是远程桌面需要的端口)如果相应端口未开,启动软件界面如下,找不到控制器4、软件登录界面,登录用户名和密码为服务器本机用户名和密码,两种登录模式:完全控制和只读模式5、创建阵列与热备,创建阵列时在raid卡型号上右键单击选择create virtual drive上图中use the drive type mixing表示使用所有可用磁盘,如果未选择,可根据需要人为设置创建热备,在未使用的物理磁盘上右键单击选择assign global hot spare:热备硬盘显示的状态:6、阵列删除,在逻辑阵列上右键单击选择delete virtual drive 即可7、阵列初始化,选择需要初始化的阵列,选择相应的选项start initialition8、阵列读写策略属性更改,选择需要更改的逻辑阵列(不要选择错误,否则出现不了相应选项),选择菜单栏Go To-virtual drive-set virtual drive properties 即可出现如下画面进行更改9、阵列在线扩展,选中要扩展的逻辑阵列,GO To-virtual drive-expand virtual diskcapacity即可fail count错误硬盘显示状态(黄色)11、硬盘掉线显示状态12、raid卡报警开启与关闭,右键单击raid卡型号,选择disable alarm或是enable alarm13、硬盘强制上下线,选择物理磁盘右键单击选择即可14、硬盘rebuild,右键单击掉线硬盘选择start rebuildRebuild进度查询,manage -show program行选择更改16、日志保存17、保存或导入raid配置信息18、raid 卡FW查看与刷新,FW刷新后需要重启服务器才能生效选中raid卡,Goto-controller-update controller firmware选中本机硬盘上的刷新文件即可进行刷新否则无法使用)Alart settings 进行raid报警级别设置Mail server 进行邮件服务器设置,sender email address :分发服务器邮箱设置(可任意设置即可),SMTP server:邮件服务器地址,其他的不用选择Email :接收服务器设置,输入接收邮箱地址,选择add加入即可,可用test进行测试注:开机自检的报错1、创建阵列时,写模式选择了,write back with BBU此项,默认模式就是write back with BBU,且无法更改,大多raid卡无此选项。
Application GuideTable of ContentsChapter 1. Introduction (1)Chapter 2. System Design (2)Chapter 3. Application Architecture (5)Chapter 4. DOCA Libraries (7)Chapter 5. Configuration Flow (8)Chapter 6. Dependencies (10)Chapter 7. Running the Application (11)Chapter 8. Arg Parser DOCA Flags (14)Chapter 9. References (17)Chapter 1.IntroductionApp Shield Agent monitors a process in the host system using the DOCA App Shield library (doca-apsh).This security capability helps identify corruption of core processes in the system from an independent and trusted DPU. This is a major and innovate intrusion detection system (IDS) ability since it cannot be provided from inside the host.The DOCA App Shield library gives the capability to read, analyze, and authenticate the host (bare metal/VM) memory directly from the DPU.Using the library, this application hashes the un-writeable memory pages (also unloaded pages) of a specific process and its libraries. Then, at regularly occurring intervals the app authenticates the loaded pages.The app reports pass/fail after every iteration until the first attestation failure. The reports are both printed to the console and exported to the DOCA telemetry service (DTS) using inter-process communication (IPC).This document describes how to build secure process monitoring using the DOCA App Shield library, which leverages the DPU's advantages such as hardware-based DMA, integrity, and more.Chapter 2.System DesignThe App Shield agent is designed to run independently on the DPU's Arm without hindering the host.The host's involvement is limited to configuring monitoring of a new process when there is a need to generate the needed ZIP and JSON files to pass to the DPU. This is done at inception ("time 0") which is when the host is still in a "safe" state.Generating the needed files can be done by running DOCA App Shield'sdoca_apsh_config.py tool on the host. See NVIDIA DOCA App Shield Programming Guide for more info.System DesignSystem DesignChapter 3.Application ArchitectureThe user creates three mandatory files using the DOCA tool doca_apsh_config.py and copies them to the DPU. The application can report attestation results to the:‣File‣Terminal‣DTS1.The files are generated by running doca_apsh_config.py on the host against the processat time zero.Note: The actions 2-5 recur at regular time intervals.2.The App Shield agent requests new attestation from DOCA App Shield library.3.The DOCA App Shield library creates a new attestation:a).Scans and hashes process memory pages (that are currently in use).b).Compares the hash to the original hash.c).Creates attestation for each lib/exe involved in the process. Each of attestationincludes the number of valid pages and the number of pages.Application Architecture4.The App Shield agent searches each attestation for inconsistency between number of usedpages and number of valid pages.5.The App Shield agent reports results with a timestamp and scan count to:a).Local telemetry files – a folder and files representing the data a real DTS would havereceived. These files are used for the purposes of this example only as normally thisdata is not exported into user-readable files.b).DOCA log (without scan count).c).DTS IPC interface (even if no DTS is active).6.The App Shield agent exits on first attestation failure.Chapter 4.DOCA LibrariesThis application leverages following DOCA libraries:‣DOCA App Shield library‣DOCA Telemetry libraryChapter 5.Configuration Flow1.Parse application argument.a).Initialize arg parser resources and register DOCA general parameters.doca_argp_init();b).Register application parameters.register_apsh_params();c).Parse app flags.doca_argp_start();2.Initialize DOCA App Shield lib context.a).Create lib context.doca_apsh_create();b).Set DMA device for lib.doca_devinfo_list_create();doca_dev_open();doca_devinfo_list_destroy();doca_apsh_dma_dev_set();c).Start the context.doca_apsh_start();apsh_system_init();3.Initialize DOCA App Shield lib system context handler.a).Get the representor of the remote PCIe function exposed to the system.doca_devinfo_remote_list_create();doca_dev_remote_open();doca_devinfo_remote_list_destroy();b).Create and start the system context handler.doca_apsh_system_create();doca_apsh_sys_os_symbol_map_set();doca_apsh_sys_mem_region_set();doca_apsh_sys_dev_set();doca_apsh_sys_os_type_set();doca_apsh_system_start();4.Find target process by PID.doca_apsh_processes_get();5.Telemetry initialization.telemetry_start();a).Initialize a new telemetry schema.b).Register attestation type event.c).Set up output to file (in addition to default IPC).Configuration Flowd).Start the telemetry schema.e).Initialize and start a new DTS source with the gethostname() name as source ID.6.Get initial attestation of the process.doca_apsh_attestation_get();7.Loop until attestation validation fail.doca_apsh_attst_refresh();/* validation logic */doca_telemetry_source_report();DOCA_LOG_INFO();sleep();8.DOCA App Shield Agent destroy.doca_apsh_attestation_free();doca_apsh_processes_free();doca_apsh_system_destroy();doca_apsh_destroy();doca_dev_close();doca_dev_remote_close();9.Telemetry destroy.telemetry_destroy();10.Arg parser destroy.doca_argp_destroy();Chapter 6.Dependencies The minimum required firmware version is 24.32.1010.Chapter 7.Running the Application1.Refer to the following documents:‣NVIDIA DOCA Installation Guide for Linux for details on how to install BlueField-related software.‣NVIDIA DOCA Troubleshooting Guide for any issue you may encounter with the installation, compilation, or execution of DOCA applications.‣NVIDIA DOCA Applications Overview for additional compilation instructions and development tips of DOCA applications.2.The App Shield Agent binary is located under /opt/mellanox/doca/applications/ app_shield_agent/bin/doca_app_shield_agent. To build the applications together, run:cd /opt/mellanox/doca/applications/meson buildninja -C build3.To build only the App Shield Agent application:a).Edit the following flags in /opt/mellanox/doca/applications/meson_option.txt:‣Set enable_all_applications to false‣Set enable_app_shield_agent to trueb).Run the commands in step 2.Note:doca_app_shield_agent will be created under ./build/app_shield_agent/src/.Application usage:Usage: doca_app_shield_agent [DOCA Flags] [Program Flags]DOCA Flags:-h, --help Print a help synopsis-v, --version Print program version information-l, --log-level Set the log level for the program <CRITICAL=20, ERROR=30, WARNING=40, INFO=50, DEBUG=60>Program Flags:-p, --pid <arg> Pid of the process to monitor-e, --ehm <path> Path to the process executable ‘hash.zip’generated file-m, --memr <path> Path to the system memory regions map –‘mem_regions.json’ generated file.-f, --pcif <arg> System PCI (VF/PF) VUID to use for DMAconnection-d, --dma <arg> DMA device name-o, --osym <path> Path to the system os symbol map –‘symbols.json’ generated file.-s, --osty [windows|linux] OS of the system where the process is running -t, --time <seconds> Time interval between scansNote: For additional information on the application, use the -h flag:/opt/mellanox/doca/applications/app_shield_agent/bin/doca_app_shield_agent-h4.The following steps need to be done only once.‣Configure the BlueField's firmware.‣On the BlueField system, configure the PF base address register and NVME emulation. Run:dpu> mlxconfig -d /dev/mst/mt41686_pciconf0 s PF_BAR2_SIZE=2PF_BAR2_ENABLE=1 NVME_EMULATION_ENABLE=1‣Perform a cold boot from the host. Run:host> ipmitool power cycleNote: These configurations can be checked using the following command:dpu> mlxconfig -d /dev/mst/mt41686_pciconf0 q | grep -E "NVME|BAR"‣Download target system (host/VM) symbols.‣For Ubuntu:host> sudo tee /etc/apt/sources.list.d/ddebs.list << EOFdeb / $(lsb_release -cs) main restricted universemultiversedeb / $(lsb_release -cs)-updates main restricteduniverse multiversedeb / $(lsb_release -cs)-proposed main restricteduniverse multiverseEOFhost> sudo apt install ubuntu-dbgsym-keyringhost> sudo apt-get updatehost> sudo apt-get install linux-image-$(uname -r)-dbgsym‣For CentOS:host> yum install --enablerepo=base-debuginfo kernel-devel-$(uname -r)kernel-debuginfo-$(uname -r) kernel-debuginfo-common-$(uname -m)-$(uname-r)‣No action is needed for Windows‣Perform IOMMU passthrough. This stage is only needed on some of the cases where IOMMU is not enabled by default (e.g., when the host is using an AMD CPU).Note: Skip this step if you are not sure whether you need it. Return to it only if DMAfails with a message in dmesg similar to the following:host> dmesg[ 3839.822897] mlx5_core 0000:81:00.0: AMD-Vi: Event logged[IO_PAGE_FAULT domain=0x0047 address=0x2a0aff8 flags=0x0000]‣Locate your OS's grub file (most likely /boot/grub/grub.conf, /boot/grub2/grub.cfg, or /etc/default/grub) and open it for editing. Run:host> vim /etc/default/grub‣Search for the line defining GRUB_CMDLINE_LINUX_DEFAULT and add the argumentiommu=pt. For example:GRUB_CMDLINE_LINUX_DEFAULT="iommu=pt <intel/amd>_iommu=on"‣Run:‣For Ubuntu:host> sudo update-grubhost> ipmitool power cycle‣For CentOS:host> grub2-mkconfig -o /boot/grub2/grub.cfghost> ipmitool power cycle‣For Windows targets only: Turn off Hyper-V capability.5.Running the application on BlueField:‣Pre-run setup:a).The DOCA App Shield library uses hugepages for DMA buffers. Therefore, the useris required to provide allocate specific size huge pages. Run:dpu> nr_huge=$(cat /sys/devices/system/node/node0/hugepages/hugepages-2048kB/nr_hugepages)nr_huge=$((42+$nr_huge))sudo echo $nr_huge > /sys/devices/system/node/node0/hugepages/hugepages-2048kB/nr_hugepagesb).Create the ZIP and JSON files. Run:Note: If the kernel and process .exe have not changed, there no need to redo thisstep.target-system> cd /opt/mellanox/doca/tools/target-system> python3 doca_apsh_config.py <pid-of-process-to-monitor> --os <windows/linux> --path <path to dwarf2json executable or pdbparse-to-json.py>target-system> cp /opt/mellanox/doca/tools/*.* <shared-folder-with-baremetal>dpu> scp <shared-folder-with-baremetal>/* <path-to-app-shield-binary>If the target system does not have DOCA installed, the script can be copied fromthe BlueField.The required dwaf2json and pdbparse-to-json.py are not provided with DOCA.Follow the NVIDIA DOCA App Shield Programming Guide for more information.‣CLI example for running the app:dpu> /opt/mellanox/doca/applications/app_shield_agent/bin/doca_app_shield_agent -p 13577 -e hash.zip -m mem_regions.json -o symbols.json -f MT2125X03335MLNXS0D0F0VF1 -d mlx5_0 -t 3 -s linuxChapter 8.Arg Parser DOCA Flags Refer to NVIDIA DOCA Arg Parser User Guide for more information.Chapter 9.References‣/opt/mellanox/doca/applications/app_shield_agent/src/app_shield_agent.cNoticeThis document is provided for information purposes only and shall not be regarded as a warranty of a certain functionality, condition, or quality of a product. NVIDIA Corporation nor any of its direct or indirect subsidiaries and affiliates (collectively: “NVIDIA”) make no representations or warranties, expressed or implied, as to the accuracy or completeness of the information contained in this document and assume no responsibility for any errors contained herein. NVIDIA shall have no liability for the consequences or use of such information or for any infringement of patents or other rights of third parties that may result from its use. This document is not a commitment to develop, release, or deliver any Material (defined below), code, or functionality.NVIDIA reserves the right to make corrections, modifications, enhancements, improvements, and any other changes to this document, at any time without notice. Customer should obtain the latest relevant information before placing orders and should verify that such information is current and complete.NVIDIA products are sold subject to the NVIDIA standard terms and conditions of sale supplied at the time of order acknowledgement, unless otherwise agreed in an individual sales agreement signed by authorized representatives of NVIDIA and customer (“Terms of Sale”). NVIDIA hereby expressly objects to applying any customer general terms and conditions with regards to the purchase of the NVIDIA product referenced in this document. No contractual obligations are formed either directly or indirectly by this document.NVIDIA products are not designed, authorized, or warranted to be suitable for use in medical, military, aircraft, space, or life support equipment, nor in applications where failure or malfunction of the NVIDIA product can reasonably be expected to result in personal injury, death, or property or environmental damage. NVIDIA accepts no liability for inclusion and/or use of NVIDIA products in such equipment or applications and therefore such inclusion and/or use is at customer’s own risk. NVIDIA makes no representation or warranty that products based on this document will be suitable for any specified use. Testing of all parameters of each product is not necessarily performed by NVIDIA. It is customer’s sole responsibility to evaluate and determine the applicability of any information contained in this document, ensure the product is suitable and fit for the application planned by customer, and perform the necessary testing for the application in order to avoid a default of the application or the product. Weaknesses in customer’s product designs may affect the quality and reliability of the NVIDIA product and may result in additional or different conditions and/or requirements beyond those contained in this document. NVIDIA accepts no liability related to any default, damage, costs, or problem which may be based on or attributable to: (i) the use of the NVIDIA product in any manner that is contrary to this document or (ii) customer product designs.No license, either expressed or implied, is granted under any NVIDIA patent right, copyright, or other NVIDIA intellectual property right under this document. Information published by NVIDIA regarding third-party products or services does not constitute a license from NVIDIA to use such products or services or a warranty or endorsement thereof. Use of such information may require a license from a third party under the patents or other intellectual property rights of the third party, or a license from NVIDIA under the patents or other intellectual property rights of NVIDIA.Reproduction of information in this document is permissible only if approved in advance by NVIDIA in writing, reproduced without alteration and in full compliance with all applicable export laws and regulations, and accompanied by all associated conditions, limitations, and notices.THIS DOCUMENT AND ALL NVIDIA DESIGN SPECIFICATIONS, REFERENCE BOARDS, FILES, DRAWINGS, DIAGNOSTICS, LISTS, AND OTHER DOCUMENTS (TOGETHER AND SEPARATELY, “MATERIALS”) ARE BEING PROVIDED “AS IS.” NVIDIA MAKES NO WARRANTIES, EXPRESSED, IMPLIED, STATUTORY, OR OTHERWISE WITH RESPECT TO THE MATERIALS, AND EXPRESSLY DISCLAIMS ALL IMPLIED WARRANTIES OF NONINFRINGEMENT, MERCHANTABILITY, AND FITNESS FOR A PARTICULAR PURPOSE. TO THE EXTENT NOT PROHIBITED BY LAW, IN NO EVENT WILL NVIDIA BE LIABLE FOR ANY DAMAGES, INCLUDING WITHOUT LIMITATION ANY DIRECT, INDIRECT, SPECIAL, INCIDENTAL, PUNITIVE, OR CONSEQUENTIAL DAMAGES, HOWEVER CAUSED AND REGARDLESS OF THE THEORY OF LIABILITY, ARISING OUT OF ANY USE OF THIS DOCUMENT, EVEN IF NVIDIA HAS BEEN ADVISED OF THE POSSIBILITY OF SUCH DAMAGES. Notwithstanding any damages that customer might incur for any reason whatsoever, NVIDIA’s aggregate and cumulative liability towards customer for the products described herein shall be limited in accordance with the Terms of Sale for the product.TrademarksNVIDIA, the NVIDIA logo, and Mellanox are trademarks and/or registered trademarks of Mellanox Technologies Ltd. and/or NVIDIA Corporation in the U.S. and in other countries. The registered trademark Linux® is used pursuant to a sublicense from the Linux Foundation, the exclusive licensee of Linus Torvalds, owner of the mark on a world¬wide basis. Other company and product names may be trademarks of the respective companies with which they are associated.Copyright© 2022 NVIDIA Corporation & affiliates. All rights reserved.NVIDIA Corporation | 2788 San Tomas Expressway, Santa Clara, CA 95051。
Installation GuideTable of Contents Chapter 1. Introduction (1)1.1. Supported Platforms (1)1.2. Hardware Prerequisites (2)1.3. DOCA Packages (2)1.4. Supported Operating System (3)Chapter 2. SDK Manager (4)Chapter 3. Manual BlueField Image Installation (5)3.1. Installation Files (5)3.2. Software Prerequisites (7)3.3. Image Installation (9)3.4. Firmware Upgrade (10)3.5. Post-installation Procedure (11)Chapter 4. DOCA DPI Installation (12)4.1. Host Setup (12)4.2. Target Setup (13)Chapter 5. Setting Up Build Environment Container for Developers (14)Chapter 1.IntroductionThere are two ways install the NVIDIA BlueField-2 DPU software:‣Using the SDK Manager which provides a GUI for full BlueField-2 installation ‣Manual installation with a step-by-step procedure1.1. Supported Platforms1.2. Hardware PrerequisitesThis quick start guide assumes that an NVIDIA® BlueField®-2 DPU has been installed in a server according to the instructions detailed in your DPU's hardware user guide.1.3.DOCA Packages1.4. Supported Operating SystemChapter 2.SDK ManagerNVIDIA SDK Manager supports DOCA installation, including software packages on the host and the BlueField-2 target.Please refer to NVIDIA SDK Manager installation guide for DOCA for detailed instructions. Developers must have access to DOCA to install the relevant SDK packages. Visit the DOCA developer zone landing page to request access.Chapter 3.Manual BlueField ImageInstallationThis guide provides the minimal first-steps instructions for setting up DOCA on a standard system.3.1. Installation Files3.2. Software Prerequisites1.Download the following packages listed in the table under section Installation Filesdepending on the OS of the host you are using:‣BlueField OS image‣OFED RuntimeNote: Alternatively, you may choose not to install MLNX_OFED (step 2). In this case,you must download the following pacakges:‣MFT‣RShim2.To continue with OFED Runtime installation, run:sudo tar -xvf MLNX_OFED_LINUX-<version>-x86_64.tgzsudo ./mlnxofedinstall --ovs-dpdk --auto-add-kernel-supportThis script also installs the firmware version associated with the OFED Runtime version.The script print-out will display the Current and Available firmware versions as shown in the following example:Device #1:----------Device Type: BlueField-2[...]Versions: Current AvailableFW <Old_FW> <New_FW>The upgrade takes effect only after mlxfwreset which is performed in later steps.3.To continue without OFED Runtime:a).Install RShim.‣For Ubuntu, run:sudo dpkg --force-all -i rshim-<version>.debsudo dpkg --force-all -i mft-<version>.deb‣For CentOS, run:sudo rpm -Uhv rshim-<version>.rpmsudo rpm -Uhv mft-<version>.rpmb).Install MFT.‣For Ubuntu, run:sudo tar -xvf mft-<version>-deb.tgzsudo ./mft-<version>-deb/install.shsudo mst start‣For CentOS, run:sudo tar -xvf mft-<version>-rpm.tgzsudo ./mft-<version>-rpm/install.shsudo mst start4.Reset the nvconfig params to their default values:sudo mlxconfig -d /dev/mst/<device> -y resetReset configuration for device /dev/mst/<device>? (y/n) [n] : yApplying... Done!-I- Please reboot machine to load new configurations.Note: You may retrieve the <device> parameter by using the command: sudo mst status–v.5.Skip this step if your BlueField DPU is Ethernet only. Please refer to Supported Platformsto learn your DPU type.If you have a VPI DPU, the default link type of the ports will be configured to IB. To verify your link type, run:sudo mst startsudo mlxconfig -d /dev/mst/<device> -e q | grep -i link_typeConfigurations: Default Current Next Boot* LINK_TYPE_P1 IB(1) ETH(2) IB(1)* LINK_TYPE_P2 IB(1) ETH(2) IB(1)Note: If your DPU is Ethernet capable only, then the sudo mlxconfig -d <device>command will not provide an output.If the current link type is set to IB, run the following command to change it to Ethernet: # sudo mlxconfig -d <device> s LINK_TYPE_P1=2 LINK_TYPE_P2=26.Assign a static IP to tmfifo_net0 (RShim host interface).‣For Ubuntu, edit the file /etc/netplan/01-netcfg.yaml by adding the following lines:tmfifo_net0:addresses: [192.168.100.1/24]dhcp4: falseExample:sudo cat /etc/netplan/01-netcfg.yaml# This file describes the network interfaces available on your system# For more information, see netplan(5).network:version: 2renderer: networkdethernets:eno1:dhcp4: yestmfifo_net0:addresses: [192.168.100.1/24]dhcp4: no‣For CentOS:a).Create the file /etc/sysconfig/network-scripts/ifcfg-tmfifo_net0.b).Set the following lines:DEVICE=tmfifo_net0BOOTPROTO=noneONBOOT=yesPREFIX=24IPADDR=192.168.100.1NM_CONTROLLED=no7.Execute network restart for implemented tmfifo_net0 static configuration.‣For CentOS:/etc/init.d/network restart‣For Ubuntu:/etc/init.d/networking restart8.Verify that RShim is active.sudo systemctl status rshimThis command is expected to display active (running). If RShim service does notlaunch automatically, run:sudo systemctl enable rshimsudo systemctl start rshim3.3. Image InstallationUbuntu users are required to provide a unique password that will be applied at the end of the BlueField OS image installation. This password needs to be defined in a bf.cfg configuration file.To set the password for the "ubuntu" user:1.Create password hash. Run:# openssl passwd -1Password:Verifying - Password:$1$3B0RIrfX$TlHry93NFUJzg3Nya00rE12.Add the password hash in quotes to the bf.cfg file:# sudo vim bf.cfgubuntu_PASSWORD='$1$3B0RIrfX$TlHry93NFUJzg3Nya00rE1'When running the intallation command, use the --config flag to provide the filecontaining the password:sudo bfb-install --rshim <rshimN> --bfb <image_path.bfb> --config bf.cfgThe following is an example of Ubuntu installation assuming the "pv" tool has beeninstalled (to view the installation progress).sudo bfb-install --rshim rshim0 --bfbDOCA_v1.0_BlueField_OS_Ubuntu_20.04-5.3-1.0.0.0-3.6.0.11699-1-aarch64.bfb --config bf.cfgPushing bfb1.08GiB 0:00:57 [19.5MiB/s] [ <=> ]Collecting BlueField booting status. Press Ctrl+C to stop…INFO[BL2]: startINFO[BL2]: DDR POST passedINFO[BL2]: UEFI loadedINFO[BL31]: startINFO[BL31]: runtimeINFO[UEFI]: eMMC initINFO[UEFI]: eMMC probedINFO[UEFI]: PCIe enum startINFO[UEFI]: PCIe enum endINFO[MISC]: Ubuntu installation startedINFO[MISC]: Installation finishedINFO[MISC]: Rebooting...Note: The --config flag is necessary for Ubuntu users only. If this flag is not used byUbuntu users, then upon first login to the BlueField device, they will be asked to updatetheir password.Note: This installation sets up the OVS bridge.3.4. Firmware UpgradeTo upgrade firmware:1.SSH to your BlueField device via 192.168.100.2 (preconfigured). The default credentials forUbuntu are as follows:‣Username: ubuntu‣Password: unique passwordFor example:*****************.100.2Password:<unique-password>2.Perform the following step only if:‣Your BlueField device is a controller‣If you did not install OFED RuntimeUpgrade firmware in BlueField DPU. Run:sudo /opt/mellanox/mlnx-fw-updater/mlnx_fw_updater.plExample output:Device #1:----------Device Type: BlueField-2[...]Versions: Current AvailableFW <Old_FW> <New_FW>3.For the firmware upgrade to take effect:a).Run the following command on the BlueField DPU and x86 host:sudo mst startb).Run the command below on the BlueField DPU and immediately afterwards on the x86host. Do not wait for the command to complete on the BlueField DPU before issuingthe command on the host.sudo mlxfwreset -d /dev/mst/<device> -l 3 -y resetNote: If your BlueField device is a controller you must power cycle the controller asmlxfwreset is not supported.3.5. Post-installation Procedure 1.Restart OFED Runtime. Run:sudo /etc/init.d/openibd restartUnloading HCA driver: [ OK ] Loading HCA driver and Access Layer: [ OK ] 2.Configure the physical function (PF) interfaces.sudo ifconfig <interface-1> <network-1/mask> upsudo ifconfig <interface-2> <network-2/mask> upFor example:sudo ifconfig p2p1 192.168.200.32/24 upsudo ifconfig p2p2 192.168.201.32/24 upPings between the source and destination should now be operational.Chapter 4.DOCA DPI Installation4.1. Host SetupDownload the following packages listed in the table under section Installation Files depending on the OS of the host you are using:‣DPDK Packages‣DPI Tools‣RXP Tools (RXP Compiler and RXPBench)Perform the following procedure:1.Install DPDK Package.‣For Ubuntu, run:apt install mlnx-dpdk-dev_<current_version>_amd64.debapt install mlnx-dpdk_<current_version>_amd64.deb‣For CentOS, run:yum install -y mlnx-dpdk-<current_version>.x86_64.rpmyum install -y mlnx-dpdk-devel- <current_version>.x86_64.rpm2.Install RXP tools (RXP compiler and bench).‣For Ubuntu, run:a).Install rxp-compiler. Run:apt install rxp-compiler_<current_version>_amd64.debb).Install rxpbench.‣For Ubuntu 18.04:sudo apt install libhyperscan4apt install rxpbench_< current_version >_amd64.deb‣For Ubuntu 20.04:sudo apt install libhyperscan5apt install rxpbench_< current_version >_amd64.deb‣For CentOS, run:a).Install rxp-compiler. Run:yum install -y rxp-compiler-<current_version>-1.el7.x86_64.rpmb).Install rxpbench.DOCA DPI Installation‣For CentOS 8.2:sudo yum install hyperscan-5.3.0yum install -y rxpbench-<>.x86_64.rpm‣For CentOS 7.x:yum install epel-release sudo yum install /centos7-x86_64/hyperscan-5.3.0-1.of.el7.x86_64.rpmyum install -y rxpbench-<>.x86_64.rpm3.Install DOCA DPI Tools.‣For Ubuntu:apt remove doca-dpi-toolsapt install doca-dpi-tools_<current_version>_amd64.deb‣For CentOS:yum remove doca-dpi-toolsyum install doca-dpi-tools-<current_version>-1.el7.x86_64.rpm4.2. Target Setup1.Download the DOCA SDK, DOCA Runtime, and DOCA Tools package from sectionInstallation Files.2.Copy deb repo package into BlueField. Run:scp -r doca-repo-aarch64-ubuntu2004-************************************************************.100.2:/tmp/3.Unpack the deb repo. Run:# dpkg -i <repo_file>For example:# sudo dpkg -i doca-repo-aarch64-ubuntu2004-local_1.0-0.5.3.0.3.6.bf.3.6.0.11691_arm64.deb4.Run apt update.# apt-get update5.Run apt install for DOCA SDK, DOCA runtime, DOCA tools:# sudo apt install doca-sdk# sudo apt install doca-runtime# sudo apt install doca-toolsChapter 5.Setting Up BuildEnvironment Container forDevelopers1.Make sure Docker is installed on your host. Run:docker versionIf docker is not installed, please visit the official Install Docker Engine for installation instructions.2.Install QEMU on the host.Note: This step is for x86 hosts only. If you are working on an aarch64 host, please move tothe next step.‣For Ubuntu host, run:sudo apt-get install qemu binfmt-support qemu-user-staticsudo docker run --rm --privileged multiarch/qemu-user-static --reset -p yes ‣For CentOS 7.x host, run:sudo yum install epel-releasesudo yum install qemu-system-armcat /etc/binfmt.d/qemu-aarch64.confsudo systemctl restart systemd-binfmtNote: If qemu-aarch64.conf does not exist or is empty, please execute "*".‣For CentOS 8.0 or 8.2 host, run:sudo yum install epel-releasesudo yum install qemu-kvmcat /etc/binfmt.d/qemu-aarch64.confsudo systemctl restart systemd-binfmtNote: If qemu-aarch64.conf does not exist or is empty, please execute "*".‣For Fedora host, run:sudo yum install qemu-system-aarch64cat /etc/binfmt.d/qemu-aarch64.confsudo systemctl restart systemd-binfmtNote: If the file /etc/binfmt.d/qemu-aarch64.conf does not exist, run:Setting Up Build Environment Container for Developersecho ":qemu-aarch64:M::\x7fELF\x02\x01\x01\x00\x00\x00\x00\x00\x00\x00\x00\x00\x02\x00\xb7:\xff\xff\xff\xff\xff\xff\xff\xfc\xff\xff\xff\xff\xff\xff\xff\xff\xfe\xff\xff:/usr/bin/qemu-aarch64-static:" > /etc/binfmt.d/qemu-aarch64.conf3.Load the docker image.a).Make sure the docker service is started. Run:systemctl daemon-reloadsystemctl start dockerb).Go to the location the tar file is saved at and run the following command from the host:sudo docker load -i <filename>For example:sudo docker load -i bfb_builder_ubuntu20.04-5.3-1.0.0.0-3.6.0.11699-1.tar Note: The loading process may take a while. After the image is loaded, you can find itsID using the command docker images.4.Run the docker image.sudo docker run -v <source-code-folder>:<dest-folder-on-docker> --privileged -it -e container=docker <image-name/ID>For example, if the source code folder is /<...>/buildEnv, the destination folder on the docker is /app, and the image is the one downloaded in the previous step, the command will look like this:sudo docker run -v /<...>/buildEnv:/app --privileged -it -e container=dockermellanox/bluefield:bfb_builder_ubuntu20.04-5.3-1.0.0.0-3.6.0.11699-1Or, for example, if you use a loaded image with the ID 185c50ecb31d, the command will be: sudo docker run -v /<...>/buildEnv:/app --privileged -it -e container=docker185c50ecb31dAfter you run this command, you will have a shell inside the container, where you can build your project using the gcc command.Note: Please make sure you map a folder that everyone has write privileges to. Otherwise,the docker will not be able to write the output file to it.Note: The folder will be mapped to the "dest" folder. In this example the folder /app insidethe docker will be mapped to /<...>/buildEnv.NoticeThis document is provided for information purposes only and shall not be regarded as a warranty of a certain functionality, condition, or quality of a product. NVIDIA Corporation nor any of its direct or indirect subsidiaries (collectively: “NVIDIA”) make no representations or warranties, expressed or implied, as to the accuracy or completeness of the information contained in this document and assume no responsibility for any errors contained herein. NVIDIA shall have no liability for the consequences or use of such information or for any infringement of patents or other rights of third parties that may result from its use. This document is not a commitment to develop, release, or deliver any Material (defined below), code, or functionality.NVIDIA reserves the right to make corrections, modifications, enhancements, improvements, and any other changes to this document, at any time without notice. Customer should obtain the latest relevant information before placing orders and should verify that such information is current and complete.NVIDIA products are sold subject to the NVIDIA standard terms and conditions of sale supplied at the time of order acknowledgement, unless otherwise agreed in an individual sales agreement signed by authorized representatives of NVIDIA and customer (“Terms of Sale”). NVIDIA hereby expressly objects to applying any customer general terms and conditions with regards to the purchase of the NVIDIA product referenced in this document. No contractual obligations are formed either directly or indirectly by this document.NVIDIA products are not designed, authorized, or warranted to be suitable for use in medical, military, aircraft, space, or life support equipment, nor in applications where failure or malfunction of the NVIDIA product can reasonably be expected to result in personal injury, death, or property or environmental damage. NVIDIA accepts no liability for inclusion and/or use of NVIDIA products in such equipment or applications and therefore such inclusion and/or use is at customer’s own risk. NVIDIA makes no representation or warranty that products based on this document will be suitable for any specified use. Testing of all parameters of each product is not necessarily performed by NVIDIA. It is customer’s sole responsibility to evaluate and determine the applicability of any information contained in this document, ensure the product is suitable and fit for the application planned by customer, and perform the necessary testing for the application in order to avoid a default of the application or the product. Weaknesses in customer’s product designs may affect the quality and reliability of the NVIDIA product and may result in additional or different conditions and/or requirements beyond those contained in this document. NVIDIA accepts no liability related to any default, damage, costs, or problem which may be based on or attributable to: (i) the use of the NVIDIA product in any manner that is contrary to this document or (ii) customer product designs.No license, either expressed or implied, is granted under any NVIDIA patent right, copyright, or other NVIDIA intellectual property right under this document. Information published by NVIDIA regarding third-party products or services does not constitute a license from NVIDIA to use such products or services or a warranty or endorsement thereof. Use of such information may require a license from a third party under the patents or other intellectual property rights of the third party, or a license from NVIDIA under the patents or other intellectual property rights of NVIDIA.Reproduction of information in this document is permissible only if approved in advance by NVIDIA in writing, reproduced without alteration and in full compliance with all applicable export laws and regulations, and accompanied by all associated conditions, limitations, and notices.THIS DOCUMENT AND ALL NVIDIA DESIGN SPECIFICATIONS, REFERENCE BOARDS, FILES, DRAWINGS, DIAGNOSTICS, LISTS, AND OTHER DOCUMENTS (TOGETHER AND SEPARATELY, “MATERIALS”) ARE BEING PROVIDED “AS IS.” NVIDIA MAKES NO WARRANTIES, EXPRESSED, IMPLIED, STATUTORY, OR OTHERWISE WITH RESPECT TO THE MATERIALS, AND EXPRESSLY DISCLAIMS ALL IMPLIED WARRANTIES OF NONINFRINGEMENT, MERCHANTABILITY, AND FITNESS FOR A PARTICULAR PURPOSE. TO THE EXTENT NOT PROHIBITED BY LAW, IN NO EVENT WILL NVIDIA BE LIABLE FOR ANY DAMAGES, INCLUDING WITHOUT LIMITATION ANY DIRECT, INDIRECT, SPECIAL, INCIDENTAL, PUNITIVE, OR CONSEQUENTIAL DAMAGES, HOWEVER CAUSED AND REGARDLESS OF THE THEORY OF LIABILITY, ARISING OUT OF ANY USE OF THIS DOCUMENT, EVEN IF NVIDIA HAS BEEN ADVISED OF THE POSSIBILITY OF SUCH DAMAGES. Notwithstanding any damages that customer might incur for any reason whatsoever, NVIDIA’s aggregate and cumulative liability towards customer for the products described herein shall be limited in accordance with the Terms of Sale for the product.TrademarksNVIDIA, the NVIDIA logo, and Mellanox are trademarks and/or registered trademarks of Mellanox Technologies Ltd. and/or NVIDIA Corporation in the U.S. and in other countries. Other company and product names may be trademarks of the respective companies with which they are associated.Copyright© 2021 NVIDIA Corporation. All rights reserved.NVIDIA Corporation | 2788 San Tomas Expressway, Santa Clara, CA 95051。