凌度A818说明书
- 格式:pdf
- 大小:7.61 MB
- 文档页数:36
T818系列自整定专家PID阀门控制专用仪表使用说明书一、概述本系列自整定专家PID阀门控制专用仪表采用多项国际先进技术,具备100~240VAC宽范围输入的开关电源,输入采用数字校正及自校准技术,测量精确稳定,消除温漂和时漂引起的测量误差。
仪表全面采用表面贴装工艺,并采用多重保护和隔离设计,抗干扰能力强、可靠性好。
本系列仪表采用先进的专家PID智能调节算法,控制精确稳定,无超调,具备高精度的自整定(AT)功能,仪表输出采用模块化硬件结构设计,AL1、AL2位置可选配继电器或无触点式开关信号进行阀门正反转控制,另有一路报警输出功能,还可选配阀门反馈变送输出,或标准通讯接口(RS485或RS232)。
本系列仪表具有多类型输入功能,一台仪表可以配接不同的输入信号(热电偶/热电阻/线性电压/线性电流/线性电阻),大大减少了备表的数量。
其适用范围非常广泛,可配合各种执行器对电加热设备和电磁、电动阀门进行PID调节和控制、报警控制、数据采集和记录。
本系列仪表具有三窗显示功能,显示测量值、给定值和阀门反馈值,使得仪表数据显示更加清晰直观。
本系列仪表还具有零点和满度修正、冷端补偿、数字滤波、传感器故障处理、通讯接口、60段折线输入修正、程序控制、开关量输入、开关量输出等扩展功能。
二、手册使用说明及仪表维护本手册主要介绍基本型仪表的使用及功能,其中增强型仪表的曲线说明将在另外手册详细介绍。
仪表在使用前必须按接线图正确接线(请特别注意电源接线、阀门正反转接线及反馈信号线)以保证仪表正常工作。
上电后,必须对仪表输入/输出参数进行正确设置,才能投入使用。
供货方可按用户要求设置仪表参数,请用户在订货时注明输入/输出规格及要求。
仪表每年应进行一次计量检定,如果仪表误差超出范围,通常都是由于潮湿、灰尘或腐蚀气体所导致,可对仪表内部进行清洁及干燥处理,如果干燥和清洁无法恢复精度,应将此仪表视同故障仪表送回厂方检修。
本系列仪表提供自产品出厂日起12个月的保修时间,如果是用户使用不当造成的损坏,或已超过保修期,则需适当收取维修费用。
MP3数码播放器使用说明前言首先对您使用本公司的MP3数码随身听产品表示感谢!在使用之前请先阅读此说明书,正确使用此产品。
为了你能尽快熟练的操作本机,我们随机配备了详尽的用户手册,从中你可以获得有关产品介绍,使用方法,系统设置以及特别提示等各方面知识。
本手册中的信息如有变更,恕不另行通知。
注意事项●不要在特别热、冷、多尘和潮湿的环境中使用本机。
●不要让本机与硬物摩擦撞击,否则可能会导致本机表面磨花、电池脱落或其它硬件损坏。
●在下列情况下请及时充电。
A、电池电量图标为空。
B、系统自动关机,再次开机后很快关机。
●尽量避免在特别干燥的环境下使用本机,以防静电。
●本机在格式化或正在进行上传下载资料时不要突然断开连接,否则可能导致程序出错。
●本机被作为移动硬盘时,用户请按正确文件管理操作方法存储导出文件,任何错误操作方法导致文件丢失,本公司概不负责。
一、功能概述二、充电说明三、外观及按键说明四、拆换面壳说明及复位五、进入主菜单及浏览操作六、操作说明1、开机及播放音乐2、关机3、音乐(MP3)模式4、录音(RECORD)模式5、收音(FM RADIO)模式6、娱乐(AMUSEMENT)模式7、设置(SETUP)模式七、连接计算机1、安装驱动程序2、连接电脑3、文件传输4、USB供电5、格式化内存6、弹出播放器7、固件升级八、附带工具软件使用说明九、技术参数十、疑难解答十一、附件一、功能概述本机是全新一代数码随身听设备。
支持MP3、WMA、W A V等多种音乐格式。
本机完美的音质、极高的可靠性和精巧的外观相得益彰,堪称大师级的作品,衷心的希望她能给您带来数码时代的超凡享受!●精巧外型:动感实足的新型一体化设计,个性化MP3播放器外观。
●大屏幕真彩显示:1.5"/65K色真彩CSTN显示屏,专为用户着想的人性化用户界面显示。
●支持多种音频格式:如MP3、WMA、W A V等音乐格式。
●独创的SMV电影功能:可将自己喜欢的电影独自享受,想看什么就看什么。

A8中文说明书(总8页) -CAL-FENGHAI.-(YICAI)-Company One1-CAL-本页仅作为文档封面,使用请直接删除Head Up Display用户使用手册概述感谢您购买本公司生产的汽车平视显示器HUD本产品是为了汽车的安全行驶而研发,在高速行驶时,特别是夜间高速行车时,为避免驾驶员低头观看仪表显示或观看音响显示,在前方遇有紧急情况就有可能因来不及采取有效措施而造成事故。
HUD正是在关键时刻体现出极为细腻的关怀,该技术把汽车行驶过程中仪表显示的重要信息(如车速)投射到前风挡玻璃上,不仅能够帮助对速度判断缺乏经验的新手控制自己的车速,避免在许多的限速路段中因超速而违章,更重要的是它能够使驾驶员在大视野不转移的条件下瞬间读数,始终头脑清醒地保持最佳观察状态。
HUD提供了很多汽车上用得到的功能,可以使您在体验速度的同时也保证自己的驾驶乐趣与行车安全。
本产品采用了最新的性能稳定的集成电路设计而成,各项指标均符合中国标准,外形独特大方,线条流畅,超薄的机身自然美观,为您的爱车增添一份美感。
在您使用本产品前,请详细阅读说明书,以便于充分发挥产品的所有功能。
HUD主要功能特点1.自动适应车型,符合OBD II 或EUOBD(车载自动诊断系统)的车型即插即用2.英寸超大屏高清显示3.多色彩屏设计,让画面更丰富,更易读取4.采用纳米技术消除多余反射,画面更清晰。
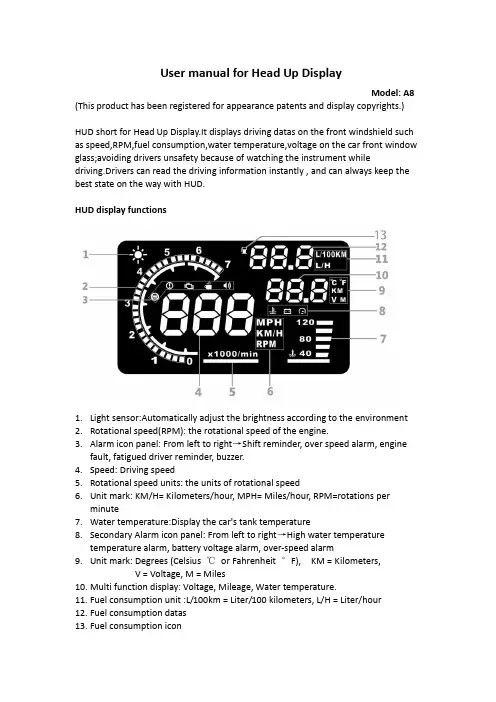
5.新增行驶里程测量6.显示内容丰富:行驶速度,引擎转速,水箱水温电压瞬间油耗,平均油耗,行驶里程测量,换挡提醒疲劳驾驶提醒,电压过低报警水温过高报警,超速报警,发动机故障报警,消除故障码公里英里自由切换7.自动开关机,随车启动,随车关机,有效保护汽车电瓶;同时保留手动开关机方式,更有益于控制HUD8.自动和手动亮度调节模式,行车不刺眼HUD按键功能1.OBDII 数据接口作为连接汽车的数据接口2.电源开关3. 设置拨轮,分别可以上拨,下拨,直按进行设置HUD屏幕功能1 感光元件: 感应外界光强度,自动调节HUD亮度以适应环境2 转速:显示发动机转速状态,亮到的刻度代表达到的转速3 警示图标:分别为换挡提醒,超速报警发动机故障疲劳驾驶图标蜂鸣器4 速度:数字显示汽车的行驶速度5 转速单位:发动机的转速,每分钟1000转6 单位符号:KM/H-公里单位,MPH-英里,KM/H-时速单位,RPM-转速7 水温显示:显示汽车的水箱温度8 警示图标:分别为水温电压超速图标9 单位符号:℃-摄氏度,℉-华氏度 KM行驶公里 V 电压 M英里。

凌渡(Lamando)电路图编号 19 / 106.2018收音机装置自 2014 年 10 月起BM1-019020618A+KL30103SC 1220A12a SC 5330AJ 9308787aSA 1125A2.5rt15*2.5rt16*216.0rtJT2ck /116.0rt2.5ws82ws =白色sw =黑色ro =红色rt =红色br =褐色gn =绿色bl =蓝色gr =灰色li =淡紫色vi =淡紫色ge =黄色or =橘黄色rs =粉红色可加热后窗玻璃继电器A -蓄电池J9-可加热后窗玻璃继电器SA1-保险丝架 A 上的保险丝1SC12-保险丝架 C 上的保险丝 12SC53-保险丝架 C 上的保险丝 53T2ck -2 芯插头连接*-自 2016 年 7 月起*2-截至 2016 年 7 月BM1-019030618R617R 21R 20B319B652B6513770.75rt/ge*T2bb 1.0rt/ge*T18d 1.0br/ge*T18d 2.5rt4*2T18d 2.5rt5*31.0br/ge T27a T4t /12.5rt*3/18 1.0br/ge *4T2bb 1.5br/ge *4/71.0br/ge /20 1.0rt/ge T27a T4t /41.0rt/ge/211.5rt/ge*4/31.0rt/ge*4/12.5brT18d /172.5br0.75br/ge*/2ws=白色sw =黑色ro =红色rt =红色br =褐色gn =绿色bl =蓝色gr =灰色li =淡紫色vi =淡紫色ge =黄色or =橘黄色rs=粉红色器R -收音机R20-左前高音扬声器R21-左前低音扬声器T2bb -2 芯插头连接T4t -4 芯插头连接T18d -18 芯插头连接T27a-27 芯插头连接377-接地连接 12,在主导线束中 617-右侧 A 柱下部接地点 2B319-正极连接 5(30a ),在主导线束中B651-连接 1(扬声器),在主导线束中B652-连接 2(扬声器),在主导线束中*-自 2018 年 6 月起*2-自 2016 年 7 月起*3-截至 2016 年 7 月*4-截至 2018 年 6 月BM1-019040618RB421B415J 533J 533R 23B653R 22B6541.0br/gn*T18d 1.0rt/gn*T18d 0.75rt/gn*T2bc 0.75br/gn*T2bc 0.35vi*T12y 0.35vi*T20a 1.0rt/gn *2T4s 1.0br/gn*2T4s 0.35or/br T12y /12CAN-L 0.35or/brT20a /100.35or/vi*3/200.35or/vi *3/6CAN-H1.0br/ge *4T27b /11.0br/gn *3/21.0br/gn /201.0rt/ge *4T27b /41.0rt/gn/211.0rt/gn*3/11.5br/gn *3/61.5rt/gn*3/2ws =白色sw =黑色ro =红色rt =红色br =褐色gn =绿色bl =蓝色gr =灰色li =淡紫色vi =淡紫色ge =黄色or =橘黄色rs =粉红色器J533-数据总线诊断接口R -收音机R22-右前高音扬声器R23-右前低音扬声器T2bc -2 芯插头连接T4s -4 芯插头连接T12y -12 芯插头连接T18d -18 芯插头连接T20a -20 芯插头连接T27b-27 芯插头连接B415-连接 1(信息娱乐 CAN 总线,High ),在主导线束中 B421-连接 1(信息娱乐 CAN 总线,Low ),在主导线束中 B653-连接 3(扬声器),在主导线束中B654-连接 4(扬声器),在主导线束中*-自 2018 年 6 月起*2-自 2016 年 7 月起*3-截至 2018 年 6 月*4-截至 2016 年 7 月BM1-019050618RR72R 15R 14R71R 17R 16R73R741.0sw/ws **2T18d 1.0bl/ws *2*T18d 1.0ws/sw *2*T18d 1.0bl/sw **2T18d 1.0ws/sw *2*3T19c /8 1.0bl/sw *2*3T19c /4 1.0sw/ws *2*3/5T19d 1.0bl/ws *2*3T19d /11.0ws/sw*2/31.0bl/sw*2/4 1.0ws/sw*2T4x /10.75br/bl*2T2bd /20.75gn/ge *2T2bd /11.0bl/sw *2T4x /41.0bl/ws*2/4 1.0sw/ws*2T4y /41.0sw/ws*2/30.75bl/sw*2T2be /10.75br/sw*2T2be /21.0bl/ws *2T4y /1ws =白色sw =黑色ro =红色rt =红色br =褐色gn =绿色bl =蓝色gr =灰色li =淡紫色vi =淡紫色ge =黄色or =橘黄色rs =粉红色器, 右后高音扬声器, 右后低音扬声器R -收音机R14-左后高音扬声器R15-左后低音扬声器R16-右后高音扬声器R17-右后低音扬声器T2bd -2 芯插头连接T2be -2 芯插头连接T4x -4 芯插头连接T4y -4 芯插头连接T18d -18 芯插头连接T19c -19 芯插头连接T19d-19 芯插头连接R71 -连接(正极,扬声器),在左后车门导线束中R72-连接(负极,扬声器),在左后车门导线束中R73-连接(正极,扬声器),在右后车门导线束中R74-连接(负极,扬声器),在右后车门导线束中*-自 2016 年 7 月起*2-用于带 8 个扬声器的汽车(8RM )*3-截至 2016 年 7 月BM1-019060618RR 15R 171.0bl/ws **2T18d 1.0sw/ws **2T18d 1.0bl/sw *2*T18d 1.0ws/sw *2*T18d 1.0ws/sw **3/8T19c 1.0bl/sw*/4T4x /11.0bl/sw **3/4T19c 1.0ws/sw */3T4x /41.0sw/ws **3/5T19d 1.0bl/ws*/4T4y /11.0bl/ws **3/1T19d 1.0sw/ws */3T4y /4ws =白色sw =黑色ro =红色rt =红色br =褐色gn =绿色bl =蓝色gr =灰色li =淡紫色vi =淡紫色ge =黄色or =橘黄色rs =粉红色收音机, 左后低音扬声器, 右后低音扬声器R -收音机R15-左后低音扬声器R17-右后低音扬声器T4x -4 芯插头连接T4y -4 芯插头连接T18d -18 芯插头连接T19c -19 芯插头连接T19d -19 芯插头连接*-用于带 6 个无源扬声器装备的汽车*2-自 2016 年 7 月起*3-截至 2016 年 7 月BM1-019070618RR 178Z 1R 109R 17961R 11382622.5br*3212.5ws102.5br*22.5br*2ws =白色sw =黑色ro =红色rt =红色br =褐色gn =绿色bl =蓝色gr =灰色li =淡紫色vi =淡紫色ge =黄色or =橘黄色rs =粉红色收音机, 天线, 右侧天线模块, 负导线中的调频频率滤波器, 正导线中的调频频率滤波器, 可加热式后窗玻璃R -收音机R11-天线R109-右侧天线模块R178-负导线中的调频频率滤波器R179-正导线中的调频频率滤波器Z1-可加热式后窗玻璃61-左侧 C 柱上的接地点 62-右侧 C 柱上的接地点 382-接地连接 17,在主导线束中*-自 2018 年 6 月起*2-截至 2018 年 6 月。

![A8说明书[1]](https://uimg.taocdn.com/a1682cd026fff705cc170a4e.webp)
User manual for Head Up DisplayModel: A8 (This product has been registered for appearance patents and display copyrights.)HUD short for Head Up Display.It displays driving datas on the front windshield such as speed,RPM,fuel consumption,water temperature,voltage on the car front window glass;avoiding drivers unsafety because of watching the instrument while driving.Drivers can read the driving information instantly , and can always keep the best state on the way with HUD.HUD display functions1.Light sensor:Automatically adjust the brightness according to the environment2.Rotational speed(RPM):the rotational speed of the engine.3.Alarm icon panel: From left to right→Shift reminder, over speed alarm, enginefault, fatigued driver reminder, buzzer.4.Speed: Driving speed5.Rotational speed units: the units of rotational speed6.Unit mark: KM/H= Kilometers/hour, MPH= Miles/hour, RPM=rotations perminute7.Water temperature:Display the car's tank temperature8.Secondary Alarm icon panel: From left to right→High water temperaturetemperature alarm, battery voltage alarm, over-speed alarm9.Unit mark: Degrees (Celsius ℃or Fahrenheit °F), KM = Kilometers,V = Voltage, M = Miles10. Multi function display: Voltage, Mileage, Water temperature.11. Fuel consumption unit :L/100km = Liter/100 kilometers, L/H = Liter/hour12. Fuel consumption datas13. Fuel consumption iconButtons Function① OBDII cable input② Power button③ Three way scroll button/setting button:a.Up button = up motionb.Ok button = inward button pressC.Down button = down motionScroll Button/Setting buttonFunctions for setting button(when the button place is in left):1 Short pull up: (1) switch the display mode(2) Increasing parameter values after enter into menu setting.2 Short pull down: Decreasing parameter values after enter into menu setting.3 Vertical Short press in:(1) switch the multi functions of water temperature/voltage/single driving distance(2) after enter into the setting menu, to increase the menu.4 Long pull down: turn on or off the buzzer.5 Vertical long Press 5 seconds: (1)enter into setting menu(menu 0-16)(2)after finish adjustment,vertical long press in 5 seconds to save it and exit.Turn off/on the buzzerWhen HUD is working,pull down the setting button for 5 seconds,to turn off the buzzer,do it again to turn on the buzzerEngine fault code clearance:When HUD connected car,pls donnot start the car,put the key to"ON",waiting for HUD shutdown,then long pull down the wave button for 5 second, you will hear “beep” sound from HUD, which means clear the fault codes completed.Reset setting:Vertically long press 5 seconds to enter into menu setting, short press 16 times to find menu 16, short pull down to parameter 1, long press in 5 seconds to save after HUD Setting (please see windscreen reflection to set)Vertical long press in the setting button for 5s to enter the menu setting, vertical short press to increase the menu option(from menu 1 to menu 16), up and down the setting button to increase or decrease the default value. After adjustment, vertical long press 5 seconds to save and exit.Menu SettingMenu Function Adjustment Range Explanation DefaultValueSetting State0 Speed 50-150 When the Speed is not the sameas dashboard:Up or down thewave button to adjust1071 RPM 50-150 When RPM is not the same as dashboard:Up or down the wave button to adjust1172Fuelconsumption50-150When fuel consumption is not thesame as dashboard:Up or downthe wave button to adjust1003 RPM alarm 10-75 When RPM reaches 5000, HUDwill give RPM alarm504Shiftreminder1-75When RPM reaches 5000, HUDwill give RPM alarm505 Four-stagealarm0-10 for turn off,1 for turn on thefour-stage alarm(60KM/H,80KM/H,100KM/H,120KM/H),speed alarm shows up whenit reaches to above four speed6 Single-stagealarm30-250Over speed alarm shows up whenthe vehicle speed exceeds 1501507 Display mode 0-3 0 =automatic mode: when speed below 80km/h, device show all information ;and when speedover 80km/h,device is in highspeed mode,1 =display all information,2=high speed mode(only display speed and fuel consumption),3=Voltage control the poweron/off(for hybrid electric vehicles)18 Brightnessadjustment0-20 =automatic adjustment,1 = darkest by manual,2 =brightest by manual9Fuelconsumptionunit0-20 is no display,1 is L/H,2 is L/100KM210 Speed unit 0-2 0 is RPM,1 is KM,2 is MPH111Watertemperatureunit0-20 = no display,1 =℃2 =℉112Mileage Unit 0-1 (switch between KM/Mile)0 =single driving distance in KM,1 =single driving distance in Mile13 Referencefuel consumption 10-500Average fuel consumption of100KM, default 80 meansaverage fuel consumption of100KM is 8L7014 Emissionsetting0-100The default car emission is16(means 1.6L),if there is no display fuelconsumption,pls adjust thedefault value to 01615Referencestart voltage110-150HUD will automatically turns onwhen voltage above 13.2V,anddevice automatically turns offwhen voltage below 13.2V13216 Reset setting 0-1 Adjust the parameter to 1,and vertical press in the wave button 5 seconds to save,then the reset is finishedHUD installation procedure1.Ensure your vehicle is OBDII compatible or EUOBD.a.C heck around the area under the steering wheel for an OBD plugb.Contact your vehicle manufacturer or search onlinec.O pen the bonnet and look for a OBDII compatible sticker (this is NOT onall OBDII compatible cars, therefore isn’t a deciding factor)2.Locate the 16 pin diagnostic link (see below picture). This is usually located inthe area under the steering wheel.3.Start vehicle’s engine and ensure power switch is in the on position.4.HUD will power on with enginea.I f the HUD displays vehicle voltage, fuel consumption, speed androtational speed the unit has installed correctly.b.Failing the above: Wait up to one minute for software to sync andconfirm OBD cable is plugged in properly.Reflective film installationUsing the unit without the reflective film may result in a double image observed by the user depending on the windshield. If you see a double layer it is due to the windshields dual layer construction and you should install the film by following the instructions below.1.Place the supplied non-slip mat in the desired position on the dashboard withthe HUD on top.2.Observing where the HUD reflects place the reflective film in position.a.E nsure the surface is clean and dry before installing the film;b.Remove the back protective side marked (1) and attach the film to theclean windscreen;c.O nce you’re satisfied with the location use a credit card or similar toremove any bubbles or air pockets that remain;d.Remove the front side marked (2), if you need to adjust the HUD’sreflection, reposition using the nonslip mat.Please note:If the car will not use in a week,please disconnect the OBD equipment. Troubleshooting1. The screen without any display, and no powerStart the car engine; check if the OBD cable line is tight; please pull down the OBD cables more times to ensure; check if HUD power switch turns on. If still no display, please change another car to test, analyze whether the car OBD diagnostic interface is good, if it is not good, please repair it and try again.2. When HUD power on, HUD only shows the car voltage and be automatic power off after a few seconds driving.HUD only available for cars with OBD2 and EU-OBD agreement(European region: after 2003 years, Other region: after 2007 years)HUD Products d on’t support JOBD and OBDI protocol.3. The machine is stuck or stuck during driving(1)Please check the OBD interface if connected withe other device(One point and two lines,positioner, tire pressure monitoring, drop lock window folding, ELM27 etc) (2)Modified and retrofitted cars (Central Control Navigation, Electronic Throttle Accelerator ,Fixed Speed Cruise, Computer System has been brushed,One-button start, keyless entry, remote start) will cause a crashPlease remove other OBD devices and do the factory reset.4. See not clearly when HUD under the sunlight,and with double reflection.This product reflects the driving data of the car on the windshield. Since the windshield is double-layered, there will be a slight ghost in the display. According to the glass of the car, the ghost image is different.If it is hard to read the datas, you can use the reflective film attached to this product.Check whether the HUD host protective film is torn,and please attached the reflection film in the gift box corresponding on the windscreen.Under the condition with power, vertical press wave button 5 seconds to enter into menu option,short press 8 times to menu 8, pull down the setting button to parameter 2,and vertical press 5 seconds to save.5.Inaccurate SpeedWhen HUD is power on,vertical press the setting button 5 seconds to enter into the menu options, here menu option shows 0,default value shows 107,up or down the button to increase or decrease the value according to the difference until it shows correct one.After adjustment, vertical press in 5 seconds to save it.(Example:If the dashboard shows 100,and HUD shows 104,then change the HUD default value from 107 to 104)6.Inaccurate fuel consumptionThe unit for fuel consumption is L/100KM, HUD display is the single driving fuel consumption, while car display is Integrated average driving fuel consumption, so it is normal if there are difference.HUD display three kinds of fuel consumptiona.Idle mode: HUD display Instantaneous fuel consumption per hour (L/H), it means HUD can figure out how much oil the car will consumed after start engine in one hourb. Driving mode: HUD display Instantaneous fuel consumption of 100KMc. Finish driving: HUD display is average fuel consumption of 100KM, when turn off the car, HUD will auto turn off in 10sUnder the condition with power,vertical press the wave button 5 seconds to enter into menu option, show press in 14 times to find menu 14,the default value is 16(means the emission is 1.6L),up or down the wave button to increase or decrease the value according to the difference with your car emission until it shows correct.Vertical press in 5 seconds to save and exit.Or find menu 2 ,the parameter shows 100,up or down to adjust.7.Over speed alarmHUD default over speed alarm value is 150,it can be adjusted.Under the condition with power,vertical press in the wave button 5 seconds to enter into menu option,short press 6 time to menu 6,parameter is 150,here 150 means over when driving speed reach 150, HUD will give over speed alarm,up or down the wave button to increase or decrease the value.Vertical press in 5 seconds to save after adjustment.8.Start Stop cars settingVertical short press the wave button 5 seconds to enter into menu setting, vertical short press 7 times to menu 7, the default value is 1, up or down the wave button to adjust the default value to 3 ( 3 is for voltage control switch for start-stop car) ,vertical press in 5 seconds to save and exit.9.Restart after shutdown, restart scanning car protocolVertical press in 5 seconds to enter into menu setting, short press 15 times to menu 15, the default value is 132, up or down to adjust the default value to 135, vertical press in 5 seconds to save and exit.10. HUD cannot be automatically power off(1) After the car is turned off, the HUD is turned off but restarted repeatedly: Observe the HUD voltage. If the voltage is between 130-135, adjust the default value of menu 15 to 136-137, then save and exit.(2) After the car is turned off, the HUD is stuck with the speed. Set the default value of menu 7 from 1 to 3. Then save and exit. If it still can't be turned off, set the menu 15 value to 136.Technical ParametersEnvironment temperature - 40 0C— +80 0CBarometric press:86-106KPaRelative humidity:10%-95%Environment voice:<=60dBAlarm of sound level:>=30dB(A)Work voltage:9V~16Vdc(12Vdc/400mA)Size of product:12.5*7.5*1.5(cm)Weight of product:110g。
2018款大众polo使用说明书1️⃣ 车辆概述与外观介绍2018款大众Polo作为紧凑型轿车的典范,以其时尚的设计、精湛的工艺以及卓越的驾驶体验赢得了市场的广泛认可。
车身线条流畅,前脸采用大众家族式设计,辨识度极高。
车尾造型简洁大方,LED尾灯在夜间行驶时提供清晰的视觉效果。
车身尺寸适中,既保证了城市驾驶的灵活性,又提供了足够的乘坐空间。
2️⃣ 内饰布局与功能操作驾驶舱设计:进入车内,2018款Polo的驾驶舱布局清晰合理,中控台上的按键排列有序,便于驾驶员操作。
仪表盘采用双圆形设计,中央配备行车电脑显示屏,可实时显示车辆状态信息。
座椅调节:前排座椅支持手动或电动调节(根据车型配置不同),可轻松找到最适合的驾驶姿势。
后排座椅支持按比例放倒,方便扩展行李厢空间。
娱乐系统:中控台中央配备触摸屏多媒体系统,支持蓝牙连接、手机映射(如Apple CarPlay、Android Auto)以及导航功能,为驾驶者提供丰富的娱乐和信息来源。
空调系统:全自动空调系统可根据车内温度自动调节,为乘客提供舒适的乘坐环境。
安全配置:车辆配备ESP车身稳定系统、ABS防抱死制动系统、EBA紧急制动辅助系统以及多安全气囊等安全配置,全方位保障行车安全。
3️⃣ 驾驶辅助与性能表现发动机与变速箱:2018款Polo提供多种动力选择,包括1.0L、1.2L和1.4L汽油发动机,以及1.4L柴油发动机。
变速箱方面,提供手动和自动两种选择,满足不同驾驶者的需求。
驾驶模式:部分车型配备驾驶模式选择功能,如标准、运动和经济模式,可根据路况和驾驶需求进行调整,以获得最佳的驾驶体验和燃油经济性。
停车辅助:配备泊车雷达和倒车影像系统(根据车型配置不同),帮助驾驶者轻松应对复杂的停车环境。
操控性能:Polo的底盘调校精准,悬挂系统经过优化,提供了良好的操控稳定性和乘坐舒适性。
在高速行驶时,车辆保持稳定,转弯时响应迅速,给驾驶者带来信心。
综上所述,2018款大众Polo凭借其时尚的外观、精致的内饰、丰富的配置以及卓越的驾驶性能,成为了紧凑型轿车市场中的佼佼者。
CORD118说明书features1.1990-1-1 to 2089-12-312.daily alarm with snooze function3.temperature measurement between –20c to +50c temperature measurement accuracy: max. +/- 1c temperature measurement resolution: 0.1c4.key tone5.3v operate6.production test7.book light function8.fm radio functionkey define1.mode key change mode / store setting2.set key set / change setting field3.up key increase setting with auto advance4.down key decrease setting with auto advance5.snooze key toggle between snooze funtion on/off6.c/f key toggle between c/f display fuctional descriptionstwo modes (date & time,alarm) *press <mode>key to change mode in the following sequence date & time mode *real time clock (hh:mm) with 12/24 hours display system. *day ofweek(sun,mon,tue,wed,thu,fri,sat) *temperature(c or f)*month and date (mm-dd)alarm mode*alarm time (hh:mm) with 12/24 hours display system *day of week (sun,mon,tue,wed,thu,fri,sat) *alarm text*month and date (mm-dd)*change back to date & time mode automatically after 8 seconds idle. time setting*press<set> key for 2 seconds at date & time mode *the order of setting is as follows: *press <up>or<down>key to change the flashing value an press<set>key to setup next item. *press <mode>key to save the setting, the day of week will setupautomatically.*change back to date & time mode automatically after 8 seconds idle. alarm time setting*press <set>key at alarm mode *the order of setting is as follows: *press <up> or <down>key to change the flashing value and press<set> key to setup next item. *press<mode>key to save the setting and return to alarm mode. *change backto date & time mode automatically after 8seconds idle. *press <up> key to toggle alarm on/off ,press<down>key to togglechime on/off.*there is 30 seconds buzzer sound when alarm time is reached, press any key tostop the buzzer sound.*if snooze is on , these are 2 reminiscent buzzer sounds for 30 seconds after5 minutes each. press any key to stop the buzzer sound. alarm trigger output*when there is 30 seconds buzzer sound, the iob3 is output high at the same time. *the iob3 output high in the daily alarm and the snooze alarm only. book lightoperation:*press the “light” button rig ht side of book light. *the book light on within 5 second. *can adjust the angle of the light attain best. *open the battery door change batteries. *use ag13 buttery.*don’t mix old new batteries. *don’t displace of batteries in fire. batteries many explode or leak. fm radio *turn on the volume button*make the antenna.*press <reset> then <scan> to auto – scan.篇二:vhh118b 电话交换机说明书篇三:说明书1.零件的分析1.1零件的作用题目给定的零件是变速箱体零件,是变速箱的基础零件,它把有关零件连接成一体,使这些零件保持正确的相对位置,彼此能协调地工作。
前言感谢您购买本汽车安全系列高清数字车载行车记录仪。
本产品是在保持原车原貌的基础上,针对现今行车事故取证难,专门研发的一款全新、时尚多功能车载行车记录仪,让您的爱车更加多姿多彩!产品概述本产品具有行业领先的数码高动态,Super HD 1440P全高清摄像,G-sensor重力感应,SOS键紧急保存,语音存储,一键式录音开关,HDMI 高清输出,ADAS 安全辅助(轨道偏离警示、前车预警提醒)等功能。
本产品独家设计,外观精致,不影响整体美观,人性化的理念设计使您享受尊贵级待遇!温馨提醒1.本用户手册将具体说明如何使用、操作、技术规格和注意事项等。
使用前请具体阅读本手册并完全理解,请妥善保管好本手册,我们希望本产品能满足您的需求并长期服务于您!2.本手册在印刷过程中,机器因外观、软件或硬件的修复过程导致了同该手册的部分操作非一致性,本公司保持最终解释权!3.请勿将产品置于潮湿的工作环境,产品不具有防水功能,敬请避免本产品被淋水或暴露在雨水中。
4.不可尝试启动外壳或尝试自行维修,若本产品或本产品的任何配件有故障,请去专业的维修点维修。
5.不可使用刺激性的化学物质、清洁溶剂或清洁剂清洁本产品。
请用微湿的软布擦拭本产品。
6.请勿在粉尘密度过大的环境下使用,以免镜头以及其它部件沾染粉尘,影响摄像效果。
7.请注意环保,勿随意丢弃本产品。
严禁把本产品投掷于火中,以免发生爆炸。
8.使用前请注意镜头表面的清洁,使用微湿的软布清理后再使用,以免出现摄像效果不好的问题出现。
内容指南(一)机器结构图示(二)机器按键及接口说明(三)充电/开机说明(四)摄像/拍照/回放基本操作说明(五)机器菜单设立说明(六)产品规格(七)GPS播放软件安装和使用 (合用于带GPS机台) (八)常见问题及解答一.机器结构图示1)TV-OUT或GPS2)HDMI接口3)支架安装口4)USB接口5)开机/拍照键6)MODE模式键7)MENU菜单键8)SOS紧急键9)SPEAKER喇叭10)散热窗11) 高清镜头12)上键13)下键14)OK确认键15)MIC16)TF卡座17)复位键18)显示屏二:机器按键及接口说明三:充电/开机说明1.充电方式:1.1:用车载电源线连接汽车点烟器插座充电。
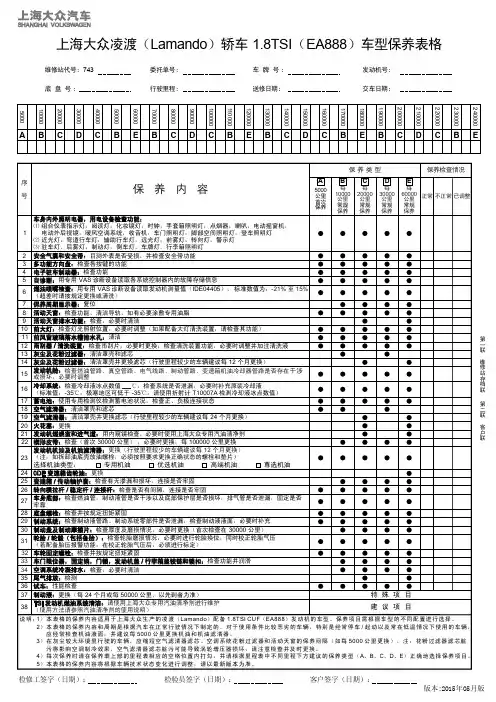
KBA5GD0132012.20205GD01312120全新凌渡使用说明书全新凌渡本说明书适用于下列表中各种型号的上汽大众LAMANDO 全新凌渡轿车。
用户在使用本公司产品以前,必须认真研读产品使用说明书,任何不当的使用、保养和修理都可能导致车辆的损坏及影响质量担保服务。
因此,在使用产品前请认真阅读本使用说明书,并对照表中的型号确认您的车型。
名称型号发动机变速箱全新凌渡轿车SVW71416NL CST 五挡手动变速器全新凌渡轿车SVW71416PL CST 七挡自动变速器全新凌渡轿车SVW71416RL CSS 七挡自动变速器全新凌渡轿车SVW71416DT DJR 五挡手动变速器全新凌渡轿车SVW71416ET DJR 七挡自动变速器全新凌渡轿车SVW71416FT DJS 七挡自动变速器全新凌渡轿车SVW71416GT DJR 七挡自动变速器全新凌渡轿车SVW71416JT DJS 七挡自动变速器全新凌渡轿车SVW71416LT DSA 七挡自动变速器全新凌渡轿车SVW71416KTDSB七挡自动变速器本使用说明书描述了该车型车辆在当前范围的配置、功能及操作的一般通用信息,但用户车辆的实际配置和功能等信息以具体交付时的为准。
本公司将持续对各种车型进行改进,各车型在外形、配置、功能和结构设计等方面也可能随时会发生变化,故本公司有权在法律法规允许的范围内对本说明书有关版本进行更改、补充,若用户对此有疑义请及时拨打上汽大众客户服务热线400-820-1111予以咨询。
未经本公司书面同意,不得复制、翻译或摘录本使用说明书。
上汽大众汽车有限公司依法保留对本说明书有关版本进行更改、补充等的一切权利。
中国印刷。
上汽大众汽车有限公司公司地址:中国上海安亭于田路公司电话:59561888邮政编码:201805企业标准号:Q/JQAB 243-2018Q/JQAB 244-Q/JQAB 311-20182020Q/JQAB 340-2020致尊敬的用户尊敬的用户:感谢您对上汽大众的信任与厚爱!在您选择了上汽大众产品的同时,您已经启动了全新的汽车生活之旅。
-1-按键操作说明1.2一键静音一键GPS导航(需提前安装导航apk 应用,如高德、凯立德等)电源键(短按开/关屏,长按开/关机)一键进入记录仪界面返回主屏按键-2-DVR卡槽:记录仪专用TF卡槽(注:请使用C10标志正品卡,每次使用前需对卡进行格式化)建议此卡槽只做行车记录用,不用担心记录被误删。
GPS卡槽:地图导航专用TF卡槽(本机已自带8GB内存可实现下记功能)把相应导航的地图包拷贝到卡上,而且可以存放音乐、视频、资料等。
(请自行上网查询您所需的导航安装及使用方法)AVIN:后镜头插头接口,安装好之后,可以实现前后监控录像,出货标配宝马头后镜(注:请先插后镜头,再通电,以识别镜头制式)USB:USB接口(供连接机器至PC使用)2.主界面介绍启动系统后显示主界面,主界面可设置快捷图标侧边栏可点击或由左边拖出或隐入-3-依次为:返回键、主屏键、音量加、音量减、菜单键。
通知栏2.1线时会显示图标、启用了调试模式时显示图标、连接WIFI 时显示图标)点击通知栏会弹出隐藏菜单,包括时间和电量显示菜单和通知信息菜单:点击图标或者时间与电量显示菜单的任意位置,弹出更详细的菜单,可以设置屏幕亮度、是否隐藏通知信息(如果这一项关闭将不显示通知信息菜单)、打开系统设置点击通知信息菜单的某项时,将进入相关设置菜单。
2.2输入法按钮当打开浏览器需要输入网址或者输入其他信息时,在屏幕右下方会显示按钮,点击会显示本机所安装的所有输入法,可以选择需要的输入法。
3.行车记录仪注:系统第一次默认勾选“自动录像”,启动后,会自动录像(需插入SD卡),5秒钟后自动返回主屏(系统后台录像)。
-4-录像功能:点击主界面的【行车录影】或面板上的,进入行车录影界面。
3.1录像静音打开/关闭(打开:录像时同时录入声音;关闭:录像时不会录入声音)前/后摄像头切换画中画功能打开/关闭(打开此功能,前后摄像头以小窗口形式展现,可对画中画进行前后摄像头切换),如下图:可点击时间水印打开/关闭(时间水印打开时,录像或拍照后可-5-显示操作时间)录像静音打开/关闭(同一样)G-sensor灵敏度设置(根据实际场景设置灵敏度,可设置为正常、较灵敏、非常灵敏)G-sensor功能如下:如遇紧急停车,自动加锁当前文件,并不可循环覆盖此文件,屏幕显示如图切换前/后摄像头打开/关闭移动侦测(打开移动侦测,当有物体从摄像头面前经过,会自动捕获下来)打开/关闭自动录像功能(打开后开机,则自动进行录像)打开/关闭画中画(同一样)格式化SD卡(只格式化行车记录仪专用TF卡)3.4录像设置菜单白平衡设置(白平衡效果,自动/白炽灯/日光/荧光灯/阴天)曝光率设置(曝光效果,-3/-2/-1/0/1/2/3)色彩模式设置(默认/黑白/深褐色/底片/浮雕)循环录像时间设置(循环录像时间可设置为:1分钟、2分钟、5分钟、10分钟保存一个文件。
Dear Audi Driver,The aim of this quick reference guide is to introduce you to the main features and controls of your vehicle.This quick reference guide cannot replace the information contained in the Owner's Manual;it is therefore important that you also read the notes and warnings in the Owner's Manual.We wish you safe andenjoyable motoringwith your new Audi.AUDI AGLOCKING AND UNLOCKING THE VEHICLEThe central locking systemlocks and unlocks all thedoors, the boot lid and thetank flap. It can be operatedwith the remote control or byturning the key in the lock.Operating the radio-activated remote control Press the appropriate button for about 1 second.1Unlocking buttonOpen one of the doors or the boot lid within about 60 sec-onds, otherwise the vehicle will lock itself again automa-tically.2Unlocking buttonfor boot lidPress the button for at least 1 second.3Locking buttonThe turn signals will flash brie-fly when the car is locked to confirm that the doors and the boot lid are closed properly.4Folding outthe master keyPress the release button.Folding away themaster keyPress the button and fold the key away.Note:Press and hold unlocking button on remote control(or turn and hold key inlock on driver’s door) toopen all the windows. Pressand hold locking button onremote control (or turn andhold key in lock on driver’sdoor) to close all the windowsand the sun roof.Warning: The doors and win-dows cannot be opened frominside the vehicle if it hasbeen locked from the outside.Anti-theft alarmThe alarm system is auto-matically set when the car islocked. The alarm system isswitched off automaticallywhen you unlock the vehiclewith the remote control.Note:If you unlock the vehicleby inserting the key in the dri-ver’s door, the ignition mustbe switched on within 15 sec-onds, otherwise the alarm willbe triggered. If you unlock theboot lid by turning the key inthe slot, the alarm will be trig-gered immediately.ADJUSTING FRONT SEATSfront seatscheck that the catch is en-front seatsINSTRUMENTS AND WARNING/INDICATOR LAMPS1Coolant temperature gauge 2Rev counter3Warning and indicator lamps Turn signals, hazard warning lights Trailer turn signals Airbag system 1)Alternator 1)Engine management 1) orGlow plugs for diesel models1)Fault in enginemanagement system 1)Main beam headlightsSide lights/ headlights Electronic stability program (ESP)Front fog lights Rear fog lightSeat belt reminder 4Driver information system display:•Warning symbols and auto-check control No faults detectedOK EPC AIRBAGFault in brake system Fault in cooling system Tyre pressure too lowIf one of the red symbols lights up while you are driving, stop the car,switch off the engine and refer to the Owner's Manual./Brake light faulty 1)Bulb failure: dipped head-lights or rear lights 1)Brake pads worn 1)Washer fluid level low Check engine oil level Fuel level low Battery voltage too high or too low 1)Automatic headlight range control faulty 1)Check tyre pressure Speed warning 1or 2(km/h or mph)Door/ boot lid not shutWhen a service becomes due,the service indicator will light up briefly.•Radio/ telephone infor-mation•Outside temperature •Menus and navigation/ telematics informationBREMS-LICHT•To call up driver infor-mationPress the button if one of the red symbols flashes.•To set speed warning 1Press the button briefly when the desired speed is reached.T o cancel the speed warning,press the button for at least 1 second while the vehicle is moving.8Adjuster buttons for quartz clock 9Time and date 10Mileage recorder T op display: trip recorder Bottom display:total mileage 11Adjuster buttons for instrument lighting 12Reset button fortrip recorder1)If one of these warning symbols lights up while you are driving,please take the vehicle to an Audi workshop straightaway.•Selector lever position (on vehicles with auto-matic gearbox)•On-board computer Instantaneous fuelconsumption Fuel range Driving timeAverage fuel consumption Average speed 5Speedometer 6Fuel gauge7Control button:•To call up auto-check control displays (in turn)Press button with the ignition on and the vehicle stationary.•To activate mileage re-corder display and clock Press the button when the ignition is switched off.økm/h 100 kmLø h km l/100 kmSAFETYinstructions for the child seat.Category 1Category 2Category 0Kurzanleitung Audi A8 englisch 7.01221.562.622.20SUN ROOFComfort settingTurn the control until it en-gages at position 2.T o tilt openPress the control briefly at position 0to tilt the roof all the way up. Pull the control briefly to close.Press and hold the control to move the roof up to an intermediate position. Pull and hold the control to move the roof down.FILLING THE TANKOpening the tank flap Open the tank flap, unscrew the tank cap and hook it onto the flap (see illustration).Stickers for:1Fuel grade 2Tyre pressuresOpening and closingTurn the control to 1to slide open the sun roof and turn it to 0to close it (the ignition must be switched on).OVERVIEW OF CONTROLS AND EQUIPMENT5Headlight range control 6Steering-wheel con-trols for Tiptronic,radio, CD player and telephone2Door handle Press the lower half of the switch to lock the vehicle centrally from the inside.Press the top half of the switch to unlock the vehicle.1Central locking switchPress the switch briefly to move window all the way down. Lift the switch briefly to move the window all the way up. The window can be stopped in any position by briefly pressing the switch again. The rear windows and rear cigarette lighter can be deactivated by pressing the safety switch (in the centre of the panel of switches).3Electric windowsSelector knob:L Left exterior mirror I OffRRight exterior mirror Retract both exterior mirrorsPress the adjuster to move the mirror surface in the desired direction. The mir-rors are heated when the ignition is on.4Electric adjustment for exterior mirrors© 2001 AUDI AGAUDI AG reserves the right to alter any part of the vehicle, its equipment and technical specifica-tions. No legal commitment can be implied by the information, illustrations or descriptions in this publication. No part of this publication may be reprinted, reproduced or translated without the written permission of AUDI AG. All rights under the laws of copyright are expressly reserved by AUDI AG. Subject to change. Printed in Germany. Concept and layout:Pfriemer Kataloge GmbH.8HornLight switch:0Lights off 1Side lights2Main or dipped beam headlights Turn signal and headlight dip lever:3Right turn signals 4Left turn signals5Main beam headlights 6Headlight flasher Cruise control system To activate the system:slide control A to ON/ EIN position. Press button B to store the current speed and maintain this speed constantly.To switch off cruise control temporarily:press either the brake pedal or clutch pedal, or slide control A to OFF/ AUS. To resume the programmed cruising speed,slide control A to RES/ AUFN.To switch off cruise con-trol completely:slide con-trol A all the way over to OFF/ AUS until the click stop engages.7Light switch and Turn signal and headlight dip lever9Air outlets0Off1Brief wipe2Intermittent wipe The wiper intervals can be varied in stages by turning the control A .3Slow wiper speed 4Fast wiper speed 5Automatic wash and wipePull lever towards you and hold.Function selector switch for on-board computer Press the top or bottom of rocker switch B to show the various displays in turn.Press and hold button C to reset display to zero.Selector button for dis-play modesPress button C repeatedly to select the following displays:on-board computer, naviga-tion system and telematics,or to switch the display off.11Windscreen wiper and washer leverSee also overleaf.10Instruments and warning/¨indicator lamps15Switch for ESP (electronic stability program)12Ignition lock 13Switch for front fog lights 14Switch for rear fog light 16Switch for hazard warning lights 18Switch for retractor function for rear head restraints 17Switch for sun blind for rear window The parking aid is automati-cally activated when reverse gear is engaged. Press the switch to activate the park-ing aid manually if you are driving forwards into a tight space.19Switch for acoustic parking aid20Lockable glove box 21Radio or Navigation System Plus 23Switch for rear window heater22Thumbwheel for seat heating (front right seat)26Ashtray, cigarette lighter and electrical socket Warning:Do not move the se-lector lever to positions P or Rwhen the vehicle is moving.Manual shift program (Tiptronic)The Tiptronic program ena-bles you to change gear manually. T o do this, move the selector lever out of posi-tion D into the Tiptronic gate on the right. Press the selec-tor lever forwards briefly to shift up a gear, or push the lever back to shift down a gear.Selector lever positions on vehicles with automatic gearbox P -Parking lock R -Reverse gear N -Neutral D -Drive S -SportTo move the selector lever out of position P or N , or into position P or R , press the interlock button on the selector lever handle and the brake pedal simultaneously.Note:Use the foot brake to hold the vehicle when station-ary with the engine running (in all selector lever positions other than P and N ).27Gear lever/selector lever30Handbrake33Memory buttons for driver's seatMechanical adjustment:Pull lever A down and adjust the position of the steering column as required. Then push the lever back up as far as it will go.Electrical adjustment:Press switch C in the appropriate direction to adjust the position of the steering column.Convenient entry function:Press button B to switch on the convenient entry function.31Lever/ switch for adjustable steering columnPlease refer to Owner's Manual.32Bonnet release leverDriver information system menusTo call up the main menu,press the MENU button when the vehicle is station-ary.Turn the pushbutton to move the selector arrow to the option you wish to select, and press the push-button to confirm. This activates the submenu.Proceed by turning and pressing the pushbutton until the required function has been performed.Navigation system or telematicPlease refer to the Operating instructions.28Controls in storage compartment for:29Cup holder。