juniper-port
- 格式:doc
- 大小:296.50 KB
- 文档页数:4


juniper交换机命令juniper 交换机配置命令整理导读:就爱阅读网友为您分享以下“juniper 交换机配置命令整理”的资讯,希望对您有所帮助,感谢您对 的支持!设置交换机名字set system host-name BaoGaoTing端口镜像set ethernet-switching-options analyzer debug input ingress interface ge-0/0/0.0set ethernet-switching-options analyzer debug input egress interface ge-0/0/0.0set ethernet-switching-options analyzer debug output interface ge-0/0/4.0Dual-partition的主要目的:解决异常断电设备无法启动的问题request system snapshot media internal slice alternate request system snapshot slice alternate //主备之间备份request system reboot slice alternate media internal // 指定从另外一个分区启动,下一次启动就会默认从上次启动的分区启动junos os,记忆功能QinQ 配置基本的set ethernet-switching-options dot1q-tunneling ether-type 0x8100 封装协议set vlans qinqvlan vlan-id 2821set vlans qinqvlan dot1q-tunnelingset interfaces ge-0/0/28 unit 0 family ethernet-switching vlan members 2821 上行端口set ethernet-switching-options dot1q-tunneling ether-type 0x8100set vlans cust1 vlan-id 100set vlans cust1 interface ge-0/0/1.0set vlans cust1 interface ge-0/0/2.0灵活的set ethernet-switching-options dot1q-tunneling ether-type 0x8100 ##set interfaces ge-0/0/27 unit 0 family ethernet-switching port-mode access ##下行端口set interfaces ge-0/0/27 unit 0 family ethernet-switching vlan members qinq ##用户Vlan为qinq 管理Vlan为Vlan600是透传上去的set interfaces ge-0/0/27 unit 0 family ethernet-switching vlan members vlan600 ** 注意点:一般情况下是不可以同时两个access的,--那样就做成trunk模式** 除非有一个vlan是dot1q-tunnel,而且需要tunnel vlan必须得有customer-vlan的,没有customer-vlan是无法提交成功的set vlans qinq vlan-id 4000 ##//灵活qinq,对于内层标签2-150的tag加上外层4000set vlans qinq interface ge-0/0/27.0set vlans qinq dot1q-tunneling customer-vlans 2-150接入交换机配置setinterfaces ge-0/1/1 unit 0 family ethernet-switching port-mode trunkset interfaces ge-0/1/1 unit 0 family ethernet-switching vlan members 2set interfaces ge-0/1/1 unit 0 family ethernet-switching native-vlan-id 600 **由于上联汇聚交换机的端口为Access口所以要透传的Vlan为native-Vlan##root用户名密码set system root-authentication encrypted-password "$1$z2Z28Ixe$AScMP7uMvMHY3fy8dgtm11" ##用户idset system login user juniper uid 2100 ##设置root用户为超级用户set system login user juniper class super-user##远程用户名和密码set system login user juniper authentication encrypted-password "$1$qUdu0s0Z$vGS88V0jrjhsPnQOTF9oy/" ##启用telnet set system services telnet connection-limit 10 set system services telnet rate-limit 10##端口模式为accesset interfaces ge-0/0/0 unit 0 family ethernet-switching port-mode access ##端口加入Vlan为600 set interfaces ge-0/0/0 unit 0 family ethernet-switching vlan members 600 ##端口为trunkset interfaces ge-0/1/0 unit 0 family ethernet-switching port-mode trunk ##允许通过Vlan为600 set interfaces ge-0/1/0 unit 0 family ethernet-switching vlan members 600 ##设置Vlan600的ip地址set interfaces vlan unit 600 family inet address 172.30.0.16/24 ##设置默认网关set routing-options static route 0.0.0.0/0 next-hop 172.30.0.1 ##开启Vlan的三层接口set vlans default l3-interface vlan.0 ##创建Vlan 名字为mgt id 为600 set vlans mgt vlan-id 600 ##开启Vlans mgt的三层接口set vlans mgt l3-interface vlan.600 ##开启Vlans mgt的三层接口set poe interface all X配置VLAN的L3接口地址set vlans name l3-interface vlan.xxset interface vlan xx unit xx family inet address x.x.x.x/24将某个交换端口添加到创建好的VLAN中set interface ge-0/0/x unit 0 family ethernet-switching port-mode access vlan members name 配置TRUNK端口set interface ge-0/0/23 unit 0 family ethernet-switching port-mode trunk native-vlan-id 1 vlan member xx预提交commit check清除LED灯报警clear alarm trafficclear alarm eventEX2200 ALARM告警灯亮红灯:show chassis alarmshow system alarmrequest system configuration rescue save/delete set chassis alarmmanagement-ethernet link-down ignore 管理口状态警告信息灯关闭set chassis alarm ethernet link-down ignore 交换机端口状态警告信息灯关闭igmp 开启set protocols igmp-snooping vlan alldeactivate protocols igmp-snooping开启生成树Set protocol stp恢复出厂设置load factory defaultDual-partition的主要目的:解决异常断电设备无法启动的问题request system snapshot media internal slice alternate //主备之间备份request system reboot slice alternate media internal // 指定从另外一个分区启动,下一次启动就会默认从上次启动的分区启动junos os,记忆功能dhcp 配置set system services dhcp pool 100.1.1.0/24 address-range low 100.1.1.10set system services dhcp pool 100.1.1.0/24 address-range high 100.1.1.200set system services dhcp pool 100.1.1.0/24 default-lease-time 7200set system services dhcp pool 100.1.1.0/24 router 100.1.1.254将端口设置为三层模式。
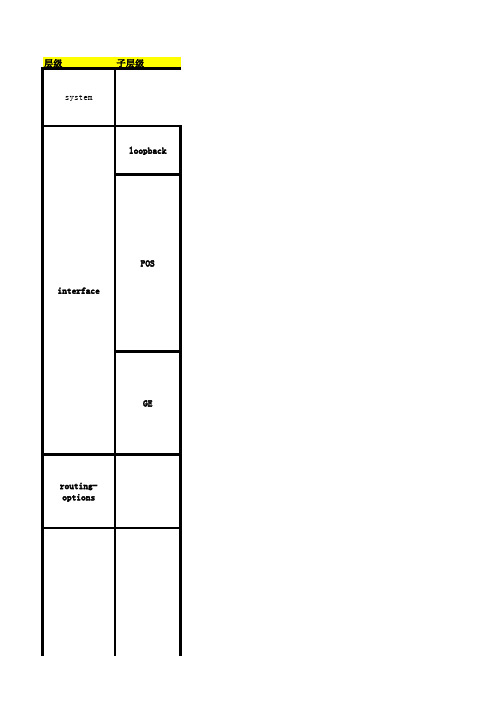
层级子层级systemrouting-options loopbackPOSGEinterfaceprotocolISISOSPFBGPMPLS-RSVP/LDP MPLS-FRRMPBGPMPLS-VPN COS功能项set system hostname hostnameset system root-authentication plain-text-passwordset system login user lab class super-user authentication plain-text-passwordset system services telnet/ftp/name-ser dns-adds et interface lo0 description descriptionset interface lo0 unit 0 family inet address ip-addressset interface lo0 unit 0 family iso address iso-addressset interface so-slot/pic/port description descriptionset interface so-slot/pic/port mtu mtu-numberset interface so-slot/pic/port hold-time up ms down msset interface so-slot/pic/port encapsultation pppset interface so-slot/pic/port sonet-options fcs [32|16]set interface so-slot/pic/port sonet-options payload-scrambler set interface so-slot/pic/port sonet-options rfc-2615set interface so-slot/pic/port unit 0 family inet address ip-addressset interface so-slot/pic/port unit 0 family isoset interface so-slot/pic/port unit 0 family mplsset interface ge-slot/pic/port description descriptionset interface so-slot/pic/port mtu mtu-numberset interface so-slot/pic/port hold-time up ms down msset interface ge-slot/pic/port unit 0 family inet address ip-addressset interface ge-slot/pic/port unit 0 family isoset interface ge-slot/pic/port unit 0 family mplsset routing-options router-id router-idset routing-options autonomous-system as-numberset routing-options static route network/mask next-hop addressset protocols isis level [ 1 | 2 ] interfaceinterface.logical-numberset protocols isis lsp-lifetime secondsset protocols isis export export-policyset protocols isis spf-delay msset protocols isis rib-group inet rg-nameset protocols isis traffic-engineering shortcutsset protocols isis level [ 1 | 2 ] wide-metrics-onlyset protocols isis level [ 1 | 2 ] preference numberset protocols isis level [ 1 | 2 ] external-preference number set protocols isis level [ 1 | 2 ] disableset protocols isis interface interface-name lsp-interval msset protocols isis interface interface-nam level [ 1 | 2 ] metric numberset protocols isis interface interface-nam level [ 1 | 2 ]hello-interval secondsset protocols isis interface interface-nam level [ 1 | 2 ]hold-time secondsset protocols isis interface interface interface-nam passive set protocols ospf area XX interface interface.logical-number set protocols ospf interface interface.logical-number metric numberset protocols ospf interface interface interface.logical-number passivset protocols ospf traffic-engineeringset protocols bgp interface interface.logical-numberset protocols bgp group group-nameset protocols bgp group group-name type external/internalset protocols bgp group group-name peer-as 1234set protocols bgp group group-name neighbor X.X.X.Xset protocols bgp hold-time secondsset protocols bgp mtu-discoveryset protocols bgp out-delay secondsset protocols bgp log-updownset protocols bgp dampingset protocols bgp group group-name description descriptionet protocols bgp group group-name local-address group-namelocal-address addressset protocols bgp group group-name family inet anyset protocols bgp group group-name neighbor address description descriptionset interfaces interface.logical-number family mplsset protocols mpls interface.logical-numberset protocols ldp interface.logical-numberset protocols rsvp interface.logical-numberset protocols mpls label-switched-path test to 10.0.9.7set protocols mpls label-switched-path test ldp-tunnelingset protocols mpls label-switched-path test link-protectionset protocols rsvp interface so-0/0/3.0 link-protectionset protocols bgp group group-name family [inet|inet-vpn|inet6|inet6-vpn|l2vpn]set routing-instances instance-nameset routing-instances instance-name instance-type VRFset routing-instances instance-name interface interface-number set routing-instances instance-name route-distinguisher xxxx set routing-instances instance-name vrf-target target:xxxx:yyyy set routing-instances instance-name routing-options static route x.x.x.x/z next-hop x.x.x.xset routing-instances instance-name protocols ospf area XX interface interface-name.logical-numberset routing-instances instance-name protocols ospf export bgp-ospfset policy-options policy-statement bgp-ospf term 1 from protocol bgpset policy-options policy-statement bgp-ospf term 1 then accept命令解释备注配置设备名必选为root帐户设置密码新建用户名为lab的帐户,并设定密码配置路由器Telnet/ftp/dns服务配置端口描述配置IP地址配置ISO地址配置端口描述配置端口MTU配置端口up/down的damping时间配置端口封装为PPP配置端口FCS的位数配置端口打开payload-scrambler配置端口FCS 32,打开payload-scrambler,C2字节为0x16配置IP地址端口允许运行ISIS端口允许运行mpls配置端口描述配置端口MTU配置端口up/down的damping时间配置IP地址端口允许运行ISIS端口允许运行mpls配置路由器Router-ID配置路由器的AS号码配置静态路由配置聚合路由配置ISIS接口并将接口加入到相应的ISIS LEVEL里必选配置IS-IS的存活时间,LSP的refresh 时间为lsp-lifetime-317秒配置IS-IS的路由分发策略配置IS-IS的SPF的延迟配置IS-IS使用的路由组配置IS-IS使用TE的shortcuts配置IS-IS的Level使用wide-metric---支持TE必选配置IS-IS内部路由的管理距离配置IS-IS外部路由的管理距离配置IS-IS禁止运行Leve 1或者2配置IS-IS端口发送LSP的间隔配置IS-IS端口的Metric值配置IS-IS端口的IIH的间隔时间配置IS-IS端口的Hold时间配置IS-IS端口运行Passive模式配置OSPF接口并将接口加入到相应的OSPF AREA里必选配置OSPF端口的Metric值配置OSPF端口运行Passive模式配置OSPF支持流量工程(启用OPAQUE LSA)配置o spf端口的IIH的间隔时间配置BGP接口必选配置BGP组必选设定BGP组为EBGP或IBGP必选设定本组内的neighbor的AS号码必选设定本组内neighbor的session IP地址必选配置BGP的Hold-timer时间,Hello时间自动调整为Hold-time的1/3配置BGP的TCP进程的MSS为路径的最大值配置BGP的的路由发送延迟配置路由器纪录BGP的邻居up/down的变化配置BGP路由启用Damping算法配置BGP的组的描述配置和BGP的组内的邻居进行通讯的时候使用的本地地址配置BGP的Group内的邻居允许运行unicast 和multicast配置BGP的邻居的描述端口允许运行mpls配置将接口加到MPLS协议组里配置将接口加到LDP协议组里配置将接口加到rsvp协议组里配置名称为test的RSVP signaled LSP, 此LSP终结点为10.0.9.7在LDP TUNNEL的路由器上配置名称为test的RSVPsignaled, LSP使得LDP能够穿越RSVP LSP启用保护的LSP保护选项在RSVP协议里,启用保护选项配置本group下的BGP session的属性,inet是启用IP路由支持,此项为默认启用,inet-vpn是启用l3mbgp-vpn路由支持,启用任意非INET属性,会将inet禁用配置routing-instances配置routing-instances的VRF将逻辑接口加入到routing-instances里配置RD,确认RD在整个routing-instance里是唯一的配置RT,确认RT在整个routing-instance里是唯一的,并且同一个routing-instance里的多个PE上RT要相同配置PE-CE之间的静态路由,这里要注意,在PE-CE之间为以太网连接的情况下,一定要加一个特定的静态路由,目的地址为PE-CE之间的互联的IP子网,下一跳地址为对端CE的接口IP地址配置PE-CE之间的OSPF路由,这里要注意,一定要加一个特定的POLICY,目的是为了将从对端PE学到的VPN路由注入PE-CE之间运行的OSPF协议,使得两端的CE互相能学到对方的路由。

Juniper常用配置Juniper 常用配置一、基本操作1、登录设备系统初始化用户名是roo t,密码是空。
在用户模式下输入configure或者是edit可以进入配置模式。
2、设置用户名:set host-name EX4200。
3、配置模式下运行用户模式命令,则需要在命令前面加一个run,如:run show interface 。
4、在show 后面使用管道符号加上display set将其转换成set 格式命令show protocols ospf | display set 。
5、在需要让配置生效需要使用commit命令,在commit之前使用commit check来对配置进行语法检查。
如果提交之后,可以使用rollback进行回滚,rollback 1回滚上一次提前之前的配置,rollback 2则是回滚上 2 次提交之前的配置。
6、交换机重启:request system reboot7、交换机关机:request system halt二、交换机基本操作2.1 设置root密码交换机初始化用户名是root 是没有密码的,在进行commit 之前必须修改root 密码。
明文修改方式只是输入的时候是明文,在交换机中还是以密文的方式存放的。
实例:明文修改方式:lab@EX4200-1# top[edit]lab@EX4200-1# edit system[edit system]lab@EX4200-1# set root-authentication plain-text-password2.2 设置删除主机名实例:#"设置主机名为EX4200"lab@EX4200-1# edit system[edit system]lab@EX4200-1# set host-name EX4200#”删除命令”#lab@EX4200-1# edit system[edit system]lab@EX4200-1# delete host-name EX42002.3 开启Telnet登陆服务说明:在默认缺省配置下,EX 交换机只是开放了http 远程登陆方式,因此如果想通过telnet登陆到交换机上,必须在系统中打开telnet 服务。

Juniper简单入门介绍(配置端口,静态路由,配置防火墙策略)登陆Juniper设备后,需输入edit或者configuration 命令进入系统配置模式Juniper 系统自带命令和变量可按“空格”键补齐Juniper 系统“用户自定义”变量可按TAB键补齐一、配置端口Juniper配置端口是基于物理端口下的逻辑端口进行配置,例如set interfaces ge-0/0/5 unit 0 family inet address 192.168.1.1以上命令为ge-0/0/5口添加一个ip地址为192.168.1.1,其中unit为逻辑端口单元,范围0~16385,若再执行命令set interfaces ge-0/0/5 unit 1 family inet address 192.168.2.1则ge-0/0/5现在有两个ip分别为192.168.1.1和192.168.2.1以上命令也可以写成set interfaces ge-0/0/5.0 family inet address 192.168.1.1其中.0代表unit 0二、配置静态路由举例:现有网段125.39.91.240/28Juniper ge-0/0/0.0 设置ip为192.168.88.1set routing-options static route 0.0.0.0/0 next-hop 192.168.88.1其中0.0.0.0/0 表示任意目标地址,192.168.88.1为路由器直连网关。
再举例:让所有访问192.168.77.X的路由走192.168.99.1set routing-options static route 192.168.77.0/24 next-hop 192.168.99.1以上192.168.77段,掩码为24,而192.168.99.1为路由器直连网关。
三、配置zoneJunos基于zone开放防火墙策略,zone可以自己建立,建立之后再将需要的端口划到zone里。

Juniper防火墙基本命令Getinteth某/某查看指定接口配置信息Getmip查看映射ip关系Getroute查看路由表Getpolicyid某查看指定策略Getnrp查看nrp信息,后可接参数查看具体vd组、端口监控设置等Getpercpude查看cpu利用率信息Getpereionde查看每秒新建会话信息Geteion查看当前会话信息,后可匹配源地址、源端口、目的地址、目的端口、协议等选项Geteioninfo查看当前会话数量Getytem查看系统信息,包括当前o版本,接口信息,设备运行时间等Getchai查看设备及板卡序列号,查看设备运行温度Getcountertat查看所有接口计数信息Getcountertateth某/某查看指定接口计数信息Getcounterflowzonetrut/untrut查看指定区域数据流信息Getcountercreenzoneuntrut/trut查看指定区域攻击防护统计信息Gettech-upport查看设备状态命令集,一般在出现故障时,收集该信息寻求JTAC支持常用设置命令Setinteth某/某zonetrut/untrut/dmz/ha配置指定接口进入指定区域(trut/untrut/dmz/ha等)Setinteth某/某ip某.某.某.某/某某配置指定接口ip地址Setinteth某/某manage配置指定接口管理选项,打开所有管理选项Setinteth某/某manageweb/telnet/l/h配置指定接口指定管理选项Setinteth某/某phyfull100mb配置指定接口速率及双工方式Setinteth 某/某phylink-down配置指定接口hutdownSetnrpvdid0monitorinterfaceeth某/某配置ha监控端口,如此端口断开,则设备发生主/备切换E某ecnrpvd0modebackup手工进行设备主/备切换,在当前的主设备上执行etroute0.0.0.0/0interfaceethernet1/3gateway222.92.116.33配置路由,需同时指定下一跳接口及ip地址所有et命令,都可以通过unet命令来取消,相当于cico中的no所有命令都可以通过“TAB”键进行命令补全,通过“”来查看后续支持的命令防火墙基本配置createaccount[admin|uer](创建账户)回车输入密码:再次输入密码:configureaccountadmin(配置账户)回车输入密码:再次输入密码:2.port配置configportautooff{peed[10|100|1000]}duple某[half|full]autooff配置端口的限速和工作模式(全和半)3.Vlan配置无论是核心还是接入层,都要先创建三个Vlan,并且将所有归于DefaultVlan的端口删除:configvlandefaultdelportall清除默认VLAN 里面所有端口createvlanServercreatevlanUer创建vlanerveruer和mangercreatevlanManger定义802.1q标记configvlanServertag10configvlanUertag20configvlanMangertag30设定Vlan网关地址:configvlanServeripa192.168.41.1/24configvlanUeripa192.168.40.1/ 24configvlanMangeripa192.168.某.某/24Enableipforwarding启用ip路由转发,即vlan间路由Trunk配置configvlanServeraddport1-3tconfigvlanUeraddport1-3tconfigvlanmangeraddport1-3t4.VRRP配置enablevrrp开启虚拟路由冗余协议configurevrrpaddvlanUerVlan在VLAN里面添加vrrpconfigurevrrpvlanUerVlanaddmatervrid10192.168.6.254configure vrrpvlanUerVlanauthenticationimple-paworde某tremeconfigurevrrpvlanUerVlanvrid10priority200configurevrrpvlanUerVlanvrid10advertiement-interval15configurevrrpvlanUerVlanvrid10preempt5.端口镜像配置首先将端口从VLAN中删除enablemirroringtoport3#选择3作为镜像口configmirroringaddport1#把端口1的流量发送到3configmirroringaddport1vlandefault#把1和vlandefault的流量都发送到36.port-channel配置enableharinggrouping{port-baed|addre-baed|round-robin}howportharing//查看配置7.tp配置enabletpd//启动生成树createtpdtp-name//创建一个生成树configuretpdaddvlan{port[dot1d|emitp|pvt-plu]} configuretpdtpd1priority16384configurevlanmarketingaddport2-3tpdtpd1emitp8.DHCP中继配置enablebootprelayconfigbootprelayadd9.NAT配置Enablenat#启用natStaticNATRuleE某ampleconfignataddout_vlan_1mapource192.168.1.12/32to216.52.8.32/3 2DynamicNATRuleE某ampleconfignataddout_vlan_1mapource192.168.1.0/24to216.52.8.1-216.52.8.31PortmapNATRuleE某ampleconfignataddout_vlan_2mapource192.168.2.0/25to216.52.8.32/28 bothportmapPortmapMin-Ma某E某ampleconfignataddout_vlan_2mapource192.168.2.128/25to216.52.8.64/ 28tcpportmap1024-819210.OSPF配置enableopf启用OSPF进程createopfarea创建OSPF区域configureopfrouterid[automatic|]配置Routeridconfigureopfaddvlan[|all]area{paive}把某个vlan加到某个Area 中去,相当于Cico中的network的作用configureopfareaaddrange[advertie|noadvertie]{type-3|type-7}把某个网段加到某个Area中去,相当于Cico中的network的作用configureopfvlanneighboraddOSPF中路由重发布配置enableopfe某portdirect[cot[ae-type-1|ae-type-2]{tag}|]enableopfe某porttatic[cot[ae-type-1|ae-type-2]{tag}|]enableopforiginate-default{alway}cot[ae-type-1|ae-type-2]{tag}enableopforiginate-router-id11.SNMP配置enablenmpacce启用SNMP访问enablenmptrap启用SNMP限制createacce-profiletype[ipaddre|vlan]confignmpacce-profilereadonly[|none]配置nmp的只读访问列表,none是去除confignmpacce-profilereadwrite[|none]这是控制读写控制confignmpaddtrapreceiver{port}diableip-optionlooe-ource-route禁止散发源路由diableip-optiontrict-ource-route禁止静态源路由diableip-optionrecord-route禁用路由记录。
j u n i p e r交换机基本操作手册work Information Technology Company.2020YEARjuniper交换机操作手册信息中心网络产品开发部一、Juniper管理界面说明: (5)二、典型配置 (5)2.1系统配置模式典型配置 (5)2.1.1 configure (5)2.1.2 Monitor (5)2.1.3 Ping (6)2.1.4 telnet (6)2.1.5 Traceroute (6)2.1.6 Restart (6)2.1.7 Request (6)2.1.7.1 系统重启 (6)2.1.7.2 保存救援配置 (6)2.1.7.3 系统软件升级: (6)2.1.8 Show (7)2.1.8.1查看系统硬件信息: (7)2.1.8.1.1查看系统硬件警告: (7)2.1.8.1.2查看系统硬件环境信息 (7)2.1.8.1.3查看板卡cpu和内存情况 (8)2.1.8.1.4查看交换机硬件的注册及型号 (8)2.1.8.1.5查看插槽具体信息 (8)2.1.8.1.6查看路由引擎的CPU/内存/启动时间等信息: (8)2.1.8.2查看当前系统配置 (9)2.1.8.3 查看poe口的供电情况: (10)2.1.8.4 查看系统信息: (10)2.1.8.4.1查看系统备份配置 (11)2.1.8.4.2 查看系统保存操作的基本信息 (11)2.1.8.4.3 查看系统当前时间及启动时间 (11)2.1.8.4.4查看系统传输层连接情况 (11)2.1.8.4.5查看系统进程占用资源情况 (12)2.1.8.4.6查看系统各类软件版本情况 (12)2.2管理配置模式典型配置 (13)2.2.1配置模式介绍 (13)2.2.1.1使用set命令 (13)2.2.1.2使用edit命令 (14)2.2.2 相关注意事项 (14)2.2.3配置二层端口 (15)2.2.4 配置三层端口 (15)2.2.5配置基本接口参数: (16)2.2.6 vlan的相关配置 (16)2.2.6.1配置vlan (16)2.2.6.2 将vlan部署到接口上 (16)2.2.6.3配置三层vlan端口 (17)2.2.6.4将三层vlan接口与vlan匹配 (17)2.2.7三层协议配置 (17)2.2.7.1静态路由相关配置 (17)2.2.7.2 OSPF协议相关配置 (18)2.2.7.2.1 区域配置 (18)2.2.7.2.2 配置末节及nssa区域 (18)2.2.7.2.3 ospf类型配置 (18)2.2.7.2.4 ospf邻居参数配置 (18)2.2.8 链路聚合配置 (18)2.2.8.1 配置链路聚合参数 (19)2.2.8.2 配置接口进入链路聚合接口 (19)2.2.8.3 配置聚合接口参数 (19)2.2.9 日常保障配置 (20)2.2.9.1 密码恢复 (20)2.2.9.2 恢复出厂设置 (20)一、Juniper管理界面说明:Juniper交换机一共有两种管理界面:传统CLI界面与J-web界面。
Juniper路由器配置命令介绍Juniper路由器配置命令介绍⒈系统配置命令⑴ `set system hostname`:设置设备的主机名。
⑵ `set system domn-name`:设置设备的域名。
⑶ `set system login user`:设置设备的登录用户信息。
⒉接口配置命令⑴ `set interfaces interface-name unit logical-unit-number family inet address ip-address/subnet-mask`:配置接口的IP地址和子网掩码。
⑵ `set interfaces interface-name unit logical-unit-number family inet6 address ipv6-address/prefix-length`:配置接口的IPv6地址和前缀长度。
⑶ `set interfaces interface-name unit logical-unit-number vlan-id vlan-tagged`:配置接口的VLAN标签。
⒊路由配置命令⑴ `set routing-options static route destination next-hop`:配置静态路由。
⑵ `set protocols ospf area area-id`:配置OSPF路由协议。
⒋安全配置命令⑴ `set security zones security-zone zone-nameinterfaces interface-name`:将接口分配给安全区域。
⑵ `set security policies from-zone source-zone to-zone destination-zone policy policy-name then permit`:配置安全策略以允许数据流动。
⒌ VPN配置命令⑴ `set security ike proposal proposal-name authentication-method pre-shared-keys`:配置IKE提议的预共享密钥认证方法。
Junipe r的防火墙管理方式有许多种:http,https,telnet,ssh。
在默认的情况下Juni per防火墙都是使用这些协议的默认端口,当然你也可以根据你的需要修改成你想要的端口。
如果用户的局域网中有服务器启用H TTP服务(使用80端口),并且通过此防火墙上网,那么就必须更改防火墙的管理端口。
更改端口的另一个好处就是非法访问者不能轻易的进入防火墙的设置界面,如果别人不知道你防火墙管理使用的端口那自然是无法对你的防火墙进行更改的。
进入Web界面,在Confi gurat ion > Admin> Manage ment页面,如下图所示:
Enable Web Manage mentIdle Timeou t 这是指登陆防火墙多长时间后没有操作自动登出的选项,默认时间为10分钟,如果设置为0的话就是没有时间限制。
HTTP Port 就是通过we b访问防火墙使用的端口,强烈建议修改为非80的端口,更改后访问防火墙就需要通过htt p://IP地址:端口号,的方式来访问防火墙了。
Redire ct HTTP to HTTPS通过http访问自动跳转到htt ps,这对防火墙的安全也很重要。
通过截图可以看到,https、telnet的端口也都是可以修改的,还可以开启s sh 功能,这样远程登录操作会比t elnet安全许多。
juniper 端口映射
网络2010-05-20 16:10:58 阅读25 评论0 字号:大中小
Juniper防火墙作为网络的一道关卡,除了控制内网用户访问外网之外还可以控制外网对内网的访问,如果用户内网的服务器需要对外网发布服务的话就需要使用Juniper防火墙的网络映射功能,这里介绍两个最常用的方式MIP和VIP。
Juniper 防火墙MIP的配置
MIP(Mapped IP)是“一对一”的双向地址翻译(转换)过程。
通常的情况是:当你有若干个公网IP地址,又存在若干的对外提供网络服务的服务器(服务器对外提供IP地址),为了实现互联网用户访问这些服务器,可在Internet出口的防火墙上建立公网IP地址与服务器私有IP地址之间的一对一映射(MIP),并通过策略实现对服务器所提供服务进行访问控制。
在Network=>Interface界面下选择Untrust接口,点击edit,进入编辑界面后上方点击MIP
选择右上角的“new”
Mapped IP:公网IP地址
Host IP:内网服务器IP地址
在POLICY中,配置由外到内的访问控制策略,以此允许来自外部网络对内部网络服务器应用的访问。
Untrust的源地址选择any
trust的目的地址选择刚才建立的MIP action选择permit
第二步添加端口
添加端口
Objects -Services -Custom -NEW-
除了选择tcp udp 以及填写808 的地方其他都默认
这样一个简单的MIP就建立好了,通过访问MIP的外网IP防火墙就会自动映射到MIP指定内网IP的服务器上了。
Juniper 防火墙VIP的配置
MIP是一个公网IP地址对应一个私有IP地址,是一对一的映射关系;而VIP是一个公网IP 地址的不同端口(协议端口如:23、80、110等)与内部多个私有IP地址的不同服务端口的映射关系。
通常应用在只有很少的公网IP地址,却拥有多个私有IP地址的服务器,并且,这些服务器是需要对外提供各种服务的。
在Network=>Interface 界面下选择Untrust接口,点击edit,进入编辑界面后上方点击VIP
Same as the interface IP address 如果你只有一个外网IP地址,那就只能选这个了。
需要注意的是该ip的80、23、443端口默认情况是给防火墙占用了,如果要将这几个端口映射给内网服务器则需要修改防火墙的管理端口,将这些端口让出了。
另外再一些旧款的防火墙如,netscreen ns-204以上的型号是没有这个选项的。
Virtual IP Address 如果你公司比较有钱,有多的ip,那就可以在这里填一个ip了。
点击“new VIP services”建立一条VIP映射
Virtual Port 是外网访问的端口,这里可以随便填,没冲突就行了
Map to Service 是对于内网服务的端口号,可以自定义的
Server Auto Detection 建议不要打钩,不然比较容易出错。
最后建立一条策略允许外网对VIP对应的服务器进行访问
Untrust端的源地址为any
trust的目的地址为新建的VIP地址
action为允许
这样一个简单的VIP就建立好了,通过访问VIP的外网IP+端口号防火墙就会自动映射到VIP指定内网IP的服务器上了。