关于Vmware view中Persona的使用
- 格式:docx
- 大小:16.05 KB
- 文档页数:2

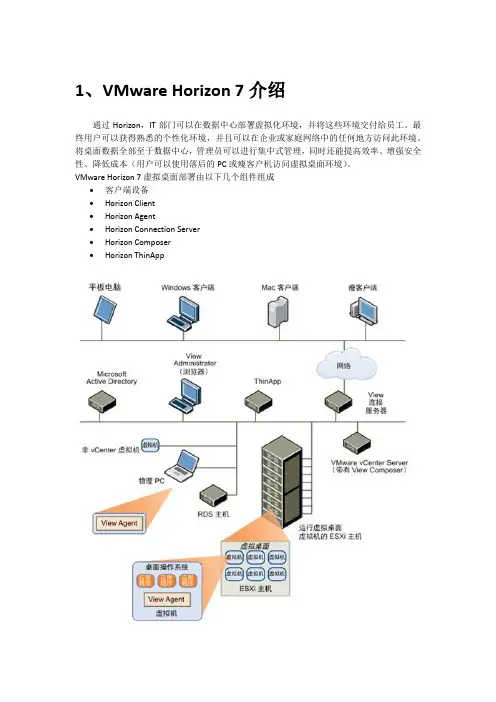
1、VMware Horizon 7介绍通过Horizon,IT部门可以在数据中心部署虚拟化环境,并将这些环境交付给员工。
最终用户可以获得熟悉的个性化环境,并且可以在企业或家庭网络中的任何地方访问此环境。
将桌面数据全部至于数据中心,管理员可以进行集中式管理,同时还能提高效率、增强安全性、降低成本(用户可以使用落后的PC或瘦客户机访问虚拟桌面环境)。
VMware Horizon 7虚拟桌面部署由以下几个组件组成•客户端设备•Horizon Client•Horizon Agent•Horizon Connection Server•Horizon Composer•Horizon ThinApp1.1客户端设备Horizon的一大优势在于,用户可以在任何地点使用任何设备访问桌面。
用户可以通过公司的笔记本电脑、家用PC、瘦客户端设备、MAC或平板访问个性化虚拟桌面。
在PC中用户只要打开Horizon Client就能显示Horizon桌面。
瘦客户端借助瘦客户端软件,管理员可以进行配置,让Horizon Client成为用户在瘦客户端上唯一能直接启动的应用程序。
将传统PC作为瘦客户端使用,可以延长硬件使用寿命。
乾颐堂数据中心1.2 Horizon ClientHorizon提供了多平台客户端,包括Windows、MAC OS、Linux、瘦客户端平台。
可以让用户通过各种硬件来访问虚拟桌面。
1.3 Horizon Agent需要在远程桌面源虚拟机、RDS服务器上安装,通过与Horizon Client连接来为用户提供连接监视,虚拟打印USB映射等功能1.4 Horizon Connection Server该服务充当客户端的连接点,Horizon Connection Server通过Windows Active Directory对用户提供身份验证,并将请求定向到相应的虚拟机、或服务器。
Horizon Connection Server还提供以了下管理功能•用户身份验证•授权用户设访问特定的桌面和池•将通过Horizon ThinApp打包的应用程序分配给特定桌面和池•管理本地和远程桌面会话乾颐堂数据中心1.5 Horizon Composer该服务可以安装在Windows版的vCenter实例上或单独的服务器(虚拟机)上。

VMware Horizon View 5.2配置手册之十四:ThinAPP软件打包及发布2013年4月目录一、安装ThinAPP软件 (3)二、打包应用程序 (5)三、发布ThinAPP应用程序 (15)一、安装ThinAPP软件1、此实验中安装ThinAPP软件的计算机使用的是一台WIN7 32位虚拟机,在安装前对虚拟机做了快照,方便还原,虚拟机准备完毕之后,开始安装2、点击“下一步”3、接受许可,点击“下一步”4、输入License Key, 点击安装5、安装结束二、打包应用程序6、安装完成后,打开“ThinApp Setup Capture”7、点击“下一步”8、点击“Prescan”9、初始扫描完成之后,开始安装应用软件,这里实验安装暴风影音10、暴风影音安装完成后,点击“Postscan”11、点击“下一步”12、点击“下一步”13、点击“下一步”14、点击“下一步”15、点击“下一步”16、点击“下一步”17、点击“下一步”18、点击“保存”19、点击“下一步”20、点击“Build”21、点击“Finish”22、暴风影音打包完成后,可以看到下面文件三、发布ThinAPP应用程序23、对文件服务器进行配置,用来存放共享ThinAPP打包好的软件,首先配置文件服务器的IP地址。
24、将文件服务器重命名并加入到域(加入到域方便权限的管理)25、新建一个文件夹,然后把这个文件夹共享并分配相应的权限,我最开始给这个文件夹分配的是域用户有读写权限,但在后面扫描文件时发现不了文件,所以有加上了everyone 的读写权限26、然后将刚才打包好的文件拷贝到共享文件夹中27、然后登陆到VIEW管理平台,然后在下图位置添加存储库28、输入刚才文件服务器的信息,然后添加29、存储库添加完成后,在清单里的Thinapp对新应用进行扫描30、找到存储库位置,然后下一步31、点击“扫描”32、扫描结束33、对应用进行分配34、将应用分配给桌面池35、在池的桌面里可以看到分配的应用(可能需要用户注销计算机,应用才能出现)36、暴风影音播放视频正常------------------------------------------------------此部分内容到此结束---------------------------------------------。

VMware vCenter Converter是一款用于虚拟机迁移和转换的工具,可以将物理机器、虚拟机、和其他格式的虚拟机互相转换。
以下是VMware vCenter Converter的基本使用手册:步骤1: 下载和安装1. 访问VMware官方网站或VMware产品下载页面,找到并下载vCenter Converter。
2. 安装vCenter Converter。
在安装过程中,按照向导指示进行配置。
步骤2: 启动vCenter Converter1. 安装完成后,启动vCenter Converter。
2. 单击"Convert Machine"。
步骤3: 选择源机器1. 在"Source System" 页面,选择要转换的源机器的类型,可以是物理机、VMware虚拟机或其他虚拟机格式。
2. 提供源机器的连接信息,例如IP地址、用户名和密码。
步骤4: 选择目标1. 在"Destination System" 页面,选择目标虚拟机的类型,可以是VMware Workstation、VMware Infrastructure虚拟机、VMware vCenter Server等。
2. 提供目标虚拟机的连接信息,例如目标主机的IP地址、用户名和密码。
步骤5: 配置转换选项1. 在"Options" 页面,配置转换选项,例如选择转换后的虚拟机硬件类型、分配的资源等。
2. 可以选择是否在转换后立即启动虚拟机。
步骤6: 定义虚拟机存储1. 在"Data to Copy" 页面,选择要复制的源机器数据。
2. 配置转换后虚拟机的存储位置。
步骤7: 安排转换任务1. 在"Ready to Complete" 页面,查看转换任务的摘要,确保设置正确。
2. 单击"Finish" 启动转换任务。
Downloads By 一、Virtual Machine介绍Virtual Machine简称VM,我们通常称呼它为虚拟机,VM的产生给我们提供了很大的方便,因为它是在一台物理的计算机上面虚拟出来的多个虚拟的计算机,这样帮助我们更加方便地去搭建实验环境,是我们学习系统一个非常好的工具。
VM除了可以帮助我们更简单的搭建虚拟的测试环境外,在很多企业中,为了节约成本充分利用服务器资源,真实的服务器都是用的VM来对用户提供服务的。
所以现在的虚拟技术不仅仅是为了测试环境的搭建,在企业应用中也越来越重要。
现在我就来讨论一下很多人在使用VM之前非常关心的两个问题:问题一:在VM中搭建测试环境测试的结果和真实的场景有没有区别啊?问题二:一台物理的计算机能开多少个虚拟机啊?首先来讨论第一个问题:我使用VM大概有五年的时间,也在VM 中做过了很多的实验,通过我使用这么多年VM和真实场景的比较得出的结论告诉我:在VM中实验的结果绝大多数(如果让我给出个比例的话,那就99%) 真实环境中完全一样,所以完全没必要为这个担心。
再来讨论第二个问题:一台物理计算机能虚拟的VM的数量是受物理计算机的硬件配置决定的。
虚拟的计算机虽然是虚拟的,但是资源的占用和工作的机制和真实的计算机是一样的,只有这样才能保证实验的结果和真实的一样的。
如果说你计算机上开三个VM,也就意味着你的有四个计算机跑在你的真机上。
当然了,你在创建VM的时候的内存的分配也直接影响你真机上VM的数量,一般来说,对于客户端的操作系统(排除Vista)一般分配128M内存就可以了,对于基本的服务器(排除Windows Server 2008)128M内存也可以了。
所以要想在你的真机上虚拟更多的VM ,除了要尽量的提升硬件的配置,还要合理的为你VM分配资源。
如果你物理计算机的内存为1GB ,基本可以开3-4个虚拟机。
二、当前VM 的产品现在做VM 软件产品的有两家:VMware 和Microsoft ,两个公司的各自的产品如下:每个厂家的虚拟机产品分客户端的系列和服务器系列。
目录第一章、部署环境介绍 (2)1. VIEW环境架构 (2)2. 实验环境架构 (3)3. 组件介绍 (3)4. 相关软件版本 (4)5. 测试环境信息表 (5)第二章、安装ESXI6.0 (6)1. 集成网卡驱动 (6)2. 安装 (6)3. 激活 (6)4. ntp (7)第三章、AD配置 (8)第四章、SQL服务器安装部署. (18)第五章、安装VCenter Server (28)1. 创建数据源 (28)2. 安装vCenter (33)第六章、安装View Composer6.2.2 (39)第七章、安装ViewConnectionServer6.2.2 (43)第八章、Horizon View基本配置 (46)1.vSphere 初始配置 (46)2.View 初始配置 (47)3.事件配置 (53)第九章、模板的安装 (55)第十章、创建桌面池 (58)第十一章、接入测试 (62)1. web访问 (62)2. PC客户端 (63)3. 安卓手机客户端 (64)附录:优化Windows 7 和Windows 8 客户机操作系统性能 (66)第一章、部署环境介绍1.VIEW环境架构2.实验环境架构连接服务器VCenter 服务器SQL 服务器Composer 服务器ESXI 服务器域控制器管理控制台3.组件介绍ESXI将物理主机虚拟为资源池vCenter Server该服务可充当联网VMware ESX/ESXi 主机的中心管理员。
vCenter Server提供了在数据中心内配置、部署和管理虚拟机的中心点。
除了将这些虚拟机作为View 桌面池的源,您还可以使用虚拟机来托管VMware View 的服务器组件,包括Connection Server 实例、Active Directory 服务器和vCenter Server 实例。
您可以将View Composer 和vCenter Server 安装在相同的服务器上,以创建链接克隆桌面池。
vmware使用手册嘿,小伙伴们,是不是每次想尝试不同的操作系统都得来回折腾电脑?别怕,今天咱们就来聊聊VMware这个神器,让你的电脑瞬间变身多系统小能手!首先,你得明白,VMware不仅仅是一个简单的虚拟机软件,它简直是操作系统界的“任意门”!无论你是想体验Windows 11的炫酷,还是怀念Windows XP的经典,亦或是对Linux世界充满好奇,VMware都能帮你一键搞定! ✨那么,咱们废话不多说,直接进入正题吧!1️⃣ 安装篇:轻松上手,告别繁琐下载VMware安装包,双击打开,跟着向导走,就像安装一个普通软件那样简单。
不过要注意哦,记得选择自定义安装,把不必要的组件勾选掉,这样既能节省空间,又能避免不必要的麻烦。
安装完成后,打开VMware,你会看到一个简洁明了的操作界面。
这时候,你是不是已经迫不及待想要创建一个虚拟机了呢?别急,咱们慢慢来。
点击“创建新的虚拟机”,选择“典型”或“自定义”安装(新手推荐典型),然后选择你要安装的操作系统类型和版本。
接下来,就是分配资源啦!内存、处理器、硬盘空间……这些都得根据你的实际需求来设置哦!2️⃣ 配置篇:量身定制,随心所欲创建好虚拟机后,别忘了给它来个“精装修”!点击“编辑虚拟机设置”,你可以在这里调整虚拟机的各项配置。
比如,想给你的虚拟机加个外接硬盘?没问题!想给它分配更多的内存?也可以!总之,只要你的电脑资源允许,想怎么配就怎么配!还有一个超级实用的功能,那就是“共享文件夹”!通过设置,你可以让虚拟机和宿主机之间共享文件,再也不用为了传输文件而烦恼了!3️⃣ 操作篇:玩转虚拟机,轻松自如配置好虚拟机后,就可以开始愉快地玩耍了!点击“开启此虚拟机”,你会看到一个全新的操作系统界面在眼前展开。
就像操作一台真实的电脑一样,你可以在这里安装软件、浏览网页、处理文档……一切操作都如同行云流水般自然!不过,别忘了给虚拟机定期打补丁、更新驱动哦!毕竟,它也是一个独立的操作系统嘛!说到这里,你是不是已经对VMware爱不释手了呢?别急,我还有个小秘密要告诉你!争议话题:有人认为,虚拟机虽然方便,但会占用大量的系统资源,影响宿主机的性能。
VMWare Horizon 7 安装指南VMware Horizon 7 7.5目录Horizon 7 安装61 服务器组件的系统要求7Horizon 连接服务器的要求7Horizon Administrator 要求9View Composer 的要求92 客户机操作系统的系统要求12Horizon Agent 支持的操作系统12独立Horizon Persona Management 支持的操作系统13远程显示协议和软件支持133 在IPv6 环境中安装Horizon 7 19在IPv6 环境中设置Horizon 7 19IPv6 环境中支持的vSphere 数据库和Active Directory 版本20IPv6 环境中Horizon 7 Server 支持的操作系统20IPv6 环境中桌面和RDS 主机支持的Windows 操作系统21IPv6 环境中支持的客户端21IPv6 环境中支持的远程协议21IPv6 环境中支持的身份验证类型22IPv6 环境中其他受支持的功能224 以FIPS 模式安装Horizon 7 25以FIPS 模式安装Horizon 7 的概述25FIPS 模式的系统要求265 准备Active Directory 27配置域和信任关系27为远程桌面创建OU 28为Kiosk 模式客户端帐户创建组织单位和组29创建用户组29为vCenter Server 创建用户帐户29为独立的View Composer Server 创建用户帐户29为View Composer AD 操作创建用户帐户30为即时克隆操作创建用户帐户31配置受限制的组策略31使用Horizon 7 组策略管理模板文件32为智能卡身份验证准备Active Directory 32在SSL/TLS 中禁用弱密码356 安装View Composer 37准备View Composer 数据库37为View Composer 配置SSL 证书45安装View Composer 服务45对从View Composer 进行的vCenter 和ESXi 连接启用TLSv1.0 47为View Composer 配置基础架构487 安装Horizon 连接服务器50安装Horizon 连接服务器软件50安装Horizon 连接服务器的前提条件51使用新配置安装Horizon 连接服务器51安装Horizon 连接服务器副本实例58配置安全服务器的配对密码64安装安全服务器65Unified Access Gateway 设备优于VPN 的方面72Horizon 连接服务器的防火墙规则73使用备份配置重新安装Horizon 连接服务器74Microsoft Windows Installer 命令行选项76使用MSI 命令行选项静默卸载Horizon 7 组件778 为Horizon 7 Server 配置TLS 证书80了解Horizon 7 Server 的TLS 证书80TLS 证书设置任务概述82获取CA 签发的TLS 证书83配置Horizon 连接服务器、安全服务器或View Composer 以使用新TLS 证书84配置客户端端点以信任根证书和中间证书89为服务器证书配置证书撤消检查91配置PCoIP 安全网关以使用新TLS 证书92将Horizon Administrator 设置为信任vCenter Server 或View Composer 证书96使用CA 签发的TLS 证书的优势96Horizon 连接服务器和安全服务器上的证书问题故障排除969 首次配置Horizon 7 98为vCenter Server、View Composer 和即时克隆配置用户帐户98首次配置Horizon 连接服务器103配置Horizon Client 连接114替换Horizon 7 服务的默认端口121调整Windows Server 设置以支持您的部署12710 配置事件报告129为Horizon 7 事件添加数据库和数据库用户129为事件报告准备SQL Server 数据库130配置事件数据库130为Syslog 服务器配置事件日志记录132Horizon 7 安装《Horizon 7 安装指南》介绍如何安装VMware Horizon® 7 服务器和客户端组件。
vmware remote console 使用方法-回复VMware Remote Console(简称VMRC)是VMware vSphere的一个功能,允许用户通过远程控制台访问和管理虚拟机。
VMRC提供了许多强大的功能,包括图形化的界面、虚拟设备的访问和配置,以及许多其他管理功能。
在本文中,我们将一步一步地回答有关VMware Remote Console使用方法的问题。
第一步:下载和安装VMware Remote Console1.要使用VMware Remote Console,首先需要从VMware官方网站下载它。
您可以访问VMware官方网站并在搜索栏中输入“VMware Remote Console”进行搜索。
2.找到适用于您操作系统的版本,并点击下载按钮。
请确保选择与您的操作系统完全兼容的版本。
3.下载完成后,运行安装程序并按照提示进行安装。
第二步:启动VMware Remote Console1.安装完成后,在您的计算机上可以找到VMware Remote Console的快捷方式。
单击该图标以启动VMRC。
2.在VMware Remote Console启动之后,您将看到一个登录界面。
输入您的vSphere服务器的地址、用户名和密码,并点击“登录”按钮。
第三步:连接和浏览虚拟机1.一旦成功登录,您将看到一个虚拟机管理界面。
这里列出了您可用的所有虚拟机。
2.在这个界面上,您可以通过单击虚拟机名称来选择要连接的虚拟机。
3.一旦选择了虚拟机,您将看到虚拟机的控制台界面。
4.在控制台界面上,您可以像在本地计算机上一样操作虚拟机。
您可以点击键盘、鼠标和虚拟机的图形界面等。
第四步:使用VMRC的高级功能1.VMRC提供了许多高级功能,允许您在远程管理虚拟机时更加灵活和方便。
以下是一些常用的高级功能:-按下“Ctrl+Alt+Ins”组合键可以发送Ctrl-Alt-Del命令到虚拟机。
View User Profile MigrationVMware Horizon 6.0 This document supports the version of each product listed andsupports all subsequent versions until the document isreplaced by a new edition. To check for more recent editionsof this document, see /support/pubs.EN-001487-00View User Profile Migration2 VMware, Inc.You can find the most up-to-date technical documentation on the VMware Web site at:/support/The VMware Web site also provides the latest product updates.If you have comments about this documentation, submit your feedback to:docfeedback@Copyright © 2014 VMware, Inc. All rights reserved. Copyright and trademark information .VMware, Inc.3401 Hillview Ave.Palo Alto, CA ContentsView User Profile Migration51User Profile Migration Overview7Best Practices for Running a V1 to V2 Profile Migration8Prerequisites for Running the Profile Migration Utility8migprofile.exe Command Usage9Migration Configuration File10Index15VMware, Inc. 3View User Profile Migration4 VMware, Inc.View User Profile MigrationView User Profile Migration describes how to use the View profile migration command-line utility to migrate Windows XP user profiles, which support the Windows V1 profile format, to Windows 7, Windows 8 or 8.1, or Windows Server 2008 R2 user profiles, which support the V2 format.Intended AudienceThis information is intended for View administrators who want to migrate V1 profiles on physicalcomputers or virtual machines to V2 profiles in a View environment. The information is written forWindows system administrators who are familiar with XML and the View Persona Management feature. VMware, Inc. 5View User Profile Migration6 VMware, Inc.User Profile Migration Overview1 The standalone command-line utility, migprofile.exe, migrates V1 user profiles, supported by WindowsXP, to V2 user profiles, supported by Windows 7, Windows 8 or 8.1, or Windows Server 2008 R2. The utility is intended for users who are migrating from Windows XP computers in any physical or virtualenvironment to Windows 7, Windows 8 or 8.1, or Windows Server 2008 R2 virtual machines in a Viewenvironment.After you migrate the user profiles, the View Persona Management feature integrates the V2 profiles on the View machines. When users log in to their new desktops, they are presented with the same personal settings and data that they used on Windows XP.You can migrate V1 profiles from the following source locations:n Remote profile repository on a CIFS network share.The utility can migrate multiple remote V1 profiles to V2 profiles on the same CIFS network share or adifferent CIFS share.n User's local V1 profile on a Windows XP computer.The utility can migrate a single local profile on a computer. To migrate multiple users' local profiles,you can write a script that directs the utility to execute in batch mode.The source Windows XP environment can comprise physical computers or virtual machines. The sourceenvironment does not have to be configured with a remote profile management solution such as ViewPersona Management or Windows roaming profiles. If no remote profile management solution is in place, you must specify users' local V1 profiles as the source profile paths.The profile migration utility has the following features:n The destination of the migrated V2 profiles must be a remote profile repository that resides on a CIFS network share. In View, this CIFS path must be configured as the View Persona Management remoteprofile repository.n You run the migration tool as a standalone utility. View components do not have to be running duringa profile migration.n The migration utility performs a one-time migration of user profile data and registry settings.The utility does not merge V1 and V2 profiles after the V2 profiles are created. If users continue to usetheir Windows XP computers after the migration, the new V1 profile data that is generated on theirlegacy computers remains separate from the migrated V2 profiles.n You can control the source and destination of the migration, and specify which folders and registry keys to migrate, by using command-line arguments and configuring settings in a migrationconfiguration file.VMware, Inc. 7View User Profile MigrationThis chapter includes the following topics:n“Best Practices for Running a V1 to V2 Profile Migration,” on page 8n“Prerequisites for Running the Profile Migration Utility,” on page 8n“migprofile.exe Command Usage,” on page 9n“Migration Configuration File,” on page 10Best Practices for Running a V1 to V2 Profile MigrationFollowing best practices ensures the success of a profile migration.n In View, configure Windows 7, Windows 8 or 8.1, or Windows Server 2008 R2 desktop pools for your users before you begin the profile migration. Configure View Persona Management for the desktoppools.In particular, configure a CIFS network share as the View Persona Management remote profilerepository. The CIFS network share will be the destination path in the migration.n In general, run the migration utility on a Windows 7 or later 32-bit system, because most V1 profiles are 32-bit.n If you can, run the migration utility on the same template or virtual machine image that the destination View desktop pool will use. Folders and files in the base image's default profile are then migrated to theV2 user profiles.n If a user must continue to use the legacy Windows XP system after a migration, configure redirected folders for both the legacy Windows XP system and the Windows 7, Windows 8 or 8.1, or WindowsServer 2008 R2 View machine. This approach allows the user to access files from both systems. Prerequisites for Running the Profile Migration UtilityBefore you run the migprofile.exe utility, verify that your legacy and destination environments satisfyspecific prerequisites.n Run the migration utility on a Windows 7, Windows 8 or 8.1, or Windows Server 2008 R2 physical computer or virtual machine.n Log in to the system as a local administrator.n Verify that the system on which you run the utility has network access to the CIFS network shares that contain the source V1 path and destination V2 path.n Verify that the user account that runs the utility is a local administrator on the destination CIFS network share.n If the user account that runs the utility does not have full ownership of the user profiles that are migrated, specify the /takeownership option with the utility.This option passes ownership of the user profile folders to the utility during the migration. Ownershipis returned to the users after the migration is completed.n Ensure that the users whose profiles are being migrated are not logged in to their Windows XP systems when you initiate the migration.If a user is in an active session during the migration, the migration might fail.n Ensure that users do not start using their Windows 7, Windows 8 or 8.1, or Windows Server 2008 R2 desktops before the migration is completed.When users start using their View desktops, View Persona Management creates V2 profiles for theusers. If a V2 profile already exists before the migration runs, the utility leaves the existing V2 profile inplace and does not migrate the legacy V1 profile.8 VMware, Inc.Chapter 1 User Profile Migration Overviewmigprofile.exe Command UsageThe syntax of the migprofile.exe command controls the migration of V1 profiles to V2 profiles.When you install View Agent with the View Persona Management setup option on a virtual machine, themigprofile.exe utility is installed in the install_directory\VMware\VMware View\Agent\bin directory.When you install the standalone View Persona Management software on a system, the migprofile.exeutility is installed in the install_directory\VMware\VMware View\Persona Management directory.From a Windows command prompt, use the following syntax for the migprofile.exe command:migprofile.exe [/s:source_path] [/t:target_path] [/r-:] [/takeownership] [config_file]Table 1‑1. migprofile.exe Command-Line OptionsOption Description/s:source_path The path name of the source V1 profile path to be migrated.Use the wildcard '*' to indicate that all child folders should be migrated.This option is mandatory. You must specify the source path either on the commandline or in the migration configuration file. If you specify the source path in both places,the command-line value is used./t:target_path Path name of the target V2 profile path.The migration utility creates a folder under this path with the same name as the sourceV1 profile folder, appended by .V2.This option is mandatory if the source path is a local V1 profile on a computer.This option is optional if the source path is located on a CIFS network share. In thiscase, if you do not specify a target path, the V2 profile folder is created as a sibling ofthe source V1 profile folder on the same CIFS network share./r-:Disables registry migration.This option is optional./takeownership Causes the migprofile.exe utility to take ownership of the user profile during themigration.Use this option if the administrator account that runs the migration utility does nothave ownership of the user profile to be migrated. Typically, only the user andSYSTEM accounts have ownership of a user profile.This option is optional. When you use this option, the original ownership of the userprofile is restored after the migration is completed.config_file Name of the migration configuration file.This option is optional. Command-line options take precedence over thecorresponding settings in the configuration file if you specify values in both places.migprofile.exe Command-Line ExamplesThe following example migrates all V1 user profiles under the \\file01\profiles folder to the samelocation. V2 user profiles are created with .V2 appended to each user's root folder name. The utility takesownership of the user profiles during the migration:migprofile.exe /s:\\file01\profiles\* /takeownershipThe following example uses the migration settings that are specified in the migconfig.xml file:migprofile.exe migconfig.xmlThe following example migrates the V1 profile for the user ts115 on the computer devvm-winxp to the remote path \\file01\profiles. The utility takes ownership of the user profiles during the migration:migprofile.exe /s:\\devvm-winxp\c$\documents and settings\ts115/t:\\file01\profiles\ /takeownershipVMware, Inc. 9View User Profile MigrationMigration Configuration FileYou can specify a migration configuration file as a command-line option with the profile migrationcommand. In the configuration file, you can specify settings such as the source and target profile locations, which are passed to the profile migration utility at runtime.The migration configuration file is optional. You can override settings that you specify in the configuration file by typing the corresponding command-line options.Migration Configuration File FormatThe migration configuration file is in XML format, which makes the file easy to read, edit, and extend. Fordefinitions of the settings, see “Migration Configuration File Settings,” on page 10.<migconfig takeownership="takeownership_value"><!-- specify the source V1 profiles to be migrated --><source><!-- specify the location of user profiles to be migrated --><profilepath>source_profile_path</profilepath></source><!-- specify the target destination of converted V2 profiles --><target><profilepath>target_profile_path</profilepath></target><!-- specify other profile migration settings --><migration><!-- migration settings for profile folders and files --><profile><!-- by default, all top-level profile folders are included --><!-- except 'Cache', 'History', & 'Local AppData' --><includeolders>included_profile_folders</includefolders><excludefolders>excluded_profile_folders</excludefolders></profile><!-- migration settings for profile registry hive --><registry [disabled="1"]><!-- by default, no registry keys are converted --><includekeys>included_registry_keys</includekeys><excludekeys>excluded_registry_keys</excludekeys></registry></migration></migconfig>Migration Configuration File SettingsIn the migration configuration file, you can specify settings that control the profile migration. Some settings correspond to the migprofile.exe command-line options. Additional settings let you configure other aspects of a migration.For example, you can specify folders to include or exclude and registry keys to include or exclude.10 VMware, Inc.Chapter 1 User Profile Migration OverviewTake Ownership of the User ProfileSet the takeownership setting to "1" to cause the migprofile.exe utility to take ownership of the user profile during the migration. Use the following format:<migconfig takeownership="1">......</migconfig>If you do not specify this setting, the value defaults to "0", which turns off the takeownership behavior. Source V1 Profile PathUse the source_profile_path setting to specify the path name of the source V1 profile path to be migrated: <source><profilepath>source_profile_path</profilepath></source>If you do not specify the source profile path in a command-line option, you must specify this setting in the migration configuration file. You can specify a single user's profile path or use the * wildcard to migrate all profiles under a folder.The following example specifies a single remote user profile:<source><profilepath>\\file01\profiles\ts115</profilepath></source>The following example specifies a single user's local profile on an existing machine:<source><profilepath>\\devvm-winxp\c$\documents and settings\ts115</profilepath></source>The following example specifies all remote user profiles under a remote shared folder:<source><profilepath>\\file01\profiles\*</profilepath></source>Target V2 Profile PathUse the target_profile_path setting to specify the path name of the target V2 profile after the migration:<target><profilepath>target_profile_path</profilepath></target>The utility appends .V2 to the root folder name of the target V2 profile.Folders to IncludeUse the included_profile_folders setting to list the V1 profile folders to include in the migration.By default, all top-level shell folders except Cache, History, and Local AppData are migrated. If you use this setting, only the specified folders are migrated.Format this setting as a comma-separated list. To specify folders, use the folder identifiers shown in Table 1-2. Do not use folder names.View User Profile MigrationThe following example specifies the My Documents, Desktop, Start Menu, and Network Neighborhoodfolders to migrate:<includefolders>Personal, Desktop, Start Menu, NetHood</includefolders>Table 1‑2. Folder Identifiers Used in the Migration Configuration FileFolder Identifiers Windows Folder NamesAppData\Application DataCache\Local Settings\Temporary Internet FilesCookies\CookiesDesktop\DesktopFavorites\FavoritesHistory\Local Settings\HistoryLocal AppData\Local Settings\Application DataMy Music\My Documents\My MusicMy Pictures\My Documents\My PicturesMy Video\My Documents\My VideosNetHood\NetHood (Network Neighborhood)Personal\My DocumentsPrintHood\PrintHood (Printer Neighborhood)Programs\Start Menu\ProgramsRecent\RecentSendTo\SendToStart Menu\Start MenuStartup\Start Menu\Programs\StartupTemplates\TemplatesFolders to ExcludeUse the excluded_profile_folders setting to list the V1 profile folders to exclude from the migration. This list can exclude folders that are included by default and folders that reside under folders in theincluded_profile_folders list.Format this setting as a comma-separated list. To specify folders, use the folder identifiers shown inTable 1-2. Do not use folder names.The following example specifies the My Documents and My Pictures folders to exclude from migration: <excludefolders>Personal, My Pictures</excludefolders>Disable Registry MigrationTo disable registry migration, set the optional disabled setting to "1". Use the following format:<registry disabled="1"></registry>Registry Keys to IncludeUse the included_registry_keys setting to list registry keys to include in the migration.Chapter 1 User Profile Migration OverviewBy default, the all registry keys in the user registry hive are migrated to the V2 profile. If you use thissetting, only the specified registry keys are migrated.Format this setting as a comma-separated list. To specify registry keys, use the following key identifiers: n Consolen Control Paneln Identitiesn Keyboard Layoutn Printersn Softwaren SystemThe following example specifies the Console and System keys:<includekeys>Console, System</includekeys>Registry Keys to ExcludeUse the excluded_registry_keys setting to list registry keys to exclude from the migration. You can exclude keys that are included by default, keys that reside within the included_registry_keys list, and subkeys of top-level keys.Format this setting as a comma-separated list. To specify registry keys, use the key identifiers shown in “Registry Keys to Include,” on page 12.Example Migration Configuration FilesYou can control a migration by editing settings in a migration configuration file.Example: Migrating from a Remote Profile PathThe following example file converts all remote V1 profiles that reside under the \\file01\profiles folder to V2 profiles in the same location.The migrated V2 profiles use the same user names as the V1 profiles. A .V2 extension is appended to the users' root folders. All folders except Local Settings are migrated. User registry keys are migrated.<migconfig version = "0.1"><!-- specify the source V1 profiles to be migrated --><source><!-- specify the location of user profiles to be migrated --><profilepath>\\file01\profiles\*</profilepath></source><!-- specify the target destination of converted V2 profiles --><target><profilepath>\\file01\profiles</profilepath></target></migconfig>Example: Migrating from a User's Local ProfileThe following example file converts a local V1 profile for the user ts115. The utility migrates the local profile on the machine devvm-winxp to a remote V2 profile under the \\file01\profiles folder.View User Profile MigrationOnly files from the My Documents, Desktop, and Start Menu profile folders are migrated. The user's registry keys are migrated.<migconfig version = "0.1"><!-- specify the source V1 profiles to be migrated --><source><!-- specify the location of user profiles to be migrated --><profilepath>\\devvm-winxp\c$\documents and settings\ts115</profilepath></source><!-- specify the target destination of converted V2 profiles --><target><profilepath>\\file01\profiles</profilepath></target><!-- specify other profile migration settings --><migration><!-- migration settings for profile folders and files --><profile><!-- by default, all top-level profile folders are included --><!-- except 'Cache', 'History', and 'Local AppData' --><includefolders>Personal, Desktop, Start Menu</includefolders></profile></migration></migconfig>IndexMmigprofile.execommand usage 9syntax 9migprofile.exe utility, prerequisites 8VV1 to V2 migrationbest practices 8configuration file 10configuration file settings 10example configuration files 13overview 7View persona management 5View User Profile Migration。
VMWare虚拟化管理员平台管理手册目录1管理平台登录介绍 (3)1.1管理平台客户端登陆 (3)2创建虚拟机模板 (7)2.1新建虚拟机 (7)2.2虚拟机创建完毕后为虚拟机安装操作系统。
(19)2.3优化模板 (39)2.4XP系统的优化 (68)2.5优化工具优化 (79)2.6语音室管理员需要执行的特殊操作 (79)2.7执行快照 (84)2.8生成模板 (86)3发布虚拟机 (92)3.1发布虚拟机 (92)3.2重构和刷新虚拟机 (112)4管理员部分安装文件获取和系统登陆 (118)1管理平台登录介绍1.1 管理平台客户端登陆1、下载管理客户端vsphere client使用网页输入以下地址:https://如下图1所示点击“继续访问”。
注:如果本地计算机【指您现在操作的计算机,以下称本地计算机】。
图1登陆结果为:图2 ,点击图中的下载vsphere client ,即可下载您想要的客户端。
图2选择您需要保存的路径,此处不同的下载工具设置保存路径的方法不同,此处视自己的情况而定。
图3下载完成后如图4 ,双击运行安装。
图4安装完成后的如图:双击运行2、登陆平台及管理以下是实训室管理员拥有的账户:sxsadmin 、sxsadmin2 、sxsadmin3 ,密码为admin2014 Ip地址或者名称栏内填写vcenter的名称:或者ip地址:10.0.7.123弹出证书问题时点击安装证书并忽略。
实训室的管理员账户登陆后所见的管理控制台的界面如图,只显示了超级管理员授权的桌面资源池等。
在该资源池中,管理员具有全部的权限,包括创建虚拟机等。
切换到虚拟机和模板视图:图中的管理员只能看见授权的教室的文件夹的内容。
在该文件夹下具有管理员的权限。
切换视图为存储和网络视图:管理员只能看见shixun4的存储,并且只有简单的文件处理及浏览分配空间的权限。
网络的视图中:管理员只能看见属于自己授权范围内的网络,并且不能更改,只能使用。
VMware GPU虚拟化部署Horizon Suite与NVIDIA公司GPU显卡虚拟化技术,包括vSGA与vDGA两种使用及配置方法。
而不使用物理显卡的显示模式为sVGA。
一、vSGA、vDGA、sVGA的概念1、vSGA 指“Virtual Shared Graphics Acceleration”(虚拟共享图形加速)。
vSGA的功能是利用在ESXi 主机中本机安装的物理GPU(图形处理单元,也称为显卡)为众多虚拟桌面提供硬件加速3D 图形。
即1块显卡的所有GPU 能被多个虚拟机使用。
2、vDGA 是VMware View 提供的专有硬件图形加速功能,用于为需要独立GPU 的使用情形提供高端工作站显卡。
使用vDGA 时,利用VMware DirectPathI/O 将安装在底层主机中的图形适配器分配给虚拟机。
将独立GPU 分配给虚拟机会让整个GPU 专供该虚拟机使用。
即1块显卡拥有多个GPU,每个GPU只能被1台虚拟机所使用。
3、sVGA 是与VMwareTools 一同安装在Windows 7 虚拟桌面上的VMware WDDM(Windows 显示驱动程序模型)驱动程序。
不使用任何硬件显卡资源,它容易与vSGA 混淆,因为二者的缩写字母和字母排列都非常接近。
二、vSGA的安装和配置1、软硬件环境服务器主机:STD宝德16路服务器GPU显卡:NVIDIA Grid K2VMware:ESX 5.5 (VMware vCenter 5.5 VMware Horizon View 6.1)显卡驱动程序:虚拟桌面操作系统:Windows 7 64位2、vSGA安装步骤1、登陆到NVIDIA驱动官网下载ESXi主机上显卡的驱动,选择好显卡的型号和主机的型号后下载。
2、打开ESXi主机的SSH功能,将下载好的驱动上传到EXSi主机上。
3、将EXSi主上的所有虚机关闭选择”进入维护模式”后再进行显卡驱动的安装。
vmos虚拟机使用流程下载温馨提示:该文档是我店铺精心编制而成,希望大家下载以后,能够帮助大家解决实际的问题。
文档下载后可定制随意修改,请根据实际需要进行相应的调整和使用,谢谢!并且,本店铺为大家提供各种各样类型的实用资料,如教育随笔、日记赏析、句子摘抄、古诗大全、经典美文、话题作文、工作总结、词语解析、文案摘录、其他资料等等,如想了解不同资料格式和写法,敬请关注!Download tips: This document is carefully compiled by theeditor. I hope that after you download them,they can help yousolve practical problems. The document can be customized andmodified after downloading,please adjust and use it according toactual needs, thank you!In addition, our shop provides you with various types ofpractical materials,such as educational essays, diaryappreciation,sentence excerpts,ancient poems,classic articles,topic composition,work summary,word parsing,copy excerpts,other materials and so on,want to know different data formats andwriting methods,please pay attention!1. 下载和安装 vmos 虚拟机在官方网站或其他可信的应用商店中搜索 vmos 虚拟机,并下载安装到你的设备上。
关于Vmware view中Persona的使用
概述
登录windows时候只加载最基本的文件(如用户配置),当需要时从存储下载View desktop所需要的文件。
persona每隔一段时间扫描一次本机客户端(默认10分钟),如果用户个人配置如果发生改变,则与远端配置库同步。
登出时只有自上一次配置同步后,个人配置发生变化时,才执行配置同步。
传统的windows配置漫游,在用户登录时加载拷贝所有用户配置文件到本地,在用户登出时拷贝到远端。
缺点是并发量大时会产生严重的效率问题,使用AD管理用户配置文件可能会对其他用户造成影响。
Persona的好处:
1、可以进行windows配置漫游,而且不依赖于Windows AD域控,可以完全在view控制下实现,同时view控制范围内发生的用户配置信息变化也不会扩散到AD域中
2、可以使用第三方的虚拟配置管理工具
3、使用户本地的配置保存在一个单独的池中
4、在能支持View的环境下,Persona没有额外的硬件需求(需保证View服务器到文件服务器之间有至少1G链路)
部署详解
Persona是一个可选特性,要使用它必须购买View Premier版本。
安装Persona主要有以下5个步骤:
1、在view能访问的远端NAS上建立一个文件夹(要求为NTFS),专门用于存储用户配置文件,路径为:\\\VPRepository\%username%.%userdomain%,其中%username%.%userdomain%为Persona自动加在末尾的,为用户的名称(可为creator配置专有权限),建立文件夹的时候不用照抄,只要保证有足够的空间即可。
2、安装View agent时选中persona选项,在进行View desktop模板的制作时,必须安装view agent,且安装view agent时必须选中persona选项。
使用物理主机或者view桌面运行在本地模式时Persona不能启用。
如果模板预制的是xp系统,xp系统中的Microsoft User Profile Hive Cleanup (UPHClean)服务必须在开机时启用,Persona才可用。
3、制作Persona管理模板。
主要指在模板view桌面上进行的若干配置工作。
a、先在虚机模板上找到ADM文件,C:\Program Files\VMware\VMware View\Agent\bin\ViewPM.adm
b、使用gpedit.msc进入组策略编辑界面,计算机配置->管理模板,右键,添加删除模板,浏览并选中ViewPM.adm,确认添加。
4、设置组策略组策略中打开本地计算机->管理模板->VMware View Agent Configuration->Persona Management,打开Roaming & Synchronization文件夹,双击Manage user persona,然后选Enable,设置扫描本机配置变化的间隔。
双击Persona repository location,并确定,键入第一步中设置好的建于NAS上的存放用户配置文件的目录地址(地址格式:\\\UserProfilesRepository\%username%),然后确认。
后面继续配置其他的组策略选项。
一切其他的组策略选项:
*remove local persona at log off,登出时删除自登入起形成的个人配置文件,默认disable,*roam local settings folders,为用户保存下来local settings文件夹的内容,默认disable,local settings里面可能涉及一些outlook的存档,pst文件可能比较大,通过网络交换将严重影响性能,且邮箱系统本身就有很好的可用性和冗余性,建议保持disable。
*files and folders to preload,指在开机时和个人配置文件一起下载到view终端上的文件,默认情况下只有startup文件夹,除非用户每次开机立即使用的文件,否则不建议添加更多的路径。
*Folder Redirection Group Policy,目录重定向,格式为\\UNCpath\share\%username%.%userdomain%\My Documents,即每个用户从属于不同的文件夹,文件夹以用户的用户名命名,关于文件夹的权限,需参考windows的配置,可为creator 配置专有权限。
5、使用经3、4建立的虚拟机模板,创建虚拟桌面池,并分配给用户使用。
以上为Persona的基本概述及安装过程叙述,vmware建议,虚拟化桌面单独管理使用,避免与物理机的AD域之间形成交互,而对原有的AD域造成影响。