Beilstein简易使用手册
- 格式:pdf
- 大小:958.17 KB
- 文档页数:6
Beilstein/Gmelin 数据库使用指南一、内容介绍Beilstein:物质信息:900多万种包含了结构和参考文献的化合物信息;数以千万条相关的化学性质和生物活性信息,其中包括了药理学、环境病毒学、转移、分布及最终结果等一系列数据。
反应信息:近1000多万条可供检索的化学反应信息;制备物质所需的详细资料以及特定的反应途径。
引用:200万种(篇)参考文献;超过80万条摘要和标题,根据1980年以来的主要的有机化学文献进行索引。
收集的化合物的时间跨度从1772年至今,3个月更新一次。
Gmelin:涵盖无机和金属有机化合物相关的理化性质、结构数据、制备过程以及相关反应、详细的包括地质学,矿物学,冶金学在内的信息资源;化学结构相关的化学、物理等方面的性质;化学反应相关的各种数据;详细的药理学,环境病毒学,生态学等最全面的信息资源;时间跨度从1771年至今;精选180种权威杂志。
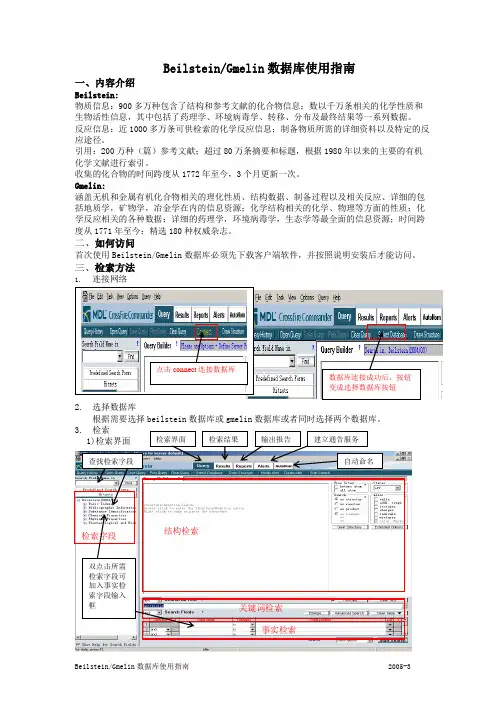
二、如何访问首次使用Beilstein/Gmelin 数据库必须先下载客户端软件,并按照说明安装后才能访问。
三、检索方法1. 连接网络2. 选择数据库根据需要选择beilstein 数据库或gmelin 数据库或者同时选择两个数据库。
点击connect 连接数据库数据库连接成功后,按钮变成选择数据库按钮a. 关键词检索:选择检索字段(包括全字段和题录字段);输入检索词,最多可输入6个,多个检索词之间可以进行布尔组配;点击右下角的start search 或敲回车,系统开始检索。
b. 事实检索: 分为两种,表格式检索和高级检索1.表格式检索:①双击fact editor,弹出表格编辑窗口;②在检索字段代码输入框中输入字段代码,可直接输入,也可双击左上方search field 中的任意字段 ,将该字段名加入检索字段代码输入框。
③在检索词输入框中输入相关化合物性质的数据、关键词等检索词,也可以通过点击索引字典(List )进行选定;④执行检索。
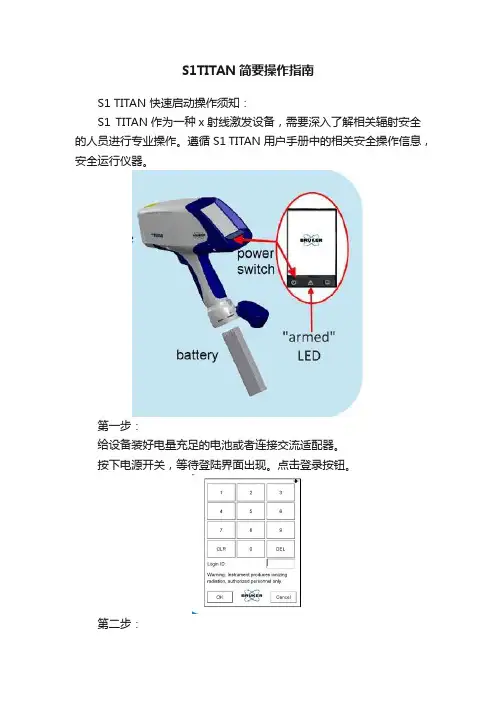
S1TITAN简要操作指南S1 TITAN 快速启动操作须知:S1 TITAN作为一种x射线激发设备,需要深入了解相关辐射安全的人员进行专业操作。
遵循S1 TITAN用户手册中的相关安全操作信息,安全运行仪器。
第一步:给设备装好电量充足的电池或者连接交流适配器。
按下电源开关,等待登陆界面出现。
点击登录按钮。
第二步:输入开机操作密码,登陆仪器。
你首先会看到安全辐射警告信息,然后扣动并释放扳机,继续进行。
第三步:在APPLICATION菜单下选择与被测样品型号所匹配的应用模式。
默认状态下,S1 TITAN 会自动匹配选择合适的测量方法,设置及显示。
第四步:将仪器头部贴近被测样品,确保检测窗口被样品完全覆盖。
警示灯(见第一步)为黄色时表示红外近距离传感器被覆盖(可以激发X射线)。
可以扣动扳机开始测量。
警告: 此刻有x射线产生。
得到满意的测量结果时,便可松开扳机停止测量。
警告高强度X射线不要把身体任何部分暴露于射线之下紧急情况下,或者是设备丢失、被盗、损坏,请立刻与Bruker总部联系(800)466-5323或(509)783-9850.并且及时与当地相关执法机构联系,告知具体情况。
注意事项·S1 TITAN只能由受过专业指导与培训的专业人员来操作。
·红色射线灯亮时,请注意X射线穿越方位,测量时避免将身靠近检测区域,尤其是眼睛和手部。
·不要手持样品至窗口处进行测量;使窗口靠近样品来检测。
·红外近距离传感器位于设备头部,目的是防止在没有被测样品时产生X射线。
请不要损坏这个重要安全设置,否则会使操作人员曝露于射线之下。
·怀孕女性使用S1TITAN应该注意:错误操作与使用会导致辐射暴露,这对胎儿生长有害。
·通过相关机构,可以购买一个合适的剂量计,在使用S1 TITAN进行测量时可以配套使用。
·操作人员对设备安全要负责。
使用时,设备应该由操作人员负责。
德国BE-Compact常规四项操作步骤一. BE全自动血凝仪检测原理检测方法:凝固法、发色底物法、免疫法等(具体可用方法数由仪器型号决定)检测原理:光电磁原理常规四项(PT、APTT、TT、FIB)检测方法:凝固法二.仪器开机步骤1.检查蒸馏水量、废液量。
2.依次打开稳压电源、打印机电源、仪器电源、主机电源、终端计算机电源。
3.仪器自检通过后,无异常提示,进入升温状态。
4.达到温度后仪器提示可以进行工作。
三.试剂准备步骤(Biopool试剂)1.PT:干品,用4ml蒸馏水溶解,室温放置10-15分钟。
APTT:CaCl2,液体,直接预温使用;APTT试剂,液体,直接预温使用。
TT:干品,用4ml蒸馏水溶解,室温放置10-15分钟。
FIB:Buffer(咪唑缓冲液),液体,用于血浆稀释。
FIB试剂,干品,用2ml蒸馏水溶解,室温放置10-15分钟。
白陶土试剂,液体,使用前须充分摇匀。
注:以上必须严格按照试剂说明书的要求进行溶解或稀释。
2.将各种试剂放置于设置好的试剂盘相应位置。
四.病人标本准备步骤1.用血凝专用硅化真空管采集标本(枸缘酸钠与待测血液1:9混匀抗凝)。
2.3500转离心10分钟。
五.检测标本1.将离心好的标本试管编号,放于样本托架上。
2.在“标本”菜单中,在“ID No.”栏手工输入标本名称或病人名称,在“Test”栏中输入要检测的项目,然后回车确认。
3.按“ESC”键退出,光标回到主菜单。
4.再次确认试剂位置及试剂量及标本位置。
5.按“F2”开始实验。
六.检测结果A.检测结果查看,在“Report”菜单中可以查找和处理数据,光标移到Report菜单回车确认,选择“Result Data”进行历史结果查看。
B.检测结果处理1.设置好自动传输模式后,检测结果将自动传输到终端计算机上。
2.结果经审核确认后,打印报告单。
七.注意事项1.确保标本采集时抗凝比例正确及充分混匀。
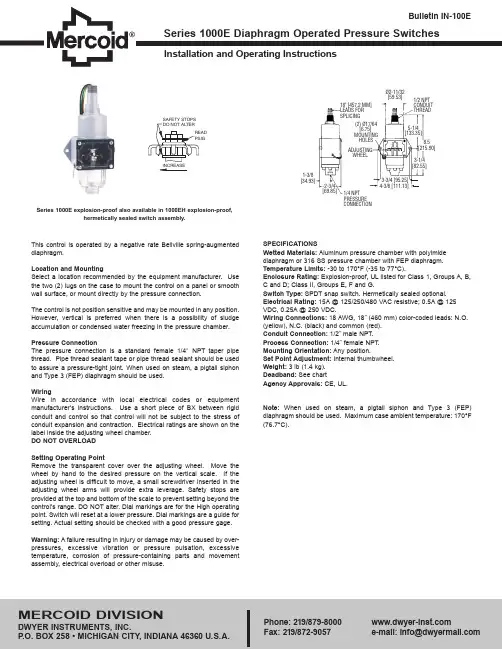
1/4 NPT PRESSURE CONNECTION1-3/8 [34.93]2-3/4 [69.85]4-3/8 [111.13]3-3/4 [95.25]8.5 [215.90]3-1/4 [82.55]5-1/4 [133.35]1/2 NPT CONDUIT THREAD[59.53]18" [457.2 MM] LEADS FOR SPLICING(2) Ø17/64 [6.75] MOUNTING HOLES ADJUSTING WHEELSeries 1000E explosion-proof also available in 1000EH explosion-proof,hermetically sealed switch assembly.SPECIFICATIONSWetted Materials:Aluminum pressure chamber with polyimide diaphragm or 316 SS pressure chamber with FEP diaphragm.Temperature Limits:-30 to 170°F (-35 to 77°C).Enclosure Rating:Explosion-proof, UL listed for Class 1, Groups A, B,C and D; Class II, Groups E, F and G.SPDT snap switch. Hermetically sealed optional.Electrical Rating:15A @ 125/250/480 VAC resistive; 0.5A @ 125VDC, 0.25A @ 250 VDC.Wiring Connections:18 AWG, 18˝ (460 mm) color-coded leads: N.O.(yellow), N.C. (black) and common (red).Conduit Connection:1/2˝ male NPT.Process Connection:1/4˝ female NPT.Mounting Orientation:Any position.Set Point Adjustment:Internal thumbwheel.3 lb (1.4 kg).Range No.3456789psig (bar)5-40 (0.35 - 2.76)10-70 (0.69 - 4.82)25 - 200 (1.72 - 13.78)50 - 350 (3.45 - 24.12)75 - 550 (5.17 - 37.90)100 - 900 (6.89 - 62.01)200 - 1400 (13.78 - 96.46)Approx. Deadband (fixed)* psig (bar)2.5 (0.17)5 (0.35)10 (0.70)18 (1.24)36 (2.48)60 (4.13)90 (6.20)Max. press. without bursting psig (bar)3000 (206.7)3000 (206.7)3000 (206.7)3000 (206.7)3000 (206.7)3000 (206.7)3000 (206.7)Operating Rages/DeadbandCode J125V 15A Electrical RatingAC Capacity250V 15A 480V 15A DC Capacity125V 0.5A (2)125V 1/8250V 1/4125V NA 250VNA DC ACHorse PowerNote (2) Resistive*Deadband is 10% larger when using 316SS diaphragm.No. Switches Action1 Snap SPDT 250V 0.25A (2)1/4 NPT PRESSURE CONNECTION1-3/8 [34.93]2-3/4 [69.85]4-3/8 [111.13]3-3/4 [95.25]8.5 [215.90]3-1/4 [82.55]5-1/4[133.35]1/2 NPTCONDUIT THREAD18" [457.2 MM] LEADS FOR SPLICING(2) Ø17/64 [6.75] MOUNTING HOLES ADJUSTING WHEELLa Serie 1000E antiexplosiva tambien esta disponible como 1000EH,con el conjunto de contactos hermetico.ESPECIFICACIONESMaximum Temperature:170°F (76°C).Pressure Connections:1/4˝ NPT(F).Electrical Rating:See chart on back.Wiring Connections:(3) 18˝color-coded leads: N.O. (amarillo), N.C.(negro) and common (rojo).Set Point Adjustment:Internal thumbwheel with visible scale.Die-cast, copper-free aluminum, weather-proof.Polyimide, Teflon ® or 316 SS.Calibration Spring:Plated steel.4 holes to accept 1/4˝ bolts.3 lb (1.4 kg).Any position.en caso de uso con vapor, se debera utilizar un sifon espiral, y©Copyright 2014 Dwyer Instruments, Inc.Printed in U.S.A. 2/14FR# 89-441921-00 Rev. 1Núm. rango 3456789bar (psig)0,35 - 2,76 (5 - 40)0,69 - 4,82 (10 - 70)1,72 - 13,78 (25 - 200)3,45 - 24,12 (50 - 350)5,17 - 37,90 (75 - 550)6,89 - 62,01 (100 - 900)13,78 - 96,46 (200 - 1400)Banda muerta aproximada(fija)*, bar (psig)0,17 (2,5)0,35 (5)0,70 (10)1,24 (18)2,48 (36)4,13 (60)6,20 (90)Presión máxima sinreventón, bar (psig)206,7 (3000)206,7 (3000)206,7 (3000)206,7 (3000)206,7 (3000)206,7 (3000)206,7 (3000)Rangos Operativos/Banda MuertaCode J125V 15A Especificaciones ElectricasCap. C.A.250V 15A 480V 15A Cap. C.C.125V0.5A (2)125V 1/8250V 1/4125V NO 250V NOPot. C.C.Pot. C.A.Horse PowerNota 2: Carga resistiva*La banda muerta es 10 % mayor al utilizar un diafragma de acero inoxidable 316.MERCOID DIVISIONDWYER INSTRUMENTS, INC.P .O. BOX 258 • MICHIGAN CITY, INDIANA 46360 U.S.A.Phone: 219/Fax: 219/872-9057e-mail: info@Cant. Tipo1 Snap SPDT 250V 0.25A (2)。
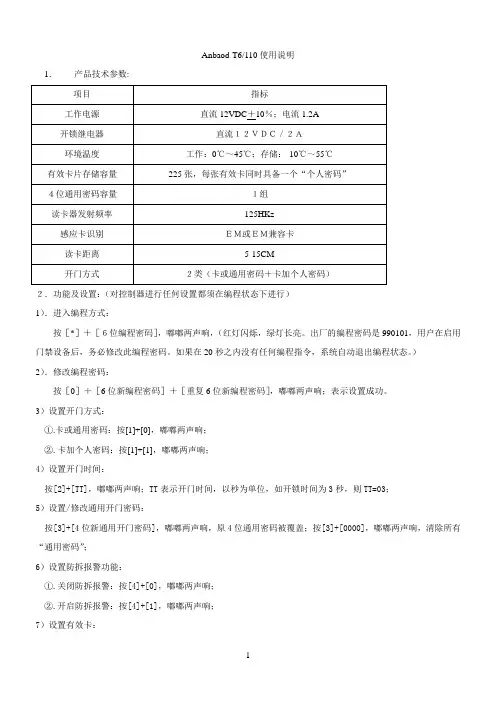
Anbaod-T6/110使用说明1.产品技术参数:2.功能及设置:(对控制器进行任何设置都须在编程状态下进行)1).进入编程方式:按[*]+[6位编程密码],嘟嘟两声响,(红灯闪烁,绿灯长亮。
出厂的编程密码是990101,用户在启用门禁设备后,务必修改此编程密码。
如果在20秒之内没有任何编程指令,系统自动退出编程状态。
)2).修改编程密码:按[0]+[6位新编程密码]+[重复6位新编程密码],嘟嘟两声响;表示设置成功。
3)设置开门方式:①.卡或通用密码:按[1]+[0],嘟嘟两声响;②.卡加个人密码:按[1]+[1],嘟嘟两声响;4)设置开门时间:按[2]+[TT],嘟嘟两声响;TT表示开门时间,以秒为单位,如开锁时间为3秒,则TT=03;5)设置/修改通用开门密码:按[3]+[4位新通用开门密码],嘟嘟两声响,原4位通用密码被覆盖;按[3]+[0000],嘟嘟两声响,清除所有“通用密码”;6)设置防拆报警功能:①.关闭防拆报警:按[4]+[0],嘟嘟两声响;②.开启防拆报警:按[4]+[1],嘟嘟两声响;7)设置有效卡:按[5]+[4位卡编号]嘟嘟两声响之后+[在控制器前感应需要设置的卡],嘟一声响后,嘟嘟两声响,加卡成功;(4位卡编码是用户自定义的,可以是0000-9999之间的任意数,每张卡的编码不得重复,该编码同时也是“卡加个人密码”门禁方式时的个人密码;8) 删除有效卡:①.按[6]+[4位卡编码],嘟嘟两声响,②.按[7]+[感应需要删除的卡],嘟一声响后,嘟嘟两声响;(删除多张有效卡重复上面的步骤)③.删除所有已设置卡,建议恢复出厂设置;9)设置门磁报警状态:①.关闭门磁报警:按[8]+[0],嘟嘟两声响;②.开启门磁报警:按[8]+[1],嘟嘟两声响;(开启本功能后,当正常开门后,没有关门,或者没有通过控制器开启,控制器将发出嘟嘟嘟连续长鸣报警,可外接报警器。
)10)恢复出厂设置:按[9]+[86],嘟嘟两声响,接着嘟嘟嘟三长声响,5秒钟后嘟嘟嘟三声短响,进入正常工作状态;11)退出编程状态:按[*],嘟嘟两声响。
004 TDA26..GB/07/12Customer ServiceGreat BritainBosch Customer Service Grand Union House Old Wolverton Road Milton Keynes MK12 5PTUK +44 (0)844 892 8923IRL +353 (0)1450 2655(*) Model dependentYou can download this manual from the local homepages of BoschThank you for buying the TDA26 steam iron from Bosch. This iron has a lightweight design and is built to perform.These instructions contain valuable information about the unique features of this iron and some hints to make ironing easier for you.Please visit for more product information or to register your product, just follow the link to the Online guarantee registration.Before using the Iron for the first timePlease carry out the following steps:1. Remove the protective cover from the soleplate before using the iron.2. While the iron is unplugged, fill the water tank (E) with tap water and set the temperature control (I) to “max” by lining it up with the pointer (H).3. Plug the appliance into the mains and when the iron has reached the correct temperature (the pilot light [K] goes out), set the steam regulator (A) to the “2” position.4. Hold the iron horizontally and repeatedly press the shot of steam button (L). Any residue should come out of the soleplate (G). It may smoke and smell – this is normal and will cease after a short while.5. If necessary, carefully clean the soleplate down with a dry, folded cloth.Cleaning and MaintenanceFor general cleaning, follow the information below:DO NOT de-scale or clean the water tank with cleaning products or solvents, as these could cause the iron to drip when using the steam function.DO NOT use a “professional steam cleaner” for cleaning the appliance.DO NOT use sharp objects or abrasive products to clean the soleplate or any other part of the appliance. To keep the soleplate in good condition, do not allow it to come into contact with metal objects.GUARANTEE TERMSThe terms of the guarantee for this appliance are in accordance with that stated by our representative for the country in which it is sold. Details of those conditions can be obtained from the retailer from whom the appliance was purchased. The SALES RECEIPT must be presented when making any claims against the terms of this guarantee. We reserve the right to make technical modifications.Environmental CareThis iron has been designed according to ecological criteria related to sustainable development; analysing its whole lifecycle, from material selection to its later reuse or recycling; evaluating the improvement possibilities from a technical, ecological and environmental point of view.Before throwing a used appliance away, you should make it noticeably inoperable e.g. cut off the mains lead and be certain to dispose of it in accordance with current laws and regulations.Your retailer, town council or local council can give you detailed information about these.This appliance is labelled in accordance with European Directive 2002/96/EG concerning used electrical and electronic appliances (waste electrical and electronic equipment – WEEE).The guideline determines the framework for thereturn and recycling of used appliances as applicable throughout the EU.ImportantThis iron has been designed according to ecological criteria, related to the sustainable development; analyzing its whole lifecycle, from material selection to its later reusing or recycling; evaluating the improvement possibilities, from a technical, economical and environmental point of view.This appliance has been designed exclusively for domestic use and must not be used for industrial purposes.Carefully read through the operating instructions for the appliance and safeguard them for future reference.General safety instructions• The iron must not be left unattended while it is connected to the supply mains.• Remove the plug from the socket before filling the appliance with water or before pouring out the remaining water after use.• The appliance must be used and placed on a stable surface.• When placed on its stand, make sure that the surface on which the stand is placed is stable.• The iron should not be used if it has been dropped, if there are visible signs of damage or if it is leaking water. It must be checked by an authorized Technical Service Centre before it can be used again.• With the aim of avoiding dangerous situations, any work or repair that the appliance may need, e.g. replacing a faulty mains cable, must only be carried out by qualified personnel from an Authorised Technical Service Centre.• This appliance can be used by children aged from 8 years and above and persons with reduced physical, sensory or mental capabilities or lack of experience and knowledge if they have been given supervision or instruction concerning use of the appliance in a safe way and understand the hazards involved. Children shall not play with the appliance. Cleaning and user maintenance shall not be made by children without supervision.• Keep the iron and its cord out of reach of children less than 8 years of age when it is energized or cooling down.• This appliance is to be connected and used in accordance with the information stated on its characteristics plate.• This appliance must be connected to an earthed socket. If it is absolutely necessary to use an extension cable, make sure that it is suitable for 16A and has a socket with an earth connection.• If the safety fuse fitted in the appliance blows, the appliance will be rendered inoperative. To restore normal operation the appliance will have to be taken to an authorised Technical Service Centre.• In order to avoid that, under unfavourable mains conditions, phenomena like transient voltage drops or lighting fluctuations can happen, it is recommended that the iron is connected to a power supply system with a maximum impedance of 0.27Ω . If necessary, the user can ask the public power supply company for the system impedance at the interface point.• The appliance must never be placed directly under the tap to fill the water tank.• Unplug the appliance from the mains supply after each use, or if a fault is suspected.• The electrical plug must not be removed from the socket by pulling the cable.• Never immerse the iron in water or any other fluid.• Do not leave the appliance exposed to weather conditions (rain, sun, frost, etc.)2 Filling the water tankSet the steam regulator (A) to the “0” position (no steam) bylining it up with the pointer (B) on the iron and unplug the ironfrom the mains!1. Place the iron at an angle of 45° with the point facing upwards.2. Fill the water tank (E) via the water tank inlet (C) but never above theDO NOT use condensation water from tumble dryers, air conditionersor similar appliances. This appliance has been designed to use normaltap water.To prolong the optimum steam function it is possible to mix tap waterwith distilled water 1:1. If the tap water in your district is very hard, mixtap water with distilled water 1:2.3The temperature control (I) adjusts the temperature of thesoleplate (G).1. Check the temperature instructions shown on the care label of thegarment you are ironing and set the temperature control (I) to thecorresponding position by lining it up with the temperature controlpointer (H) on the iron:the garment is made from mixed fabrics, set the temperature for themost delicate material.3. For silk, woollen or synthetic materials iron the reverse side of the fabricto prevent shiny patches. Avoid using the spray function to preventstains.4. Sort your garments based on their care labels, always starting withthose that have to be ironed at the lowest temperature.5. The pilot light on the top of the handle (K) will stay lit while the ironis heating up and go out once the selected temperature has beenreached. Wait for a few seconds after the light goes out before youstart ironing. Once the iron is ready, you can continue to iron even ifthe pilot lamp comes on again.6. If your iron has auto shut-off and the pilot light is flashing, the auto-shutoff has activated. Gently move the iron from side to side to restart it.4 Ironing with steamThe steam regulator (A) is used to adjust the amount of steamproduced when ironing.1. Make sure that there is water in the tank (E).2. Adjust the temperature control (I) and then set the steam regulator (A)according to the table below by lining it up with the steam regulator••13. You can get extra steam by pressing and holding the steam regulatorto avoid water dripping from the soleplate (G).5 Ironing with shot of steamThis can be used to remove stubborn wrinkles or to press in asharp crease or pleat. It cannot be used on a synthetic settingfor delicate items.1. Make sure that there is water in the tank (E).2. Set the temperature control (I) to the “•••” or “max” position and thesteam regulator (A) to the “2” position.3. Press the shot of steam button (L) on the handle repeatedly at intervalsof 5 seconds.6 Vertical steaming with shot of steamThis can be used to remove creases from hanging clothes,curtains etc. It cannot be used on a synthetic setting fordelicate items.WARNING! Do not vertical steam while the item is being worn.Never spray or aim steam at people or animals!1. Make sure that there is water in the tank (E).2. Set the temperature control (I) to the “•••” or “max” position and thesteam regulator (A) to the “2” position.3. Hold the iron in an upright position about 15 cm away from the garmentbeing steamed.4. Press the shot of steam button (L) on the handle at intervals of 5seconds, however, after 4 jets of steam, wait for 10 seconds to allow Using Your Iron。


实例1:查询CA号为36505-84-7的化合物的所有理化性质。
操作步骤:1)点击窗口左侧标签“predefined Search form”;2)双击“Substance Identification Data”;3)在弹出的”query form”对话框中,在“Chemical Abstracts RegistryNumber”后的文本框中输入CA号;4)点击对话框右上角“OK”按钮;5)点击右下角“Start Search”开始检索;6)在弹出的“Search Status Report”对话框中,点击右下角“View”按钮;7)在弹出的“Results”窗口中,双击化学结构;8)点击页面中的超链接或拖动右侧的滚动条浏览化合物信息。
4357实例2:查询化合物6-nitro-nicotinic acid 的制备方法操作步骤:1) 双击结构绘图区,(将自动弹出绘图工具); 2) 绘制化学结构,点击绘图软件左上角的“done”; 3) 按照图示设置检索参数;4)点击“Start Search”检索。
8结构绘制区8物质基本信息熔点,沸点,核磁,红外等信息化学反应信息点击“RX ”可获取更详尽的信息1实例3:检索含有如下子结构的化合物,结果保存为word格式OOO实例4:查询如下化学反应查看相关文献信息并保存摘要操作步骤:1)绘制结构;2)选择右侧的“Free Sites”下的“all atoms”;3)点击“Start Search”检索;4)如图所示点击“export hits”;5)从下拉菜单中选择“compound list to word”,保存。
1245操作步骤:1) 在结构绘图区输入反应式; 2) 选择“reaction”; 3) 点击“Start Search”;4) 查看反应信息并点击文献超链接查看文章摘要; 5) 选择该条记录;6) 点击最右边的按钮选择以“word”格式保存摘要信息。

beilstein有机化学手册
Beilstein有机化学手册是一本综合性的有机化学参考书,被广
泛认为是最权威的有机化学手册之一。
该手册由德国化学家弗里德里希·庇尔斯坦(Friedrich Konrad Beilstein)于1881年首
次出版,目前已经发展成为一个庞大的有机化学数据库。
Beilstein手册收录了大量的有机化合物的化学信息,包括化合
物的化学式、结构、物理性质、制备方法、反应性质等。
它的独特之处在于它的数据库是以化合物的反应性质作为组织结构的基础,而不是以化合物的结构作为组织结构的基础。
这种组织方式使得用户可以根据所需的反应性质来查找合适的化合物。
Beilstein手册涵盖了广泛的有机化合物领域,包括有机合成、
化学反应、有机化学理论、物理有机化学等。
它是有机化学研究人员、教师和学生的重要工具,也是化学品公司和药物公司的基本参考资料。
目前,Beilstein手册已经与另一个有机化学数据库Gmelin合并,形成了Beilstein/Gmelin数据库,覆盖了更广泛的化学信息。
同时,Beilstein手册也通过网络平台Beilstein-Institut提供在线访问,方便用户获取最新的有机化学信息。

机器人史宾v2说明书导言祝贺选择罗伯萨皮尔?2版,新一代罗伯萨皮尔?具有新的技术和个性。
并且有了更先进的运动能力和互动式传感器,新功能程序,语言能力,和独特的个性。
具有思想,感情和多种能力结合的机器人时代已经来到~请务必精心阅读本手册全面理解您的新的和改进的机器人的许多特点。
此包包含:1个罗伯萨皮尔?2版1个控制器1个绿色保龄球球3 个红保龄球瓶快速入门指南马上见识一些罗伯萨皮尔?V2的非常酷的功能,插入他的电池(见5- 6)打开它(见第13页),并按照下列指示:停止:按停止罗伯萨皮尔?2版将停止目前的行动。
演示1:按下去将执行预置的舞蹈。
演示2:SHIFT1+D按顺序执行罗伯萨皮尔?V2的一系列动作的演示静躺/坐起来/静躺/站起来:SHIFT2+D罗伯萨皮尔?V2版将循环执行这些功能。
左摇杆L=步行:步行是受左摇杆控制;主要有前进,后退,左,右,和对角线运动。
右摇杆R=头和上身:控制权可以控制上身基本运动。
胳膊:SHIFT1+SHIFT2+D右摇杆和SHIFT1、SHIFT2按钮配合使用,可以控制罗伯萨皮尔?V2的胳膊。
自由漫步:让罗伯萨皮尔?2版自由漫步,自主探索他的环境。
不过确定他在地板上面再开始。
~红外视觉:与罗伯萨皮尔?2版直接交流。
把你的手在他面前,他会跟踪你的动作。
02内容表格•电池信息:第5- 6 •罗伯萨皮尔?2版简介:第7页•控制器概述:第8页•控制器综述功能图:左侧第9-10页,右侧第11- 12页•基本操作:电源开关第13页访问控制命令第13页停止第14页散步第14页头部和上身第15页胳膊第16页•演示和动画:舞蹈演示第17页运动演示第17页右臂命令第17页左臂命令第17页躺下/坐起来/静躺/站起来第17页起床第17页行动第17- 18页•重置:全复位第19页快速复位/步态变化第25页睡眠/唤醒第25页关闭电源第19页声波传感器开/关19页视觉系统开/关19页•自由漫游: 自由漫游第20页待机模式第20也03目录•视觉系统:视觉系统开/关21页远距离红外视觉21页近距离红外视觉21页退缩反应28页躲开物体28页•彩色摄像:颜色识别第23 – 25页彩色摄像头设置25页闪烁26页•声波传感器:声波传感器开/关26页听力第26 - 27倾斜传感器27页握传感器/举高第27 - 28手套传感器第29页脚传感器第29页•编程:编程键30页定位程序目录30页主定位程序模式第30 – 32页左,右定位程序模式第32页控制器程序目录第32页主要程序目录第32 – 33页退出程序第33页子程序第33 - 34声音和视觉程序模式p.34 •警戒模式:35页•机器人互动:罗伯萨皮尔?2版第36页罗伯萨皮尔恐龙第37页罗伯萨皮尔狗第37页重要提示第38页04电池信息电池要求:罗伯萨皮尔?2版的身体和大脑罗伯萨皮尔?2版是由6 ×1号电池(不包括在设备内)和4 ×7号电池(不包括)。

Quantity : Description : 11 Puck-Aluminum 1 Bolt 4 Bolt 6 Bolt 2 Bolt 5 Washer-Flat 6 Washer-Flat 1 Washer-Fender6 Nut 1 Drop Plate 2Grille Support1 St. Guide Lift BracketMOUNTAIN OFF ROAD ENTERPRISES, LLC. P.O. BOX 690, DELTA, COLORADO 81416 970-625-0500 970-625-3747 FaxE-mail:************************Page 1 of 41.Remove the 4 bolts holding the fan shroud to the radiator.2. Remove the 4 nuts that hold the fan to the water pump pulley.3. Remove the shroud and fan.4. Inside the Jeep on the drivers side, pull the carpet away from the floor pan to expose the 4 bolts thathold the transfer case shift linkage bracket. (This bracket is on the under side of the body and it's pur-pose is to locate the bellcrank for the linkage.) Remove the 4 bolts and remove the bracket from the un-der side.5. Loosen all 11 body mount bolts. Remove the one under the grille. Remove 5 bolts on the driver’s side.(Hint, The hidden mount bolts are between the fuel tank and the upper rear shock mount!).6.Place a stout piece of wood on a floor jack and place the jack between body mount 3 and 4 on the chan-nel portion of the body. Jack up the body just enough to install the 1 inch pucks on top of the factory steel washers/rubber insulators. Place the M.O.R.E.™ pucks in locations 2,3,4,5,6. It is recommended that you use a dab of lock-tight on the new longer bolts. Start the new longer bolts in locations 2,3,4,5,6. Do not tighten at this time. See Figure 1 for locations of body mounts.6A. If you are replacing the body mounts with our Urethane mounts then the position for these are : Positions :1,5, and 6 : MO2288 , M02429 , S10125 See Figure 1Positions : 2,3, and 4 : M02348 , MO2350 , S10125 See Figure 17. Repeat this procedure on the passenger side of the body.8. Install the last puck under the grille (location 1) and start the longer bolt.9.Remove the factory rubber grille supports and replace them with the supplied 1” taller urethane grillesupports. It is recommended to apply a lubricant to the urethane to help with the install.10. Now, tighten the new longer body mount bolts. Use your judgment as to how tight to torque the bolts. Donot "crush" the rubber insulators or leave the bolts too loose!11. Find the 4 holes in the mounting flange on the radiator where the shroud mounted. Measure 1 inch belowthe factory holes and center punch a mark. Do this as accurately as possible. (The passenger side lower hole will end up in a large existing hole and can not be drilled. (This is what the large fender washer is for.)12. Drill the center punched marks with a 1/4" drill bit. You may find it easier to use a angle-head drill for thisjob, however a standard drill can be used.13. Since the radiator stays in the stock location, and its bolted to the body, it moves up 1 inch with the bodylift. The fan shroud must line up with the fan, and it is connected to the engine. The engine stays in the stock location. For the shroud to fit in the new holes you just drilled, the shroud needs to be trimmed slightly to clear the lower radiator hose. You can use a round file, Dremmel® Tool (hi-speed grinder), or what ever you have to perform this job. The shroud is made out of a plastic material that cuts, sands and forms easily, so be careful when grinding or filing. Make sure that the shroud doesn't touch the hose when bolted in place.14. Install the fan and shroud. Tighten the nuts that hold the fan to the pulley/water pump. Install the factorybolts through the shroud and into the holes you drilled in the mounting flange. Use the CrimpLoc nuts provided. Do not over tighten the nuts/bolts, just a bit past snug will do the trick. The large fender washer is for the lower hole on the passenger side. Place it on the steel side of the mounting flange so the CrimpLoc nut has a surface to grab against.Page 2 of 4Figure 3bFigure 4Page 4 of 4Figure 5Figure 6Figure 7Now GoJeepin !。
Cat ® B Hammers are suitable for use in a wide range of construction and general demolition applications – such as breaking concrete sidewalks and driveways, pavement, roads, masonry, site prep and landscaping, and breaking frozen ground for utility repairs. Each model of B Hammer is available in either silenced or non-silenced configurations. The silenced version is identified by the ‘s’ suffix, for example B6s.Silenced vs. Non-silencedS ilenced hammers fully enclose and isolation mount the power cell between urethane and nylon buffers, thus limiting noise and damping vibration to the hammer and machine. N on-silenced hammers rigidly mount the power cell between two metal frames. This open configuration allows better access for serviceability.Flat top/top-mount styleF lat top/top-mount style provides a larger work areaand excellent operator visibility with a common footprint and hole pattern for optimum versatility.T op-mount style increases impact power by keepingbreaker force and stick force in line. A top-mount bracket will transfer back significantly less recoil and bendingstress into the end of the stick, resulting in reduced impact on machine structures. F ull complement of mounting brackets is available to suit coupler or pin-on preference.F lat top hammer bracket design features enhanced hose routing and improved ingress/egress with new bolt-on step and updated central step.B rackets are compatible with H Hammers (H35s-H95s) and the CVP16 and CVP40 Vibratory Plate Compactors.Gas fired designG as fired design delivers consistently high production overtime making the breaker reliable in applications such as concrete, asphalt, rock and light trenching.Internal Control ValveI nternal Control Valve (ICV) maintains maximum hydraulic pressure to ensure breaker delivers all blows at full power with no residual blows. B y controlling smooth movement of the piston, it can immediately stop the breaker when oil flow ceases.Ergonomically positioned hydraulic linesE rgonomically positioned hydraulic lines are designedto optimize serviceability, are easily accessible and require no special tools. H ydraulic lines and back head pressure can be checked and charged while breaker is mounted to machine, allowing quick monitoring of breaker’s condition.Slip fit bushingsS lip fit bushings are field replaceable and easy to maintain due to one locking pin, extending wear life and reducing owning and operating costs. U pper bushing rotates 360°, lower bushing has two positions and can be rotated 90° to minimize play between tool and bushing, extending bush life cycle.Standard items included with hammerT ool box with service items comes standard to helpmaintain the hammer. Items included are: nitrogen charge gauge, hammer paste tube, tool pin, retention spring pins and other key service items. Two tools, cone and crosscut/transverse chisel.Cat®B HammersS KID S TEER L OADERS M ULTI T ERRAIN L OADERS C OMPACT T RACK L OADERS M INI E XCAVATORS B ACKHOE LOADERS2 B Hammers for SSL, MTL, CTL, MHE, BHLCat ®B HammersMoil/Pyramid Tool is a general purpose tool where the point improves speed of penetration.For use on pavement, concrete, bed rock, hard rock and trenching.Cone Toolis a multi-use tool that can make circle holes in soft material. Point improves speedof penetration but there is no control of fracture direction. For use on concrete, bed rock and hard rock.Blunt Toolshatters with vibration instead of penetration. For use on concrete, bed rock, trenching,operating on slopes and cutting lines.Chisel Tool (cross cut/transverse and parallel/in-line along machine driving direction) aidscontrolled and accurate fracture line. For use on pavement, concrete, bed rock, trenching, operating on slopes and cutting lines.B Hammers for SSL, MTL, CTL, MHE, BHL 3Cat ®B HammersSpecificationsB2s (Silenced) Hammer shownB2 (Non-Silenced) Hammer shownCat ®B HammersAEHQ8138-01 (07-2019)Replaces AEHQ8138For more complete information on Cat products, dealer services, and industry solutions, visit us on the web at © 2019 Caterpillar All rights reservedMaterials and specifications are subject to change without notice. Featured machines in photos may include additional equipment. See your Cat dealer for available options.CAT, CATERPILLAR, LET’S DO THE WORK, their respective logos, “Caterpillar Yellow,” the “Power Edge” and Cat “Modern Hex” trade dress as well as corporate and product identity used herein, are trademarks of Caterpillar and may not be used without permission.Specifications (continued)B6B6s B8B8s A Width mm (in)440(17.3)440(17.3)440(17.3)440(17.3)B Length mm (in)316(12.4)316(12.4)316(12.4)316(12.4)C Height mm (in)1375(54.1)1370(53.9)1413(55.6)1402(55.2)D Tool diameter mm (in)68(2.7)68(2.7)75(3)75(3)E Tool working length mm (in)427(16.8)377(14.8)408(16.1)358(14.1)Impact frequency BPM 500-900500-900400-800400-800Minimum carrier weight kg (lb)3999(8,816)3999(8,816)6998(15,428)6998(15,428)Optimal hydraulic flow L/min (gpm)40-70(11-19)40-70(11-19)50-90(13-24)50-90(13-24)Operating weight kg (lb)259(571)277(611)350(772)344(758)Operating pressurebar(psi)108(1,566)108(1,566)95(1,378)95(1,378)B6s (Silenced) Hammer shownB6 (Non-Silenced) Hammer shown。
B324 简要操作说明功能键说明:F1~F4: 功能键,功能见屏幕上方的文字说明START: 开始STOP: 停止EDIT: 编辑ENTER: 确认UP: 上键DOWN: 下键方法设置:按ENTER进入蒸馏菜单按EDIT进入加入水量的设置按上下键改变数字按ENTER确认已经改变的数字选择NaOH和H3BO3,方法同上选择DEST,设置蒸馏时间选择STEAM,设置蒸汽调节,凯氏法都设置在100%选择ASPIR,ALL: 样品和吸收液SAM:样品REC:吸收液OFF:关闭编辑方法后按SAVE,并输入方法名称保存。
按LOAD可以将储存在仪器的方法调出。
仪器可储存20种不同的方法。
在该界面内按PREH可直接运行预热程序,按ESC退出。
主菜单:选择PREHEATING:预热选择CLEANING:运行清洗程序直接按START键运行。
仪器的设置:在主菜单内选择CONFIGURATION,并按ENTER选择SYSTEM CONFIGURATION选择SETTINGS根据需要更改打印机和外界键盘的设置根据需要更改RS232接口的设置选择OPTIONS,可以做如下设置:硼酸加入:ON/OFF蒸汽调节:ON/OFF吸收液排空:ON/OFF(只有在连接滴定仪时)选择PUMP CALIBRATION,按屏幕指示做泵的校准选择H2O进行水泵校准选择TITRATOR CONFIGURATION,进行滴定仪设置选择TITRATOR,连接的选择ON,并选择相应的型号和滴定模式选择TIME FORMAT,设置时间格式并可设置日期格式及查看软件版本。
日常操作程序:1. 开机后显示主菜单,检查所连接的水及溶液是否准备好,打开冷凝水开关2. 安装空的样品管3. 选择PREAHTING,按START键运行,进行仪器的预热4. 选择DISTILLATION选择您所需要运行的蒸馏程序,并按START运行5. 如果需要做空白样品的话,建议先做2-3个平行样品,取平均值6. 做完所有样品后,进入主菜单,选择CLEANING,按START运行清洗程序注意事项:1. 在仪器运行时请勿打开维护门2. 在仪器运行前检查蒸馏水,切勿在无蒸馏水的情况下运行,否则会损坏蒸汽发生器3. 在仪器运行前打开冷凝水,冷凝水力度不够会影响氨的吸收效果,造成测量结果偏低4. 确保在加载样品管后开始运行5. 如测量样品之间相差较大时,建议运行清洗程序。
beilstein有机化学手册Beilstein有机化学手册是一部涵盖了有机化学领域广泛知识的权威参考书籍。
它是由德国化学家费德里希·康拉德·贝尔斯坦于1880年首次出版,以其名字命名。
Beilstein手册以其丰富的内容和权威性,被誉为有机化学领域的“百科全书”。
Beilstein有机化学手册涵盖了广泛的有机化学领域,包括有机化合物的合成方法、性质与反应、化合物的结构和性质描述等。
该手册内容丰富,详细介绍了已知化合物的合成方法和相关反应条件、产品的物理性质和化学性质。
同时,该手册还包含了大量的化合物结构图和实验数据,为有机化学研究提供了重要的参考资料。
在Beilstein手册中,读者可以找到各种有机反应的详细描述、反应条件和实验操作方法,以及有机化合物的物理性质和化学性质。
这些信息对于有机化学实验室的学生和研究人员来说,都是非常宝贵的参考资料。
此外,Beilstein手册还提供了大量的化合物结构图和光谱数据,有助于读者快速准确地找到所需信息。
Beilstein有机化学手册的编纂历经百年,经过多次修订和更新,内容丰富而全面。
从最初的印刷版到现在的在线版本,Beilstein手册一直在不断发展和完善,以满足有机化学领域的需求。
目前,Beilstein手册已经成为世界各地有机化学研究人员不可或缺的重要参考资料之一。
值得一提的是,Beilstein有机化学手册的在线版在搜索功能和跨链接方面具有很大的优势。
用户可以通过关键词搜索或者化合物结构搜索,快速准确地找到所需的信息。
此外,它还提供了丰富的附加信息,如实验操作方法、相关文献引用等,使得用户能够在一个平台上获取全面的有机化学知识。
总的来说,Beilstein有机化学手册是一部权威的有机化学参考资料,具有丰富的内容和广泛的知识覆盖面。
它为有机化学领域的学习和研究提供了重要的支持,对于有机化学教学和科研工作都具有重要的意义。
随着科技的不断发展,Beilstein手册将继续更新与完善,为有机化学领域的发展做出更大的贡献。
实例1:查询CA 号为36505-84-7的化合物的所有理化性质。
操作步骤:
1) 点击窗口左侧标签“predefined Search form”; 2) 双击“Substance Identification Data”;
3) 在弹出的”query form”对话框中,在“Chemical Abstracts Registry
Number”后的文本框中输入CA 号; 4) 点击对话框右上角“OK ” 按钮;
5) 点击右下角“Start Search”开始检索;
6) 在弹出的“Search Status Report ”对话框中,点击右下角“View ”按钮; 7) 在弹出的“Results ”窗口中,双击化学结构;
8) 点击页面中的超链接或拖动右侧的滚动条浏览化合物信息。
3
4
7
实例2:查询化合物6-nitro-nicotinic acid 的制备方法
操作步骤:
1) 双击结构绘图区,(将自动弹出绘图工具); 2) 绘制化学结构,点击绘图软件左上角的“done”; 3) 按照图示设置检索参数;
4)
点击“Start Search”检索。
8
结构绘制区
8
物质基本信息
熔点,沸点,核磁,红外等信息
化学反应信息
点击“RX ”可获取更详尽的信息
1
实例3:检索含有如下子结构的化合物,结果保存为word格式
操作步骤:
O
O O
1)绘制结构;
2)选择右侧的“Free Sites”下的“all atoms”;
3)点击“Start Search”检索;
4)如图所示点击“export hits”;
5)从下拉菜单中选择“compound list to word”,保存。
1
2
4
5
实例4:查询如下化学反应查看相关文献信息并保存摘要
操作步骤:
1) 在结构绘图区输入反应式; 2) 选择“reaction”; 3) 点击“Start Search”;
4) 查看反应信息并点击文献超链接查看文章摘要; 5) 选择该条记录;
6) 点击最右边的按钮选择以“word”格式保存摘要信息。
1
文献信息超链接
反应信息
4
6。