MRC媒体资源管理中心使用手册
- 格式:pptx
- 大小:3.96 MB
- 文档页数:53

XMAM 工作站操作手册—版soQeyWWW R|Qitl*y«CQrTl成都索贝数码科技股份有限公司目录2009-5目录第一章概述错误!未定义书签产品介绍错误!未定义书签产品背景错误!未定义书签XMAM 产品介绍错误!未定义书签产品特色错误! 未定义书签。
三产品组成错误! 未定义书签第二章软件的使用错误!未定义书签软件登录错误!未定义书签素材上载错误!未定义书签三任务审核错误! 未定义书签上载任务审核错误!未定义书签下载任务审核错误! 未定义书签四资料编目错误! 未定义书签。
五资料检索错误! 未定义书签。
六资料归档错误! 未定义书签。
七素材下载错误! 未定义书签。
八我的工作区错误! 未定义书签我的消息:错误! 未定义书签。
我的任务:错误! 未定义书签。
第三章附录错误!未定义书签。
一各编码格式的宽度比例(单位:像素)二各编码格式的高度比例(单位:像素)错误!未定义书签三各编码格式的码率(单位:kbps )错误!未定义书签错误!未定义书签第一章概述一产品介绍产品背景随着传媒产业的不断发展、数字多媒体的深入应用、广播频道的不断扩充,媒体资源的多样性应用和重复使用已经显示出了它巨大的潜在价值。
而目前的各种媒体资料的审看或回放都是通过人工从大量无序的录像带和光盘中查找、调用,再通过录像机播放的方式操作,不仅效率低下,且共享性能差。
已不能适应数字化时代的发展需要。
媒体资产的数字化、信息化、网络化、智能化改造是当前音像资料管理发展的必然趋势。
很多单位都保存了一大批具有历史意义和科研价值的视音频节目素材。
庞大的视音频资料保存、管理和应用的难度很大,如何实现对这些媒体资料的有效管理,已成为所有单位面临的一个重要课题。
为了珍藏的原始影像资料能长期保存、为了快速检索所需的影像资源、为了方便管理并具有高保密性和安全性、为了实现网上共享、浏览、播放,主要解决视音频等多媒体数据资料的数字化存储、编目管理、检索查询和资料发布等问题的媒体资产管理系统将成为信息数字化过程中不可或缺的部分。
HP Media Center PC软件指南HP 产品和服务的所有保修限于这些产品与服务所附带的明确保修声明。
本文的任何条款都不应视作构成保修声明的附加条款。
HP 不对本文的技术性错误、编印错误或冗长负任何责任。
对于在非 HP 提供的设备上 HP 软件的使用和可靠性,HP概不负责。
本文档包含的所有权信息均受版权保护。
未经 HP 事先书面许可,不得将本文档的任何部分影印、复制或翻译成其他语言。
Hewlett-Packard CompanyP.O. Box 4010Cupertino, CA 95015–4010USA Copyright © 2001–2006 Hewlett-Packard Development Company, L.P.截至 2008 年 8 月 28 日之前,在美国可能获得美国专利号 4,930,158 与 4,930,160 中一种或两种的许可。
Microsoft 和 Windows 是 Microsoft Corporation 在美国的注册商标。
HP 支持科技产品在法律允许范围内的使用,我们不认可、也不鼓励我们的产品被用于著作权法所不允许的目的。
本文档中的内容可随时更改,恕不另行通知。
目录欢迎 (1)感受 Media Center 带给您的无穷乐趣 (1)观看和录制电视节目 (1)随时播放您想听的音乐 (1)分享您的数码内存 (1)把您的客厅变成电影院 (1)使用 Media Center 的功能 (2)使用 Media Center (3)设置 Media Center (3)使用鼠标打开 Media Center (3)使用遥控器打开 Media Center (4)Media Center 菜单栏 (4)浏览 Media Center (5)Media Center 的控制菜单 (5)使用 Media Center 暂离模式 (6)完成设置向导中的所有步骤 (7)Media Center 开始菜单 (8)Media Center “开始”菜单选项 (8)在线聚焦 (9)使用 Media Center 中的即时消息 (9)登录至您的 Messenger 帐户 (9)更改 Media Center 设置 (10)Media Center 设置的类别 (10)查找更多 Media Center 信息 (11)使用遥控器 (13)遥控器按钮概述 (14)观看和录制电视节目 (17)浏览“我的电视” (17)观看电视 (18)观看实况电视 (18)控制电视回放 (19)在“我的电视”中使用遥控器 (20)使用“电视收视指南” (21)无“指南”情况下使用 Media Center (21)“电视收视指南”错误 (22)浏览电视收视指南 (22)设置 Media Center 下载“指南”的方式 (23)手动下载“指南” (24)添加邮政编码以接收正确的“指南” (24)将缺少的频道添加至“指南” (25)在“指南”中编辑频道 (25)从“指南”中删除频道 (26)搜索电视节目 (26)按类别搜索电视节目............................................................ 27录制电视节目 (28)从指南录制电视节目 (29)不使用“指南”手动录制节目 (30)录制质量和硬盘存储空间 (31)将录制的电视节目复制到 DVD 或 CD (31)媒体复制保护 (32)播放录制的电视节目 (32)播放音乐文件 (33)我的音乐 (33)Media Center 与“我的音乐”的配合使用 (33)向“我的音乐”曲库中添加音乐 (34)从硬盘添加音乐文件 (34)添加来自 CD 的音乐文件 (35)从“我的音乐”曲库删除音乐文件 (35)使用受支持的音乐文件类型 (36)在“我的音乐”中播放音乐文件 (36)在“我的音乐”中播放唱片集 (37)在“我的音乐”中播放歌曲 (37)在“我的音乐”中创建队列列表 (38)在“我的音乐”中查找和播放唱片集 (38)在“我的音乐”中创建播放列表 (39)在“我的音乐”中将音乐文件复制到 CD (40)处理图片 (41)HP Photosmart (41)我的图片 (41)处理数码图像 (42)在 Media Center 中使用 HP Photosmart (42)在 HP Photosmart Premier 中创建图片编录 (42)创建相册 (44)修改图片的日期 (44)为图片指定关键字 (45)为图片指定位置 (45)在 Media Center 中搜索图片 (46)在 HP Photosmart 中查看图片 (46)在 HP Photosmart 中观看幻灯片播放 (46)在 HP Photosmart 中观看配有音乐的幻灯片 (47)在 HP Photosmart Premier 中编辑图片 (47)从桌面 HP Photosmart Premier 编辑图片 (47)在 Media Center 的 HP Photosmart 中编辑图片 (48)在 HP Photosmart Premier 中共享图片 (48)HP Photosmart Premier 支持的文件类型 (50)在 HP Photosmart 中打印图片 (51)为您的图片创建备份光盘 (51)在 Media Center 中使用“我的图片” (52)向“我的图片”中添加图片 (53)从硬盘添加图片文件 (53)目录iii查看“我的图片”中的图片 (54)以幻灯片播放方式观看图片 (54)在“我的图片”中观看带有音乐的幻灯片 (55)“我的图片”支持的图片文件类型 (55)编辑“我的图片”中的图片 (56)修正红眼或对比度 (56)在“我的图片”中裁剪图片 (56)旋转图片 (57)在“我的图片”中打印图片 (57)将图片刻录到 CD 和 DVD (58)播放视频 (59)在 Media Center 中播放数字视频 (59)使用受支持的视频文件类型 (60)传输和刻录视频文件 (60)刻录模拟视频文件 (60)刻录数字视频文件 (60)从视频文件创建 CD/DVD (61)播放 DVD (63)在 Media Center 中播放 DVD 影片 (63)更改 DVD 影片的语言 (64)更改 DVD 的音频设置 (64)收听调频广播 (65)播放调频广播 (65)组织广播电台预设 (66)同时使用调频广播和电视信号 (66)制作音频和数据光盘 (67)刻录前请擦除光盘上的内容 (67)制作音频 CD (68)验证音频文件刻录有无错误 (69)音频 CD 提示 (69)制作音频 CD (70)制作 jukebox 光盘 (70)制作数据 DVD 和 CD (71)验证数据光盘刻录是否无误 (71)数据光盘提示 (71)制作数据光盘 (72)复制 DVD 或 CD (72)将文件归档至 CD 或 DVD (73)使用 Media Center 归档文件 (74)处理映像文件 (74)制作映像文件 (74)从映像文件进行烧录 (75)使用 LightScribe 制作光盘标签 (75)Lightscribe 要求................................................................... 75使用 Sonic Express Labeler 烧录 LightScribe 标签.. (76)使用胶粘光盘标签 (76)兼容性信息 (76)光盘特性及兼容性图表 (77)光驱快速参考图表 (78)软件快速参考图表 (79)制作视频光盘和影片 (81)开始捕获影片之前 (81)Sonic MyDVD Video 项目 (82)制作视频项目 (82)将文件添加到视频项目 (83)为视频项目捕获视频 (83)将幻灯片添加到视频项目 (84)将子菜单添加到视频项目 (84)编辑视频项目的样式 (85)编辑影片文件 (85)将视频项目刻录到光盘 (86)使用 Direct-to-Disc 向导制作视频项目 (87)视频质量和光盘尺寸 (88)DVD 刻录时间 (89)使用 muvee autoProducer 制作影像 (91)制作影像的基本步骤 (91)定位 muvee autoProducer 的两种版本 (92)使用桌面上的 muvee autoProducer (93)从桌面开始 (93)从数码视频摄像机截取影像 (94)加入影像 (95)加入图片 (96)加入音乐 (97)选择风格 (97)更改设置 (97)加入开场标题和结束署名 (98)制作影像 (99)预览影像 (99)修改影像 (100)保存影像项目 (101)将影像项目刻录到光碟 (102)在 Media Center 中使用 muvee autoProducer unPlugged (103)选择影像 (104)选择图片 (104)选择音乐 (105)选择风格 (106)调整音频和视频设置 (106)制作影像 (107)升级 muvee autoProducer (108)iv HP Media Center PC 软件指南使用 HP Personal Media Drive (109)安装 HP Personal Media Drive 使其与 Media Center协同工作 (109)安装后找到硬盘驱动器 (110)为 HP Personal Media Drive 指定一个盘符 (110)查看和存储文件 (110)播放媒体文件 (111)播放音乐文件 (111)查看图片文件 (111)播放视频文件 (112)观看 HP Personal Media Drive 中存储的电视节目 (112)关于将电视录制到 HP Personal Media Drive (113)将电视节目录制到 HP Personal Media Drive (114)将电视录制路径更改为 HP Personal Media Drive (114)将电视录制路径更改至本地硬盘 (115)安全断开 HP Personal Media Drive 的连接 (115)更改磁盘分配 (116)移除 HP Personal Media Drive 后更新录制的电视列表 (116)在其他电脑上观看录制的电视节目所需的系统配置 (116)索引 (117)目录vvi HP Media Center PC 软件指南欢迎感受 Media Center 带给您的无穷乐趣Microsoft® Windows® XP Media Center Edition2005 with Update Rollup 2 像一支魔术棒,它可以使您的电脑变得愈加神奇。


XXXXXXX技术方案解决书索贝数码科技股份有限公司SOBEY DIGITAL TECHNOLOGY CO. LTD.【版权所有不得复制】目录概述 (3)第1章产品设计原则 (4)第2章产品总体设计 (6)2.1 产品设计理念 (6)2.2 产品适用范围 (6)2.3 产品形态及组成 (7)2.4 产品软件模块 (8)2.5 产品格式支持 (9)2.6 产品业务流程 (10)2.7 数据安全(选配) (11)第3章产品优势亮点 (12)1.1 产品特色 (12)1.2 技术亮点 (14)第4章系统功能介绍 (15)1.3 素材上载 (15)1.4 素材检索 (16)1.5 我的任务 (18)1.6 素材编目 (19)1.7 故事板 (20)1.8 资料集 (21)1.9 归档管理 (22)1.10 素材下载 (24)1.11 系统设置 (25)1.12 外部系统交互 (27)概述随着多媒体技术的不断发展,在各个领域的应用也得到了空前的普及。
多媒体作为一种新兴的记录手段,被越来越多的应用到各个单位的日常工作中。
媒体资产数字化、信息化、网络化、智能化是当前多媒体资料管理发展的必然趋势。
媒体资源的多样性应用(一个节目被多种形式媒体采用)和重复使用(许多节目或素材被重新编辑后产生新的价值)是其潜藏价值的集中体现。
而目前影视录像带、唱片等多媒体资料的审看是通过从大量无序的录像带和光盘中查找、调用,再通过录像机播放,效率非常低,且共享性能差,已经不能适应数字化时代飞速发展的需要。
同时,随着岁月的流逝,许多保存着珍贵的历史资料和素材的载体磁带,出现磁迹丢失、受潮发霉等情况,使这些无价之宝遭受灭顶之灾。
如何最大价值的发挥节目资源的优势,高效的解决节目资源的整理、复制和保存工作,索贝公司推出了多媒体资源中心系列产品(Multimedia Resource Center简称MRC),MRC 的推出,完美的解决了上述的各种矛盾。

XMAM媒体资产管理系统版本:V1.0XMAM快速使用指南索贝数码科技股份有限公司高新区新加坡工业园新园南二路2号四川,成都中国声明版权所有© 2008 Sobey Corporation. 保留所有权利。
未经本公司书面许可,任何个人和单位不得摘抄或者复制本手册内容的部分或者全部,并不得以任何形式进行传播。
由于产品版本升级或其它原因,本手册内容会不定期更新,恕不另行通知。
本手册仅作为使用指导,本手册中的内容不构成任何明示或暗示的担保。
本手册所包含的商标都属各自所有人所有。
关于本手册本手册适用于所有XMAM媒体资产管理系统的用户,并作为用户使用此软件的标准指导手册。
本手册作为XMAM媒体资产管理系统的组成部分,全面介绍了系统的各项功能及其使用方法,提供了由易到难的面向用户的任务向导型描述。
目录第1章概述 (1)第2章快速使用指南 (2)2.1运行与退出软件 (2)2.1.1 运行软件 (3)2.1.2 退出软件 (3)2.2内容上载 (3)2.3任务审核 (3)2.3.1 上载任务审核 (4)2.3.2 下载任务审核 (5)2.4资料编目 (7)2.4.1 一层编目.......................................................................................................................... 错误!未定义书签。
2.4.2 二层编目.......................................................................................................................... 错误!未定义书签。
2.4.3 关键帧 .............................................................................................................................. 错误!未定义书签。


媒体资源管理系统使用指南郑州上画一、清除结果该选项仅对本页面生成及录入项进行自动删除,不对总表其他数据做任何修改。
二、核对与添加该项两个作用:1.不再单元格客户名称后方单元格G1内录入客户名称,则仅对该客户所选点位做核对,确认所选点位是否可用,但不做录入。
2.如单元格G1录入有客户名称,则在总表内正式占用该点位位置。
注意事项:客户所选点位不能有空行,空行判定已经执行完毕,会造成录入不准确;客户名称命名规则建议采用客户名称+录入时间,并与阅报栏合同日期表中名称相同,便于查找;录入操作期间,不建议其他操作,避免重复录入,意外删除。
录入结束后,请将录入结果反馈重新归档,转交业务员。
操作完成后,请点击清除结果按钮,便于下次使用,并避免误操作。
三、查找指定客户1.在单元格G1(客户名称后方单元格)录入所要查找的客户名称,点击查找指定客户按钮,即可生成该客户所选点位。
2.因兼顾表格的准确性,本项查找功能不支持模糊查询,建议录入客户名称前,与阅报栏合同日期表核对,或在总表中核对客户名称后,再填写。
3.查找指定客户生成表使用后,请及时点清除结果按钮清除。
四、删除指定客户1.在单元格G1(客户名称后方单元格)录入所要删除的客户名称,点击删除指定客户按钮,即可删除该客户在总表中所占用的点位。
2.因兼顾表格的准确性,本项查找功能不支持模糊查询,建议录入客户名称前,与阅报栏合同日期表核对,或在总表中核对客户名称后,再填写。
五、下撤指定点位客户该功能用在客户部分点位调整中,下撤部分客户点位,请务必在G1单元格录入与原录入客户同名,才能正确删除。
六、最新点位生成直接点击最新点位生成按钮即可生成最新可发布点位。
七、编号核对该功能用于只知道编号,不知道具体点位时,在第一列录入需要查询的编号,即可自动添加相应的点位详细信息。
八、断电位置添加从第二行粘贴售后断电位置表,点击断电位置添加按钮即可在总表中生成断电。
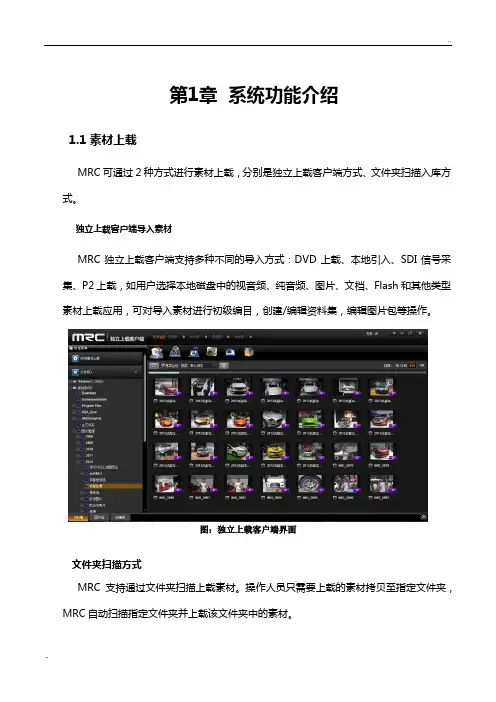
第1章系统功能介绍1.1 素材上载MRC可通过2种方式进行素材上载,分别是独立上载客户端方式、文件夹扫描入库方式。
独立上载客户端导入素材MRC独立上载客户端支持多种不同的导入方式:DVD上载、本地引入、SDI信号采集、P2上载,如用户选择本地磁盘中的视音频、纯音频、图片、文档、Flash和其他类型素材上载应用,可对导入素材进行初级编目,创建/编辑资料集,编辑图片包等操作。
图:独立上载客户端界面文件夹扫描方式MRC支持通过文件夹扫描上载素材。
操作人员只需要上载的素材拷贝至指定文件夹,MRC自动扫描指定文件夹并上载该文件夹中的素材。
1.2 素材检索MRC检索提供便捷的B/S检索,随处可用IE登录访问。
支持索贝高效的全文检索引擎以及第三方全文检索引擎无缝嵌入,提供类似于“Google”的个性化检索方式,高级检索中可针对不同的文件类型自动切换到对应的检索过滤条件上。
图:检索主界面全文检索:根据事先对素材信息建立的全文索引进行模糊查找,并将查找的结果反馈给用户的检索方式。
在不知道素材的具体属性时可以选择此种检索方式,反馈给用户模糊检索结果,供用户筛选自己所需的素材。
高级检索:高级检索是直接从数据库检索数据,可以自由组合检索条件,更加准确地定位所需要的素材。
提供可自由组合的常用条件:素材名、入库时间、存储状态、创建者等。
对素材属性比较熟悉的情况下,可选此方式,可精确快速的定位到所需素材。
图:高级检索智能条件检索:智能条件根据不同的文件类型,抽取出文件类型特殊信息共用户检索。
如按照图片尺寸、图片格式、图片颜色等方式检索图:图片类型检索按照文档格式、文档内容方式检索图:文档类型检索1.3 我的任务我的任务是系统的任务管理、调度与控制中心。
通过任务控制中心,用户能够将自己发起任务重做、终止等,并对这些任务进行控制和管理:主要功能如下:●任务执行状态:用户可以查看各类任务执行的状态,以及在流程中执行到什么步骤,并进行相关排序、查询操作。

中心管理软件使用说明书目录1 概述 (3)1.1 软件概述 (3)1.2 软件的主要功能 (3)2 软件安装 (4)2.1 软件运行环境 (4)2.2 软件安装 (5)2.3 软件卸载 (5)3 中心管理软件操作手册 (5)3.1 登录 (5)3.2 软件主界面及功能介绍 (6)3.2.1 主界面 (6)3.2.2 图像显示窗口 (7)3.2.3 操作按钮 (7)3.2.4 广播对讲 (7)3.2.5 画面显示控制 (8)3.2.6 系统功能按键 (8)3.3 摄像机分组 (8)3.3.1 设备搜索添加管理 (9)3.3.2 手动添加设备 (10)3.4 系统设置 (10)3.4.1 一般设置 (10)3.4.2 用户管理 (11)3.4.3 录像存储 (12)3.4.4 报警设置 (13)3.4.5 运行模式 (13)3.5 录像回放 (15)1 概述1.1 软件概述中心管理软件用于实现对前端所有网络视频监控设备(包括网络视频服务器、网络存储视频服务器、网络摄像机)的集中监视、存储、管理和控制。
该管理软件可最大同时管理1728个前端网络监控设备;可对任一设备进行设置和控制,远程升级等功能;支持1/4/9/16/36画面单屏显示,以及双向语音对讲、电子地图、日志检索、报警控制、远程检索回放等功能。
功能强大、界面友好、操作简便,方便用户实现大型远程网络监控系统的组网应用。
1.2 软件的主要功能◆可同时管理1728路音视频通道(48组)◆可对前端所有网络视频监控设备(包括网络视频服务器、网络摄像机)进行集中监视、存储、数据转发、管理和控制。
◆可显示电子地图◆可实时图像监视预览、轮巡监视◆可手动调节监听音量◆可双向语音对讲、语音广播◆录像(预录像、手动录像、报警联动录像、定时录像)◆可提供通道、日期录像检索回放◆云台控制(支持40多种解码器球机协议),预置、调用,轨迹调用◆支持报警联动调用预置位◆支持视频丢失、视频移动、网络异常中断、前端探头触发报警◆日志管理(可查询系统操作记录,报警记录)◆后端抓拍、前端抓拍◆DDNS(动态域名解析)◆PPPOE(拨号上网功能)◆被动连接模式(DVS主动连接模式)2.1 软件运行环境操作系统◆32位简体中/英文Windows2000、Windows2003、WindowsXP、Windows Vista和64位简体中/英文Windows2000、Windows2003、WindowsXP、Windwos Vista等操作系统硬件环境最低配置◆CPU: 奔腾2.1Ghz◆内存:256 MB◆显示卡:TNT2◆声卡:需要语音监听、双向对讲时必备◆硬盘:如需要录制图像,应不低于40G硬件环境推荐配置◆CPU:奔腾2.6GMhz◆内存:512MB◆显示卡:Nvidia Geforce FX5200 或者 ATI RADEON 7000(9000) 系列128M显存<显卡需支持硬件缩放功能>软件环境◆IE 6.0以上版本◆DirectX8.0以上版本◆TCP/IP网络协议支持的分辫率◆支持1024*768、1280*800两种分辨率工作模式。
1、 安装编程软件,步骤略2、 双击桌面 图标,启动软件程序,进入编程界面,如下图所示上图为动作编辑界面,另可切换到遥控器编辑界面及设置界面2-1 编辑动作时可以点击关节显示区对应的关节名称,也可以直接在视图显示区点击需要调整的关节而进行选择,注意:当选择其它如“机器人旋转”按钮后再选择关节时需要点击第一个按钮“关节选择”按钮,然后再点击画面上的关节2-2 编辑动作时可以直接在画面上拖动选择的关节旋转到所需要的角度,也可以在右下角的输入框输入数值,还可以在轮盘上用鼠标拖动指针以达到需要的角度。
注意:以上方法无论哪一种,视图内的相应关节均会随着旋转相应的角度2-3 动作中单帧动作的调整,左键单击可对该帧进行复制、镜像、删除等编辑BA、单击A按钮,调整该帧动作的过渡时间,精确到0.1秒,如下图所示B、单击B按钮,调整该帧动作的暂停时间,精确到0.1秒,如下图所示C、单击C按钮,选择该帧动作所需配置的音乐文件,如下图所示操作时,如需要在该帧加音乐,则在“音轨”下拉菜单处选择“开”,“输出”栏下的“开”打勾,“输入”栏下的对应编号打勾,“音频”下的选项为所需加载的音乐文件ID号,对应“设置”界面的“音频”ID注意:默认状态下第一帧的音乐会不管该帧动作的时间长短而一直唱到音乐结束,除非在需要停止该音乐文件处将输出栏下的“输出”音乐文件对应ID选择“关”2-3 完成动作后保存动作文档到硬盘内3、点击“遥控器”按钮进入遥控器编辑界面,如下图所示上图为遥控器编辑界面3-1 点击组合键编辑区的“新增”按钮,设置一个新的组合键,随后可以在弹出的对话框内输入组合键的名称(任意数字或字母)然后“完成”3-2 选择想要设置的遥控器组合按键,可以单个按键也可多个按键组合成一组,如下图示例的两个按键组合3-3 点击“组合键动作编辑区”的“增加”按钮,在弹出的对话框内选择已保存的动作程序,然后点击“打开”4、点击“设置”按钮切换到设置界面,如下图所示:4-1 下载COM口设置上图为下载端口设置界面当下载连接线与机器人连接好后,将机器人电源打开,选择正确的连接线下载端口注意:此处的连接线连接好后可在电脑里找到对应的COM口,此步骤省略当机器人的关节出现些许偏差时可进行相应的调节,调整时可从输入框中输入数值也可从轮盘处拖动指针到对应的位置4-3 机器人原点调整界面框中输入数值,也可从转动轮盘上拖动指针以达到需要的位置4-5 音频控制界面点击“增加”或双击“ID”/“文件名称”可增加音频文件,注意:音频文件的格式为WA VE,能下载的最大音频文件容量为1M左右,可从显示区下的百分数处看出已用多少空间5、连接下载线,打开机器人电源,在COM口设置界面将下载口正确设置6、点击软件界面顶端的图标,将机器人与电脑导通注意:6-1在导通后,编辑动作时机器人会随着软件内关节的调整而变化对应关节,可在线调试机器人动作,此时需用手扶住机器人,以防止摔倒。
J MRCP服务器使用说明书 MRCPv v2服务器使用说明书北京捷通华声语音技术有限公司2010年5月12日版本历史时间版本号修改人内容2008-9-4 1.0 语音平台开发组创建2009-5-6 1.1 语音平台开发组修改2010-5-12 1.2 语音平台开发组修改目录术语表 (4)一、引言 (1)二、安装与卸载 (1)2.1硬件配置环境 (1)2.2软件配置环境 (1)2.3软件安装 (1)2.4软件卸载 (6)三、MRCP服务配置工具使用说明 (8)3.1M RCP V ERSION (M RCP协议版本) (9)3.2M AX S ESSION N UMBER (最大SIP会话线数) (9)3.3S ESSION M AX L IFE T IME (SIP会话的最大生存时间) (9)3.4RTP P ORT S COPE(可以使用的R TP端口范围) (9)3.5RTP T IME S LICE (RTP报文发送的时间片) (10)3.6.MRCP L ISTEN P ORT (MRCP监听端口) (10)3.7SIP L ISTEN P ORT (SIP监听端口) (10)3.8.TTS P LUGIN(TTS P LUG-IN动态库路径) (10)3.9L OCAL IP(本地IP地址) (10)3.10LOG(日志配置) (10)3.11TTSS ERVER(配置TTS服务) (11)3.12IPC(MRCP服务进程控制配置) (11)四、RM(资源管理)服务配置工具使用说明 (12)4.1SIP R EQUEST A GENT (13)4.2L OG (13)4.3S ERVICE IPC (14)4.4控制按键说明 (14)五、协议支持 (15)5.1SIP消息支持 (15)5.2SDP支持 (15)5.3MRCP支持 (16)六、JMRCPV2服务器使用说明 (20)6.1服务器配置操作使用说明 (20)6.2服务启动 (21)6.3服务关闭 (21)6.4注册服务 (22)6.5注销服务 (22)七、常见问题解答 (22)7.1服务不能启动 (22)7.2 J M RCPV2服务返回405错误或没有语音数据合成 (23)八技术支持 (24)术语表MRCP V2(MRCP V2(Media Resource Control Protocol Version 2Media Resource Control Protocol Version 2Media Resource Control Protocol Version 2): ):): The MRCPv2 protocol allows client hosts to control media service resources such as speech synthesizers, recognizers, verifiers and identifiers residing in servers on the network. 请见:/proceedings/06nov/IDs/draft-ietf-speechsc-mrcpv2-11.txt .Server MRCP Server::Aggregate of one or more "Media Resource" entities on a Server, exposed through the MRCPv2 protocol ("Server" for short).Client MRCP Client DualDual:Tone Multi-Frequency; a method of transmitting key presses in-band, either as actual tones (Q.23 [29]) or as named tone events (RFC2833 [30]).SIP SIP((Protocol Session Initiation Protocol):):SIP 为会话初试化协议,被描述为用来生成,修改和终结一个或多个参与者之间的会话。
北京龙腾鸿志科技发展有限公司Beijing Great ldeal Like Flying Gragon S&T Co.Lt北京龙腾鸿志公司超越TL-MZGL媒资管理系统说明书联系人:董博159****3112销售部:************传真:************北京龙腾鸿志科技发展有限公司- 1 - 地址:北京市朝阳区望京南湖西园中广宜景湾A座1103电话:************159****3112联系人:董博北京龙腾鸿志科技发展有限公司Beijing Great ldeal Like Flying Gragon S&T Co.Lt第一章系统初始化1.1系统简介随着广播电视行业的发展,节目量剧增,传统的以磁带为介质的节目保存、使用方式面临许多问题:(1)磁带寿命有限,以往保存在磁带上的大量有价值的视音频资料需要抢救。
(2)多种格式介质并存,经常要转换格式引致质量下降、效率低下,对台- 2 - 地址:北京市朝阳区望京南湖西园中广宜景湾A座1103 电话:************ 159****3112联系人:董博北京龙腾鸿志科技发展有限公司Beijing Great ldeal Like Flying Gragon S&T Co.Lt服务器软件配置:Microsoft Windows 2000 Server操作系统工作站软件配置:Microsoft Windows 2000操作系统,安装Windows 2000 sp4系统补丁,或Microsoft Windows XP操作系统,安装Windows XP sp2系统补丁;DirectX:DirectX8.1以上版本。
1.3硬件加密锁的安装将硬件加密锁安装在计算机的USB端口上。
1.4软件安装打开安装光盘,双击“SpeedMedia Setup.exe”文件,运行安装程序。
根据安装程序提示完成安装。
KMC100KMCMEDIA CENTEROwner’s Manual2Owner’s ManualMedia CenterMulti-Media Receiver w/ USB, Bluetooth and SiriusXM-Ready™Thank you for purchasing the KMC100 Media Center. We recommendreading through the entire manual for detailed instructions on how to installand operate the unit. For support please call: 1-800-844-2774Purchase Date:Serial Number:SiriusXM Radio ID:(SiriusXM® Connect Tuner sold separately)ITEMS INCLUDED:(1) KMC100 (1) Trim Ring (1) Wiring Harness (1) UV Cover(1) Mounting Gasket (1) Owner’s ManualFCC Compliance StatementThis equipment has been tested and found to comply with the limits for a Class B digital device, pursuant to part 15 of the FCC Rules. These limits are designed to provide more reasonable protection against harmful interference in a residential installation.Operation is subjected to the following two conditions: (1) This device maynot cause harmful interference, and (2) the device must accept any interference re-ceived, including interference that may cause undesired operation.This equipment generates, uses, and can radiate radio frequency energy and, if not installed and used in accordance with the instructions, may causeharmful interference to radio communications. However, there is no guarantee that interference will not occur in a particular installation. If this equipment does cause harmful interference to radio or television reception, which can be determined by turn-ing the equipment off and on, you are encouraged to try to correct the interference by one of the following measures:• Reorient or relocate the receiving antenna.• Increase the separation between the equipment and receiver.• Connect the equipment into an outlet on a circuit different from that to which the receiver is connected.• Consult the dealer or an experienced radio/TV technician for helpChanges or modifications not expressly approved by the party responsible for compli -ance could void the user’s authority to operate the equipment.The equipment should be installed and operated with minimum distance 20cm between the radiator & your body.CEOperation temperature: (-25°C~55°C )Bluetooth: 2402-2480MHzBluetooth transmitter power: 4.33dBmHereby declares that this equipment is in compliance with essential requirements and other relevant provisions of Directive 2014/53/EU.All radio frequencies can be used in all EU member safe without restrictions.3Installation Overview1- RGB Black +12v 2- RGB Red GND 3- RGB Green GND 4- RGB Blue GND1. Main Harness 13. Front RCA Output 14. Rear RCA Output15. Subwoofer RCA Output 16. Zone 2 RCA Output5.5”4The button layout below will give you a quick overview of the button functionality.BUTTONS:1 - Source 2 - Favorites 3 - Menu4 - Back/Return5 - Seek/Tune Down6 - Play/Pause7 - Seek/Tune Up8 - Volume KnobFunction: How To:Power On Hold the Source (1) button for 2 seconds.Power Off Hold the Source (1) button for 2 seconds.Volume Up Turn the knob (8) clockwise.Volume Down Turn the knob (8) counter-clockwise.Seek Up Press Seek Up (7) once.Seek Down Press Seek Down (5) once.Tune Up Hold down Seek Up (7).Tune Down Hold down Seek Down (5).Enter/Select Press the Knob (8) inward once.Pause/Play Press Play/Pause (6) once.Mute Press Play/Pause (6) once.Back Press Back (4) once.12384567DISPLAYKMC100 Settings MENUTo enter the Settings Menu : Hold the MENU (3) button for 2 seconds.Rotate the knob to scroll between menu items and press enter on knob to select.Available Settings are:Day/Night:The Day/Night feature allows you to change the color scheme from Day Mode to Night Mode. The unit is defaulted to auto switch when your lights are turned on. In order for the unit to automatically switch between day and night modes, the orange illumination wire must be connected. You can also set the unit to stay in either Day mode or Night mode by rotating the knob and selecting the desired setting.Dimmer:The Dimmer allows you to adjust the brightness of the screen, and buttons. You can adjust the brightness from 0 to +12.Low Battery Alert:The Low Battery Alert setting allows you to turn ON /OFF the Low Battery Alert. When set to ON, if the unit drops below 10.5V , the unit will display a visual and audible alert warning that your batteries need charged.Tuner:Allows you to change the region for the tuner.Your available options: USA , EUROPE5KMC100 Settings MENU Cont.Zone 2:The Zone 2 feature gives you the ability to have a secondary volume control. Within Zone 2 there are 4 additional settings:High Pass Crossover:Adjusts the high-pass crossover for internal channels and Front, Rear, Zone 2 RCA outputs.Your available options: OFF , 50Hz, 80Hz, 120Hz.Loudness:Turns the loudness setting ON/OFF .Voltmeter:Turns the voltmeter display ON /OFF .ON/OFF:Allows you to turn the 2nd Zone volume control ON and OFF .NAMING:Allows you to change the Zone 2 name.Your available options: Zone 2, Tower, Transom, Cockpit, Interior.Control:Allows you to select which connection is controlled by the Zone 2 volume.a. Internal Power- Zone 2 internal channels are controlled by Zone 2 volume. Zone 2 RCA is controlled by Zone 1 volume.b. Preamp- Zone 2 RCA is controlled by the Zone 2 volume. Zone 2 internal channels are controlled by Zone 1 volume.c. Both- Zone 2 internal channels and Zone 2 RCA are controlled by Zone 2 volume.Absolute/Relative:The Absolute and Relative setting for Zone 2 change the behavior of the Zone 2 volume control with regard to the main zone volume.a. Relative- When the main zone volume is increased or decreased, Zone 2 volume will adjust up or down accordingly.b. Absolute- When the main zone volume is increased or decreased, Zone 2 volume will remain at the same level until adjusted independently.SourcesTo change any of the sources, press the Source button on the KMC100. Rotating the knob left or right will scroll through the available sources and pressing enter will select the source.FM Source:AM Source:Weatherband (WX) Source:USB Source:Function: How To: Seek Up: Press the Seek Up (7) button once. Seek Down: Press the Seek Down (5) button once. Tune Up: Hold the Tune Up (7) button for 2 seconds. Then press (7) once. Tune Down: Hold the Tune Down (5) button for 2 seconds. Then press (5) once. Mute: Press the Play/Pause button.Function: How To: Seek Up: Press the Seek Up (7) button once. Seek Down: Press the Seek Down (5) button once. Tune Up: Hold the Tune Up (7) button for 2 seconds. Then press (7) once. Tune Down: Hold the Tune Down (5) button for 2 seconds. Then press (5) once. Mute: Press the Play/Pause button.Function: How To: Seek Up: Press the Seek Up (7) button once. Seek Down: Press the Seek Down (5) button once. Tune Up: Hold the Tune Up (7) button for 2 seconds. Then press (7) once. Tune Down: Hold the Tune Down (5) button for 2 seconds. Then press (5) once. Mute: Press the Play/Pause button.Function: How To: Next Track: Press the Seek Up (7) button once. Previous Track: Press the Seek Down (5) button once. Fast Forward: Hold the Tune Up (7) button. Rewind: Hold the Tune Down (5) button. Pause: Press the Play/Pause button.AUX Input Source:Function: How To: Mute: Press the Play/Pause button. Bluetooth Source:Function: How To: Next Track: Press the Seek Up (7) button once. Previous Track: Press the Seek Down (5) button once. Pause: Press the Play/Pause button. Bluetooth Device Name: Media Center. There is no password required.SiriusXM Source:Function: How To: Channel Up: Press the Seek Up (7) button once. Channel Down: Press the Seek Down (5) button once. Fast Browse Up: Hold the Tune Up (7) button. Fast Browse Down: Hold the Tune Down (5) button. Mute: Press the Play/Pause button.The SiriusXM source allows you to access SiriusXM satellite radio. SiriusXM Connect Tuner and subscription required and sold separately.67FAVORITESCamera/Video InputThe Favorites button will allow you to view and set your favorite station from the following sources: FM - AM - WX - SXM 16 favorites can be set.This feature allows you to connect an external camera or video source and view it though the KMC100. A reverse trigger is provided to activate the camera when putting the vehicle in reverse or you may select the video input manually. The reverse trigger is a +12v trigger.Setting a Favorite1. Select the station you wish to add to the favorites list.2. Press the Favorites button and select the Favorites preset you wish to set.3. Press and Hold the knob (8) button for 2 seconds to set.Entering Video Input Manually1. Press and Hold the Favorites button to display the connected device on the screen.2. Press and Hold the Favorites button to exit the video input mode.Audio SettingsAudio Settings Cont.Audio Menu: Press the knob for 2 seconds from any source screen to enter the Audio Settings Menu. Rotating the knob left and right will scroll between the available settings. Pressing the knob will select highlighted setting.Equalizer: When the EQ is ON, Bass, Mid & Treble controls are not accessible. The KMC100 has the following preset options for the EQ:OFF - ROCK - POP - JAZZ - CUSTOM. Rotating the knob left and right to scroll between the options and press knob (8) to select. To en-able Bass, Mid & Treble controls, EQ must be set to OFF .Bass: Rotate the knob left and right to adjust the Bass. Pressing enter will confirm setting. Adjustment is from -6 to +6.Mid: Rotate the knob left and right to adjust the Midrange. Pressing enter will confirm setting. Adjustment is from -6 to +6.Treble: Rotate the knob left and right to adjust the Treble. Pressing enter will confirm setting. Adjustment is from -6 to +6.Balance: Rotate the knob left and right to adjust the Balance. Pressing enter will confirm setting. Adjustment is from Left 6 to Right 6.Fader: Rotate the knob left and right to adjust the Fader. Pressing knob (8) will confirm setting. Adjustment is from Front 6 to Rear 6.Sub: Rotate the knob left and right to adjust the Subwoofer level. Pressing enter will confirm setting. Adjustment is from 0 to +12.When using the CUSTOM EQ you can adjust the following frequencies:50Hz - 125Hz - 250Hz - 500Hz - 1kHz - 3kHz - 8kHzIn each of these frequencies you can adjust the values from -6 to 6.Source Specific Menus Source Specific Menus Cont.Press and release the Menu button while in the following sources will bring up Source Specific Menu items: WX - USB - BT - AUX - SiriusXM. Rotate the knob to adjust the settings and press enter to confirm.WX Menu:Auto-Alert On and OFF - this feature will automatically interrupt any source and tune to Weatherband for an alert message.USB Menu:BROWSE: Displays all files/folders available for playback. Rotate the knob to scroll through the items and press knob (8) to begin playback of selected track.REPEAT: Allows you to select Repeat for Current Playlist or Repeat Off. SHUFFLE: Allows you to turn Shuffle tracks for Current Playlist,All Tracks or Off.DME: Digital Music Enhancer. This feature will enhance the sound quality of compressed music files. Setting is ON/OFF.BLUETOOTH Menu:ENTER PAIRING MODE: Places the device in to pairing mode.Device Name: Media CenterIn order to pair your phone to the Media Center you must:1. Make sure the Bluetooth is turned “ON”, on your device.2. Search for “Media Center”.3. Connect/ Trust the device to begin streaming music.(No password required)Select Device: Allows you to view all paired devices and select the device you wish to use for playback.Disconnect Current Device: Disconnects the current paired device and connects to the next device on the list.Delete Device: Allows you to view all paired devices and select the device you wish to delete.Delete All Devices: Deletes all stored Bluetooth® devices from memory and puts the unit into pairing mode.8SiriusXM® Radio OperationOnly SiriusXM® brings you more of what you love to listen to, all in one place. Get over140 channels, including commercial-free music plus the best sports, news, talk, comedy and entertainment. Welcome to the world of satellite radio. A SiriusXM Connect Tuner and Subscription are required. For more information, visit Activating your SiriusXM SubscriptionAfter installing your SiriusXM Connect Tuner and antenna, power on your KMC100 and select SiriusXM mode. You should be able to hear the SiriusXM preview channel on Channel 1. If you cannot hear the preview channels, please check the installation instructions to make sure your SiriusXM Connect Tuner is properly installed.After you can hear the Preview channel, tune to Channel 0 to find the Radio ID of your tuner. In addition, the Radio ID is located on the bottom of the SiriusXM Connect Tuner. You will need this number to activate your subscription. Write the number down for reference.Note: the SiriusXM Radio ID does not include the letters I, O, S or F.In the USA, you can activate online or by calling SiriusXM Listener care:• Visit /activatenow• Call SiriusXM Listener Care at 1-866-635-2349For Canadian Subscriptions, please contact:• Visit www.siriusxm.ca/activatexm• Call XM customer Care at 1-877-438-9677When your radio detects that the tuner has received the activation message, your radio will display: “Subscription Updated”. Once subscribed, you can tune to channels in your subscription plan. Note, the activation process usually takes 10 to 15 minutes, but may take up to an hour. Your radio will need to be powered on and receiving the SiriusXM signal to receive the activation message.910SiriusXM Radio Operation Cont.Alternate tuning options and settingsPress MENU and rotate the knob to select an alternate tuning method or system setting below:Channel Browse: Allows users to browse SiriusXM channels before selec-tion. Rotating the knob left and right will scroll through the channel lineup. Pressing enter will select highlighted channel and begin playback.Category Browse: Allows users to browse SiriusXM categories. Rotating the knob left and right will scroll through the different categories. Pressing the knob (8) on the highlighted category will show a list of available channels within that category. Pressing the knob (8) again will select the highlighted channel and begin playback.DIRECT TUNING: Allows you to manually enter in the channel number you wish to tune to. Rotate the volume knob to adjust the digit, then press the knob (8) to select the next digit. Once the channel number has been entered, the unit will tune to that channel and begin playback.RESET: Allows you to Reset the KMC100 to the SiriusXM factory defaults. Parental Controls will be disabled and lock code restored to the default.PARENTAL CONTROLS: Allows you to limit access to SiriusXM channels with mature content. When enabled, the Parental Control feature requires you to enter a passcode to tune to the locked RMATION: Displays SiriusXM Radio ID.SiriusXM Parental Controls Cont.ENABLE PARENTAL CONTROLS: After choosing to enable the parental controls, you will be prompted to enter a 4-Digit passcode: Default Pass-code is 0000. Rotate the volume knob to adjust the digit, then press the knob (8) to select the next digit.MANAGE PASSWORD: With the password set, you will also be given the option to MANAGE your password, which allows you to change/reset the current passcode.DISABLE PARENTAL CONTROLS: Select Disable Parental Controls, to remove all mature channel restrictions.SiriusXM Connect Tuner and Subscription sold Sirius, XM and all related marks and logos are trademarks of Sirius XM Radio Inc. All rights reserved.The following checklist will help you remedy problems you may encounter with your unit. Before going through the checklist below, checkthe connection and operating procedures. If the problem is not solved, please contact your local KICKER retailer or call 1-800-844-2774.GeneralNo power is being supplied to the unit- Check to ensure 12V is being supplied to the red wire and the black wire has a good ground.-Press the Source button.No Sound- Check to ensure amplifiers (if applicable) are on.- Check to ensure fader is in the middle (0) position.The buttons will not function- Perform Master Reset by holding the Play/Pause button down for 10 seconds.Radio ReceptionStations cannot be received- Check Antenna for proper connection.- The broadcast signal is too weak.- Ensure Tuner in Settings Menu is setto proper region.RDSRDS Information is not displayed- The current station is not an RDS station.- RDS data has not been received.USB playbackYou cannot play back items via a USB hub.- This unit cannot recognize USB devices via a USB hub.A USB device takes longer to play back.- The USB device contains files with a complicated tree structure or contains a large amount of files.The sound is intermittent.- The sound may be intermittent at a high-bit-rate of more than 320 kbps.11For SiriusXM Radio operation:Check Antenna- The radio has detected a fault with the SiriusXM antenna. The antenna cable may be either disconnected or damaged.- Verify that the antenna cable is connected to the SiriusXM Connect Tuner.- Inspect the antenna cable for damage and kinks. Replace the antenna if the cable is damaged. SiriusXM products are available at your local retailer or online at Check Tuner- The radio is having difficulty communicating with the SiriusXM Connect Tuner.- The tuner may be disconnected or damaged.- Verify that the SiriusXM Connect Tuner cable is securely connected to the radio.No Signal- The SiriusXM Connect Tuner is having difficulty receiving the SiriusXM satellite signal.- Verify that your vehicle is outdoors with a clear view of the sky.- Verify that the SiriusXM antenna is mounted on the outside of the vehicle.- Move the SiriusXM antenna away from any obstructions.- Inspect the antenna cable for damage and kinks.- Consult the SiriusXM Connect Tuner installation manual for more information on antenna installation. Replace the antenna if the cable is damaged. SiriusXM products are available at your local retailer or online at Subscription Updated- The radio has detected a change in your SiriusXM subscription status. Press the knob (8) to clear the message. Visit www. or call 866-635-2349 if you have questions about your subscription.Channel Not Available- The channel you have requested is not a valid SiriusXM channel or the channel that you were listening to is no longer available. You may also see this message briefly when first connecting a new SiriusXM Connect Tuner.- Visit for more information about the SiriusXM channel lineup.Channel Not Subscribed- The channel that you have requested is not included in your SiriusXM subscription package or the channel that you were listeningto is no longer included in your SiriusXM subscription package.- Visit or call 866-635-2349 if you have questions about your subscription package or would like to subscribe to this channel.Channel Locked- The channel that you have requested is Locked by the radio Parental Control feature. See page 10 for more information on the Parental Con-trol feature and how to access locked channels. Default Passcode is 0000.12WARRANTYElectronics Limited Warranty (including KICKER Accessories)When purchased from an Authorized KICKER Dealer, CPS warrants this product to be free from defects in material and workmanship under normal use fora period of ONE (1) YEAR from date of original purchase with receipt. If this product is identified as “Refurbished” or “B Goods”, the warranty is limited toa period of THREE (3) MONTHS from the date of original purchase. In all cases you must have the original receipt. Should service be necessary under this warranty for any reason due to manufacturing defect or malfunction during the warranty period, CPS will repair or replace (at its discretion) the defective merchandise with equivalent merchandise. Warranty replacements may have cosmetic scratches and blemishes. Discontinued products may be replacedwith more current equivalent products. Warranty is valid only for the original purchaser and is not extended to owners of the product subsequent to theoriginal purchaser. Any applicable implied warranties are limited in duration to a period of the express warranty as provided herein beginning with the date ofthe original purchase at retail, and no warranties, whether express or implied, shall apply to this product thereafter.© 2019 CPS Distributors, Inc.6024 Parretta Dr. Kansas City, MO 64120800-844-2774131415。
2014媒资使用说明书(公版new)|媒体资产管理系统指令概述媒体是内容资产的载体,内容是媒体的表达,它们相辅相成,相互依存。
如果媒体不能完全管理内容,没有正确使用的内容自然不能帮助媒体。
在信息时代,媒体竞争异常激烈,内容需要管理。
只有有效的内容资产管理才能使媒体在竞争中脱颖而出。
什么是的有效管理?让我们举一个简单的例子:一个突然的国际新闻事件,比如戴安娜王妃戏剧性的车祸死亡。
消息一发布,各大新闻媒体纷纷回应。
这些报道不仅包括现场报道、分析和评论,还包括大量关于戴安娜王妃生平的信息、图片和纪录片。
每个新闻媒体都应该从自己的数据库中快速找到相关内容。
原因很简单,在这种时候,你得到的信息最多,最详细,安排最合理,而且能以最快的速度到达受众,你比其他媒体都要好。
以下是你在观众眼中的权威的上升和观众数量的增加。
美国有线电视新闻网在那一年以及时、迅速和丰富的报道从多媒体中脱颖而出,并取得了目前的成就。
这是有效管理内容资产的结果随着媒体产业的发展和科技的进步,媒体内容资产管理的数字化、信息化、网络化和智能化得到了迅速发展。
目前的媒体资产管理模式已经形成。
媒体资产管理(MAM)是一个综合管理各种媒体资料(如视频资料、音频资料、文本、图表等)的数字存储、编目管理、检索和查询、未编译资料的转码、数据分发、设备和固定资产的系统。
建立MAM的目的是为了建立一个完善的系统,保存和管理这些有价值的数据,充分利用它们,创造良好的经济和社会效益媒体资产的良好管理可以为电视台、广播电台和其他媒体提供各种功能。
稳健的媒体资产管理由稳定的硬件环境和强大的管理软件组成。
我公司推出的蚂蚁传媒资产管理系统是资产管理的软件部分。
Sql大型数据库结构、友好的人机交互界面设计、科学合理的编目方法、强大的搜索引擎(独立的拼音字母)、非共享的网络模式、稳定的软件环境以及公司的后期开发能力,使其成为您媒体资产管理的利器,不仅适用于电视台、广播电台等广播电视行业,也可扩展到其他行业。