Control4 无线ELV调光开关使用说明书
- 格式:pdf
- 大小:367.33 KB
- 文档页数:2
无线遥控器使用手册一、介绍无线遥控器是一种方便的电子设备,它能够通过无线信号控制电子设备的操作。
无线遥控器可以应用于各种领域,例如家庭娱乐设备、智能家居控制、玩具、汽车等。
本使用手册旨在帮助用户了解无线遥控器的基本功能和操作方式,确保用户能够正确、高效地使用无线遥控器。
二、功能概述无线遥控器通常具备以下基本功能:1. 按键控制:无线遥控器上的按键用于控制特定设备的各种功能。
按下相应的按键可以实现设备的开关、音量调节、频道切换等操作。
2. 电源管理:无线遥控器通常通过电池供电,因此需要注意电池的使用和更换。
某些无线遥控器还可以通过充电器进行充电。
3. 学习功能:部分无线遥控器支持学习功能,可以通过学习其他遥控器上的按键操作,实现对更多设备的控制。
三、无线遥控器的基本操作1. 准备工作:确保无线遥控器的电池或电量充足,保持与要控制的设备在一定距离范围内,确保无线信号传输的稳定性。
2. 操作步骤:a. 打开设备的电源。
b. 按下无线遥控器上的相应按键,实现对设备的控制。
c. 如需调节音量或频道等功能,可通过遥控器上的对应按键进行操作。
3. 关机:在使用完毕后,记得关闭设备的电源,保持无线遥控器处于待机状态,以节省能源。
四、常见问题解答1. 无线遥控器无法控制设备怎么办?a. 检查无线遥控器的电池是否耗尽,如果是,请更换新电池或充电。
b. 检查遥控器与设备之间的距离是否超过有效控制范围,尽量保持在有效范围内。
c. 确保无线遥控器上的按键与设备上的对应按键一致,如有需要,请重新学习遥控器按键。
2. 无线遥控器无法操作特定功能怎么办?a. 请确保设备本身支持该功能,并正确设置。
b. 检查无线遥控器的说明书,了解是否需要特殊操作方式才能实现该功能。
3. 如何更换无线遥控器的电池?a. 根据无线遥控器的说明书,找到电池仓盖。
b. 使用适当的工具打开电池仓盖。
c. 将电池取出并注意正负极的方向,放入新电池。
d. 关上电池仓盖,确保牢固。
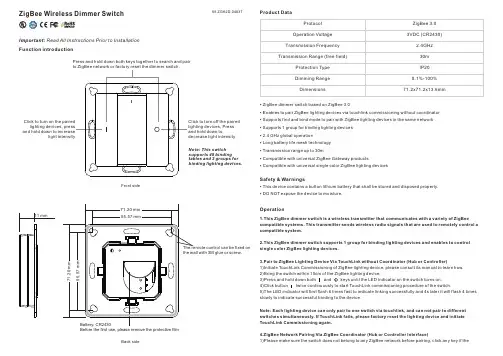
ZigBee Wireless Dimmer Switch09.ZGK2D.0483711 mmFunction introductionImportant: Read All Instructions Prior to Installation Front sideBack sideBefore the first use, please remove the protective filmProduct DataPress and hold down both keys together to search and pair Note: This switch supports 48 binding tables and 2 groups for binding lighting devices.Click to turn off the paired lighting devices, Press and hold down todecrease light intensity Protocol Operation VoltageTransmission Frequency Transmission Range (free field)Protection Type Dimming Range DimensionsZigBee 3.03VDC (CR2430)2.4GHz 30m IP200.1%-100%71.2x71.2x13.6mm• This device contains a button lithium battery that shall be stored and disposed properly.• DO NOT expose the device to moisture.Safety & WarningsOperation1.This ZigBee dimmer switch is a wireless transmitter that communicates with a variety of ZigBeecompatible systems. This transmitter sends wireless radio signals that are used to remotely control a compatible system.2.This ZigBee dimmer switch supports 1 group for binding lighting devices and enables to control single color ZigBee lighting devices.3.Pair to ZigBee Lighting Device Via TouchLink without Coordinator (Hub or Controller)1)Initiate TouchLink Commissioning of ZigBee lighting device, please consult its manual to learn how.2)Bring the switch within 10cm of the ZigBee lighting device.3)Press and hold down both and keys until the LED indicator on the switch turns on.4)Click button twice continuously to start TouchLink commissioning procedure of the switch.5)The LED indicator will first flash 6 times fast to indicate linking successfully and 4s later it will flash 4 times slowly to indicate successful binding to the device.Note: Each lighting device can only pair to one switch via touchlink, and can not pair to different switches simultaneously. If TouchLink fails, please factory reset the lighting device and initiate TouchLink Commissioning again.4.ZigBee Network Pairing Via ZigBee Coordinator (Hub or Controller Interface)1)Please make sure the switch does not belong to any ZigBee network before pairing, click any key if the• • • • • • • • • ZigBee dimmer switch based on ZigBee 3.0Enables to pair ZigBee lighting devices via touchlink commissioning without coordinatorSupports find and bind mode to pair with ZigBee lighting devices in the same network Supports 1 group for binding lighting devices 2.4 GHz global operationLong battery life mesh technology Transmission range up to 30mCompatible with universal ZigBee Gateway productsCompatible with universal single color ZigBee lighting devicesMountingThe key part of this controller is an universal one, especially rotary standard switch element that can be integrated in numerous frames by different manufactures as below list:BEKER S1, B1, B3, B7 glass GIRA Standard55, E2, Event, EspritJUNG A500, Aplus MERTENM-smart, M-Arc, M-Planindicator turns on, which means the switch has already paired to a network. Please remove it from the network first, otherwise the pairing will fail.2)Press and hold down both and keys until the LED status indicator turns on, then immediately click button to enable the switch to search nearby network, LED indicator will flash every 1 second. 20 seconds timeout if there is no network, the indicator will turn off, repeat the operation.3)From your ZigBee Controller or hub interface, choose to add device and enter Locating/Pairing mode as instructed by the controller.4)Network Pairing Begins Automatically: LED indicator on the switch blinks 6 times quickly as it scans for a compatible network controller to pair with.5)After the remote is located and paired to the ZigBee network, the indicator will stop blinking and turn off, then the remote will appear in your controller's menu.6)The switch is now paired to the ZigBee network.5.Battery Power Monitor Function, the switch will report battery power value to the coordinator under following situations:When powered on.When user clicks both and keys simultaneously.When user operates the switch to send data packets (over 4 hours since last operation).When added to the network by a coordinator.6.Pair with A ZigBee Lighting Device Via Find and Bind Mode without Coordinator1)Start find and bind mode on the ZigBee lighting device (initiator node) and enable it to find and bind target, please consult its manual to learn how.2)Press and hold down both and keys on the switch until the LED indicator turns on.3)Click button to enable the switch (target node) to find and bind initiator.4)The binding will be successful within 4 seconds, and LED indicator on the switch will flash 4 times. If binding fails, LED indicator will flash twice.7.Unpair with A ZigBee Lighting Device Via Find and Bind Mode without Coordinator1) Start find and bind mode on the ZigBee lighting device (initiator node) and enable it to find and unbind target, please consult its manual to learn how.2)Press and hold down both and keys on the switch until the LED indicator turns on.3)Click button twice continuously to enable the switch (target node) to find and unbind initiator.4)The unbinding will be successful within 4 seconds, and LED indicator on the switch will flash 4 times. If unbinding fails, LED indicator will flash twice.8.Unpair with All ZigBee Lighting Devices Bind with The Switch without Coordinator 1)Press and hold down both and keys on the switch until the LED indicator turns on.2)Click button five times continuously to clear all bind lighting devices with this remote.3)LED indicator on the switch will flash 4 times to indicate successful unbinding of all devices.9.Binding Between the Switch and ZigBee Lighting Devices Via Coordinator (Hub or Controller Interface)1)Once the switch and compatible ZigBee lighting devices are paired to the same network, click any button to activate the switch, then from your ZigBee controller or hub interface, choose to bind devices to the remote as instructed by the controller. Then the devices can be controlled by the remote.2)Once the binding operation is done between the remote and ZigBee lighting devices, the remote can still control the devices in the event of gateway/coordinator loss.Note: This switch supports 48 binding tables and 1 group for binding lighting devices.10.Unbinding Between the Remote and ZigBee Lighting DevicesTo unbind the remote and ZigBee lighting devices, first click any button to activate the switch, then from your ZigBee controller or hub interface, choose to unbind the device from a remote as instructed by the controller.• • • • 11.Factory Reset the Switch (Remove From ZigBee Network)From the ZigBee Controller or Hub Interface1)From your ZigBee controller or hub interface, choose to remove or reset the remote as instructed. The LED indicator on the remote will turn on and flash 3 times quickly to indicate successful reset to factory default setting.Manual2)Press and hold down both and keys until the LED indicator on the switch turns on -> immediately click button 5 times continuously -> LED indicator flashes 3 times quickly to indicate successful removal from the network and reset to factory default.Note: All configuration parameters will be reset after the remote is removed from the network.12.ZigBee Clusters Supported by This Remote Are As Follows:Input clusters:BasicPower Configuration IdentifyDiagnostics Output clusters:Identify On/offLevel control Ota。
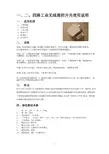
一、二、四路工业无线遥控开关使用说明一、 适用范围1、工程机械2、照明设备3、工业电器4、电动大门5.起重机6.电动葫芦二、功能单稳:按遥控器启动键,接收板启动继电器吸合;松开启动键,接收板启动继电器释放;(功能为购买时选定)该控制器是单稳控制模式。
其它键功能同上。
双稳:按一下遥控器启动键,接收板启动继电器吸合;再按一下遥控器启动键,接收板启动 继电器释放;其它键功能同上。
(功能为购买时选定)互锁:按一下遥控器启动键,接收板启动继电器吸合;再按一下遥控器停止键,接收板启动继电器释放,接收板停止继电器吸合,依次类推。
单稳/双稳并存功能:可按客户要求订做,例如两路双稳,另两路为单稳单稳/双稳/互锁并存功能:可按客户要求订做。
注:双稳或单稳功能具有 0.5秒延时功能,有效的克服继电器火花干扰,防止继电器频闪。
使遥控开关工作性能更加稳定可靠!三、 特点KW-2/4PC-100X型工业无线遥控开关接收主机采用高级防水塑料外壳可安装在户外,超外差 高灵敏度接收模块,学习型解码芯片免去人工对码,内置直流开关电源能虑除外来电源杂波对 接收机的干扰适应电源范围更宽,抗干扰电路有效的克服继电器触点火花的干扰使其工作更 稳定,继电器无源触点输出使用更为灵活方便。
四、接收器技术参1、 体 积:120 X 90 X 55mm2、 重 量:200g3、 使用温度:-10-40度4、 工作电压: AC220、380V、110V、24V、12V(购买时选定)本产品为AC380V,5、 工作频率:315/433MHz6、 接收方式:超外差7、 触点电流:220V 5A8、 输出方式:无源常开\常闭输出9、 遥控状态:单稳10、 遥控通道:4路(有2路备用)五、通过外接交流接触器控制电机启动停止接线示意图如下图所示,具有自锁功能的电机控制线路,当起动电动机时合上电源开关Q,按下起动按钮酗SB1,接触器KM线圈有电,KMJ主触点闭合使电动机M运转;松开SB1,由于接触器KMJ常开辅助触点闭合自锁,控制电路仍保持接通,电动机M继续运转。

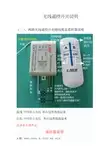
无线遥控开关说明(一)、两路无线遥控开关接线图及遥控器说明
蓝线中间串上电灯和右边黑线接起来
白色中间串上电灯和右边黑线接起来
具体如上图所示
遥控器说明
A 键:控制灯1的亮灭,按一次灯亮,再按一次灯灭
B键:控制灯2的亮灭,按一次灯亮,再按一次灯灭
ON/OFF键:控制灯1,灯2同时亮灭,按一下两灯同时亮,再按一下两灯同时灭SLEEP键:在灯亮的情况下,按一下这个键,延时25秒左右的时间,灯灭
(二)、三路无线遥控开关接线图
注意事项:以上,请亲严格按照接线图接线,不可按自己的想法接线,因接线错误造成的产品损坏,卖家一律不承担维修、换货、退款的责任。
如在接线的过程中有不明白的地方,请拨打售后客服电话:152********。
丹东三安RLC-IV智能路灯控制器操作说明一、概述智能型路灯控制器采用国外最先进的计算机控制技术,运用太阳与地球的运行规律以及地球经纬度与日出日落的关系,并根据一年四季变化规律与经纬度算法计算日出日落时间,来自动控制路灯开关灯。
本产品有开关时间微调和半夜控制功能,从而能适应不同地理环境的需要;是路灯、霓虹灯、广告灯箱、监控补光等设备的最佳时间控制器,能有效节约资源消耗,减少浪费;可广泛应用于街道、铁路车站、航道、工矿、学校、小区及供电部门等一切需要时间控制的场所。
二、功能特点1、采用国外先进的微处理芯片,可靠性高、误差小、稳定性强。
2、具有断电数据保护,时钟不间断工作,无需更换电池,维持时钟运行十年以上。
3、工作模式:开灯时间可由用户设定,范围在12:00至23:59;关灯时间可由用户设定,范围在00:00至11:59。
同月开关时间相同,月份不同可设成不同的开关时间。
4、全夜工作模式:根据经纬度控制开关时间,随季节变化合理控制,每天自动调节开关灯时间,并有开关时间微调功能,范围在负50至50,往负方向提前开关灯,往正方向延迟开关灯。
5、半夜工作模式:根据经纬度控制开灯时间,关灯时间可由用户设定,范围在00:00至23:59之间,可有效节约电能。
6、具有自动/手动转换,便于用电设备的检修或重大庆典的需要。
7、抗干扰能力强,大功率继电器输出,可接220V接触器或380V接触器,使用寿命长。
8、可带光控,与经纬度控制结合使用。
(订货时需注明带光控)注意:1、在设置中,若30秒无按键动作,智能路灯控制器会恢复自动工作状态,显示当前时间。
只有处在手动状态时,不会自动恢复!2.、经纬度与光控相结合使用时,根据光控感应在经纬度开关时间±30分钟内关灯/开灯。
光控传感器引线标配1.5米。
(带光控需在订货时说明)。
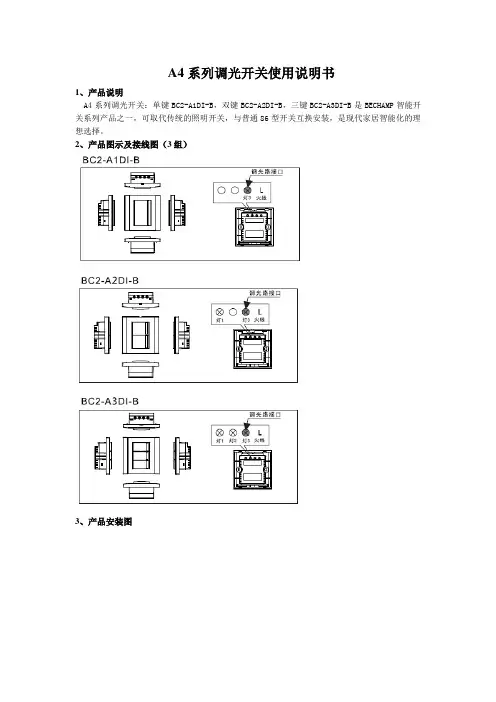
A4系列调光开关使用说明书1、产品说明A4系列调光开关:单键BC2-A1DI-B,双键BC2-A2DI-B,三键BC2-A3DI-B是BECHAMP智能开关系列产品之一,可取代传统的照明开关,与普通86型开关互换安装,是现代家居智能化的理想选择。
2、产品图示及接线图(3组)3、产品安装图4、开关的功能1)遥控功能:使用波创系列遥控器、智能网关及电话远程控制器可实现本地、网络远程、电话远程控制照明设备。
2)单路调光功能A4系列调光开关只有一路可调光,调光路为灯3路,必须使用白炽灯、射灯等纯阻性负载;3) 亮度记忆功能调光路有记忆功能,再次打开会自动恢复到上次设定的亮度;4)遥控调光功能用遥控器调光时,只对最后打开的调光路进行调光5)单向调光性长按开关面板上的按键进行调光时,灯光亮度会逐渐到最亮状态并保持,或者逐渐到最暗状态并保持。
若想把灯光调光到相反的状态,必须重按开关进行调光。
当灯光调整到所要的亮度时立即松开按键,开关会停止调光并保持现有亮度。
5、技术参数调光路开关技术参数工作制式220Vac/50Hz 110Vac/60Hz工作电压AC180~250V AC90~130V调光路最小功率单键调光开关25W 单键调光开关25W 双键调光开关60W 双键调光开关60W 三键调光开关100W 三键调光开关100W调光路最大功率800W 400W工作温度-10~50℃-10~50℃工作湿度≤90%RH ≤90%RH接收灵敏度-105dbm -105dbm负载类型白炽灯/射灯白炽灯/射灯非调光路开关技术参数工作制式220Vac/50Hz 110Vac/60Hz 工作电压AC180~250V AC90~130V单路最小功率0W 0W每路最大功率白炽灯1100W 白炽灯550W日光灯、节能灯440W 日光灯、节能灯220W工作温度-10~50℃-10~50℃工作湿度≤90%RH ≤90%RH接收灵敏度-105dbm -105dbm负载类型白炽灯/节能灯/日光灯/射灯白炽灯/节能灯/日光灯/射灯6、注意事项1).安装和拆卸时,须聘请专业的技术人员,且必须切断电源。
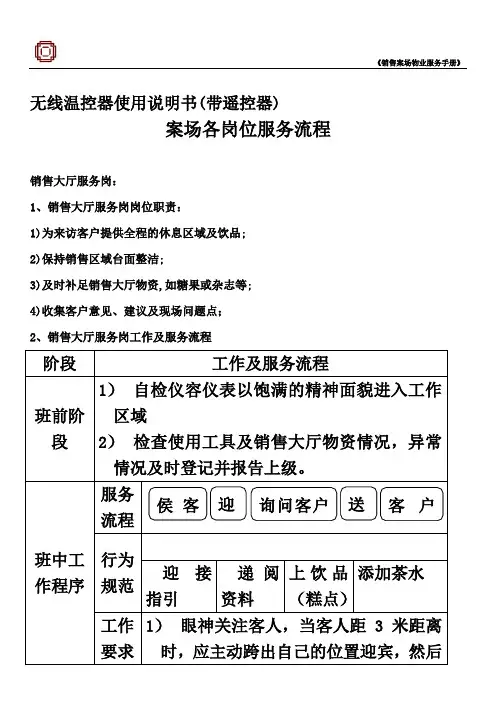
无线温控器使用说明书(带遥控器)案场各岗位服务流程销售大厅服务岗:1、销售大厅服务岗岗位职责:1)为来访客户提供全程的休息区域及饮品;2)保持销售区域台面整洁;3)及时补足销售大厅物资,如糖果或杂志等;4)收集客户意见、建议及现场问题点;2、销售大厅服务岗工作及服务流程阶段工作及服务流程班前阶段1)自检仪容仪表以饱满的精神面貌进入工作区域2)检查使用工具及销售大厅物资情况,异常情况及时登记并报告上级。
班中工作程序服务流程行为规范迎接指引递阅资料上饮品(糕点)添加茶水工作要求1)眼神关注客人,当客人距3米距离时,应主动跨出自己的位置迎宾,然后侯客迎询问客户送客户注意事项15度鞠躬微笑问候:“您好!欢迎光临!”2)在客人前方1-2米距离领位,指引请客人向休息区,在客人入座后问客人对座位是否满意:“您好!请问坐这儿可以吗?”得到同意后为客人拉椅入座“好的,请入座!”3)若客人无置业顾问陪同,可询问:请问您有专属的置业顾问吗?,为客人取阅项目资料,并礼貌的告知请客人稍等,置业顾问会很快过来介绍,同时请置业顾问关注该客人;4)问候的起始语应为“先生-小姐-女士早上好,这里是XX销售中心,这边请”5)问候时间段为8:30-11:30 早上好11:30-14:30 中午好 14:30-18:00下午好6)关注客人物品,如物品较多,则主动询问是否需要帮助(如拾到物品须两名人员在场方能打开,提示客人注意贵重物品);7)在满座位的情况下,须先向客人致歉,在请其到沙盘区进行观摩稍作等待;阶段工作及服务流程班中工作程序工作要求注意事项饮料(糕点服务)1)在所有饮料(糕点)服务中必须使用托盘;2)所有饮料服务均已“对不起,打扰一下,请问您需要什么饮品”为起始;3)服务方向:从客人的右面服务;4)当客人的饮料杯中只剩三分之一时,必须询问客人是否需要再添一杯,在二次服务中特别注意瓶口绝对不可以与客人使用的杯子接触;5)在客人再次需要饮料时必须更换杯子;下班程序1)检查使用的工具及销售案场物资情况,异常情况及时记录并报告上级领导;2)填写物资领用申请表并整理客户意见;3)参加班后总结会;4)积极配合销售人员的接待工作,如果下班时间已经到,必须待客人离开后下班;1.3.3.3吧台服务岗1.3.3.3.1吧台服务岗岗位职责1)为来访的客人提供全程的休息及饮品服务;2)保持吧台区域的整洁;3)饮品使用的器皿必须消毒;4)及时补充吧台物资;5)收集客户意见、建议及问题点;1.3.3.3.2吧台服务岗工作及流程阶段工作及服务流程班前阶段1)自检仪容仪表以饱满的精神面貌进入工作区域2)检查使用工具及销售大厅物资情况,异常情况及时登记并报告上级。
1、Control4 24V供电模块C4-DR-PSU-M商品分类:导轨灯光能给Control4灯光模块提供1000mA的电源供应能给Control4灯光模块提供1000mA的电源供应。
DIN模块尺寸:52.5mm(3M)电源输入/电压:230V+10%50 - 60Hz,单相输入端子:螺丝端子控制输入(1):105mm(6M)控制输入(2):105mm(6M)输出:每个DIN导轨系统至少需要一个24V DIN 电源的。
模块加载输出(230V):最大0.15A标准(CE认证,EMC认证):EN55015, EN61547,EN61000-3-3 ,EN60669-1和EN60669-2-1尺寸:56mmx 100mmx64mm重量:0.34kgControl4 DIN导轨照明的常见问题什么是DIN导轨?DIN导轨是一个标准的35毫米金属轨道。
它主要用于安装继电器及控制设备。
什么是Control4 DIN导轨的照明系统?Control4 DIN导轨解决方案是一个集中控制的照明解决方案,方便安装照明模块,符合DIN标准。
在DIN导轨照明系统中所有照明线路通过控制模块集中控制,多通道照明可以自动化控制。
DIN导轨照明系统只能用于照明吗?DIN导轨系统不仅能控制照明,还可用于控制各种各样的其他设备,并可接入其他传感设备。
例如,继电器模块可用于控制吊扇,热水器,门等。
此外,Control4系统通过I/O扩展器可对于第三方感应触点开关编程以实现控制。
我如何连接到Control4系统的其余设备?Control4 DIN导轨通过RS-232串口连接其他设备。
RS-232串口提供照明系统的双向通信。
我可以使用什么控制器控制Control4系统的DIN导轨?您需要使用一台HC-300主机或I/O扩展器,通过RS-232连接到Control4 DIN 导轨。
HC-200主机不兼容串行连接DIN导轨。
HC-300有两个RS-232接口。
无线电编码遥控四级调光灯开关
张晓东
【期刊名称】《电子世界》
【年(卷),期】1999()10
【摘要】本刊1998年第5期刊登《无线电遥控、触摸调光灯开关》一文后,收到了读者大量来信。
编辑部根据读者的要求,特请作者撰写此文。
【总页数】2页(P52-53)
【关键词】调光灯;无线电编码遥控;开关
【作者】张晓东
【作者单位】
【正文语种】中文
【中图分类】TP872.02;TM564.805
【相关文献】
1.无线电遥控、触模调光灯开关 [J], 张晓东
2.无线电遥控无级调光灯的制作 [J], 陈国华
3.无线遥控四级调光灯开关 [J], 张晓东
4.无线电遥控、触摸调光灯开关 [J], 张晓东
5.无线遥控四级调光灯开关 [J], 张晓东
因版权原因,仅展示原文概要,查看原文内容请购买。
零火智能调光开关使用说明书适用范围:索科特零火智能调光开关产品优势:1,外观精美,工艺细致,颜色和图案可根据用户喜好而定制。
2,背光效果为你在黑夜中指明前进的方向,实用贴心。
3,开关上的每个开关按键完全满足5-500瓦对应光源。
4,超大容量的每个开关按键可以保存20个遥控器按键值。
5,控制方式多样化,可以实现触摸控制、现场遥控、远程控制。
安全警告:1,安装和拆卸前请务必切断总电源。
2,安装前确保线路没有短路,接错。
3,安装和使用本产品时须注意防水、防蒸汽、防敲击。
4,勿用尖锐的物体刮擦触摸面板。
5,开关在开灯或关灯时请勿用力过猛,以免按碎触摸面板。
6,清洁时请使用干布进行擦拭,禁用潮湿或含有腐蚀性物质的东西擦拭。
否则触电危险及产品器件腐蚀损坏。
7,严禁超负荷使用,否则易引起发热,导致烧毁或引起火灾等。
一,产品图示说明二,安装方法(与零火智能开相同)将灯具的接线与零火智能开关的接线连接好,再将220V的市交流电接线接入零火智能开关中,确定无误后,给零火智能开关供电。
N:接220V零线L:接220V火线L1灯光的火线供电,负载最大500W。
三,使用方法1,灯光开启与关闭1.1,开启:触摸ON/OFF键,灯光渐渐变亮,直到上次关闭前的亮度。
1.2,关闭:触摸ON/OFF键,灯光渐渐变暗,直到关闭。
2,亮度调节2.1,调亮:触摸△键,灯光渐渐变亮,直到亮度达到要求时松手。
2.2,调暗:触摸▽键,灯光渐渐变暗,直到亮度达到要求时松手。
提示:本说明书所提到的“触摸”操作,均为快速触摸,一般不超过0.5秒,如动作过轻或过慢均影响操作。
3,遥控对码3.1,开灯后长按开关ON/OFF键触摸区约4秒,蜂鸣1声并伴有蓝色背光闪烁,进入对码状态。
3.2,进入遥控器灯光控制界面中,按下欲配对的数字键发出信号,当开关接收到无线信号后,背光会出现快速闪烁。
3.3,再次长按开关ON/OFF键,蜂鸣器快速连响5声后并保存并退出。
无线电编码遥控4级调光灯开关(1)结构与特点新颖的无线电编码遥控4级调光灯开关如图28所示。
这种电路可控制普通白炽灯按照“弱光、中光、强光、熄灭、弱光……”顺序循环变化。
该开关采用了专用无线电遥控发射、接收头的新型编码方式的4级调光灯专用集成电路,所以具有制作容易、调试简单、工作稳定、遥控距离长(<I oo m)和性价比高等优点。
整个开关自身耗电甚微,经实测不到O.3W。
无线电编码迢控4级调光灯开关由无线电编码发射器和无线电解码接收控制器两大部分组成。
无线电编码发射器电路如图28(a)所示。
图中U2为无线电遥控专用发射头,它实质上是一种具有内藏天线未经讯号调制的超短波无线电发射模块。
ul为4级调光灯专用编码器,它采用5位二态地址编码对遥控指令进行加密,即a1一a5五个编码端每位可设定为“l,r(开路)或“o”(接地)两种状态,故共有32种不重复编码,这样可使温控开关做到同领不同码,决不会产生误动作,提高了可靠性。
当按下S1时,从u1的17脚输出编码串行指令,经R2加至U2的情号输入端IN,对U2内部产生的265MHz射频信号进行调制.并直接由内藏天线向周围空间发射出编码迢控电磁波。
无线电解码接收控制器电路如图28(b)所示,其中Nz是为便于说明原理而绘出的被控制电灯。
u4是与u2配对的无线电遥控专用接收头,它实质上是一种具有内藏天线的、像电视机高频头一样的无线电接收及解调模块。
u3为4级调光专用解码器,它内部巳包含了4级调光控制信号产生电路,使用非常方便。
在有效距离范围内,u2发射出的编码器遥控电磁波被u4内藏天线接收,经模块内部电路解调、放大、整形后,从u4的ouT端输出对应于产生的编码串行指令信号,此信号直接送入u3的10脚进行解码。
当编解码方式一致时,对应于图28(a)中s1按下的次数,u3的9脚便依次输出3种相位的触发脉冲,通过c2去控制双向晶闸管vs的导通角,从而使被遥控的电灯具有3级变光(弱、中、强) 和关断功能。
全能遥控器使用说明一、全能遥控器外观结构及功能介绍:图1-11、全能遥控器的功能介绍:(1) 采用LCD液晶显示,界面直观,操作方便。
(2) 可通过学习红外遥控多种电视、空调、DVD、音响设备,实现多个遥控器合一。
(3) 可无线遥控灯光开关、插座、窗帘。
2、全能遥控器的技术参数:●无线发射距离:无阻隔>60m,普通室内环境(带非金属阻隔物)>30m;●红外发射距离:>8m;●待机时间:三天;●电池:3.7V/900mAh;●外形尺寸:200mm(W) ×55mm(H) ×20mm(D);●显示方式:LCD液晶显示;●型号:WIA-YK-I2。
3、全能遥控器的外观结构示意图及按键说明:图1-2A、全能遥控器的按键分布图:如图1-2所示,全能遥控器的按键按照功能主要划分为以下几类:(1)、设备选择键:【电视】、【空调】、【DVD】、【灯光】、【插座/窗帘】、【音响】;(2)、红外设备电源键:;(3)、数字键:【0】~【9】;(4)、【V+】/【开】、【V-】/【关】在红外控制时作为音量加减键,在无线控制时作为开关键;(5)、频道加减键:【】、【】;(6)、复用/房间键:此键有两重功能,用作【SHIFT】复用或【房间】切换。
(在学习状态时,具有复用功能,例如【SHIFT】+/关两个编码。
另外,此键还有房间切换功能(每按下一次【房间】键房号增加1),单独使用时,用来控制不同房间里的无线灯光或插座等我公司的无线设备;当与我公司的“无线收发器”配合使用时,还可用来控制不同房间里的空调、电视等红外设备);(7)、功能学习键:/【调光】、【AV/TV】/【►】、【定时】/【Ⅱ】、【菜单】/【●】、【静音】。
(此组键可用来学习红外设备上相对应的功能键编码,以方便记忆);(8)、数字或功能学习键:【情景一】、【情景二】、【情景三】、【情景四】;(以方便记忆;情景1键、情景2键、情景3键、情景4键用于灯光控制时的情景键);(9)、特殊功能键:【CTRL】/【清除】、【确定】、【学习】、【取消】;(10)、清除键:【Clear】,此键在机壳后面对应的小孔下面,用来清除全部的红外编码;(11)、重启键:【Reset】,此键在机壳后面对应的小孔下面,当死机或出现异常情况时可用来重启程序。
4路4工作方式的学习型无线遥控开关使用说明书(2007版本)4路4种工作方式选择的无线遥控开关是我公司根据用户要求推出的一款人性化、理想化的实用无线控制装置。
学习型功能方便用户更换遥控器,更方便用户软件更换输出端,更方便用户更换工作方式。
本无线遥控开关不但适应本公司的加强型无线遥控发射器,而且兼容市场上的各种固定编码的无线遥控发射器。
不但适用于遥控发射器与接收板一对一操作,而且能够实现一遥(遥控器)多控(多路控制)的组合控制。
对用户开放4种工作方式,使用户根据自己的需要来选择方式,不但扩大了应用范围,而且为临时更换应用创造了条件,同时为今后的其他用途增大了应用灵活性。
电路输出具有常闭、常开两种输出方式也方便了用户不同用途的选择。
该无线遥控开关广泛应用到家庭中,工业控制中,对于学生学习自动化控制,启迪开发思路也是一个良好的教具。
一、4路4工作方式选择的无线遥控开关的控制分布图二、学习与设置:在无线遥控接收板未通电之前按下学习开关,接通电源,状态指示灯点亮,松开学习按键开关,状态指示灯保持点亮。
遥控器控制的顺序如上图所示的继电器顺序。
如果使用单码操作的遥控器,,当按下一个按键后,状态指示灯闪烁一次,表示此时第一路学习完毕,按下第二个按键后,状态指示灯闪烁两下表示第二路学习完毕,顺序学习完4路的遥控器操作,每路的学习均有状态指示灯闪烁对应的次数指示。
4路学习完毕,状态指示灯快速闪烁数次后,仍然保持点亮状态,此时已经进入工作方式的学习状态。
工作方式见下面表中的4种方式。
用户根据选定的工作方式号,在此输入上面学习顺序对应的按键,状态指示灯熄灭,方式学习完毕。
例如:上面使用按自然顺序来学习,4路控制按键分别使用1、2、3、4按键,此时如果选用工作方式2,则按上面的学习顺序2,也就是按键2再次按一下即可。
如果学习顺序为4、3、2、1按键,此时选择工作方式2,需要按按键3即可。
对于使用多位遥控器的双码进行学习,其学习方法与上面相同,只不过操作的时候需要按下两位编码才学习一路。
无线ELV调光开关使用说明书
型号
C4-TDIM2-Z
规格参数
该调光开关可独立运行,或者作为Control4系统的控制终端来使用。
它安装于美标底盒上,通过无线 Zigbee信号来与Control4系统进行通信。
其规格参数如下所示:
电源:220-240VAC 50/60Hz
负载能力:220-240VAC时2.5安
通信标准:IEEE 802.15.4,2.4GHz
警告:若您不能确认火线、零线、负载线与地线,请选择资深电工来进行设备安装。
注意:请勿用此设备控制插座。
重要!任何有悖于本文档相关说明的使用方法所造成的设备损坏将不在产品保修范
围内。
重要!请勿使用电动起子来安装设备。
安装指示
1 请确认设备安装位置满足如下标准:
无线控制系统的覆盖范围及性能表现与如下条件紧密相关:设备间的距离;房间布局;隔开设备的墙体;邻近的电气设备。
请勿超出调光开关的最大功率负载(每个设备1000伏)。
2在安装或维护该设备前必须关闭电源。
3 准备好底盒及线缆。
警告!该设备必须接地。
4 仔细辨识,并将开关面板上的连接线与底盒中的电线相连。
5 将线缆放回底盒。
仔细盘好线缆以使得它们能方便的被安放在底盒内。
6 用螺丝钉将调光开关固定在底盒上。
7 盖好调光开关面板。
警告!在完全盖好面板前请勿打开电源。
8 确认调光开关上的所有LED都被点亮。
线缆连接示例图
注意:该设备必须连接交流零线以使设备得以工作。
使用四线接线端子来连接电源、开关及负载。
端子接线情况示意见下表及下图。