Tenda USB无线网卡W311MA使用说明介绍
- 格式:pdf
- 大小:2.69 MB
- 文档页数:58
usb无线网卡怎么用
众所周知,绝大多数台式电脑由于没有内置无线网卡,因此无法连接wifi进行无法上网。
不过,台式电脑可以通过购买一个USB无线网卡,轻松实现无线上网。
本文主要教大家台式电脑如何借助usb无线网卡实现无线上网。
1、首先需要购买一个usb无线网卡。
如今无线网卡种类很多,价格大都在几十元,便宜的仅二三十元。
小编购买的是一个比较小巧的迷你型TP-Link usb无线网卡,速率是150Mbps,如上图。
2、将购买的usb无线网卡插入台式电脑,之后还需要安装驱动,因此首次安装usb无线网卡,还需要借助网络,如下图。
3、usb无线网卡驱动安装比较简单,在有网络的情况下,借助驱动精灵或者鲁大师等工具,可以在线安装驱动。
4、usb无线网卡驱动完成之后,拔掉网线,然后在任务栏右下角就可以看到无线网络图标了,点击打开,就可以搜索到的Wifi无线网络,选择需要连接的无线网络,输入Wifi密码,连接成功后,台式电脑就可以实现无线上网了。
编后语:
随着Wifi无线网络的流行,如今台式电脑借助无线网卡也可以轻松实现无线上网。
但需要注意的是,一些太过便宜的usb无线网卡信号比较差,接收信号的距离有限,如果台式电脑离无线路由器比较远的话,建议大家首选300Mbps速率的ubs无线网卡,以获得更佳的无线上网体验。
一、关于路由器的设置问题:
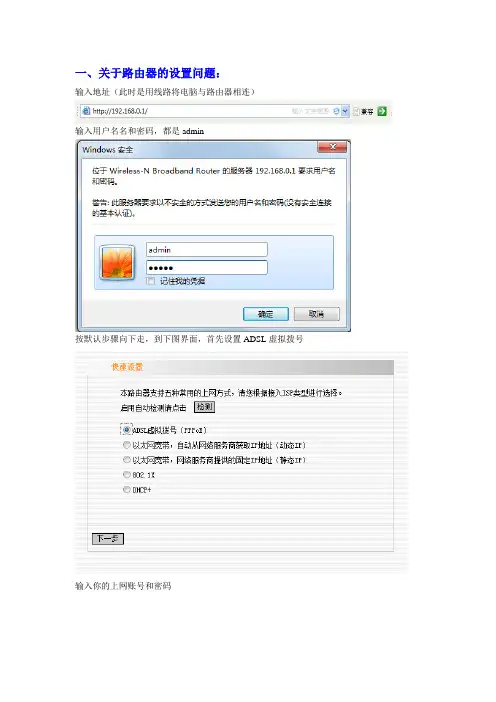
输入地址(此时是用线路将电脑与路由器相连)
输入用户名名和密码,都是admin
按默认步骤向下走,到下图界面,首先设置ADSL虚拟拨号
输入你的上网账号和密码
点击下一步完成设置,,重启路由器。
注意,此时你的的电脑应该是可以通过本地连接
连接到Internet的,此过程一般是电脑自动连接的,如不能注意下看是不是你的本地连接已禁用。
之后再设置以太网宽带,如下图
同样需要重启
此时拔掉电脑与路由器之间的线应该可以通过无线网络连接了
连接无线网络,如下图(xiong是我取得名字,如果没有设置,默认为Tenda)
二、注意!在“未”设置路由器前要确认TCP/IPv4的设置是否正确(一般是正确的),步骤如下
三、貌似在最初的最初,还要适配路由器并设连接路由器的密码,有某种时候貌似还要一个PIN码,此在路由器底部,八位数字。
鉴于使用者具备一定的才智,于此不作介绍。
好吧,这是最后完整的映射,如果出现这样的状况,你就可以放心的玩啦
申明:此手册系非完全手册,只介绍无线路由设置的主要步骤,笔者经过尝试使用,是可以让多台电脑通过无线网络连接到Internet的。
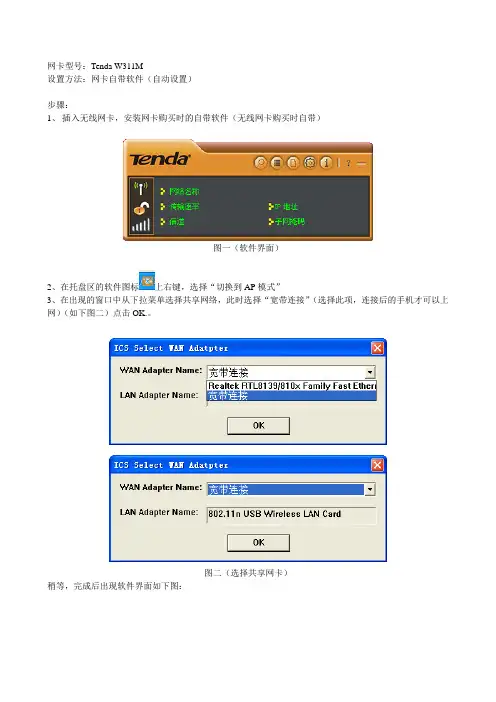
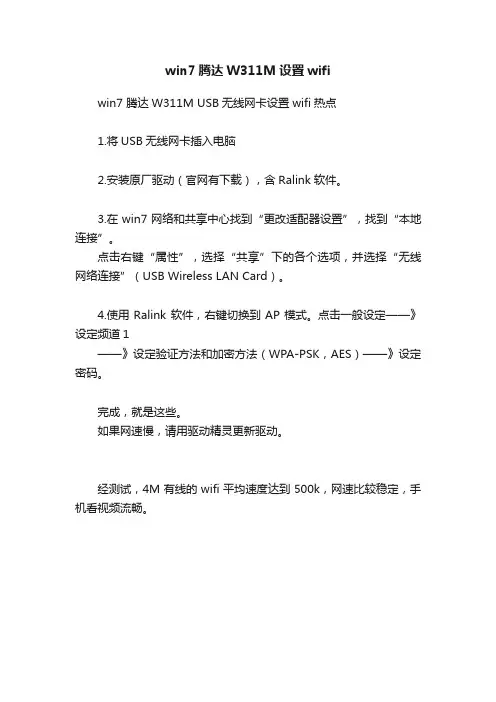
网卡型号:Tenda W311M
设置方法:网卡自带软件(自动设置)
步骤:
1、插入无线网卡,安装网卡购买时的自带软件(无线网卡购买时自带)
图一(软件界面)
2、在托盘区的软件图标上右键,选择“切换到AP模式”
3、在出现的窗口中从下拉菜单选择共享网络,此时选择“宽带连接”(选择此项,连接后的手机才可以上网)(如下图二)点击OK.。
图二(选择共享网卡)
稍等,完成后出现软件界面如下图:
图三(无线AP模式下的软件界面)
4、等待切换完成后再进入图一界面,上方按钮“一般设置”进入共享账号设置,如下图:
图四
5、设置网络名称,点右箭头进入下一步。
中间设置一般默认即可,但在选择验证方法时,最好选择WPA2-PSK方式(加密效果强)如下图:
图五(加密方式选择)
6、最后输入密码后点下一步完成。
图六(输入密码界面)
7、完成,可以用你的手机试着连接下。
(手机上的WLAN设置中选择自动获取IP就行)。
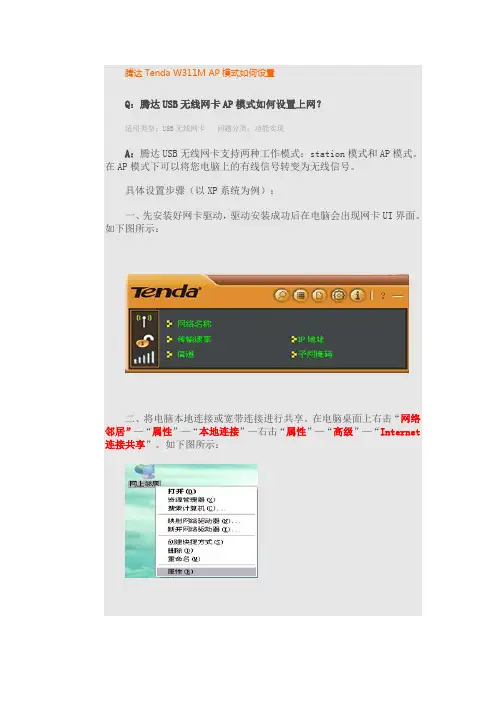
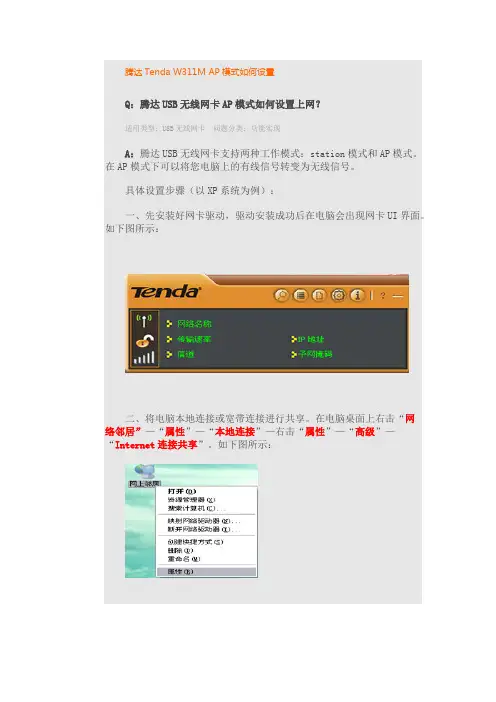
腾达Tenda W311M AP模式如何设置
Q:腾达USB无线网卡AP模式如何设置上网?
适用类型:USB无线网卡问题分类:功能实现
A:腾达USB无线网卡支持两种工作模式:station模式和AP模式。
在AP模式下可以将您电脑上的有线信号转变为无线信号。
具体设置步骤(以XP系统为例):
一、先安装好网卡驱动,驱动安装成功后在电脑会出现网卡UI界面。
如下图所示:
二、将电脑本地连接或宽带连接进行共享。
在电脑桌面上右击“网络邻居”—“属性”—“本地连接”—右击“属性”—“高级”—“Internet 连接共享”。
如下图所示:
三、由于USB网卡默认的是station模式,所以需要进行模式切换。
右击电脑右下角tenda标识的网卡UI图标,点击“切换至AP模式”。
如下图所示:
点击切换后会出现如下图标:
四、(1)、切换AP模式成功后,在设置界面里点击“一般设置”--- 填写“AP的网络名称(SSID )”--“下一步”。
如下图所示:
(2)、设置好SSID点击下一步“选择国家区域码是默认”,“信道”建议选择“1”“6”“11”。
如下图所示:
(3)、选择信道后点击下一步,设置“验证方法”和“加密方法”(建议使用WPA-PSK、AES)。
如下图所示:
(4)、AP 模式设置成功,可查看到网络名称和IP地址。
如下图所示:
第五步:验证AP模式是否设置成功。
在附近通过另一台电脑搜索AP 的无线信号,连接成功后,获取的IP地址为软AP分配的IP地址。
如下图所示:。
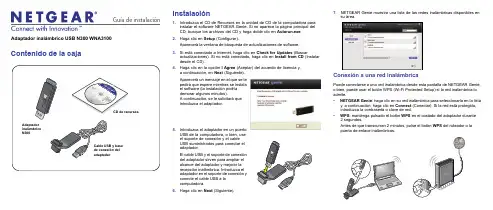
Guía de instalación Adaptador inalámbrico USB N300 WNA3100Contenido de la cajaCD de recursos Instalación1. Introduzca el CD de Recursos en la unidad de CD de la computadora parainstalar el software NETGEAR Genie. Si no aparece la página principal delCD, busque los archivos del CD y haga doble clic en Autorun.exe.2. Haga clic en Setup (Configurar).Aparecerá la ventana de búsqueda de actualizaciones de software.3. Si está conectado a Internet, haga clic en Check for Updates (Buscaractualizaciones). Si no está conectado, haga clic en Install from CD (Instalardesde el CD).4. Haga clic en la opción I Agree (Aceptar) del acuerdo de licencia y,a continuación, en Next (Siguiente).Aparecerá un mensaje en el que se lepedirá que espere mientras se instalael software (la instalación podríademorar algunos minutos).A continuación, se le solicitará queintroduzca el adaptador.5. Introduzca el adaptador en un puertoUSB de la computadora, o bien, useel soporte de conexión y el cableUSB suministrados para conectar eladaptador.El cable USB y el soporte de conexióndel adaptador sirven para ampliar elalcance del adaptador y mejorar larecepción inalámbrica. Introduzca eladaptador en el soporte de conexión yconecte el cable USB a lacomputadora.6. Haga clic en Next(Siguiente).7. NETGEAR Genie muestra una lista de las redes inalámbricas disponibles ensu área.Conexión a una red inalámbricaPuede conectarse a una red inalámbrica desde esta pantalla de NETGEAR Genie,o bien, puede usar el botón WPS (Wi-Fi Protected Setup) si la red inalámbrica loadmite.• NETGEAR Genie: haga clic en su red inalámbrica para seleccionarla en la listay, a continuación, haga clic en Connect (Conectar).Si la red está protegida,introduzca la contraseña o clave de red.• WPS: mantenga pulsado el botónWPS en el costado del adaptador durante2 segundos.Antes de que transcurran 2 minutos, pulse el botón WPS del ruteador o lapuerta de enlace inalámbricos.Septiembre de 2012Este símbolo se ha colocado conforme a la directiva 2002/96 de la UE sobre residuos de aparatos eléctricos y electrónicos (WEEE, por sus siglas en inglés). Si tuviera que desechar este producto dentro de la Unión Europea, manipúlelo y recíclelo de conformidad con lo dispuesto en las leyes locales pertinentes que implementan la directiva WEEE.NETGEAR, el logotipo de NETGEAR y Connect with Innovation son marcas comerciales o marcas registradas de NETGEAR, Inc. o sus filiales en Estados Unidos u otros países. La información contenida en el documento puede sufrir modificaciones sin previo aviso. El resto de marcas y nombres de productos son marcas comerciales o marcas comerciales registradas por sus respectivos titulares. ©NETGEAR, Inc. Todos losderechos reservados.Para consultar la declaración de conformidad completa de la Unión Europea, visite /app/answers/detail/a_id/11621/.Solo para uso en interiores en todos los países de la Unión Europea y Suiza.El adaptador se conectará a la red, lo que puede tardar algunos minutos. La configuración se guarda en un perfil.Corroborar el estado de la conexiónTras instalar el adaptador, el icono de NETGEAR Genie aparece en la bandeja del sistema de Windows y en el escritorio.Puede hacer clic en este icono para abrir NETGEAR Genie y realizar cambios o conectarse a una red inalámbrica diferente. El color del icono indica la intensidad de la conexión inalámbrica:Verde: 3-5 barras (conexión fuerte) Amarillo: 1–2 barras (conexión débil) Rojo: 0 (cero) barras (sin conexión)Si extrae el adaptador, NETGEAR Genie no estará disponible, por lo que el icono tampoco se mostrará. Cuando vuelva a conectar el adaptador, el icono aparecerá de nuevo.Servicio técnicoUna vez instalado el dispositivo, busque en la etiqueta del producto el número de serie y regístrelo en https:// .Debe registrar el producto antes de poder empezar a usar el servicio de asistencia telefónica de NETGEAR. NETGEAR recomienda registrar el producto en el sitio web de NETGEAR. Para obtener actualizaciones del producto y asistencia técnica en línea, visite .Obtenga el manual del usuario en línea en o mediante un enlace en la interfaz de usuario del producto.。

版权声明是深圳市吉祥腾达科技有限公司注册商标。
文中提及的其它商标或商品名称均是深圳市吉祥腾达科技有限公司的商标或注册商标。
本产品的所有组件,包括硬件和软件,其版权属深圳市吉祥腾达科技有限公司所有,在未经过深圳市吉祥腾达科技有限公司许可的情况下,不得任意拷贝、抄袭、仿制或翻译成其它语言。
本手册中的所有图片和产品参数仅供参考,随着软件或硬件的升级会略有差异,如有变更,恕不另行通知,如需了解更多产品信息,请登录我们公司网站:。
目 录版权声明..........................................................- 1 -第一章产品简介.. (1)1.1物品清单(以实际产品为准) (1)1.2指示灯描述 (1)1.3产品特性 (1)1.4产品应用 (2)1.5安装前准备工作 (2)1.6停用其它厂商的无线网卡 (3)1.7产品保养 (4)第二章安装指南 (5)第三章使用系统自带的无线配置程序 (9)3.1W INDOWS XP无线网络连接 (9)3.2VISTA无线网络连接 (13)3.3W INDOWS 7无线网络连接 (16)第四章客户端应用程序使用 (18)4.1S TATION模式(客户端模式) (19)4.1.1 连接信息 (20)4.1.2 站点检测 (20)4.1.3 配置管理 (21)4.1.4 流量统计 (31)4.1.5 WPS 配置 (32)4.2AP M ODE (32)4.2.1基本配置 (33)4.2.2安全设置 (34)4.2.3访问控制 (37)4.2.4关于 (38)4.2.5 Windows 7下AP模式 (39)附录一相关技术名词解释 (40)附录二如何设置WPS功能 (41)附录三常见问题解答 (45)附录四产品有毒有害物质清单 (47)第一章产品简介Tenda无线网卡支持IEEE无线标准,能迅速处理文件传输、视频、多媒体、以及其它对带宽要求较高的应用。

无线网卡的使用流程下载温馨提示:该文档是我店铺精心编制而成,希望大家下载以后,能够帮助大家解决实际的问题。
文档下载后可定制随意修改,请根据实际需要进行相应的调整和使用,谢谢!并且,本店铺为大家提供各种各样类型的实用资料,如教育随笔、日记赏析、句子摘抄、古诗大全、经典美文、话题作文、工作总结、词语解析、文案摘录、其他资料等等,如想了解不同资料格式和写法,敬请关注!Download tips: This document is carefully compiled by theeditor. I hope that after you download them,they can help yousolve practical problems. The document can be customized andmodified after downloading,please adjust and use it according toactual needs, thank you!In addition, our shop provides you with various types ofpractical materials,such as educational essays, diaryappreciation,sentence excerpts,ancient poems,classic articles,topic composition,work summary,word parsing,copy excerpts,other materials and so on,want to know different data formats andwriting methods,please pay attention!1. 购买无线网卡。
在购买无线网卡之前,需要确定你的设备是否支持无线网卡。
腾达Tenda W311M AP模式如何设置
Q:腾达USB无线网卡AP模式如何设置上网?
适用类型:USB无线网卡问题分类:功能实现
A:腾达USB无线网卡支持两种工作模式:station模式和AP模式。
在AP模式下可以将您电脑上的有线信号转变为无线信号。
具体设置步骤(以XP系统为例):
一、先安装好网卡驱动,驱动安装成功后在电脑会出现网卡UI界面。
如下图所示:
二、将电脑本地连接或宽带连接进行共享。
在电脑桌面上右击“网
络邻居”—“属性”—“本地连接”—右击“属性”—“高级”—“Internet连接共享”。
如下图所示:
三、由于USB网卡默认的是station模式,所以需要进行模式切换。
右击电脑右下角tenda标识的网卡UI图标,点击“切换至AP模式”。
如下图所示:
点击切换后会出现如下图标:
四、(1)、切换AP模式成功后,在设置界面里点击“一般设置”--- 填写“AP的网络名称(SSID )”--“下一步”。
如下图所示:
(2)、设置好SSID点击下一步“选择国家区域码是默认”,“信道”建议选择“1”“6”“11”。
如下图所示:
(3)、选择信道后点击下一步,设置“验证方法”和“加密方法”(建议使用WPA-PSK、AES)。
如下图所示:
(4)、AP 模式设置成功,可查看到网络名称和IP地址。
如下图所示:
第五步:验证AP模式是否设置成功。
在附近通过另一台电脑搜索
AP的无线信号,连接成功后,获取的IP地址为软AP分配的IP地址。
如下图所示:。

W311MA 软AP的操作文档W311MA一共有两种工作模式:station模式和AP模式。
在station模式下她相当于无线网卡;在AP模式下可以将您电脑上的有线信号转变为无线信号。
下面是在XP系统下,W311MA的详细操作文档。
我们使用的网卡的版本的详细信息是:驱动程序版本为:3.1.6.0硬件版本为:0.26具体如图接下来进行具体第一步:将网卡的驱动装好,在您的电脑的右下角会出现有tenda标识的黄色的图标。
第二步:要将本地连接进行共享。
在您的电脑桌面上右击网络邻居——打开——查看网络连接右击本地连接——属性——高级——Internet连接共享具体如下图所示:第三步:切换AP模式。
由于W311MA默认的是station模式,所以我们要进行模式切换。
右击电脑右下角tenda标识的图标,点击“切换至AP模式”。
如下图:出现如下图标:第四步:在W311MA的界面里点击一般设置,进行如下设置:具体如图:(1)选择一般设置,填入软AP的网络名称。
设置完成后,如图操作,下一步。
(2)选择国家区域码是默认的;信道建议选择“1”“6”“13”。
设置完成后如图操作。
(5)对软AP进行无线加密,选择常见的验证方法和加密方法。
设置完成后如图操作。
(4)输入密码。
设置完成后如图操作。
(5)软AP已经设置成功,如下图所示,可以查看到网络名称和IP地址。
第五步:验证软AP是否设置成功。
在附近一台电脑上搜索无线信号。
显示已经设置成功,并且也已经连接上。
获取的IP地址为软AP分配的地址注意问题点:(1)安装驱动的时候最好安装我们的IU,可以便于操作。
(2)做软AP的时候一定要注意首先本地连接要进行共享。
11N Wireless USB Adapter User Guide11N Wireless USB Adapter User GuideCopyright Statementis the registered trademark of Shenzhen Tenda Technology Co., Ltd. All the products and product names mentioned herein are the trademarks or registered trademarks of their respective holders. Copyright of the whole product as integration, including its accessories and software, belongs to Shenzhen Tenda Technology Co., Ltd. Without the permission of Shenzhen Tenda Technology Co., Ltd, any individual or party is not allowed to copy, plagiarize, imitate or translate it into other languages.All the photos and product specifications mentioned in this guide are for references only. As the upgrade of software and hardware, there will be changes. And if there are changes, Tenda is not responsible for informing in advance. If you want to know more about our product information, please visit our website at .11N Wireless USB Adapter User GuideTable of ContentChapter 1 Introduction (3)1.1 Product Feature (4)1.2 Product Deployment (5)1.3 Indicator Description (6)1.4 Package Contents (6)Chapter 2 Installation Guide (7)Chapter 3 Client Utility Interface (12)3.1 Station Mode (13)3.1.1 Station Mode Topology (13)3.1.2 Status (14)3.1.3 Site Survey (15)3.1.4 Profile Management (16)3.1.5 Statistics (18)3.1.6 WPS Setting (18)3.2 AP Mode (20)3.2.1 AP Mode Topology (20)3.2.2 Basic Setting (21)3.2.3 Security Setting (22)3.2.4 Access Control (23)3.2.5 About (25)Appendix One: Acronyms and Terms (26)Appendix Two: Product Specification (29)Appendix Three: How to connect with PSP (30)11N Wireless USB Adapter User Guide Chapter 1 IntroductionW311U utilizes the latest wireless networking technology, IEEE802.11n (Draft 2.0), and can be greatly compatible backwards with 802.11b/g standards, which multiples wireless transmission range and reduces “dead spots” in the wireless coverage area.Soft AP supported by W311U can help you establish wireless LAN networking fastly. Besides, WPS (Wi-Fi Protected Setup) encryption methods can free you from remembering the long passwords. Moreover, complete WMM support makes your voice and video more smooth. Especially supporting PSP, NDS and WII connections with Xlink Kai will be your best choice to enjoy on-line gaming.All in all, W311U is a cost-effective Wireless-N USB Adapter with high-performance and further wireless coverage.11N Wireless USB Adapter User Guide 1.1 Product Feature∙Complies with IEEE 802.11n (Draft 2.0), IEEE 802.11g and IEEE 802.11b standards ∙Provides USB2.0 port∙Provides 150Mbps receiving rate and 150Mbps sending rate∙Supports 20MHz/40MHz frequency width∙Auto-detects and changes the networktransmission rate∙Provides two work modes: Infrastructure and Ad-Hoc∙Supports Soft AP to establish your wireless LAN networking∙supports PSP, WII and NDS connecting with Internet and Xlink Kai to enjoy on-line gaming ∙Supports 64/128-bit WEP, WPA, WPA2encryption methods and 802.1x securityauthentication standard∙Supports WPS (Wi-Fi Protected Setup)encryption method to free you fromremembering long passwords11N Wireless USB Adapter User Guide∙Supports WMM to make your voice and video more smooth∙Easy-to-install, plug and play1.2 Product DeploymentW311U Wireless USB Adapter offers fast,reliable and cost- effective solution forwireless access. Deployment as follows;∙For staff who requires higher mobility in the office, they want to have access to traditionalwired or wireless network in any place of thecompany;∙Enterprise or individual who requires often changes in lay out of network cables;∙Companies or places which are not suitable for LAN cable laying out because of budget orobjective building, including places of greatinterests, rent places or places for short-term11N Wireless USB Adapter User Guide usage;Company or individual who avoids using expensive cables, renting cables or rentingrights for access.1.3 Indicator DescriptionIn the front panel of W3111U, there is a LED indicator blinking when data communication is going on.1.4 Package ContentsUnpack the packets, and please find the following items:One W311U 11N Wireless USB AdapterOne CD-ROM11N Wireless USB Adapter User Guide Chapter 2 Installation GuideThis chapter is to assist you how to use the included CD-ROM which comprises the Setup Wizard and the Client Utility Interface.The following steps on Setup Wizard are taken the Windows XP as example.1. Please insert the Wireless USB Adapter into theUSB port of your computer.2. “Found New Hardware” system dialogue appears,and selects “Cancel” to use the included SetupWizard for fast installation; of course, you also canselect “Next” to install by manual.11N Wireless USB Adapter User Guide3.Inert the included CD-ROM into the CD-ROMdrive of your computer, and the Welcome screen appears. (If not appear, double click the “Setup.exe” icon.)11N Wireless USB Adapter User Guide 4. Click “Enter”.5.Click “Next” to start installing.11N Wireless USB Adapter User Guide6.Click “Change…” to select the directory path, orclick “Next”.7.Select “OK” and “Next” in the following window.11N Wireless USB Adapter User Guide8. During the installation, the following dialoguemaybe appears. Click the “Continue Anyway” to continue. There is no security threat to your computer.9. Click “Finish” to complete the installation.11N Wireless USB Adapter User Guide Chapter 3 Client Utility InterfaceThis software is for the W311U Wireless USB Adapter management. If it does not appear, select “Start”—“All Programs” —“TENDA”—“W311U”, or click the shortcut on your PC’s desktop.Note:In the Windows XP, you can select the included W311U Client Utility Interface or the Windows XP internal wireless application to configure the device.There are two client utility applications in W311U: Station mode and AP mode.Note:In this utility interface, Station Mode (Client Mode) is the default access way.11N Wireless USB Adapter User Guide 3.1 Station Mode3.1.1 Station Mode TopologyIn this mode, W311U serves as a client to receive the wireless signals to access the Internet.11N Wireless USB Adapter User Guide 3.1.2 StatusIn the Network Status window, it displays something on wireless adapter and wireless network status, including SSID, Authentication type, Encryption Type, IP address, subnet mask and gateway and so on.11N Wireless USB Adapter User Guide 3.1.3 Site SurveyThe Site Survey is used to scan the available wireless network around, showing the wireless network’s signal strength and other information which provides basis for you to access which wireless network.Connect: select one entry in the wireless network list and click the button to connect the device with the selected network.Refresh: rescan the wireless network around.11N Wireless USB Adapter User Guide 3.1.4 Profile ManagementThis window saves the general wireless parameters for different profiles, which is used to fast connect the wireless network you need.UP/DOWN: To change the profile’s sequence in the list.Connect: To activate one profile.New: To create a new profile and configure the site status and security setting.Modify: To modify one existing profile.Delete: To delete one existing profile.11N Wireless USB Adapter User Guide(Site Status)(Security Setting)11N Wireless USB Adapter User Guide 3.1.5 StatisticsStatistics is used to summarize Rx and Tx data packets, including the success and error packet amount.Clear: click this button to renew the statistics.3.1.6 WPS SettingWPS setting is enabled only on WPS-compliant devices.11N Wireless USB Adapter User GuidePIN: Enter the Pin code and click the “PIN” to automatically connect the wireless adapter with wireless devices around.PBC:Click the “PBC” to complete auto-check and connections between wireless adapter and other wireless device.Refresh: to update the Pin code.Rescan: to rescan the WPS-compliant wireless network around.Connect: click this button to connect the WPS wireless network.Disconnect: to disconnect the connected wireless network.11N Wireless USB Adapter User Guide 3.2 AP Mode3.2.1 AP Mode TopologyThe device also can serve as an access point to transmit wireless signals and create wireless network, allowing other wireless clients to access the network.Click the AP Mode icon to enter the AP Mode interface.11N Wireless USB Adapter User Guide 3.2.2 Basic SettingThis window is used to configure the AP’s basic para- meters, including SSID, Wireless Mode and Channel.SSID: Wireless network’s ID name scanned bywireless adapter.Wireless Mode: 802.11b/802.11g/802.11b/gmixed.Channel: 1~11 channels provided.Restore Default: to restore the set parameters to default factory default settings.Apply: to make the changes made take effect.11N Wireless USB Adapter User Guide 3.2.3 Security SettingThis window is used to configure the wireless network’s security authentication, providing WEP, WPA-PSK, WPA2-PSK, and WPA-PSK/WPA2-PSK encryption methods.WEP:10/26 bits Hex or 5/13 ASCII support.WPA-PSK:8~32 bits ASCII support.WPA2-PSK:8~32 bits ASCII support.WPA-PSK/WPA2-PSK:8~32 bits ASCII support.11N Wireless USB Adapter User GuideNote:1.The Hex characters include 0~9 numbers anda~f letters.2.ASCII characters include any numbers/lettersand characters.3.2.4 Access ControlAccess Control is based on the MAC address to decide that the specified client connects to the wireless network, or disables it to access the wireless network.11N Wireless USB Adapter User GuideFilter Policy:Disabled: to disable the filter function.All Permitted: to permit all clients in the list to access the wireless network.All Blocked: to refuse all clients in the list to access the wireless network.MAC Address:to input the client’s MAC address to implement the corresponding filter policy. For example: b0000a8cd702.Add: to add the entered MAC address into the list. Delete: to delete one existing MAC address in the list.Remove All: to delete all clients’ MAC address in the list.Apply: to make the changes made take effect.11N Wireless USB Adapter User Guide 3.2.5 AboutThis window displays something about software version and wireless adapter.11N Wireless USB Adapter User Guide Appendix One: Acronyms and TermsWLAN Wireless Local Area Network802.11 A family of specifications developed bythe IEEE for WLAN technology.802.11a An extension to 802.11 WLAN standardthat provides up to 54 Mbps transmis-sion in the 5 GHz UNI radio band. 802.11b An extension to 802.11 WLAN standardthat provides up to 11 Mbpstransmission in the 2.4 GHz ISM radioband. 802.11b uses DSSS modulation. 802.11g An extension to 802.11 WLAN standardthat provides up to 54 Mbpstransmission in the 2.4 GHz ISM radioband. 802.11b uses OFDM modulationand is backwards compatible with802.11b.Ad-Hoc A group of computers each with wirelessadapters, connected as an independentWLAN.AES Advanced Encryption Standard11N Wireless USB Adapter User GuideBSSID Basic Service Set IDDHCP Dynamic Host Configuration Protocol DSSS Direct Sequence Spread Spectrum.DSSS is one of two types of spreadspectrum radio. The other isfrequency-hopping spread spectrum(FHSS).ServiceofQoS QualityOFDM Orthogonal Frequency DivisionMultiplexingRADIUS Remote Authentication Dial In UserServiceRTS Request to SendSSID Service Set Identifier. A 32-characterunique identifier attached to the headerof packets sent over a WLAN that acts asa password when a mobile device triesto connect to the BSS.TCP/IP Transmission Control Protocol/InternetProtocolTKIP Temporal Key Integrity ProtocolWDS Wireless Distribution System11N Wireless USB Adapter User GuideWEP Wired Equivalent Privacy. A securityprotocol forWLANs defined in the IEEE 802.11standard.W i-Fi Protected AccessWPAWPA2Wi-Fi Protected Access 2. The nextgeneration ofWi-Fi security, based on the 802.11istandard.WPA2-PSK Wi-Fi Protected Access 2-Pre-shared KeysWPA-PSK W i-Fi Protected Access-Pre-shared Keys11N Wireless USB Adapter User GuideAppendix Two: Product SpecificationStandard IEEE802.11g, IEEE802.11b, IEEE802.11nPort USB2.0 Frequency Range 2.4GHzTransmission Rate 130Mbps, 117Mbps, 104Mbps, 78Mbps, 52Mbps, 39Mbps,26Mbps, 13Mbps, 65Mbps, 58.5Mbps, 52Mbps, 39Mbps,26Mbps, 19.5Mbps, 13Mbps, 6.5Mbps, 54 Mbps, 48 Mbps, 36 Mbps, 24 Mbps, 18 Mbps, 12 Mbps, 9 Mbps, 6 Mbps, 11 Mbps, 5.5 Mbps, 2 Mbps, 1 MbpsTransmissionPowerMax. 15dbmModulation Method OFDM, CCKWorking Temper. 0℃~40℃Storage Temper. -40℃~70℃Working Humidity 10%~90%RH non-condensing11N Wireless USB Adapter User Guide Appendix Three: How to connect with PSP 1.Topology of PSP connecting with W311U2.To configure PSP with Ad-Hoc modeSelect Network Settings11N Wireless USB Adapter User Guide Select Ad-Hoc mode2.3 Select Channel11N Wireless USB Adapter User Guide 3.In W311U Utility Interface scan PSP anddouble-click to connect the wirelessnetwork.4.In Site Survey check “enable PSP connectionmode” box.11N Wireless USB Adapter User Guide5.To configure Xlink KaiSelect “Start”→ “All programmers” → “Xlink Kai Evolution VII” → “Start Kai Config” to configure the user name, password and other parameters as follows.11N Wireless USB Adapter User Guide6.Login Xlink KaiSelect “Start”→ “All programmers” → “Xlink Kai Evolution VII” → “Start Kai”. PSP will connect with Xlink Kai automatically. The following window will indicate the connection is established well now.。
Copyright Statementis the registered trademark of Shenzhen Tenda Technology Co., Ltd. All the products and product names mentioned herein are the trademarks or registered trademarks of their respective holders. Copyright of the whole product as integration, including its accessories and software, belongs to Shenzhen Tenda Technology Co., Ltd. Without the permission of Shenzhen Tenda Technology Co., Ltd, any individual or party is not allowed to copy, plagiarize, reproduce, or translate it into other languages.All the photos and product specifications mentioned in this guide are for references only. Upgrades of software and hardware may occur, and if there are changes, Tenda is not responsible for notifying in advance. If you would like to know more about our product information, please visit our website at .ContentsChapter 1 Product Introduction (3)1.1 Package Contents (3)1.2 LED Indicator Description (3)1.3 Product Features (4)1.4 Product Usage (4)1.5 Before Installation (5)1.6 Disable other manufacturers’ wireless network adapters (5)1.7 Product Maintenance (7)Chapter 2 Installation Guide (8)2.1 Hardware Installation (8)2.1.1 Install the USB network adapter (8)2.1.2 Install the PCI network adapter (8)2.2 Software Installation (9)Chapter 3 How to use the Windows Built-in Wireless Configuration (14)3.1 Wireless Network Connection under Windows XP (14)3.2 Wireless Network Connection under VISTA (18)3.3 Wireless Network Connection under Windows 7 (21)Chapter 4 Tenda Wireless Utility (23)4.1 Station mode (Client Mode) (23)4.1.1 Available Networks (24)4.1.2 Link Information (27)4.1.3 Profile Settings (29)4.1.4 Advanced (41)4.1.5 About (41)4.1.6 Help (42)4.2 AP mode (42)4.2.1 Config AP (44)4.2.2 Advanced (46)4.2.3 Access Control List (47)4.2.4 Associate List (48)4.2.5 AP Mode under Windows 7 (48)Appendix 1: Acronyms and Terms (50)Appendix 2: How to Set WPS (51)Appendix 3: How to connect with PSP (59)Appendix 4 :FAQ (63)Appendix 5 :Regulatory Information (68)Chapter 1 Product IntroductionThank you for choosing this Tenda wireless adapter!The Tenda wireless adapter supports IEEE wireless standards, and is able to quickly process file transfer, video, multi-media and other applications that require higher bandwidth.This Tenda wireless adapter also integrates wireless configuration program, which makes it easy and quick to set up the wireless client. Besides, Soft AP is supported for fast wireless network establishment, and WPS encryption supported for you to quickly encrypt and secure your wireless network.All in all, the Tenda wireless adapter is easy-to-use, and of robust signal, long transmitting distance.1.1 Package Contents¾One Wireless network adapter¾One Software CD (includes user guide and driver)The above list is for your reference only,the actual contents may differ according to the product you purchase.1.2 LED Indicator DescriptionThere is one status LED indicator on the side of the wireless network adapter. It lights up and stays ON when working correctly, and flashes when transferring data.1.3 Product Features¾Supports soft AP feature¾Detects wireless network and adjusts transmitting rate automatically¾Provides two working modes: Infrastructure and Ad-Hoc¾Supports WEP data encryption and WPA-PSK/WPA2-PSK encryption methods¾Supports WPS (Wi-Fi Protected Setup) encryption to secure your wireless network¾Complies with Windows 7/XP/ 2000/Vista, Linux, MAC OS, etc.1.4 Product UsageThis Tenda Wireless Adapter offers a fast, reliable and extendable solution for wireless access.It is mostly used in the following circumstances:1.Enables staff members who require higher mobility, to have access to the wireless network anywhere inside their company.2.Enables wireless communication for companies or places which are not suitable for wired LAN installation because of budget or building environment restrictions, such as historical buildings, rentals, or places for short-term usage.3.Suitable for Enterprises or individuals requiring to regularly alter the networking topology4.Helps enterprises or individuals who would like to usewireless to establish wireless network quickly and frees them from the trouble of cable distribution.1.5 Before Installation1.Please read through the whole user guide before you install and use this product.2.Please close or uninstall the configuration programs of other manufacturers’ before you install the configuration programs of Tenda network adapters to avoid possible UI (user interface) conflict.3.To avoid possible network conflicts between this Tenda network adapter and those of other manufactures’, we recommend that you first disable the network adapters of other manufacturers before installaing the driver.1.6 Disable other manufacturers’ wireless network adapters1. Right click “My Computer” and select “Manage”2. On the Computer Management screen ,select“Device Manager”- “Network adapters”, and right click the network adapter you want to disable and click “Disable”3. Click the “Yes” button on the dialogue box to disable thenetwork adapter.1.7 Product Maintenance1.Please keep the product away from water and humidenvironment to guarantee its normal performance 2.Protect it against hazardous substances (such as acids,alkalis etc).3.Please don’t directly expose the adapter to the sunlight orexcessive heat.4.Please contact Tenda tech support if any problems occur.Chapter 2 Installation GuideThis chapter will guide you through the process of installing the network adapter software package, with the included software CD. The package integrates driver and configuration software. Thus, when you are installing the driver, the configuration software will be installed automatically as well.The software installation steps and operating guide in this user guide are explained under Windows XP, Installation steps for other operating systems are similar.2.1 Hardware Installation2.1.1 Install the USB network adapterPlease insert the Wireless USB Adapter into the USB port of your computer.2.1.2 Install the PCI network adapterInsert the wireless adapter into the PCI slot of yourcomputer when it is turned off and then start it(Please make sure the PCI adapter’s “gold fingers” are clean. If the PCI adapter can not be identified after being inserted into the mainboard slot,or the adapter can not scan signals after the driver being installed, please shut down your computer and clean the adapter,and then re-install).2.2 Software Installation2.2.1When The “Found New Hardware Wizard” system dialogue pops up, we recommend that you select” Cancel” and use the included Setup Wizard software CD for fast installation.2.2.2 Put the included software CD into the CD drive of your computer ,and the driver should run automatically , a Welcome screen should pop up, just click the “RUN” button.( Double click “Tenda.exe”in the software CD and manually install when it doesn’t auto-run).2.2.3 Select “I accept the terms of the license agreement” and click “Next”.2.2.4 Two set up types are provided: one is “Install driver only” ,the other is “Install driver and Tenda WLAN Utility”.NOTE:you may select the first method when you areaccustomed to use the WINDOWS built-inwireless configuration program.However, thisprogram doesn’t support AP mode, WPS, andthe WPS button on the wireless adapter. To usethese advanced features, the second method isrecommended.2.2.5 Click “Install” to begin the driver installation.2.2.6 Click “Finish” to complete the installation.Chapter 3 How to use the Windows Built-in Wireless ConfigurationThis chapter explains to users who don’t install Tenda configuration program how to use Windows Built-in Wireless Configuration to connect to the wireless network .Use of the Windows Built-in Wireless Configuration requires enabling Wireless Zero Configuration service(the default is enabled).3.1 Wireless Network Connection under Windows XP1. Right click “My Network Places” on the desktop and select “Properties”.2. Open the network connection.Right click “Wireless NetworkConnection” and select “View Available Wireless Networks” as shown below.3. On the right of the screen displayed are the currently scanned wireless networks. If the one you want to connect has not been scanned, click “Refresh Network List” to update the network list.4. Select the wireless network you want to connect, and click “Connect” or double click this wireless network. Input the key in the key dialogue box (the key input is case-sensitive) then click “Connect”.NOTE: If the wireless device you are connecting to is not encrypted, the key dialogue box will not pop up.5.When it shows “Connected” as the picture below, then youcan enjoy wireless access to Internet now.6. You can modify wireless network key from “Change advanced settings”.7. Select “Wireless Networks”and choose the one you want to modify, and then click “Properties”.8. Modify the key in the appearing dialogue box.3.2 Wireless Network Connection under VISTA1. Click the Wireless Connection icon in the lower right corner of your desktop and select “Connect to a network” as shown below.2.Select the wireless network you wish to connect and click “Connect” or double click the wireless network to connect. Click the Refresh icon in the upper right corner to update the network list if you don’t find the specified wireless network.3. If the wireless network that you are connecting has enabledsecurity mode, you’ll be prompted to enter the network key .Click “Connect” after you enter the correct key.4.The following screen will appear after successfullyconnected to the wireless network.5.If you want to change the wireless network key, just rightclick the wireless network’s SSID and then select“Properties”.6.You can modify the key from the appearing dialogue box.3.3 Wireless Network Connection under Windows 71.Click the wireless connection in the lower right corner of the computer’s desktop to view the available wireless networks. Select the wireless network you wish to connect and click “Connect” or double click the wireless network to connect. If you don’t find the specified one, please click the refresh icon in the upper right corner to update the list.2.If the wireless network you are connecting is encrypted,you’ll be prompted to enter the key. Click “Ok” after you enter the correct key.3. It shows “Connected” after successfully connected. You can disconnect it, view its status or modify the wireless network properties by right click the wireless networkChapter 4 Tenda Wireless UtilityWhen you are installing the driver, select “Install driver and Tenda WLAN Config Tool” and the adapter driver and client utility will be installed. All functions of this adapter can be configured via Tenda’s utility interface (in the following text it is abbreviated as UI).Select “Start”—“All Programs” —“Tenda Wireless”— Tenda Wireless Utility”, or click the “Tenda Wireless Utility” shortcut on your PC’s desktop to start the UI.4.1 Station mode (Client Mode)Station mode (Client Mode) OverviewIt is a common solution to use the wireless network adapter as a client to receive signals.Main interface for station modeThe function buttons on the top(From L to R )are respectively Site Survey, Link Information, Profile, Advanced, About, Help, and MiniSize. While the left column displays Turn On/Off RF, Security /No security, and Signal status.4.1.1 Available NetworksThe “Available Networks” screen displays currently scannedwireless signals and you can click one to connect the signal. Select one and you may view the AP’s MAC address, wireless mode (A/B/G/N), authentication type, and encryption type, or WPS authentication and signal strength.Before you connect to a wireless network, please click the “Rescan” button to update the wireless network list and select the one you wish to connect, then click the “Connect” icon.For the networks that are not encrypted, you can directly click “Connect”. However, for the encrypted wireless networks,a“Profile” dialog will pop up and you must select the corresponding authentication type and encryption type,and then click the “Next” button to input the correct key.Please note that this type of connection will not create a profile ,thus next time connect to this network you still need to select it manually.The detailed explanations about the authentication and encryption are as follows:WEP:Supports 10/26-bit Hex characters and 5/13-bit ASCII. WPA-PSK:Supports 8-63-bit ASCII and 8-64-bit Hex characters.WPA2-PSK:Supports 8-63-bit ASCII and 8-64-bit Hex characters.WPA-PSK/WPA2-PSK:Supports 8-63-bit ASCII and 8-64 -bit hex characters.NOTE:The Hex characters consist of numbers 0~9 and letters a-f. ASCII characters consist of any Arabic digitals/letters and characters.4.1.2 Link InformationAfter successfully connected to one wireless network, you can view its detailed information by clicking the “Link Information” on the main interface.1.“Link Status” screen displays the detailed information of theconnected AP including its SSID,MAC address,authentication type, encryption type, network typeand channel.2. “Throughput” screen displays the signal strength of each of the wireless adapter’s antennas and the link quality.3.”Statistics” screen is used to count the total Rx and Tx data packets, including transmitted,retransmitted and fail to receive ACK after all retries.You can click the “Reset Counter” button to clear the count.4.1.3 Profile SettingsExcept the above common connection type, you can also connect to the wireless network by adding a profile on the “Profile Settings“screen.The “Profile Settings” screen is used to save the wireless network parameters. When the adapter is successfully connected to a network, the profile name of this network will automatically be added here, which helps the adapter to quickly connect to the wireless network next time.However, there’s one exception that when you have set the hidden SSID,namely the SSID can not be scanned,then you must manually connect by adding the profile name.The main interface is as shown below.Add: create a new profileDelete: delete the existing profileEdit: modify the existing profileAdd WPS Profile: WPS setting requires that the connecting wireless device support WPS function.WPS helps you to fulfill wireless encryption fast aswell as secure your wireless network. For detailedsetting steps, refer to appendix2.There are two network types for your option when clicking the “Add” button to add wireless adapter connection: Infrastructure and Ad-Hoc.Infrastructure is an application mode that integrates the wired and wireless LAN architectures. It is different from Ad-Hoc in that in this mode the computer installed with the wireless network adapter has to fulfill the wirelesscommunication via AP or wireless router. It can be devided into two modes:“wireless AP + wireless network adapter” and “wireless router + wireless network adapter”.Ad-Hoc is a special wireless mobile network application mode. All nodes in the network are ually it is used to share resources by connecting the opposing computer’s wireless adapter.1. Infrastructure Profile ManagementWhen you are connecting the wireless adapter to an AP or a wireless router, please select the Infrastructure mode.Click the “Add”button and select the network type as” Infrastructure”,and enter the profile name and SSID or you can find the SSID you wish to connect from the drop-down list.Click the next button to select the authentication type and encryption type such as WPA-PSK and AES, and then input the key and click next.After a profile is successfully added, the profile name can be seen on the profile list,you can edit , import or export the profile,click “Active” to finish the connection,now you can also view the detailed connection status on the “Link Information”screen.NOTE:If the SSID broadcast function of the wireless router or AP you wish to connect is disabled, then the wireless adapter can not scan the SSID, thus you need to connect by creating the corresponding profile.2.Ad-Hoc Profile managementUsing the Ad-hoc mode to establish a wireless network requires that each computer should be equipped with a wireless network adapter. By connecting these wireless adapters, computers are able to share the resources. The detailed setting steps are as follows:1)Firstly you’ll have to allocate a static IP to each wireless adapter to be connected in Ad-hoc mode.a.Right click “My Network Places” on your computer’s desktopand select “Properties”.b.Right click “Wireless Network Connection”, and select“Properties”c.Select “Internet Protocol(TCP/IP)”and click “Properties”.d. Please enter the IP address and subnet mask, and make surethis IP address is not used by other devices in thenetwork.For example: if your wireless adapter’s IPaddress is 192.168.0.1,then set other wirelessadapters’ IP addresses within the range of192.168.0.2—192.168.0.254.Click “Ok” to save thesettings.2) Create a new Ad-hoc profileClick the “Add” button and enter the network name in the SSID field to identify the wireless network, and select Ad-hoc as the network type and then select the channel.Click the “Next” button to select the authentication type and encryption type and then input the correct key and click “Next”.After a profile is successfully added,the profile can be seen on the profile list ,select it and click the “Active” icon on the lower right corner.And then search for the wireless network on other clients. Double click the wireless network you have configured and you’ll be prompted for the key .After entering the key, click “Connect”.When the highlighted part shows “Connected“ ,it indicates the connection is successful.4.1.4 AdvancedThis section is used to set the wireless mode and country region code for the current wireless adapter. You have three options to choose from: 2.4G, 5G or 2.4G+5G. The widely used is 2.4G wireless adapter. To use the 5G mode of 802.11a technology, please set it here.4.1.5 AboutThis screen mainly displays the version information of the UI’s different programs as well as Tenda’s copyright statement.4.1.6 HelpClick the help button to open the user manual.4.2 AP modeWhen you want to use the wireless adapter’s AP function, please right click the UI icon on the taskbar of your computer desktop and select “Switch to AP Mode”.In this mode, the wireless adapter acts as an AP to transmit wireless signal and create a wireless network, while allowing other wireless clients to access this network.As shown in the diagram below: The PC in the left has already accessed to the Internet by using a wired network adapter, meanwhile, you install a Tenda wireless adapter (take a USB wireless adapter as an example) and its UI on this computer, and set the adapter to AP mode.By using the wireless adapters to scan the AP’S SSID to connect, the computers in the right can also access to the Internet after successfully connectedIn this mode, the client utility differs from that in station mode,and the main interface is as shown below.When it is switched to AP mode, the wireless adapter will automatically set its IP address as 192.168.123.1, and other clients that connected to this AP will automatically obtain the IP addresses of: 192.168.123.X(X is any integer from 2 to 254).The function buttons on the top (From L to R )are respectively Config AP, Advanced, Access Control List, Associate List, About, Help, and MiniSize, while the left column displays Turn On/Off RF, Security /No security, and AP mode icon.4.2.1 Config APThis screen is used to set the AP’s general parameters including SSID, wireless mode, channel, authentication type and encryption type, as shown in the picture below.Here the authentication type is set as “Open” and the encryption type “Not Use”.4.2.2 AdvancedThis screen is used to set the advanced parameters of the wireless adapter when working in AP mode, such as No forwarding among wireless clients and TX power.No forwarding among wireless clients: This featureisolates the communications among the wireless clients that are connected to the wireless adapter in AP mode.TX power: To adjust the transmit power for the wireless adapter4.2.3 Access Control ListAccess Control is based on the wireless adapter’ MAC addresses to allow or reject a specified client’s access to this wireless network.Access Policy:Disable: To disable the filter function.Allow All: To permit all hosts whose wireless MAC addresses are included in the list to access the wireless network,other hosts whose wireless MAC addresses have notbeen added to the list will be prohibited by default. Reject All: To prohibit all hosts whose wireless MAC addresses are included in the list from accessing the wireless network,other hosts whose wireless MAC addresses have not been added to the list will be permitted by default.MAC Address:To input the client’s wireless MAC address you want to filter in the physical address field.: to add the entered wireless client MAC address to the list.: to delete an existing MAC address in the list.: to delete all clients’ wireless MAC addresses in the list.Add the MAC address of the client’s wireless network adapter to the list and select “All Allow” in the access policy drop-down list, computers whose wireless MAC addresses are not included in the list will be rejected by default. Select “All reject”, and only the host computers whose wireless MAC addresses are included in the list can not access the AP wireless network.4.2.4 Associate ListWhen there’s client connected to this AP and has successfully obtained the IP address ,then the client’s MAC address, AID and Status can be seen on the list.4.2.5 AP Mode under Windows 7。
Q:XP/Vista/WIN7操作系统如何手动添加一个无线网络连接?
A:连接无线网络时,路由器一般默认开启了SSID广播,我们直接搜索到无线SSID再连接即可。
但在一些安全性要求比较高的网络环境下,设置禁止广播SSID后无法再搜索到,就需要用手动添加的方式来连接到一个无线网络。
详细图文解答:
1、在XP下手动添加无线网络连接
首先打开“无线网络连接”窗口,选择“为家庭或小型办公室设置无线网络”按流程开始操作:
安全加密设置必须与路由器匹配点击下一步后输入无线WPA密钥。
如下图所示:
输入完后这里有两种方式,选择USB方式是方便在其它电脑上安装这个无线配置,将U盘插入后根据提示操作即可,也可选择只手动设置这台电脑网络,完成后保存即可:
2、在Vista下手动添加无线网络连接
打开“连接网络”,选择如图“设置连接或网络”:
选择“手动连接到无线网络”后下一步:
输入需要要连接网络的名称,安全类型、加密类型、密钥与无线路由器中相关设置相同:
添加完成后选择“连接到。
”即可连接:
3、在Win7下手动添加无线网络连接
打开“网络和共享中心”,选择如图“设置新的连接或网络”,在弹出窗口选择“手动连接到无线网络”后选择下一步操作:
同样输入需要要连接网络的名称,安全类型、加密类型、密钥与无线路由器中相关设置相同:
点击下一步设置完成后如图所示:
然后我们在“网络和共享中心”点击“管理无线网络”即可看到刚添加的无线配置,一旦此路由器有信号发出则会自动连接。
Guide d'installation Adaptateur WiFi USB N300Modèle WNA3100Contenu de la boîteCDCâble USB et supportde l'adaptateur Installation1. Insérez le CD dans le lecteur de CD-ROM de votre ordinateur pour installer lelogiciel NETGEAR genie. Si l'écran principal du CD ne s'affiche pas, parcourezles fichiers du CD et double-cliquez sur Autorun.exe.2. Cliquez sur Setup (Configurer).L'écran Software Update Check (Détection de mises à jour) apparaît.3. Si vous êtes connecté à Internet, cliquez sur Check for Updates (Vérifiermises à jour). Si vous n'êtes pas connecté, cliquez sur Install from CD(Installer à partir du CD).4. Cliquez sur I Agree (J'accepte) pour accepter les conditions de la licence, puiscliquez sur Next (Suivant).Un message s'affichera, vousdemandant de patienter pendantl'installation du logiciel (l'installationpeut prendre quelques minutes). Vousserez alors invité à insérer votreadaptateur.5. Vous pouvez soit insérer l'adaptateurdans un port USB de votre ordinateur,soit le connecter à l'aide du supportet du câble USB inclus dans la boîte.Le câble USB et le support del'adaptateur permettent d'augmenterla portée de ce dernier et d'optimiserla réception sans fil. Insérezl'adaptateur dans le support etbranchez le câble USB à l'ordinateur.6. Cliquez sur Next(Suivant).7. NETGEAR genie affiche la liste des réseaux sans fil présents dans votre zone.Connexion à un réseau sans filVous pouvez vous connecter à un réseau sans fil à partir de l'écran NETGEARgenie. Vous pouvez également utiliser la fonctionnalité WPS (WiFi Protected Setup)si votre réseau sans fil est compatible.• NETGEAR genie : Cliquez sur votre réseau sans fil pour le sélectionner dans laliste, puis cliquez sur Connect (Se connecter).Si le réseau est sécurisé, entrezle mot de passe ou la clé réseau.• WPS : Appuyez sur le bouton WPS situé sur le côté de l'adaptateur etmaintenez-le enfoncé 2 secondes.Dans un délai de 2 minutes, appuyez sur le bouton WPS situé sur votre routeurou passerelle sans fil.Décembre 2014© NETGEAR, Inc. NETGEAR et le logo NETGEAR Logo sont des marques de commerce de NETGEAR, Inc. Toutes les marques de commerce autres que NETGEAR sont utilisées à titre de référence uniquement.L'adaptateur se connecte au réseau (l'opération peut prendre quelques minutes). Vos paramètres sont enregistrés dans un profil.Vérification du statut de votre connexionLorsque vous installez votre adaptateur, l'icône NETGEAR genie s'affiche dans la zone de notification Windows et sur le bureau. Double-cliquez sur cette icône pour ouvrir NETGEAR genie et apporter des modifications ou établir une connexion vers un autre réseau WiFi. La couleur de l'icône indique le niveau de puissance de votre connexion WiFi :Blanc . Connexion forte Jaune . Connexion faible Rouge . Aucune connexionSi vous retirez l'adaptateur, NETGEAR genie n'est pas disponible et l'icône nes'affiche pas. Elle s'affiche de nouveau si vous réinsérez l'adaptateur.SoutienNous vous remercions d'avoir acheté ce produit NETGEAR.Après l'installation de votre appareil, notez le numéro de série inscrit sur l'étiquette située sous votre produit. Celui-ci vous sera nécessaire pour enregistrer votre produit à l'adresse https:// .Vous devez enregistrer votre produit avant de pouvoir bénéficier des services de soutien par téléphone NETGEAR. NETGEAR vous recommande d'enregistrer votre produit sur le site Web NETGEAR. Pour obtenir des mises à jour de produits et consulter le soutien Web, visitez le site .NETGEAR vous recommande d'utiliser uniquement les ressources d'assistance officielles NETGEAR.Obtenez le guide de l'utilisateur à l'adresse ou en cliquant sur le lien à cet effet dans l'interface utilisateur du produit.Pour consulter la déclaration de conformité en vigueur pour l'UE, visitez le site /app/answers/detail/a_id/11621/.Pour obtenir des renseignements sur la conformité, visitez la page /about/regulatory/.Consultez le document relatif à la conformité réglementaire avant de brancher l'appareil.。
版 权 申 明是深圳市吉祥腾达科技有限公司注册商标。
文中提及到的其它商标或商品名称均是他们所属公司的商标或注册商标。
本产品的所有部分,包括配件和软件,其版权属深圳市吉祥腾达科技有限公司所有,在未经过深圳市吉祥腾达科技有限公司许可的情况下,不得任意拷贝、抄袭、仿制或翻译成其它语言。
本手册中的所有图片和产品规格参数仅供参考,随着软件或硬件的升级会略有差异,如有变更,恕不另行通知,如需了解更多产品信息,请浏览我们的网站:目 录第1章产品简介 (1)1.1产品规格 (2)1.2包装清单 (3)1.3面板指示灯及接口说明 (3)第2章产品安装 (5)2.1硬件安装 (5)2.2网络应用拓扑 (7)第3章如何登陆到路由器 (8)3.1正确设置您的计算机网络配置 (8)3.2登陆路由器 (11)第4章快速设置指南 (13)4.1快速设置向导 (13)第5章高级设置 (17)5.1LAN设置 (17)5.2WAN设置 (18)5.3MAC地址克隆 (20)5.4域名服务器 (21)第6章无线设置 (22)6.1基本设置 (22)6.2无线安全设置 (23)6.3高级设置 (26)6.4WPS设置 (28)6.5WDS设置 (29)6.6无线访问控制 (31)6.7连接状态 (31)第7章 DHCP服务器 (32)7.1DHCP服务设置 (32)7.2DHCP列表与绑定 (33)第8章虚拟服务器 (34)8.1端口段映射 (34)8.2DMZ主机 (35)8.3UPNP设置 (36)第9章宽带控制 (37)9.1宽带控制 (37)第10章安全设置 (39)10.1客户端过滤 (39)10.2URL过滤 (40)10.3MAC地址过滤 (41)10.4防网络攻击 (42)10.5远程WEB管理 (42)10.6WAN口PING (43)第11章路由设置 (45)11.1路由表 (45)第12章系统工具 (46)12.1时间设置 (46)12.2DDNS (47)12.3备份/恢复设置 (48)12.4恢复出厂设置 (49)12.5软件升级 (51)12.6重启路由器 (51)12.7修改登录密码 (52)12.8系统日志 (53)12.9退出登录 (53)附录一:常用无线名词解释 (54)附录二:常见问题解答 (56)第1章 产品简介感谢您购买W311R 11N无线宽带路由器(以下简称路由器)。
使用系统自带的无线配置程序需开启Windows Wireless Configuration服务(默认已开启)。
3.1 Windows XP无线网络连接
1、在桌面上,右击“网上邻居”,然后选择“属性”。
2、打开网络连接,我们可以看到现无线连接处于断开状态。
右击“无线网络连接”—选择“查看可用无线网络连接”,如下图。
3、右边显示了当前网卡搜索到的无线网络,可通过点击“刷新网络列表”按钮,更新网络列表。
选中您要连接的无线网络,点击“连接”或者双击无线网络,将出现输入密钥的对话框,在此输入密钥(输入密钥时注意区分大小写),然后点击“连接”。
注意:如果所要连接的无线设备没有进行加密设置,是不会出现输入密钥对话框的。
4、如图显示已连接上,这时您就可以安心畅享无线上网了。
5、当需要更改无线网络密钥时,可通过更改高级设置。
1、选择“无线网络配置”选项卡,选中您要更改配置的无线网络,并单击“属
性”。
7、在弹出的对话框里即可更改密钥信息。