perflab实验报告
- 格式:doc
- 大小:451.00 KB
- 文档页数:15
LAB5实验报告实验目的:●了解第一个用户进程创建过程●了解系统调用框架的实现机制●了解ucore如何实现系统调用sys_fork/sys_exec/sys_exit/sys_wait来进行进程管理实验内容:实验4完成了内核线程,但到目前为止,所有的运行都在内核态执行。
实验5将创建用户进程,让用户进程在用户态执行,且在需要ucore支持时,可通过系统调用来让ucore提供服务。
为此需要构造出第一个用户进程,并通过系统调用sys_fork/sys_exec/sys_exit/sys_wait 来支持运行不同的应用程序,完成对用户进程的执行过程的基本管理。
一.练习练习0:填写已有实验根据提示,对标注LAB5 YOUR CODE : (update LAB4 steps)的部分进行一定的改动。
Kern/trap/trap.c:/* LAB1 YOUR CODE : STEP 3 *//* handle the timer interrupt *//* (1) After a timer interrupt, you should record this event using a global variable (increase it), such as ticks in kern/driver/clock.c* (2) Every TICK_NUM cycle, you can print some info using a funciton, such as print_ticks().* (3) Too Simple? Yes, I think so!*//* LAB5 YOUR CODE *//* you should upate you lab1 code (just add ONE or TWO lines of code):* Every TICK_NUM cycle, you should set current process'scurrent->need_resched = 1*/ticks ++;if (ticks % TICK_NUM == 0) {assert(current != NULL);current->need_resched = 1;}/* LAB1 YOUR CODE : STEP 2 *//* (1) Where are the entry addrs of each Interrupt Service Routine (ISR)?* All ISR's entry addrs are stored in __vectors. where is uintptr_t __vectors[] ?* __vectors[] is in kern/trap/vector.S which is produced by tools/vector.c* (try "make" command in lab1, then you will find vector.S in kern/trap DIR)* You can use "extern uintptr_t __vectors[];" to define this extern variable which will be used later.* (2) Now you should setup the entries of ISR in Interrupt Description Table (IDT).* Can you see idt[256] in this file? Yes, it's IDT! you can use SETGATE macro to setup each item of IDT* (3) After setup the contents of IDT, you will let CPU know where is the IDT by using 'lidt' instruction.* You don't know the meaning of this instruction? just google it! and check the libs/x86.h to know more.* Notice: the argument of lidt is idt_pd. try to find it!*//* LAB5 YOUR CODE *///you should update your lab1 code (just add ONE or TWO lines of code), let user app to use syscall to get the service of ucore//so you should setup the syscall interrupt gate in hereextern uintptr_t __vectors[];int i;for (i = 0; i < sizeof(idt) / sizeof(struct gatedesc); i ++) {SETGATE(idt[i], 0, GD_KTEXT, __vectors[i], DPL_KERNEL);}SETGATE(idt[T_SYSCALL], 1, GD_KTEXT, __vectors[T_SYSCALL], DPL_USER);lidt(&idt_pd);Kern/process/proc.c:static struct proc_struct *alloc_proc(void) {struct proc_struct *proc = kmalloc(sizeof(struct proc_struct));if (proc != NULL) {//LAB4:EXERCISE1 YOUR CODE/** below fields in proc_struct need to be initialized* enum proc_state state; // Process state* int pid; // Process ID* int runs; // the running times of Proces * uintptr_t kstack; // Process kernel stack* volatile bool need_resched; // bool value: need to be rescheduled to release CPU?* struct proc_struct *parent; // the parent process* struct mm_struct *mm; // Process's memory management field* struct context context; // Switch here to run process* struct trapframe *tf; // Trap frame for current interrupt* uintptr_t cr3; // CR3 register: the base addr of Page Directroy Table(PDT)* uint32_t flags; // Process flag* char name[PROC_NAME_LEN + 1]; // Process name*/proc->state = PROC_UNINIT;proc->pid = -1;proc->runs = 0;proc->kstack = 0;proc->need_resched = 0;proc->parent = NULL;proc->mm = NULL;memset(&(proc->context), 0, sizeof(struct context));proc->tf = NULL;proc->cr3 = boot_cr3;proc->flags = 0;memset(proc->name, 0, PROC_NAME_LEN);//LAB5 YOUR CODE : (update LAB4 steps)/** below fields(add in LAB5) in proc_struct need to be initialized* uint32_t wait_state; // waiting state* struct proc_struct *cptr, *yptr, *optr; // relations between processes*/proc->wait_state = 0;proc->cptr = proc->yptr = proc->optr = NULL;}return proc;}intdo_fork(uint32_t clone_flags, uintptr_t stack, struct trapframe *tf) {int ret = -E_NO_FREE_PROC;struct proc_struct *proc;if (nr_process >= MAX_PROCESS) {goto fork_out;}ret = -E_NO_MEM;//LAB4:EXERCISE2 YOUR CODE/** Some Useful MACROs, Functions and DEFINEs, you can use them in below implementation.* MACROs or Functions:* alloc_proc: create a proc struct and init fields (lab4:exercise1)* setup_kstack: alloc pages with size KSTACKPAGE as process kernel stack* copy_mm: process "proc" duplicate OR share process "current"'s mm according clone_flags* if clone_flags & CLONE_VM, then "share" ; else "duplicate"* copy_thread: setup the trapframe on the process's kernel stack top and* setup the kernel entry point and stack of process* hash_proc: add proc into proc hash_list* get_pid: alloc a unique pid for process* wakup_proc: set proc->state = PROC_RUNNABLE* VARIABLES:* proc_list: the process set's list* nr_process: the number of process set*/// 1. call alloc_proc to allocate a proc_struct// 2. call setup_kstack to allocate a kernel stack for child process // 3. call copy_mm to dup OR share mm according clone_flag // 4. call copy_thread to setup tf & context in proc_struct// 5. insert proc_struct into hash_list && proc_list// 6. call wakup_proc to make the new child process RUNNABLE // 7. set ret vaule using child proc's pidif ((proc = alloc_proc()) == NULL) {goto fork_out;}proc->parent = current;assert(current->wait_state == 0);if (setup_kstack(proc) != 0) {goto bad_fork_cleanup_proc;}if (copy_mm(clone_flags, proc) != 0) {goto bad_fork_cleanup_kstack;}copy_thread(proc, stack, tf);bool intr_flag;local_intr_save(intr_flag);{proc->pid = get_pid();hash_proc(proc);set_links(proc);}local_intr_restore(intr_flag);wakeup_proc(proc);ret = proc->pid;//LAB5 YOUR CODE : (update LAB4 steps)/* Some Functions* set_links: set the relation links of process. ALSO SEE: remove_links: lean the relation links of process* -------------------* update step 1: set child proc's parent to current process, make sure current process's wait_state is 0* update step 5: insert proc_struct into hash_list && proc_list, set the relation links of process*/fork_out:return ret;bad_fork_cleanup_kstack:put_kstack(proc);bad_fork_cleanup_proc:kfree(proc);goto fork_out;}练习1:加载应用程序并执行do_execv函数调用load_icode(位于kern/process/proc.c中)来加载并解析一个处于内存中的ELF执行文件格式的应用程序,建立相应的用户内存空间来放置应用程序的代码段、数据段等,且要设置好proc_struct结构中的成员变量trapframe中的内容,确保在执行此进程后,能够从应用程序设定的起始执行地址开始执行。
一、实验背景随着互联网技术的飞速发展,网站和应用系统的访问量越来越大,对服务器资源的压力也越来越大。
为了提高系统的稳定性和性能,负载均衡技术应运而生。
负载均衡可以将请求分发到多个服务器上,从而提高系统的并发处理能力和可靠性。
本实验旨在验证负载均衡技术的有效性,通过实际操作了解负载均衡的配置、测试和分析过程。
二、实验目的1. 熟悉负载均衡的基本概念和原理。
2. 掌握负载均衡的配置方法。
3. 验证负载均衡在提高系统性能和可靠性方面的作用。
4. 分析负载均衡的优缺点。
三、实验环境1. 服务器:2台虚拟机,分别安装Linux操作系统。
2. 负载均衡器:1台虚拟机,安装Nginx负载均衡软件。
3. 测试工具:Apache JMeter。
四、实验步骤1. 配置服务器(1)在2台服务器上安装Apache HTTP服务器,并配置虚拟主机。
(2)配置服务器A的IP地址为192.168.1.100,服务器B的IP地址为192.168.1.101。
2. 配置负载均衡器(1)在负载均衡器上安装Nginx软件。
(2)编辑Nginx配置文件,配置反向代理服务器。
```upstream myapp {server 192.168.1.100;server 192.168.1.101;}server {listen 80;location / {proxy_pass http://myapp;}}}```3. 验证负载均衡(1)启动2台服务器和负载均衡器。
(2)使用Apache JMeter进行压力测试,模拟大量请求。
(3)观察服务器响应时间和负载均衡器的转发情况。
4. 分析实验结果(1)在实验过程中,负载均衡器成功地将请求分发到2台服务器上。
(2)服务器响应时间在负载均衡后有所降低,说明负载均衡提高了系统性能。
(3)负载均衡器能够根据服务器的负载情况动态调整请求分发策略。
五、实验结论1. 负载均衡技术可以有效提高系统的并发处理能力和可靠性。
linux实验报告实验目的:通过对Linux操作系统的实践,掌握基本的Linux命令和操作方法,了解Linux操作系统的特点和优势。
实验一:Linux环境搭建在实验一中,我们首先需要搭建Linux操作系统的环境。
根据实验指导书的要求,我们选择了Ubuntu作为实验平台。
通过下载Ubuntu镜像文件,并利用虚拟机软件创建一个虚拟机,将镜像文件安装到虚拟机中。
在安装过程中,我们需要选择合适的分区和网络配置等,并设置root用户的密码。
实验二:基本命令的使用在实验二中,我们主要学习了Linux的基本命令的使用方法。
首先,我们了解了Linux文件系统的结构,包括根目录、用户目录、系统目录等。
然后,通过命令行终端进行一系列的实践操作,比如查看文件内容、创建目录、复制文件等。
这些命令的使用不仅提高了我们的工作效率,同时也增强了对Linux操作系统的理解。
实验三:软件安装与卸载实验三主要涉及到Linux的软件安装与卸载。
我们首先学习了使用APT工具进行软件包管理,通过安装命令行界面的方式安装了一些常用的软件,比如文本编辑器、终端工具等。
此外,我们还学习了如何卸载已安装的软件包,清理不需要的文件,以保持系统的整洁性。
实验四:权限管理在实验四中,我们学习了Linux的权限管理机制。
Linux操作系统采用了基于用户和组的权限模型,通过设置文件和目录的权限,实现对文件的读、写、执行的控制。
我们通过实际操作,创建了新的用户和组,并为不同的用户和组设置了不同的权限。
这样,可以有效地保护系统的文件和数据的安全性。
实验五:网络配置与服务搭建在实验五中,我们主要学习了Linux的网络配置和服务搭建。
通过设置网络接口、IP地址和网关等参数,实现了网络的正常连接。
同时,我们还学习了一些常用的网络命令,比如ping、ssh等。
此外,我们尝试搭建了一个简单的Web服务器,通过浏览器访问,可以查看服务器上的网页。
实验六:系统监控和故障恢复在实验六中,我们学习了Linux的系统监控和故障恢复方法。
LAB5实验报告实验目的:●了解第一个用户进程创建过程●了解系统调用框架的实现机制●了解ucore如何实现系统调用sys_fork/sys_exec/sys_exit/sys_wait来进行进程管理实验内容:实验4完成了内核线程,但到目前为止,所有的运行都在内核态执行。
实验5将创建用户进程,让用户进程在用户态执行,且在需要ucore支持时,可通过系统调用来让ucore提供服务。
为此需要构造出第一个用户进程,并通过系统调用sys_fork/sys_exec/sys_exit/sys_wait 来支持运行不同的应用程序,完成对用户进程的执行过程的基本管理。
一.练习练习0:填写已有实验根据提示,对标注LAB5 YOUR CODE : (update LAB4 steps)的部分进行一定的改动。
Kern/trap/trap.c:/* LAB1 YOUR CODE : STEP 3 *//* handle the timer interrupt *//* (1) After a timer interrupt, you should record this event using a global variable (increase it), such as ticks in kern/driver/clock.c* (2) Every TICK_NUM cycle, you can print some info using a funciton, such as print_ticks().* (3) Too Simple? Yes, I think so!*//* LAB5 YOUR CODE *//* you should upate you lab1 code (just add ONE or TWO lines of code):* Every TICK_NUM cycle, you should set current process'scurrent->need_resched = 1*/ticks ++;if (ticks % TICK_NUM == 0) {assert(current != NULL);current->need_resched = 1;}/* LAB1 YOUR CODE : STEP 2 *//* (1) Where are the entry addrs of each Interrupt Service Routine (ISR)?* All ISR's entry addrs are stored in __vectors. where is uintptr_t __vectors[] ?* __vectors[] is in kern/trap/vector.S which is produced by tools/vector.c* (try "make" command in lab1, then you will find vector.S in kern/trap DIR)* You can use "extern uintptr_t __vectors[];" to define this extern variable which will be used later.* (2) Now you should setup the entries of ISR in Interrupt Description Table (IDT).* Can you see idt[256] in this file? Yes, it's IDT! you can use SETGATE macro to setup each item of IDT* (3) After setup the contents of IDT, you will let CPU know where is the IDT by using 'lidt' instruction.* You don't know the meaning of this instruction? just google it! and check the libs/x86.h to know more.* Notice: the argument of lidt is idt_pd. try to find it!*//* LAB5 YOUR CODE *///you should update your lab1 code (just add ONE or TWO lines of code), let user app to use syscall to get the service of ucore//so you should setup the syscall interrupt gate in hereextern uintptr_t __vectors[];int i;for (i = 0; i < sizeof(idt) / sizeof(struct gatedesc); i ++) {SETGATE(idt[i], 0, GD_KTEXT, __vectors[i], DPL_KERNEL);}SETGATE(idt[T_SYSCALL], 1, GD_KTEXT, __vectors[T_SYSCALL], DPL_USER);lidt(&idt_pd);Kern/process/proc.c:static struct proc_struct *alloc_proc(void) {struct proc_struct *proc = kmalloc(sizeof(struct proc_struct));if (proc != NULL) {//LAB4:EXERCISE1 YOUR CODE/** below fields in proc_struct need to be initialized* enum proc_state state; // Process state* int pid; // Process ID* int runs; // the running times of Proces * uintptr_t kstack; // Process kernel stack* volatile bool need_resched; // bool value: need to be rescheduled to release CPU?* struct proc_struct *parent; // the parent process* struct mm_struct *mm; // Process's memory management field* struct context context; // Switch here to run process* struct trapframe *tf; // Trap frame for current interrupt* uintptr_t cr3; // CR3 register: the base addr of Page Directroy Table(PDT)* uint32_t flags; // Process flag* char name[PROC_NAME_LEN + 1]; // Process name*/proc->state = PROC_UNINIT;proc->pid = -1;proc->runs = 0;proc->kstack = 0;proc->need_resched = 0;proc->parent = NULL;proc->mm = NULL;memset(&(proc->context), 0, sizeof(struct context));proc->tf = NULL;proc->cr3 = boot_cr3;proc->flags = 0;memset(proc->name, 0, PROC_NAME_LEN);//LAB5 YOUR CODE : (update LAB4 steps)/** below fields(add in LAB5) in proc_struct need to be initialized* uint32_t wait_state; // waiting state* struct proc_struct *cptr, *yptr, *optr; // relations between processes*/proc->wait_state = 0;proc->cptr = proc->yptr = proc->optr = NULL;}return proc;}intdo_fork(uint32_t clone_flags, uintptr_t stack, struct trapframe *tf) {int ret = -E_NO_FREE_PROC;struct proc_struct *proc;if (nr_process >= MAX_PROCESS) {goto fork_out;}ret = -E_NO_MEM;//LAB4:EXERCISE2 YOUR CODE/** Some Useful MACROs, Functions and DEFINEs, you can use them in below implementation.* MACROs or Functions:* alloc_proc: create a proc struct and init fields (lab4:exercise1)* setup_kstack: alloc pages with size KSTACKPAGE as process kernel stack* copy_mm: process "proc" duplicate OR share process "current"'s mm according clone_flags* if clone_flags & CLONE_VM, then "share" ; else "duplicate"* copy_thread: setup the trapframe on the process's kernel stack top and* setup the kernel entry point and stack of process* hash_proc: add proc into proc hash_list* get_pid: alloc a unique pid for process* wakup_proc: set proc->state = PROC_RUNNABLE* VARIABLES:* proc_list: the process set's list* nr_process: the number of process set*/// 1. call alloc_proc to allocate a proc_struct// 2. call setup_kstack to allocate a kernel stack for child process // 3. call copy_mm to dup OR share mm according clone_flag // 4. call copy_thread to setup tf & context in proc_struct// 5. insert proc_struct into hash_list && proc_list// 6. call wakup_proc to make the new child process RUNNABLE // 7. set ret vaule using child proc's pidif ((proc = alloc_proc()) == NULL) {goto fork_out;}proc->parent = current;assert(current->wait_state == 0);if (setup_kstack(proc) != 0) {goto bad_fork_cleanup_proc;}if (copy_mm(clone_flags, proc) != 0) {goto bad_fork_cleanup_kstack;}copy_thread(proc, stack, tf);bool intr_flag;local_intr_save(intr_flag);{proc->pid = get_pid();hash_proc(proc);set_links(proc);}local_intr_restore(intr_flag);wakeup_proc(proc);ret = proc->pid;//LAB5 YOUR CODE : (update LAB4 steps)/* Some Functions* set_links: set the relation links of process. ALSO SEE: remove_links: lean the relation links of process* -------------------* update step 1: set child proc's parent to current process, make sure current process's wait_state is 0* update step 5: insert proc_struct into hash_list && proc_list, set the relation links of process*/fork_out:return ret;bad_fork_cleanup_kstack:put_kstack(proc);bad_fork_cleanup_proc:kfree(proc);goto fork_out;}练习1:加载应用程序并执行do_execv函数调用load_icode(位于kern/process/proc.c中)来加载并解析一个处于内存中的ELF执行文件格式的应用程序,建立相应的用户内存空间来放置应用程序的代码段、数据段等,且要设置好proc_struct结构中的成员变量trapframe中的内容,确保在执行此进程后,能够从应用程序设定的起始执行地址开始执行。
Lab3 实验报告任务一:完成alloc_proc函数alloc_proc是申请一个新进程的函数,主要是申请一个进程结构体并对其中的一些变量进行初始化。
首先为其申请一块物理内存:struct proc_struct *proc = kmalloc(sizeof(struct proc_struct));变量初始化:proc->state = PROC_UNINIT;//未初始化状态proc->pid = -1;//进程idproc->runs = 0;//已调度的次数proc->kstack = 0;//内核栈指针proc->need_resched = 0;//是否需被调度proc->parent = NULL;//父进程指针proc->mm = NULL;// 内存管理信息memset(&proc->context, 0, sizeof(struct context));//清零proc->tf = NULL;//中断帧的指针proc->cr3 = boot_cr3;//设置CR3为页目录表地址proc->flags = 0;//标志位set_proc_name(proc, "");//清空list_init(&proc->list_link);//初始化链表list_init(&proc->hash_link);//初始化链表任务二:根据注释,完成do_fork函数判断是否已存在进程数超过给定要求:if (nr_process > MAX_PROCESS)goto fork_out;为新进程申请进程块:proc = alloc_proc();设置当前进程为新进程的父进程:proc->parent = current;为进程分配一个内核栈:setup_kstack(proc);复制原进程内存管理信息到新进程:copy_mm(clone_flags, proc);复制原进程上下文到新进程:copy_thread(proc, stack, tf);保存中断符:uint32_t flag;将新进程添加到进程列表:local_intr_save(flag);设置进程:IDproc->pid = get_pid();设置进程hash链信息:hash_proc(proc);将进程加入进程链表:list_add(&proc_list, &(proc->list_link));进程数加:1nr_process ++;重载中断符:local_intr_restore(flag);唤醒新进程:wakeup_proc(proc);返回新进程号:ret = proc->pid。

第1篇一、实验目的1. 理解操作系统内存分配的基本原理和常用算法。
2. 掌握动态分区分配方式中的数据结构和分配算法。
3. 通过编写程序,实现内存分配和回收功能。
二、实验环境1. 操作系统:Linux2. 编程语言:C语言3. 开发工具:GCC编译器三、实验原理1. 内存分配的基本原理操作系统内存分配是指操作系统根据程序运行需要,将物理内存分配给程序使用的过程。
内存分配算法主要包括以下几种:(1)首次适应算法(First Fit):从内存空间首部开始查找,找到第一个满足条件的空闲区域进行分配。
(2)最佳适应算法(Best Fit):在所有满足条件的空闲区域中,选择最小的空闲区域进行分配。
(3)最坏适应算法(Worst Fit):在所有满足条件的空闲区域中,选择最大的空闲区域进行分配。
2. 动态分区分配方式动态分区分配方式是指操作系统在程序运行过程中,根据需要动态地分配和回收内存空间。
动态分区分配方式包括以下几种:(1)固定分区分配:将内存划分为若干个固定大小的分区,程序运行时按需分配分区。
(2)可变分区分配:根据程序大小动态分配分区,分区大小可变。
(3)分页分配:将内存划分为若干个固定大小的页,程序运行时按需分配页。
四、实验内容1. 实现首次适应算法(1)创建空闲分区链表,记录空闲分区信息,包括分区起始地址、分区大小等。
(2)编写分配函数,实现首次适应算法,根据程序大小查找空闲分区,分配内存。
(3)编写回收函数,回收程序所占用的内存空间,更新空闲分区链表。
2. 实现最佳适应算法(1)创建空闲分区链表,记录空闲分区信息。
(2)编写分配函数,实现最佳适应算法,根据程序大小查找最佳空闲分区,分配内存。
(3)编写回收函数,回收程序所占用的内存空间,更新空闲分区链表。
3. 实验结果分析(1)通过实验,验证首次适应算法和最佳适应算法的正确性。
(2)对比两种算法在内存分配效率、外部碎片等方面的差异。
五、实验步骤1. 创建一个动态内存分配模拟程序,包括空闲分区链表、分配函数和回收函数。
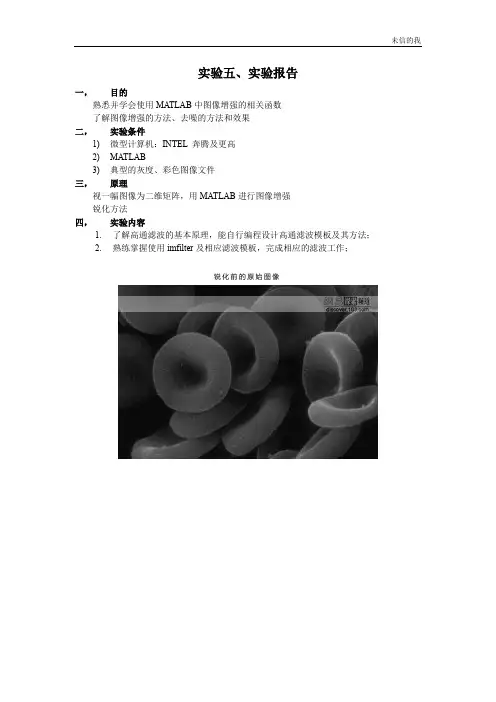
实验五、实验报告一,目的熟悉并学会使用MA TLAB中图像增强的相关函数了解图像增强的方法、去噪的方法和效果二,实验条件1)微型计算机:INTEL 奔腾及更高2)MATLAB3)典型的灰度、彩色图像文件三,原理视一幅图像为二维矩阵,用MA TLAB进行图像增强锐化方法四,实验内容1.了解高通滤波的基本原理,能自行编程设计高通滤波模板及其方法;2.熟练掌握使用imfilter及相应滤波模板,完成相应的滤波工作;锐化前的原始图像阈值处理后的垂直模板锐化阈值处理后的水平模板锐化cd d:O=imread('test.jpg');I=rgb2gray(O);imshow(I);title('锐化前的原始图像');[m,n]=size(I);%SobelX=[-1,-1,-1;0,0,0;1,1,1]; %上下垂直模板%SobelY=[-1,0,1;-1,0,-1;-1,0,-1]; %左右选取TEMP=zeros(m+2,n+2); %避免边界为空,用0像素值填充for i=1:1:mfor j=1:1:nTEMP(i+1,j+1)=I(i,j);endend%定义所需的空间vertical=zeros(m,n);vertical_=zeros(m,n);horize=zeros(m,n);horize_=zeros(m,n);for x=2:1:m+1for y=2:1:n+1%上下水平模板vertical(x,y)=[-TEMP(x-1,y-1)+TEMP(x-1,y+1)-TEMP(x,y-1)+TEMP(x,y+1)-TEMP(x +1,y-1)+TEMP(x+1,y+1)];%阈值处理AA=abs(vertical(x,y));if AA > 16vertical_(x,y)=255;elsevertical_(x,y)=0;end%左右垂直模板horize(x,y)=[-TEMP(x-1,y-1)-TEMP(x-1,y)-TEMP(x-1,y+1)+TEMP(x+1,y-1)+TEMP( x+1,y)+TEMP(x+1,y+1)];%阈值处理BB=abs(horize(x,y));if BB > 16horize_(x,y)=255;elsehorize_(x,y)=0;endendendfigure;imshow(vertical);title('垂直模板锐化');figure;imshow(vertical_);title('阈值处理后的垂直模板锐化');figure;imshow(horize);title('水平模板锐化');figure;imshow(horize_);title('阈值处理后的水平模板锐化');五,讨论与分析比较:平滑滤波与锐化滤波有何异同平滑滤波(低通滤波)可分为均值滤波和中值滤波,均值滤波是以图像的模糊为代价换取降噪的效果,邻域越大,降噪的效果越好,均值滤波作为一种线性的滤波方法处理线性高斯分布的噪声效果较为明显,对非线性的椒盐噪声处理能力较弱;而中值滤波属于非线性增强方法,对消除孤立点和线段脉冲等干扰及图像扫描噪声最为有效,在去噪的同时还很好的保留了边缘特性。

Lab2 实验报告任务一:根据代码中的提示完成get_pte函数在一级页表中查找二级页表:pde_t *pdepage=&pgdir[PDX(la)];如果二级页表不存在,即:(*pdepage & PTE_P)==0;再看是否需要创建,如果需要创建,那么申请一页新的物理页:page = alloc_page() 然后设置映射标志:set_page_ref(p, 1);清零:uintptr_t pa = KADDR(page2pa(page));memset(pa, 0, PGSIZE);设置用户权限:*pdepage = page2pa(p) | PTE_USER;如果已经存在了,那么可以直接返回它的物理地址:return &((pte_t*)KADDR(PDE_ADDR(*pdepage)))[PTX(la)]任务二:把page_rmovepte函数补全,仔细阅读page_insert函数了解映射过程,以及函数上面的注释来完成这个练习释放一个二级页表首先要看看它是否还映射到了其他页上,如果有映射,那么就不能释放。
这个判断的函数在pmm.h中有定义:static inline intpage_ref_dec(struct Page *page) {return atomic_sub_return(&(page->ref), 1);}也就是将映射变量减一:page_ref_dec(page),观察返回值,如果为0,那么就说明pte没有再映射到其他页,可以释放:if (page_ref_dec(p) == 0)free_pages(p, 1);同时每次释放或添加页的时候都要更新一次TLB表:tlb_invalidate(pgdir, la)。
任务三:实现page_pgtable_items函数根据提示情况可知:table是要查的页表、left---right是需要查找的表项范围、left_store------right_store是连续权限相同的表项的范围、start是开始查找的位置要查找相同选项的页,采取的算法是从start开始从左到右,*left_store = start;找到第一个有效页(table[start] & PTE_P) != 0然后观察其权限并记录:table[start] & PTE_USER继续往下找连续的相同权限的页,找到第一个权限不同的页时,以其为右边界(*right_store = start)即可。

练习1、理解通过make生成执行文件的过程。
[练习1.1] 操作系统镜像文件ucore.img 是如何一步一步生成的?在proj1执行命令make V=可以得到make指令执行的过程从这几条指令中可以看出需要生成ucore.img首先需要生成bootblock,而生成bootblock需要先生成bootmain.o和bootasm.o还有sign,这三个文件又分别由bootmain.c、bootasm.S、sigh.c来生成。
ld -m elf_i386 -N -e start -Ttext 0x7C00 obj/boot/bootasm.o obj/boot/bootmain.o –o obj/bootblock.o这句话用于生成bootblock,elf_i386表示生成elf头,0x7C00为程序的入口。
'obj/bootblock.out' size: 440 bytes这句话表示生成的bootblock的文件大小,因为大小不到512字节,所以需要给blootblock填充,填充的功能在sign.c中有所体现,最后两字节设置为了0x55,0xAAbuf[510] = 0x55;buf[511] = 0xAA;FILE *ofp = fopen(argv[2], "wb+");size = fwrite(buf, 1, 512, ofp);[练习1.2] 一个被系统认为是符合规范的硬盘主引导扇区的特征是什么?前面已经提到过:引导扇区的大小为512字节,最后两个字节为标志性结束字节0x55,0xAA,做完这样的检查才能认为是符合规范的磁盘主引导扇区。
Sign.c文件中有作检查:if (size != 512) {fprintf(stderr, "write '%s' error, size is %d.\n", argv[2], size);return -1;}练习2:使用qemu执行并调试lab1中的软件。

课程实验报告课程名称:计算机系统原理实验实验项目名称: BombLab 专业班级:计科1501 姓名:马子垚学号: 201508010114 完成时间: 2017 年 4 月 19 日实验目的理解汇编语言,学会使用调试器实验原理二进制炸弹是作为一个目标代码文件提供给学生们的程序,运行时,它提示用户输入6个不同的字符串。
如果其中任何一个不正确,炸弹就会“爆炸”:打印出一条错误信息。
学生通过反汇编和逆向工程来确定是哪六个字符串,从而解除他们各自炸弹的雷管。
实验步骤及体会一、实验准备1、首先,由于虚拟机操作系统与windows系统相互独立,所以首先将Bomb.c及其相关文件存至百度云盘,然后在ubantu操作系统内下载至文件系统目录下的下载文件夹里面:2、输入./bomb试运行bomb.c文件时会提示权限不够:所以需要输入chmod+x+文件名的命令于改变文件或目录的访问权限。
用它控制文件或目录的访问权限。
在经过操作之后,获得了权限,程序可以正常运行了:3、由于bomb.c文件并没有蕴含许多能破解的信息,所以需要将其进行反汇编,详细操作如下:输入objdump –d bomb >bomb.txt将汇编代码输出到自动生成一个bomb.txt的文件里面,方便我们查看与分析代码:二、具体实验步骤及其分析试查看导出的bomb.txt,我发现总的文本里面分为很多段,其中就有Phase_1~Phase_6、Phase_defuse、Phase_secret以及其他相关函数的代码,所以我猜测每一段Phase代码就是我们需要破解的关卡,所以我将它们分别导出新建text文件,逐段分析。
Phase_1及其破解过程:知识点:string,函数调用,栈反汇编代码及其分析:08048f61 <phase_1>:8048f61: 55 push %ebp//压栈 ebp为栈指针 esp为栈指针。
push指令可以理解为两个步骤:1. subl $4 , %esp –栈底向下移一位2. movl %ebp ,(%esp)将ebp的值存入esp中8048f62: 89 e5 mov %esp,%ebp//把esp赋值给ebp8048f64: 83 ec 18 sub $0x18,%esp//esp指针下移0x18个字节8048f67: c7 44 24 04 5c a1 04 movl $0x804a15c,0x4(%esp)//取0x804a15c处的内容存入*(%esp+4)//前一段总的分析:初始化栈,push是压栈指令,ebp寄存器中的内容是栈底指针。
华东师范大学软件学院实验报告实验课程:操作系统实践年级:大二实验成绩:实验名称:Pintos-User Programs 姓名:实验编号:学号:实验日期:2018/12/27指导教师:组号:实验时间:4学时一、实验目的当前, 我们已经完成了pintos 的第一部分(熟悉了其基础结构和线程包), 现在是开始处理系统中允许运行用户程序的部分的时候了。
基本代码已经支持加载和运行用户程序, 但不能加载和运行或交互性。
在此项目中, 我们将使程序能够通过系统调用与操作系统进行交互。
我们将在"userprog" 目录中进行工作, 但我们也将与pintos 的几乎所有其他部分进行交互。
具体目的如下:(1)了解Pintos操作系统的功能流程及内核的软件工程结构。
(2)通过Pintos操作系统内核的剖析,了解现有Pintos操作系统在处理用户程序方面中存在的参数传递问题,有效解决其参数传递的问题。
(3)通过Pintos内核剖析,了解其中断处理的机制,学会操作系统中断功能的编写方法。
(4)了解现有Pintos操作系统的系统调用功能,根据其中断机制,完善系统调用功能,使Pintos系统具有处理用户中断请求的功能。
(5)通过Pintos内核剖析,解决现有Pintos操作系统中存在的进程终止时缺少终端提示的问题。
(6)通过Pintos内核剖析,解决现有Pintos操作系统中存在的运行文件禁止写操作的问题。
二、实验内容与实验步骤实验内容如下:(1)在分析内核的基础上,对Pintos操作系统的参数传递问题提出有效的策略,设计算法,分步跟踪和调试,通过实践,有效解决参数传递问题,并对实验结果进行分析。
(2)通过Pintos操作系统内核的剖析,了解其中断处理的机制,在此基础上,完善Pintos的系统调用功能,设计算法,分步跟踪和调试,通过测试分析完善的系统调用功能。
(3)在分析内核的基础上,对现有Pintos操作系统进行完善,增加进程终止的终端提示功能,设计算法,分步跟踪和调试,通过实践,验证终端提示功的有效性。
理学院School of Science计算机网络实验报告学生姓名: 学生学号:所在专业:电子信息科学与技术 所在班级:实验一1.7.1 综合技巧练习 - Packet Tracer 简介实验目的∙研究 Packet Tracer 实时模式∙研究逻辑工作空间∙研究 Packet Tracer 的运行∙连接设备∙检查设备配置∙查看标准实验设置∙设备概述实验背景在整个课程中,将采用实际PC、服务器、路由器和交换机组成的标准实验配置来学习网络概念。
此方法提供最广泛的功能和最真实的体验。
由于设备和时间有限,因此还会通过模拟环境来强化这种体验。
本课程使用的模拟程序是Packet Tracer。
Packet Tracer 提供一组丰富的协议、设备和功能,但只有一部分部分功能可以用真正的设备实现。
Packet Tracer 只是一种辅助补充体验,而不是要取代操作真实设备的体验。
建议您将从Packet Tracer 网络模型获取的结果与实际设备的行为进行比较。
同时也建议查看Packet Tracer 中的帮助文件,其中包含大量“My First PT Lab(我的首个Packet Tracer 实验)”、教程,以及使用Packet Tracer 创建网络模型的优点和局限性等相关信息。
实验任务任务 1:学习 PT 界面步骤 1 –逻辑工作空间当Packet Tracer 启动时,将会以实时模式显示网络的逻辑视图。
PT 界面的主要部分是逻辑工作空间。
这是一个大区域,用于放置和连接设备。
步骤 2 –符号导航PT 界面的左下部分(黄色条下方)是界面中用于选择设备以及将设备放入逻辑工作空间的部分。
左下部分第一个框中包含代表设备组的符号。
在这些符号上移动鼠标指针时,设备组的名称将显示在中间的文本框中。
当您单击这些符号的其中一个时,组中的特定设备就会显示在右边的框中。
当您指向具体设备时,该设备说明就会显示在以下具体设备的文本框中。
Perflab优化实验【实验目的】理解编译器,学习程序优化,从优化程序代码和程序执行速度两方面着手。
【实验原理】通过循环展开、cache友好、替换变量等手段来实现程序优化。
【实验内容】将下载下来的kernels.c中的rotate、smooth函数进行优化。
【操作界面】从网上下载了SSH Secure Shell Client和SSH Secure File Transfer Client代替Putty作为实验平台,可以方便的进行文件上传与下载,所以此次实验以本地编辑文件,再上传覆盖原文件运行为主。
软件界面如下:通过在SSH Secure Shell Client将压缩包解压之后,可以直接通过SSH Secure File Transfer Client下载所需要的kernels.c文件,无需通过cmd输入长指令进行下载。
改好的kernel.c也只需通过SSH Secure File Transfer Client,右击upload即可。
【程序优化】1. Naive_rotate1-1.原始代码char naive_rotate_descr[] = "naive_rotate: Naive baseline implementation";void naive_rotate(int dim, pixel *src, pixel *dst){int i, j;for (i = 0; i < dim; i++)for (j = 0; j < dim; j++)dst[RIDX(dim-1-j, i, dim)] = src[RIDX(i, j, dim)];}1-2.分析这段代码的作用就是将所有的像素进行行列调位、导致整幅图画进行了90度旋转。
P 从defs.h中可以找到#define RIDX(i,j,n) ((i)*(n)+(j)) 。
代码从阅读性上来说,这段代码非常具有可读性,但是,从cache友好性来说,这段代码则显得难以接受。
湖南大学课程实验报告
课程名称:计算机组成与结构
实验项目名称:perflab
专业班级:
姓名:
学号:
指导教师:
完成时间:2015 年05 月22 日
计算机科学与工程系
rotate函数:
void rotate(int dim, pixel *src, pixel *dst)
{
int i,j,ii,jj;
for(ii=0;ii<dim;ii+=4)
for(jj=0;jj<dim;jj+=4)
for(i=ii;i<ii+4;i++)
for(j=jj;j<jj+4;j++)
dst[RIDX(dim-1-j,i,dim)]=src[RIDX(i,j,dim)];
}
多添加了两个for函数,将循环分成了4*4的小块,在cache存储体不足够大的情况下,对循环分块能够提升高速缓存命中率,从高提升了空间局部性。
从测试的CPE中也可以看出,在dim 是64的时候,原代码和本代码CPE相差不大,而随着dim的增大,本代码CPE增加不大,而原代码CPE急剧增加,就是受到了cache存储的局限性。
smooth函数:
void smooth(int dim, pixel *src, pixel *dst)
{
pixel_sum rowsum[530][530];
dst[RIDX(dim-1, j, dim)].red = (unsigned
short)((rowsum[dim-2][j].red+rowsum[dim-1][j].red)/snum);
dst[RIDX(dim-1, j, dim)].blue = (unsigned
short)((rowsum[dim-2][j].blue+rowsum[dim-1][j].blue)/snum);
dst[RIDX(dim-1, j, dim)].green = (unsigned
short)((rowsum[dim-2][j].green+rowsum[dim-1][j].green)/snum);
}
}
本函数取消调用了avg函数,通过在函数中直接对像素点的三原色比例分别求平均值的方法来求像素的平均值。
因为取消了avg函数的调用,减少了大多数函数调用环节,并且将重复利用的数据储存在了数组之中,因此提升了速度。
但是本方法提升的速度不够显著。
仅是在dim较小的情况下才有较好的优化。
且当dim>512时,超出了设置的数组大小会报错。
第二种版本:
CPE分析:
rotate函数:
void rotate(int dim, pixel *src, pixel *dst)
{
dst->blue=(P1->blue+(P1+1)->blue+(P1+2)->blue+P2->blue+(P2+1)->blue+(P2+2)->blue)/6;
dst++;
P1++;
P2++;
}
dst->red=(P1->red+(P1+1)->red+P2->red+(P2+1)->red)>>2;
dst->green=(P1->green+(P1+1)->green+P2->green+(P2+1)->green)>>2;
dst->blue=(P1->blue+(P1+1)->blue+P2->blue+(P2+1)->blue)>>2;
}
这段代码也是通过不调用avg函数来加速程序。
将Smooth函数处理分为4块,一为主体内部,由9点求平均值;二为4个顶点,由4点求平均值;三为四条边界,由6点求平均值。
从图片的顶部开始处理,再上边界,顺序处理下来,其中在处理左边界时,for循环处理一行主体部分,就是以上的代码。
第三种版本:
CPE分析:。