jsp 图片上传功能实现原创
- 格式:doc
- 大小:40.50 KB
- 文档页数:5
┊┊┊┊┊┊┊┊┊┊┊┊┊装┊┊┊┊┊订┊┊┊┊┊线┊┊┊┊┊┊┊┊┊┊┊┊┊图片上传的设计与实现二.设计目的运用jsp开发工具和数据库开发一个小型的基于Web系统。
要求提交详细的设计说明书及各步骤所需图表和文档,对复杂的代码段和程序段,应画出程序流程图。
在界面设计中,画出每个窗口的布局。
通过本实践性教学环节,能较好地巩固jsp基本知识,jsp连接数据库实现动态网页。
三.需求分析如今时代,互联网已经进入我们的生活,而互联网上就有图片上传,显示,访问等等功能,有着很大的市场空间。
图片上传必须实现:1.数据库访问模块:利用JavaBean封装对数据库的操作,主要包括连接数据库、添加、删除、查询数据表、关闭连接等功能;2.上传模块:通过上传组件实现图片的上传。
3.显示模块:提供图片信息列表的显示效果。
4.查看模块:点击可以显示图片的内容。
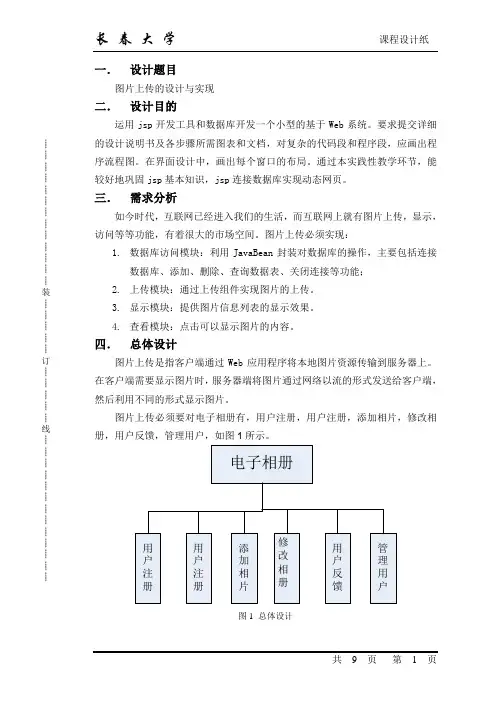
四.总体设计图片上传是指客户端通过Web应用程序将本地图片资源传输到服务器上。
在客户端需要显示图片时,服务器端将图片通过网络以流的形式发送给客户端,然后利用不同的形式显示图片。
图片上传必须要对电子相册有,用户注册,用户注册,添加相片,修改相册,用户反馈,管理用户,如图1所示。
图1 总体设计┊┊┊┊┊┊┊┊┊┊┊┊┊装┊┊┊┊┊订┊┊┊┊┊线┊┊┊┊┊┊┊┊┊┊┊┊┊1.文件上传组件介绍文件上传组件是一些开源组织发布的针对实现文件上传功能的一组class 文件。
jspSmartUpload和Apache的common-fileupload是两个比较流行的文件上传组件。
这两个组件都可以在JSP中实现文件上传。
本节使用Apache的common-fileupload组件实现图片上传。
2.HTML中文件上传组件介绍HTML中<input type="file"/>元素可以创建文件上传组件。
该控件带有一个文本框和浏览按钮。
使用该组件时要注意以下几点。
3000分求JSP 图片上传/放大缩小/裁减的源代码guestdsf竹省省市滋发息加友铜牌会员1 # 大 中 小 发表于 2009-08-27 10:33:003000分求JSP 图片上传/放大缩小/裁减的源代码。
能裁减固定大小比如(120*100)的就行。
有预览,能显示图片长宽和大小(file size)最好。
本人结帖率是99.87%, 可用分8000+非常感谢!!如果没有JSP 源代码,PHP 源代码也可以。
package myBean; import java.io.*; public class uploadpic {String picPath;//图片路径 (如:F:picturea.gif ) public String pictype[];//设置图片的后缀名 FileInputStream in; int piclength;//设置图片的最大kb public void setpicPath(String picPath)//获得图片的路径 {this.picPath=picPath; } 设置图片的最大长度{this.piclength=piclength;}public int getpiclength(){return piclength;}public boolean testlength()//判断图片的长度是否大于设定的最大长度try{in=new FileInputStream(picPath);if(in.available()/1024>piclength)return false;}catch(IOException e){System.out.println(e.getMessage());}return true;}public void setpictype(String[] pictype)//设置图片的扩展名{this.pictype=pictype;}public boolean testpictype()//判断图片的扩展名是否是规定的{if(pictype!=null){for(int i=0;i <pictype.length;i ){if(picPath.endsWith(pictype))return true;}return false;}return false;}}以下是在jsp页面中调用uploadpic首先要引入此bean所在的包<%@page import="myBean.uploadpic" %><jsp:useBean id="pic" scope="page" class="myBean.uploadpic" /> 下一条语句是得到上一层页面,也就是用户提交的图片路径!picp=codetostring.codeToString(request.getParameter("picPath"));pic.setpicPath(picp);pic.setpiclength(100);//以kb为单位if(pic.testlength())out.print("length ok <br>");elseout.print("length ok");String p1,p2;p1=".jpg";p2=".gif";String[] type={p1,p2};pic.setpictype(type);if(pic.testpictype())out.print("typeok");elseout.print("type error");made by zonecens 不知道2楼的怎么样,我来学习一个!帮顶!好像百度一招很多百度一下,找到相关网页约11,400,000篇,用时0.036秒3000连个星星都升不了这个是JAVA代码package ftp;import .ftp.*;import .*;import java.awt.*;import java.awt.event.*;import java.applet.*;import java.io.*;class FTPextends Applet {FtpClient aftp;DataOutputStream outputs;TelnetInputStream ins;TelnetOutputStream outs;TextArea lsArea;Label LblPrompt;Button BtnConn;Button BtnClose;TextField TxtUID;TextField TxtPWD;TextField TxtHost;int ch;public String a = "没有连接主机";String hostname = "";public void init() {setBackground(Color.white);setLayout(new GridBagLayout());GridBagConstraints GBC = new GridBagConstraints();LblPrompt = new Label("没有连接主机");LblPrompt.setAlignment(Label.LEFT);BtnConn = new Button("连接");BtnClose = new Button("断开");BtnClose.enable(false);TxtUID = new TextField("", 15);TxtPWD = new TextField("", 15);TxtPWD.setEchoCharacter('*');TxtHost = new TextField("", 20);Label LblUID = new Label("User ID:");Label LblPWD = new Label("PWD:");Label LblHost = new Label("Host:");lsArea = new TextArea(30, 80);lsArea.setEditable(false);GBC.gridwidth = GridBagConstraints.REMAINDER;GBC.fill = GridBagConstraints.HORIZONTAL; ( (GridBagLayout) getLayout()).setConstraints(LblPrompt, GBC);add(LblPrompt);GBC.gridwidth = 1;( (GridBagLayout) getLayout()).setConstraints(LblHost, GBC);add(LblHost);GBC.gridwidth = GridBagConstraints.REMAINDER; ( (GridBagLayout) getLayout()).setConstraints(TxtHost, GBC);add(TxtHost);GBC.gridwidth = 1;( (GridBagLayout) getLayout()).setConstraints(LblUID, GBC);add(LblUID);GBC.gridwidth = 1;( (GridBagLayout) getLayout()).setConstraints(TxtUID, GBC);add(TxtUID);GBC.gridwidth = 1;( (GridBagLayout) getLayout()).setConstraints(LblPWD, GBC);add(LblPWD);GBC.gridwidth = 1;( (GridBagLayout) getLayout()).setConstraints(TxtPWD, GBC);add(TxtPWD);GBC.gridwidth = 1;GBC.weightx = 2;( (GridBagLayout) getLayout()).setConstraints(BtnConn, GBC);add(BtnConn);GBC.gridwidth = GridBagConstraints.REMAINDER;( (GridBagLayout) getLayout()).setConstraints(BtnClose, GBC);add(BtnClose);GBC.gridwidth = GridBagConstraints.REMAINDER;GBC.fill = GridBagConstraints.HORIZONTAL;( (GridBagLayout) getLayout()).setConstraints(lsArea, GBC);add(lsArea);}public boolean connect(String hostname, String uid,String pwd) {this.hostname = hostname;LblPrompt.setText("正在连接,请等待.....");try {aftp = new FtpClient(hostname);aftp.login(uid, pwd);aftp.binary();showFileContents();}catch (FtpLoginException e) {a = "无权限与主机:" + hostname + "连接!";LblPrompt.setText(a);return false;}catch (IOException e) {a = "连接主机:" + hostname + "失败!";LblPrompt.setText(a);return false;}catch (SecurityException e) {a = "无权限与主机:" + hostname + "连接!";LblPrompt.setText(a);return false;}LblPrompt.setText("连接主机:" + hostname + "成功!");return true;}public void stop() {try {aftp.closeServer();}catch (IOException e) {}}public void paint(Graphics g) {}public boolean action(Event evt, Object obj) { if (evt.target == BtnConn) {LblPrompt.setText("正在连接,请等待....."); if (connect(TxtHost.getText(), TxtUID.getText(), TxtPWD.getText())) {BtnConn.setEnabled(false);BtnClose.setEnabled(true);}return true;}if (evt.target == BtnClose) {BtnConn.enable(true);BtnClose.enable(false);LblPrompt.setText("与主机" + hostname + "连接已断开!");return true;}return super.action(evt, obj);}public boolean sendFile(String filepathname) { boolean result = true;if (aftp != null) {LblPrompt.setText("正在粘贴文件,请耐心等待....");String contentperline;try {a = "粘贴成功!";String fg = new String("\");int index = stIndexOf(fg);String filename = filepathname.substring(index + 1);File localFile;localFile = new File(filepathname); RandomAccessFile sendFile = new RandomAccessFile(filepathname, "r");//sendFile.seek(0);outs = aftp.put(filename);outputs = new DataOutputStream(outs); while (sendFile.getFilePointer() < sendFile.length()) {ch = sendFile.read();outputs.write(ch);outs.close();sendFile.close();}catch (IOException e) {a = "粘贴失败!";result = false;}LblPrompt.setText(a);showFileContents();}else {result = false;}return result;}public void showFileContents() {StringBuffer buf = new StringBuffer();lsArea.setText("");try {ins = aftp.list();while ( (ch = ins.read()) >= 0) { buf.append( (char) ch);}lsArea.appendText(buf.toString());ins.close();}catch (IOException e) {}}public static void main(String args[]) { Frame f = new Frame("FTP Client");f.addWindowListener(new WindowAdapter() {public void windowClosing(WindowEvent e) { System.exit(0);}});FTP ftp = new FTP();ftp.init();ftp.start();f.add(ftp);f.pack();f.setVisible(true);}}2楼 2004-10-13 08:56 angel7532 [引用] [回复]这个是HTML网页<html><head><meta http-equiv="Content-Type" content="text/html; charset=GBK" /><title>FTP下载 </title><script type="text/javascript">var javawsInstalled = false;var isIE = false;var isICE = erAgent.indexOf("ICEBrowser") >=0;if (navigator.mimeTypes && navigator.mimeTypes.length) javawsInstalled = navigator.mimeTypes['application/x-java-jnlp-file'];elseisIE = true;function insertLink(url, name) {if (javawsInstalled) {document.write("<a href="" + url + "">" + name + " </a>");} else {if (isICE) {document.write("JBuilder's Web View does not support Web Start (no appropriate Web Start plugin is available). ");document.write("Other popular (external) browsers are supported");} else {document.write("Need to install Java Web Start");}document.write(" -- for more information, visit");document.write("<a href="/products/javawebstart/">" );document.write("the Java Web Start page");document.write(" </a>");}}</script><script type="text/vbscript">on error resume nextIf isIE ThenIf Not(IsObject(CreateObject("JavaWebStart.IsInstalled"))) ThenjavawsInstalled = falseElsejavawsInstalled = trueEnd IfEnd If</script></head><body><h1>Java Web Start application </h1> <script type="text/javascript"><!--insertLink("FTPEXE.jnlp","FTP下载");// --></script><noscript><a href="FTPEXE.jnlp">FTP下载 </a></noscript></body></html>3楼 2004-10-13 09:21 szabo [引用] [回复]angel7532(卡卡西):哪我服务器上要不要作一些配置或安装其他软件呢?4楼 2004-10-15 09:30 szabo [引用] [回复] 不能沉啊。
在用java开发企业器系统的使用,特别是涉及到与办公相关的软件开发的时候,文件的上传是客户经常要提到的要求.因此有一套很好文件上传的解决办法也能方便大家在这一块的开发.首先申明,该文章是为了自己记录一备以后开发需要的时候,不用手忙脚乱哈哈........现在在国内用的非常多的一般是两种方法解决来解决文件上传.cos.jar + uploadbean.jar + filemover.jar这个是用的非常普遍的,原因是因为他操作方便,是我们不必再去关注,那些文件的输入和输出流,使我们从底层的流中解脱出来.uploadfile,uploadbean,multipartformdatarequest<%@ page contenttype="text/html;charset=gb2312" %><head><title>fbysss uploadbean 示例</title><!--meta http-equiv="content-type" content="text/html; charset=iso-8859-1"--><!--meta http-equiv="content-type" content="text/html; charset=gb2312"--></head><form name="form1" method="post" action="sssupload.jsp" enctype="multipart/form-data"><input name="title" type= "text" value="中文字"><td class="bodystyle">附件</td><td class="bodystyle"> <input name="attach" type="file" id="attach" size="50" > </td><input name="ok" type= "submit" value="提交"></form>2.读取表单页面sssgetdata.jsp<!--//==================================================== ======================//文件:uploadbean上传实例//功能:解决中文乱码,完成文件上传,并提供上传改名解决方案//作者:fbysss//msn:jameslastchina@//==================================================== ======================--><%@ page contenttype="text/html;charset=gbk" %><%@ page language="java" import="com.jspsmart.upload.*"%><%@ page import="java.text.simpledateformat"%><%@ page import="java.io.file"%><%@ page import="java.util.*"%><%@ page import="javazoom.upload.*"%><%@ page import="uploadutilities.filemover"%><head><meta http-equiv="content-type" content="text/html; charset=gb2312"></head><%request.setcharacterencoding("gbk");//设置编码格式,就不用一个个转码了。

1.开发环境:1)eclipse3.2+tomcat5.5;2)创建dynamic web project;3)下载:Commons FileUpload 可以在/commons/fileupload/下载附加的Commons IO 可以在/commons/io/下载将commons-fileupload-1.2.1.jar commons-io-1.4.jar拷贝到WebContent\WEB-INF\\lib 目录;2.前台:<;form method=";post"; enctype=";multipart/form-data"; action=";upload.jsp"; target=";_blank";>;<;%-- 类型enctype用multipart/form-data,这样可以把文件中的数据作为流式数据上传,不管是什么文件类型,均可上传--%>;<;table>;<;tr>;<;td>;作品:<;input type=";file"; name=";upfile"; size=";50";>;<;/td>;<;/tr>;<;tr>;<;td>;作者:<;input type=";text"; name=";author"; size=";22";>;标题:<;input type=";text"; name=";title"; size=";22";>;<;input type=";submit"; name=";submit"; value=";上传";>;<;/td>;<;/tr>;<;tr>;<;td>;备注:上传的jpg图片(显示扩展名为.jpg)大小不能超过4M!<;/td>;<;/tr>; <;/table>;<;/form>;3.后台:1)引用:<;%@ page import=";mons.fileupload.servlet.ServletFileUpload";%>; <;%@ page import=";mons.fileupload.disk.DiskFileItemFactory";%>; <;%@ page import=";mons.fileupload.*";%>;2)代码:String id=null;//上传记录idString destinationfileName=null;//目标文件名String author=null;String title=null;int flag=0;//上传标志String uploadPath =request.getSession().getServletContext().getRealPath(";/";)+";upload/";;//图片上传路径String tempPath = request.getSession().getServletContext().getRealPath(";/";)+";upload/temp/";;//图片临时上传路径StringimagePath=request.getScheme()+";://";+request.getServerName()+";:";+request.getS erverPort()+request.getContextPath()+";/";; // 图片网络相对路径if(!new File(uploadPath).isDirectory()) new File(uploadPath).mkdirs();// 文件夹不存在就自动创建:if(!new File(tempPath).isDirectory())new File(tempPath).mkdirs();try {DiskFileUpload fu = new DiskFileUpload();fu.setSizeMax(4194304);// 设置最大文件尺寸,这里是4MBfu.setSizeThreshold(4096);// 设置缓冲区大小,这里是4kbfu.setRepositoryPath(tempPath);// 设置临时目录:List fileItems = fu.parseRequest(request);// 得到所有的文件:Iterator i = fileItems.iterator();while(i.hasNext()) {// 依次处理表单中每个域FileItem file = (FileItem)i.next();// 获得用户上传时文件名if (file.isFormField()){ //获得文本域表单数据if(";author";.equals(file.getFieldName()))author=codeToString(file.getString());if(";title";.equals(file.getFieldName())) title=codeToString(file.getString()); continue;//非file域不处理}String sourcefileName = file.getName();if( sourcefileName.endsWith(";.jpg";)){//生成上传后的文件名Random rd = new Random();Calendar time = Calendar.getInstance();id=String.valueOf(time.get(Calendar.YEAR))+ String.valueOf(time.get(Calendar.MONTH)+1)+ String.valueOf(time.get(Calendar.DAY_OF_MONTH))+ String.valueOf(time.get(Calendar.HOUR_OF_DAY))+ String.valueOf(time.get(Calendar.MINUTE))+ String.valueOf(time.get(Calendar.SECOND))+ String.valueOf(rd.nextInt(100));destinationfileName=id+";.jpg";;File fTmp=new File(uploadPath+destinationfileName);file.write(fTmp);//out.print(";<;img src=";+imagePath+";upload/";+destinationfileName+";>;";); flag=1;//上传成功标志1}else{out.print(";上传失败,只能上传jpg文件!";); }}//out.print(";<;script>;location.href=\";demo.jsp\";;<;/script>;";);}catch (IOException e) {out.print(";上传失败!";);}out.flush();out.close();4.主要解决点:1)问题:form设置enctype=";multipart/form-data";,request.getParameters函数无法获取表单域值;2)解决方案:if (file.isFormField()){ //获得文本域表单数据if(";author";.equals(file.getFieldName()))author=codeToString(file.getString());if(";title";.equals(file.getFieldName())) title=codeToString(file.getString()); continue;//非file域不处理}。
Struts1实现文件上传功能实现技术:Struts1.3+JSP主要实现:上传文件类型的前台验证,后台验证上传文件的类型、格式;实现图片的压缩和添加水印等功能。
JSP页面部分代码:(1)上传表单代码<form action='bk/image/addImage.do?method=add'method="post"enctype="multipart/form-data"><label for='imagename' >上传图片:</label><input type="file" class='formfield' name='imagename' id='imagename' /><span style="color: red; margin-left:40px;">* 只允许上传gif、jpg、bmp、png!</span> <input type="submit" value="提交" onclick="return SureSubmit(this.form)"/><input type="reset" value="重置" /></form>(2)JavaScript验证代码<script type="text/javascript">function verifyForm(objForm){//取得上传文本框的值var imagefile=objForm.imagename.value;//取得上传文件扩展名var ext=imagefile.substring(imagefile.length-3).toLowerCase();if (ext!="jpg" && ext!="gif" && ext!="bmp" && ext!="png"){alert("只允许上传gif、jpg、bmp、png!");return false;}return true;}function SureSubmit(objForm){//验证通过则提交表单if (verifyForm(objForm)) objForm.submit();return false;}</script>(3)/WEB-INF/UI/success.jsp代码<span style="color: red; font-size: 20px; font-weight: bold;">${suc }</span><a href="${backurl }">点击返回</a>(4)/WEB-INF/UI/fail.jsp代码<span style="color: red; font-size: 20px; font-weight: bold;">操作失败!${message }</span><a href="javascript:void(0)" onclick="javascript:window.history.go(-1);">单击返回前一页</a>Struts1中配置文件的配置<form-beans><form-bean name="imageForm" type="com.ImageForm"/></form-beans><action-mappings><action path="/bk/image/addImage" type="com.action.UploadAction" name="imageForm" scope="request" parameter="method"><forward name="fail" path="/WEB-INF/UI/fail.jsp"/><forward name="success" path="/WEB-INF/UI/success.jsp"/></action></action-mappings>后台代码(1)Domain Objectpackage com;import java.io.File;import java.io.FileOutputStream;import java.util.Arrays;import java.util.List;import org.apache.struts.action.ActionForm;import org.apache.struts.upload.FormFile;public class ImageForm extends ActionForm {/**图片路径**/private FormFile imagename;public FormFile getImagename() {return imagename;}public void setImagename(FormFile imagename) {this.imagename = imagename;}//验证上传图片的格式和类型public static boolean validateImageFileType(FormFile formFile) {if (formFile != null && formFile.getFileSize() > 0) {// 获取上传文件的后缀String ext = formFile.getFileName().substring(formFile.getFileName().lastIndexOf('.') + 1).toLowerCase();//允许上传的文件类型List<String> arrowType =Arrays.asList("image/bmp","image/png","image/gif","image/jpg","image/jpeg","image/pjpeg") ;//允许上传的文件后缀List<String> arrowExtension = Arrays.asList("gif","jpg","bmp","png");returnarrowType.contains(formFile.getContentType().toLowerCase())&&arrowExtension.contains(ext) ;}return true;}/**获取上传文件的后缀*/public static String getExt(FormFile formfile){returnformfile.getFileName().substring(formfile.getFileName().lastIndexOf('.')+1).toLowerCase() ;}/***保存文件*@param savedir存放目录*@param fileName文件名称*@param data保存的内容*@return保存的文件*@throws Exception*/public static File saveFile(File savedir, String fileName, byte[] data) throws Exception{ if(!savedir.exists()) savedir.mkdirs();//如果目录不存在就创建File file = new File(savedir, fileName);FileOutputStream fileoutstream = new FileOutputStream(file);fileoutstream.write(data);fileoutstream.close();return file;}}(2)Action文件的内容package com.action;import java.awt.Color;import java.io.File;import java.text.SimpleDateFormat;import java.util.Date;import java.util.UUID;import javax.servlet.http.HttpServletRequest;import javax.servlet.http.HttpServletResponse;import org.apache.struts.action.ActionForm;import org.apache.struts.action.ActionForward;import org.apache.struts.action.ActionMapping;import org.apache.struts.actions.DispatchAction;import org.apache.struts.upload.FormFile;import com.ImageForm;import com.util.ImageSizer;import com.util.WarterImage;public class UploadAction extends DispatchAction {/***添加图片*/public ActionForward add(ActionMapping mapping, ActionForm form,HttpServletRequest request, HttpServletResponse response)throws Exception {ImageForm image = (ImageForm) form;// 获取到页面中传输过来的文件FormFile file = image.getImagename();if (!ImageForm.validateImageFileType(file)) {request.setAttribute("message", "文件格式不正确,只允许上传gif/jpg/png/bmp图片");return mapping.findForward("fail");}// 判断传过来的数据是否为空,如果为空,返回页面if (null != file.getFileName() && file.getFileSize() > 0&& file.getFileSize() < 204800) {// 我们要生成一个文件路径,我们应该把上传的文件放到一个文件夹内,路径第一如下upfile/images/2011/X/x/sss.xxSimpleDateFormat sdf = new SimpleDateFormat("yyyy/MM/dd/HH/");String fileUrlDir = "/upfile/images/" + sdf.format(new Date());//得到图片保存目录的真实路径String fileUrl = request.getSession().getServletContext().getRealPath(fileUrlDir)+ "\\";System.out.println(fileUrl);String ext = ImageForm.getExt(file);String imagename = UUID.randomUUID().toString() + "." + ext;//构建文件名称ImageForm.saveFile(new File(fileUrl), imagename, file.getFileData());// 文件保存到服务器上的路径String imagePro = fileUrl + imagename;// 对图片进行压缩,如果传过来的数据为0,则使用默认值ImageSizer.resize(new File(imagePro), new File(imagePro), 120, ext);// 添加水印,这个路径要选择服务器的路径,保存要和保存图片的路径一致WarterImage.pressText("添加水印", imagePro, "宋体", 0, Color.black, 10, 0, 0);request.setAttribute("suc", "图片保存成功");return mapping.findForward("success");}// 判断图片不能太大else if (null != file.getFileName() && file.getFileSize() > 0) {request.setAttribute("message", "提交图片不能超过200k");return mapping.findForward("fail");}return mapping.findForward("fail");}}图片压缩和添加水印类(1)图片压缩package com.util;import java.awt.Color;import ponent;import java.awt.Graphics;import java.awt.Graphics2D;import java.awt.Image;import java.awt.MediaTracker;import java.awt.Toolkit;import java.awt.image.BufferedImage;import java.awt.image.ConvolveOp;import java.awt.image.Kernel;import java.io.ByteArrayOutputStream;import java.io.File;import java.io.FileInputStream;import java.io.FileOutputStream;import java.io.IOException;import java.io.OutputStream;import javax.imageio.ImageIO;import javax.swing.ImageIcon;import com.sun.image.codec.jpeg.JPEGCodec;import com.sun.image.codec.jpeg.JPEGEncodeParam;import com.sun.image.codec.jpeg.JPEGImageEncoder;/***图像压缩工具**/public class ImageSizer {public static final MediaTracker tracker = new MediaTracker(new Component() { private static final long serialVersionUID = 1234162663955668507L;});/***@param originalFile原图像*@param resizedFile压缩后的图像*@param width图像宽*@param format图片格式jpg,png,gif(非动画)*@throws IOException*/public static void resize(File originalFile, File resizedFile, int width, String format) throws IOException {if(format!=null && "gif".equals(format.toLowerCase())){resize(originalFile, resizedFile, width, 1);return;}FileInputStream fis = new FileInputStream(originalFile);ByteArrayOutputStream byteStream = new ByteArrayOutputStream();int readLength = -1;int bufferSize = 1024;byte bytes[] = new byte[bufferSize];while ((readLength = fis.read(bytes, 0, bufferSize)) != -1) {byteStream.write(bytes, 0, readLength);}byte[] in = byteStream.toByteArray();fis.close();byteStream.close();Image inputImage = Toolkit.getDefaultToolkit().createImage( in );waitForImage( inputImage );int imageWidth = inputImage.getWidth( null );if ( imageWidth < 1 )throw new IllegalArgumentException( "image width "+ imageWidth + " is out of range");int imageHeight = inputImage.getHeight( null );if ( imageHeight < 1 )throw new IllegalArgumentException( "image height " + imageHeight + " is out of range" );// Create output image.int height = -1;double scaleW = (double) imageWidth / (double) width;double scaleY = (double) imageHeight / (double) height;if (scaleW >= 0 && scaleY >=0) {if (scaleW > scaleY) {height = -1;} else {width = -1;}}Image outputImage = inputImage.getScaledInstance( width, height,java.awt.Image.SCALE_DEFAULT);checkImage( outputImage );encode(new FileOutputStream(resizedFile), outputImage, format);}/**Checks the given image for valid width and height.*/private static void checkImage( Image image ) {waitForImage( image );int imageWidth = image.getWidth( null );if ( imageWidth < 1 )throw new IllegalArgumentException( "image width "+ imageWidth + " is out of range");int imageHeight = image.getHeight( null );if ( imageHeight < 1 )throw new IllegalArgumentException( "image height "+ imageHeight + " is out of range"); }/**Waits for given image to e before querying image height/width/colors.*/ private static void waitForImage( Image image ) {try {tracker.addImage( image, 0 );tracker.waitForID( 0 );tracker.removeImage(image, 0);} catch( InterruptedException e ) { e.printStackTrace(); }}/**Encodes the given image at the given quality to the output stream.*/private static void encode( OutputStream outputStream, Image outputImage, String format )throws java.io.IOException {int outputWidth = outputImage.getWidth( null );if ( outputWidth < 1 )throw new IllegalArgumentException( "output image width " + outputWidth + " is out of range" );int outputHeight = outputImage.getHeight( null );if ( outputHeight < 1 )throw new IllegalArgumentException( "output image height "+ outputHeight + " is out of range" );// Get a buffered image from the image.BufferedImage bi = new BufferedImage( outputWidth, outputHeight,BufferedImage.TYPE_INT_RGB );Graphics2D biContext = bi.createGraphics();biContext.drawImage( outputImage, 0, 0, null );ImageIO.write(bi, format, outputStream);outputStream.flush();}/***缩放gif图片*@param originalFile原图片*@param resizedFile缩放后的图片*@param newWidth宽度*@param quality缩放比例(等比例)*@throws IOException*/private static void resize(File originalFile, File resizedFile, int newWidth, float quality) throws IOException {if (quality < 0 || quality > 1) {throw new IllegalArgumentException("Quality has to be between 0 and 1");}ImageIcon ii = new ImageIcon(originalFile.getCanonicalPath());Image i = ii.getImage();Image resizedImage = null;int iWidth = i.getWidth(null);int iHeight = i.getHeight(null);if (iWidth > iHeight) {resizedImage = i.getScaledInstance(newWidth, (newWidth * iHeight) / iWidth, Image.SCALE_SMOOTH);} else {resizedImage = i.getScaledInstance((newWidth * iWidth) / iHeight, newWidth, Image.SCALE_SMOOTH);}// This code ensures that all the pixels in the image are loaded.Image temp = new ImageIcon(resizedImage).getImage();// Create the buffered image.BufferedImage bufferedImage = new BufferedImage(temp.getWidth(null),temp.getHeight(null),BufferedImage.TYPE_INT_RGB);// Copy image to buffered image.Graphics g = bufferedImage.createGraphics();// Clear background and paint the image.g.setColor(Color.white);g.fillRect(0, 0, temp.getWidth(null), temp.getHeight(null));g.drawImage(temp, 0, 0, null);g.dispose();// Soften.float softenFactor = 0.05f;float[] softenArray = {0, softenFactor, 0, softenFactor, 1-(softenFactor*4), softenFactor, 0, softenFactor, 0};Kernel kernel = new Kernel(3, 3, softenArray);ConvolveOp cOp = new ConvolveOp(kernel, ConvolveOp.EDGE_NO_OP, null);bufferedImage = cOp.filter(bufferedImage, null);// Write the jpeg to a file.FileOutputStream out = new FileOutputStream(resizedFile);// Encodes image as a JPEG data streamJPEGImageEncoder encoder = JPEGCodec.createJPEGEncoder(out);JPEGEncodeParam param = encoder.getDefaultJPEGEncodeParam(bufferedImage);param.setQuality(quality, true);encoder.setJPEGEncodeParam(param);encoder.encode(bufferedImage);}}(2)添加水印package com.util;import java.awt.Color;import java.awt.Font;import java.awt.Graphics;import java.awt.Image;import java.awt.image.BufferedImage;import java.io.File;import java.io.FileOutputStream;import javax.imageio.ImageIO;import com.sun.image.codec.jpeg.JPEGCodec;import com.sun.image.codec.jpeg.JPEGImageEncoder;public class WarterImage {public WarterImage() {}/****把图片印刷到图片上**@param pressImg--*水印文件*@param targetImg--*目标文件*@param x*--X坐标*@param y*--y坐标*/public final static void pressImage(String pressImg, String targetImg,int x, int y) {try {// 目标文件File _file = new File(targetImg);Image src = ImageIO.read(_file);// 获取图片的宽度int wideth = src.getWidth(null);// 获取图片的高度int height = src.getHeight(null);BufferedImage image = new BufferedImage(wideth, height,BufferedImage.TYPE_INT_RGB);Graphics g = image.createGraphics();g.drawImage(src, 0, 0, wideth, height, null);// 水印文件File _filebiao = new File(pressImg);Image src_biao = ImageIO.read(_filebiao);// 获取水印图片的宽度int wideth_biao = src_biao.getWidth(null);// 获取水印图片的高度int height_biao = src_biao.getHeight(null);// 如果传输过来的坐标值为x==-1,y==-1,则水印图片添加到左下角if (x == -1 && y == -1) {g.drawImage(src_biao, wideth - wideth_biao, height- height_biao, wideth_biao, height_biao, null);} else {g.drawImage(src_biao, x, y, wideth_biao, height_biao, null);}// 水印文件结束g.dispose();FileOutputStream out = new FileOutputStream(targetImg);JPEGImageEncoder encoder = JPEGCodec.createJPEGEncoder(out);encoder.encode(image);out.close();} catch (Exception e) {e.printStackTrace();}}/****************************************************************************打印文字水印图片**@param pressText*--文字*@param targetImg--*目标图片*@param fontName--*字体名*@param fontStyle--*字体样式*@param color--*字体颜色字体大小*@param x*x坐标轴*@param y*y坐标轴*/public static void pressText(String pressText, String targetImg,String fontName, int fontStyle, Color color, int fontSize, int x,int y) {try {System.out.println(targetImg);File _file = new File(targetImg);Image src = ImageIO.read(_file);int wideth = src.getWidth(null);int height = src.getHeight(null);BufferedImage image = new BufferedImage(wideth, height,BufferedImage.TYPE_INT_RGB);Graphics g = image.createGraphics();g.drawImage(src, 0, 0, wideth, height, null);if (color == null) {g.setColor(Color.black);} else {g.setColor(color);}g.setFont(new Font(fontName, fontStyle, fontSize));// 判断输入的是中文还是英文,因为英文和中文所占的像素比例不一样,所以需要设置一下,美观漂亮byte[] bytes = pressText.getBytes();int i = bytes.length;// i为字节长度int j = pressText.length();// j为字符长度// 如果i==j 说明是英文字符if (i == j) {g.drawString(pressText, (int) (wideth- (fontSize * (pressText.length() / 2.0)) - x), height- y);} else {g.drawString(pressText, (int) (wideth- (fontSize * pressText.length()) - x), height - y);}g.dispose();FileOutputStream out = new FileOutputStream(targetImg);JPEGImageEncoder encoder = JPEGCodec.createJPEGEncoder(out);encoder.encode(image);out.close();} catch (Exception e) {System.out.println(e);}}}。
现在想写个程序向数据库中插入图片路径(或则插入图片也可以)最好是插入图片的路径这样可插入任意大的图片...请高手指点一下思路..感激不尽1.通过显示层向数据库中插入图片2.在界面显示的时候是小图片(缩小过的)3.当点击查看大图片会显示图片(原来的大小)提供给你图片上传和显示的代码吧!希望对你有帮助我在程序代码里贴了向Mysql数据库写入image代码的程序,可是好多人都是Java的初学者,对于这段代码,他们无法将它转换成jsp,所以我在这在写一下用jsp怎样向数据库写入图像文件。
大家先在数据库建这样一张表,我下面的这些代码对任何数据库都通用,只要支持blob类型的只要大家将连接数据库的参数改一下就可以了。
SQL> create table image(id int,content varchar(200),image blob);如果在sqlserver2000的数据库中,可以将blob字段换为image类型,这在SqlServer2000中是新增的。
testimage.html文件内容如下:<HTML><HEAD><TITLE> Image File </TITLE><meta http-equiv= "Content-Type " content= "text/html; charset=gb2312 "></HEAD><FORM METHOD=POST ACTION= "testimage.jsp "><INPUT TYPE= "text " NAME= "content "> <BR><INPUT TYPE= "file " NAME= "image "> <BR><INPUT TYPE= "submit "> </FORM><BODY></BODY></HTML>我们在Form的action里定义了一个动作testimage.jsp,它的内容如下:<%@ page contentType= "text/html;charset=gb2312 "%><%@ page import= "java.sql.* " %><%@ page import= "java.util.* "%><%@ page import= "java.text.* "%><%@ page import= "java.io.* "%><html><%Class.forName( "org.gjt.mm.mysql.Driver ").newInstance();String url= "jdbc:mysql://localhost/mysql?user=root&password=&useUnicode=true&characterEncoding=885 9_1 ";//其中mysql为你数据库的名字,user为你连接数据库的用户,password为你连接数据库用户的密码,可自己改Connection conn= DriverManager.getConnection(url);String content=request.getParameter( "content ");String filename=request.getParameter( "image ");FileInputStream str=new FileInputStream(filename);String sql= "insert into test(id,content,image) values(1,?,?) ";PreparedStatement pstmt=dbconn.conn.prepareStatement(sql);pstmt.setString(1,content);pstmt.setBinaryStream(2,str,str.available());pstmt.execute();out.println( "Success,You Have Insert an Image Successfully ");%>下面我写一个测试image输出的例子看我们上面程序写的对不对,testimageout.jsp的内容如下:<%@ page contentType= "text/html;charset=gb2312 "%><%@ page import= "java.sql.* " %><%@ page import= "java.util.* "%><%@ page import= "java.text.* "%><%@ page import= "java.io.* "%><html><body><%Class.forName( "org.gjt.mm.mysql.Driver ").newInstance();String url= "jdbc:mysql://localhost/mysql?user=root&password=&useUnicode=true&characterEncoding=885 9_1 ";//其中mysql为你数据库的名字,user为你连接数据库的用户,password为你连接数据库用户的密码,可自己改Connection conn= DriverManager.getConnection(url);String sql = "select image from test where id =1 ";Statement stmt=null;ResultSet rs=null;try{stmt=conn.createStatement();rs=stmt.executeQuery(sql);}catch(SQLException e){}while(rs.next()) {res.setContentType( "image/jpeg ");ServletOutputStream sout = response.getOutputStream();InputStream in = rs.getBinaryStream(1);byte b[] = new byte[0x7a120];for(int i = in.read(b); i != -1;){sout.write(b);in.read(b);}sout.flush();sout.close();}}catch(Exception e){System.out.println(e);}%></body></html>你运行这个程序,你就会看到刚才你写入美丽的图片就会显示在你面前。

首先下载jsmartcom_zh_CN.jar /hijackwust然后将其解压,并放到项目web-inf下面的lib目录下,之后到myeclipse的项目下导入jar包到项目下。
JSP+Mysql+jspsmart=上传图片并生成略缩图片然后记录到数据库原代码代码是由网上找的,然后自己修改了一下将输入的信息以及图片路径保存到数据库。
根目录必须预先有2个文件夹存在1。
pc 文件夹 --> 用来装上传的正本图片2。
pc2 文件夹 --> 用来装缩小的图片希望对大家有用~~jspsmart插件下栽地址/upfile*************.rar将web-inf 这个目录下面的那个jspsmart包,放入你自己的.classess文件夹里面放的位置是:tomcat\网站根目录\WEB-INF\classes\com\jspsmart\uploadupimg.jsp--------------------------------------------------------------------------------------<%@ page contentType="text/html; charset=utf-8" language="java" import="java.sql.*" errorPage="" %><!DOCTYPE html PUBLIC "-//W3C//DTD XHTML 1.0 Transitional//EN" "/TR/xhtml1/DTD/xhtml1-transitional.dtd"><html xmlns="/1999/xhtml"><head><meta http-equiv="Content-Type" content="text/html; charset=utf-8" /> <title>上传文件</title></head><body><table border="0" align="center" cellpadding="0" cellspacing="0"><tr><td height="45" align="center" valign="middle"><formaction="uploadimage.jsp" method="post" enctype="multipart/form-data" name="form1"><p>上传人姓名(注意上面加红色的代码一定要加,否则获取页面就得不到参数)<input name="name" type="text" id="name" onpaste="return false;" style='border: 1px solid #CCCCCC; font-size:9pt;margin-top:4px;ime-mode:disabled;' size="20"onfocusout="if(isSearch(this.value))this.focus()" /></p><p>请选择上传的图片<input type="file" name="file"><input type="submit" name="Submit" value="上传"></p></form></td></tr></table></body></html>===================================================================== =======uploadimage.jsp--------------------------------------------------------------------------------------<%@ page contentType="text/html;charset=gb2312" language="java" import="java.io.*,java.awt.Image,java.awt.image.*,com.sun.image.codec .jpeg.*,java.sql.*,com.jspsmart.upload.*,java.util.*"%><jsp:useBean id="db" scope="page" class="classmate.DB"/><html><head><title>文件上传处理页面</title><meta http-equiv="Content-Type" content="text/html; charset=gb2312"> </head><bord><%SmartUpload mySmartUpload =new SmartUpload();long file_size_max=4000000;String fileName2="",ext="",testvar="";String url="pc/"; //应保证在根目录中有此目录的存在//初始化mySmartUpload.initialize(pageContext);//只允许上载此类文件try {mySmartUpload.setAllowedFilesList("jpg,gif");//上载文件mySmartUpload.upload();} catch (Exception e){%><SCRIPT language=javascript>alert("只允许上传.jpg和.gif类型图片文件");window.location=''upfile.jsp'';</script><%}try{com.jspsmart.upload.File myFile = mySmartUpload.getFiles().getFile(0); if (myFile.isMissing()){%><SCRIPT language=javascript>alert("请先选择要上传的文件");window.location=''upfile.jsp'';</script><%}//String myFileName=myFile.getFileName(); //取得上载的文件的文件名ext= myFile.getFileExt(); //取得后缀名int file_size=myFile.getSize(); //取得文件的大小String str1=mySmartUpload.getRequest().getParameter("name"); //获得上传的人名称!String saveurl="";if(file_size<file_size_max){//更改文件名,取得当前上传时间的毫秒数值Calendar calendar = Calendar.getInstance();String filename = String.valueOf(calendar.getTimeInMillis());saveurl=request.getRealPath("/")+url;saveurl+=filename+"."+ext; //保存路径myFile.saveAs(saveurl,mySmartUpload.SAVE_PHYSICAL);//out.print(filename);//-----------------------上传完成,开始生成缩略图-------------------------java.io.File file = new java.io.File(saveurl); //读入刚才上传的文件String url2="pc2/";String newurl=request.getRealPath("/")+url2+filename+"."+ext; //新的缩略图保存地址String weburl=filename+"."+ext; //保存数据库路径Image src =javax.imageio.ImageIO.read(file); //构造Image 对象float tagsize=100;old_w=src.getWidth(null); //得到源图宽int old_h=src.getHeight(null);int new_w=0;int new_h=0; //得到源图长int tempsize;float tempdouble;if(old_w>old_h){tempdouble=old_w/tagsize;}else{tempdouble=old_h/tagsize;}new_w=Math.round(old_w/tempdouble);new_h=Math.round(old_h/tempdouble);//计算新图长宽BufferedImage tag = newBufferedImage(new_w,new_h,BufferedImage.TYPE_INT_RGB);tag.getGraphics().drawImage(src,0,0,new_w,new_h,null); //绘制缩小后的图FileOutputStream newimage=new FileOutputStream(newurl); //输出到文件流JPEGImageEncoder encoder =JPEGCodec.createJPEGEncoder(newimage);encoder.encode(tag); //近JPEG编码newimage.close();String sql="insert into pc(name,url,day) values ('"+str1+"','"+ weburl +"',NOW())";db.executeUpdate(sql);%>yes ok!!<%}else{out.print("<SCRIPT language=''javascript''>");out.print("alert(''上传文件大小不能超过"+(file_size_max/1000)+"K'');");out.print("window.location=''upfile.jsp;''"); out.print("</SCRIPT>");}}}catch (Exception e){e.toString();}%></bord></html>。
js控件Kindeditor实现图⽚⾃动上传功能Kindeditor本⾝提供了许多⾮常实⽤的插件,由于代码开源,开发⼈员可以根据需要对其进⾏任意扩展和修改。
在使⽤Kindeditor编辑⽹站内容时考虑这样⼀个场景:编辑⼈员往往会从其它页⾯或者Word⽂档将内容复制到Kindeditor编辑器中,⽽不会从⼀张⽩纸开始编写内容。
如果所复制的内容中包含图⽚,则需要⾸先将图⽚从源地址下载到本地,然后将其上传到本⽹站所在的服务器,否则图⽚仍然会指向你所复制的页⾯或者⽂档,这会导致图⽚可能在页⾯中⽆法正确打开。
编辑⼈员往往要处理许多的⽂档,这样的操作⽆疑⾮常繁琐。
能否让Kindeditor⾃动识别粘贴到其中的内容,并将图⽚⾃动上传到服务器呢?下⾯的代码实现了这⼀功能。
有关如何在页⾯中使⽤Kindeditor可以去查看官⽅⽹站的⽂档,这⾥不再详细介绍。
实现该功能的基本思路:在Kindeditor编辑器的keyup事件中添加代码,以检查编辑器的内容中是否包含图⽚;找出需要⾃动上传到服务器的图⽚,通过Ajax⽅式调⽤图⽚上传程序将图⽚上传到服务器;在Ajax的回调函数中将对应图⽚的src地址修改为本地相对地址。
该功能不⽀持将Word中的图⽚复制出来并上传到服务器。
上图是最终实现效果。
程序会⾃动识别编辑器中的内容,如果有图⽚需要上传,则会在编辑器的顶部显⽰⼀条提⽰信息。
⽤户点击“上传”链接,程序会通过Ajax请求调⽤图⽚上传程序,并在回调函数中将对应图⽚的src地址修改为本地相对地址。
具体实现步骤及相关代码:1. Kindeditor编辑器修改找到kindeditor.js⽂件,在keyup()事件中添加⾃定义代码。
不同版本的Kindeditor所提供的代码差别可能会⽐较⼤,需要借助于官⽅⽂档进⾏查找。
本⽂基于Kindeditor 4.1.10版本。
2. auto.js⽂件代码function df() {var haspicContainer = document.getElementById("has_pic");if (haspicContainer == null) {haspicContainer = document.createElement("div");haspicContainer.id = "has_pic";haspicContainer.innerHTML = "<input type='text' id='piclist' value='' style='display:none;'/><div id='upload'><b>您有图⽚需要上传到服务器</b> <a href='javascript:uploadpic();' >上传</a></div><div id='confirm'></div>"; $(".ke-toolbar").after(haspicContainer);}var img = $(".ke-edit-iframe").contents().find("img");var piccount = 0;var sstr = "";$(img).each(function (i) {var that = $(this);if (that.attr("src").indexOf("http://") >= 0 || that.attr("src").indexOf("https://") >= 0) {piccount++;if (i == $(img).length - 1)sstr += that.attr("src");elsesstr += that.attr("src") + "|";}});$("#piclist").val(sstr);document.getElementById("has_pic").style.display = (piccount > 0) ? "block" : "none";}function closeupload() {$("#has_pic").hide();$("#upload").show();}function uploadpic() {var piclist = encodeURI($("#piclist").val());if (piclist.length == 0) return false;$.ajax({url: "/uploadpic.ashx",data: "pic=" + piclist,type: "GET",beforeSend: function () {$("#upload").hide();$("#confirm").text("正在上传中...");},success: function (msg) {if (msg !== "") {var str = new Array();str = msg.split('|');var img = $(".ke-edit-iframe").contents().find("img");$(img).each(function (i) {var that = $(this);if (that.attr("src").indexOf("http://") >= 0 || that.attr("src").indexOf("https://") >= 0) {that.attr("src", "/uploads/image/" + str[i]);that.attr("data-ke-src", "/uploads/image/" + str[i]);}});$("#confirm").html(img.length + "张图⽚已经上传成功! <a href='javascript:closeupload();'>关闭</a>");}else $("#confirm").text("上传失败!");}});}其中的$(".ke-edit-iframe").contents().find("img")⽤来查找编辑器内容中的所有图⽚。
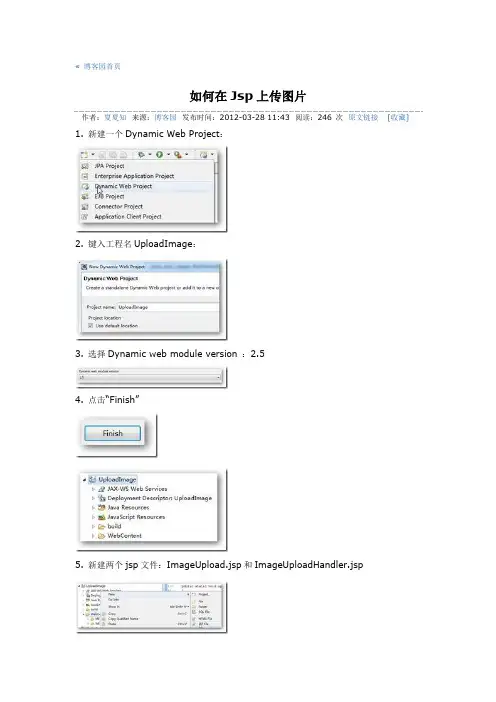
«博客园首页如何在Jsp上传图片作者:夏夏知来源:博客园发布时间:2012-03-28 11:43 阅读:246 次原文链接[收藏] 1. 新建一个Dynamic Web Project:2. 键入工程名UploadImage:3. 选择Dynamic web module version :2.54. 点击“Finish”5. 新建两个jsp文件:ImageUpload.jsp和ImageUploadHandler.jsp6. 新建一个类,专门用来处理图片上传新建一个包mytest:在包下新建一个类FileUpload:代码内容:package mytest;import java.awt.image.BufferedImage;import java.io.*;import java.awt.Image;import com.sun.image.codec.jpeg.JPEGCodec;import com.sun.image.codec.jpeg.JPEGImageEncoder; public class FileUpload{public static void uploadImage(String imgFolderPath,String srcFileName,String dstFileName) throws IOException{//判断文件夹image是否存在,若不存在则创建File folder = new File(imgFolderPath);System.out.println("function'uploadFileTest2'-imgFolderPath'"+imgFolderPath);if(!folder.exists()){folder.mkdir();System.out.println("maked a folder!");}File _file = new File(srcFileName); //读入文件Image src = javax.imageio.ImageIO.read(_file); //构造Image对象int wideth=src.getWidth(null); //得到源图宽int height=src.getHeight(null); //得到源图长BufferedImage tag = newBufferedImage(wideth,height,BufferedImage.TYPE_INT_RGB); tag.getGraphics().drawImage(src,0,0,wideth,height,null); FileOutputStream out=new FileOutputStream(dstFileName); //输出到文件流JPEGImageEncoder encoder = JPEGCodec.createJPEGEncoder(out); encoder.encode(tag); //JPEG编码out.close();System.out.println("function 'uploadFileTest2'-status:A Image File Saved!");}}发现报错:找到代码的库Libraries:打开rt.jar所在文件夹:复制这个文件:右键粘贴到WEB_INF\lib下:效果:没再报错。
JSP实现⽂件上传功能本⽂实例为⼤家分享了JSP实现⽂件上传功能的具体代码,供⼤家参考,具体内容如下⼀、准备部分需要fileupload.jar与io.jar包共同完成。
构建完成路径后可继续。
⼆、页⾯部分<form action="UploadServlet" method="post" enctype="multipart/form-data">学号:<input type="text" name="sno"/><br/>姓名:<input type="text" name="sname"/><br/>上传照⽚:<input type="file" name="spicture"/><br/><input type="submit" value="注册"/></form>注意:1.⽂件上传必须要使⽤post,以避免⽤get⽅法时传输总量超过搜索框所能承载最⼤字符数。
2.必须加⼊enctype="multipart.form-data"字段3.⽂件处需⽤“file”三、Servlet部分package webtest;import java.io.File;import java.io.IOException;import java.util.Iterator;import java.util.List;import javax.servlet.ServletException;import javax.servlet.annotation.WebServlet;import javax.servlet.http.HttpServlet;import javax.servlet.http.HttpServletRequest;import javax.servlet.http.HttpServletResponse;import mons.fileupload.FileItem;import mons.fileupload.FileItemFactory;import mons.fileupload.FileUploadBase;import mons.fileupload.FileUploadException;import mons.fileupload.disk.DiskFileItemFactory;import mons.fileupload.servlet.ServletFileUpload;/*** Servlet implementation class UploadServlet*/@WebServlet("/UploadServlet")public class UploadServlet extends HttpServlet {private static final long serialVersionUID = 1L;protected void doGet(HttpServletRequest request, HttpServletResponse response)throws ServletException, IOException {request.setCharacterEncoding("utf-8");// 请求编码处理,传输时response.setCharacterEncoding("utf-8");// 响应编码处理,传输时response.setContentType("utf-8");// 响应编码处理,显⽰时boolean isMultipart = ServletFileUpload.isMultipartContent(request);// 判断是否有entype="multipart/form-data"部分if (isMultipart) {try {FileItemFactory factory = new DiskFileItemFactory();ServletFileUpload upload = new ServletFileUpload(factory);//设置上传时的内存缓冲区⼤⼩,超出时写⼊临时⽂件 10kb((DiskFileItemFactory) factory).setSizeThreshold(10240);//单位byte//设置临时⽂件⽬录,防⽌系统空间不⾜((DiskFileItemFactory) factory).setRepository(new File(request.getSession().getServletContext().getRealPath("Uploadtemp")));//动态获取Uploadtemp⽂件夹位于该项⽬中的位置 //控制上传单个⽂件的最⼤值 20kbupload.setSizeMax(20480);//单位byteList<FileItem> items = upload.parseRequest(request);// 解析form中的所有请求字段,并保存在item中Iterator<FileItem> iter = items.iterator();while (iter.hasNext()) {// 解析时⽆顺序,因此需根据名字查找FileItem item = iter.next();if (item.isFormField()) {//⾮⽂件数据String itemName = item.getFieldName();//获取⾮⽂件的范围数据名if (itemName.equals("sno")) {int sno = -1;sno = Integer.parseInt(item.getString("utf-8"));}else if (itemName.equals("sname")) {String sname = null;sname = item.getString("utf-8");}else {System.out.println("其他字段...");}} else {//⽂件上传String fileName = item.getName();//获取⽂件范围数据。
jsp用户上传头像、上传图片、邮件上传附件代码jsp教程用户上传头像、上传图片、邮件上传附件代码2. 页面表单的实现文件上传表单和普通表单有两个区别1) 需要文件上传字段<input type=”file” />2) form 表单的 enctype 属性需要指定为 multipart/form-data3. 服务器端解析request在 Servlet 中通过 request.getInputStream 获得表单上传数据,会发现数据是分段发送的由于自己写程序解析有难度,我们可以使用Apache 开发的开源组件Commons-fileupload需要导入 jar 包Commons-fileupload 和Commons-io4 . UploadServlet 中处理文件上传程序// 1. 创建工厂类DiskFileItemFactory factory = new DiskFileItemFactory();// 2. 创建FileUpload对象ServletFileUpload upload = new ServletFileUpload(factory);// 3. 判断是否是上传表单boolean b = upload.isMultipartContent(request);if(!b) {// 不是文件上传request.setAttribute("message", "对不起,不是文件上传表单!");request.getRequestDispatcher("/message.jsp").forward(requ est, response);return;}// 是文件上传表单// 4. 解析request,获得FileItem项List<FileItem> fileitems = upload.parseRequest(request); // 5. 遍历集合for(FileItem item : fileitems) {// 判断是不是普通字段if(item.isFormField()) {String name = item.getFieldName();String value = item.getString();// 手工的转换了value = new String(value.getBytes("iso-8859-1"),"utf-8"); System.out.println(name + "=" + value);} else {// 文件上传字段// 获得文件名String filename = item.getName();System.out.println(filename);filename = filename.substring(stIndexOf("")+1);System.out.println(filename);// 创建文件ServletContext context = getServletContext();String dir = context.getRealPath("WEN-INF/upload");File file = new File(dir, filename);file.createNewFile();// 获得流,读取数据写入文件InputStream in = item.getInputStream(); FileOutputStream fos = new FileOutputStream(file);int len;byte[] buffer = new byte[1024];while((len=in.read(buffer))>0)fos.write(buffer,0,len);fos.close();in.close();item.delete(); // 删除临时文件}二、文件上传处理细节1. 中文乱码问题1) 文件名中文乱码问题,解决办法:告诉文件上传组件以什么编码方式来解码文件名ServletUpload.setCharacterEncoding(“utf-8”);request. setCharacterEncoding(“utf-8”);2) 普通字段中文乱码问题fileitem.getString(“utf-8”);2. 临时文件对于大文件不能缓存在内存,需要缓存到硬盘,为了方便管理,我们需要设置临时文件存放目录// 设置临时文件的存放位置factory.setRepository(new File("d:/temp"));文件上传完毕需要删除临时文件,否则会导致服务器存在两份上传文件// 注意,需要先将流进行关闭,否则会导致临时文件无法删除out.close();in.close();// 删除临时文件fileitem.delete();3. 文件存放目录1) 目录需要隐藏,禁止外界直接访问2) 文件名需要保证不重复3) 文件应该分目录存放三、上传进度条1. 实现进度监听需要实现对文件上传进度的监听,需要给FileUpload 对象添加ProgressListener在upload方法中对与进度相关的数据进行处理upload.setProgressListener(new ProgressListener() {long num = 0;public void update(long bytesRead, long contentLength, int items) {long progress = bytesRead*100/contentLength;if(progress==num)return;num = progress;System.out.println("上传进度:" + progress + "%");// request.getSession().setAttribute("progress", progress);}});2. 在 jsp 页面显示进度实验:1) 使用 iframe 发送请求,请求一个Servlet, 在Servlet 中返回响应,发送自增的num此时会发现 iframe 会不停第想Servlet发送请求2) 点击文件上传按钮后,iframe立刻停止刷新,直至上传完毕页面跳转至新页面3)为了观察实验结果,将form 的target 指定为iframe,UploadServlet回送上传完毕的结果4) 出现上述问题的原因,浏览器不支持多线程同时访问服务器只能同时发送一个请求,这样的访问方式为同步访问5) 要在文件上传的同时在iframe中实现进度访问,就需要ie浏览器与服务器进行异步交互此时就需要 XMLHttpRequest 对象在网页特效中可以直接使用XMLHttpRequest 对象与服务器进行异步通信获得XmlHttpRequest 对象的方式有两种ie7以上版本var xhr = null;if(window.XMLHttpRequest)xhr = new XMLHttpRequest();ie7以下版本if(window.ActiveXObject)xhr = new ActiveXObject(“Microsoft.XMLHTTP”);获得对象后需要调用open方法输入请求地址注意请求方式,地址的输入,并且需要设置为true 指定异步访问该地址xhr.open(“get”,”/upload/servlet/UploadServlet”, false)// 调用send 方法发送请求,post方式需要发送消息体,get方式则不用直接传入null值xhr.send(null);// 访问 responseT ext 属性获得 Servlet 回送的数据document.write(xhr.responseText);四、 api方法1. DiskFileItemFactory 对象设置缓冲区大小,字节为单位,默认为10K,一般不用修改factory.setSizeThreshold(1000);设置临时文件存放目录factory.setRepository(file);2. ServletFileUpload 对象判断是否为文件上传表单boolean b = upload.isMultipartContent(request);解析request对象List<FileItem> list = upload.parseRequest(request);设置上传文件的最大值setFileSizeMax(long fileSizeMax)设置上传文件总量的最大值setSizeMax(long sizeMax)设置编码格式setHeaderEncoding(ng.String encoding)注册进度监听器setProgressListener(ProgressListener pListener)3. FileItem 对象获得表单字段的属性名item.getFieldName();获得普通字段的值item.getString(charsetName)获得文件上传字段的文件名item.getName()获得文件上传的流item.getInputStream()文件上传时需要注意的问题:1.如何设置上传文件最大值,并实现超出最大值时给用户一个友好提示upload.setFileSizeMax(1024*10); //设置最大值实现超出最大值时给用户一个友好提示:在程序中捕获FileUploadBase.FileSizeLimitExceededException只要程序抛出这个异常,代表用户上传的文件超出最大值2.上传过程中的乱码问题2.1 普通输入项的乱码item.getString("码表 ")2.2 上传文件名的乱码ServletFileUpload.setHeaderEncoding("码表")3.上传文件的安全性问题为防止用户直接上传文件,危害服务器安全,程序应禁止用户直接访问上传文件(即把上传文件保存在用户无法直接访问的目录)4.防止文件覆盖(UUID)5.文件打散存储(一个目录下面不能存超出1000个文件)用hash算法生成目录保存6.设置监听器,监听文件上传进度upload.setProgressListener(newProgressListener(){public void update(long arg0, longarg1, int arg2) {System.out.println("当前已上传" +arg0 + ",当前处理的文件总大小" + arg1);}});7.临时文件的删除问题处理完每一个文件上传后,一定要记得调用Fileitem.delete方法,删除临时文件8.限定上传文件类型判断上传文件后缀名。
js上传图⽚前端上传图⽚的原理是:运⽤input type=“file”的标签获取图⽚,再使⽤FileReader这个对象 new ⼀个实例,通过这个对象的readAsDataURL()⽅法读取file标签获取的图⽚并转换为base64格式,完成之后通过ajax之类的⽅式传到后台。
HTML需要⼀个input type="file" 的标签如果需要预览的话可以再加⼀个img标签<div class="warp"><div class="warp-content">点击上传</div><input type="file" id="file"/></div><img src=""/>JS⼀、图⽚上传需要检测上传的图⽚是否变化,所以这⾥选择js的onchange事件.先获取input,img的dom元素,在input type=‘file’的demo元素下,有⼀个files属性,⾥⾯是我们上传的⽂件信息,打印⼀下,就可以看到上传⽂件的名字,类型等信息。
var file = document.getElementById('file');var image = document.querySelector("img");file.onchange = function() {var fileData = this.files[0];//这是我们上传的⽂件}⼆、然后运⽤ FileReader 这个对象,FileReader主要⽤于将⽂件内容读⼊内存,通过⼀系列异步接⼝,可以在主线程中访问本地⽂件。
使⽤FileReader对象,web应⽤程序可以异步的读取存储在⽤户计算机上的⽂件(或者原始数据缓冲)内容,可以使⽤File对象或者Blob对象来指定所要处理的⽂件或数据。
最近做SSH项目碰到一个问题,我在页面上想上传一个图片文件到服务器,但是在上传前希望能在页面上看到图片的预览。
查了一下资料,发现有几种方式可以完成这个功能。
一种是通过javascript来实现这个预览的功能,但是这种方法对浏览器有限制,有的浏览器用此方法无效。
一种是通过ajax实现,还有一种就是通过无刷新页面上传文件到服务器,通过显示服务器上的临时图片文件也可以实现预览的效果。
下面讲的就是最后一种方式。
先看页面文件test.html源码:<!DOCTYPE html><html><head><title>test.html</title><meta name="keywords"content="keyword1,keyword2,keyword3"><meta name="description"content="this is my page"> <meta name="content-type"content="text/html; charset=GB18030"><!--<link rel="stylesheet" type="text/css"href="./styles.css">--></head><body><form action="/ECSystem/imgupload"id="form1" name="form1"encType="multipart/form-data"method="post"target="hidden_frame"><input type="file"id="file"name="file"style="width:450" accept=".jpg, .gif"><INPUT type="submit"value="上传文件"><spanid="msg"></span><br><font color="red">支持JPG,JPEG,GIF,BMP,SWF,RMVB,RM,AVI文件的上传</font><iframe name='hidden_frame'id="hidden_frame"style='display:none'></iframe></form></body></html>上面的源码中,要上传图片文件form的属性里必须有encType="multipart/form-data"method="post"z,想要页面不刷新,“target="hidden_frame"”这个是必要的设置,表示页面的action请求刷新到iframe里,不必刷新整个页面。
JSP文件上传简单实例1、index.html代码:<html><head><title>上传图片</title></head><body><form action="do_upload.jsp" method="post" enctype="multipart/form-data"><input type="file" name="Photo"><input type="submit" value="上传"></form></body></html>2、使用到的函数和类说明File类文件和目录路径名的抽象表示形式,File(parent,child)方法根据parent 抽象路径名和child 路径名字符串创建一个新File实例FileOutputStream文件输出流,InputStream输入流,将输入数据看成一根管道,可以形象的将输入流比喻成管道的入口,而输出流比喻成管道的出口。
read(byte[] b) 从此输入流中将最多b.length 个字节的数据读入一个字节数组中。
read() 从此输入流中读取一个数据字节。
write(int b) 将指定字节写入此文件输出流,write(byte[] b, int off, int len) 将指定字节数组中从偏移量off 开始的len 个字节写入此文件输出流。
write(byte[] b) 将 b.length 个字节从指定字节数组写入此文件输出流中Random.readLine()逐行读入,Random.seek(int pos)设置到此文件开头测量到的文件指针偏移量,该位置发生下一个读取和写入操作,Random.getFilePointer()返回此文件当前偏移量,Random.readByte()此方法从该文件的当前文件指针开始读取第一个字节。
JS实现上传图⽚的三种⽅法并实现预览图⽚功能在常见的⽤户注册页⾯,需要⽤户在本地选择⼀张图⽚作为头像,并同时预览。
常见的思路有两种:⼀是将图⽚上传⾄服务器的临时⽂件夹中,并返回该图⽚的url,然后渲染在html页⾯;另⼀种思路是,直接在本地内存中预览图⽚,⽤户确认提交后再上传⾄服务器保存。
这两种⽅法各有利弊,⽅法⼀很明显,浪费流量和服务器资源;⽅法⼆则加重了浏览器的负担,并且对浏览器的兼容性要求更⾼(在某些低版本中的IE浏览器不⽀持)。
以下是实现上述思路的⽅法:1. 模板⽂件<!DOCTYPE html><html lang="en"><head><meta charset="UTF-8"><title>Title</title></head><body><div style="margin-left: 30px; margin-top: 30px"><form action="">{% csrf_token %}<h3>⽤户注册</h3><p>⽤户名:<input type="text" name="userName"></p><p>密码:<input type="password" name="password"></p><p>邮箱:<input type="text" name="email"></p><input id="avatar" type="text" value="/static/images/sample.png" name="avatar" style="width: 400px"> {# 实际应⽤中要将该input标签隐藏,display:none; #} <p><input type="submit" value="注册"></p></form><div style="position: absolute; top: 85px; left: 300px;"><input id="avatarSlect" type="file" style="position: absolute;float: left; z-index: 10; opacity: 0;width: 100px; height: 100px;"><img id="avatarPreview" src="/static/images/sample.png" title="点击更换图⽚" style="position: absolute; z-index: 9; float: left; width: 100px; height: 100px"> </div></div></body><script src="/static/jquery-3.2.1.js"></script><script>$(function () {bindAvatar();});function bindAvatar() {if(window.URL.createObjectURL){bindAvatar3();}else if(window.FileReader){bindAvatar2();}else {bindAvatar1();}}/*Ajax上传⾄后台并返回图⽚的url*/function bindAvatar1() {$("#avatarSlect").change(function () {var csrf = $("input[name='csrfmiddlewaretoken']").val();var formData=new FormData();formData.append("csrfmiddlewaretoken",csrf);formData.append('avatar', $("#avatarSlect")[0].files[0]); /*获取上传的图⽚对象*/$.ajax({url: '/upload_avatar/',type: 'POST',data: formData,contentType: false,processData: false,success: function (args) {console.log(args); /*服务器端的图⽚地址*/$("#avatarPreview").attr('src','/'+args); /*预览图⽚*/$("#avatar").val('/'+args); /*将服务端的图⽚url赋值给form表单的隐藏input标签*/}})})}/*window.FileReader本地预览*/function bindAvatar2() {console.log(2);$("#avatarSlect").change(function () {var obj=$("#avatarSlect")[0].files[0];var fr=new FileReader();fr.onload=function () {$("#avatarPreview").attr('src',this.result);console.log(this.result);$("#avatar").val(this.result);};fr.readAsDataURL(obj);})}/*window.URL.createObjectURL本地预览*/function bindAvatar3() {console.log(3);$("#avatarSlect").change(function () {var obj=$("#avatarSlect")[0].files[0];var wuc=window.URL.createObjectURL(obj);$("#avatarPreview").attr('src',wuc);$("#avatar").val(wuc);{# $("#avatarPreview").load(function () {#} /*当图⽚加载后释放内存空间,但在jQuery3.2.1中会报错。
package com.lsl.util;import java.awt.Image;import java.awt.image.BufferedImage;import java.io.File;import java.io.FileNotFoundException;import java.io.FileOutputStream;import java.io.IOException;import javax.imageio.ImageIO;import com.sun.image.codec.jpeg.JPEGCodec;import com.sun.image.codec.jpeg.JPEGEncodeParam;import com.sun.image.codec.jpeg.JPEGImageEncoder;/**** @author Administrator* 图像处理类*/public class PicCompression {/*** 压缩图片方法** @param oldFile* 将要压缩的图片的绝对地址* @param width* 压缩宽* @param height* 压缩长* @param quality* 压缩清晰度<b>建议为1.0</b>* @param smallIcon* 压缩图片后,添加的扩展名* @return*/public String zoom(String oldFile, int width, int height, float quality) {if (oldFile == null) {return null;}String newImage = null;try {File file = new File(oldFile);if(!file.exists()) //文件不存在时return null;/** 对服务器上的临时文件进行处理*/Image srcFile = ImageIO.read(file);// 为等比缩放计算输出的图片宽度及高度double rate1 = ((double) srcFile.getWidth(null)) / (double) width+ 0.1;double rate2 = ((double) srcFile.getHeight(null)) / (double) height+ 0.1;double rate = rate1 > rate2 ? rate1 : rate2;int new_w = (int) (((double) srcFile.getWidth(null)) / rate);int new_h = (int) (((double) srcFile.getHeight(null)) / rate);/** 宽,高设定*/BufferedImage tag = new BufferedImage(new_w, new_h,BufferedImage.TYPE_INT_RGB);tag.getGraphics().drawImage(srcFile, 0, 0, new_w, new_h, null);String filePrex = oldFile.substring(0, stIndexOf('.'));/** 压缩后的文件名*/// newImage =smallIcon + filePrex// +oldFile.substring(filePrex.length());newImage = filePrex+width+"x"+height + oldFile.substring(filePrex.length());// newImage = smallIcon;/** 压缩之后临时存放位置*/FileOutputStream out = new FileOutputStream(newImage);JPEGImageEncoder encoder = JPEGCodec.createJPEGEncoder(out);JPEGEncodeParam jep = JPEGCodec.getDefaultJPEGEncodeParam(tag);/** 压缩质量*/jep.setQuality(quality, true);encoder.encode(tag, jep);out.close();srcFile.flush();} catch (FileNotFoundException e) {e.printStackTrace();} catch (IOException e) {e.printStackTrace();}return newImage;}}package com.lsl.goods.action;import java.io.File;import java.io.IOException;import java.text.SimpleDateFormat;import java.util.Date;import javax.annotation.Resource;import mons.io.FileUtils;import org.apache.struts2.ServletActionContext;import org.springframework.context.annotation.Scope;import org.springframework.stereotype.Controller;import com.lsl.bean.GoodsInfo;import com.lsl.bean.Lsluser;import com.lsl.service.GoodsInfoService;import com.lsl.util.PicCompression;import com.opensymphony.xwork2.ActionContext;@Controller @Scope("prototype")public class SetGoodsPicAction {@Resource GoodsInfoService goodsInfoService;private File image; // 上传的文件如果多文件就用数组形式File[] imageprivate String imageFileName; // 上传的文件名如果多文件就用数组形式String[] imageFileName 这里用来获取文件的后缀名private String imageContentType; //上传文件的类系如果多文件就用数组形式String[] imageContentType//注意文件的大小不再这里设置在struts.xml配置上传文件的大小public File getImage() {return image;}public void setImage(File image) {this.image = image;}public String getImageFileName() {return imageFileName;}public void setImageFileName(String imageFileName) {this.imageFileName = imageFileName;}public String getImageContentType() {return imageContentType;}public void setImageContentType(String imageContentType) {this.imageContentType = imageContentType;}//设置图片public String setGoodsPic() throws IOException{if(image !=null){if(imageContentType.indexOf("image") != -1){ //检测是否为图片String path="/Images/goodsImgs/";String imageBasePath = ServletActionContext.getServletContext().getRealPath(path);Lsluser lu= (Lsluser)ActionContext.getContext().getSession().get("currentUser");String privatePath =lu.getLslId().toString();String realPath=imageBasePath+"\\"+privatePath; //硬盘的目录这里第一个\是转译符意思是第二个\是有效字符SimpleDateFormat dateFormat =new SimpleDateFormat("yyyyMMddHHmmssSSS");String imageName=dateFormat.format(new Date()); //设置文件名以时间命名StringsuffixName=imageFileName.substring(stIndexOf(".")).toLowerCase();//获取文件的后缀名File saveFile= new File(new File(realPath),imageName+suffixName);if(!saveFile.getParentFile().exists()) saveFile.getParentFile().mkdirs();//如果不存在绝对目录那就创建改目录FileUtils.copyFile(image, saveFile); //保存原图成功PicCompression pc = new PicCompression(); //处理图片的类int w=200;int h=250;pc.zoom(newFile(realPath).toString()+"\\"+imageName+suffixName,w,h,1); //生成缩略图命名规则就是在原图的名字后面加上宽度x长度String bigPicRelativePath = path + privatePath+"/"+imageName+suffixName; //实图的相对路径用于存放进数据库String smallPicRelativePath = path + privatePath+"/"+imageName+w+"x"+h+suffixName; //缩略图的相对路径用于存放进数据库GoodsInfoaddingGoods=(GoodsInfo)ActionContext.getContext().getSession().get("addingGoods");addingGoods.setImgUrl(bigPicRelativePath);addingGoods.setSmallImgUrl(smallPicRelativePath);goodsInfoService.update(addingGoods);ActionContext.getContext().getSession().put("setPicRestul", "图片上传成功");}}return "setPicSuccess";}}AnyQuestion --- Qq:16895920。