E-Prime声音属性设置
- 格式:doc
- 大小:47.50 KB
- 文档页数:1


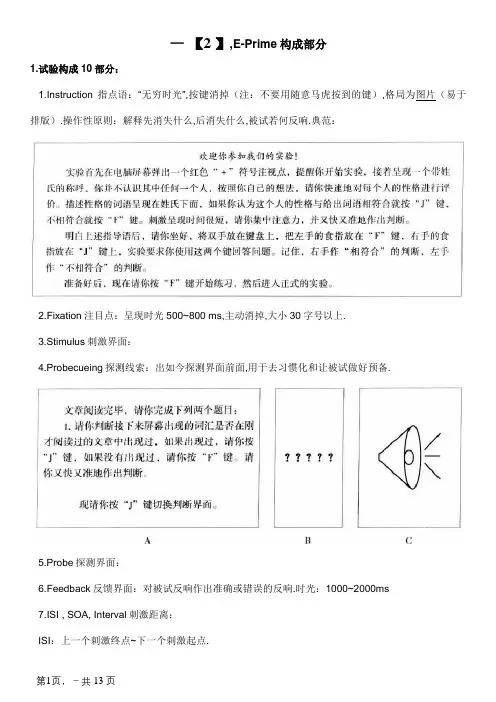
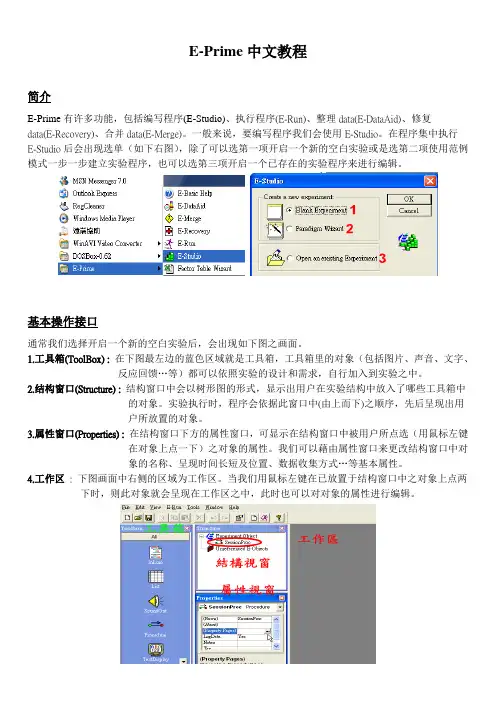
一【2 】,E-Prime构成部分1.试验构成10部分:1.Instruction指点语:“无穷时光”,按键消掉(注:不要用随意马虎按到的键),格局为图片(易于排版).操作性原则:解释先消失什么,后消失什么,被试若何反响.典范:2.Fixation注目点:呈现时光500~800 ms,主动消掉,大小30字号以上.3.Stimulus刺激界面:4.Probecueing探测线索:出如今探测界面前面,用于去习惯化和让被试做好预备.5.Probe探测界面:6.Feedback反馈界面:对被试反响作出准确或错误的反响.时光:1000~2000ms7.ISI , SOA, Interval刺激距离:ISI:上一个刺激终点~下一个刺激起点.SOA:前一刺激起点~下一个刺激起点).两者的关系SOA=ISI+DurationInterval:刺激与目的,目的和其他界面的距离时光.8.Buffer Interval 试验缓冲:500~1200ms.被试作反响后推迟下一个Trial的呈现.反馈界面也起到缓冲的后果.9.Mask 遮蔽界面:400~1000ms,常用于启动效应试验和记忆试验.在记忆试验中,清除刺激的感到记忆.10.Exp End 结语界面:1000~1500ms,如,“试验完毕,感谢您的参与!”2.试验程序掌握5要素Duration呈现时光:固准时光,变化时光(设置变量或数组),无穷时光(“-1”,“infinite”)Mode呈现方法(=消掉方法):主动(不须要设置),按键(无穷时光+设置按键在刺激界面),反响(无穷时光+反响键在探测界面),主动+反响(固准时光+反响键)Format呈现格局:刺激物属性:字符(字体,大小,远景色彩?,背景色彩,下划线),图片(尺寸大小,文件大小,亮度,色调?,饱和度?,灰度?,比较度);地位;边框(大小,色彩)Response反响方法:键盘反响(字母,数字,功效键);语音反响;外接反响键;脚踏板反响Data logging数据收集:反响时Response Time ;RT ,正误Accuracy;ACC,反响Response;RESP, 试验流程示意图3.试验进程Procedure:Session Procedure全进程;CEP Core Experimental Procedure(运行一次是一次Trial,一个Block=指点语+CEP+停止语)4.试验设计的4模式:Paralleling并联模式:(图B)完成CEP1再完成CEP2.Series串联模式(轮回模式):(图C)例子:对30小我进行50种共性有无的断定.Counter balance均衡模式(选择模式):(图D)见P10(20/224)??是串联和相嵌的联合.Nesting相嵌模式:(图E)CEP挪用List的材料和掌握,List又挪用List1和List2的材料和掌握.例如:多种变量的完整随机变化.List存地位信息,List1是目的刺激,List2是干扰信息.三个list都设置为Random.单一模式:(图A)所有试验模式都包含了单一模式.二,E-Prime程序介绍:1.关于E-Studio:Toolbox中有构成试验的部分E-object.Structure是试验流程图,properties是试验对象的各个属性.当菜单隐蔽时,点View.看不到Structure的构造时,点Session Procedure前的“+”或右击消失菜单——Allow Collapsing——去掉落对勾.点“—”可以隐蔽构造.各个对象(控件)E-Object的功效:1.Experiment:掌握各个对象,情形,变量,装备.不在toolbox中,在Structure的最高地位.2.TextDisplay:呈现文本类型的材料,单刺激型对象,只能是统一属性的文本.3.ImageDispay:呈现图片材料,单刺激型.2.0版支撑bmp,jpg,jpeg,gif,png,tif,tiff,emf,wmf等格局.4.Sound out:播放语音材料.支撑WAV格局.支撑频率Samples:11025.22050.44100Hz.支撑分辩率BitsPer Sample:16.8bits.声道Channels:单声道,立体声道.5.Slide:用处最广.可同时呈现多个刺激.6.List:TrialList,行动Level程度,一行就是一个试验刺激,列为Attribute属性,一列就是刺激的一类属性.列又称作字段.List的三个感化:1)Trialproc焦点试验进程的生成:在List的默认字段Procedure中输入TrialProc——按回车.如图中方框1.2)存放试验材料及材料的属性:如框2,刺激放在Stimulus中,刺激的答案放在Answer中.3)存放刺激呈现后果,如呈现方法,数目等.呈现方法有:Sequential次序呈现,Random随机,Random with replacement带反复的随机,Counterbalance均衡,Offset分支次序,Permutation数列次序.(框3)呈现数目:选择全体或是部分呈现.Weight设置为0为不呈现,1为呈现.(框4)7.FeedbackDisplay:反馈控件,一般是对探测界面反馈.8.PackageCall:挪用一段子程序的控件.试验进程控件.9.Wait:延伸前一对象的呈现进程.10.Procedure:试验进程控件.11.Inline:可用于编写程序代码bel:?13.MovieDisplay:支撑的格局有mpeg,avi,wmv.14.SoundIn:用于灌音.2.设计步骤新建目次时,所有文件需消失统一个目次下,并且试验用的汉字文件最好转换为图片.指点语设置:左击SessionProc——按左拖动slide到流程图上——右击Slide1——点Rename 改为Instruction——双击设计属性——单击SlideImage——拖到空白处左击——消失Image1——右击图片点properties/(Sub Object)(Property Pages:file搜刮文件目次?)呈现时光:Properties——Duration/Input设置为Infinite呈现方法:按键消掉,InputMasks——Device(s)—Add—Add Input Device选Keyboard—OK Allowable中输入按键名.CEP焦点试验设置:双击SessionProc——拖List到流程图——List1改为LxList——双击进入界面——procedure下输入LxProc,按回车键(注,按回车才能生成CEP)在List中输入刺激和属性等内容:行动刺激,有若干行就是若干刺激,ID是编号,Weight运行的次数,Nested相嵌?,Procedure进程(指定和生成焦点试验进程).Add Attribute加列——Name改为StimNo刺激编号.StimType刺激类型,Stimulus刺激,Answer答案.呈现方法:properties——selection——order呈现次序设置LxProc中的程序:设置Fixation注目点:TextDisplay改为Fixation——Properties设置Font字体,字号Point Size——General——Forecolor改为Red设置探测界面/刺激界面:TextDisplay改为Probe——输入[Stimulus].这里的刺激是不断变化的,挪用了字段名(方括号+字段名)反响方法:按键反响Allowable改为所有可以按的按键名如pj,Correct改为Answer设置反馈界面:拖FeedbackDisplay到流程图,反馈的联系关系设置:properties——General——Input object name——probe.设置停止语:SessionProc——Slide——expEnd.注:试验进程中不能有雷同的名称!!3.运行.调试.修正程序:运行:点Run——程序主动生成剧本文件(.ebs)——主动检讨错误并提醒.——调试/修正——编译成功——提醒:输入被试信息——被试编码——回车——被试分组——回车——确认无误,点Yes.4.用已有的模块制造新模块:比如:演习模块复制成试验模块:View——browser——复制演习模块:右击Lxlist点Copy——在Browser光标处点paste(同样复制Lxproc)——生成Lxlist1和Lxproc1——rename:expProc,expList.此时Structure中显示新对象为Unreferenced E-Object(非引用),需改为引用——移动到SessionProc中——双击SessionProc——选中Unreferenced E-Object中的expList拖到List和expEnd之间.——双击expList——将所有Trial的Procedure从Lxproc改为expProc.试验模块expProc不须要反馈,是以改成试验缓冲BufferInterval:选Structure窗口中expProc中的feedBackDisplay——删除Delete——拖TextDisplay——改为BufferInterval——呈现时光改为800ms.注:进程名,对象名雷同时它们是联动的,改个中一个其他也会被修正.是以expProc是复制了LxProc但不能直接挪用.如,Lxproc中的Probe数据收集选项为None,expProc中需改为Standard.因为试验进程中的探测界面需收集数据.5.演习与试验的过渡阶段:拖Slide改为lxEnd——呈现:Infinite,按键消掉——allowable输入PQ.例如:设置按Q键返回演习,按P持续试验.创建Label1,IxEnd,InLine1,Label2来实现.上方为InLine1中需写入的代码.是Basic中的断定句,意思为“If假如……then那么……else不然……end if语句停止”.留意:单词之间有空格!!三,试验实行记载下目的机的设置装备摆设,显示器情形和各个参数,因为要写在论文里.拷入公用电脑最好把文件改为只读,以防他人修正.被试编码和分组必须主试亲自输入,一旦反复,先前的被试信息会被笼罩.四,E-Prime数据处理1.熟悉数据文件:数据文件的定名为“程序名—被试编码—试验分组.ed at”.运行时,程序会师长教师成一个临时的TXT文本式文件,当所有试验完毕时才生成表格局文件.当消失故障时可用E-recover修复数据.E-Prime记载数据的方法:1.数据记载方法及寄义:ACC反响正误(“1”准确,“0”错误),RESP,CRESP准确的反响,RT反响时,RT Time(反响一霎时盘算机的时光点,单位为毫秒),DurationError现实呈现时光与设置的Duration的差异,OnSetDelay启动延迟,OnSetTime(对象启动的时光点,单位为毫秒),ActionDelay(对象启动的必须时光导致的延迟??),ActionTime(对象完成启动的时光),应用E—dataAid打开数据,2.归并数据:1.预备工作:归并前备份数据,因为不能再一次归并.2.E-Merge界面如下图:1.打开文件:在FolderTree中找到数据文件(框1),FileList中显示文件列表.(框2)2.点SelectUnmerged(框3)选择归并的文件.3.点Merge(框4)——弹出对话框Select The Merge Operation——StandardMerge——Set Target File定名归并的文件.4.提醒你归并是否成功,哪些成功归并,哪些掉败.归并过的文件有绿色对勾标志.5.归并掉败的可能原因:数据长度不同(如列数不同)或被试编码反复.多重归并:用前面用的StandardMerge不能再次归并数据.这时需用RecursiveMerge:(在Select The MergeOperation对话框)——第一个下拉选项选择文件类型(归并前的.归并后的),第二个下拉选项进一步限制选项(归并过的,未归并的,任何).RecursiveMerge功效更壮大,可以归并已归并的文件. 3.提取数据:1.过滤演习阶段的数据:E-DataAid——Filter——ColumnName中选择字段Running——CheckList 中选择ExpList(选摘要保留的部分)——CurrentFilter中消失过滤前提,假如想撤消则按Clear/ClearAll——Close封闭选择界面——呈现过滤后的数据.2.重排字段Arrange Columns(列):E-DataAid——Arrange Columns——一列是隐蔽的字段,一列是显示的字段.因为显示的字段很少,所以先点RemoveAll,都移到左列.点Add移动到右列——点MoveUp/MoveDown分列字段次序.注:假如都是统一试验组则不需显示Session字段,假如不是则选Session.3.导出数据Export:File——Export——对话框,选导出数据的格局(Export To)——对话框,输入文件名.注:不管选SPSS照样Exal,导出的文件都是文本格局.4.修复数据:打开E-Recovery——点Browse阅读——找到需恢复的文本文件——Recover——生成同名表格文件.。


E-Prime使用说明1这是一份老师给我的学习资料,应该是从网上找到的,现在把它放上来,算作转载。
通过自习阅读这篇文章,用两三个小时的时间你可以基本理解E-Prime的使用方法和过程。
简介E-Prime有许多功能,包括编写程序(E-Studio)、执行程序(E-Run)、整理data(E-DataAid)、修复data(E-Recovery)、合并data(E-Merge)。
一般来说,要编写程序我们会使用E-Studio。
在程序集中执行E-Studio后会出现选单(如下右图),除了可以选第一项开启一个新的空白实验或是选第二项使用范例模式一步一步建立实验程序,也可以选第三项开启一个已存在的实验程序来进行编辑。
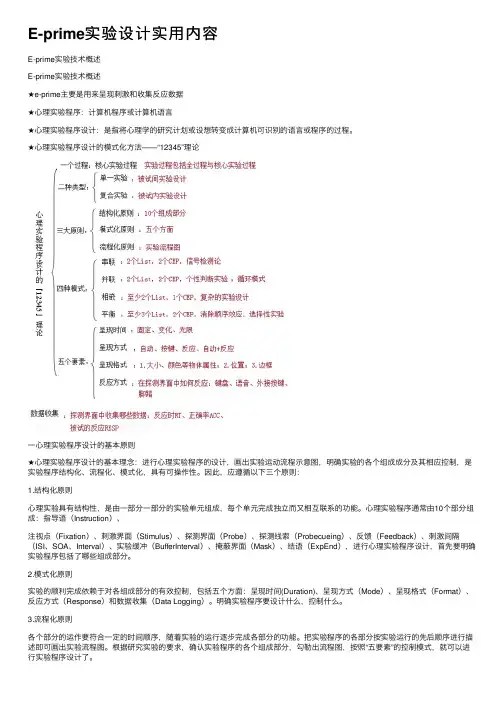
基本操作接口通常我们选择开启一个新的空白实验后,会出现如下图之画面。
1. 工具箱(ToolBox): 在下图最左边的蓝色区域就是工具箱,工具箱里的对象(包括图片、声音、文字、反应回馈…等)都可以依照实验的设计和需求,自行加入到实验之中。
2. 结构窗口(Structure): 结构窗口中会以树形图的形式,显示出用户在实验结构中放入了哪些工具箱中的对象。
实验执行时,程序会依据此窗口中(由上而下)之顺序,先后呈现出用户所放置的对象。
3. 属性窗口(Properties):在结构窗口下方的属性窗口,可显示在结构窗口中被用户所点选(用鼠标左键在对象上点一下) 之对象的属性。
我们可以藉由属性窗口来更改结构窗口中对象的名称、呈现时间长短及位置、数据收集方式…等基本属性。
4. 工作区:下图画面中右侧的区域为工作区。
当我们用鼠标左键在已放置于结构窗口中之对象上点两下时, 则此对象就会呈现在工作区之中,此时 也可以对对象的属性进行编辑。
编辑实验程序 举例说明假设我们现在的实验,想请受试者先看一个中文字中的部件 (如:言),再看一个中文字(如:试),并请受试者判断先前看到的部件,是否有出 现在后来看到的中文字中。
因此,本实验的呈现顺序为:指导语画面T 练习开始画面T 练习(5个trial )—练习结束画面—正式实验(10个trial )—实验结束画面练习trial 为:哔声—部件—遮蔽(mask )—中文字—回馈—全 黑画面正式实验trial 为:哔声—部件—遮蔽(mask )—中文字—全黑画 面开始编辑1. 时间轴:首先,在SessionProc图标上按鼠标左键一下,会出现 按鼠标左键两下,则工作区中会出现一条时间轴 (如下图)。

E-prime实验设计实⽤内容E-prime实验技术概述E-prime实验技术概述★e-prime主要是⽤来呈现刺激和收集反应数据★⼼理实验程序:计算机程序或计算机语⾔★⼼理实验程序设计:是指将⼼理学的研究计划或设想转变成计算机可识别的语⾔或程序的过程。
★⼼理实验程序设计的模式化⽅法——“12345”理论⼀⼼理实验程序设计的基本原则★⼼理实验程序设计的基本理念:进⾏⼼理实验程序的设计,画出实验运动流程⽰意图,明确实验的各个组成成分及其相应控制,是实验程序结构化、流程化、模式化,具有可操作性。
因此,应遵循以下三个原则:1.结构化原则⼼理实验具有结构性,是由⼀部分⼀部分的实验单元组成,每个单元完成独⽴⽽⼜相互联系的功能。
⼼理实验程序通常由10个部分组成:指导语(Instruction)、注视点(Fixation)、刺激界⾯(Stimulus)、探测界⾯(Probe)、探测线索(Probecueing)、反馈(Feedback)、刺激间隔(ISI、SOA、Interval)、实验缓冲(BufferInterval)、掩蔽界⾯(Mask)、结语(ExpEnd),进⾏⼼理实验程序设计,⾸先要明确实验程序包括了哪些组成部分。
2.模式化原则实验的顺利完成依赖于对各组成部分的有效控制,包括五个⽅⾯:呈现时间(Duration)、呈现⽅式(Mode)、呈现格式(Format)、反应⽅式(Response)和数据收集(Data Logging)。
明确实验程序要设计什么,控制什么。
3.流程化原则各个部分的运作要符合⼀定的时间顺序,随着实验的运⾏逐步完成各部分的功能。
把实验程序的各部分按实验运⾏的先后顺序进⾏描述即可画出实验流程图。
根据研究实验的要求,确认实验程序的各个组成部分,勾勒出流程图,按照“五要素”的控制模式,就可以进⾏实验程序设计了。
⼆实验过程与实验类型★实验过程:指实验从开始到结束的实验进程。
包括全过程和核⼼实验过程两种形式。

一,E-Prime组成部分1.实验组成10部分:1.Instruction指导语:“无限时间”,按键消失(注:不要用轻易按到的键),格式为图片(易于排版)。
操作性原则:说明先出现什么,后出现什么,被试如何反应。
范例:2.Fixation注视点:呈现时间500~800 ms,自动消失,大小30字号以上。
3.Stimulus刺激界面:4.Probecueing探测线索:出现在探测界面前面,用于去习惯化和让被试做好准备。
5.Probe探测界面:6.Feedback反馈界面:对被试反应作出正确或错误的反应。
时间:1000~2000ms7.ISI ,SOA,Interval刺激间隔:ISI:上一个刺激终点~下一个刺激起点。
SOA:前一刺激起点~下一个刺激起点)。
两者的关系SOA=ISI+DurationInterval:刺激与目标,目标和其他界面的间隔时间。
8.Buffer Interval 实验缓冲:500~1200ms。
被试作反应后推迟下一个Trial的呈现。
反馈界面也起到缓冲的效果。
9.Mask 掩蔽界面:400~1000ms,常用于启动效应实验和记忆实验。
在记忆实验中,消除刺激的感觉记忆。
10.Exp End 结语界面:1000~1500ms,如,“实验完毕,谢谢您的参与!”2.实验程序控制5要素Duration呈现时间:固定时间,变化时间(设置变量或数组),无限时间(“-1”,“infinite”)Mode呈现方式(=消失方式):自动(不需要设置),按键(无限时间+设置按键在刺激界面),反应(无限时间+反应键在探测界面),自动+反应(固定时间+反应键)Format呈现格式:刺激物属性:字符(字体,大小,前景颜色?,背景颜色,下划线),图片(尺寸大小,文件大小,亮度,色调?,饱和度?,灰度?,对比度);位置;边框(大小,颜色)Response反应方式:键盘反应(字母,数字,功能键);语音反应;外接反应键;脚踏板反应Data logging数据收集:反应时Response Time ;RT ,正误Accuracy;ACC,反应Response;RESP,实验流程示意图3.实验过程Procedure:Session Procedure全过程;CEP Core Experimental Procedure(运行一次是一次Trial,一个Block=指导语+CEP+结束语)4.实验设计的4模式:Paralleling并联模式:(图B)完成CEP1再完成CEP2。
E-Prime实验操作手册目录一、安装 (3)二、界面介绍 (5)三、基本操作 (7)四、控件设置: (8)一、图片控件设置: (8)二、Inline 程序语句的编写 (10)三、Lable (10)四、List的参数设置 (11)五、Moviedisplay的参数设置 (12)六、Silde的参数设置 (13)七、反馈控件的参数设置 (14)八、录音控件的参数设置 (16)九、声音控件的参数设置 (16)十、文本控件的参数设置 (17)十一、Wait参数的设置 (18)五、行为数据的处理 (19)一、安装放入光盘打开后的界面如图:直接安装第二项,安装过程如下,直接点NEXT即可:在这里提示是否安装I/O设备,选择是。
在这里提示是否安装反应盒驱动,选择是。
然后在第一次打开时会有如图提示:选择否即可。
在此注册,输入用户名和公司单位以及序列号,序列号格式如:4198A5-8D7E92-9E89BD。
e-prime1.0在安装的时候需要插上狗才可以安装,而2.0不需要。
二、界面介绍 打开软件的界面如图: 嵌入图片刺激实现程序语句设置标签表单嵌入视频刺激调用子进程进程嵌入符合刺激(图片、文字、声音、视频)嵌入反馈提示声音录制嵌入声音刺激嵌入文字刺激设置等待菜单栏快捷方式工具箱工作区结构视窗属性视窗另外需要介绍的在edit下的experiment里有一些外接设备和显示设置界面如图:双击第一项则出现Dieplay index 设置在那个显示器上显示。
Default background color 设置背景颜色Match desktop resolution at runtime 设置是否全屏否则启动setting中设置的分辨率Width和height设置分辨率Color bit depth 设置颜色质量点击Add可以增加反应设备如图:可以增加游戏摇杆,也可以增加自己设计的并口设备。
三、基本操作双击打开时间轴:控件时间轴ImageDisplay对象是E-prime用来呈现图形图片实验材料的控件。
ContentsSafety Instructions Page 1 Introduction Page 2 Features Page 2 What’s in the Box Page 3 Unpacking Page 3 Setup and Operation Page 4 Cleaning Page 8 Troubleshooting Page 8 Warranty Information Page 10 Contact Us Page 11IntroductionWelcome to the Audioengine family and congratulations on your purchase of the Audioengine N22 Premium Desktop Audio Amplifier! The Audioen-gine team is dedicated to bringing you the highest quality listening experi-ence possible and the Audioengine N22 amplifier was designed with the same attention to detail and operational simplicity as other Audioengine products. As with our other past efforts we thank our customers, distributors and resellers for inspiring us to create another great Audioengine product.Connect your iPod, computer, and speakers or headphones for a great-sounding personal stereo system with N22. Or plug in an optional Audioen-gine wireless audio adapter and use N22 to power your home theater rear speakers.Features • Powerful but compact stereo audio amplifier • Cool-running 22 watts RMS per channel • 2 inputs for iPod, iPhone, computer, TV, etc.Basic Safety Instructions • Read these instructions for all components before using this product.• Keep these instructions for future reference.• Heed all warnings on the product and in the owner's guide.• Follow all instructions.• Do not use this apparatus near water or moisture. Do not use this product near a bathtub, washbowl, kitchen sink, laundry tub, in a wet basement, near a swimming pool, or anywhere else that water or moisture are present.• Clean only with a dry cloth and as directed by the manufacturer. Unplug this product from the wall outlet before cleaning.•Do not block any ventilation openings. Install in accordance with the manufacturer's instructions. To ensure reliable operation of the product and to protect it from overheating, put the product in a position and location that will not interfere with its proper ventilation. For example, do not place the product on a bed, sofa, or similar surface that may block the ventilation openings. Do not put it in a built-in system, such as a bookcase or a cabinet that may keep air from flowing through its ventilation openings.• Do not install near any heat sources, such as radiators, heat registers, stoves or other apparatus that produce heat.•Do not defeat the safety purpose of the polarized orgrounding-type plug. A polarized plug has two blades with one wider than the other. A grounding-type plug has two • Unplug this apparatus during lightning storms or when unused for long periods of time to prevent damage to this product.• Refer all servicing to qualified service personnel.•Servicing is required when the apparatus has been damaged in any way such as power supply cord or plug is damaged, liquid has been spilled or objects have fallen into the apparatus, the apparatus has been exposed to rain or moisture, does not operate normally, or has been dropped. Do not attempt to service this product yourself. Opening or removing covers may expose you to dangerous voltages or other hazards. Please contact the manufacturer to be referred to an authorized service center near you.• To prevent risk of fire or electric shock, avoid over loading wall outlets, extension cords, or integral convenience receptacles .• Do not let objects or liquids enter the product as they may touch dangerous voltage points or short out parts that could result in a fire or electric shock.• See product enclosure bottom for safety related markings.• Use Proper Power Sources. Plug the product into a proper power source, as described in the operating instructions or as marked on the product.•Avoid power lines– Use extreme care when installing an outside antenna system to keep from touching power lines orgauge bare wire, banana plugs, spade lugs, or pin terminators. If you use your own speaker wire we recommend using at least 16 gauge wire and using the same length of wire from the amplifier to each speaker. It's also a good idea to turn off your amplifier before connecting power, audio sources or speakers.Preparing the Speaker WireSeparate the last 3” of each speaker wire conductor. Strip ½” of insulation from the end of each wire.● Twist the exposed copper strands with your fingers 3 or 4 times so thestrands stay together.Note: As you make your connections, be sure to connect the positive (+) terminals on your amplifier to the positive (+) terminals on your speakers. Even if your wire does not have (+) or (-) markings, most 2-conductor speaker wire has printing on one side to help you differentiate between the wire pairs.UnpackingYour Audioengine N22 amplifier was carefully tested and inspected before packaging and shipping. After unpacking please check for any damage. It is rare that any damage occurs during shipping, but if this does happen contact the shipping company immediately. We recommend that you keep the original carton and packing material.Works With • Audioengine P4 passive speakers • Audioengine wireless audio adapters• Desktop computers and laptops (Mac and PC) • iPods and iPhones • Headphones• Rear channel surround speakers• Any products with mini-jack or RCA audio outputs!Step 3 – Connecting the Power SupplyBe sure that the volume/power switch on the front panel is in the OFF position by rotating it counterclockwise until you hear a click.Connect the cable with the round end from the power supply to the N22 rear panel power connector. Note that this connector is “keyed” so line up the arrow on the cable end with the arrow on the rear panel. Please do not use excessive force on the connector and use only the power supply provided with the amplifier.Connect the AC power cable from the power supply to a power outlet and verify that the indicator light on the power supply is illuminated. We recommend using a high-quality surge suppressor and/or AC line filter on all electronics equipment.Step 4 – Connecting Audio SourcesUsing the appropriate audio cable (3.5" mini-jack and/or RCA cable), connect your audio source (computer, iPod, etc.) to the N22 audio inputs.❷❸Using Bare WireUse your thumb and finger to unscrew the binding post connectors on the back of each speaker.Insert each speaker wire into the holes on the side of the binding post connectors, observing proper polarity.● Retighten the binding posts with your fingers.❍ The stripped portion of the wire should be secured firmly in each connector.⏹ Make sure that none of the speaker wire strands have come in contact with an adjoining terminal.☐Repeat steps 1 and 5 to connect speaker wires to the amplifier.Left SpeakerRight SpeakerCleaningWe don’t recommend using any solvents or cleaners on Audioengine amplifiers, cabinets, or speakers. Just wipe down with a soft, dry cloth.Troubleshooting• Recheck speaker wire connections from the amplifier to each speaker.• Verify that the amplifier and your source components are turned on.• Check that the AC wall outlet is on and working.• Check that the cable from the power supply is connected to the N22 and the power supply indicator is lit.• Check that the volume/power knob on the front panel is turned on and not set to minimum volume.• Check that your audio sources (iPod, computer, etc) are turned on and not set to minimum volume.• Check that the cables from your audio sources are working and are properly connected.• Check to see that the AC power cord is securely connected to the power supply and to an AC power outlet.• Check that the AC power outlet is supplying power.• Recheck all speaker wire connections on the speakers and the amplifier.• Check that the cables from your audio sources to the amplifier are properly connected. • If using a computer, verify that the audio output balance setting is centered.• Check the polarity of the speaker wires on the amplifier and both speakers.• Check the EQ or sound settings on your audio source.• Decrease the volume of the input audio source and increase the volume of the amplifier.Other FeaturesHeadphone Out - For headphone enthusiasts the N22 includes a high- performance, low-noise headphone amplifier which works well with all types of headphones. Even if you don't connect speakers to your N22 the headphone amplifier will make your iPod or computer sound better through headphones. Keep in mind that permanent hearing loss may occur if earbuds or headphones are used at high volume so be sure to set the volume to a safe level.Line Out - The N22 includes a variable preamp output so you can connect a subwoofer, external amplifier, or Audioengine wireless adapter and control the volume of the line-out from the front panel.USB Power - The USB power port allows you to charge and power your iPod, iPhone, Audioengine wireless adapters or any other USB powered product through the USB connector on the rear panel. Note that this is for power only, not USB audio or data transfer.For a complete list of product features and specifications go to: WarrantyPeriodAll Audioengine products have a 3-year Limited Warranty on parts and labor from date of purchase. Your warranty is automatic so there is no need to register. This Limited Warranty applies only to Audioengine products purchased in the Continental United States. For Limited Warranty coverage elsewhere please contact your Audioengine dealer, reseller, or distributor.What is coveredAll defective parts or faulty workmanship.What is not coveredThe Audioengine Limited Warranty does not cover damage caused by accident, misuse, abuse, neglect, excessive moisture, lightning, power surges, other acts of nature, unauthorized product modification or repairs, or failure to follow the instructions outlined in the Setup Guide.What we will doWe will repair or replace any defective parts, at our option, within a reasonable amount of time and free of charge any time during the warranty period. After service, we will be responsible for shipping the product back to you at our expense.What we ask from youYou will be responsible for shipping or transportation charges directly to Audioengine or to an authorized dealer. We recommend that you keep the original shipping materials, as it is important that you package the product so that it will not be damaged during shipping. Audioengine cannot be responsible for any damages incurred during shipping due to poor packing, so please pack well and make sure to insure your shipment.How to obtain Audioengine Warranty serviceIf you have any questions about your warranty coverage or you think you may need service, email the Audioengine Authorized Service Center at: ************************** or call toll-free in the United States at: (877) 853-4447. We will do everything we can to answer your questions and resolve any issues as quickly as possible.Exclusive RemedyThis Limited Warranty is fully transferable provided that the current owner furnishes the original proof of purchase and that the serial number on the product is intact. THE MAXIMUM LIABILITY OF AUDIOENGINE SHALL NOT EXCEED THE ACTUAL PURCHASE PRICE PAID BY YOU FOR THE PRODUCT. IN NO EVENT SHALL AUDIOENGINE BE LIABLE FOR SPECIAL, INCIDENTAL, CONSEQUENTIAL OR INDIRECT DAMAGES.Product Returns and RefundsYour satisfaction is guaranteed! Should you have a problem or are not satisfied with any Audioengine product, send us an email at: ************************** or call toll-free in the United States at: (877) 853-4447.HumAdding a new component such as your N22 amplifier can bring out hum or buzz that may not have existed before. Your first assumption may be that something is wrong with the component but this is generally caused by a “ground-loop” in your system. Consider these tips for possible solutions:• First try moving all components to the same electrical circuit or AC outlet.• If the hum or buzz is still present, power off all gear and remove the mini-jack and/or RCA audio cables to and from the N22 amplifier.• Turn the N22 back on and check for hum. If the noise is still audible try plugging the N22 power cable into a different AC outlet.• If the hum goes away while the audio cables are still disconnected, the noise is likely coming from another component in your system. Connect each component back one at a time and the one that causes the system to hum is likely the culprit.• A common ground-loop source is from cable TV or satellite cables. If the hum or buzz persists after trying the previous tips, disconnect thecoaxial cable from your cable box, TV, or DVR and if the hum goes away the cable is the cause. In this case you can get a ground-loop isolator from your local electronics store. These are inexpensive and easy to connect inline with your video cable.• Sometimes something as simple as a portable heater or dehumidifier will add noise into your wall wiring that could be picked up by your audio gear. A dimmer switch on a halogen lamp, a wireless internet router, or wireless phone near the amplifier, for example, could also all be possible culprits.The best overall solutions are to use an AC line filter, plug the unit into a different AC circuit, or in the case of noise introduced by a wireless router, for example, move it further away from your audio gear.Contact UsIf you have any questions or feel you may need service contact the reseller where you purchased your product or feel free to email us directly at: ************************** or call toll-free in the United States: (877) 853-4447About AudioengineAudioengine designs and builds innovative audio products with all your music in mind. Great sound, simple but elegant designs, high-quality materials, and truly useful features are what Audioengine is all about. We sincerely hope you get as much enjoyment from our products as we've had creating them! For information about our other products go to:Information for Users on Disposal of Old Equipment[European Union]This symbol indicates that the electrical and electronic equipment should not be disposed as general household waste at its end-of-life. Instead, the product should be handed over to the applicable collec-tion point for the recycling in accordance with your national legisla-tion. By disposing of this product correctly, you will help to conserve natural resources and will help prevent potential negative effects on the environment and human health that could otherwise be caused byinappropriate waste handling of this product. For more information about collec-tion point and recycling of this product, please contact your local municipal office, your household waste disposal service or the shop where you purchased the product. Penalties may be applicable for incorrect disposal of this waste, in accor-dance with national legislation.[Other Countries outside the European Union]If you wish to dispose of this product, please do so in accordance with applicable national legislation or other rules in your country for the treatment of old electrical and electronic equipment.Attention:This symbol is only valid in the European Union.。
eprime简介Eprime好像不大稳定,如果不是正版的话就更加糟糕,程序里面只要有中文就会不稳定,我一般是先写好程序,编译成ebs文件后,然后把list覆盖了,用ebs脚本文件运行就会稳定一些。
实验刺激的编排和呈现实验刺激的编排和呈现中国科学院心理研究所中国科学院心理研究所脑高级功能研究实验室脑高级功能研究实验室刘海程刘海程*******************************.cn20062006--66LABLAB--HBF, IPCASHBF, IPCASfMRI实验研究流程图问题提出问题提出实验设计实验设计扫描扫描刺激刺激数据分析数据分析论文写作论文写作LABLAB--HBF, IPCASHBF, IPCAS实验刺激实验刺激的类别-视觉(文本,图片等)-听觉-其它如嗅觉,触觉等.TriggerLABLAB--HBF, IPCASHBF, IPCAS实验刺激实验刺激的基本特征-基本物理特征刺激大小位置刺激的呈现颜色,背景颜色亮度,灰度等-持续时间-间隔时间LABLAB--HBF, IPCASHBF, IPCAS实验刺激编排编:对于图片(bmp),声音(wav)的实验刺激,要先用专业软件制作好,并统一命名,存放在实验文件夹内.排:在用计算机呈现刺激之前,一般要将刺激呈现顺序以及相应的属性列在表格中LABLAB--HBF, IPCASHBF, IPCAS实验刺激呈现常用的刺激呈现的软件有Presentation, Inquisition,DMDX,E-Prime等.E-PrimeLABLAB--HBF, IPCASHBF, IPCASEE--PrimePrime软件使用软件使用LABLAB--HBF, IPCASHBF, IPCAS大纲E-Prime基本操作与应用E-Prime高级应用E-Prime专题讨论-Timing Precision-E-Basic编程LABLAB--HBF, IPCASHBF, IPCAS大纲E-Prime基本操作与应用-安装-使用E-Prime编写的程序演示(4个不同类型) -向导使用,界面简介-文本刺激的呈现(举例,总结)-图片,声音刺激的呈现-Slide中State的使用高级应用高级应用LABLAB--HBF, IPCASHBF, IPCASInstallation1,安装前请先下载1.1安装版,SP3,HDD32,同时拿到加密狗.2,运行HDD32.exe,安装加密狗驱动,一直等到Finished出现,才进入下一步.3,安装1.1-输入序列号等信息.不理会安装过程中出现的Microsoft驱动徽标警告信息.4,安装SP3补丁LABLAB--HBF, IPCASHBF, IPCAS一个例子问题:真词和非词判断速度比较-Cat; 文明-Cak; 都展LABLAB--HBF, IPCASHBF, IPCASBefore E-Prime,the most important is……实验设计-实验设计的类别和方式直接决定了刺激应该以什么样的方式呈现实验设计的可操作性规范-将你的实验设计越具体化,越详细,在编写刺激呈现程序时失误的可能越小LABLAB--HBF, IPCASHBF, IPCAS实验设计的可操作性规范,实验包含哪些自变量每个变量有几个水平实验的关键刺激是什么刺激呈现之后,需要被试作出反应吗如果需要被试作出反应,被试应该如何反应,实验的具体流程是什么在一段时间内,被试需要经历哪些事件,这些事件有何特点,需要记录哪些因变量,期望的实验过程,期望计算机记录哪些数据123456LABLAB--HBF, IPCASHBF, IPCAS问题1左键左键右键右键LABLAB--HBF, IPCASHBF, IPCAS问题2LABLAB--HBF, IPCASHBF, IPCAS问题3刺激正确的反应在屏幕中央呈现"+"Duration=2s反应输入=1,2反应中止刺激呈现前景=黑背景=白Probe在屏幕中央呈现"+"Duration=1s背景=白注视点变化属性固定属性刺激正确的反应在屏幕中央呈现"+"Duration=2s反应输入=1,2反应中止刺激呈现前景=黑背景=白Probe在屏幕中央呈现"+"Duration=1s前景=黑背景=白注视点变化属性固定属性LABLAB--HBF, IPCASHBF, IPCAS 问题4反应时,反应,反应准确率LABLAB--HBF, IPCASHBF, IPCAS 问题5正确反应-反应后刺激消失错误反应-反应后刺激消失无效反应-刺激在2秒时消失2秒内没有反应-刺激在2秒时消失LABLAB--HBF, IPCASHBF, IPCAS 问题6LABLAB--HBF, IPCASHBF, IPCASLABLAB--HBF, IPCASHBF, IPCAS1:为实验建立专门的文件夹为实验创建一个专门的文件夹(e.g.,C:\MyExperiments\LexicalDecision) 实验名称中最好包含版本信息(e.g., LexicalDecision001).LABLAB--HBF, IPCASHBF, IPCAS2:核心实验DesignList/MaterialLABLAB--HBF, IPCASHBF, IPCAS3: 核心实验ProcedualLABLAB--HBF, IPCASHBF, IPCAS4: 设定trial events的属性刺激正确的反应在屏幕中央呈现"+"Duration=2s反应输入=1,2反应中止刺激呈现前景=黑背景=白Probe在屏幕中央呈现"+"Duration=1s前景=黑背景=白注视点变化属性固定属性刺激正确的反应在屏幕中央呈现"+"Duration=2s反应输入=1,2反应中止刺激呈现前景=黑背景=白Probe在屏幕中央呈现"+"Duration=1s前景=黑背景=白注视点变化属性固定属性LABLAB--HBF, IPCASHBF, IPCAS5:设定要记录的数据反应时,反应,反应准确率LABLAB--HBF, IPCASHBF, IPCAS6: 执行和测试实验程序正确反应-反应后刺激消失错误反应-反应后刺激消失无效反应-刺激在2秒时消失2秒内没有反应-刺激在2秒时消失LABLAB--HBF, IPCASHBF, IPCAS7: 检查结果中记录到的数据LABLAB--HBF, IPCASHBF, IPCAS如何编制实验呈现程序1,实验包含哪些自变量每个变量有几个水平实验的关键刺激是什么刺激呈现之后,需要被试作出反应吗如果需要被试作出反应,被试应该如何反应2,实验的具体流程是什么在一段时间内,被试需要经历哪些事件3,这些事件有何特点4,需要记录哪些因变量5,期望的实验过程6,期望计算机记录哪些数据LABLAB--HBF, IPCASHBF, IPCAS如何编制实验呈现程序1,实验包含哪些自变量每个变量有几个水平实验的关键刺激是什么刺激呈现之后,需要被试作出反应吗如果需要被试作出反应,被试应该如何反应完成DesignList2,实验的具体流程是什么在一段时间内,被试需要经历哪些事件完成Procedural3,这些事件有何特点 Events的属性设置4,需要记录哪些因变量数据的记录5,期望的实验过程运行和测试6,期望计算机记录哪些数据数据初步分析LABLAB--HBF, IPCASHBF, IPCAS声音刺激的呈现Experiment-Device-Soundlist-Script loadLABLAB--HBF, IPCASHBF, IPCAS大纲E-Prime基本操作与应用E-Prime高级应用1,Trial的精细化2,List的完成3,Block的完成4,其它(1)设定时间模式,测试(2)运行,分析,保存,系列实验刺激呈现程序编制刺激呈现程序编制E-Prime的工作模式——TotalIn E-Prime, 实验的关键框架的实现:List object (e.g., DesignList):选取样本点和样本点要执行的时间序列Procedure object (e.g., TrialProc) 指定时间序列上事件之间的关系Events (e.g., Fixation and Probe display). 指定时间序列上的事件LABLAB--HBF, IPCASHBF, IPCAS§The experiment data and associated routines are combined to define the Context object§上级Attribute中的值可以被下级继承和重设,当前遇到[attribute],在从本级往上搜索,直到得到赋值. Session Sessionlevel levelcontextcontextBlock Blocklevel levelcontextcontextSubSub--TrialTriallevel levelcontextcontextTrial Triallevel levelcontextcontextInheritanceInheritanceSearchSearchE-Prime的工作模式——上下级关系Attributes是实验中主要的自变量和控制变量.如condition, stimulus, correct answer Properties是与对象相关的,可以被提取和修改的数据项目.如text, forecolor, duration PropertyPropertyAttributeAttribute调用调用赋值赋值[attribute]表示在程序运行过程中,某个object的某个property的值是通过调运指定的attribute,得到指定的attribute的当前值来赋予的.Property and AttributeLABLAB--HBF, IPCASHBF, IPCASE-Prime的工作模式——ListConditionCondition CorrectAnswerCorrectAnswerProbeProbe1122NonwordNonwordwordwordLABLAB--HBF, IPCASHBF, IPCAS1: Trial Procedure的精细化目标:-使被试能够控制trial出现的时间.-刺激呈现之前的类别信息是否影响被试的判断.-每个trial后给被试反馈信息.LABLAB--HBF, IPCASHBF, IPCAS2: 完成List,设定取样方式等完成DesignList.使词和非词出现的相对比率为1;2.刺激随机呈现LABLAB--HBF, IPCASHBF, IPCAS2: 完成List,设定取样方式等Method A -Enter Conditions DirectlyMethod B -Use of Nested ListsMethod C -Factor Table WizardLABLAB--HBF, IPCASHBF, IPCASNested Lists(1)The Nested column的使用可以实现当前表格对其它表格和属性的调用.-不同的条件包含不同的刺激或者属性集-这样可以为被调用的表格使用不同的取样方式LABLAB--HBF, IPCASHBF, IPCASFor the Stimulus attribute, the experiment resolves the value of [Word] using the value obtained from the nested List, and the Stimulus attribute is set to "dog."Nested Lists(2)LABLAB--HBF, IPCASHBF, IPCASFactor Table Wizard适用于对于多因素多水平的实验设计Step:-使用CreatNew Factor来创建要交叉的因素-Add Column:添加和某个被交叉的因素牢牢所定的变量-Cross Factors:交叉因素,产生列表.LABLAB--HBF, IPCASHBF, IPCASSampling mode(1)Sampling modes include sequential, random(without replacement), random (withreplacement),counterbalance, offset, and permutationLABLAB--HBF, IPCASHBF, IPCASSampling mode(2)1,4,71,4,72,5,82,5,86,9,126,9,12……subjectsubjectLABLAB--HBF, IPCASHBF, IPCASSampling mode(3)Counterbalance一一Offset顺序组合顺序组合多多Permutation穷尽组合穷尽组合LABLAB--HBF, IPCASHBF, IPCAS3: 添加组块(Block)目标1:-考察启动刺激(词/非词)的呈现时间(500ms vs. 100ms)对词汇判断有无影响LABLAB--HBF, IPCASHBF, IPCASLABLAB--HBF, IPCASHBF, IPCAS目标2 :-比较对动物和水果词的词汇判断有无差异LABLAB--HBF, IPCASHBF, IPCAS11223344MeMeMotherMotherSon2Son2Son1Son1LABLAB--HBF, IPCASHBF, IPCAS目标3:-比较启动刺激后有无Mask的差别LABLAB--HBF, IPCASHBF, IPCASLABLAB--HBF, IPCASHBF, IPCAS-Use a block level attribute to set a parameter of an object executed in the trial procedure (the PrimeDuration)同样的程序,同样的刺激,不同的刺激属性-Use of nested lists passed from the block level同样的程序,不同的刺激-Use of block Procedure to pass in the trial Procedure同样的刺激,不同的程序-第一种方法trial直接调用Block.后两种方法Block都是作为trial和其它表格联系的桥梁.不同的是,前者的表格之间是嵌套关系,trial中有Attribute是通过其嵌套的表格来赋值的;而后者的表格之间没有嵌套关系,trial中的Attribute不需要被调用的表格来赋值3:添加组块(Block)LABLAB--HBF, IPCASHBF, IPCAS4:时间模式设定Timing Precision计时精度LABLAB--HBF, IPCASHBF, IPCAS4:测试(1)Run experiment to verify correct and error responses Checking scoring and data collectionChecking timing accuracyRunning pilot subjects-Verifying the understanding of instructions-Checking the dataLABLAB--HBF, IPCASHBF, IPCAS4:测试(2)Run experiment to verify correct and error responses -正确反应-错误反应-无效反应-没有反应LABLAB--HBF, IPCASHBF, IPCAS4: 测试(3)Checking scoring and data collection-白纸记录,机纸对照;不必全完,十个足够-E-DataAid中检查是否正确记录了实验所有水平的数据-反应和反应时是否记录并被正确地赋值-检查trial和block数目,检查被试号和序列号-正确反映了变量的水平和水平组合-再次检查分析所需的数据是否都被记录LABLAB--HBF, IPCASHBF, IPCASStage 8: 运行实验Running subjectsRunning on multiple machines-Subject Station installationLABLAB--HBF, IPCASHBF, IPCAS4: 基本数据分析Merging data-Standard Merge vs. Recursive Merge operation Checking data condition accuracy and dataquality [Data editing Tracking modifications]-the checking at this point is more in referenceto the completeness and appropriateness of the data, the experimenter's assignment of subject numbers, and assignment of subjects to conditions.Analysis and export of dataLABLAB--HBF, IPCASHBF, IPCAS4:保存保存实验程序(ES)保存实验结果EDAT ,EMRG,ASCII-保存最原始的数据,去处过滤和隐藏LABLAB--HBF, IPCASHBF, IPCAS4: 系列实验Modifying experiments-保持实验不同版本之间的一致(Consistency).实验名称和变量有利于数据比较和数据融合-记录不同版本实验的差别Developing functional libraries-Subroutines与Procedures的打包LABLAB--HBF, IPCASHBF, IPCAS大纲E-Prime基本操作与应用E-Prime高级应用E-Prime专题讨论-Timing Mode 的设置-E-Basic编程LABLAB--HBF, IPCASHBF, IPCASIntended and Actual DisplayDuration -Without E-PrimeLABLAB--HBF, IPCASHBF, IPCAS哪些影响了精确计时显示前的准备工作刷新周期计算机的管理工作E-prime怎么办 E-prime如何克服或者最小化这些影响精确计时的因素不同的问题不同的解决办法LABLAB--HBF, IPCASHBF, IPCASPreReleasePre-release,在当前刺激呈现的同时进行下一个刺激呈现的准备工作刺激起始时间序列刺激1234Expected time 0 preparation010*******Time with preparation30160290420Time with pre-release & preparation30130230330LABLAB--HBF, IPCASHBF, IPCAS优点-避免了由于刺激准备时间带来的delay不足-使用受到限制Feedback前的对象时间窗口长于对象的呈现时间被试的反应终止了对象的呈现设置-100-200msTradeoffs of Using Pre-ReleaseLABLAB--HBF, IPCASHBF, IPCASEvent vs. CumulativeEvent Mode Timing -刺激的呈现时间固定,刺激之间的间隔变化. Cumulative Mode Timing -两个刺激的起始时间之间的间隔不变,刺激的呈现时间变短. STIM1STIM3STIM2STIM4Prep2Prep3Prep410020030400Cumlativ e M odeSTI M1STI M3STIM2Prep2Prep3Prep4Event M ode STIM5M 4 Pr ep 5 y Pr e Pr ep 5 Ti m e (m s) 500 De la y s STI M 1 ST IM 3 ST IM 2IM4Prep2Prep3Prep4100 200 30400 Cumu lativ e M odeSTI M1STI3STIM2Prep2Prep3Prep4Event M ode STIM5 STI M4Prep5yPrePr5Time(ms)500DelaysLABLAB--HBF, IPCASHBF, IPCAS根据刷新率来设定刺激的Duration呈现第一个刺激-等待指定的持续时间-监视第二个刷新周期开始的信号-开始呈现第二个刺激LABLAB--HBF, IPCASHBF, IPCAS根据刷新率来设定刺激的Duration设定的刺激呈现时间= 想要呈现的时间(刷新时间的倍数)-x-刷新率60-75HZ,X=10ms-刷新率大于75HZ,X=刷新时间/2ms60.15Hz, 16.63ms. 想要呈现50ms设定的刺激呈现时间=16.63ms×3-10ms=49.89ms-10ms=39.89ms rounded 40msLABLAB--HBF, IPCASHBF, IPCAS如何使用关键是实验对时间精度的要求.误差:10;100; 00LABLAB--HBF, IPCASHBF, IPCAS不同实验设计与调整时间精度的方法 Single stimulus event to response timing, -仅仅需要精确记录单个刺激的持续时间和被试的反应时间-Event mode without PreReleaseCritical sequence of events,-刺激的持续时间和刺激之间的间隔都很重要-Event mode with PreRelease. Duration accord refresh rate. Critical and varying duration of an event in a sequence,-变化的刺激持续时间.-Event mode with PreRelease; list; Duration accord refresh rate Cumulative timing of a repeating sequence of events,-固定的/精确的呈现频率重复的任务,-Cumulative with PrePelease; 前后Continuous sequences of events at a high rate with short stimuluspresentationdurations,-连续高速呈现短的刺激cache readLABLAB--HBF, IPCASHBF, IPCAS不同机器的刺激Duration限制LABLAB--HBF, IPCASHBF, IPCAS大纲E-Prime基本操作与应用E-Prime高级应用E-Prime专题讨论-Timing Precision-E-Basic编程LABLAB--HBF, IPCASHBF, IPCAS为什么要使用E-BasicEE--StudioStudio图形化,直观性,能图形化,直观性,能满足人们的绝大多数需求满足人们的绝大多数需求EE--BasicBasic代码化,逻辑性,能代码化,逻辑性,能满足人们的特殊的,自定义需求满足人们的特殊的,自定义需求LABLAB--HBF, IPCASHBF, IPCASE-Basic是什么E-Basic 是一种脚本语言,是E-Prime的根基.和Visual Basic for Applications相比较,只是为了实验研究的需要而增加了一些命令.-Visual Basic for Applications是嵌套在微软应用程序中的Visual Basic派生语言.LABLAB--HBF, IPCASHBF, IPCAS如何使用E-BasicE-Studio 生成的EBS(E-Basic script file)用户书写的代码-InLine对象:编译时插入EBS文件,成为其一部分在程序中的某个时间点执行,在实验的开始用来初始化全局变量.-Script窗口中的User按钮:用于全局变量的定义(Declaration of globalvariables)函数(Function)和分路径(Subroutine)LABLAB--HBF, IPCASHBF, IPCAS。
一,E-Prime构成部分之杨若古兰创作1.实验构成10部分:1.Instruction指点语:“无穷时间”,按键消逝(注:不要用轻易按到的键),格式为图片(易于排版).操纵性准绳:说明先出现什么,后出现什么,被试如何反应.范例:2.Fixation谛视点:呈现时间500~800 ms,主动消逝,大小30字号以上.3.Stimulus刺激界面:4.Probecueing探测线索:出此刻探测界面前面,用于去习气化和让被试做好筹办.5.Probe探测界面:6.Feedback反馈界面:对被试反应作出准确或错误的反应.时间:1000~2000ms7.ISI , SOA, Interval刺激间隔:ISI:上一个刺激起点~下一个刺激起点.SOA:前一刺激起点~下一个刺激起点).两者的关系SOA=ISI+DurationInterval:刺激与目标,目标和其他界面的间隔时间.8.Buffer Interval 实验缓冲:500~1200ms.被试作反应后推迟下一个Trial的呈现.反馈界面也起到缓冲的后果.9.Mask 遮蔽界面:400~1000ms,经常使用于启动效应实验和记忆实验.在记忆实验中,清除刺激的感觉记忆.10.Exp End 结语界面:1000~1500ms,如,“实验终了,感谢您的介入!”Duration呈现时间:固定时间,变更时间(设置变量或数组),无穷时间(“-1”,“infinite”)Mode呈现方式(=消逝方式):主动(不须要设置),按键(无穷时间+设置按键在刺激界面),反应(无穷时间+反应键在探测界面),主动+反应(固定时间+反应键)Format呈现格式:刺激物属性:字符(字体,大小,前景色彩?,布景色彩,下划线),图片(尺寸大小,文件大小,亮度,色调?,饱和度?,灰度?,对比度);地位;边框(大小,色彩)Response反应方式:键盘反应(字母,数字,功能键);语音反应;外接反应键;脚踏板反应Data logging数据收集:反应时Response Time ;RT ,正误Accuracy;ACC,反应Response;RESP,实验流程示意图Procedure:Session Procedure全过程;CEP Core Experimental Procedure(运转一次是一次Trial,一个Block=指点语+CEP+结束语)4.实验设计的4模式:Paralleling并联模式:(图B)完成CEP1再完成CEP2.Series串联模式(轮回模式):(图C)例子:对30个人进行50种个性有没有的判断.Counter balance平衡模式(选择模式):(图D)见P10(20/224)??是串联和相嵌的结合.Nesting相嵌模式:(图E)CEP调用List的材料和控制,List又调用List1和List2的材料和控制.例如:多种变量的完整随机变更.List存地位信息,List1是目标刺激,List2是干扰信息.三个list都设置为Random.单一模式:(图A)所有实验模式都包含了单一模式.二,E-Prime程序介绍:1.关于E-Studio:Toolbox中有构成实验的部分E-object.Structure是实验流程图,properties 是实验对象的各个属性.当菜单埋没时,点View.看不到Structure的结构时,点Session Procedure前的“+”或右击出现菜单——Allow Collapsing——去掉对勾.点“—”可以埋没结构.各个对象(控件)E-Object的功能:1.Experiment:控制各个对象,环境,变量,设备.不在toolbox中,在Structure的最高地位.2.TextDisplay:呈现文本类型的材料,单刺激型对象,只能是同一属性的文本.3.ImageDispay:呈现图片材料,单刺激型.2.0版撑持bmp,jpg,jpeg,gif,png,tif,tiff,emf,wmf等格式.4.Sound out:播放语音材料.撑持WAV格式.撑持频率Samples:11025、22050、44100Hz.撑持分辨率BitsPer Sample:16、8bits.声道Channels:单声道,立体声道.5.Slide:用处最广.可同时呈现多个刺激.6.List:TrialList,行为Level水平,一行就是一个实验刺激,列为Attribute 属性,一列就是刺激的一类属性.列又称作字段.List的三个感化:1)Trialproc核心实验过程的生成:在List的默认字段Procedure中输入TrialProc——按回车.如图中方框1.2)存放实验材料及材料的属性:如框2,刺激放在Stimulus中,刺激的答案放在Answer中.3)存放刺激呈现后果,如呈现方式,数量等.呈现方式有:Sequential顺序呈现,Random随机,Random with WordStrment带反复的随机,Counterbalance平衡,Offset分支顺序,Permutation数列顺序.(框3)呈现数量:选择全部或是部分呈现.Weight设置为0为不呈现,1为呈现.(框4)7.FeedbackDisplay:反馈控件,普通是对探测界面反馈.8.PackageCall:调用一段子程序的控件.实验过程控件.9.Wait:耽误前一对象的呈现过程.10.Procedure:实验过程控件.11.Inline:可用于编写程序代码bel:?13.MovieDisplay:撑持的格式有mpeg,avi,wmv.14.SoundIn:用于录音.新建目录时,所有文件需存在同一个目录下,而且实验用的汉字文件最好转换为图片.指点语设置:左击SessionProc——按左拖动slide到流程图上——右击Slide1——点Rename改为Instruction——双击设计属性——单击SlideImage——拖到空白处左击——出现Image1——右击图片点properties/(Sub Object)(Property Pages:file搜索文件目录?)呈现时间:Properties——Duration/Input设置为Infinite呈现方式:按键消逝,InputMasks——Device(s)—Add—Add Input Device选Keyboard—OKAllowable中输入按键名.CEP核心实验设置:双击SessionProc——拖List到流程图——List1改为LxList——双击进入界面——procedure下输入LxProc,按回车键(注,按回车才干生成CEP)在List中输入刺激和属性等内容:行为刺激,有多少行就是多少刺激,ID是编号,Weight运转的次数,Nested相嵌?,Procedure过程(指定和生成核心实验过程).Add Attribute加列——Name改为StimNo刺激编号.StimType刺激类型,Stimulus刺激,Answer答案.呈现方式:properties——selection——order呈现顺序设置LxProc中的程序:设置Fixation谛视点:TextDisplay改为Fixation——Properties设置Font字体,字号Point Size——General——Forecolor改为Red设置探测界面/刺激界面:TextDisplay改为Probe——输入[Stimulus].这里的刺激是不竭变更的,调用了字段名(方括号+字段名)反应方式:按键反应Allowable改为所有可以按的按键名如pj,Correct改为Answer设置反馈界面:拖FeedbackDisplay到流程图,反馈的关联设置:properties——General——Input object name——probe.设置结束语:SessionProc——Slide——expEnd.注:实验过程中不克不及有不异的名称!!3.运转、调试、点窜程序:运转:点Run——程序主动生成脚本文件(.ebs)——主动检查错误并提示.——调试/点窜——编译成功——提示:输入被试信息——被试编码——回车——被试分组——回车——确认无误,点Yes.4.用已有的模块建造新模块:比方:练习模块复制成实验模块:View——browser——复制练习模块:右击Lxlist点Copy——在Browser光标处点paste(同样复制Lxproc)——生成Lxlist1和Lxproc1——rename:expProc,expList.此时Structure中显示新对象为Unreferenced E-Object(非援用),需改为援用——挪动到SessionProc中——双击SessionProc——选中Unreferenced E-Object中的expList拖到List和expEnd之间.——双击expList——将所有Trial的Procedure从Lxproc改为expProc.实验模块expProc不须要反馈,是以改成实验缓冲BufferInterval:选Structure窗口中expProc中的feedBackDisplay——删除Delete——拖TextDisplay——改为BufferInterval——呈现时间改为800ms.注:过程名,对象名不异时它们是联动的,改其中一个其他也会被改动.是以expProc是复制了LxProc但不克不及直接调用.如,Lxproc中的Probe数据收集选项为None,expProc中需改为Standard.由于实验过程中的探测界面需收集数据.5.练习与实验的过渡阶段:拖Slide改为lxEnd——呈现:Infinite,按键消逝——allowable输入PQ.例如:设置按Q键返回练习,按P继续实验.创建Label1,IxEnd,InLine1,Label2来实现.上方为InLine1中需写入的代码.是Basic中的判断句,意思为“If如果……then那么……else否则……end if语句结束”.留意:单词之间有空格!!三,实验实施记录下目标机的配置,显示器情况和各个参数,由于要写在论文里.拷入公用电脑最好把文件改为只读,以防他人点窜.被试编码和分组必须主试亲自输入,一旦反复,先前的被试信息会被覆盖.四,E-Prime数据处理1.认识数据文件:数据文件的命名为“程序名—被试编码—实验分组.edat”.运转时,程序会师长教师成一个临时的TXT文本式文件,当所有实验终了时才生成表格式文件.当出现故障时可用E-recover修复数据.E-Prime记录数据的方式:1.数据记录方式及含义:ACC反应正误(“1”准确,“0”错误),RESP,CRESP准确的反应,RT反应时,RT Time(反应一霎时计算机的时间点,单位为毫秒),DurationError实际呈现时间与设置的Duration的差别,OnSetDelay启动延迟,OnSetTime(对象启动的时间点,单位为毫秒),ActionDelay(对象启动的必须时间导致的延迟??),ActionTime(对象完成启动的时间),使用E—dataAid打开数据,2.合并数据:1.筹办工作:合并前备份数据,由于不克不及再一次合并.2.E-Merge界面如下图:1.打开文件:在FolderTree中找到数据文件(框1),FileList中显示文件列表.(框2)2.点SelectUnmerged(框3)选择合并的文件.3.点Merge(框4)——弹出对话框Select The Merge Operation——StandardMerge——Set Target File命名合并的文件.4.提示你合并是否成功,哪些成功合并,哪些失败.合并过的文件有绿色对勾标记.5.合并失败的可能缘由:数据长度分歧(如列数分歧)或被试编码反复.多重合并:用前面用的StandardMerge不克不及再次合并数据.这时候需用RecursiveMerge:(在Select The Merge Operation对话框)——第一个下拉选项选择文件类型(合并前的、合并后的),第二个下拉选项进一步限制选项(合并过的,未合并的,任何).RecursiveMerge功能更强大,可以合并已合并的文件.3.提取数据:1.过滤练习阶段的数据:E-DataAid——Filter——ColumnName当选择字段Running——CheckList当选择ExpList(选摘要保存的部分)——CurrentFilter 中出现过滤条件,如果想取消则按Clear/ClearAll——Close关闭选择界面——呈现过滤后的数据.2.重排字段Arrange Columns(列):E-DataAid——Arrange Columns——一列是埋没的字段,一列是显示的字段.由于显示的字段很少,所以先点RemoveAll,都移到左列.点Add挪动到右列——点MoveUp/MoveDown排列字段顺序.注:如果都是同一实验组则不需显示Session字段,如果不是则选Session.3.导出数据Export:File——Export——对话框,选导出数据的格式(Export To)——对话框,输入文件名.注:不管选SPSS还是Exal,导出的文件都是文本格式.4.修复数据:打开E-Recovery——点Browse浏览——找到需恢复的文本文件——Recover ——生成同名表格文件.。