骨科常用仪器使用
- 格式:ppt
- 大小:3.50 MB
- 文档页数:12

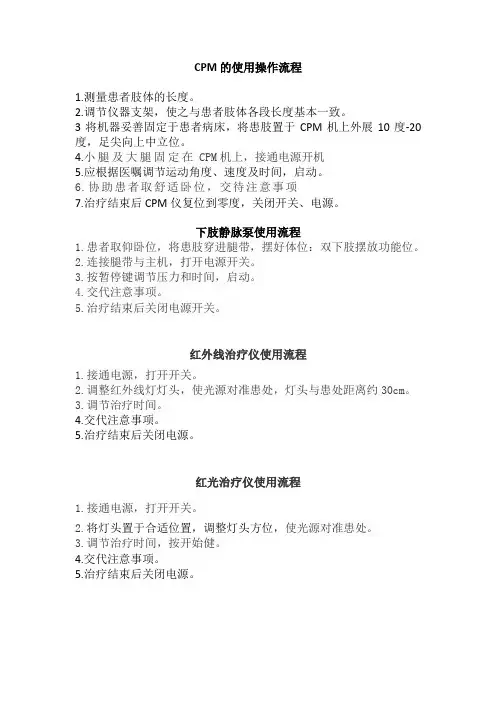
CPM的使用操作流程
1.测量患者肢体的长度。
2.调节仪器支架,使之与患者肢体各段长度基本一致。
3将机器妥善固定于患者病床,将患肢置于CPM机上外展10度-20度,足尖向上中立位。
4.小腿及大腿固定在CPM机上,接通电源开机
5.应根据医嘱调节运动角度、速度及时间,启动。
6.协助患者取舒适卧位,交待注意事项
7.治疗结束后CPM仪复位到零度,关闭开关、电源。
下肢静脉泵使用流程
1.患者取仰卧位,将患肢穿进腿带,摆好体位:双下肢摆放功能位。
2.连接腿带与主机,打开电源开关。
3.按暂停键调节压力和时间,启动。
4.交代注意事项。
5.治疗结束后关闭电源开关。
红外线治疗仪使用流程
1.接通电源,打开开关。
2.调整红外线灯灯头,使光源对准患处,灯头与患处距离约30cm。
3.调节治疗时间。
4.交代注意事项。
5.治疗结束后关闭电源。
红光治疗仪使用流程
1.接通电源,打开开关。
2.将灯头置于合适位置,调整灯头方位,使光源对准患处。
3.调节治疗时间,按开始健。
4.交代注意事项。
5.治疗结束后关闭电源。


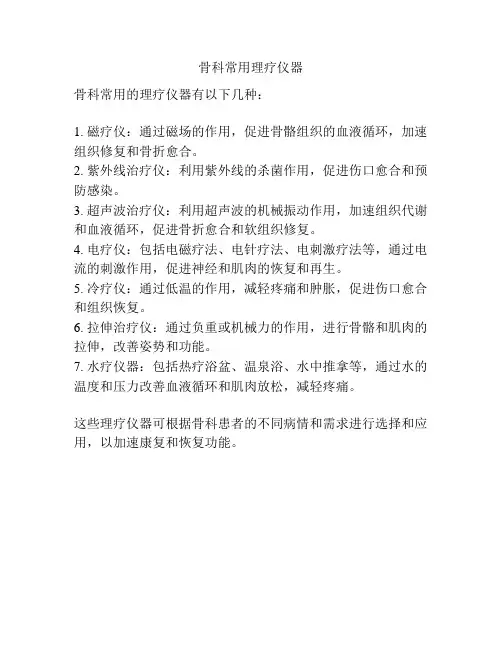
骨科常用理疗仪器
骨科常用的理疗仪器有以下几种:
1. 磁疗仪:通过磁场的作用,促进骨骼组织的血液循环,加速组织修复和骨折愈合。
2. 紫外线治疗仪:利用紫外线的杀菌作用,促进伤口愈合和预防感染。
3. 超声波治疗仪:利用超声波的机械振动作用,加速组织代谢和血液循环,促进骨折愈合和软组织修复。
4. 电疗仪:包括电磁疗法、电针疗法、电刺激疗法等,通过电流的刺激作用,促进神经和肌肉的恢复和再生。
5. 冷疗仪:通过低温的作用,减轻疼痛和肿胀,促进伤口愈合和组织恢复。
6. 拉伸治疗仪:通过负重或机械力的作用,进行骨骼和肌肉的拉伸,改善姿势和功能。
7. 水疗仪器:包括热疗浴盆、温泉浴、水中推拿等,通过水的温度和压力改善血液循环和肌肉放松,减轻疼痛。
这些理疗仪器可根据骨科患者的不同病情和需求进行选择和应用,以加速康复和恢复功能。
骨科护理常用仪器培训计划一、培训目的骨科护理常用仪器培训的目的是为了提高护理人员对各种仪器的熟练操作技能,使其能够熟练操作各种骨科仪器,提高护理工作的效率和质量,并且保障患者的安全和健康。
二、培训对象骨科护理常用仪器培训适用于骨科护士、助理护士等相关人员,通过培训,使其掌握各种骨科护理仪器的操作技能和使用方法。
三、培训内容骨科护理常用仪器培训的内容包括以下几个方面:1. 常用骨科仪器的认识:包括骨钳、骨锤、骨科手术台、骨科手术台等各种骨科常用仪器的功能和特点。
2. 护理常用仪器的操作:包括骨科仪器的正确使用方法、操作步骤、维护和保养等。
3. 骨科护理仪器的安全使用:介绍各种骨科仪器的安全使用注意事项,提高护理人员对骨科仪器的安全操作意识。
4. 骨科护理仪器的故障处理:介绍各种骨科仪器的常见故障及处理方法,以保障仪器的正常使用。
5. 骨科护理仪器的消毒和清洁:介绍各种骨科仪器的消毒和清洁方法,以保障患者的安全和健康。
6. 实际操作演练:通过实际操作演练,提高护理人员的实际操作能力和技能。
四、培训方法骨科护理常用仪器培训采用以下培训方法:1. 讲课授课:通过讲课的方式,向护理人员传授相关知识和技能。
2. 示范操作:通过教师的示范操作,向护理人员展示正确的操作方法。
3. 情境模拟:通过情境模拟的方式,对护理人员进行实际操作演练,以提高其操作技能。
4. 现场指导:对护理人员进行现场指导,帮助其解决实际操作中遇到的问题。
五、培训考核骨科护理常用仪器培训的考核主要包括以下几个方面:1. 理论考核:考核护理人员对骨科护理常用仪器的功能、使用方法、安全注意事项等的理论知识掌握情况。
2. 实际操作考核:考核护理人员对骨科护理仪器的实际操作能力和技能情况。
3. 作业考核:要求护理人员完成相关的作业,对其的操作技能进行综合考核。
六、培训效果评估通过骨科护理常用仪器培训,护理人员认识到了骨科护理常用仪器的重要性,掌握了相关仪器的操作技能和使用方法,提高了护理工作的效率和质量,并且保障了患者的安全和健康。
骨科常用仪器的使用和操作流程下载温馨提示:该文档是我店铺精心编制而成,希望大家下载以后,能够帮助大家解决实际的问题。
文档下载后可定制随意修改,请根据实际需要进行相应的调整和使用,谢谢!并且,本店铺为大家提供各种各样类型的实用资料,如教育随笔、日记赏析、句子摘抄、古诗大全、经典美文、话题作文、工作总结、词语解析、文案摘录、其他资料等等,如想了解不同资料格式和写法,敬请关注!Download tips: This document is carefully compiled by theeditor. I hope that after you download them,they can help yousolve practical problems. The document can be customized andmodified after downloading,please adjust and use it according toactual needs, thank you!In addition, our shop provides you with various types ofpractical materials,such as educational essays, diaryappreciation,sentence excerpts,ancient poems,classic articles,topic composition,work summary,word parsing,copy excerpts,other materials and so on,want to know different data formats andwriting methods,please pay attention!1. C 型臂 X 光机:操作前准备:确保设备完好,检查电源、电缆连接等。
Table of ContentsIndications and Contraindications ................................. IFC Introduction . (1)Surgical ProtocolStep 1 – Pre-Operative Planning (2)Step 2 – Acetabular Preparation (3)Step 3 – Socket Preparation (4)Step 4 – Trialing (5)Step 5 – Cement Fixation Bone Preparation (6)Step 6 – Cement Introduction (7)Step 7 – Cup Implantation (8)Step 8 – Final Step (9)Catalog InformationInstrument Listing (10)Implant Listing ............................................................... 12IndicationsThe indications for use for total hip arthroplasty include:• P ainful, disabling joint disease of the hip resulting from: degenerative arthritis, rheumatoid arthritis, post-traumatic arthritis or late stage avascular necrosis.• R evision of previous unsuccessful femoral head replacement, cup arthroplasty or other procedure.• C linical management problems where arthrodesis or alternative reconstructive techniques are less likely to achieve satisfactory results.• W here bone stock is of poor quality or inadequate for other reconstructive techniques, such as cementless fixation, as indicated by deficiencies of the acetabulum.The Exeter X3 RimFit Acetabular cup is intended for Cemented use only.Contraindications• A ny active or suspected latent infection in or about the hip joint.• A ny mental or neuromuscular disorder which would create an unacceptable risk of prosthesis instability, prosthesis fixation failure, or complications in postoperative care.• B one stock compromised by disease, infection or prior implantation which cannot provide adequate support and/ or fixation to the cement mantle around the prosthesis.• S keletal immaturity.• O besity. An overweight or obese patient can produce loads on the prosthesis which can lead to failure of the fixation of the device or to failure of the device itself.Warnings and PrecautionsSee implant package insert for warnings, precautions, adverse effects and other essential product information.Before using instrumentation, verify:• I nstruments have been properly disassembled prior to cleaning and sterilization• Instruments have been properly assembled post sterilization • Instruments have maintained design integrity• Proper size configuration is availableExeter X3 RimFit Acetabular CupThis publication sets forth detailed recommended procedures for using Stryker Orthopaedics devices and instruments. It offers guidance that you should heed, but, as with any such technical guide, each surgeon must consider the particular needs of each patient and make appropriate adjustments when and as required.* OD = Diameter at the top of the cement spacers12EXETER X3 RIMFIT ACETABULAR CUP SURGICAL TECHNIQUESTEP 1Pre-operative templating and X-ray evaluation using X-rays that have been suitably scaled for magnification allows the surgeon to predict the optimal size of implant for the patient’s anatomy and hip pathology.Check all instruments and implants for any damage or defects before beginning the procedure.Surgical Templates Scale 1 – 6309-4-100Scale 1.2 – 6309-4-120Figure 1Figure 234EXETER X3 RIMFIT ACETABULAR CUP SURGICAL TECHNIQUE A. Spherical ReamingTo obtain optimal component positioning in the reaming process the reamer handle should normally be at approximately 45º of abduction and 25º of anteversion (Figure 3).Medial wall osteophyte should be removed prior to concentric reaming. The aim is for the inferior edge of the cup to be positioned at the level of the transverse ligament.It is recommended that the initial reaming begin with a Reamer that is 4mm smaller than the templated or gauged size. Continue to ream up in 2mm increments (Figure 4).B. Final ReamingThe full profile of the Stryker Spherical Reamer necessitates reaming to the full depth.Care should be taken so as not to enlarge or distort the acetabulum by eccentric reaming. After final reaming to the correct depth all cartilage will have been removed and the subchondral bone may have been breached leaving cancellous bone which is an ideal surface for cement application. When the subchondral bone remains intact multiple holes should be drilled through this to allow cement interdigitation.Particular attention is paid to clear the rim of the acetabulum of cartilage and soft tissue and expose trabecular bone by drilling, since it is important to achieve interdigitation of cement with bone in this area.Figure 4Figure 5“ A fter final reaming, it is useful to leave the finalreamer in the socket in the correct orientation.The edge acts as a guide for the removal of excessosteophytes with an osteotome” (Figure 5).EXETER DESIGNER SURGEONGROUPFigure 3Contemporary Instrument Tray 6304-4-080Retractor Aspirator 6781-8-560STEP 4Following the reaming procedure, the appropriate cup trial of the same diameter as the final implant size is inserted into the reamed cavity. The appropriate diameter of cup to be inserted is normally a size 2mm less than the diameter of the last reamer used. The trial is used to assess fit, contact, and congruency of the trial with the acetabulum.After choosing the appropriate size acetabular component, the cup is mounted on the cup introducer. The flange is trimmed appropriately so that the rim of the flange lies just within the mouth of the acetabulum. Specific trimming scissors are available to cut out the flange. The flange has a line marked. This line corresponds to the diameter of the cup at the top of the cement spacers and surgeons may cut up to this line if necessary (Figure 8). A further rehearsal is made to ensure that the cup can be introduced through the soft tissues into the desired position without difficulty.TRIALINGFigure 8Inner Surface (I.D.)Chamfer Hole for Cup Introducer Posterior Wall Blowhole O.D. Reference Line Exeter X3 RimFit Trials 6304-7-XXX Trimmer Scissors 6304-4-1405Figure 9Figure 10Figure 11Acetabular6EXETER X3 RIMFIT ACETABULAR CUP SURGICAL TECHNIQUESTEP 6Cement mixing is commenced during the final bonypreparation of the acetabulum. The cement may behandled approximately 3.5 minutes after commencementof mixing (Simplex cement at 20° C.). After introductionof the cement bolus, excess material is removed so thesurface of the cement lies with a slightly concave surfacewithin the mouth of the acetabulum. This step preventsescape of surplus cement into the soft tissues when theacetabular pressurizer is used.Pressurization of the cement is carried out using adisposable acetabular pressurizer on a handle (Figure 12).Three diameters are available so that an adequateseal can always be established at the socket rim. Thepressurizing technique entails applying significant forceonto the device to drive the cement into the bone and, bymaintaining pressure, protect the bone cement interfacefrom backbleeding from the host bone. The pressurizeris applied as soon as the cement has been placed in theacetabulum and full pressure is maintained until thecement viscosity has risen to a level suitable for cupinsertion (Figure 13), usually about 5 minutes after thecommencement of mixing. In the elderly, or where a largesurface area of open trabecular bone has been exposed,a significant volume of cement is pressurized into theacetabulum and a further bolus is required on top ofthe initial cement. This will become apparent when thepressurizer is removed. If more cement is to be used, thenthe existing cement should be clean and dry before it isapplied.Figure 12Figure 13Acetabular CementPressurizer HandleStraight-0935-0-001Curved-0935-0-002AcetabularCement Seal0935-0-0XX7Posterior WallLateral Cup Cup Pusher Straight – 6304-4-110 Curved – 6304-4-120Figure 14Figure 178EXETER X3 RIMFIT ACETABULAR CUP SURGICAL TECHNIQUESTEP 8Clear any excess cement with a small curette (Figure 18).The post-operative radiograph should show good cementpenetration and no radiolucent lines in any zone. TheX-ray wire will allow the surgeon to see the correctposition of the cup (Figure 19).Figure 18Figure 1991 10EXETER X3 RIMFIT ACETABULAR CUP SURGICAL TECHNIQUEINSTRUMENT LISTINGAcetabular Step DrillØ 9mm 6781-8-750Trimming Scissors6304-4-140Lateral Cup IntroducerFor cup O.D. 40/42 6304-4-022For cup I.D. 36/40 6304-4-024For other cups 6304-4-060Cup Pusher Straight6304-4-110Cup Pusher Curved6304-4-120Heads for Cup PusherØ 22.2mm 6304-4-122Ø 28mm 6304-4-128Ø 32mm 6304-4-132Ø 36mm 6304-4-136Ø 40mm 6304-4-240Straight Handle (for acetabular cement pressurization)0935-0-001Curved Handle (for acetabular cement pressurization)0935-0-002Acetabular Cement Seal (5 pack)Ø 54mm 0935-0-054Ø 60mm 0935-0-060Ø 66mm 0935-0-06611。


骨科常用理疗仪器一、理疗仪器简介理疗仪器是指利用物理因子对人体进行治疗的仪器设备。
常见的物理因子包括电、光、热、声、磁等,通过这些物理因子的作用,可以改善局部血液循环,缓解疼痛,促进炎症消散,加速组织的修复和再生。
骨科常用理疗仪器主要针对骨骼、肌肉和关节等疾病进行治疗。
二、骨科理疗仪器种类骨科理疗仪器主要包括电疗、光疗、热疗、磁疗和超声波治疗等仪器。
这些仪器根据其工作原理和应用范围,可以分为不同的类型。
以下是一些常见的骨科理疗仪器种类:1.电疗仪器:包括低频电疗仪、中频电疗仪和高频电疗仪等。
它们通过电流刺激肌肉和神经,促进血液循环和肌肉松弛,缓解疼痛。
2.光疗仪器:包括红外线治疗仪、紫外线治疗仪和激光治疗仪等。
它们利用不同波长的光线对皮肤和皮下组织产生热效应、光化学效应或光生物效应,促进局部血液循环和新陈代谢,缓解疼痛和消炎。
3.热疗仪器:包括热敷、热包、石蜡疗法等。
它们通过加热方式促进局部血液循环,缓解肌肉紧张和疼痛。
4.磁疗仪器:利用磁场对人体的作用,促进血液循环和淋巴循环,缓解疼痛和消炎。
5.超声波治疗仪:利用超声波的机械效应和热效应,对局部组织产生刺激和按摩作用,促进血液循环和新陈代谢,缓解疼痛。
三、骨科理疗仪器原理及应用范围骨科理疗仪器的作用原理主要是利用物理因子对人体的作用,缓解疼痛、促进炎症消散和加速组织的修复与再生。
不同类型的理疗仪器有不同的应用范围,适用于不同的病症。
例如:1.电疗仪器主要应用于治疗肌肉疼痛、关节僵硬、神经损伤等病症,可以促进血液循环和肌肉松弛。
2.光疗仪器中的红外线治疗仪主要用于缓解肌肉疼痛和僵硬,促进血液循环;紫外线治疗仪则常用于治疗银屑病、白癜风等皮肤病,以及促进伤口愈合;而激光治疗仪则广泛应用于治疗各种疼痛、炎症和皮肤疾病等。
3.热疗仪器主要应用于缓解肌肉疼痛和紧张,促进血液循环。
4.磁疗仪器能够促进血液循环和淋巴循环,缓解肌肉疲劳和疼痛。
5.超声波治疗仪则常用于缓解关节疼痛和僵硬,促进炎症消散和组织的修复与再生。
骨伤科护理操作流程(一)颈椎牵引注意事项:1、牵引后您如果出现青紫、肿胀、发冷、麻木、疼痛等感觉,应及时报告医护人员。
2、为了保持反牵引,床尾应抬高,一般皮肤牵引抬高10~15cm,骨牵引抬高20~25cm,而颅骨牵引则抬高床头。
3、每5—10分钟巡视病人一次,注意观察病情,如面色、呼吸、有无胸痛等不适,发现异常及时调节或终止牵引。
4、牵引后不要机械复位,以免增加病人疼痛。
5、为避免牵引治疗后疼痛,首次牵引治疗的牵引力量不应超过病人的1/2体重,随后的牵引力量可根据治疗目的和病人的反应渐增。
时间以30分钟为宜。
6、牵引治疗结束后,在病人起床前,应锁定牵引床的滑动分离部分,并对病人牵引后的症状、运动功能进行评价,记录症状和运动范围的变化情况。
(三)中药外洗注意事项:1、冬季应保暧,暴露部位尽量加盖衣被。
2、熏洗药温一般为50—70℃,不宜过热。
以防烫伤。
3、在伤口部位进行熏洗时,按无菌技术操作进行。
4、包扎部位熏洗时,应揭去敷料。
薰洗完毕后,更换消毒敷料。
(四)翻身注意事项:1、动作应轻柔,扶托好肢体,勿损伤病人。
2、翻身后注意病人体位是否舒适,各固定垫有无放正确位罨。
3、注意保持各管道固定通畅,勿压迫扭曲。
4、注意病人的安全和保暖。
(五)下肢功能锻炼仪(CPM)1、初次开始进行治疗时选择的角度宜小,速度宜慢。
2、膝关节角度活动范围一般不超过120度,髋关节不超过120度,关节不超过60度。
3、每5一10分钟巡视一次,耐心听取病人主诉,疼痛较剧烈时应暂停治疗。
4、每次治疗时先按上一次锻炼的角度来回2--3次,如无不适方可按新的角度进行锻炼。
(六)布朗氏架的制作和使用注意事项:1、布朗氏架的松紧以患肢放在架上无明显的凹陷为宜。
不宣过紧或过松。
2、有伤口的肢体,架上应先垫上治疗巾,防止污染。
3、下壁骨折的病人,如肢体肿胀厉害,应多采用布朗氏架抬高。
4、使用时注意病人体位,勿使病人下滑,防止布朗氏架压迫大腿根部或会阴部。
骨科设备仪器培训计划一、培训目的骨科设备仪器是骨科手术的重要工具,其正确使用和维护对手术操作的顺利进行及手术效果的提高至关重要。
为了提升医护人员对骨科设备仪器的了解和运用能力,特制定骨科设备仪器培训计划,旨在提高医护人员的工作效率和手术质量。
二、培训对象本培训计划面向骨科医生、护士、器械护士等相关专业人员,特别是初次接触骨科设备仪器的医护人员和需要提高技术水平的参训人员。
三、培训内容本培训计划主要内容包括以下几个方面:1. 骨科设备仪器基础知识(1)骨科设备仪器的分类及功能(2)常用骨科设备仪器的使用方法(3)骨科设备仪器的维护和保养2. 骨科手术操作规范(1)骨科手术操作流程(2)骨科手术仪器的使用技巧(3)骨科手术中常见问题的解决方法3. 骨科设备仪器的应用(1)骨科设备仪器在各类手术中的应用(2)骨科设备仪器在手术中的注意事项(3)骨科设备仪器在手术中的配合和协调4. 实际操作演练(1)使用各类骨科设备仪器的实际操作演练(2)执拗使用骨科设备仪器的技术培训(3)骨科设备仪器的维护和保养操作演练四、培训方式1. 理论授课通过专业讲师的讲解,向参训人员传授骨科设备仪器的基础知识、操作规范和应用技巧。
2. 实践操作在专业的骨科手术室内,安排参训人员进行骨科设备仪器的实际操作演练,帮助他们熟悉各类仪器的使用方法和技术要求。
3. 实际案例分析结合真实的骨科手术案例,分析手术中遇到的各种问题,并探讨解决方法,以提高参训人员在手术中的判断和处理能力。
五、培训时间本培训计划将分为两个阶段进行,第一阶段为理论学习和实践操作,预计为两个星期,第二阶段为实际案例分析和综合评估,预计为一个星期。
六、培训考核参训人员将通过理论考试、实际操作考核和综合评估等方式进行培训考核,通过考核并获得结训证书的参训人员方可参与骨科手术操作。
七、培训后续为了帮助参训人员更好地应用培训所得知识,将安排专业人员进行跟踪指导和辅导,提供指导意见和技术支持,确保参训人员的工作效率和手术质量。