centos6.5+mhvtl+gui+iscsi-tgt虚拟磁带库的安装与应用
- 格式:doc
- 大小:216.00 KB
- 文档页数:18

CentOS6.5系统下安装和配置NFS服务CentOS 6.3下安裝配置NFS4服務安装 NFS 服务器所需的软件包:# yum install nfs-utils這會將所需要的關聯軟件包一並安裝完成。
注意,NFS4不同於NFS3,不再需要安裝portmap,網上很多文章都還寫著要安裝portmap,完全是瞎扯蛋。
配置 NFS 共享編輯/etc/exports文件,此文件初始狀態下什麼內容都沒有,自己加吧。
# vi /etc/exports/home/exp 192.168.0.10(rw,sync,fsid=0) 192.168.0.11(rw,sync,fsid=0)192.168.0.10 和192.168.0.11兩台機器可以掛載NFS服務器上的/home/exp目錄到自己的文件系統中。
rw表示可讀可寫;sync表示同步寫內存和磁盤,fsid=0表示將/home/exp這個導出文件夾包裝成起始根目錄。
啟動nfs服務:先開啟rpcbind和nfs隨機自啟動:#chkconfig rpcbind on# chkconfig nfs on然後分別啟動rpcbind和nfs服務:#service rpcbind start#service nfs start確認nfs服務啟動成功:# rpcinfo -pprogram vers proto port100000 2 tcp 111 portmapper100000 2 udp 111 portmapper100003 2 udp 2049 nfs100003 3 udp 2049 nfs100003 4 udp 2049 nfs...100005 3 tcp 750 mountd检查 NFS 服务器是否输出我们想共享的目录 /home/exp:# exportfs/home/exp 192.168.0.10/home/exp 192.168.0.11NFSv4已經不使用portmap了,而是rpcbind,這一點要注意。

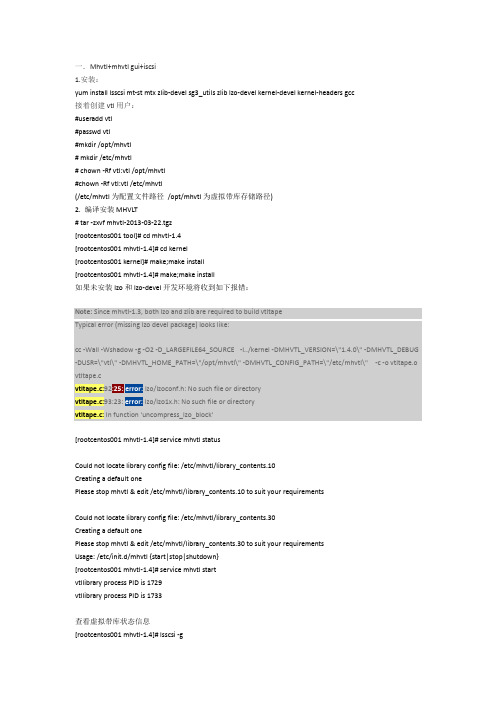
一.Mhvtl+mhvtl gui+iscsi1.安装:yum install lsscsi mt-st mtx zlib-devel sg3_utils zlib lzo-devel kernel-devel kernel-headers gcc接着创建vtl用户:#useradd vtl#passwd vtl#mkdir /opt/mhvtl# mkdir /etc/mhvtl# chown -Rf vtl:vtl /opt/mhvtl#chown -Rf vtl:vtl /etc/mhvtl(/etc/mhvtl为配置文件路径/opt/mhvtl为虚拟带库存储路径)2. 编译安装 MHVLT# tar -zxvf mhvtl-2013-03-22.tgz[rootcentos001 tool]# cd mhvtl-1.4[rootcentos001 mhvtl-1.4]# cd kernel[rootcentos001 kernel]# make;make install[rootcentos001 mhvtl-1.4]# make;make install如果未安装lzo和lzo-devel开发环境将收到如下报错:Note: Since mhvtl-1.3, both lzo and zlib are required to build vtltapeTypical error (missing lzo devel package) looks like:cc -Wall -Wshadow -g -O2 -D_LARGEFILE64_SOURCE -I../kernel -DMHVTL_VERSION=\"1.4.0\" -DMHVTL_DEBUG -DUSR=\"vtl\" -DMHVTL_HOME_PATH=\"/opt/mhvtl\" -DMHVTL_CONFIG_PATH=\"/etc/mhvtl\" -c -o vtltape.o vtltape.cvtltape.c:92 lzo/lzoconf.h: No such file or directoryvtltape.c:93:23: lzo/lzo1x.h: No such file or directoryvtltape.c: In function 'uncompress_lzo_block'[rootcentos001 mhvtl-1.4]# service mhvtl statusCould not locate library config file: /etc/mhvtl/library_contents.10Creating a default onePlease stop mhvtl & edit /etc/mhvtl/library_contents.10 to suit your requirementsCould not locate library config file: /etc/mhvtl/library_contents.30Creating a default onePlease stop mhvtl & edit /etc/mhvtl/library_contents.30 to suit your requirementsUsage: /etc/init.d/mhvtl {start|stop|shutdown}[rootcentos001 mhvtl-1.4]# service mhvtl startvtllibrary process PID is 1729vtllibrary process PID is 1733查看虚拟带库状态信息[rootcentos001 mhvtl-1.4]# lsscsi -g[1:0:0:0] cd/dvd NECVMWar VMware IDE CDR10 1.00 /dev/sr0 /dev/sg0 [2:0:0:0] disk VMware, VMware Virtual S 1.0 /dev/sda /dev/sg1 [3:0:0:0] mediumx STK L700 0104 /dev/sch0 /dev/sg10 [3:0:1:0] tape IBM ULT3580-TD5 0104 /dev/st0 /dev/sg2 [3:0:2:0] tape IBM ULT3580-TD5 0104 /dev/st1 /dev/sg3 [3:0:3:0] tape IBM ULT3580-TD4 0104 /dev/st2 /dev/sg4 [3:0:4:0] tape IBM ULT3580-TD4 0104 /dev/st3 /dev/sg5 [3:0:8:0] mediumx STK L80 0104 /dev/sch1 /dev/sg11 [3:0:9:0] tape STK T10000B 0104 /dev/st4 /dev/sg6 [3:0:10:0] tape STK T10000B 0104 /dev/st5 /dev/sg7 [3:0:11:0] tape STK T10000B 0104 /dev/st6 /dev/sg8 [3:0:12:0] tape STK T10000B 0104 /dev/st7 /dev/sg9 [rootcentos001 mhvtl-1.4]# lsscsi -l[1:0:0:0] cd/dvd NECVMWar VMware IDE CDR10 1.00 /dev/sr0state=running queue_depth=1 scsi_level=6 type=5 device_blocked=0 timeout=30 [2:0:0:0] disk VMware, VMware Virtual S 1.0 /dev/sdastate=running queue_depth=32 scsi_level=3 type=0 device_blocked=0 timeout=30 [3:0:0:0] mediumx STK L700 0104 /dev/sch0state=running queue_depth=32 scsi_level=6 type=8 device_blocked=0 timeout=0 [3:0:1:0] tape IBM ULT3580-TD5 0104 /dev/st0state=running queue_depth=32 scsi_level=6 type=1 device_blocked=0 timeout=900 [3:0:2:0] tape IBM ULT3580-TD5 0104 /dev/st1state=running queue_depth=32 scsi_level=6 type=1 device_blocked=0 timeout=900 [3:0:3:0] tape IBM ULT3580-TD4 0104 /dev/st2state=running queue_depth=32 scsi_level=6 type=1 device_blocked=0 timeout=900 [3:0:4:0] tape IBM ULT3580-TD4 0104 /dev/st3state=running queue_depth=32 scsi_level=6 type=1 device_blocked=0 timeout=900 [3:0:8:0] mediumx STK L80 0104 /dev/sch1state=running queue_depth=32 scsi_level=6 type=8 device_blocked=0 timeout=0 [3:0:9:0] tape STK T10000B 0104 /dev/st4state=running queue_depth=32 scsi_level=0 type=1 device_blocked=0 timeout=900 [3:0:10:0] tape STK T10000B 0104 /dev/st5state=running queue_depth=32 scsi_level=0 type=1 device_blocked=0 timeout=900 [3:0:11:0] tape STK T10000B 0104 /dev/st6state=running queue_depth=32 scsi_level=0 type=1 device_blocked=0 timeout=900 [3:0:12:0] tape STK T10000B 0104 /dev/st7state=running queue_depth=32 scsi_level=0 type=1 device_blocked=0 timeout=900 这里的/dev/sg10和/dev/sg11是机械手。

VirtualBox-4.3.12-93733-Win + CentOS-6.5-i386-bin-DVD1+Red Hat (32 bit)什么是Virtualbox?VirtualBox 是一款开源虚拟机软件(注:跟vmware差不多)。
VirtualBox 是由德国Innotek 公司开发,由Sun Microsystems公司出品的软件,使用Qt编写,在Sun 被Oracle 收购后正式更名成Oracle VM VirtualBox。
Innotek 以GNU General Public License (GPL) 释出VirtualBox,并提供二进制版本及OSE 版本的代码。
使用者可以在VirtualBox上安装并且执行Solaris、Windows、DOS、Linux、OS/2 Warp、BSD等系统作为客户端操作系统。
这里我使用Virtualbox虚拟机最新版本(以下简称VBOX,版本号4.3.12)。
什么是CentOS?CentOS(Community Enterprise Operating System,中文意思是:社区企业操作系统)是Linux发行版之一,它是来自于Red Hat Enterprise Linux依照开放源代码规定释出的源代码所编译而成。
由于出自同样的源代码,因此有些要求高度稳定性的服务器以CentOS替代商业版的Red Hat Enterprise Linux使用。
两者的不同,在于CentOS并不包含封闭源代码软件。
CentOS6.5是2013-12-01发行的。
1、首先下载VBox并且安装VBox官网:https:///VBox 的安装比较简单,根据提示下一步就行。
2、打开VBox,并且创建CentOS 6.5 64位环境。
a)新建虚拟机环境,由于VBox环境没有CentOS的选项,所以可以选择Red Hat Linux(32Bit)b )动态分配硬盘大小所以你可以选择大一点的硬盘空间(不用的话不会占用的,但是C 盘性能上没固定的好)创建完成!3、下载CentOS 6.5系统CentOS系统官网:4、安装CentOSa)在VBOX主界面,选择刚刚新建的CentOS65,点击启动。

CentOS 6.5 安装说明书CenOS 6.5系统安装1.系统版本:CentOS release 6.5 (Final) 64位2.选择“Install system with basic video driver”,点击Enter。
如图:3.选择“Skip”,跳过检查。
按“Tab”键,可以在“Ok”“Skip”之间切换。
点击Enter。
如图4.点击“next”。
如图:5.选择简体中文,点击“Next”。
如图:6.选择“美国英语”,点击“下一步”。
如图:7.选择“基础存储设备”,点击“下一步”。
如图:8.选择“是忽略所有数据”,点击“下一步”,如图:9.输入主机名,例如“Hadoop1”,点击“下一步”,如图注意:在大数据集群中,要把其中一台主机名命名为master,其他机器主机名命名为slave1、slave2、、、10.选择时区,点击“下一步”,如图11.输入根账号密码,点击“下一步”,如图12.如出现下图,请根据提示选择,如图13.选择“创建自定义布局”,点击“下一步”,如图。
14.以下是创建分区。
sda为硬盘名称。
如果系统自动对硬盘进行了分区、布局,请先删除,然后按照以下流程重新创建。
创建/boot分区,大小为200M。
创建swap分区,配置为2048M即可。
创建/分区,把系统磁盘剩余空间全部分给/ 分区。
15.分完区之后点击下一步:会有下面提示,点击格式化,然后点击下一步。
点击“将修改写入磁盘”,格式化完成后点击“下一步”。
16.请确保“引导装载程序”安装在正确的硬盘上。
点击“更换设备”可以选择“引导装载程序”的安装位置。
如下图:图表 1修改步骤:点击“更换设备”后,刚开始看到的或许是这样,请选择“主引导记录(MBR)”:进入“BIOS驱动器顺序”,第一BIOS驱动器选择硬盘这时“主引导记录MBR”变成了下面:点击确定“更换设备”完成。
17.选择“现在自定义”,点击“下一步”。
18.左栏里有“Web服务”,“可扩展文件系统支持”,“基本系统”,“应用程序”,“开发”,“弹性存储”,“数据库”,“服务器”,“桌面”,“系统管理”,“虚拟化”,“语言支持”,“负载平衡器”,“高可用性”14个选项,请按照以下进行选择:(1)“Web服务”,“可扩展文件系统支持”,“基本系统”,“应用程序”,“开发”,“弹性存储”,“服务器”,“桌面”,“系统管理”,“虚拟化”,“负载平衡器”,“高可用性”这几项,分别在其对应的右栏里面的每一项右键点击“选择所有的可选软件包”。

CentOS6.5的安装详解(图⽂详解)第⼀步点击"Install or upgrade an existing system"
第⼆步磁盘硬件检测界⾯,⼀般都正常,不需检测,选择"skip",没必要在这⼀步浪费⼏分钟时间
第三步发现当地安装媒介界⾯,Enter
第四步进⼊CentOS6.5引导界⾯,点击“Next”
第五步安装语⾔选择界⾯,最好是选择"English(English)",点击“Next”。
当然你也可以选择中⽂,但是,博主我,强烈建议你选英⽂,既然你搞⼤数据,就要顺应⼤众
第六步键盘语⾔选择界⾯,选择“U.S English”,点击“Next”
第七步安装哪种设备类型选择界⾯,选择“Basic Storage Devices”,点击“Next”
第⼋步存储设备警告界⾯,选择“Yes,discard any data”,点击"Next"。
这个好⽐我们在安装windows⼀样,安装系统把C盘给格式化。
第九步
第⼗步选择对应的时区,这⾥我们选择上海,系统时间选择UTC
第⼗⼀步输⼊root密码,两次⼀样,然后next下⼀步
第⼗⼆步选择创建⾃定义布局,你也可以使⽤所有空间,这个看需求
然后创建分区
再建⽴⼀个swap分区,建议⼤⼩是你主机内存1.5倍,然后OK,next
最后建⽴根分区 / 使⽤磁盘剩余所有空间
分区完毕后,检查看下是否按我们的要求分配,选择next
将要对分区进⾏格式化操作,选择格式化
警告我们所有数据将会丢失,选择将改写写⼊磁盘
开始安装系统
最后,系统安装结束,reboot重启,登录系统。

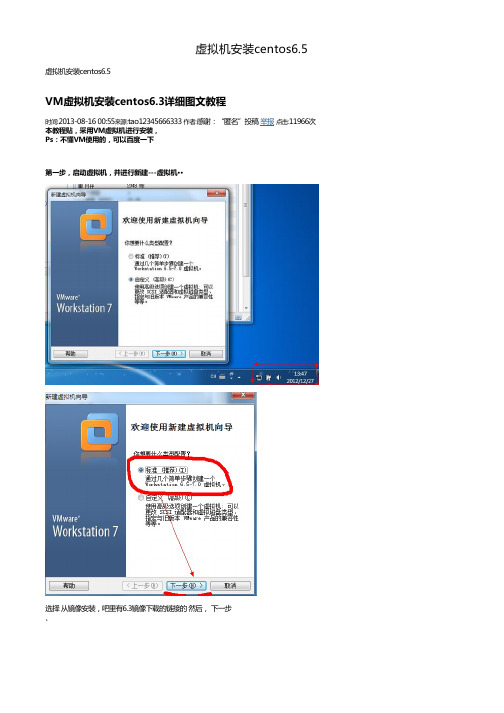
选择 从镜像安装,吧里有6.3镜像下载的链接的 然后, 下一步、
选择客户机版本然后下一步
命名以及更改客户机占用空间的位置,建议是更改至空间较大的位置
设置分配空间的大小
如果对客户机硬件有需求的,可以进行定制硬件,如果没有,可以直接下一步
开始安装centos,以及对客户机的设置。
依照个人需要设置,注意,将光驱中载入下载好的光盘镜像
开始安装
选择跳过检测
选择下一步
为你的客户机命名
设置root密码···
点击下一步····然后选择自定义布局
现在开始创建分区
这里要注意,分区的规划。
例如,我这里有10G,然后我/分6G swap 分2G(因为内存在2G以下就选择内存的2倍,如果在2G就2G 吧)。
我这里再专门分一个区/data 用来存放数据
直接下一步
如果是新手初次使用,建议使用Desktop .如果是做服务器,建议是Minimal (最小)。
我以Desk 为例
接下来就是一段时间的等待
安装完成之后,重新引导。
CentOS6.5下载和安装详细步骤1、软件下载1.1.软件获取登录官网https:///download/建议复制网址通过迅雷客户端下载,网页下载速度较慢1.2.软件下载2、CentOS6.5安装2.1 查看配置创建虚拟机前,检查【管理】-【全局设定】:1. 编辑-首选项-工作区-虚拟机的默认位置:指向空间充足的磁盘分区下专用目录2. 编辑-虚拟网络编辑器-仅主机网卡VMnet1 设置配置仅主机网卡VMnet1 对应192.168.235.0/255.255.255.0 此时默认会给宿主机windows 系统分配IP:192.168.235.1/255.255.255.02.2 新建虚拟机mysql22.2.1 Oracle Linux 64 位2.2.2 磁盘大小50G2.2.3 自定义硬件2.2.4 内存2G2.2.5 处理器数量12.2.6 使用ISO 映像文件2.2.7 网络适配器-VMnet1(仅主机模式)2.2.8 完成2.2.9 描述os:centos6.5 x86_64 ip:192.168.235.101 hostname:mysql2 root/mysql2:mysql22.3 启动虚拟机安装2.3.1 启动虚拟机2.3.2 默认第一项按回车进入图形化安装界面2.3.3 Skip 跳过安装介质检测2.3.4 OK2.3.5 Next2.3.6 安装语言默认English2.3.7 键盘布局默认U.S.English2.3.8 默认第一项基本存储设备Next2.3.9 Yes,discard any data丢弃数据2.3.10配置网络主机名:mysql2默认是DHCP 修改手动设置Manual 配置静态ip Applyclose -Next2.3.11选择Asia/ShanghaiUTC:linux 下特种表示时间的方法,系统中两种时间: 一种是BIOS clock,格林威治时间GMT,时间偏移量0,即bios 中是英国伦敦时间。
图解CentOS6.5桌面版安装来自Vic___:/vic___CentOS 6.5 新版本发布随着RHEL 6.5新版本的发布,CentOS 6.5在12月1号准时跟上。
现在是时间来玩弄它了。
如果想要从已经安装好的6.4系统升级到6.5,只要简单的使用 yum update 命令,然后就是见证奇迹的时刻。
CentOS 6.5 迎来了新的更新包和新功能。
可以在release notes 中查看更多细节信息。
主要更新•精密时间协议 - 以前仅是一个科技预览版 - 现在已经完整支持了!以下设备支持网络时间戳:bnx2x,tg3 , e1000e , igb , ixgbe ,sfc。
•OpenSSL 升级到1.0.1版本•OpenSSL、NSS支持TLS1.1和1.2•KVM得到大量加强。
包括提升对VMDK文件和VHDX文件的只读,CPU支持热插拔以及升级了 virt-v2v-/virt-p2v-conversion 工具•Hyper-V 和 VMware 驱动升级•升级到 Evolution(2.32)和 Libre Office(4.0.4)下载这篇教程我们将要安装它的桌面版。
你可以从下面的任意一个url 开始选择你的机器制式,它会列出一张镜像表。
进入任何一个镜像、得到种子文件下载或者直接下载iso链接。
有许多选择下载方式可以选择,比如,LiveCD, LiveDVD, Dvd1+2双碟套装, Minimal最小化安装和 Netinstall.Minimal最小化安装是一个基于文字界面的安装程序,这样安装的CentOS将只有shell和最少软件应用程序。
剩余的所有东西不得不你自己通过yum安装。
LiveCD/LiveDVD提供桌面版和GUI安装程序,可以安装CentOS 系统但是不提供任何可选择的软件包。
DvD1+2双碟套装给有需求的人提供完整的应用程序集合netinstall 事实上会先下载安装镜像然后再安装这篇文章我们将使用LiveCD。
MHVTL虚拟磁带库安装解读mhvtl.docx1.在安装mhvtl之前,先安装如下软件包:2.接着创建vtl用户:3.解压mhvtl-2010-09-01.tgz软件包:4.编译mhvtl:5.安装完成后启动mhvtl:# /etc/init.d/mhvtl start6.如果没有配置文件,会生成默认的配置。
用lsscsi –g查看:这里的/dev/sg10和/dev/sg11是机械手。
这个默认的容量是500MB,这个可以查看mhvtl的配置文件mhvtl.conf:# cat /etc/mhvtl/mhvtl.confcapacity=500就是指默认容量为500MB。
7.简单应用:查看机械手状态:将磁带从1号槽位装入driver 0:# mtx -f /dev/sg10 load 1 0# mtx -f /dev/sg10 status查看磁带状态:# mt –f /dev/st0 status使用tar命令测试下,能否写入文件:# tar -cvvf /dev/st4 /boot写入成功了,测试是否能读取呢:# tar -tvvf /dev/st4OK,读取成功。
接下来测试倒带:#mt -f /dev/st4 rewind卸载磁带:#mtx -f /dev/sg10 unload 1 0OK,卸载成功。
8.自定义磁带库和drive的品牌或者型号,修改虚拟磁带库的/etc/mhvtl/device.conf文件vi /etc/mhvtl/device.confmhvtl 默认定义的磁带库和drive自定义的磁带库和drivemhvtl GUI安装1.安装Apache和Apache所需要的一些依赖包yum –y install curl curl-devel zlib-devel openssl-devel perl cpio expat-devel gettext-devel安装phpyum –y install httpd php-commom php-devel php-gd php-mcrypt php-mbstring php-pear php-bcmath php-dba php-mhash php-mysql php-mx2.下载mhvtl GUI安装,并进行安装3.解压安装niadev67-mhvtl-gui-1.5.0-5-g6d4187f.tar.gz,将mhvtl-gui程序拷贝到/var/www/html/mhvtl4.检查/var/www/html/mhvtl文件夹内的内容root@localhost mhvtl#ls5.修改/etc/httpd/conf/httpd.conf文件,在文件最后面添加以下内容Alias /mhvtl "/var/www/html/mhvtl"<Directory "/var/www/html/mhvtl">Options NoneAllowOverride NoneOrder allow,denyAllow from all</Directory>6.修改/etc/sudoer文件chmod 777 /etc/sudoervi /etc/sudoer7.修改/etc/sudoer文件的权限,改回440,要不然不能正常访问,重启Apache服务chmod 440 /etc/sudoersudoer service httpd start8.通过浏览器访问mhvtl GUI访问地址为:http://mhvtl server ip/mhvtl,登录的密码为:mhvtlhttp://192.168.0.1/mhvtl虚拟磁带库和drive的共享如果我想将linux mhvtl虚拟带库共享出去,给windows。
VMware12下安装centos6.5详细教程前言:很多童鞋想学习以下Linux系统的操作,但又不想安装Linux系统(操作不习惯),这时就可以考虑将系统装在虚拟上,既不影响主系统的使用,又可以方便地进行Linux系统的学习和测试。
本教程就带大家熟悉一下在VMware上安装CentOS6.5的操作,虚拟机选择VMware是因为它是比较常用的主流虚拟机,使用也比较方便,其他的像Virtual Box自然也是可以的,具体看个人使用习惯;至于Linux系统选择CentOS,一方面是因为CentOS商用比较多,学习比较贴近实际,另一方面选择6.5版本也是因为市场上比较主流,所以学习比较有实用性。
关于教程,我尽量想写的稍微详细一点,对完全的小白比较友好一点,但对于已有经验的人可能稍显哆嗦,大家可以根据自己的情况有选择地参考,有些细节方面限于篇幅和主题,也没有展开说明,有需要的可以自行去了解和补充,如有错误和不足希望大家多多指正,那么简单介绍完就开始一起学习吧!步骤1、工具准备物理计算机一台配置要求:操作系统:win7/win8/10-64位硬盘建议可用容量10G+内存建议4G+虚拟机安装包产品:VMware® Workstation 12 Pro版本:12.5.7 build-5813279大小:404MB●安装包获取:这里就不介绍了,网上一搜一大把,找不到的自己去撞棉花吧。
注:这里不一定要用12版本的,10和11版本的都可以用。
Centos6.5系统镜像产品:CentOS6.5版本:CentOS-6.5-x86_64.iso大小:4.2GB●镜像获取:建议从官网下载,比较安全,当然其它一些第三方网站也可以官网为英文,有些童鞋可能不太熟悉,这里介绍一下官网下载流程:①.首先进入CentOS官方网站https://,首页如下:②.点击页面中的”Get CentOS Now”按钮获取CentOS,进入下载页面,主界面上有三个不同的镜像文件类型的CentOS,分别为DVD ISO、Everything ISO、Minimal ISO,如下图所示:下面简单介绍一下这三种类型镜像文件的区别:DVD ISO:此镜像类型为普通光盘安装版,可离线安装到计算机硬盘上,包含大量的常用软件,一般选择这种镜像类型即可。
一.Mhvtl+mhvtl gui+iscsi1.安装:yum install lsscsi mt-st mtx zlib-devel sg3_utils zlib lzo-devel kernel-devel kernel-headers gcc接着创建vtl用户:#useradd vtl#passwd vtl#mkdir /opt/mhvtl# mkdir /etc/mhvtl# chown -Rf vtl:vtl /opt/mhvtl#chown -Rf vtl:vtl /etc/mhvtl(/etc/mhvtl为配置文件路径/opt/mhvtl为虚拟带库存储路径)2. 编译安装 MHVLT# tar -zxvf mhvtl-2013-03-22.tgz[rootcentos001 tool]# cd mhvtl-1.4[rootcentos001 mhvtl-1.4]# cd kernel[rootcentos001 kernel]# make;make install[rootcentos001 mhvtl-1.4]# make;make install如果未安装lzo和lzo-devel开发环境将收到如下报错:Note: Since mhvtl-1.3, both lzo and zlib are required to build vtltapeTypical error (missing lzo devel package) looks like:cc -Wall -Wshadow -g -O2 -D_LARGEFILE64_SOURCE -I../kernel -DMHVTL_VERSION=\"1.4.0\" -DMHVTL_DEBUG -DUSR=\"vtl\" -DMHVTL_HOME_PATH=\"/opt/mhvtl\" -DMHVTL_CONFIG_PATH=\"/etc/mhvtl\" -c -o vtltape.o vtltape.cvtltape.c:92 lzo/lzoconf.h: No such file or directoryvtltape.c:93:23: lzo/lzo1x.h: No such file or directoryvtltape.c: In function 'uncompress_lzo_block'[rootcentos001 mhvtl-1.4]# service mhvtl statusCould not locate library config file: /etc/mhvtl/library_contents.10Creating a default onePlease stop mhvtl & edit /etc/mhvtl/library_contents.10 to suit your requirementsCould not locate library config file: /etc/mhvtl/library_contents.30Creating a default onePlease stop mhvtl & edit /etc/mhvtl/library_contents.30 to suit your requirementsUsage: /etc/init.d/mhvtl {start|stop|shutdown}[rootcentos001 mhvtl-1.4]# service mhvtl startvtllibrary process PID is 1729vtllibrary process PID is 1733查看虚拟带库状态信息[rootcentos001 mhvtl-1.4]# lsscsi -g[1:0:0:0] cd/dvd NECVMWar VMware IDE CDR10 1.00 /dev/sr0 /dev/sg0 [2:0:0:0] disk VMware, VMware Virtual S 1.0 /dev/sda /dev/sg1 [3:0:0:0] mediumx STK L700 0104 /dev/sch0 /dev/sg10 [3:0:1:0] tape IBM ULT3580-TD5 0104 /dev/st0 /dev/sg2 [3:0:2:0] tape IBM ULT3580-TD5 0104 /dev/st1 /dev/sg3 [3:0:3:0] tape IBM ULT3580-TD4 0104 /dev/st2 /dev/sg4 [3:0:4:0] tape IBM ULT3580-TD4 0104 /dev/st3 /dev/sg5 [3:0:8:0] mediumx STK L80 0104 /dev/sch1 /dev/sg11 [3:0:9:0] tape STK T10000B 0104 /dev/st4 /dev/sg6 [3:0:10:0] tape STK T10000B 0104 /dev/st5 /dev/sg7 [3:0:11:0] tape STK T10000B 0104 /dev/st6 /dev/sg8 [3:0:12:0] tape STK T10000B 0104 /dev/st7 /dev/sg9 [rootcentos001 mhvtl-1.4]# lsscsi -l[1:0:0:0] cd/dvd NECVMWar VMware IDE CDR10 1.00 /dev/sr0state=running queue_depth=1 scsi_level=6 type=5 device_blocked=0 timeout=30 [2:0:0:0] disk VMware, VMware Virtual S 1.0 /dev/sdastate=running queue_depth=32 scsi_level=3 type=0 device_blocked=0 timeout=30 [3:0:0:0] mediumx STK L700 0104 /dev/sch0state=running queue_depth=32 scsi_level=6 type=8 device_blocked=0 timeout=0 [3:0:1:0] tape IBM ULT3580-TD5 0104 /dev/st0state=running queue_depth=32 scsi_level=6 type=1 device_blocked=0 timeout=900 [3:0:2:0] tape IBM ULT3580-TD5 0104 /dev/st1state=running queue_depth=32 scsi_level=6 type=1 device_blocked=0 timeout=900 [3:0:3:0] tape IBM ULT3580-TD4 0104 /dev/st2state=running queue_depth=32 scsi_level=6 type=1 device_blocked=0 timeout=900 [3:0:4:0] tape IBM ULT3580-TD4 0104 /dev/st3state=running queue_depth=32 scsi_level=6 type=1 device_blocked=0 timeout=900 [3:0:8:0] mediumx STK L80 0104 /dev/sch1state=running queue_depth=32 scsi_level=6 type=8 device_blocked=0 timeout=0 [3:0:9:0] tape STK T10000B 0104 /dev/st4state=running queue_depth=32 scsi_level=0 type=1 device_blocked=0 timeout=900 [3:0:10:0] tape STK T10000B 0104 /dev/st5state=running queue_depth=32 scsi_level=0 type=1 device_blocked=0 timeout=900 [3:0:11:0] tape STK T10000B 0104 /dev/st6state=running queue_depth=32 scsi_level=0 type=1 device_blocked=0 timeout=900 [3:0:12:0] tape STK T10000B 0104 /dev/st7state=running queue_depth=32 scsi_level=0 type=1 device_blocked=0 timeout=900 这里的/dev/sg10和/dev/sg11是机械手。
这个默认的容量是500MB,这个可以查看mhvtl的配置文件mhvtl.conf: [rootcentos001 mhvtl-1.4]# cat /etc/mhvtl/mhvtl.conf# Home directory for config file(s)MHVTL_CONFIG_PATH=/etc/mhvtl# Default media capacity (500 M)CAPACITY=500# Set default verbosity [0|1|2|3]VERBOSE=1# Set kernel module debuging [0|1]VTL_DEBUG=0capacity=500就是指默认容量为500MB。
3.简单应用:查看机械手状态:[rootcentos001 mhvtl-1.4]# mtx -f /dev/sg10 statusStorage Changer /dev/sg10:4 Drives, 43 Slots ( 4 Import/Export ) Data Transfer Element 0:EmptyData Transfer Element 1:EmptyData Transfer Element 2:EmptyData Transfer Element 3:EmptyStorage Element 1:Full :VolumeTag=E01001L4Storage Element 2:Full :VolumeTag=E01002L4Storage Element 3:Full :VolumeTag=E01003L4Storage Element 4:Full :VolumeTag=E01004L4Storage Element 5:Full :VolumeTag=E01005L4Storage Element 6:Full :VolumeTag=E01006L4Storage Element 7:Full :VolumeTag=E01007L4Storage Element 8:Full :VolumeTag=E01008L4Storage Element 9:Full :VolumeTag=E01009L4Storage Element 10:Full :VolumeTag=E01010L4Storage Element 11:Full :VolumeTag=E01011L4Storage Element 12:Full :VolumeTag=E01012L4Storage Element 13:Full :VolumeTag=E01013L4Storage Element 14:Full :VolumeTag=E01014L4Storage Element 15:Full :VolumeTag=E01015L4Storage Element 16:Full :VolumeTag=E01016L4Storage Element 17:Full :VolumeTag=E01017L4Storage Element 18:Full :VolumeTag=E01018L4Storage Element 19:Full :VolumeTag=E01019L4Storage Element 20:Full :VolumeTag=E01020L4Storage Element 21:EmptyStorage Element 22:Full :VolumeTag=CLN101L4Storage Element 23:Full :VolumeTag=CLN102L5Storage Element 24:EmptyStorage Element 25:EmptyStorage Element 26:EmptyStorage Element 27:EmptyStorage Element 28:EmptyStorage Element 29:EmptyStorage Element 30:Full :VolumeTag=F01030L5Storage Element 31:Full :VolumeTag=F01031L5Storage Element 33:Full :VolumeTag=F01033L5Storage Element 34:Full :VolumeTag=F01034L5Storage Element 35:Full :VolumeTag=F01035L5Storage Element 36:Full :VolumeTag=F01036L5Storage Element 37:Full :VolumeTag=F01037L5Storage Element 38:Full :VolumeTag=F01038L5Storage Element 39:Full :VolumeTag=F01039L5Storage Element 40 IMPORT/EXPORT:EmptyStorage Element 41 IMPORT/EXPORT:EmptyStorage Element 42 IMPORT/EXPORT:EmptyStorage Element 43 IMPORT/EXPORT:Empty [rootcentos001 mhvtl-1.4]# mtx -f /dev/sg11 statusStorage Changer /dev/sg11:4 Drives, 44 Slots ( 4 Import/Export ) Data Transfer Element 0:EmptyData Transfer Element 1:EmptyData Transfer Element 2:EmptyData Transfer Element 3:EmptyStorage Element 1:Full :VolumeTag=G03001TAStorage Element 2:Full :VolumeTag=G03002TAStorage Element 3:Full :VolumeTag=G03003TAStorage Element 4:Full :VolumeTag=G03004TAStorage Element 5:Full :VolumeTag=G03005TAStorage Element 6:Full :VolumeTag=G03006TAStorage Element 7:Full :VolumeTag=G03007TAStorage Element 8:Full :VolumeTag=G03008TAStorage Element 9:Full :VolumeTag=G03009TAStorage Element 10:Full :VolumeTag=G03010TAStorage Element 11:Full :VolumeTag=G03011TAStorage Element 12:Full :VolumeTag=G03012TAStorage Element 13:Full :VolumeTag=G03013TAStorage Element 14:Full :VolumeTag=G03014TAStorage Element 15:Full :VolumeTag=G03015TAStorage Element 16:Full :VolumeTag=G03016TAStorage Element 17:Full :VolumeTag=G03017TAStorage Element 18:Full :VolumeTag=G03018TAStorage Element 19:Full :VolumeTag=G03019TAStorage Element 20:Full :VolumeTag=G03020TAStorage Element 21:Full :VolumeTag=G03021TAStorage Element 22:Full :VolumeTag=G03022TAStorage Element 23:Full :VolumeTag=G03023TAStorage Element 24:Full :VolumeTag=G03024TAStorage Element 25:Full :VolumeTag=G03025TAStorage Element 26:Full :VolumeTag=G03026TAStorage Element 28:Full :VolumeTag=G03028TAStorage Element 29:Full :VolumeTag=G03029TAStorage Element 30:Full :VolumeTag=G03030TAStorage Element 31:Full :VolumeTag=G03031TAStorage Element 32:Full :VolumeTag=G03032TAStorage Element 33:Full :VolumeTag=G03033TAStorage Element 34:Full :VolumeTag=G03034TAStorage Element 35:Full :VolumeTag=G03035TAStorage Element 36:Full :VolumeTag=G03036TAStorage Element 37:Full :VolumeTag=G03037TAStorage Element 38:Full :VolumeTag=G03038TAStorage Element 39:Full :VolumeTag=G03039TAStorage Element 40:Full :VolumeTag=CLN303TAStorage Element 41 IMPORT/EXPORT:EmptyStorage Element 42 IMPORT/EXPORT:EmptyStorage Element 43 IMPORT/EXPORT:EmptyStorage Element 44 IMPORT/EXPORT:Empty将磁带从1号槽位装入driver 0:[rootcentos001 mhvtl-1.4]# mtx -f /dev/sg10 load 1 0sLoading media from Storage Element 1 into drive 0...done[rootcentos001 mhvtl-1.4]# mtx -f /dev/sg10 statusStorage Changer /dev/sg10:4 Drives, 43 Slots ( 4 Import/Export )Data Transfer Element 0:Full (Storage Element 1 Loaded):VolumeTag = E01001L4Data Transfer Element 1:EmptyData Transfer Element 2:EmptyData Transfer Element 3:EmptyStorage Element 1:EmptyStorage Element 2:Full :VolumeTag=E01002L4Storage Element 3:Full :VolumeTag=E01003L4查看磁带状态:[rootcentos001 mhvtl-1.4]# mt -f /dev/st0 statusSCSI 2 tape drive:File number=0, block number=0, partition=0.Tape block size 0 bytes. Density code 0x46 (LTO-4).Soft error count since last status=0General status bits on (41010000):BOT ONLINE IM_REP_EN使用tar命令测试下,能否写入文件:[rootcentos001 mhvtl-1.4]# tar -cvvf /dev/st1 /boottar: Removing leading `/' from member namesdr-xr-xr-x root/root 0 2014-09-11 16:58 /boot/-rw-r--r-- root/root 2519609 2014-07-25 17:00 /boot/System.map-2.6.32-431.20.5.el6.x86_64 drwxr-xr-x root/root 0 2013-11-13 18:04 /boot/efi/drwxr-xr-x root/root 0 2013-11-13 18:04 /boot/efi/EFI/drwxr-xr-x root/root 0 2014-07-30 14:55 /boot/efi/EFI/redhat/-rwxr-xr-x root/root 252990 2014-07-25 20:08 /boot/efi/EFI/redhat/grub.efi-rw-r--r-- root/root 105200 2014-09-10 06:02 /boot/config-2.6.32-431.29.2.el6.x86_64-rw-r--r-- root/root 193945 2014-09-10 06:02 /boot/symvers-2.6.32-431.29.2.el6.x86_64.gz drwxr-xr-x root/root 0 2014-09-10 15:45 /boot/grub/-rw-r--r-- root/root 13268 2013-11-13 18:09 /boot/grub/jfs_stage1_5-rw-r--r-- root/root 12620 2013-11-13 18:09 /boot/grub/fat_stage1_5-rw-r--r-- root/root 13380 2013-11-13 18:09 /boot/grub/e2fs_stage1_5-rw-r--r-- root/root 512 2013-11-13 18:09 /boot/grub/stage1-rw-r--r-- root/root 13964 2013-11-13 18:09 /boot/grub/xfs_stage1_5-rw-r--r-- root/root 11748 2013-11-13 18:09 /boot/grub/ffs_stage1_5-rw-r--r-- root/root 11364 2013-11-13 18:09 /boot/grub/vstafs_stage1_5-rw-r--r-- root/root 14412 2013-11-13 18:09 /boot/grub/reiserfs_stage1_5-rw-r--r-- root/root 11756 2013-11-13 18:09 /boot/grub/iso9660_stage1_5lrwxrwxrwx root/root 0 2013-11-13 18:09 /boot/grub/menu.lst -> ./grub.conf写入成功了,测试是否能读取呢:[rootcentos001 mhvtl-1.4]# tar -tvvf /dev/st1dr-xr-xr-x root/root 0 2014-09-11 16:58 boot/-rw-r--r-- root/root 2519609 2014-07-25 17:00 boot/System.map-2.6.32-431.20.5.el6.x86_64 drwxr-xr-x root/root 0 2013-11-13 18:04 boot/efi/drwxr-xr-x root/root 0 2013-11-13 18:04 boot/efi/EFI/drwxr-xr-x root/root 0 2014-07-30 14:55 boot/efi/EFI/redhat/-rwxr-xr-x root/root 252990 2014-07-25 20:08 boot/efi/EFI/redhat/grub.efi-rw-r--r-- root/root 105200 2014-09-10 06:02 boot/config-2.6.32-431.29.2.el6.x86_64-rw-r--r-- root/root 193945 2014-09-10 06:02 boot/symvers-2.6.32-431.29.2.el6.x86_64.gz查看磁带位置:[rootcentos001 mhvtl-1.4]# cd /opt/mhvtl[rootcentos001 mhvtl]# du -sm *1 CLN101L41 CLN102L51 CLN303TA1 E01001L4141 E01002L4接下来测试倒带:[rootcentos001 mhvtl-1.4]# mt -f /dev/st1 rewind[rootcentos001 mhvtl-1.4]#卸载磁带:[rootcentos001 mhvtl-1.4]# mtx -f /dev/sg10 unload 1 0Unloading drive 0 into Storage Element 1...done[rootcentos001 mhvtl-1.4]#4.配置linux iscsi发起端,使用tgtd,安装tgtd(tgtd:iscsi服务器端进程),安装iSCSI taget 安装iSCSI taget 前先安装perl-Config-General-2.52-1.el6.noarch.rpm,然后安装scsi-target-utils-1.0.24-12.el6_5.x86_64.rpm[rootcentos001 mhvtl]# yum install scsi-target-utils--> Running transaction check---> Package scsi-target-utils.x86_64 0:1.0.24-12.el6_5 will be installed--> Processing Dependency: perl(Config::General) for package: scsi-target-utils-1.0.24-12.el6_5.x86_64 --> Running transaction check---> Package perl-Config-General.noarch 0:2.52-1.el6 will be installed--> Finished Dependency ResolutionDependencies Resolved================================================================================ Package Arch Version Repository Size================================================================================ Installing:scsi-target-utils x86_64 1.0.24-12.el6_5 updates 175 kInstalling for dependencies:perl-Config-General noarch 2.52-1.el6 base 72 k Transaction Summary================================================================================ Install 2 Package(s)Total download size: 247 kInstalled size: 623 kIs this ok [y/N]: yDownloading Packages:(1/2): perl-Config-General-2.52-1.el6.noarch.rpm | 72 kB 00:00(2/2): scsi-target-utils-1.0.24-12.el6_5.x86_64.rpm | 175 kB 00:00--------------------------------------------------------------------------------Total 950 kB/s | 247 kB 00:00Running rpm_check_debugRunning Transaction TestTransaction Test SucceededRunning TransactionInstalling : perl-Config-General-2.52-1.el6.noarch 1/2Installing : scsi-target-utils-1.0.24-12.el6_5.x86_64 2/2Verifying : perl-Config-General-2.52-1.el6.noarch 1/2Verifying : scsi-target-utils-1.0.24-12.el6_5.x86_64 2/2启动tgtd服务[rootcentos001 mhvtl]# service tgtd start把带库映射给iscsi[rootcentos001 mhvtl]# lsscsi -g[1:0:0:0] cd/dvd NECVMWar VMware IDE CDR10 1.00 /dev/sr0 /dev/sg0[2:0:0:0] disk VMware, VMware Virtual S 1.0 /dev/sda /dev/sg1[3:0:0:0] mediumx STK L700 0104 /dev/sch0 /dev/sg10[3:0:1:0] tape IBM ULT3580-TD5 0104 /dev/st0 /dev/sg2[3:0:2:0] tape IBM ULT3580-TD5 0104 /dev/st1 /dev/sg3[3:0:3:0] tape IBM ULT3580-TD4 0104 /dev/st2 /dev/sg4[3:0:4:0] tape IBM ULT3580-TD4 0104 /dev/st3 /dev/sg5 [3:0:8:0] mediumx STK L80 0104 /dev/sch1 /dev/sg11 [3:0:9:0] tape STK T10000B 0104 /dev/st4 /dev/sg6 [3:0:10:0] tape STK T10000B 0104 /dev/st5 /dev/sg7 [3:0:11:0] tape STK T10000B 0104 /dev/st6 /dev/sg8 [3:0:12:0] tape STK T10000B 0104 /dev/st7 /dev/sg9 [rootcentos001 mhvtl]# vim /etc/tgt/targets.conf添加<target iqn.2014-09..example:server.targetmhvtl>backing-store /dev/sg10backing-store /dev/sg2backing-store /dev/sg3backing-store /dev/sg4backing-store /dev/sg5backing-store /dev/sg11backing-store /dev/sg6backing-store /dev/sg7backing-store /dev/sg8backing-store /dev/sg9device-type ptbs-type sg</target>initiator-address ALL[rootcentos001 mhvtl]# service tgtd restartStopping SCSI target daemon: [ OK ] Starting SCSI target daemon: [ OK ]可以查询一下映射的带库[rootcentos001 mhvtl]# tgtadm --lld iscsi --op show --mode targetTarget 1: iqn.2014-09..example:server.targetmhvtlSystem information:Driver: iscsiState: readyI_T nexus information:LUN information:LUN: 0Type: controllerSCSI ID: IET 00010000SCSI SN: beaf10Size: 0 MB, Block size: 1Online: YesRemovable media: NoPrevent removal: NoReadonly: NoBacking store type: nullBacking store flags:LUN: 1Type: passthroughSCSI ID: IET 00010001SCSI SN: beaf11Size: 0 MB, Block size: 1Online: YesRemovable media: NoPrevent removal: NoReadonly: NoBacking store type: sgBacking store path: /dev/sg10Backing store flags:LUN: 2Type: passthroughSCSI ID: IET 00010002SCSI SN: beaf12Size: 0 MB, Block size: 1Online: YesRemovable media: NoPrevent removal: NoReadonly: NoBacking store type: sgBacking store path: /dev/sg11Backing store flags:LUN: 3Type: passthroughSCSI ID: IET 00010003SCSI SN: beaf13Size: 0 MB, Block size: 1Online: YesRemovable media: NoPrevent removal: NoReadonly: NoBacking store type: sgBacking store path: /dev/sg2Backing store flags:LUN: 4Type: passthroughSCSI ID: IET 00010004SCSI SN: beaf14Size: 0 MB, Block size: 1Online: YesPrevent removal: NoReadonly: NoBacking store type: sgBacking store path: /dev/sg3Backing store flags:LUN: 5Type: passthroughSCSI ID: IET 00010005SCSI SN: beaf15Size: 0 MB, Block size: 1Online: YesRemovable media: NoPrevent removal: NoReadonly: NoBacking store type: sgBacking store path: /dev/sg4Backing store flags:LUN: 6Type: passthroughSCSI ID: IET 00010006SCSI SN: beaf16Size: 0 MB, Block size: 1Online: YesRemovable media: NoPrevent removal: NoReadonly: NoBacking store type: sgBacking store path: /dev/sg5Backing store flags:LUN: 7Type: passthroughSCSI ID: IET 00010007SCSI SN: beaf17Size: 0 MB, Block size: 1Online: YesRemovable media: NoPrevent removal: NoReadonly: NoBacking store type: sgBacking store path: /dev/sg6Backing store flags:LUN: 8Type: passthroughSCSI ID: IET 00010008SCSI SN: beaf18Size: 0 MB, Block size: 1Online: YesRemovable media: NoPrevent removal: NoReadonly: NoBacking store type: sgBacking store path: /dev/sg7Backing store flags:LUN: 9Type: passthroughSCSI ID: IET 00010009SCSI SN: beaf19Size: 0 MB, Block size: 1Online: YesRemovable media: NoPrevent removal: NoReadonly: NoBacking store type: sgBacking store path: /dev/sg8Backing store flags:LUN: 10Type: passthroughSCSI ID: IET 0001000aSCSI SN: beaf110Size: 0 MB, Block size: 1Online: YesRemovable media: NoPrevent removal: NoReadonly: NoBacking store type: sgBacking store path: /dev/sg9Backing store flags:Account information:ACL information:ALL为了方便操作和定义带库型号如果需要图形界面可以安装apache和mhvtl gui[rootcentos001 tool]# tar -zxvfniadev67-mhvtl-gui-1.5.0-5-g6d4187f.tar.gz [rootcentos001 tool]# mkdir /var//html/mhvtl[rootcentos001 niadev67-mhvtl-gui-6d4187f]# cp -af * /var//html/mhvtl 修改/etc/httpd/conf/httpd.conf文件,添加Alias /mhvtl "/var//html/mhvtl"<Directory "/var//html/mhvtl">Options NoneAllowOverride NoneOrder allow,denyAllow from all</Directory>修改/etc/sudoers文件注释#Defaults requiretty添加apache ALL=(ALL) NOPASSWD:ALL重启httpd服务[rootcentos001 etc]# service httpd restart输入地址192.168.228.146/mhvtl/,密码mhvtl如果要更改密码,可以到[rootcentos001 etc]# ls -ltr /var//html/mhvtl/go.php if ( $password == "mhvtl" ) { //Replace with your password服务器端用到的服务:service mhvtl status service tgtd status service httpd status二.客户端安装Win:安装Microsoft iSCSI Initiator安装成功后产生程序组Microsoft iSCSI Initiator, 桌面也有相应图标。