佳能iRi数码复印机佳能IA打印复印扫描一体机技术规范书(参考Word)
- 格式:doc
- 大小:43.50 KB
- 文档页数:11
13 W hen the message to start initialization appears on theLCD screen, press the start button to start chargingthe ink. Ink charging takes approximately 10 minutes. A message appears when ink charging is complete. Press the OKbutton to continue.Note: The included ink bottles are designed for reliable printersetup and cannot be resold. After setup, the remaining ink isavailable for printing.14 T o complete filling the ink tanks, repeat steps 1 through 7using the remaining ink in the bottles.Note: Replace the bottle cap before disposing of the bottles.15 C lose the ink tank cover and scanner unit.16 S elect Maintenance > Reset Ink Levels, then follow theon-screen instructions to reset the ink levels.17 Follow the on-screen instructions to adjust the printquality. Press the OK button to continue.Note:• Y ou need to load paper before you can adjust the print quality. See“Load paper” on the back of this sheet for details.• Y ou can change these settings later using the product’s controlpanel. For more information, see the online User’s Guide.See the online User’s Guide for information about loadingcapacity, available paper types and sizes, and loadingenvelopes.1 M ake sure the product is not charging ink. Then flip thefeeder guard forward, raise the paper support, and tilt itbackwards slightly.2 Slide the edge guides all the way out.IMPORTANT: Before using this product, make sure you readthese instructions and the safety instructions in the online User’sGuide.Note: As part of the ReadyPrint™ program, Epson monitors ink usageremotely to provide you with additional ink before you run out of it. Theproduct must be connected to the internet to function and monitor inkusage.Note: Do not open the ink bottles until you are ready to fill the inktanks. The ink bottles are vacuum packed to maintain reliability.1 R emove all protective materials from the product.2 L ift up the scanner unit. Remove all protective materialsfrom inside the product.Caution: Do not touch the flat white cable or the ink tubes andtheir translucent cover.Note:• U• U1 O2 U3 I4 W5 W.ET-2750UStart HereMobile and voice-activatedprinting• Print directly from your smartphone or tablet using iOS or Android™ with Epson iPrint™. Simply connect your printer and device to the same network and tap the action icon to select the print option.• Print directly from your Android (v4.4 or later) device*.Simply connect your printer and device to the same network and tap the menu icon to select the print option. • Print from wherever you are, next to your printer or remotely, with Epson Connect™. Learn more at /connect .• Use voice-activated assistants to print a variety of creativeand everyday items from your Epson ® product. Simply add your product to an Epson Connect account, then link the account to a voice-activated assistant. See /voice for more information.* M ay require the Epson Print Enabler or Mopria Print Service app from Google Play™.Any problems?Network setup was unsuccessful.• Make sure you select the right network name (SSID).• Restart your router (turn it off and then on), then try toconnect to it again.• The printer can only connect to a network that supports 2.4 GHz connections. If your router offers both 2.4 GHz and 5 GHz connections, make sure 2.4 GHz is enabled.• If you see a firewall alert message, click Unblock or Allow to let setup continue.• If your network has security enabled, make sure you enter your network password (WEP key or WPA passphrase) correctly. Be sure to enter your password in the correct case.• Print a network connection report to identify network problems and solutions. See your online User’s Guide for instructions.There are lines or incorrect colors in my printouts.Run a nozzle check to see if there are any gaps in the printout. Then clean the print head, if necessary. See the online User’s Guide for more information.The product’s screen is dark.Make sure your product is turned on, and press any button towake it from sleep mode.EPSON is a registered trademark, EPSON Exceed Your Vision is a registered logomark, and Epson Connect and Epson iPrint are trademarks of Seiko Epson Corporation. ReadyPrint and Designed for Excellence are trademarks of Epson America, Inc.Windows is a registered trademark of Microsoft Corporation in the United States and/or other countries.Mac is a trademark of Apple Inc., registered in the U.S. and other countries.Android and Google Play are trademarks of Google LLC.General Notice: Other product names used herein are for identification purposes only and may be trademarks of their respective owners. Epson disclaims any and all rights in those marks.This information is subject to change without notice.3 L oad paper, glossy or printable side up and short edgefirst, in the middle of the rear paper feed slot.4 Slide the edge guide against the paper, but not too tightly.5 Pull out the output tray.6 Select the paper settings on the product’s control panel.Note: An Internet connection is required to obtain the product software.1 M ake sure the product is NOT CONNECTED to yourcomputer.Windows ®: If you see a Found New Hardware screen, click Cancel and disconnect the USB cable.2D ownload and run your product’s software package:/support/et2750u3 F ollow the instructions on the computer screen to run thesetup program.4 W hen you see the Select Your Connection screen, selectone of the following:• Wireless connectionIn most cases, the software installer automatically attempts to set up your wireless connection. If setup is unsuccessful, you may need to enter your network name (SSID) and password.• Direct USB connectionM ake sure you have a USB cable (not included).Declaration of ConformityAccording to 47CFR, Part 2 and 15 for Class B Personal Computers and Peripherals; and/or CPU Boards and Power Supplies used with Class B Personal Computers:We:Epson America, Inc.Located at: 3840 Kilroy Airport Way, MS 3-13,Long Beach, CA 90806-2469 Telephone:(562) 981-3840Declare under sole responsibility that the product identified herein, complies with 47CFR Part 2 and 15 of the FCC rules as a Class B digital device. Each product marketed, is identical to the representative unit tested and found to be compliant with the standards. Records maintained continue to reflect the equipment being produced can be expected to be within the variation accepted, due to quantity production and testing on a statistical basis as required by 47CFR §2.906. Operation is subject to the following two conditions: (1) this device may not cause harmful interference, and (2) this device must accept any interference received, including interference that may cause undesired operation.Trade Name: EpsonType of Product: Multifunction printer Model: C634A Marketing Name: ET -2750U。
佳能扫描仪说明书篇一:扫描仪的使用方法与技巧扫描仪使用方法与技巧不少用户在购买扫描仪后,常常会发现扫描图片的品质不太理想,实际上,出现这种情况,主要的还是与用户使用扫描仪的技巧密切相关。
准备工作要做好普通用户在使用扫描仪之前,很有必要对扫描仪的基本原理做个初步的了解,这样将大大有助于正确合理地使用扫描仪。
扫描仪获取图像的方式是将光线照射到待扫描的图片或文档上,光线反射后由感光元件——CCD(Charge Coupled Device,电荷耦合元件)或CISr)接收,由于图像色彩深浅不一,致使反射光强度也各不相同,感光元件可以接收各种强度的光,并转换为二进制的数字信号,最后由控制扫描的软件将这些数据还原为显示器上可以看到的图像.为了将图像客观真实地反映出来,必须保证光线能够平稳地照到待扫描的稿件上,笔者建议大家在扫描前可以先打开扫描仪预热5至10分钟,使机器内的灯管达到均匀发光状态,这样可以确保光线平均照到稿件每一处。
此外,不要因扫描仪的倾斜或抖动影响到扫描品质,用户应尽量找一处比较平坦、稳定的地方放置,一些用户为节约办公空间而直接将扫描仪置于机箱上方的做法万万不可取。
现在,佳能公司的N系列扫描仪都实现了直立扫描,配有专用扫描仪支架,有效的节约了办公空间。
此外,扫描前仔细检查玻璃上方是否有污渍,若有一定要用软布擦拭干净,以免影响扫描效果。
预扫步骤不可少为了节约扫描时间,一些用户贪图方便,常常忽略预扫步骤。
其实,在正式扫描前,预扫功能是非常必要的,它是保证扫描效果的第一道关卡。
通过预扫有两方面的好处,一是在通过预扫后的图像我们可以直接确定自已所需要招描的区域,以减少扫描后对图像的处理工序;二是可通过观察预扫后的图像,我们大致可以看到图像的色彩、效果等,如不满意可对扫描参数重新进行设定、调整之后再进行扫描。
限于扫描仪的工作原理,扫描得到的图像或多或少会出现失真或变形。
因此,好的原稿对得到高品质的扫描效果是格外重要的,而品质不佳的原稿,即使通过软件处理可以改善扫描效果,但终究属亡羊补牢的做法。
(1) 打印机设置1) 基本设置基本设置根据用户需要修改或取消工厂设置的某些打印机功能。
a.警告提示页输出禁止禁止输出警告提示页时,设置此程序。
b.打印测试页输出禁止用来禁止打印测试页。
设定此项设置后,就不能再通过用户设置(测试页打印) 打印测试页。
c.A4/信纸类型自动转换需要用信纸进行打印,但没有信纸时此设置允许将打印内容切换到A4纸上进行打印。
*A4纸张缺少时,不允许将打印内容输出到信纸尺寸的纸张上。
d.保持数据删除此程序用来手动删除硬盘上所有数据。
e.内存满时的输出方法打印机数据内存满时,无法再进行更多内容打印。
所以,此时机器打印保存在内存中的数据。
此程序用来设置打印条件,工厂默认设置为“1”。
AR-C260M打印部分13 –92) 接口设置接口设置用来设置数据监视,以及控制数据到机器并行口和网络端口的输出。
a.端口选择方法用来选择机器的并行口和网络端口。
设置项目项目内容工作结束后改变打印完成后,端口选择被设置成自动。
I/O 超时后改变当达到I/O超时设置所设的时间( 以下所列项目) 时,端口选择变成自动选择。
b. 并行口允许设置此程序用来设置从并行口打印的允许/禁止。
c. USB端口允许设置此程序用来设置从USB端口打印的允许/禁止。
d. 网络端口允许设置此程序用来设置从网络端口打印的允许/禁止。
e. I/O 超时时间端口在打印数据接收等待状态时,经过一段时间端口没有收到打印数据后,此程序用来中断端口的连接,同时用来自动选择端口,并启动端口待机状态等待接收下次打印数据进行打印。
I/O 超时项表示打印数据接收等待状态到I/O端口超时之间的时间间隔。
3) 网络设置此设置用来将打印机设置成网络打印机。
网络设置可以设置以下这些项目。
改变设置项目后,终止管理者程序,关闭机器主开关,稍等片刻后重新打开机器主开关,设置被确认。
a.IP地址设置机器在TCP/IP网络协议环境下运行时,可以用此设置来设定机器的IP地址。
贵阳幼专传真复印扫描一体机简单操作说明本说明主要用于我校新校区传真复印扫描一体机,我校一体机主要型号为CANON_UTIL_MF4700系列,如遇问题可先按此操作说明书指导进行。
功能描述:●打接电话○打电话时请将一体机状态调为“传真”,然后拿起话筒,直接拨号即可。
○如是接听电话,拿起话筒即可。
●接发传真(各部门的传真设置我部门已为大家设好,请勿修改)请先将一体机状态调为“传真”○接收传真时,对方会拨通本方一体机电话,本方拿起电话后,给对方一个传真信号(即按一下“启动”按钮),然后再放下话筒即可。
○发送传真时,首先把要传送的文件放在输稿器上(如:图 - 1),字面朝上,最多可装入 20张,然后拨通对方电话,等对方给了传真后信号后,本方按一下“启动”按钮,然后再放下话筒即可。
●复印第一步:放置纸张放置方式1:把要传送的文件放在输稿器上,字面朝上,最多可装入 20 张。
(即可连续复印20张)图-1放置方式2:见下图(注:字面如所示图-2,此种方式每次只能复印一张)图-2第二步:选择复印模式第三步:在数字键盘输入打印份数第四步:然后按“启动”即开始复印。
●扫描○方法A:第一步:放置纸张放置方式:见下图(注:字面如图所示)第二步:选择扫描模式第三步:选择“计算机”第四步:选择扫描模式第五步:按“ok”键后,机子自动扫描,扫描完成后电脑会自动弹出图片保存位置。
○方法B——使用 MF Toolbox工具扫描:第一步:在【开始菜单】【程序】处找到【ToolBox4.9】打开第二部:选择扫描仪(如果一体机已设为默认打印,可跳过此步)。
第三步:进行扫描相关设置,如扫描模式、文件设置等(尽量保持默认)。
第四步:点“开始”即开始扫描,文件并存到相应的设置位置。
REVOLUTIONIZE TODAY’S WORKSPACE• E asily connect your mobile devices without a router using Wi-Fi ® Direct Connection.*• P rint at speeds of up to 42 pages per minute ,** with your first print in your hands in 7.5 seconds or less .***• P rint on-the-go with Canon PRINT Business ,†Apple ®AirPrint ®,†† Mopria ™ Print Service ,††† and GoogleCloud Print ™.■• S eamlessly navigate through all the features with the user-friendly 3.5-inch , Color , Touch-Panel LCD .• L egal-sized platen glass accommodates your diverse scanning and copying needs.• S upports host-based UFR II , PCL 6, and Adobe ®PostScript ® languages to provide printing versatility.• S ecure Print helps protect the privacy of yourprinted documents.•P assword-protected Department ID feature monitors and controls device usage for up to 300 IDs.• E asily print from, and scan to, your USB flash drive in JPEG, TIFF, and PDF formats.• E co-friendly, all mode, two-sided printing out-of-the- box saves paper and related costs.• G enerous, expandable paper capacity allows for up to 1,600 sheets .■■• L ow energy consumption; uses 1.4 W or less inEnergy Saver mode .• E mbedded uniFLOW capability allows for print security,follow-me printing, and output management and reporting.All-in-One, Wireless, Duplex, Laser PrinterPRINT SCAN COPY FAXPrint On-the-GoPrint a variety of file types, Web pages, and images on- the-go with Canon PRINT Business,†Apple AirPrint,††Mopria Print Service,††† and Google Cloud Print■ using your compatible mobile device. You can also scan hard- copy originals to your mobile device using Canon PRINT Business.Secure PrintThe imageCLASS MF515dw featuresSecure Print to help protect theprivacy of your printed documents. Department ID ManagementThe imageCLASS MF515dw features password-protected Department ID Management. To help reduce costs, device usage can bemonitored andcontrolled forup to 300 IDs.Environmentally ConsciousHelp decrease power consumption and energy costs with Canon’s efficient Energy Saving mode. In this mode, the MF515dw uses less than two watts of energy and meets ENERGY STAR® guidelines.Color, Touch-Panel LCDThe intuitive, seven-line, color,touch-panel LCD allows usersto navigate through the menuseamlessly. The user-friendlywide-screen and color displayare easy to read, helping youto complete tasks more quickly.2ADVANCED TECHNOLOGIESFOR YOUR OFFICE*W i-Fi® is a registered trademark of the Wi-Fi Alliance®. The Wi-Fi CERTIFIED™ Logo is acertification mark of the Wi-Fi Alliance®.**P rint speed is based on internal testing. Print speed may vary depending on the numberof copies selected as well as the settings for size, type, and orientation of paper.***M ay vary based on the output environment.C anon PRINT Business is a free app available on the App Store® and Google Play™ Store. Usersof Canon Mobile Printing can simply update the app to use Canon PRINT Business; users whohave installed Canon Mobile Scanning for Business should install Canon PRINT Business on theircompatible device. After Canon PRINT Business is installed, users can re-register their CanonMobile Scanning for Business device list and local documents.A pple AirPrint functionality requires an iPad, iPad Mini, iPad 2, the new iPad, iPhone 3GS or later,or iPod touch 3rd generation or later device running iOS 7.0 - 8.0 or later, and an AirPrint-enabledprinter connected to the same network as your iOS device. A printer connected to the USB portof your Mac, PC, AirPort Base Station, or Time Capsule is not supported.M opria Print Service, available free at the Google Play Store, requires a compatible Android 4.0 orlater smartphone or tablet. The printer must be either wirelessly connected to the network routeror with an Ethernet cable. The mobile device and printer must be connected to the same network.■Google Cloud Print requires an Internet connection and Google Account. Printer firmware updatemay be necessary for Google Cloud Print™ function. Certain exceptions may apply. A PC runningWindows XP or later or a Mac running OS 10.4.11 or later and USB cable are required to performfirmware update.■■Based on 20 lb. Bond paper.3** P rint speed is based on internal testing. Print speed may vary depending on the number of copies selectedas well as the settings for size, type, and orientation of paper. *** M ay vary depending on the output environment.† C anon PRINT Business is a free app available on the App Store ® and Google Play™ Store. Users of CanonMobile Printing can simply update the app to use Canon PRINT Business; users who have installed Canon Mobile Scanning for Business should install Canon PRINT Business on their compatible device. After Canon PRINT Business is installed, users can re-register their Canon Mobile Scanning for Business device list and local documents. †† A pple AirPrint functionality requires an iPad, iPad Mini, iPad 2, the new iPad, iPhone 3GS or later,or iPod touch 3rd generation or later device running iOS 7.0 - 8.0 or later, and an AirPrint-enabled printer connected to the same network as your iOS device. A printer connected to the USB port of your Mac, PC, AirPort Base Station, or Time Capsule is not supported. ††† M opria Print Service, available free at the Google Play Store, requires a compatible Android 4.0 orlater smartphone or tablet. The printer must be either wirelessly connected to the network router or with an Ethernet cable. The mobile device and printer must be connected to the same network.■G oogle Cloud Print requires an Internet connection and Google Account. Printer firmware update may be necessary for Google Cloud Print™ function. Certain exceptions may apply. A PC running Windows XP or later or a Mac running OS 10.4.11 or later and USB cable are required to perform firmware update. ■■ B ased on 20 lb. Bond paper. ■■■ L etter-sized, after being restored from Energy Saver mode. ▲ W ireless performance may vary based on terrain/distance between printer and wireless network clients. ▲▲A 5 paper is supported in Simplex mode only. ▲▲▲B ased on Letter-sized scanning at 300 x 300 dpi. u T he Public Switched Telephone Network currently supports fax modem speeds of 28.8 Kbpsor lower, depending on telephone line conditions. Sending and receiving fax machines need to conform to ITU-T v.34 guidelines. uu B ased on ITU-T #1 Chart (standard mode). u uu W arranty program is subject to certain conditions and restrictions. See warranty card for details. D eclared noise emission in accordance with ISO 9296.As an ENERGY STAR partner, Canon U.S.A., Inc. has qualified this model as meeting the ENERGY STAR energy imageCLASS MF515dw Supplies and AccessoriesimageCLASS MF515dw0292C008MF515dw shown with two optional Paper Feeders and optional Cabinet Type-M1。
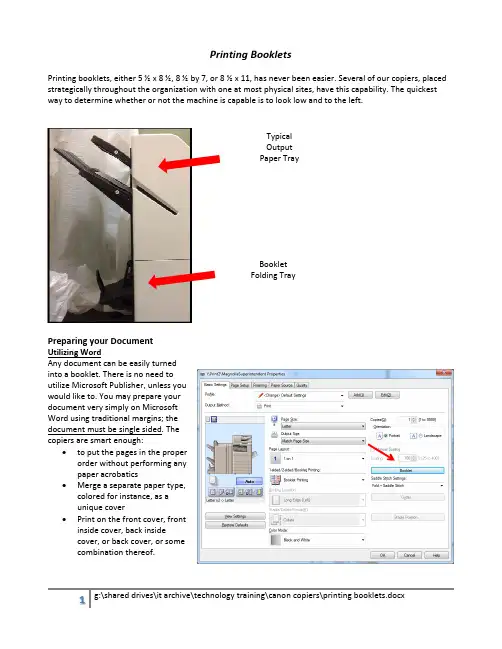
Printing BookletsPrinting booklets, either 5 ½ x 8 ½, 8 ½ by 7, or 8 ½ x 11, has never been easier. Several of our copiers, placed strategically throughout the organization with one at most physical sites, have this capability. The quickest way to determine whether or not the machine is capable is to look low and to the left.Preparing your DocumentUtilizing WordAny document can be easily turned into a booklet. There is no need toutilize Microsoft Publisher, unless you would like to. You may prepare your document very simply on Microsoft Word using traditional margins; the document must be single sided. The copiers are smart enough:∙ to put the pages in the properorder without performing any paper acrobatics∙ Merge a separate paper type,colored for instance, as a unique cover∙ Print on the front cover, frontinside cover, back insidecover, or back cover, or some combination thereof.Typical Output Paper TrayBooklet Folding TrayUtilizing PublisherIf you have a documentutilizing the native bookletformat within Publisher andthen you select the bookletsettings on the canon copieryour booklet will be printedrather small. Have no fear; byforcing the Published settingsbe used rather than the printdriver settings the bookletshould be printed normally.The ProcessBelow is a step by step process of a common booklet creation task. It is meant to give you an idea of how the basic feature works and a premise to work from if your particular task is different.Our desire is:∙Have a front cover which is a colored sheet of paper∙Print on the front and back covers∙Print in color∙Have the dimensions of 5 ½ x 8 ½∙Have it stapled down the middle, known as saddle stich1.Prepare your document inWord. The text for the front andback cover should be on theirown individual pages.2.Place the documents in thefeeder tray in the proper order;cover sheet, booklet sheets andback cover sheet.3.Log into the copier and choosethe copy option.4.Choose the Select Colorbutton & select the colorfeature that you wouldlike, most likely the autoselection (Color/Black).5.Select the options button to launch the booklet settings.6.Choose the Booklet option.a.The next screen thatappears is the settings forthe booklet copying.b.Part A:i.Booklet scan is tobe used whenyour sourcedocument isprinted with onepage of text perpage, this willlikely be the mostcommon. If youhave the text already printed and staged for the booklet fold, then select the do notbooklet scan.ii.If the source document is not normal letter size, you may change the size and pageorientation if need be by changing the original size. Notice the change button directlybelow the original size graphic on the right side of the screen shot below.c.Part B:i. By selecting the fold & saddle stich opton the final product will be folded and stapled down the middle of the fold on the inside of the booklet, this will likely be the most common selection because who wouldn’twant the copier to do all of the work.ii. To specify the size of the final product, 5 ½ by 8 ½ in our example, we will need to have alayout size of 8 ½ by 11 R, or landscape. The layout size option, righthand section of part B, will need to be changed to landscape letter.iii. If the sheet size is not currently in the machine, you will need to place it in the machineeither in one of the standard drawers or in the manual tray. The machine may prompt for the paper type so that it can handle itappropriately.d. Part B – AddingCoversi. There is much flexibility when it comes to printing, on either side, of the front and/or backcover. The user designates which side of the cover, if any, is printed on.ii. As for the source document, assuming that we have selected all four cover areas to beprint on for simplicity, the first, second, the second from the last, and the last page will be printed on the four cover areas. This is regardless of the number of pages your booklet will entail. If there are not enough pages to print on every page then a blank page will be leftin the booklet and the back cover will have the final text.Part A Part B7.To set up for the cover, selectthe add cover button which willlaunch the paper size screen sothat you can designate the type ofpaper and its location. The manualtray may be the easiest for thecover sheets but it is notmanadatory8.Select the start button tobegin the process. As with anynew project, you may want toprint one booklet to make sure itappears as you would like prior toprinting a mas quantity.Printing as a booklet1.Open the document in its native program; this will generally be Adobe. Do not print it from thebrowser.2.Select a printer that has a booklet maker. The booklet maker option will appear in the 1 sided/2‐sideded/booklet maker dropdown regardless as it is merely a dropdown field. After selecting thebooklet maker, If the booklet button option to the right of the popup is grayed out there is not anattached booklet maker to the selected printer3.If printing an 8 ½ x 11 booklet, you will need to change the output size to 11x17, which will fold into 8½ x 11‐booklet size.4.Depending on how the document was prepared, select for the booklet printing process, popup willappear once the booklet button is selected, either with application settings or with driver settings.。
安徽省电力公司集中招标采购临泉供电公司佳能iR 2525i 数码复印机佳能2525I A3 打印复印扫描一体机技术规范书设计单位:临泉供电公司2011年3月单位:批准:审核:编制:2011年3月1日分标编号:货物需求一览表(买方填写)供货范围(卖方填写)1 总则产品总体要求:1、上述组件均为必配部件,供应商不得变更、调整、减少,应保证设备正常运行所应配置的相关辅件、组件。
2、必需符合中国CCC认证、能源之星认证、环保(绿色)认证要求,必需提供相关证明文件。
3、为保证供货渠道的合法性,需出具原厂商针对该项目的供货证明函原件和原厂针对本项目的专项授权函。
4、产品推荐:2、打印机需求基本参数复印/打印方式激光静电转印方式感光材料 OPC显影系统干式单组分显影定影系统按需定影内存标配 256MB(iR 2525)or512MB(iR 2520i/2525i/2530i/2535i/2545i)最大 512MB(iR 2525)预热时间主机电源打开时 30秒或更短睡眠模式恢复时 1秒最大原稿尺寸 A3首页输出时间 iR 2520i 6.4秒iR 2525i/2525/2530i 5.4秒iR 2535i/2545i 3.9秒灰度等级 256级分辨率扫描 600dpi×600dpi复印 1200dpi(等效)×600dpi打印真正1200dpi×1200dpi复印倍率固定倍率 25%,50%,61%,70%,81%,86%,115%,122%,141%,200%,400% 手动缩放 25%-400%(以1%为单位)连续输出速度 iR 2520i 20页/分钟(A4)iR 2525i/2525 25页/分钟(A4)iR 2530i 30页/分钟(A4)iR 2535i 35页/分钟(A4)iR 2545i 45页/分钟(A4)连续复印张数 999 张供纸量 iR 2520i/2525i/2525/2530i 标准 250张+550张(前置式纸盒)+100张(手送纸盘) 最大 250张+550张×3(前置式纸盒)+100张(手送纸盘)iR 2535i/2545i 标准 550张×2(前置式纸盒)+100张(手送纸盘)最大 550张×4(前置式纸盒)+100张(手送纸盘)纸张尺寸纸盒 A3-A5R、8K、16K和16KR手送纸盘 A3-A5R、8K、16K、16KR、非标准尺寸和信封纸张厚度纸盒 64-90g/m2手送纸盘 64-128g/m2出纸托盘容量 250张(A4)电源 iR 2520i/2525i/2525/2530i 220V AC_50Hz_3.3AiR 2535i/2545i 220V AC_50Hz_4.2A最大功耗 iR 2520i/2525i/2525/2530i 1.5kwiR 2535i/2545i 1.8kw主机尺寸 (宽×深×高) iR 2520i/2525i/2530i 565mm×693mm×896mm(安装有双面自动输稿器)iR 2525 565mm×680mm×806mm(安装有稿台盖板)iR 2535i/2545i 565mm×693mm×907mm(安装有双面自动输稿器)主机安装空间(宽×深) 1079mm×1441mm(不安装可选设备时)1367mm×1441mm(安装了可选的内置式装订器-B1时)重量 iR 2520i/2525i/2530i 约76.1kgiR 2525 约70.6kgiR 2535i/2545i 约78.4kg打印规格(标配)UFR II LT网络打印(标配)打印分辨率真正1200dpi×1200dpi打印语言 UFR II LT接口 100BASE-TX/10BASE-T、USB2.0高速网络协议 TCP/IP系统环境 Microsoft Windows?2000/XP/Vista/7,Server 2003/2008,Macintosh OS?(10.4或以上)PCL打印组件-AF1(选配)打印分辨率 1200dpi(等效)×600dpi打印语言 PCL5e, PCL6接口 100BASE-TX/10BASE-T、USB2.0高速网络协议 TCP/IP系统环境 Microsoft Windows?2000/XP/Vista/7,Server 2003/2008PS打印组件-AF1(选配)打印分辨率 1200dpi(等效)×600dpi打印语言 PS3仿真接口 100BASE-TX/10BASE-T、USB2.0高速网络协议 TCP/IP系统环境 Microsoft Windows?2000/XP/Vista/7,Server 2003/2008双面自动输稿器(仅限iR 2520i/2525i/2530i/2535i/2545i,iR 2525需选配)输稿速度 iR 2520i/2525i/2525/2530i 复印25页/分钟(A4,80g/m2)扫描25页/分钟(A4,80g/m2,黑白/彩色)iR 2535i/2545i 复印45页/分钟(A4,80g/m2)扫描30页/分钟(A4,80g/m2,黑白/彩色)原稿尺寸 A3-A5、8K、16K原稿厚度 iR 2520i/2525i/2525/2530i 50-105g/m2iR 2535i/2545i 52-128g/m2原稿托盘容量 iR 2520i/2525i/2525/2530i 50张(A4、80g/m2)iR 2535i/2545i 100张(A4、80g/m2)扫描规格扫描方式拉式标配推式 iR 2525选配色彩方式彩色/黑白扫描分辨率最大600dpi×600dpi(推式,黑白)生成格式 JPEG/TIFF/PDF/高压缩PDF(标配)/OCR PDF(需选配)传真规格(选配)Super G3传真卡-AG1适用线路公用电话线路1条线路调制解调速度 Super G3(最大33.6kbps)数据压缩方式 MH,MR,MMR,JBIG传输速度大约3秒/页 (33.6kbps)其它主要选购件内置式装订器-B1托盘数量 2个(主体本身标配一个,另外的附加内置装订托盘-B1需选配) 托盘容量标准托盘不分套、分套或分组模式 1000张或125mm(A4)装订模式 30套或125mm(A4)安装了附加托盘-B1 不分套、分套或分组模式 100张或12.5mm(A4)装订模式 15套或8.1mm(A4)最大装订张数 50张(A4,64-80g/m2)装订位置角落、两点内置式双路托盘-G1托盘数量 2个(包括一个主机托盘)托盘容量 100张(A4,80g/m2)双纸盒组件-AE1纸张容量 550张×2(80g/m2)纸张尺寸 A3-A5R、8K、16K纸张厚度 64-90g/m2耗材墨粉 NPG-50墨粉(印量约19,400页,用于iR 2535i/2545i)NPG-51墨粉(印量约14,600页,用于iR 2520i/2525i/2525/2530i)感光鼓 NPG-50/51感光鼓(印量约140,000页,用于iR 2535i/2545i) NPG-50/51感光鼓(印量约132,000页,用于iR 2520i/2525i/2525/2530i) 装订针-J1 角落装订、两点装订用针,5000支×3,用于内置式装订器-B1 佳能复印纸 A4 70g复印纸A3 70g复印纸A4 80g复印纸A3 80g复印纸2 测试和验收2.1 概述a 验收包括工厂验收和现场验收;b 投标方提供给招标方的所有设备必须在交货前通过工厂验收,并得到招标方的确认,若招标方未签署工厂验收报告,任何设备不能从投标方工厂发运;c 投标方应提供工厂验收和现场验收的测试程序的详细说明,测试项目和性能都应在详细说明中指出;d 招标方要求的一些特殊试验,只要合理都应进行;e 即使招标方在试验报告上签字,投标方仍应对设备固有缺陷和合同中的项目承担责任;f 测试和验收计划:投标方应提交有关工厂验收和现场验收的详细计划,包括系统性能和功能等的测试方法等,招标方有权修改测试和验收计划,在计划被招标方确认前,计划不应生效;g 测试设备:在工厂验收和现场验收中,投标方应提供验收过程中必需的设备,如检验设备、测量设备、记录设备等。
型号:Canon iR2520UFRII LT 打印机扫描操作手册1-7页:单面原稿扫描操作设置8-9页:双面原稿扫描操作设置10页:注意事项及图纸扫描邓世超2015年9月1、插入优盘,屏幕出现上图对话框,点击“确定”。
2、点击“发送”按钮,进入扫描界面。
3、点击“新地址”,选择扫描路径。
4、在‘新地址’菜单中点击“存储介质”。
5、弹出文件路径对话框,点击“存储介质(A:)”再点击“确定”。
6、完成扫描路径设置后的界面。
7、点击屏幕“扫描设置”按钮,进行分辨率、黑白和彩色扫描设置。
8、机器默认是200×200pdi的分辨率,为了提高扫描质量,使扫描更清晰,注意选择300×300pdi的分辨率。
对于红头文件、盖红章、照片等有色彩的资料文件,为保持其原貌,选择“彩色300×300dpi”;对于黑白资料、没有彩色要求的资料文件、及图纸,选择“黑白300×300pdi”。
彩色的特点是保持文件原貌,黑白的特点是电子版和打印出的文件更清晰。
9、点击“文件格式”按钮,进行文件格式设置。
10、弹出文件格式设置菜单,多页连续扫描建议选择“PDF”格式,单页照片或证件扫描建议选择“JPEG”格式。
这里的黑白和彩色与扫描分辨率里面的黑白和彩色相通。
设置、生成的文件格式设置)12、点击绿色的“启动”按钮,即可进行文件扫描。
13、在扫描设置中有个“选项”按钮,点击进入下面的界面。
14、点击此处,双面原稿的扫描设置。
15、弹出上图所示菜单,直接点击“确定”按钮,回到下图所示菜单。
16、此时双面原稿扫描设置完成,按钮成黑色。
未设置前是白色的。
打印机扫描操作手册17、注意事项:A3纸在下、A4纸在上,可整体扫描,反之亦可。
①不同尺寸的原稿,A3、A4原稿可同时进行扫描,保证宽度一致即可。
②文件扫描前将订书钉去除干净。
③打印机为公共财物,使用时注意爱护。
18、装订好的图纸如何变成电子版①装订好的原图纸文件不得拆开的情况下(大部分是A3图纸),放在打印机面板上,按照1:1的比例(A3纸),一页一页复印出来。
12W hen the message to see the setup manual is displayedon the LCD screen, press and hold the OK button for3 seconds.13 P ress the start button to start charging the ink. Inkcharging takes approximately 20 minutes. Ink chargingis complete when the power light stops flashing.20 minutesNote: The ink bottles included with the printer are designedfor printer setup and not for resale. After some ink is used for charging, the rest is available for printing.Caution: Do not turn off the product or load paper while the product is charging or you’ll waste ink.1 M ake sure the product is not charging ink. Then flip thefeeder guard forward, raise the paper support, and tilt itbackwards slightly.2 S lide the edge guide to the left.3 L Do not open the ink bottles until you are ready to fill the ink tanks. The ink bottles are vacuum packed to maintain reliability.emove all protective materials from the product.5 C arefully seal the bottle using the reverse side of thebottle tip for proper disposal.6 7 8 C lose the ink tank unit cover.9 C onnect the power cord to the back of the product andC aution: Do not connect to your computer yet.10 R aise the control panel and turn on the product. Note: If an error message appears, turn off the product and check that no protective material has been left inside the product.Caution: Do not lower the control panel without first squeezing the release bar underneath or you may damage the product.11 T o select your language, press or , then press theOK button.Note: You can change the language later using the product’s control panel. For more information, see the online User’s Guide .Mobile printingTo print from a mobile device, your product must be set up forwireless printing or Wi-Fi Direct ®. See the online User’s Guide for instructions.Epson Connect ™ SolutionsEpson Connect offers a variety of remote printing options for your product. Connect wirelessly from your tablet, smartphone, or computer. Print documents and photos from across the room or around the world./connect (website available in Spanish)Epson iPrint ™ for iOS/Android ™Download the Epson iPrint app from Google Play ™ or the App Store to print documents and photos from your iOS or Android device on any email-enabled Epson ® printer.Any problems?Network setup was unsuccessful.• F or detailed instructions on setting up your product on a wireless network, see the Wireless Installation Guide .• M ake sure you select the right network name (SSID). The product can only connect to a network that supports 2.4 GHz.• I f you see a firewall alert message, click Unblock or Allow to let setup continue.• I f your network has security enabled, make sure you enter your network password (WEP key or WPA passphrase) correctly. Passwords must be entered in the correct case.There are lines or incorrect colors in my printouts.Run a nozzle check to see if any of the print head nozzles are clogged. Then clean the print head, if necessary. See the online User’s Guide for more information.Setup is unable to find my product after connecting it with a USB cable.Make sure the product is on and securely connected as shown:EPSON is a registered trademark, Epson Connect and Epson iPrint are trademarks, andEPSON Exceed Your Vision is a registered logomark of Seiko Epson Corporation. Designed for Excellence is a trademark of Epson America, Inc.Mac and OS X are trademarks of Apple Inc., registered in the U.S. and other countries. App Store is a service mark of Apple Inc.Android and Google Play are trademarks of Google Inc.Wi-Fi Direct is a registered trademark of Wi-Fi Alliance .General Notice: Other product names used herein are for identification purposes only and may be trademarks of their respective owners. Epson disclaims any and all rights in those marks.This information is subject to change without notice.4 S 5 P 6 Select the paper settings on the product’s control panel.Note: If your computer does not have a CD/DVD drive or you areusing a Mac, an Internet connection is required to obtain the product software.1 M ake sure the product is NOT CONNECTED to yourcomputer.W indows ®: If you see a Found New Hardware screen, clickCancel and disconnect the USB cable.2I nsert the product CD or download and run your product’ssoftware package:/Support/L4753 F ollow the instructions on the screen to run the setupprogram.OS X: Make sure you install Epson Software Updater to receive firmware and software updates for your product.4 W hen you see the Select Your Connection screen, selectone of the following, then continue with the on-screeninstructions:• Wireless connectionIn most cases, the software installer automatically attempts to set up your wireless connection. If setup is unsuccessful, you may need to enter your network name (SSID) and password.• Direct USB connectionM ake sure you have the USB cable.5 W hen software installation is complete, restart yourcomputer.。
佳能IR3300复印机功能使用说明一、复印(双面)印到(单面)特殊功能-------图像合并------A5------下一步-------2合1--------下一步-------A4--------(放置正面)启动-------(放置反面)启动--------完成-------//复位二、双面复印选择纸-------②A4R------完成-------双面模式-------确定三、卡纸处理1、打开右门取纸-------关闭右门2、打开前门扳动左下角的绿色手柄--------取纸------复位绿色手柄3、打开左门取纸-------关闭左门4、关闭前门CANON 佳能iR2200/iR2800/iR3300 /5000/6000 数码复印机维修/调整定期维修周期每12万印进行一次维修程序模式进入法: 按面板操作部的用户方式(星号"*")键→同时按住数字键"2"和"8"→再按面板操作部的用户方式(星号"*")键打印维修模式一览表 COPIER>FUNCTION>MISC-P>LBL-PRNT用手进纸盒,选择LBL-PRNT显示反转后按OK键,打印出一维修模式一览表打印维修模式设定值的一览表 COPIER>FUNCTION>MISC-P>P-PRINT选择P-PRINT,显示反转后按OK键,打印出打印维修模式一览表打印操作面板的按键输入记录 COPIER>FUNCTION>MISC-P>KEY-HIST选择KEY-HIST,显示反转后按OK键,打印出操作面板的按键输入记录打印卡纸记录/出错代码记录 COPIER>FUNCTION>MISC-P>HIST-PRT选择HIST-PRT,显示反转后按OK键,打印出维修模式的卡纸记录/出错代码记录打印用户模式一览表 COPIER>FUNCTION>MISC-P>USER-PRT 选择USER-PRT,显示反转后按OK键,打印出用户模式一览表故障码清除: 选择ERR,显示反转后按OK键盘(全部操作要在3秒完成),再将主电源开关OFF/ON用户设定的[规格设定/密码模式/部门ID/模式记忆等]后备数据的清除COPIER>FUNCTION>CLEAR>MMI 选择MMI,显示反转后按OK键;OFF/ON主电源开关E000~E004定影故障码清除: COPIER>FUNCTION>CLEAR>ERR 选择ERR,显示反转后按OK键盘,再将主电源开关OFF/ONE032清除: COPIER>FUNCTION>CLEAR>ERR 选择ERR,显示反转后按OK键盘,再将主电源开关OFF/ON 清除故障码E717清除: COPIER>FUNCTION>CLEAR>ERR 选择ERR,显示反转后按OK键盘,再将主电源开关OFF/ON 清除故障码E345清除 COPIER>FUNCTION>CLEAR>E345-CLR选择E345-CLR,显示反转后按OK键;OFF/ON主电源开关,清除E345E355清除 COPIER>FUNCTION>CLEAR>E355-CLR选择E355-CLR,显示反转后按OK键;OFF/ON主电源开关,清除E355清除维修模式的后备数据 COPIER>FUNCTION>CLEAR>SERVICE 选择SERVICE,显示反转后按OK键;OFF/ON主电源开关清除卡纸记录 COPIER>FUNCTION>CLEAR>JAN-HIST 选择JAM-HIST,显示反转后按OK键;OFF/ON主电源开关清除出错记录 COPIER>FUNCTION>CLEAR>ERR-HIST 选择ERR-HIST,显示反转后按OK键;OFF/ON主电源开关用户模式[系统管理]密码的清除 COPIER>FUNCTION>CLEAR>PWD-CLR 选择PWD-CLR,显示反转后按OK键;OFF/ON主电源开关主控板计数的维修计数器的清除 COPIER>FUNCTION>CLEAR>CNT-MCON选择CNT-MCON,显示反转后按OK键;OFF/ON主电源开关DC板计数的维修计数器的清除 COPIER>FUNCTION>CLEAR>CNT-DCON选择CNT-DCON,显示反转后按OK键;OFF/ON主电源开关计数器清除步骤: COPIER>COUNTER>××××>××××选择要清除的××××计数器项目,该项目显示反转后按清除键,定期更换/消耗品零部件(定期更换PRDC-1/消耗品零部件DRBL-1/消耗品零部件DRBL-2)计数器的检查:例:TR-ROOL / 00000201 / 00240000 / 0% !! 000082TR-ROOL,零部件名称, 本例中的TR-ROOL为转印电极辊00000201 为转印电极辊计数器实际已使用数 (该零部件更换后要将该计数器清除) 00240000 为转印电极辊零部件寿命限定的使用数(在该项目中的数据可以设定,数据设定后按"OK"键)0% 为实际使用数与限定使用数的比值,!! 为实际使用数与限定使用数的比值达到90~100%时显示1个 ! ;超过100%时显示2个 !!000082 为预计在82天后需要更换转印电极辊零部件.检查图像位置 3-3T纸盒前/后位置调整(图像横向对位调整),首先用下例维修模式调整,如果不能解决问题,可分别调整每个纸盘的机械位置(每个刻多度大约1毫米)纸盒1水平(横向)对位自动调整 COPIER>FUNCTION>MISC-P>C1-ADJ-Y选择C1-ADJ-Y显示反转后按OK键,从纸盒1输纸打印出一半色调PG图像2.5±1.5毫米同时水平对位传感器PS11测试移动量,并把数据存入存储器纸盒2水平(横向)对位自动调整 COPIER>FUNCTION>MISC-P>C2-ADJ-Y选择C2-ADJ-Y显示反转后按OK键,从纸盒2输纸打印出一半色调PG图像2.5±1.5毫米同时水平对位传感器PS11测试移动量,并把数据存入存储器纸盒3水平(横向)对位自动调整 COPIER>FUNCTION>MISC-P>C3-ADJ-Y选择C3-ADJ-Y显示反转后按OK键,从纸盒3输纸打印出一半色调PG图像2.5±1.5毫米同时水平对位传感器PS11测试移动量,并把数据存入存储器纸盒4水平(横向)对位自动调整 COPIER>FUNCTION>MISC-P>C4-ADJ-Y选择C4-ADJ-Y显示反转后按OK键,从纸盒4输纸打印出一半色调PG图像2.5±1.5毫米同时水平对位传感器PS11测试移动量,并把数据存入存储器手进纸盒水平(横向)对位自动调整 COPIER>FUNCTION>MISC-P>MF-ADJ-Y选择MF-ADJ-Y显示反转后按OK键,从手进纸盒输纸打印出一半色调PG图像同时水平对位传感器PS11测试移动量,并把数据存入存储器侧纸仓(L1)水平(横向)对位自动调整 COPIER>FUNCTION>MISC-P>DK-ADJ-Y选择DK-ADJ-Y显示反转后按OK键,从侧纸仓(L1)输纸打印出一半色调PG图像2.5±1.5毫米同时水平对位传感器PS11测试移动量,并把数据存入存储器打印出一维修模式一览表 COPIER>FUNCTION>MISC-P>LBL-PRNT用手进纸盒,选择LBL-PRNT显示反转后按OK键,打印出一维修模式一览表纸盒1激光写开始位置调整 COPIER>ADJUST>MISC>C1-ADJ-Y 调整围-32~+32,每步0.16毫米纸盒2激光写开始位置调整 COPIER>ADJUST>MISC>C2-ADJ-Y 调整围-32~+32,每步0.16毫米纸盒3激光写开始位置调整 COPIER>ADJUST>MISC>C3-ADJ-Y 调整围-32~+32,每步0.16毫米纸盒4激光写开始位置调整 COPIER>ADJUST>MISC>C4-ADJ-Y 调整围-32~+32,每步0.16毫米手进纸盒激光写开始位置调整 COPIER>ADJUST>MISC>MF-ADJ-Y 调整围-32~+32,每步0.16毫米侧纸仓(L1)激光写开始位置调整 COPIER>ADJUST>MISC>DK-ADJ-Y 调整围-32~+32,每步0.16毫米双面再进纸时横向对位调整 COPIER>ADJUST>FEED-ADJ>ADJ-REFE 调整围-100~+100 每步0.1毫米横向对位检测动作 1,横向对位传感器的原位位置检测:当主电源开关ON,或卡纸复位期间,或前门开关关闭时检测2,横向对位传感器的检测开始位置检测:检测开始位置是当对位传感器PS10 ON 时,参考手进纸盘纸宽挡板和纸盘纸尺寸数据,驱动横向对位传感器步进电机M3将横向对位传感器移到离开纸横向边缘大约10毫米处3,当对位传感器PS10检测到纸前沿后,横向对位传感器步进电机M3向横向对位检测开始位置移动,从横向对位检测开始位置到纸的横向边缘大约可移动10毫米,根据横向对位传感器步进电机M3每个脉冲大约移动0.16毫米来确定纸实际位置进纸对位置调整(对位离合器ON时序调整)对位离合器ON时序调整 COPIER>ADJUST>FEED-ADJ>REGIST调整围-600~+600,每步0.1毫米,数据大对位离合器ON时序延迟图像前/后位置调整(图像横向对位调整)主扫描方向图像读取开始位置调整 COPIER>ADJUST>ADJ-XY>ADJ-Y调整围100~400,每12步1毫米,标准2.5±2.0毫米,数据大移向前边DADF主扫描方向图像读取开始位置调整 COPIER>ADJUST>ADJ-XY>ADJ-Y-DF 调整围100~400 每步0.1毫米图像前沿空白调整扫描器图像前沿开始位置调整 COPIER>ADJUST>ADJ-XY>ADJ-X调整围250~290,每12步1毫米,标准2.5±2.0毫米,数据大移向后移光学扫描原位位置调整(原位传感器PS400) COPIER>ADJUST>ADJ-XY>ADJ-S 调整围16~128,工厂调整用,每步0.1毫米DADF流动扫描CCD读取位置的调整 COPIER>ADJUST>ADJ-XY>STRD-POS 调整围0~60 每步0.1毫米激光主扫描速度(横向倍率)调整 COPIER>ADJUST>MISC>FRAME-X 调整围-50~+50,每步1%副扫描方向扫描速度(纵向倍率)调整 COPIER>ADJUST>MISC>FRAME-Y 调整围-50~+50,每步1%主板向DC板送数据时,副扫描方向图像延迟调整 COPIER>ADJUST>MISC>IMG-DLY 调整围-20~+20,每步0.1毫米"漏电继电器开关"的检查: 按"漏电继电器开关"的检查按钮,"漏电继电器开关"跳到开关OFF的位置并将电源切断,如果按检查按钮后,"漏电继电器开关"动作不正常,要更换"漏电继电器开关"后再进行检测主电源开关,操作面板电源开关ON时时序:主电源开关SW1接通复印机AC电源,操作面板电源开关ON时时序:加热器开关SW2,接通镜头,扫描反光镜,纸盒加热器的AC电源门开关SW3,第1,2组接点接通定影加热器;选购件辅助电源板的AC电源;第3组接点检测门打开/关闭状态,接通主电机.定影电机,复合电源板的24VU1SW电源机器启动时序主电源开关ON后主控制板的CPU首先执行辅助ROM中的自诊断程序,检查SDRAM和硬盘的状态,如果检测到自诊断异常显示E601-0000 硬盘驱动;主控制板主控制板与硬盘驱动器图像传输中,主控制板检测到控制信息异常E601-0001 硬盘驱动;主控制板主控制板与DC控制板图像传输中,DC控制板检测到控制信息异常E602-0001 硬盘驱动;主控制板从BOOT ROM 启动硬盘时检测到硬盘安装异常E602-0002 硬盘驱动;主控制板从BOOT ROM 启动硬盘时检测到硬盘读出数据异常如果自诊断正常,辅助ROM中的辅助程序将系统软件从硬盘中读出并写入SDRAM中系统程序区,此后SDRAM中的系统软件启动,进行各部分的初始化初,始化完成后显示正常操作画面;复印键的LED灯由红变绿显示环境传感器检测到的机温度 COPIER>DISPLAY>ANALOG>TMPE 单位℃显示环境传感器检测到的机相对湿度 COPIER>DISPLAY>ANALOG>HUM 单位%RH 机湿度绝对值 COPIER>DISPLAY>ANALOG>ABS-HUM 单位g显示OPC鼓周围温度 COPIER>DISPLAY>ANALOG>DR-TMPE 单位℃显示主热敏电阻M-TH1检测到定影薄膜中间的温度 COPIER>DISPLAY>ANALOG>FIX-C 单位℃显示副热敏电阻S-TH2检测到定影薄膜边缘的温度 COPIER>DISPLAY>ANALOG>FIX-E 单位℃CANON 佳能 iR5000/iR6000 数码复印机读出(扫描)部分维修/调整进入维修程序模式法: 按面板操作部的用户方式(星号"*")键→同时按住数字键"2"和"8"→再按面板操作部的用户方式(星号"*")键更换读出控制板后执行 1,将旧读出控制电路板上的EEPROM取下装到新的读出控制电路板上2,检查COPIER>ADJUST>AE>的全部项目;COPIER>ADJUST>ADJ-XY>和COPIER>ADJUST>CCD>的全部项目,如果与维修模式的值不相同,将新板上的数据登记到维修标签记录卡上电源ON时扫描时序扫描灯架原位传感器PS400检测到扫描灯架在原位后开始前进扫描动作,然后再返回到原位,曝光灯点亮1秒后进行光补偿(增益调整);OFF一定间隔后再次ON,100秒后进行光补偿(CCD原稿尺寸检测用临界电平调整),完成扫描准备(SREADY)动作原稿曝光系统原稿尺寸检测: 1,原稿台读取模式,副扫描方向的原稿尺寸由原稿长度传感器SD1;主扫描方向的原稿尺寸由CCD上的原稿尺寸检测位置的4个检测点2,ADF的流动读取模式,由ADF的原稿尺寸检测传感器完成原稿尺寸检测时序原稿台盖板打开工作模式时1,原稿台打开,第1反光镜灯架从待机时的扫描原位传感器PS400位置前进到CCD上设定的4个原稿尺寸检测位置;原稿扫描曝光(氙灯)OFF,进行CCD外光检测2,放置原稿后CCD上的4个原稿检测点如果有的检测点检测到外光,该位置被判定未被原稿盖住表示无原稿3,按复印键后曝光灯点亮,检测主扫描方向上CCD的原稿原稿尺寸检测点的输出电平;副扫描方向的原稿尺寸由原稿长度传感器SD1检测,组合后确定出原稿尺寸原稿台盖板关闭工作模式时1,原稿台打开,第1反光镜灯架从待机时的扫描原位传感器PS400位置前进到CCD上设定的4个原稿尺寸检测位置;原稿扫描曝光(氙灯)OFF,进行CCD外光检测2,放置原稿后CCD上的4个原稿检测点如果有的检测点检测到外光,该位置被判定未被原稿盖住表示无原稿3,原稿台盖板关闭角度传感器PS401检测到低于25度时曝光灯点亮,检测主扫描方向上CCD的原稿原稿尺寸检测点的输出电平;副扫描方向的原稿尺寸由原稿长度传感器PS43检测,组合后确定出原稿尺寸原稿曝光动作时序书本模式/一页原稿/原稿台盖板(闭)1,稿台打开,第1反光镜灯架从待机时的扫描原位传感器PS400位置前进到原稿尺寸检测位置;原稿扫描曝光(氙灯)OFF,进行CCD外光检测2,原稿台盖板关闭,曝光灯点亮检测原稿尺寸;原稿尺寸检测后曝光灯OFF,第1反光镜灯架从原稿尺寸检测位置返回到扫描原位传感器PS400位置,进行光补偿3,按复印键后,第1反光镜灯架从扫描原位传感器PS400位置,向左移动到流动读出的开始位置后再开始原稿扫描4,原稿图像扫描终了,第1反光镜灯架从停止位置返回到流动读出的开始位置后再回到扫描原位传感器PS400位置书本模式/一页原稿/原稿台盖板(开)1,稿台打开,第1反光镜灯架从待机时的扫描原位传感器PS400位置前进到原稿尺寸检测位置,;原稿扫描曝光(氙灯)OFF,进行CCD外光检测2,按复印键曝光灯点亮后,检测原稿尺寸,检测后曝光灯OFF,第1反光镜灯架从原稿尺寸检测位置返回到扫描原位传感器PS400位置,3,进行光补偿,光补偿后,第1反光镜灯架从扫描原位传感器PS400位置,向左移动到流动读出的开始位置后再开始原稿扫描4,原稿图像扫描终了,第1反光镜灯架从停止位置返回到流动读出的开始位置后再回到原稿尺寸检测位置原稿扫描曝光LAMP1(氙灯) 注:曝光灯亮度不可调整;光强度:40000LX 更换"曝光(氙)灯"执行: 进入维修程序模式, 1,选择COPIER>FUNCTION>CCD>CCD-ADJ进行CCD自动调整;2,选择COPIER>ADJUST>CCD>全部项目进行CCD调整数据原稿扫描曝光(氙)灯异常 E220-0001曝光(氙)灯用的将+24V电压变换为高频高压的(DC/AC)变换电路的INV-ERR信号在读取电路控制板的待机时检测到灯ON,复印读取时检测到灯OFF;读取电路板故障曝光(氙)灯电路,CCD/AP电路异常 E225-0000 电源开关ON后在CCD放大电路光补偿补正中,未收到规定的曝光灯电平信号曝光(氙)灯电路,CCD/AP电路异常 E225-0002 顶端放大补正值与前一的补正值相比超过规定电平复印倍率: 1,ADF模式: 25~800%(第1反光镜架固定在流动读取位置的曝光玻璃下,原稿由ADF输送)2,原稿台读取模式: 25~800%倍率变化: 主扫描方向主扫描方向25~800%,由主控制板图像处理的变倍程序软件完成,副扫描方向副扫描方向50%以上由第1反光镜架的扫描速度或ADF的原稿搬送速度确定副扫描方向25%~49%和401%~800%由主控制板图像处理的变倍程序软件完成,原稿扫描电机,扫描原位传感器 E202-0001电源开关ON后或按复印键后光学系统前进40毫米,扫描原位传感器PS400未OFF;或扫描电机M3故障原稿扫描电机,扫描原位传感器 E202-0002 光学系统返回450毫米,光学系统扫描原位传感器PS400未ON;注:键盘锁住,不显示E202;可进入维修程序模式,选择COPIER>DISPLAY>ERR 中确定故障码图象前沿检测信号故障(ADF) E204-0001 ADF板或读取板故障,打印过程中未收到ADF 来的图象前沿信号;扫描灯架前进时未收到图象前沿信号.注:键盘锁住,不显示E204;可进入维修程序模式,选择COPIER>DISPLAY>ERR 中确定故障码扫描位置调整 ADJ-XY COPIER>ADJUST>ADJ-XY>副扫描方向图像读取开始位置调整 COPIER>ADJUST>ADJ-XY>ADJ-X 调整围250~290 每步0.1毫米数据大移向稿台刻度主扫描方向图像读取开始位置调整 COPIER>ADJUST>ADJ-XY>ADJ-Y 调整围100~400 每步0.1毫米读取开始位置在稿台玻璃左后方,数据大移向前边光学原位位置调整(HP传感器) COPIER>ADJUST>ADJ-XY>ADJ-S 调整围55~70 每步0.1毫米调整值改变后必修将ADF打开再关闭ADF主扫描方向图像读取开始位置调整 COPIER>ADJUST>ADJ-XY>ADJ-Y-DF 调整围100~400 每步0.1毫米用ADF移动扫描时CCD读取位置的调整 COPIER>ADJUST>ADJ-XY>STRD-POS 调整围0~60 每步0.1毫米图像处理系统CCD/AP板(CCD驱动;模拟图像处理;A/D变换)注:CCD,600dpi(7450象素);255级灰度;读取控制板(光补偿补正;自动浓度调整)模拟图像处理由CCD/AP板完成:CCD驱动;模拟图像处理(CCD输出的增益补正,不均匀性补正);CCD输出的A/D变换CCD输出的增益补正,不均匀性补正由于CCD(7450个象素)各象素的光电转换效率不可能相同,要进行CCD输出的模拟图像信号增益补正,;使无入射光时的输出电压为一定值,进行不均匀性补正;注:CCD,600dpi(7450象素);255级灰度(8bit A/D变换)数字图像处理由读取控制板完成遮蔽Shading补偿补正,自动浓度调整遮蔽Shading补偿由于CCD各象素的感光度不均匀;镜头中心与边缘透光率不同;曝光灯中间与边光量不同和老化遮蔽Shading补偿分:用维修模式确定目标值的遮蔽Shading补偿调整和每次原稿扫描时进行的遮蔽Shading补偿补正;短期光量变动的补正用增益来补正遮蔽Shading补偿调整测定白纸和标准白板的浓度数据经演算处理并记忆这些参数作为遮蔽Shading补偿的目标值(更换曝光灯或光量变化后用维修模式进行)遮蔽Shading补偿补正每次原稿扫描时进行,先测定标准白板的数据然后与遮蔽Shading补偿补正的目标值进行比较将其差值作遮蔽Shading补偿补正值来设定补偿原稿扫描时的各CCD的图像的偏差使图像浓度均匀端部增益补正(ADF用) ADF进行流动读出时,第1反光镜灯架固定在流动读出位置,为检测光量的变化在流动读出玻璃的后端部安装了端部增益补正测试板(灰色)读出该测试板反射回来光量,经过计算后作为增益值,使用该数据进行光量变化的补正标准白纸的浓度数据设定如有底灰降低设定数 COPIER>ADJUST>CCD>PPR 设定围0~255标准白板的浓度数据设定 COPIER>ADJUST>CCD>PLT 设定围0~255CCD输出的增益调整值输入 COPIER>ADJUST>CCD>GAIN-E/OCCD输出的不均匀性Offset调整值输入 COPIER>ADJUST>CCD>OFST-E/O遮蔽Shading补偿补正时标准白纸和标准白板的白电平比例数据 COPIER>ADJUST>CCD>SH-RATIO遮蔽Shading补偿正时的白色程度目标值输入 COPIER>ADJUST>CCD>SH-TRGTCCD的顶端放大补正开始位置调整值输入 COPIER>ADJUST>CCD>EGGN-ST CCD的顶端放大补正结束位置调整值输入 COPIER>ADJUST>CCD>EGGN-END 实时AE模式的文字浓度调整 COPIER>ADJUST>AE>AE-TBL 调整围1~9,缺省值5,数据大文字浓度加深对报纸类等底色浓的原稿为了使复印件不再出现原稿的底色,本调整在自动浓度模式或文字模式有效,ABC回路进行数据处理CCD光补偿自动补正的自动调整: COPIER>FUNCTION>CCD>CCD-ADJ1,稿台上放10标准白纸2,选择COPIER>FUNCTION>CCD>CCD-ADJ3,CCD-ADJ,显示反转后按OK键后进行自动调整4,COPIER>ADJUST>CCD>的整个项目已更新,要在维修标签中进行登记CCD 遮蔽(Shading)补偿位置调整: COPIER>FUNCTION>CCD>SHDG-POS遮蔽(Shading)补偿的标准白板上的位置自动调整的数据,调整围240~+320CCD 遮蔽(Shading)补偿位置设定: COPIER>FUNCTION>CCD>SH-PS-SET遮蔽(Shading)补偿的标准白板上的位置自动调整的数据更换稿台玻璃(标准白色板)以后或中间色调中有明显的白色条时要执行该模式执行该模式前要进行COPIER>FUNCTION>CCD>CCD-ADJ 调整1,清洁稿台玻璃2,选择COPIER>FUNCTION>CCD>SH-PS-SET,按OK键3,按OK执行自动CCD 遮蔽(Shading)补偿位置设定调整,调整后自动停止.CCD的端部放大补正的自动调整 COPIER>FUNCTION>CCD>EGGN-POS (仅使用RADF进行流动读出时有效)1,打开ADF,2,选择该项目按OK键,3,自动调整,(大约分钟)调整后自动停止(如果显示NG检查:ADF是否打开;移动读出用扫描玻璃安装是否正确;玻璃顶端(后面)的灰色放大补正板是否有问题;原稿曝光灯点亮是否正确)由于COPIER>ADJUST>CCD>EGGN-ST和EGGN-END的项目已更新,要在维修标签中进行记录图像清晰度电平设定 COPIER>OPTION>BODY>SHARP 设定围:1~5 ;缺省值=3,数值大清晰度高(焦距增大)更换CCD/AP单元后要执行:D光补偿自动补正的自动调整: COPIER>FUNCTION>CCD>CCD-ADJ 1,稿台上放10标准白纸2,选择COPIER>FUNCTION>CCD>CCD-ADJ3,CCD-ADJ,显示反转后按OK键后进行自动调整4,COPIER>ADJUST>CCD>的整个项目已更新,要在维修标签中进行登记D的端部放大补正的自动调整: COPIER>FUNCTION>CCD>EGGN-POS(仅使用ADF进行流动读出时有效)1,打开ADF, 2,选择该项目按OK键, 3,自动调整,4,调整后自动停止显示OK/NG,(如果显示NG检查:ADF是否打开;移动读出用扫描玻璃安装是否正确;玻璃顶端(后面)的灰色放大补正板是否有问题;原稿曝光灯点亮是否正确)5,由于COPIER>ADJUST>CCD>EGGN-ST和EGGN-END的项目已更新,要在维修标签中进行记录D调整数据: COPIER>ADJUST>CCD>的全部进行COPIER>FUNCTION>CCD>CCD-ADJ操作后,图像有问题时,输入维修标签上的值电信号补偿正时的白色程度目标值输入 COPIER>ADJUST>CCD>SH-TRGT电信号补偿正时的标准白色纸与标准白板之比率数据值 COPIER>ADJUST>CCD>SH-RATIO CCD的端部放大补正开始位置调整值输入 COPIER>ADJUST>CCD>EGGN-STCCD的端部放大补正结束位置调整值输入 COPIER>ADJUST>CCD>EGGN-ENDCCD读取位置调整 ADJ-XY主扫描方向图像读取开始位置调整 COPIER>ADJUST>ADJ-XY>ADJ-Y 调整围100~400每步0.1毫米数据大移向前边副扫描方向图像读取开始位置调整 COPIER>ADJUST>ADJ-XY>ADJ-X 调整围250~290每步0.1毫米数据大移向稿台刻度光学原位(白板读取位置)调整(HP传感器) COPIER>ADJUST>ADJ-XY>ADJ-S 调整围55~70 每步0.1毫米调整值改变后必修将ADF打开再关闭ADF主扫描方向图像读取开始位置调整 COPIER>ADJUST>ADJ-XY>ADJ-Y-DF 调整围100~400 每步0.1毫米用ADF移动扫描时CCD读取位置的调整 COPIER>ADJUST>ADJ-XY>STRD-POS 调整围30~60 每步0.1毫米电信号补偿正时的白色程度目标值输入 COPIER>ADJUST>CCD>SH-TRGT标准白纸和标准白板的白电平比例数据 COPIER>ADJUST>CCD>SH-RATIO CCD光补偿正时,标准白纸和标准白板的白电平比例数据。
Ca non佳能(中国)有限公司技术资讯(复合机,打印机,扫描仪,投影机)第一期发布日期:2005年4月25日佳能(中国)有限公司市场技术服务部Ca non 目录一. 技术常识1. 分辨率的技术指标2. 图像存储格式二. 问题及解决1. PIXMA IP2000打印机安装问题2. W7200打印机在PHOTOSHOP6.0打印时,打印内容不完全3. LBP3200纸张走向歪斜(打印表格不正)解决方法4. LBP3200不定期卡纸问题三. 维修信息发布1. PIXMA iP1500 配件变更信息2. PIXMA iP2000 ROM错误配件号标记信息四. 佳能(中国)上海分公司发布的技术月刊一. 技术常识1. 分辨率的技术指标一般的情况下,我们常用DPI(每英寸的点数)来描述分辨率。
事实上存在一个与DPI相似而又不同的重要参数— PPI(每英寸的像素数)。
图像处理设备中,因为PPI包含了色深(色彩位数),因此PPI往往比我们所习惯的DPI更能确切的说明这个设备的规格。
它提示我们对光学设备的技术规格描述中不要忽略另一些重要的指标,如色深,动态密度等。
因此我们在此将DPI和PPI的概念进行一下比较。
DPI:Dot Per Inch(每英寸的点数)DPI指出在每英寸图像上点的密度,而这里所说明的点只存在有和无“1”和“0”的概念。
PPI:Pixel Per Inch(每英寸的像素数)PPI指出在每英寸图像上的像素数,而这里的像素却包含了对色彩的描述(色深),当我们说图像上的点的原色在数字上以8位描述时,则实际上该点的像素色彩为RGB共24位来说明。
为更确切的描述DPI与PPI的区别,我们以如下实例来进行说明:假设我们要对一个彩色图像进行打印,而所使用的为3色(CMY)打印机。
当打印的图像中某一像素为C或M或Y颜色时,只要对应打印出C或M或Y的点即可表示了。
但是当要打印除CMY以外的任一其它中间颜色时,便无法打印出来了。
佳能扫描仪说明书篇一:扫描仪的使用方法与技巧扫描仪使用方法与技巧不少用户在购买扫描仪后,常常会发现扫描图片的品质不太理想,实际上,出现这种情况,主要的还是与用户使用扫描仪的技巧密切相关。
准备工作要做好普通用户在使用扫描仪之前,很有必要对扫描仪的基本原理做个初步的了解,这样将大大有助于正确合理地使用扫描仪。
扫描仪获取图像的方式是将光线照射到待扫描的图片或文档上,光线反射后由感光元件——CCD(Charge Coupled Device,电荷耦合元件)或CISr)接收,由于图像色彩深浅不一,致使反射光强度也各不相同,感光元件可以接收各种强度的光,并转换为二进制的数字信号,最后由控制扫描的软件将这些数据还原为显示器上可以看到的图像.为了将图像客观真实地反映出来,必须保证光线能够平稳地照到待扫描的稿件上,笔者建议大家在扫描前可以先打开扫描仪预热5至10分钟,使机器内的灯管达到均匀发光状态,这样可以确保光线平均照到稿件每一处。
此外,不要因扫描仪的倾斜或抖动影响到扫描品质,用户应尽量找一处比较平坦、稳定的地方放置,一些用户为节约办公空间而直接将扫描仪置于机箱上方的做法万万不可取。
现在,佳能公司的N系列扫描仪都实现了直立扫描,配有专用扫描仪支架,有效的节约了办公空间。
此外,扫描前仔细检查玻璃上方是否有污渍,若有一定要用软布擦拭干净,以免影响扫描效果。
预扫步骤不可少为了节约扫描时间,一些用户贪图方便,常常忽略预扫步骤。
其实,在正式扫描前,预扫功能是非常必要的,它是保证扫描效果的第一道关卡。
通过预扫有两方面的好处,一是在通过预扫后的图像我们可以直接确定自已所需要招描的区域,以减少扫描后对图像的处理工序;二是可通过观察预扫后的图像,我们大致可以看到图像的色彩、效果等,如不满意可对扫描参数重新进行设定、调整之后再进行扫描。
限于扫描仪的工作原理,扫描得到的图像或多或少会出现失真或变形。
因此,好的原稿对得到高品质的扫描效果是格外重要的,而品质不佳的原稿,即使通过软件处理可以改善扫描效果,但终究属亡羊补牢的做法。
Stampante laser MFP monocromaticaGuida per l'utenteSommarioInformazioni relative alla sicurezza (12)Informazioni sulla stampante (14)Configurazioni della stampante (14)Scelta della posizione della stampante (14)Funzioni di base dello scanner (15)Informazioni su ADF e vetro dello scanner (16)Informazioni sul pannello di controllo della stampante (17)Informazioni sulla schermata iniziale (18)Utilizzo dei pulsanti del touch screen (20)Configurazione della stampante aggiuntiva (25)Installazione delle opzioni interne (25)Opzioni interne disponibili (25)Accesso alla scheda di sistema per l'installazione delle opzioni interne (26)Installazione di una scheda di memoria (28)Installazione di una scheda di memoria Flash o di una scheda firmware (29)Installazione di una porta ISP (Internal Solutions Port) (32)Installazione del disco fisso della stampante (38)Installazione di una scheda fax (42)Collegamento dei cavi (44)Verifica della configurazione della stampante (45)Stampa della pagina delle impostazioni dei menu (46)Stampa di una pagina delle impostazioni di rete (46)Impostazione del software della stampante (47)Installazione del software della stampante (47)Aggiornamento delle opzioni disponibili nel driver della stampante (47)Impostazione della stampa wireless (48)Informazioni necessarie per l'impostazione della stampante su una rete wireless (48)Installazione di stampante su una rete wireless (Windows) (49)Installazione della stampante su una rete wireless (Macintosh) (51)Installazione della stampante in una rete cablata (53)Modifica delle impostazioni della porta dopo l'installazione di una nuova porta ISP (InternalSolutions Port) di rete (56)Impostazione della stampa seriale (58)Configurazione della stampante per il fax (60)Selezione di una connessione fax (60)Uso dell'adattatore RJ11 (61)Collegamento diretto a una presa a muro telefonica in Germania (64)Collegamento a un telefono (66)Collegamento a una segreteria telefonica (67)Collegamento a un computer con modem (68)Impostazione del nome e del numero del fax in uscita (70)Impostazione di data e ora (70)Attivazione dell'ora legale (70)Caricamento della carta e dei supporti speciali (71)Impostazione del tipo e delle dimensioni della carta (71)Configurazione delle impostazioni di dimensione carta Universale (71)Caricamento del vassoio standard oppure opzionale da 250 o 550 fogli (72)Caricamento del vassoio da 2000 fogli (75)Caricamento dell'alimentatore multiuso (79)Caricamento dell'alimentatore buste (81)Collegamento e scollegamento dei vassoi (82)Collegamento dei vassoi (82)Scollegamento dei vassoi (83)Assegnazione di nome del tipo di carta personalizzato (83)Modifica di un nome per l'impostazione Personalizzata tipo <x> (83)Informazioni sulla carta e sui supporti speciali (85)Istruzioni relative alla carta (85)Caratteristiche della carta (85)Carta non adatta (86)Scelta della carta (86)Scelta dei moduli prestampati e della carta intestata (87)Uso di carta riciclata e di altri tipi di carta da ufficio (87)Conservazione della carta (87)Tipi, formati e pesi supportati (88)Dimensioni carta supportate dalla stampante (88)Tipi e pesi di carta supportati dalla stampante (90)Tipi e pesi di carta supportati dai raccoglitori di uscita (90)Copia (92)Esecuzione di copie (92)Esecuzione di una copia rapida (92)Copia tramite ADF (92)Copia tramite vetro dello scanner (93)Copia di fotografie (93)Copia su supporti speciali (93)Creazione di lucidi (93)Copia su carta intestata (94)Personalizzazione delle impostazioni di copia (94)Copia da una dimensione a un'altra (94)Esecuzione di copie utilizzando carta proveniente da un vassoio selezionato (95)Copia di un documento che contiene dimensioni carta miste (95)Copia su entrambi i lati del foglio (fronte/retro) (96)Riduzione o ingrandimento di copie (97)Regolazione della qualità di copia (97)Fascicolazione copie (98)Inserimento di fogli separatori tra copie (98)Copia di più pagine su un singolo foglio (99)Creazione di un processo personalizzato (creazione processo) (99)Interruzione processo (100)Inserimento di informazioni sulle copie (100)Inserimento di data e ora nella parte superiore di ogni pagina (100)Inserimento di un messaggio del modulo elettronico in ogni pagina (101)Annullamento di un processo di copia (101)Annullamento di un processo di copia quando il documento è nell'ADF (101)Annullamento di un processo di copia quando si copiano pagine dal vetro dello scanner (101)Annullamento di un processo di copia durante la stampa delle pagine (102)Informazioni su opzioni e schermate di copia (102)Copia da (102)Copia in (102)Scala (102)Tonalità (103)Contenuto (103)Lati (fronte/retro) (103)Fascicola (103)Opzioni (103)Migliorare la qualità delle copie (105)Funzione di e-mail (106)Approntamento per la funzione di e-mail (106)Impostazione della funzione e-mail (106)Configurazione delle impostazioni e-mail (107)Creazione di una scelta rapida per la funzione di e-mail (107)Creazione di una scelta rapida e-mail tramite server Web incorporato (107)Creazione di una scelta rapida e-mail tramite il touch screen (107)Invio di un documento tramite e-mail (108)Invio di un messaggio e-mail tramite il touch screen (108)Invio di e-mail tramite numero di scelta rapida (108)Invio di un'e-mail tramite rubrica (108)Personalizzazione delle impostazioni e-mail (109)Aggiunta dell'oggetto dell'e-mail e delle informazioni sul messaggio (109)Modifica del tipo di file di output (109)Annullamento di un'e-mail (110)Informazioni sulle opzioni e-mail (110)Dimensione originale (110)Lati (fronte/retro) (110)Orientamento (111)Rilegatura (111)Oggetto (111)Nome file e-mail (111)Messaggio (111)Risoluzione (111)Invia come (111)Contenuto (112)Opzioni avanzate (112)Funzione fax (113)Invio di un fax (113)Invio di un fax tramite il pannello di controllo della stampante (113)Invio di un fax mediante il computer (114)Creazione di scelte rapide (114)Creazione di una scelta rapida di destinazione fax tramite server Web incorporato (114)Creazione di una scelta rapida per una destinazione fax tramite il touch screen (115)Utilizzo delle scelte rapide e della rubrica (115)Uso delle scelte rapide del fax (115)Uso della rubrica (116)Personalizzazione delle impostazioni del fax (116)Modifica della risoluzione del fax (116)Come schiarire o scurire un fax (117)Invio di fax a un'ora programmata (117)Visualizzazione di un registro fax (118)Blocco dei fax indesiderati (118)Annullamento di un fax in uscita (118)Eliminazione di un fax mentre il documento è ancora sottoposto a scansione (118)Eliminazione di un fax dopo che l'originale è stato acquisito e salvato in memoria (119)Informazioni sulle opzioni fax (119)Dimensione originale (119)Contenuto (119)Lati (fronte/retro) (119)Risoluzione (120)Tonalità (120)Opzioni avanzate (120)Miglioramento della qualità dei fax (121)Messa in attesa e inoltro di fax (121)Messa in attesa di fax (121)Inoltro di un fax (122)Scansione su un indirizzo FTP (123)Scansione su un indirizzo FTP (123)Scansione su un indirizzo FTP mediante tastierino (123)Scansione su un indirizzo FTP mediante un numero di scelta rapida (124)Scansione su un indirizzo FTP mediante la rubrica (124)Creazione di scelte rapide (124)Creazione di una scelta rapida FTP tramite il server Web incorporato (124)Creazione di una scelta rapida FTP tramite il touch screen (125)Descrizione delle opzioni FTP (125)Dimensione originale (125)Lati (fronte/retro) (125)Orientamento (125)Rilegatura (126)Risoluzione (126)Invia come (126)Contenuto (126)Opzioni avanzate (127)Miglioramento della funzionalità FTP (127)Scansione su un computer o un'unità Flash (128)Scansione su un computer (128)Scansione su unità Flash (129)Informazioni sulle opzioni del profilo di scansione (129)Impostazione rapida (129)Tipo di formato (130)Compressione (130)Contenuto predefinito (130)Colore (130)Dimensione originale (130)Orientamento (131)Lati (fronte/retro) (131)Tonalità (131)Risoluzione (131)Imaging avanzato (131)Miglioramento della qualità di scansione (132)Stampa (133)Stampa di un documento (133)Stampa su supporti speciali (134)Suggerimenti sull'uso della carta intestata (134)Suggerimenti sull'uso di lucidi (134)Suggerimenti sull'uso delle buste (134)Suggerimento sull'uso delle etichette (135)Suggerimenti sull'uso dei cartoncini (135)Stampa dei processi riservati e in attesa (136)Processi in attesa (136)Stampa di processi riservati e in attesa da Windows (137)Stampa di processi riservati e in attesa da un computer Macintosh (137)Stampa da unità Flash (138)Stampa di pagine di informazioni (139)Stampa di un elenco di directory (139)Stampa delle pagine di prova della qualità di stampa (139)Annullamento di un processo di stampa (140)Annullamento di un processo di stampa dal pannello di controllo della stampante (140)Annullamento di un processo di stampa dal computer (140)Rimozione degli inceppamenti (142)Come evitare gli inceppamenti (142)Aree di inceppamento e codici correlati (143)200 e 201 Inceppamenti carta (143)202 Inceppamento carta (145)230–239 Inceppamenti carta (146)240–249 Inceppamenti carta (147)Inceppamento carta 250 (148)260 Inceppamento carta (149)270–279 Inceppamenti carta (149)280–282 Inceppamenti carta (149)283 Inceppamenti graffette (150)290–294 Inceppamenti carta (152)Informazioni sui menu della stampante (154)Elenco dei menu (154)Menu Carta (155)Menu Origine predefinita (155)Menu Dimensioni/tipo carta (155)Menu Configura MU (158)Miglioramento buste (159)Menu Sostituisci dimensioni (159)Menu Grana carta (159)Menu Peso carta (161)Menu Caricamento carta (162)Menu Tipi personalizzati (164)Menu Nomi personalizzati (164)Menu Dimensioni di scansione personalizzate (165)Menu Nomi raccoglitori personalizzati (165)Menu Impostazione Universale (165)Menu Installaz. raccoglitore (166)Menu, report (167)Menu Rete/Porte (168)Menu NIC attivo (168)Menu Rete standard o Rete (169)Menu Impostazione SMTP (171)Menu Report di rete (172)Menu Scheda di rete (172)Menu TCP/IP (173)Menu IPv6 (174)Menu Wireless (174)Menu AppleTalk (175)Menu NetWare (175)Menu LexLink (176)Menu USB standard (177)Menu Parallela <x> (179)Menu Seriale <x> (182)Menu Protezione (186)Menu Varie (186)Menu Stampa riservata (187)Menu Pulizia disco in corso (187)Menu Registro controllo protezione (189)Menu Imposta data/ora (189)Menu Impostazioni (190)Menu Impostazioni generali (190)Menu Impostazioni copia (199)Menu Impostazioni fax (204)Menu Impostazioni e-mail (214)Menu Impostazioni FTP (219)Menu Unità Flash (222)Impostazioni di stampa (227)Menu Guida (239)Informazioni sui messaggi della stampante (240)Elenco di messaggi di stato e di errore (240)Manutenzione della stampante (260)Pulizia della parte esterna della stampante (260)Pulizia del vetro dello scanner (261)Regolazione della registrazione dello scanner (262)Conservazione dei materiali di consumo (263)Conservazione dei materiali di consumo (263)Verifica dello stato dei materiali di consumo (264)Verifica dello stato dei materiali di consumo dal pannello di controllo della stampante (264)Verifica dello stato dei materiali di consumo da un computer di rete (264)Ordinazione di materiali di consumo (264)Richiesta di cartucce di stampa (264)Spostamento della stampante (265)Prima di spostare la stampante (265)Spostamento della stampante (265)Installazione della stampante in una nuova postazione (266)Trasporto della stampante (266)Supporto amministrativo (267)Uso del server Web incorporato (267)Verifica dello stato della periferica (267)Impostazione degli avvisi e-mail (267)Visualizzazione di report (268)Regolazione della luminosità del display (268)Regolazione dell'opzione Risparmio energia (268)Ripristino delle impostazioni predefinite di fabbrica (269)Risoluzione dei problemi (270)Risoluzione dei problemi della stampante di base (270)Il display del pannello di controllo della stampante è vuoto o contiene solo simboli didiamanti (270)Risoluzione dei problemi di stampa (270)Non è possibile stampare i PDF multilingua (270)Viene visualizzato un messaggio di errore relativo alla lettura dell'unità USB (271)I processi non vengono stampati (271)I processi riservati e altri processi in attesa non vengono stampati (272)La stampa richiede più tempo del previsto (272)La carta o il vassoio utilizzato per la stampa del processo non è corretto (273)Stampa di caratteri errati (273)Collegamento dei vassoi non funzionante (273)I processi di grandi dimensioni non vengono fascicolati (273)Vengono visualizzate interruzioni di pagina errate (274)Risoluzione dei problemi di copia (274)La fotocopiatrice non risponde (274)L'unità scanner non si chiude (274)Scarsa qualità di copia (275)Copie di documenti o di foto parziali (276)Risoluzione dei problemi dello scanner (277)Controllo di uno scanner che non risponde (277)Scansione non riuscita (277)La scansione richiede troppo tempo o causa il blocco del computer (277)Scarsa qualità dell'immagine sottoposta a scansione (277)Scansioni di documenti o di foto parziali (278)Impossibile eseguire la scansione da un computer (278)Risoluzione dei problemi del fax (279)Mancata visualizzazione dell'ID chiamante (279)Impossibile inviare o ricevere fax (279)È possibile effettuare l'invio ma non la ricezione di fax (281)È possibile effettuare la ricezione ma non l'invio di fax (281)I fax ricevuti presentano una scarsa qualità di stampa (282)Risoluzione dei problemi relativi alle opzioni (282)L'opzione non funziona correttamente o smette di funzionare dopo l'installazione (282)Vassoi carta (283)Vassoio da 2000 fogli (283)Alimentatore buste (284)Opzioni di uscita (284)Scheda di memoria Flash (284)Disco fisso con adattatore (285)Porta ISP (Internal Solutions Port) (285)Scheda di memoria (285)Risoluzione dei problemi di alimentazione della carta (285)Si verificano numerosi inceppamenti carta (285)Il messaggio Inceppamento carta resta visualizzato anche dopo l'eliminazione dell'inceppamento (286)La pagina inceppata non viene ristampata dopo la rimozione dell'inceppamento (286)Problemi di qualità di stampa (287)Individuazione dei problemi relativi alla qualità di stampa (287)Pagine bianche (287)I caratteri presentano bordi irregolari (288)Le immagini sono tagliate (288)Immagini sfocate (289)Sfondo grigio (289)I margini sono errati (289)Arricciamento della carta (290)Irregolarità nella stampa (290)Difetti ricorrenti (291)La stampa è obliqua (292)Striature bianche o nere piene (292)La stampa è troppo chiara (293)La stampa è troppo scura (294)Le pagine sono interamente colorate (295)Striature verticali (295)Sulla pagina sono presenti ombreggiature dovute al toner (296)Aderenza difettosa del toner (296)Puntini di toner (297)La qualità di stampa sul lucido è scarsa (297)Il server Web incorporato non si apre (297)Verificare i collegamenti di rete (297)Verificare le impostazioni della rete (298)Come contattare il servizio di assistenza (298)Avvertenze (299)Nota all'edizione (299)Avvertenze Industry Canada (300)Consumo energetico (304)Indice (306)Informazioni relative alla sicurezzaCollegare il cavo di alimentazione a una presa elettrica dotata di messa a terra posta nelle vicinanze del prodotto e facilmente raggiungibile.Non posizionare o utilizzare questo prodotto in prossimità di acqua o superfici bagnate.ATTENZIONE — PERICOLO DI LESIONI: questo prodotto utilizza un laser. L'uso di regolazioni, procedure ocontrolli diversi da quelli specificati può causare l’esposizione a radiazioni pericolose.Questo prodotto utilizza un processo che sottopone a riscaldamento i supporti di stampa; il calore generato puòcausare l'emissione di sostanze nocive da parte dei supporti. Leggere attentamente la sezione delle istruzioni operative riguardante la scelta dei supporti di stampa in modo da evitare il rischio di emissioni nocive. Sostituire la batteria al litio con molta cautela.ATTENZIONE — PERICOLO DI LESIONI: in caso di sostituzione errata della batteria al litio, potrebbe verificarsiun'esplosione. Sostituire la batteria al litio solo con un tipo equivalente. Non ricaricare, smontare o bruciare batterie al litio. Disfarsi delle batterie usate seguendo le istruzioni del produttore e le norme locali.ATTENZIONE — SUPERFICIE MOLTO CALDA: l'area interna della stampante può surriscaldarsi. Per evitareinfortuni, lasciare raffreddare la superficie prima di toccarla.ATTENZIONE — PERICOLO DI LESIONI: la stampante pesa oltre 18 kg (40 libbre) e deve essere sollevata dadue o più persone allenate.ATTENZIONE — PERICOLO DI LESIONI: prima di spostare la stampante, per evitare di ferirsi o danneggiare lastampante stessa, attenersi alle seguenti istruzioni:•Spegnere la stampante con l'interruttore e scollegare il cavo di alimentazione dalla presa a muro.•Scollegare tutti i cavi della stampante prima di spostarla.•Sollevare la stampante dal cassetto opzionale e metterla da parte anziché tentare di sollevare il cassetto e la stampante contemporaneamente.Nota: utilizzare i punti di presa ai lati della stampante per sollevarla e separarla dal cassetto opzionale. Utilizzare solo il cavo di alimentazione fornito con il prodotto o componenti sostitutivi autorizzati dal produttore. Quando si collega il prodotto alla rete telefonica pubblica commutata, utilizzare solo il cavo per telecomunicazioni (RJ-11) fornito con il prodotto oppure un cavo 26 AWG o un cavo sostitutivo più grande.ATTENZIONE — PERICOLO DI SCOSSA: se si accede alla scheda di sistema o si installano dispositivi di memoriao hardware opzionali dopo aver configurato la stampante, prima di continuare, spegnere la stampante e scollegare il cavo di alimentazione dalla presa a muro. Spegnere gli eventuali dispositivi collegati alla stampantee scollegare tutti i cavi della stampante.ATTENZIONE — PERICOLO DI SCOSSA: accertarsi che tutte le connessioni esterne (quali connessioni Ethernete a sistemi telefonici) siano installate in modo corretto nelle relative porte contrassegnate.Questo prodotto è stato progettato, testato e approvato per essere utilizzato con componenti di uno specifico produttore, conformemente ai rigidi standard globali per la sicurezza. Le caratteristiche legate alla sicurezza di alcune parti potrebbero non essere ovvie. Il produttore non è da ritenere responsabile in caso di uso di altre parti di ricambio.ATTENZIONE — PERICOLO DI LESIONI: non attorcigliare, legare, schiacciare o posizionare oggetti pesanti sulcavo di alimentazione. Evitare abrasioni o tensioni. Non stringere il cavo di alimentazione tra oggetti quali mobili o pareti. Se il cavo di alimentazione non viene utilizzato correttamente, potrebbero verificarsi incendi o corto circuiti. Ispezionare regolarmente il cavo di alimentazione per verificare eventuali segni di usi non corretti.Rimuovere il cavo di alimentazione dalla presa elettrica prima di ispezionarlo.Per riparazioni di tipo diverso dagli interventi descritti nella documentazione per l'utente, rivolgersi a un tecnico specializzato.ATTENZIONE — PERICOLO DI SCOSSA: per evitare il rischio di scosse elettriche quando si pulisce la parteesterna della stampante, prima di continuare scollegare il cavo di alimentazione dalla presa a muro e scollegare tutti i cavi dalla stampante.ATTENZIONE — PERICOLO DI SCOSSA: in caso di temporali non utilizzare la funzione fax, non installare questoprodotto né effettuare i collegamenti elettrici o dei cavi, ad esempio la funzione fax, il cavo di alimentazione o del telefono, durante un temporale.ATTENZIONE - PERICOLO DI PUNGERSI: le configurazioni con installazione a terra richiedono componentiaggiuntivi per garantire una stabilità maggiore. Se si utilizzano un vassoio di alimentazione ad alta capacità, un'unità fronte/retro e un'opzione di alimentazione oppure più opzioni di alimentazione, è necessario utilizzare un supporto o una base per la stampante. Se è stata acquistata una stampante multifunzione (MFP) in grado di eseguire operazioni di scansione, copia e invio di fax, potrebbero occorrere opzioni aggiuntive. Per ulteriori informazioni, visitare il sito Web /literature/workgroupconfig.SALVARE QUESTE ISTRUZIONI.Informazioni sulla stampanteConfigurazioni della stampanteNota: la configurazione della stampante può variare a seconda del modello della stampante.Modelli di base1Alimentatore automatico documenti (ADF, Automatic Document Feeder)2Pannello di controllo della stampante3Raccoglitore di uscita standard4Alimentatore multiuso5Vassoio da 550 fogli (Vassoio 1)6Vassoio da 550 fogli (Vassoio 2)7Raccoglitore di uscita opzionaleScelta della posizione della stampanteQuando si sceglie una posizione per la stampante, lasciare spazio sufficiente per aprire vassoi, coperchi e sportelli. Se si prevede di installare opzioni, lasciare spazio sufficiente anche per questi componenti. Importante:•Accertarsi che il flusso d'aria nella stanza sia conforme all'ultima revisione dello standard ASHRAE 62.•Scegliere una superficie piana, solida e stabile.•Posizionare la stampante:–Lontano dal flusso diretto di eventuali condizionatori d'aria, riscaldatori o ventilatori–Al riparo dalla luce solare diretta, da livelli estremi di umidità o da escursioni termiche–Al riparo da polvere e sporcizia•Consentire la seguente quantità di spazio consigliata intorno alla stampante per una corretta ventilazione:1Lato destro20 cm (8 poll.)2Lato sinistro31 cm (12 poll.)3Anteriore51 cm (20 poll.)4Posteriore20 cm (8 poll.)5Superiore31 cm (12 poll.)Funzioni di base dello scannerLo scanner consente di effettuare operazioni quali l'esecuzione di copie, l'invio di fax e la scansione in rete di grandi quantità di documenti. È possibile:•Eseguire rapidamente copie e modificare le impostazioni del pannello di controllo della stampante per eseguire specifici processi di copia.•Inviare un fax tramite il pannello di controllo della stampante.•Inviare fax a più destinatari contemporaneamente.•Eseguire la scansione di documenti e inviarli al computer, a un indirizzo e-mail, a un'unità Flash o a unadestinazione FTP.•Eseguire la scansione di documenti e inviarli a un'altra stampante (file PDF mediante protocollo FTP).Informazioni su ADF e vetro dello scannerÈ possibile utilizzare l'ADF o il vetro dello scanner per eseguire la scansione dei documenti.Uso di ADFL'alimentatore automatico documenti (ADF) può eseguire la scansione di più pagine, incluse le pagine fronte/retro. Quando si utilizza l'ADF:•Caricare il documento rivolto verso l'alto, inserendo per primo il bordo corto nell'ADF.•Caricare al massimo di 75 fogli di carta normale nel vassoio di alimentazione dell'ADF.•Eseguire la scansione di dimensioni comprese tra 76,2 x 139,4 mm (3 x 5,5 poll.) e 215,9 x 355,6 mm (8,5 x 14 poll.).•Eseguire la scansione di documenti con dimensioni pagina miste (Letter e Legal).•Eseguire la scansione di supporti con peso compreso tra 52 e 120 g/m2 (14 - 32 lb).•non caricare nell'ADF cartoline, foto, supporti di piccole dimensioni, lucidi, carta fotografica o altri supporti di spessore limitato, quali ritagli di riviste. Posizionare questi elementi sul vetro dello scanner.Uso del vetro dello scannerIl vetro dello scanner può essere utilizzato per eseguire la scansione o la copia di singole pagine o pagine di un libro. Quando si utilizza il vetro dello scanner:•Posizionare il documento nell'angolo superiore sinistro del vetro dello scanner con il lato di stampa rivolto verso il basso.•Eseguire la scansione o la copia di documenti con dimensioni massime di 215,9 x 355,6 mm (8,5 x 14 poll.).•Copiare i libri con spessore massimo di 25,3 mm (1 poll.).Informazioni sul pannello di controllo della stampantedi fax, premereDalla schermata iniziale, premeredalla funzione fax o dalla schermata iniziale, la selezione diNel menu Copia, premerepremendo più volteper eliminare un'intera vocedi scelta rapida. Una volta eliminata un'intera riga, un'altra selezione diNell'elenco di destinazioni e-mail, premerePremerePremereDalla schermata iniziale, premereInformazioni sulla schermata inizialeDopo l'accensione della stampante e un breve periodo di riscaldamento, sul display viene visualizzata la seguente schermata di base, nota come schermata iniziale. Utilizzare i pulsanti della schermata iniziale per avviare un'azione, come ad esempio, la copia, l'invio di fax o la scansione oppure per aprire la schermata del menu o per rispondere ai messaggi.Elemento visualizzato Descrizione1Copia Consente di aprire i menu Copia.Nota: dalla schermata iniziale, è possibile accedere ai menu Copia anche premendoun numero sul tastierino.2E-mail Consente di aprire i menu E-mail.3Menu Consente di aprire i menu. Questi menu sono disponibili solo se la stampante si trovanello stato Pronta.4FTP Consente di aprire i menu FTP (File Transfer Protocol).Nota: questa funzione deve essere configurata dal responsabile del supporto delsistema. Una volta configurata, compare come elemento visualizzato.5Barra dei messaggi di stato•Mostra lo stato corrente della stampante, ad esempio Pronta o Occupata.•Mostra le condizioni della stampante, ad esempio Toner in esauri-mento.•Mostra i messaggi di intervento per fornire istruzioni sulle operazioni da eseguireper consentire la normale attività della stampante, ad esempio Chiuderesportello o Inserire cartuccia di stampa.6Stato/Materiali di consumo Viene visualizzato sul display ogni volta che lo stato della stampante include unmessaggio che richiede un intervento. Per ottenere ulteriori informazioni sulmessaggio di intervento e su come eliminarlo, toccare il pulsante per accedere allaschermata dei messaggi.7Suggerimenti Tutti i menu contengono un pulsante Suggerimenti. Suggerimenti è una funzionedella guida sensibile al contesto, presente all'interno dei touch screen.8Invia tramite Consente di aprire i menu Fax.。
复印机管理参考手册(参考)1.引言本文档旨在提供复印机的管理参考,以帮助用户更好地使用和维护复印机。
本手册详细介绍了复印机的操作步骤、维护保养、故障排除以及安全注意事项,旨在确保复印机的正常运行和延长使用寿命。
请仔细阅读并按照指南进行操作,以确保复印机的最佳性能。
2.复印机操作步骤2.1开启和关闭复印机-确保复印机已经正确连接电源插座,并打开电源开关。
-复印机将进行自检,等待其准备就绪。
-使用复印机的控制面板,选择所需的复印设置,如份数、缩放比例、纸张大小等。
-放置原始文件在扫描区域上,并确保它们平整。
-按下“开始”按钮,复印机将开始复制文件。
-复印完成后,确保及时关闭复印机,以节省能源和延长设备寿命。
2.2使用复印机的附加功能-传真:连接电话线并按照控制面板上的指示进行传真发送或接收。
-扫描:将文件放在扫描区域上,选择扫描到电子邮件、网络文件夹或USB存储设备等目的地。
-打印:连接计算机并安装适当的打印机驱动程序,通过计算机发送打印任务。
3.复印机维护保养3.1清洁复印机-定期清洁复印机的外部和内部部件,以保持其最佳性能。
-使用干净的布或纸巾轻轻擦拭复印机的外壳和操作面板。
-使用专用的复印机清洁剂清洁扫描区域和玻璃。
-定期清理复印机的内部纸路和墨粉盒,以防止卡纸和打印质量下降。
3.2更换耗材-定期检查墨粉盒的剩余墨粉量,并根据需要更换新的墨粉盒。
-遵循制造商的指南,正确地安装和更换墨粉盒。
-定期检查复印机的其他耗材,如纸张、墨水、碳粉等,并根据需要补充或更换。
4.故障排除4.1卡纸问题-如果复印机出现卡纸情况,请先关闭复印机电源,然后小心地打开纸盒和内部纸路,取出卡纸。
-确保纸张放置正确,纸张尺寸和类型符合复印机的要求。
-检查内部纸路是否有异物或损坏,及时清理或更换损坏的部件。
4.2打印质量问题-确保墨粉盒充足且状态良好。
-检查复印机的扫描区域和玻璃是否干净,如有污渍或灰尘,请清洁干净。
-检查复印机的打印设置,确保选择了正确的纸张类型和质量。
安徽省电力公司集中招标采购临泉供电公司佳能iR 2525i 数码复印机佳能2525I A3 打印复印扫描一体机技术规范书设计单位:临泉供电公司2011年3月单位:批准:审核:编制:2011年3月1日分标编号:货物需求一览表(买方填写)供货范围(卖方填写)1 总则产品总体要求:1、上述组件均为必配部件,供应商不得变更、调整、减少,应保证设备正常运行所应配置的相关辅件、组件。
2、必需符合中国CCC认证、能源之星认证、环保(绿色)认证要求,必需提供相关证明文件。
3、为保证供货渠道的合法性,需出具原厂商针对该项目的供货证明函原件和原厂针对本项目的专项授权函。
4、产品推荐:2、打印机需求基本参数复印/打印方式激光静电转印方式感光材料 OPC显影系统干式单组分显影定影系统按需定影内存标配 256MB(iR 2525)or512MB(iR 2520i/2525i/2530i/2535i/2545i)最大 512MB(iR 2525)预热时间主机电源打开时 30秒或更短睡眠模式恢复时 1秒最大原稿尺寸 A3首页输出时间 iR 2520i 6.4秒iR 2525i/2525/2530i 5.4秒iR 2535i/2545i 3.9秒灰度等级 256级分辨率扫描 600dpi×600dpi复印 1200dpi(等效)×600dpi打印真正1200dpi×1200dpi复印倍率固定倍率 25%,50%,61%,70%,81%,86%,115%,122%,141%,200%,400% 手动缩放 25%-400%(以1%为单位)连续输出速度 iR 2520i 20页/分钟(A4)iR 2525i/2525 25页/分钟(A4)iR 2530i 30页/分钟(A4)iR 2535i 35页/分钟(A4)iR 2545i 45页/分钟(A4)连续复印张数 999 张供纸量 iR 2520i/2525i/2525/2530i 标准 250张+550张(前置式纸盒)+100张(手送纸盘) 最大 250张+550张×3(前置式纸盒)+100张(手送纸盘)iR 2535i/2545i 标准 550张×2(前置式纸盒)+100张(手送纸盘)最大 550张×4(前置式纸盒)+100张(手送纸盘)纸张尺寸纸盒 A3-A5R、8K、16K和16KR手送纸盘 A3-A5R、8K、16K、16KR、非标准尺寸和信封纸张厚度纸盒 64-90g/m2手送纸盘 64-128g/m2出纸托盘容量 250张(A4)电源 iR 2520i/2525i/2525/2530i 220V AC_50Hz_3.3AiR 2535i/2545i 220V AC_50Hz_4.2A最大功耗 iR 2520i/2525i/2525/2530i 1.5kwiR 2535i/2545i 1.8kw主机尺寸 (宽×深×高) iR 2520i/2525i/2530i 565mm×693mm×896mm(安装有双面自动输稿器)iR 2525 565mm×680mm×806mm(安装有稿台盖板)iR 2535i/2545i 565mm×693mm×907mm(安装有双面自动输稿器)主机安装空间(宽×深) 1079mm×1441mm(不安装可选设备时)1367mm×1441mm(安装了可选的内置式装订器-B1时)重量 iR 2520i/2525i/2530i 约76.1kgiR 2525 约70.6kgiR 2535i/2545i 约78.4kg打印规格(标配)UFR II LT网络打印(标配)打印分辨率真正1200dpi×1200dpi打印语言 UFR II LT接口 100BASE-TX/10BASE-T、USB2.0高速网络协议 TCP/IP系统环境 Microsoft Windows?2000/XP/Vista/7,Server 2003/2008,Macintosh OS?(10.4或以上)PCL打印组件-AF1(选配)打印分辨率 1200dpi(等效)×600dpi打印语言 PCL5e, PCL6接口 100BASE-TX/10BASE-T、USB2.0高速网络协议 TCP/IP系统环境 Microsoft Windows?2000/XP/Vista/7,Server 2003/2008PS打印组件-AF1(选配)打印分辨率 1200dpi(等效)×600dpi打印语言 PS3仿真接口 100BASE-TX/10BASE-T、USB2.0高速网络协议 TCP/IP系统环境 Microsoft Windows?2000/XP/Vista/7,Server 2003/2008双面自动输稿器(仅限iR 2520i/2525i/2530i/2535i/2545i,iR 2525需选配)输稿速度 iR 2520i/2525i/2525/2530i 复印25页/分钟(A4,80g/m2)扫描25页/分钟(A4,80g/m2,黑白/彩色)iR 2535i/2545i 复印45页/分钟(A4,80g/m2)扫描30页/分钟(A4,80g/m2,黑白/彩色)原稿尺寸 A3-A5、8K、16K原稿厚度 iR 2520i/2525i/2525/2530i 50-105g/m2iR 2535i/2545i 52-128g/m2原稿托盘容量 iR 2520i/2525i/2525/2530i 50张(A4、80g/m2)iR 2535i/2545i 100张(A4、80g/m2)扫描规格扫描方式拉式标配推式 iR 2525选配色彩方式彩色/黑白扫描分辨率最大600dpi×600dpi(推式,黑白)生成格式 JPEG/TIFF/PDF/高压缩PDF(标配)/OCR PDF(需选配)传真规格(选配)Super G3传真卡-AG1适用线路公用电话线路1条线路调制解调速度 Super G3(最大33.6kbps)数据压缩方式 MH,MR,MMR,JBIG传输速度大约3秒/页 (33.6kbps)其它主要选购件内置式装订器-B1托盘数量 2个(主体本身标配一个,另外的附加内置装订托盘-B1需选配) 托盘容量标准托盘不分套、分套或分组模式 1000张或125mm(A4)装订模式 30套或125mm(A4)安装了附加托盘-B1 不分套、分套或分组模式 100张或12.5mm(A4)装订模式 15套或8.1mm(A4)最大装订张数 50张(A4,64-80g/m2)装订位置角落、两点内置式双路托盘-G1托盘数量 2个(包括一个主机托盘)托盘容量 100张(A4,80g/m2)双纸盒组件-AE1纸张容量 550张×2(80g/m2)纸张尺寸 A3-A5R、8K、16K纸张厚度 64-90g/m2耗材墨粉 NPG-50墨粉(印量约19,400页,用于iR 2535i/2545i)NPG-51墨粉(印量约14,600页,用于iR 2520i/2525i/2525/2530i)感光鼓 NPG-50/51感光鼓(印量约140,000页,用于iR 2535i/2545i) NPG-50/51感光鼓(印量约132,000页,用于iR 2520i/2525i/2525/2530i) 装订针-J1 角落装订、两点装订用针,5000支×3,用于内置式装订器-B1 佳能复印纸 A4 70g复印纸A3 70g复印纸A4 80g复印纸A3 80g复印纸2 测试和验收2.1 概述a 验收包括工厂验收和现场验收;b 投标方提供给招标方的所有设备必须在交货前通过工厂验收,并得到招标方的确认,若招标方未签署工厂验收报告,任何设备不能从投标方工厂发运;c 投标方应提供工厂验收和现场验收的测试程序的详细说明,测试项目和性能都应在详细说明中指出;d 招标方要求的一些特殊试验,只要合理都应进行;e 即使招标方在试验报告上签字,投标方仍应对设备固有缺陷和合同中的项目承担责任;f 测试和验收计划:投标方应提交有关工厂验收和现场验收的详细计划,包括系统性能和功能等的测试方法等,招标方有权修改测试和验收计划,在计划被招标方确认前,计划不应生效;g 测试设备:在工厂验收和现场验收中,投标方应提供验收过程中必需的设备,如检验设备、测量设备、记录设备等。
2.2 工厂验收工厂验收包括系统功能测试和稳定性测试:2.2.1 系统功能测试a 系统应该在指定环境下正常和连续运行;b 应测试所有人机接口的主要功能;c 测试所有硬件;d 测试所有的报警功能;e 测试所有的诊断程序;f 系统测试所需时间不应超过2周;2.2.2 稳定性测试为了测试系统,稳定性测试应连续运行72小时。
在72小时内,除招标方事先同意外,不应进行任何设备和软件的调整,在此期间,为了不中断测试,故障的设备可以用备品备件替换,由于硬件的故障可以允许成功的切换,故障部分应立即修复并回到服务状态,如果由于紧急异常情况测试被中断(手动切换系统除外),则72小时测试应重新开始。
在72小时内,用户可以在任何时候转储数据,但不应妨碍测试系统的性能。
测试成功的条件如下:a 所有功能和性能满足本标书的要求;b 关键进程不丢失;c 远方控制或响应命令正确;e 不丢失数据信息;如果任何设备或功能不满足要求,投标方应替换或修复故障部分或功能,所有发生的成本都应由投标方负责,对第三方提供的设备或功能也应同此处理方法。
2.2.3 招标方将派出有经验的工程师参加工厂验收,投标方应提供必需的仪器、办公场地等。
2.2.4 如果工厂验收不满足技术要求,招标方工程师有权拒绝签署工厂验收报告。
2.2.5 在工厂验收被确认甚至签字后,如果发现有不满足合同要求的设备或部件,投标方必须进行完善,否则招标方有权拒绝全部设备或部件发往现场,由此引起的一切后果由投标方承担。
2.2.6 如果工厂验收因投标方责任不能完成时,则投标方应负全部责任。
2.3 现场验收a 投标方应负责指导招标方工程师完成设备的现场安装和现场验收;b 现场验收测试应在系统接入实时数据并与实时通信通道连通后进行,测试内容与工厂验收相同,现场验收完成后10日内,双方应签署现场验收报告;c 如果现场验收开始四周内系统仍不能正常运行,则现场验收应视为不合格;d 投标方应对设备的安装、测试期间设备的损坏负责。
3 技术文件3.1 概述投标方应提供并全面的设计、制造、文件,安装手册等,这些文件和手册是招标方完成验收、测试、安装和运行维护以及将来功能开发所必需的;投标方提供的技术说明书等应与本技术规范书的要求相一致.3.2 技术文件内容投标方所提供技术文件应包含如下内容:a 系统概述;b 整个系统及每个设备模板的技术参数;c 操作指南;d 维护指南;e安置指南;f 合同设备之间及合同设备与招标方设备之间的连接指南;g 备品备件和存储设备的清单及描述;h 包装、运输和存储要求;i 软件概述;j 所有软件的详细说明,包括某些源码要求和程序图表,以磁带或光盘等形式提供两套完整的资料;k 程序员手册和指南;l 验收测试说明。