GBase8t安装配置(for linux and unix)
- 格式:pdf
- 大小:933.62 KB
- 文档页数:16

中标麒麟配置Gbase8S环境变量使用GBase 8s数据库命令(如:oninit、onclean、onload、onlog、onmode、onparams、onspaces、onstat、ontape 和onunload)来管理数据库需要配置相关的环境变量。
设置方法(以bash脚本为例):1. 打开gbasedbt用户的.bash_profile文件vi $HOME/.bash_profile2. 在文件末尾插入以下内容:GBASEDBTDIR=/home/gbasedbt/gbaseGBASEDBTSERVER=ol_gbasedbt1210_1ONCONFIG=onconfig.ol_gbasedbt1210_1GBASEDBTSQLHOSTS=/home/gbasedbt/gbase/etc/sqlhosts.ol _gbasedbt1210_1PATH=${GBASEDBTDIR}/bin:${GBASEDBTDIR}/extend/krakatoa /jre/bin:${PATH}export GBASEDBTDIR GBASEDBTSERVER ONCONFIG GBASEDBTSQLHOSTS GL_USEGLU PATHØ GBASEDBTDIR - GBase 8s数据库安装目录Ø GBASEDBTSERVER - GBase 8s数据库实例名Ø ONCONFIG - onconfig配置文件的文件名Ø GBASEDBTSQLHOSTS - sqlhosts配置文件的全目录Ø PATH - 可执行文件的位置3. 应用环境变量source $HOME/.base_profile4. 设置GLS环境变量如果要使用非缺省语言(美式英语),请设置Global Language Support (GLS) 环境变量。
使用以下环境变量处理 GLS:CLIENT_LOCALEDB_LOCALESERVER_LOCALEDBLANGC8BITLEVELESQLMFGLS8BITFSYSGL_DATEGL_DATETIME5. 设置Unicode:如果计划使用Unicode,请设置以下环境变量以支持UTF-8GL_USEGLU=16. 指定环境变量如果在$HOME/.base_profile文件中配置环境变量,每次登录到系统时会自动指定环境变量,如果需要配置多个实例,可以将不同实例的环境变量配置到不同的文件中,需要进行操作时使用对应环境变量文件来指定环境变量,切换操作的实例。

南大通用大数据新型列存储数据库GBase 8a透明网关参考手册南大通用大数据新型列存储数据库GBase 8a透明网关参考手册引言本文档为南大通用大数据新型列存储数据库GBase 8a透明网关的参考手册,旨在为用户提供详细的使用指南和技术支持。
本手册将介绍GBase 8a透明网关的功能和操作方法,并提供相关示例和案例,以帮助用户全面了解和使用该产品。
章节一、产品概述1.1 产品介绍1.1.1 GBase 8a透明网关的作用和优势1.1.2 适用场景和使用范围1.1.3 系统环境要求1.2 主要功能特性1.2.1 数据安全性和隐私保护1.2.2 数据传输效率和性能1.2.3 数据连接和集成1.2.4 数据存储和管理1.2.5 监控和日志管理1.3 系统组成和架构1.3.1 系统组件和模块1.3.2 系统架构图1.3.3 数据流和传输路径章节二、安装与配置2.1 安装准备2.1.1 硬件和软件要求2.1.2 系统文件和目录结构 2.1.3 安装包和2.2 安装步骤2.2.1 安装前准备工作2.2.2 安装过程和注意事项 2.2.3 安装后配置和初始化2.3 网关管理和设置2.3.1 网关管理控制台介绍2.3.2 系统设置和配置2.3.3 用户管理和权限设置章节三、数据传输与集成3.1 数据源配置和连接3.1.1 数据源类型和兼容性 3.1.2 数据源连接方法和参数 3.1.3 连接池管理和优化3.2 数据传输和同步3.2.1 数据传输模式和方式 3.2.2 数据同步策略和机制 3.2.3 数据过滤和转换3.3 数据集成和交互3.3.1 数据集成工具和方法 3.3.2 数据交互接口和格式 3.3.3 数据映射和转换规则章节四、数据存储与管理4.1 数据存储结构和管理4.1.1 数据表和表空间4.1.2 数据索引和分区4.1.3 数据备份和恢复4.2 数据查询和操作4.2.1 SQL查询语句和优化 4.2.2 数据增删改操作4.2.3 事务处理和并发控制4.3 数据安全和权限管理4.3.1 数据权限和访问控制 4.3.2 数据加密和解密4.3.3 审计和日志记录章节五、监控与维护5.1 系统监控和管理5.1.1 系统性能监控和调优 5.1.2 错误日志和告警处理 5.1.3 运行状态和资源管理5.2 数据库维护和优化5.2.1 数据库备份和恢复5.2.2 索引和查询优化5.2.3 数据碎片整理和压缩5.3 系统升级和升级5.3.1 安全升级和漏洞修复5.3.2 新功能和版本兼容性5.3.3 系统配置和参数修改附件:本文档涉及附件,如数据库安装包、配置文件示例、使用案例、问题排查指南等,请参考附件部分。

gbase安装教程⼀、安装前的准备⼯作1、对⽹卡进⾏配置[root@gbase8a ~]#vi /etc/sysconfig/network-scripts/ifcfg-eth0DEVICE=eth0HWADDR=00:0C:29:2E:E9:71TYPE=EthernetUUID=771cc37d-0811-4961-8648-b280f3f8232fONBOOT=yesNM_CONTROLLED=yesBOOTPROTO=staticDNS1=192.168.204.1IPADDR=192.168.204.131NETMASK=255.255.255.0GETEWAY=192.168.204.1[root@gbase8a ~]#service network restart2、检查系统是否安装了必须的软件包安装系统时,如果没有选择“桌⾯”或“软件开发⼯作站”安装,或不清楚系统安装情况时,请按如下⽅法检查系统中是否安装了必须的软件包:# rpm -qa | grep boostboost-signals-1.41.0-11.el6_1.2.x86_64boost-wave-1.41.0-11.el6_1.2.x86_64boost-python-1.41.0-11.el6_1.2.x86_64boost-system-1.41.0-11.el6_1.2.x86_64boost-date-time-1.41.0-11.el6_1.2.x86_64boost-serialization-1.41.0-11.el6_1.2.x86_64boost-graph-1.41.0-11.el6_1.2.x86_64boost-test-1.41.0-11.el6_1.2.x86_64boost-program-options-1.41.0-11.el6_1.2.x86_64boost-regex-1.41.0-11.el6_1.2.x86_64boost-1.41.0-11.el6_1.2.x86_64boost-iostreams-1.41.0-11.el6_1.2.x86_64boost-filesystem-1.41.0-11.el6_1.2.x86_64boost-thread-1.41.0-11.el6_1.2.x86_64# rpm -qa | grep libtoollibtool-ltdl-2.2.6-15.5.el6.x86_64# rpm -qa | grep aprapr-1.3.9-3.el6_1.2.x86_64apr-util-ldap-1.3.9-3.el6_0.1.x86_64apr-util-1.3.9-3.el6_0.1.x86_64# rpm -qa | grep cppqpid-cpp-client-ssl-0.12-6.el6.x86_64qpid-cpp-server-0.12-6.el6.x86_64libmcpp-2.7.2-4.1.el6.x86_64qpid-cpp-server-ssl-0.12-6.el6.x86_64mcpp-2.7.2-4.1.el6.x86_64abrt-addon-ccpp-2.0.4-14.el6.x86_64qpid-cpp-client-0.12-6.el6.x86_64# rpm -qa | grep elfutilselfutils-libelf-0.152-1.el6.x86_64elfutils-0.152-1.el6.x86_64elfutils-libs-0.152-1.el6.x86_64# rpm -qa | grep filefilesystem-2.4.30-3.el6.x86_64mozilla-filesystem-1.9-5.1.el6.x86_64file-libs-5.04-11.el6.x86_64control-center-filesystem-2.28.1-25.el6.x86_64 fontpackages-filesystem-1.41-1.1.el6.noarch rootfiles-8.1-6.1.el6.noarchfoomatic-db-filesystem-4.0-7.20091126.el6.noarch file-5.04-11.el6.x86_64libsndfile-1.0.20-5.el6.x86_64libxkbfile-1.0.6-1.1.el6.x86_64file-roller-2.28.2-6.el6.x86_64boost-filesystem-1.41.0-11.el6_1.2.x86_64 desktop-file-utils-0.15-9.el6.x86_64# rpm -qa | grep gcclibgcc-4.4.6-3.el6.x86_64# rpm -qa | grep gdbgdbm-1.8.0-36.el6.x86_64gdb-7.2-50.el6.x86_64eggdbus-0.6-3.el6.x86_64# rpm -qa|grep libgomplibgomp-4.4.6-3.el6.x86_64# rpm -qa|grep libiculibicu-4.2.1-9.el6.x86_64# rpm -qa|grep libproxylibproxy-0.3.0-2.el6.x86_64libproxy-python-0.3.0-2.el6.x86_64libproxy-bin-0.3.0-2.el6.x86_64# rpm -qa|grep neonneon-0.29.3-1.2.el6.x86_64# rpm -qa|grep pakchoispakchois-0.4-3.2.el6.x86_64# rpm -qa|grep patchpatch-2.6-6.el6.x86_64# rpm -qa|grep perlperl-CPANPLUS-0.88-119.el6_1.1.x86_64perl-Params-Check-0.26-119.el6_1.1.x86_64perl-Log-Message-0.02-119.el6_1.1.x86_64perl-Compress-Zlib-2.020-119.el6_1.1.x86_64perl-ExtUtils-CBuilder-0.27-119.el6_1.1.x86_64perl-DBD-SQLite-1.27-3.el6.x86_64perl-Time-HiRes-1.9721-119.el6_1.1.x86_64perl-libxml-perl-0.08-10.el6.noarchperl-version-0.77-119.el6_1.1.x86_64perl-devel-5.10.1-119.el6_1.1.x86_64perl-Compress-Raw-Zlib-2.023-119.el6_1.1.x86_64 perl-Log-Message-Simple-0.04-119.el6_1.1.x86_64 perl-Module-CoreList-2.18-119.el6_1.1.x86_64perl-XML-Twig-3.34-1.el6.noarchperl-CGI-3.51-119.el6_1.1.x86_64perl-HTML-Parser-3.64-2.el6.x86_64perl-libs-5.10.1-119.el6_1.1.x86_64perl-5.10.1-119.el6_1.1.x86_64perl-ExtUtils-ParseXS-2.2003.0-119.el6_1.1.x86_64 perl-Module-Load-Conditional-0.30-119.el6_1.1.x86_64 perl-IO-Compress-Base-2.020-119.el6_1.1.x86_64 perl-Archive-Tar-1.58-119.el6_1.1.x86_64perl-Archive-Extract-0.38-119.el6_1.1.x86_64perl-Module-Loaded-0.02-119.el6_1.1.x86_64perl-DBI-1.609-4.el6.x86_64perl-Module-Build-0.3500-119.el6_1.1.x86_64perl-parent-0.221-119.el6_1.1.x86_64perl-core-5.10.1-119.el6_1.1.x86_64perl-XML-Dumper-0.81-6.el6.noarchperl-Parse-CPAN-Meta-1.40-119.el6_1.1.x86_64perl-libwww-perl-5.833-2.el6.noarchperl-Pod-Escapes-1.04-119.el6_1.1.x86_64perl-Pod-Simple-3.13-119.el6_1.1.x86_64perl-Test-Harness-3.17-119.el6_1.1.x86_64perl-Module-Load-0.16-119.el6_1.1.x86_64perl-Package-Constants-0.02-119.el6_1.1.x86_64 perl-IO-Zlib-1.09-119.el6_1.1.x86_64perl-File-Fetch-0.26-119.el6_1.1.x86_64perl-Object-Accessor-0.34-119.el6_1.1.x86_64perl-URI-1.40-2.el6.noarchperl-CPAN-1.9402-119.el6_1.1.x86_64perl-ExtUtils-Embed-1.28-119.el6_1.1.x86_64perl-XML-Parser-2.36-7.el6.x86_64perl-Module-Pluggable-3.90-119.el6_1.1.x86_64perl-ExtUtils-MakeMaker-6.55-119.el6_1.1.x86_64 perl-Term-UI-0.20-119.el6_1.1.x86_64perl-Digest-SHA-5.47-119.el6_1.1.x86_64perl-Crypt-SSLeay-0.57-16.el6.x86_64perl-XML-Grove-0.46alpha-40.el6.noarchperl-HTML-Tagset-3.20-4.el6.noarchperl-Locale-Maketext-Simple-0.18-119.el6_1.1.x86_64 perl-IPC-Cmd-0.56-119.el6_1.1.x86_64perl-IO-Compress-Zlib-2.020-119.el6_1.1.x86_64 perl-Test-Simple-0.92-119.el6_1.1.x86_64perl-DBIx-Simple-1.32-3.el6.noarchperl-Time-Piece-1.15-119.el6_1.1.x86_64# rpm -qa|grep ppllibpanelappletmm-2.26.0-3.el6.x86_64poppler-utils-0.12.4-3.el6_0.1.x86_64poppler-glib-0.12.4-3.el6_0.1.x86_64wpa_supplicant-0.7.3-2.el6.x86_64poppler-data-0.4.0-1.el6.noarchpoppler-0.12.4-3.el6_0.1.x86_64gnome-applets-2.28.0-7.el6.x86_64gdm-user-switch-applet-2.30.4-32.el6.x86_64 gnome-python2-applet-2.28.0-4.el6.x86_64# rpm -qa|grep unzipunzip-6.0-1.el6.x86_64# rpm -qa|grep xzxz-libs-4.999.9-0.3.beta.20091007git.el6.x86_64xz-4.999.9-0.3.beta.20091007git.el6.x86_64xz-lzma-compat-4.999.9-0.3.beta.20091007git.el6.x86_64# rpm -qa | grep jsonpython-simplejson-2.0.9-3.1.el6.x86_64json-c-0.10-2.el6.x86_64⼆、安装GBase 8a1、在Linux下创建⼀个⽤户在安装GBase 8a 之前,需要在Linux 下使⽤root ⽤户创建⼀个新的操作系统⽤户,这个新⽤户⽤于GBase 8a 的安装以及安装后的运⾏。
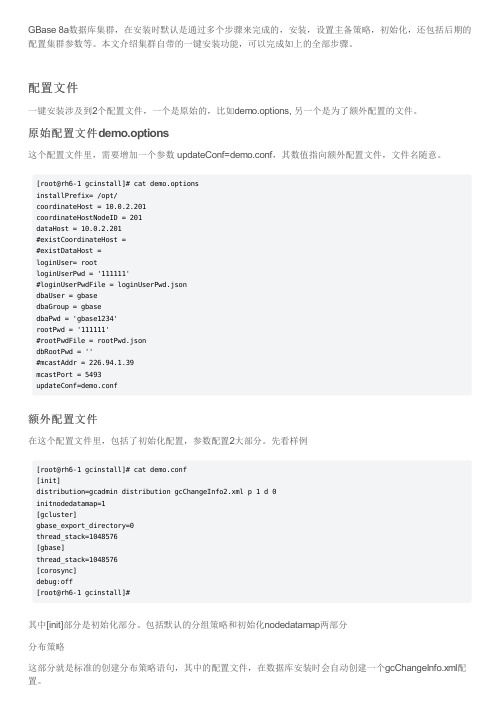
GBase 8a数据库集群,在安装时默认是通过多个步骤来完成的,安装,设置主备策略,初始化,还包括后期的配置集群参数等。
本文介绍集群自带的一键安装功能,可以完成如上的全部步骤。
配置文件一键安装涉及到2个配置文件,一个是原始的,比如demo.options, 另一个是为了额外配置的文件。
原始配置文件demo.options这个配置文件里,需要增加一个参数 updateConf=demo.conf,其数值指向额外配置文件,文件名随意。
[root@rh6-1 gcinstall]# cat demo.optionsinstallPrefix= /opt/coordinateHost = 10.0.2.201coordinateHostNodeID = 201dataHost = 10.0.2.201#existCoordinateHost =#existDataHost =loginUser= rootloginUserPwd = '111111'#loginUserPwdFile = loginUserPwd.jsondbaUser = gbasedbaGroup = gbasedbaPwd = 'gbase1234'rootPwd = '111111'#rootPwdFile = rootPwd.jsondbRootPwd = ''#mcastAddr = 226.94.1.39mcastPort = 5493updateConf=demo.conf额外配置文件在这个配置文件里,包括了初始化配置,参数配置2大部分。
先看样例[root@rh6-1 gcinstall]# cat demo.conf[init]distribution=gcadmin distribution gcChangeInfo2.xml p 1 d 0initnodedatamap=1[gcluster]gbase_export_directory=0thread_stack=1048576[gbase]thread_stack=1048576[corosync]debug:off[root@rh6-1 gcinstall]#其中[init]部分是初始化部分。
Cognos8 安装及配置1. Cognos 8 BI Server 8.3 安装 (2)2. 配置服务器(IIS) (4)3. Cognos Configuration 故障排除 (8)4. 配置数据源(Oracle9) (10)5. 对语言包的安装 (13)1.Cognos 8 BI Server 8.3 安装执行Cognos 8 BI Server 8.3中 server\win32\issetup.exe 进行安装,安装步骤很简单,如下图。
语言选择,默认是英语,83的安装中不支持中文,据说84支持,不过不要紧,Web界面方面可以通过后期安装语言包解决。
选择开始安装开始按默认的进行Æ>选择路径Next一路Next这时我们就安完了,下面来安装其它的组件,到相应的组件的安装文件夹win32下选择这里我们要注意两点:①安装的组件的路径要和上面安装的一样。
②在安装时会出现如下图这里我们要选择“Yes”这里我们要选择“No”;然后我们默认安装就可以了。
2.配置服务器(IIS)首先创建虚拟目录:给其命名为cognos8对应Cognos8程序目录下的Webcontent目录给予权限:接下来在已创建的cognos8虚拟目录下继续创建cgi-bin目录,对应目录Cognos8程序目录下的cgi-bin目录。
给予权限:最终IIS里的目录结构:修改默认网站的端口为8088,因为有可能80端口已被占用,右键点击,选择“属性”:在下图中修改TCP端口为:8088,点击确定。
¾tomcat配置IIS服务或是Tomcat 两者选择一个作为服务器就可以了。
Cognos产品在安装时,就把Tomcat服务也安装好了,可以直接配置使用。
配置如下:在<conos8 安装路径>\c8\webcontent目录下,拷贝所有文件或文件夹,复制到\c8\webapps\p2pd目录中。
在Cognos Configuration 中对Environment项进行配置:Gateway URI:http://localhost:80/cognos8/cgi-bin/cognos.cgi替换为:http://localhost:9300/p2pd/servlet/dispatch注意:在做transformer设计时,提示登录错误,有http://localhost:80/cognos8/cgi-bin/cognos.cgi等信息提示,是默认网关地址指定错误3.Cognos Configuration 故障排除a)jre 数据包报错Cognos Configuration 无法正常启动,这是因为系统中的JAVA_HOME环境变量指向了一个独立安装的JDK,而不是用Cognos自带的jre,只要将<conos8 安装路径>/c8/bin/jre/1.5.0/lib/ext目录下的“bcprov-jdk14-134.jar”拷贝到JAVA_HOME所指向的<jdk 安装路径>/jre/lib/ext目录下即可。
IBM Cognos8Software Development KitVersion8.4.1Installation and Configuration GuideProduct InformationThis document applies to IBM Cognos8Version8.4.1and may also apply to subsequent releases.To check for newer versions of this document, visit the IBM Cognos Information Centers(/infocenter/cogic/v1r0m0/index.jsp).CopyrightLicensed Materials-Property of IBM©Copyright IBM Corp.2005,2009.US Government Users Restricted Rights–Use,duplication or disclosure restricted by GSA ADP Schedule Contract with IBM Corp.IBM,the IBM logo,,and Cognos are trademarks or registered trademarks of International Business Machines Corp.,in many jurisdictions worldwide.Other product and service names might be trademarks of IBM or other companies.A current list of IBM trademarks is available on the Web at /legal/copytrade.shtml.Microsoft,Windows,Windows NT,and the Windows logo are trademarks of Microsoft Corporation in the United States,other countries,or both. Linux is a registered trademark of Linus Torvalds in the United States,other countries,or both.UNIX is a registered trademark of The Open Group in the United States and other countries.Table of ContentsIntroduction5Installing and Configuring the SDK7Upgrading the SDK Software7Install the SDK8Configuring the SDK10Uninstall the SDK11Index13Licensed Materials–Property of IBM©Copyright IBM Corp.2005,2009.3Table of Contents4Software Development KitIntroductionThis document is intended for use with IBM Cognos 8software development kit (SDK).The SDK is a collection of cross-platform Web services,libraries,programming interfaces,and related APIs that you can use to access the full functionality of IBM Cognos 8.For more information,see the SDK Developer Guide .The IBM Cognos 8software development kit includes the IBM Cognos 8Mashup Service,which allows you to develop applications that expose IBM Cognos 8outputs,such as reports and analyses,as Web services (both SOAP and REST).You can also use the Mashup Service to create applications that use a structured view of IBM Cognos 8outputs as input.This document provides instructions for installing the SDK package from the IBM Cognos 8Software Development Kit CD.AudienceTo use this guide,you should have basic Windows,UNIX,and Linux administration skills.Related DocumentationOur documentation includes user guides,getting started guides,new features guides,readmes,and other materials to meet the needs of our varied audience.The following documents contain related information and may be referred to in this document.Note :For online users of this document,a Web page such as The page cannot be found may appear when clicking individual links in the following table.Documents are made available for your par-ticular installation and translation configuration.If a link is unavailable,you can access the document on the IBM Cognos Resource Center (/software/data/support/cognos_crc.html ).DescriptionDocument Installing,upgrading,configuring,and testing IBM Cognos 8,changing application servers,and setting up samplesIBM Cognos 8Installation and Configuration Guide Managing IBM Cognos 8processes and imple-menting custom reporting solutions by using acollection of cross-platform Web services,librar-ies,and programming interfaces provided withthe IBM Cognos 8SDKIBM Cognos 8Software Development KitDeveloper Guide Managing servers,security,reports,and portalservices;and setting up the samples,customizingthe user interface and troubleshooting IBM Cognos 8Administration and Security GuideLicensed Materials –Property of IBM5©Copyright IBM Corp.2005,2009.IntroductionDocumentDescriptionDeveloping applications with the IBM Cognos IBM Cognos8Mashup Service Developer Guide8Mashup Service that exposes IBM Cognos8BI outputs,such as reports and analyses,as Webservices(both SOAP and REST).Finding InformationProduct documentation is available in online help from the Help menu or button in IBM Cognosproducts.To find the most current product documentation,including all localized documentation andknowledge base materials,access the IBM Cognos Resource Center(/software/data/support/cognos_crc.html).You can also read PDF versions of the product readme files and installation guides directly fromIBM Cognos product CDs.Using Quick ToursQuick tours are short online tutorials that illustrate key features in IBM Cognos product components.To view a quick tour,start IBM Cognos Connection and click the Quick Tour link in the lower-right corner of the Welcome page.Getting HelpFor more information about using this product or for technical assistance,visit the IBM CognosResource Center(/software/data/support/cognos_crc.html).This site providesinformation on support,professional services,and education.Printing Copyright MaterialYou can print selected pages,a section,or the whole book.You are granted a non-exclusive,non-transferable license to use,copy,and reproduce the copyright materials,in printed or electronicformat,solely for the purpose of operating,maintaining,and providing internal training on IBMCognos software.6Software Development KitInstalling and Configuring the SDKAfter you install and configure IBM Cognos8,install and configure the IBM Cognos8softwaredevelopment kit(SDK)to enable developers and system integrators to extend the value of the coresolution of IBM Cognos8capabilities.This is achieved with the integration of external applicationsand environments and the development of custom unique capabilities.The IBM Cognos8SDK CD contains●the SDK software,including Web services,libraries,programming interfaces,and related APIs●the SDK Developer Guide●the Mashup Service Developer Guide●the Framework Manager script player●the Framework Manager modeling SDK●SDK samples●Mashup Service samplesYou must use the same versions of the IBM Cognos8software development kit(SDK)and IBMCognos8and Framework Manager.The process for installing the IBM Cognos8software development kit includes:❑Install the SDK(p.8).❑Configure the SDK(p.10).Upgrading the SDK SoftwareWhen you upgrade from an older version of the IBM Cognos8Software Development Kit,ensurethat you upgrade to the same version of IBM Cognos8and Framework Manager.If you have SDK applications that rely on a previous version of the report specifications,you cannotuse Framework Manager to publish your model without losing backward compatibility.For more information about upgrading IBM Cognos8and Framework Manager,see the IBMCognos8Installation and Configuration Guide.For information about changes that may affect the product during or after an upgrade,see therelease notes and upgrade sections of the IBM Cognos8Software Development Kit Installationand Configuration Guide.IBM Cognos8automatically upgrades the content store.If you upgrade from ReportNet,you must make some changes to your SDK program for it tofunction with the IBM Cognos8version of the WSDL file.Some methods,classes,and propertieshave been deprecated in IBM Cognos8.Deprecated features continue to function as before,but Licensed Materials–Property of IBM©Copyright IBM Corp.2005,2009.7Installing and Configuring the SDKwill be removed in future releases.Some other methods,classes,and properties are obsolete,andhave been removed from the IBM Cognos8SDK.For information about changes to methods,classes,properties,and enumeration sets,see the ReleaseNotes appendixes in the IBM Cognos8SDK Developer Guide.New report specifications have been added in IBM Cognos8.If you run a report that was createdin ReportNet or in a previous version of IBM Cognos8,it is automatically upgraded to the newIBM Cognos8format.After a report is upgraded to the new format,it cannot be returned to theReportNet or older IBM Cognos8format.Because of the potential for users to upgrade reportspecifications that SDK applications may depend on,we recommend that you set access permissionson those reports to limit user access.For more information about setting access permissions,seethe IBM Cognos8Administration and Security Guide.If you have SDK applications that create,modify,or save report specifications,do not upgrade yourreport specifications when you install the new version of IBM Cognos8.You must first updateyour SDK applications to comply with the IBM Cognos8report specifications schema.Otherwise,your SDK applications may not be able to access the upgraded report specifications.For informationabout upgrading report specifications,see the IBM Cognos8SDK Developer Guide.We recommend that you do not upgrade your report specifications if you are unsure about whetheryou have SDK applications that create,modify,or save report specifications.Contact your SDKadministrator for more information about your SDK applications.Install the SDKInstall the SDK files from the IBM Cognos8SDK CD on every computer where SDK applicationsare developed,and in the same installation location as IBM Cognos8.The IBM Cognos8SDK and some IBM Cognos8server components are available for installationon64-bit systems.Before you install the IBM Cognos8SDK on a64-bit system,check the Readmefor late-breaking information about where to install the components.You can view an up-to-date list of environments supported by IBM Cognos products,such asoperating systems,patches,browsers,web servers,directory servers,and database servers on theIBM Cognos Resource Center(/software/data/support/cognos_crc.html).It isimportant to note that the Linux operating system is available in a number of distributions andsupports a number of hardware platforms.Ensure that the Linux distribution and hardware com-bination you are using is a supported combination.It is important to apply all required operating system patches and to use only the versions of third-party software that are supported for an IBM Cognos product.Otherwise,your product may notwork properly.The IBM Cognos8SDK must be installed on a computer where IBM Cognos8is already installed.For information about deploying SDK applications,see IBM Cognos8SDK Getting Started.For more information about installing IBM Cognos8components,see the IBM Cognos8Installationand Configuration Guide.Before you install the IBM Cognos8SDK,ensure that IBM Cognos8BI components are installed. 8Software Development KitInstalling and Configuring the SDKIf you plan to use the Excel plug-in demo,you must have MSINET.OCX installed in the System32 sub-folder of your Windows folder.Steps for UNIX or Linux1.Mount the IBM Cognos8product disk or go to the directory where the installation files weredownloaded and extracted.Important:If you are installing on HP-UX,mount the IBM Cognos8SDK CD with Rock Ridge file extensions and do the following:●Add the pfs_mount directory in your path.For example,PATH=/usr/sbin/:$PATHexport PATH●To start the required NFS daemons and run the daemons in the background,typebg pfs_mountd and then type bg pfsd●To mount the drive,typepfs_mount-t rrip<device><mount_dir>-o xlat=unixFor example,pfs_mount/dev/dsk/c0t2d0/cdrom-o xlat=unixYou can now install or copy files as a non-root user using an IBM Cognos CD from this drive.●When the installation is complete,type pfs_umount/cdrom and kill the pfsd and pfs_mountddaemons to unmount the CD.2.Go to the directory that is appropriate for your operating system and start the installation:●If you use X Windows,type./issetup●Otherwise,you must run an unattended installation.For more information,see the IBMCognos8Business Intelligence Installation and Configuration Guide.3.In the Welcome page,select the language to use for the installation,and click Next.4.Follow the instructions to copy the required files to the same location where you installed IBMCognos8components.5.In the Finish page of the installation wizard:●If you want to view the transfer log or the summary-error log,click the appropriate Viewbutton.●If you want to see the readme file,select the View the Readme check box.Installation and Configuration Guide9Installing and Configuring the SDK6.Click Finish.Steps for Windows1.Insert the IBM Cognos8product disk or go to the directory where the installation files weredownloaded and extracted.The installation wizard starts automatically from the product disk.2.If the Welcome page does not appear,go to the operating system directory and double-clickthe issetup.exe file.3.Select the language to use for the installation,and click Next.4.Follow the instructions to copy the required files to the same location where you installed IBMCognos8components and Framework Manager.5.In the Finish page of the installation wizard:●If you want to view the transfer log or the summary-error log,click the appropriate Viewbutton.●If you want to see the readme file,select the View the Readme checkbox.6.Click Finish.You can access the SDK documentation using the shortcut in the Start menu.Configuring the SDKTo use the SDK,you must perform some configuration and set-up tasks.To configure the SDK,follow this process:❑If you want to run the Framework Manager script player from outside the bin directory,con-figure the FM_INI_FILE_PATH environment variable as a system variable on Windows.Theenvironment variable must point to the cognos8_location\configuration\fm.ini directory.❑To allow the browsing or import of system objects such as tables,views,synonyms,stored procedures,or functions from a relational database in Framework Manager,edit the entry forImportDatabaseSystemObjects in your fm.ini file.By default,ImportDatabaseSystemObjects is set to ers can see only the user tablesin the import and expression editor dialog boxes.To allow browsing or import of systemobjects,set the preference to TRUE.❑Set up the samples for IBM Cognos8and Framework Manager.For more information,see the Installation and Configuration Guide.❑Set up IBM Cognos8to use the SDK code samples.For more information,see the SDK Developer Guide.❑Set up IBM Cognos8to use the Mashup Service samples.10Software Development KitInstalling and Configuring the SDK For more information,see the Mashup Service Developer Guide.Uninstall the SDKUninstall the SDK if you no longer require IBM Cognos8or if you are upgrading the IBM Cognos8software.Steps for UNIX or Linux1.If the console attached to your computer does not support a Java-based graphical user interface,determine the process identification(pid)of the IBM Cognos8process by typing the followingcommand:ps-ef|grep cogbootstrapservice2.Stop the IBM Cognos8process:●If you run XWindows,start IBM Cognos Configuration,and from the Actions menu,clickStop.●If you do not run XWindows,type:kill-TERM pid3.To uninstall IBM Cognos8,go to the c8_location/uninstall directory and type the appropriatecommand:./uninst-u4.Follow the prompts to begin the uninstallation.5.When you are prompted to select the packages you want to uninstall,click the check box forIBM Cognos8Software Development Kit and then click Next.6.Continue following the prompts to complete the uninstallation.7.Delete all temporary Internet files.Steps for Windows1.From the Start menu,click Programs,IBM Cognos8,Uninstall IBM Cognos8.The Uninstall wizard appears.Tip:IBM Cognos8is the default name of the Program Folder that is created during theinstallation.If you chose another name,go to that folder to find the program.2.Follow the prompts to begin the uninstallation.3.When you are prompted to select the packages you want to uninstall,click the check box forIBM Cognos8Software Development Kit and then click Next.4.Continue following the prompts to complete the uninstallation.The Cognos_uninst_log.htm file records the activities that the Uninstall wizard performs whileuninstalling files.Installation and Configuration Guide11Installing and Configuring the SDKTip:To find the log file,look in the Temp directory.5.Delete all temporary Internet files.For more information,see your Web browser documentation.Uninstalling does not remove any files that changed since the installation,such as configurationand user data files.Your installation location remains on your computer,and you retain thesefiles until you delete them manually.12Software Development KitIndexAaudience of document,5Cconfiguring the SDK,10IIBM Cognos Resource Center,6installing the SDK,8Qquick toursusing,6SSDKconfiguring,10installing,8upgrading,7UUNIXinstalling the SDK,8upgrading the SDK software,7WWindowsinstalling the SDK,8Licensed Materials–Property of IBM©Copyright IBM Corp.2005,2009.13。
目录1. 数据库安装前的准备 (2)1.1 创建informix组 (2)1.2 创建GBase 8t数据库安装目录 (2)1.3 准备informix用户环境变量 (2)2 GBase 8t 数据库安装 (4)2.1上传安装介质 (4)2.2安装GBase 8t步骤 (4)3 GBase 8t 数据库初始化 (15)3.1 配置数据库ONCONFIG文件和sqlhosts文件 (15)3.2 初始化数据库 (16)4 数据库配置 (17)4.1 创建dbspace (17)4.2 添加物理日志/逻辑日志 (18)4.3 优化数据库参数重启数据库 (18)1.数据库安装前的准备1.1 创建informix组使用root用户执行groupaddinformix -g 505;创建informix用户并修改口令useradd -u 505 -g informix -d /home/informix -s /bin/bash -m informixpasswd informix1.2 创建GBase 8t数据库安装目录假设数据库安装路径为/home/informix/gbasemkdir /home/informix/gbasecd /homechmod 755 informixchown -Rf informix:informix /home/informix/gbase假设将数据库的数据文件存放在/opt/dbs目录cd /optmkdir dbschown -Rf informix:informix dbs1.3 准备informix用户环境变量假设1:GBase 8t数据库软件的安装目录为/home/informix/gbase目录;假设2:GBase 8t数据库使用的实例名为gbaseserver登录informix用户,vi .bash_profile(根据不同的SHELL环境编辑不同的环境变量文件,unix 下默认为.profile文件),并加入如下内容:export INFORMIXSERVER=gbaseserverexport INFORMIXDIR=/home/informix/gbaseexport ONCONFIG=onconfig.gbaseserverexport INFORMIXSQLHOSTS=$INFORMIXDIR/etc/sqlhosts.gbaseserverexport PATH=$INFORMIXDIR/bin:/usr/bin:${PATH}:.export GL_DATE=" %iY/%m/%d"export DATETIME="%iY-%m-%d %H:%M:%S"export DB_LOCALE=zh_cn.GB18030-2000export CLIENT_LOCALE=zh_cn.GB18030-2000export LD_LIBRARY_PATH=${INFORMIXDIR}/lib:${INFORMIXDIR}/lib/esql:${INFORMIXDIR}/lib/cliexport TERM=vt100export TERMCAP=$INFORMIXDIR/etc/termcap export INFORMIXTERM=termcapexport DBTEMP=$INFORMIXDIR/tmp保存退出!2GBase 8t 数据库安装2.1上传安装介质上传安装介质到服务器并在单独的目录中解压。
GBase 8A 管理手册概述GBase 8A 是一款高性能、可靠性强的数据库管理系统软件。
本手册旨在为用户提供关于 GBase 8A 的详细管理指南,方便用户更好地了解和使用该软件。
安装与配置1.安装–下载 GBase 8A 安装包并解压。
–执行安装脚本进行安装,并按照提示进行相应配置。
2.配置–修改配置文件,包括数据库参数设置、日志路径配置等。
数据库管理1.数据库创建–使用CREATE DATABASE命令创建新数据库。
–指定数据库名称、字符集和校对规则。
2.用户管理–使用CREATE USER命令创建新用户。
–分配用户权限,包括读、写、管理数据库等权限设置。
3.备份与恢复–使用备份命令BACKUP DATABASE对数据库进行备份。
–使用恢复命令RESTORE DATABASE进行数据库恢复。
性能优化1.索引优化–通过创建合适的索引来提高查询效率。
–定期对索引进行优化和维护。
2.查询优化–避免全表扫描,尽量使用索引加快查询速度。
–尽量避免复杂的联合查询,减少查询时间。
安全管理1.用户权限管理–定期审查用户权限,避免权限过大或过小。
–合理分配用户权限,避免数据泄露和损坏。
2.数据加密–使用 SSL/TLS 加密保护数据库通信安全。
–对重要数据进行加密存储,以防止数据泄露。
故障处理1.日志监控–定期监控日志文件,检查是否有异常报错信息。
–及时处理异常,以避免影响系统正常运行。
2.故障恢复–在发生数据库故障时,及时备份数据,并尝试进行恢复。
–针对不同类型的故障,采取相应的应急措施。
升级与维护1.版本升级–定期检查官方发布的版本更新,及时进行软件升级。
–在升级过程中,确保备份数据和配置文件,以免数据丢失。
2.性能监控–使用监控工具对数据库性能进行监控,发现问题及时解决。
–对数据库进行定期的性能优化和调整。
结语通过本手册的了解和实践,相信您能更好地管理和运维 GBase 8A 数据库,保障系统的稳定运行。
GBase8t数据库Linux/Unix下安装配置数据库安全事业部8t技术组1GBase8t数据库安装1.1数据库安装前的准备1.1.1创建informix组使用root用户执行groupadd informix;创建informix用户并修改口令useradd-g informix-d/home/informix-s/bin/bash-m informix passwd informix1.1.2创建GBase8t数据库安装目录假设数据库安装路径为/home/informix/gbasemkdir/home/informix/gbasechown-Rf informix:informix/home/informix/gbase假设将数据库的数据文件存放在/opt/dbs目录cd/optmkdir dbschown-Rf informix:informix dbs1.1.3准备informix用户环境变量假设1:GBase8t数据库软件的安装目录为/home/informix/gbase目录;假设2:GBase8t数据库使用的实例名为gbaseserver登录informix用户,vi~/.bash_profile(根据不同的SHELL环境编辑不同的环境变量文件,unix下默认为.profile文件),并加入如下内容:备注:在/home/informix目录下执行!export INFORMIXSERVER=gbaseserverexport INFORMIXDIR=/home/informix/gbaseexport ONCONFIG=onconfig.gbaseserverexport INFORMIXSQLHOSTS=$INFORMIXDIR/etc/sqlhosts.gbaseserverexport PATH=$INFORMIXDIR/bin:/usr/bin:${PATH}:.export GL_DATE="%m/%d/%iY"export DATETIME="%iY-%m-%d%H:%M:%S"export DB_LOCALE=zh_cn.GB18030-2000export CLIENT_LOCALE=zh_cn.GB18030-2000exportLD_LIBRARY_PATH=${INFORMIXDIR}/lib:${INFORMIXDIR}/lib/esql:${INFORM IXDIR}/lib/cliexport TERM=vt100export TERMCAP=$INFORMIXDIR/etc/termcapexport INFORMIXTERM=termcapexport DBTEMP=$INFORMIXDIR/tmp保存退出!退出后执行生效命令..bash_profile或者source~/.bash_profile1.2数据库安装步骤1.1.4GBase8t SERVER安装1.1.1.1上传安装介质上传安装介质到服务器并在单独的目录中解压。
解压后产生的安装文件tar-xvf GBase8tV8.5.12.10.FC4G1TL_1.6.3.35.RHEL6_x86.tarbundle.properties CSDK ICONNECT ids_installJDBC README.html SERVER1.1.1.2安装GBase8t SERVER步骤使用root用户执行ids_install文件进行安装执行./ids_install–i swing确认license协议选择安装路径选择安装模式确认安装组件配置oat监听主机接口及主机名设置oat管理用户口令设置oat管理用户名及密码确认lic是否实现角色分离是否创建实例安装概要信息确认安装成功字符界面安装:[root@s_info~]#./ids_installPreparing to install...Extracting the JRE from the installer archive...Unpacking the JRE.........You may cancel this installation at any time by typing'quit'. PRESS<ENTER>TO CONTINUE://回车......2.RESTRICTIONS.Software is confidential and copyrighted.Title to SoftwarePRESS<ENTER>TO CONTINUE://回车......related to the use of or inability to use software,even if GeneralData hasPRESS<ENTER>TO CONTINUE://回车......7.CHINESE GOVERNMENT RESTRICTED.If Software is being acquired by or on behalfPRESS<ENTER>TO CONTINUE://回车......depresentative of each party.When the translation document has the differentPRESS<ENTER>TO CONTINUE://回车......DO YOU ACCEPT THE TERMS OF THIS LICENSE AGREEMENT?(Y/N):Y//输入YInstallation Location---------------------Choose location for software installationDefault Install Folder:ENTER AN ABSOLUTE PATH,OR PRESS<ENTER>TO ACCEPT THE DEFAULT :/home/gbase//输入安装目录,如/home/gbaseINSTALL FOLDER IS:/home/gbaseIS THIS CORRECT?(Y/N):Y//确认安装目录,如正确,输入Y,反之N ......->1-Typical installation2-Custom installation3-Extract the product files(-DLEGACY option)ENTER THE NUMBER FOR YOUR CHOICE,OR PRESS<ENTER>TO ACCEPT THE DEFAULT:: //回车Create a server instance?->1-Yes-create an instance2-No-do not create an instanceENTER THE NUMBER FOR YOUR CHOICE,OR PRESS<ENTER>TO ACCEPT THE DEFAULT:: 2//输入2......Enter the host name for your machine.Host Name:(DEFAULT:s_info)://回车......Port Number(DEFAULT:8080)://回车......Enable OAT Password Protection?(DEFAULT:yes)://回车......User name:(DEFAULT:admin)://回车......Password://输入OAT管理密码,如admin......Retype the password://重复OAT管理密码,如adminInstalling...-------------[==================|==================|==================|========= =========][------------------|------------------|------------------|------------------]......Congratulations!GBase8t V8.5Software Bundle installation is complete.Product install status:GBase8t V8.5:SuccessfulGBase8t V8.5Client-SDK:SuccessfulGBase8t V8.5JDBC Driver:SuccessfulOpenAdmin Tool for GBase8t:SuccessfulFor more information about using GBase8t V8.5products,see the GBASE Companywebsite at .PRESS<ENTER>TO EXIT THE INSTALLER://回车执行完以上步骤,数据库安装完成。
2GBase8t数据库初始化2.1配置数据库ONCONFIG文件和sqlhosts文件假设1:GBase8t使用的数据文件类型为操作系统文件(路径为/opt/dbs)假设2:数据库所在机器ip地址为192.168.1.60假设3:GBase8t数据库使用的监听端口为9088使用informix用户操作:⏹创建存放数据文件的目录,并生成rootdbs数据文件cd/opt/dbstouch rootdbschmod660rootdbs⏹将$INFORMIXDIR/etc/目录中的sqlhosts.std文档拷贝一份,名称为$INFORMIXSQLHOSTS变量制定的名称cd/home/informix/gbase/etccp sqlhosts.std sqlhosts.gbaseserver⏹将$INFORMIXDIR/etc/目录中的onconfig.std文档拷贝一份,名称为$ONCONFIG变量制定的名称cd/home/informix/gbase/etccp onconfig.std onconfig.gbaseserver⏹编辑sqlhosts.gbaseserver文件在文件末尾按照格式:实例名网络连接方式IP端口进行添加,如:gbaseserver onsoctcp192.168.1.109088⏹编辑onconfig.gbaseserver文件主要修改ppt讲解的部分参数ROOTPATH/opt/dbs/rootdbs根数据库空间所在设备的路DBSERVERNAME gbaseserver数据库服务器名称。