百叶窗产品说明书
- 格式:doc
- 大小:2.31 MB
- 文档页数:8
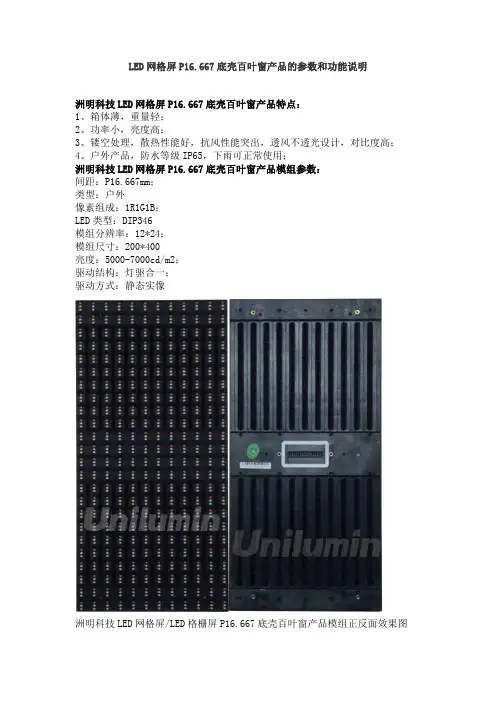
LED网格屏P16.667底壳百叶窗产品的参数和功能说明洲明科技LED网格屏P16.667底壳百叶窗产品特点:1、箱体薄,重量轻;2、功率小,亮度高;3、镂空处理,散热性能好,抗风性能突出,透风不透光设计,对比度高;4、户外产品,防水等级IP65,下雨可正常使用;洲明科技LED网格屏P16.667底壳百叶窗产品模组参数:间距:P16.667mm;类型:户外像素组成:1R1G1B;LED类型:DIP346模组分辨率:12*24;模组尺寸:200*400亮度:5000-7000cd/m2;驱动结构:灯驱合一;驱动方式:静态实像洲明科技LED网格屏/LED格栅屏P16.667底壳百叶窗产品模组正反面效果图洲明科技LED网格屏P16.667底壳百叶窗产品箱体参数:型号:F16.667;箱体分辨率:48*48;箱体尺寸:800*800;亮度:5000-7000cd/m2;安装方式:固定安装;灰度等级:14bit;刷新率:1000Hz;洲明科技LED网格屏/LED格栅屏P16.667底壳百叶窗产品箱体效果图洲明科技LED网格屏P16.667底壳百叶窗产品应用范围广泛适合于任何场所,最大的特点是透风不透光,重量轻24Kg/㎡,抗风性能好、安装方便、散热性能好、前后维护方便、防水性能好,抗震性能好、辅助安装框架成本低、无风扇、静音等优点;为确保户外现实工程像素点足够亮度,模组正面用硅胶灌封做防水处理,硅胶的顔色可以安工程要求,对照色卡专配,使这与建筑外墙色彩完美协调;模组出线为高低温性能绝佳的硅胶线材,带专业防水接头,专业设计精心打造的全密封防水结构,防护等级达到IP67,能适应户内外各种温度环境,工作环境温度范围可达-20——80摄氏度,下雨情况下正常工作;可任意组合各种形状,安装方便,不影响原有物体外观结构;显示像素点距较大16.667mm,有一定的装饰效果的超大屏显示场合使用,是居于普通常规显示屏和灯光亮化之间的一种LED显示应用产品;其显示单元为条状,组装套件采用专业铝型,可横向、竖向、斜向拼装,显示单元之间采用防水接头连接;由于显示单元为条状,可拼装成内弧显示面形,外弧显示面形,S显示面形,球状形等多种异形屏,有普通常规显示屏无法实现的显示效果。

60型中空百叶窗技术规格书
【原创实用版】
目录
1.60 型中空百叶窗简介
2.技术规格参数
3.应用范围与安装方法
4.产品优势与特点
正文
【60 型中空百叶窗简介】
60 型中空百叶窗是一种适用于现代家居、办公场所和商业空间的窗饰产品,以其优雅的外观、良好的通风性和卓越的节能效果受到广泛欢迎。
该款百叶窗采用中空玻璃结构,有效降低噪音、保温、隔热,为用户提供一个舒适的室内环境。
【技术规格参数】
1.材质:优质铝合金
2.尺寸:60mm 宽×25mm 厚
3.叶片:采用优质 ABS 工程塑料,具有良好的抗老化、抗紫外线性能
4.角度调节:叶片可调节至任意角度,满足不同通风需求
5.承重能力:可承受 100kg/m以上的重量
6.抗风压性能:可达到 12 级台风的抗风压能力
【应用范围与安装方法】
60 型中空百叶窗广泛应用于家庭、办公室、酒店、餐厅等场所,为
其提供美观、实用的窗饰效果。

百叶窗帘技术参数百叶窗帘是一种非常流行的室内装饰和遮阳产品,其独特的设计和功能使其在家庭和商业场所广泛应用。
在介绍百叶窗帘的技术参数之前,我们先了解一下百叶窗帘的基本结构和作用。
百叶窗帘是由一系列可调节角度的水平或垂直的横条组成,这些横条通常被称为百叶,它们的角度可以使用绳索、铰链或手动杆来调节。
通过调节百叶的角度,可以实现对光线和视线的控制,使室内环境更加舒适和私密。
现在,让我们来看一下百叶窗帘的技术参数,包括材质、尺寸、功能等方面的内容。
一、材质1. 金属百叶窗帘:金属百叶窗帘通常采用铝合金、镀锌钢或不锈钢等材质制成,具有较好的耐久性和稳定性。
其表面可采用不同的表面处理工艺,如阳极氧化、喷涂等,以提高其防腐性和美观性。
2. 木制百叶窗帘:木制百叶窗帘采用天然木材或人工板材制成,如松木、橡木、樱桃木等。
其表面通常进行磨砂处理或涂装,具有较好的装饰性和环保性。
3. 塑料百叶窗帘:塑料百叶窗帘多采用PVC或聚苯乙烯等高分子材料制成,具有防水防潮、易清洁等特点,适用于潮湿环境。
二、尺寸1. 宽度:百叶窗帘的宽度通常根据窗户的实际尺寸来订制,可以根据用户需要进行定制裁剪,或选择标准尺寸的产品。
2. 高度:百叶窗帘的高度也根据窗户的实际尺寸来订制,通常可根据用户需求进行定制裁剪,或选择标准尺寸的产品。
三、功能1. 遮阳:百叶窗帘的主要功能之一就是遮阳,通过调整百叶的角度可以有效控制室内的光线强度,避免阳光的直射,起到遮阳的作用。
2. 隐私保护:百叶窗帘还可以实现对室内的隐私保护,通过调节百叶的角度可以阻挡外界的视线,保持室内的私密性。
3. 调节室内环境:通过调节百叶的角度,还可以实现室内环境的通风和湿度调节,使室内空气更加清新舒适。
以上是关于百叶窗帘技术参数的一些介绍,希望对您有所帮助。
如果您对其他方面的内容有需求,也可以随时与我进行交流。
百叶使用简介Blinds use instruction自动控制Auto Control自动控制包含安全性功能和舒适性功能,如果两种功能的指令同时被触发,以保证百叶安全优先。
Auto control includes safety function and convenience function, if two functions are triggered at the same time, safety function is priorityfor protecting the blinds. 安全性功能包括风警报,冰警报。
Safety function Includes wind monitor function and ice monitor function.风警报指室外风速达到一定速度时(本项目南北立面设定为12m/s,东西立面设定为15m/s),百叶自动收起来。
室外风速持续小于设定值8分钟,风警报解除。
Wind monitor function can detect the wind speed by weather station on roof, once the wind exceed the safety value(this project we set 12m/son South and North elevation, 15m/s on East and West elevation), all blindsmove up automatically to avoid any damage by strong wind.Windspeed lower than the safety valueover8 minutes, wind alarmwill belifted.冰警报指室外温度低到一定温度时(本项目设定为3℃),百叶自动收起来。
室外温度高于设定值10分钟,冰警报解除。

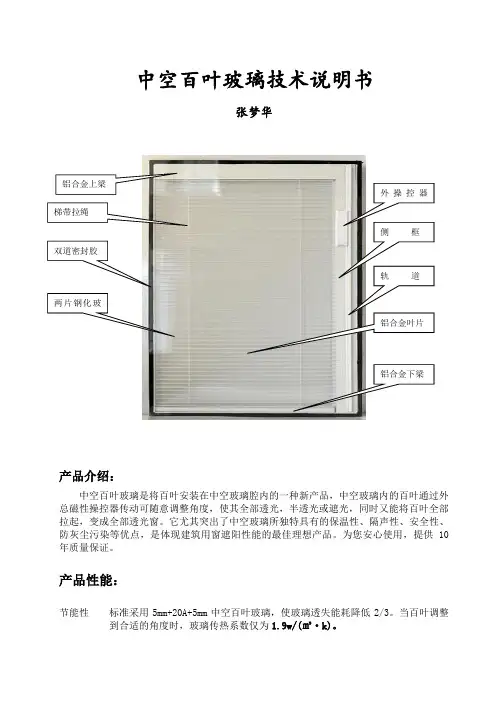
中空百叶玻璃技术说明书张梦华产品介绍:中空百叶玻璃是将百叶安装在中空玻璃腔内的一种新产品,中空玻璃内的百叶通过外总磁性操控器传动可随意调整角度,使其全部透光,半透光或遮光,同时又能将百叶全部拉起,变成全部透光窗。
它尤其突出了中空玻璃所独特具有的保温性、隔声性、安全性、防灰尘污染等优点,是体现建筑用窗遮阳性能的最佳理想产品。
为您安心使用,提供10年质量保证。
产品性能:节能性 标准采用5mm+20A+5mm 中空百叶玻璃,使玻璃透失能耗降低2/3。
当百叶调整到合适的角度时,玻璃传热系数仅为1.9w/(㎡·k)。
外操控器侧 框轨 道铝合金叶片 铝合金下梁铝合金上梁梯带拉绳双道密封胶两片钢化玻遮阳性中空百叶玻璃的透光折减系数最低为0.12,营造舒适、静怡的室内环境,中空百叶是完全密封,角度调节或是叶片的收放都是通过外部的磁控开关或遥控器实现。
隔音性降低噪音可达到36db,隔音性能优异。
最适合于办公隔断,道路周边楼宇门窗使用。
经济性降低空调能源消耗,节约大量电力消耗。
防紫外线,保护室内用品,更省去了窗帘的采购费用及保洁费用。
洁净性整洁干净,无需窗帘,易于清洁消毒,不藏尘螨。
健康性因为是密封在中空玻璃内部,所以不会像传统百叶窗一样落满灰尘,滋生细菌,使人们远离污染。
安全性降低火灾隐患,采用双层钢化玻璃,提高了整体建筑的安全水平,抗风压、抗冲击力强,减少了低楼层的破窗入室风险。
产品的技术参数:1、保温性能分级可达到7级(K≤1.9W/(㎡·K)以上;2、气密性能在 4级(q1≤1.5m3/(m·h)以上;3、抗风压性能可达 6级(p3≥3.5kpa)以上;4、水密性能可达到 5级(△P≥500Pa)以上;5、隔音性能可达到 3级(RW≥36db)以上;6、遮蔽系数SC在0.12以内。
7、产品的中空层采用的是19A,两片玻璃可以选择:钢化白玻璃,夹层玻璃,LOW-E玻璃等。
8、中间的百叶片经测试,收拉翻转可以达到70000次以上。
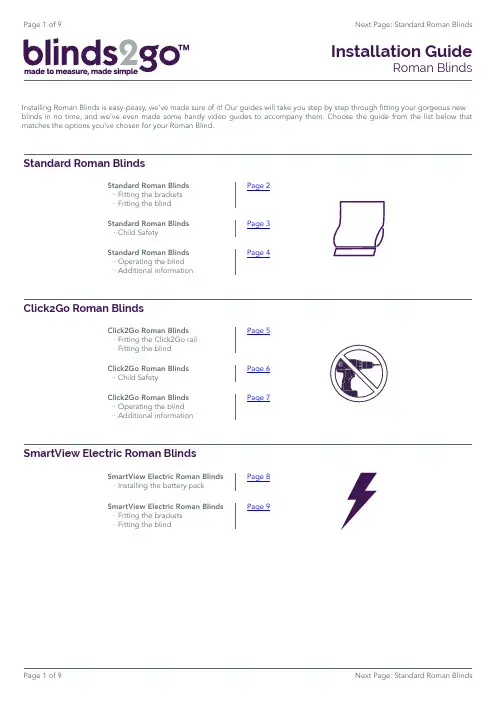
Page 1 of 9Next Page: Standard Roman BlindsInstallation GuideRoman BlindsStandard Roman BlindsClick2Go Roman BlindsSmartView Electric Roman BlindsInstalling Roman Blinds is easy-peasy, we’ve made sure of it! Our guides will take you step by step through fitting your gorgeous new blinds in no time, and we’ve even made some handy video guides to accompany them. Choose the guide from the list below that matches the options you’ve chosen for your Roman Blind.SmartView Electric Roman Blinds ·Installing the battery pack Page 8SmartView Electric Roman Blinds ·Fitting the brackets ·Fitting the blindPage 9Click2Go Roman Blinds ·Fitting the Click2Go rail ·Fitting the blind Page 5Click2Go Roman Blinds ·Child SafetyPage 6Click2Go Roman Blinds ·Operating the blind ·Additional informationPage 7Standard Roman Blinds ·Fitting the brackets ·Fitting the blind Page 2Standard Roman Blinds ·Operating the blind ·Additional informationPage 4Standard Roman Blinds ·Child SafetyPage 3The brackets offer two methods of installation:Note that the position of the outermost brackets should be at least 5cm away from the ends of the rail, with any other brackets evenly distributed across the width.Top-FixingUse the single hole in the top of the bracket to fix tothe lintel (the ‘ceiling’ of the recess).Face-FixingUse two screws through the back plate to mountonto a facing surface (a wall or window frame)Situate the front lip of the headrail into the front of the bracket.Push the back of the headrail upwards to lock it into the backof the bracket.To release the blind from the brackets at any point after installing, push firmly against the blind’s headrail to disengage it from the front of the bracket. At the same time, twist theback of the headrail downwards to release it from the back.Page 2 of 9Page 3 of 9Next Page: Operating Instructions & Additional InformationPage 4 of 9Next Page: Click2Go Roman BlindsRaiseLowerPull down on the front part of the chain to lower the blind, and pull down on the rear part of the chain to raise the blind.Operating the blindTop TipIf you find at any point that the blind has fallen to one side, the likelihood is that this has been caused by a simple mix-up with the controls, in that they may have been pulled the wrong way to either raise or lower, which can cause the cords to roll up unevenly. To fix this, simply use the front of the chain to fully lower the blind, then continue pulling the chain until it raises to the top. The blind should even itself out as you do, and you can prevent the same issue occurring again by making sure the chain is always pulled in the correct direction from that point forward.Additional InformationRemoving the fabric for cleaningThe fabric attaches at the front with velcro, simply peel the fabric away from the headrail.At the back, the cords attach to the fabric using clips, which double as achild-safety feature. These clips are in two parts, and can be easily unclipped to separate the cords from the fabric.If you need to remove the fabric, to take it to a dry-cleaner for example, then that’s easy.Installation GuideStandard Roman BlindsPage 5 of 9Page 6 of 9Next Page: Operating Instructions & Additional InformationInstalling the battery packWe recommend charging the battery pack before you begin to use the blind, to ensure it starts with a full battery. Use the charger plug included - the LED on the charger plug will turn green when the battery pack is fully charged.When the battery pack is charged, hook it up to the blind’s motor using the motor cable.Blinds ordered as ‘recess fitting’Blinds ordered as ‘exact fitting’Use the ‘hook’ brackets from the fittings kit to hang the battery pack onto the back of the blind’s headrail, as shown.Top-FixingFace-FixingIf there is not enough space behind the headrail to hang the battery pack, then it can fixed to another surface using the ‘clip’ bracketsprovided. The clip brackets can be either top-fixed or face-fixed.Installation GuideSmartView Electric Roman BlindsDownload the SMARTVIEW appFollow the instructions in the app, then flip this label to find the blind ID to add this blindOn the front of the swing tag that comes with your blind, you’ll find a handy QR code you can scan with your phone. Scan this to download the SmartView app - you’ll be setting up your blinds in moments!Recycle your electrical and electronic devices free at your local recycling centre. To find yournearest centre, visit the Recycle More website and type in your postcode.Blinds 2go Ltd is part of the DTS scheme.Fitting the bracketsThe brackets offer two methods of installation:Note that the position of the outermost brackets should be at least 5cm away from the ends of the rail, with any other brackets evenly distributed across the width.5cm5cmTop-FixingUse the single hole in the top of the bracket to fix tothe lintel (the ‘ceiling’ of the recess).Face-FixingUse two screws through the back plate to mount onto a facing surface (a wall or window frame)Fitting the blindTo release the blind from the brackets, push firmly against the blind’s headrail then, still pushing against it, twist the back of the headrail downwards.Situate the front lip of the headrail into the front of the bracket.Push the back of the headrail upwards to lock it into the back of the bracket.Page 9 of 9Installation GuideSmartView Electric Roman Blinds。

Battery Powered FlexShade System by Please check all appropriate selections and attach room schedule with verified dimensions.Color name, no. & opennessDraper GreenScreen® Revive _____________________________________Draper SunBloc SB9000 _________________________________________Draper SunBloc SB9100 _________________________________________Ferrari Soltis 99® _______________________________________________Mermet "E" Screen______________________________________________Mermet Flocké _________________________________________________Mermet "M" Screen _____________________________________________Mermet "S" Screen _____________________________________________Mermet SilverScreen ____________________________________________Mermet "T" Screen______________________________________________Mermet Vela __________________________________________________Mermet Vizela _________________________________________________Phifer SheerWeave®Basic _______________________________________Phifer SheerWeave® Infinity2 _____________________________________Phifer SheerWeave® PW3500/4100/4400 ____________________________Phifer SheerWeave® PW4500/4600 ________________________________Phifer SheerWeave® PW4550/4650 ________________________________Phifer SheerWeave® PW4800 _____________________________________Phifer SheerWeave® SW2000/2100 ________________________________Phifer SheerWeave®SW2400/2500/2600/2900 _______________________Phifer SheerWeave® SW2701/2703/2705/2710 _______________________Phifer SheerWeave®SW3000 _____________________________________Phifer SheerWeave® SW5000 _____________________________________Phifer SheerWeave® SW7000 _____________________________________Phifer SheerWeave® SW7100 _____________________________________Phifer SheerWeave®SW7500 _____________________________________Rockland Roc-Rol ______________________________________________specifications.No Hardware (Motor only for retrofit)Optional Ceiling/Wall HeadboxCharcoal BronzeInside (head/sill, jamb/jamb)Outside (overlap opening)Do any units abut at mullions? Which?Do any units install in pocket at ceiling?Which?Select Operator LocationSelect right side (standard for fascia) or left side (required for brackets) as seenRight SideLeft Side1-Channel Transmitter4-Channel Transmitter1-Channel Wall Switch4-Channel Wall SwitchSun SensorProgrammable Timer12V Battery WandReloadable Battery Wand (AA lithium batteries NOT INCLUDED)NiMH Solar Rechargeable Battery Wand with Solar Recharge PanelRegular Roll (from back of roller)Reverse Roll (from front of roller) [Not available with surface headbox]Copyright © 2015 Draper Inc. Form BatteryPoweredFlexShade_Sub15 Printed in U.S.A.PROJECT:ARCHITECT:CONTRACTOR:SUPPLIER:DATE: REVISED:Battery Powered FlexShadeSpecificationsEquipmentBattery Operator: Drive unit inside roller, instantly reversible, lifetime lubricated.Right hand motor location standard. Left hand motor location also availablewith endcaps. Limit switches adjustable using wall switch or remote control. Oper-ates on power provided by two 12V battery wands. Reloadable battery wand (AAlithium batteries NOT INCLUDED) and NiMH Solar Rechargeable Battery Wandwith Solar Recharge Panel also available (for limitations see documentation at/go/ BatteryPoweredShade.htm.). Can be retrofitted toDraper manual shades.HardwareRollers: 1½" dia., extruded aluminum. Roller assembly easily removable.Mounting Brackets: 1018 plated steel stamping universal bracket for mounting towall, ceiling, or jamb. Brackets do not require additional adapters.Roller Idler Assembly: Type 6/6 injected molded nylon and spring-loaded pin foreasy installation and removal of the roller.Slat: Aluminum, min. 1/8" x 1", encased in heat seamed hem.Endcaps: 1028 steel stamping. 3¼" x 3¾". Complete with adapter roller bracket.Installs to wall, ceiling, or jamb. Accepts fascia or headbox. Clear Anodized (stan-dard), or black, white, ivory or bronze powder coat finish available.Endcap Covers: Plastic covers snap onto endcaps. Available in ivory, bronze,black or white to match fascia.Fascia: L-shaped cover of extruded aluminum, .060 wall. Assembly snaps ontoendcaps without exposed fasteners. Clear Anodized (standard), black, white,ivory, or charcoal bronze finish available.Headbox: Standard consists of fascia, L-shaped back/top cover. Assembly snapsonto endcaps. 33/8" x 37/8".Please note: Dimensions of rollers, operators and hardware at manufac-turer’s discretion.(Left-hand bracket andBattery Wand SizeNiMH Battery Wand (Solar Rechargeable)161/8" long x 11/16" diameterReloadable Wand (AA lithium Batteries NOT INCLUDED)18" long x 11/16" diameter (screw-on cap is ¾" diameter)Battery Wand16" long x 11/16" diameterSolarPanel。


百叶窗技术说明文|恒兴窗帘布艺城暨恒兴文艺广场文宣部铝合金的成分1、综述帘片采用Alloy AA6011,6011化学成分采用铝业协会指定的标准,具有极佳的特性,能够生产经久耐用、预压成弧的铝卷材料。
2、物理特性合金 AA 6011 T8张紧力>330N/mm屈服力>320N/mm延伸率>3%3、化学特性铝合金AA6011含有以下成分:Si硅 0.6~1.2%Fe铁á1.0%Cu铜 0.4-0.9%Mn锰á0.8%Mg镁 0.6-1.2%Cr铬á0.3%Ni镍á0.2%Zn锌á1.5%Ti钛á0.2%规格及公差上涂前厚度0.195±0.01mm2、宽度帘片宽度为25.0±0.2mm帘片形状1、弧度弧高约为1.7±0.3mm2、上下拱度拱度约为+3mm(上拱)和-5mm(下拱)之间3、扭曲度1.2m长帘片扭曲度不超过3mm4、侧弯2m长帘片侧弯不超过3mm铝卷预处理涂层采用一级水准处理,对环境无害。
对所有冷卷帘片进行预处理保证涂层附着力极佳,因此能抗腐蚀,适应潮湿环境。
铝卷涂层对经过化学预处理的铝卷进行适于室内用的装饰涂层。
该涂层通常包含一层漆膜,用动态涂层线控制所有涂层,因此保证百叶帘帘片附着力吸引、牢固、润滑和色彩统一。
HD特殊的铝卷涂层加工过程保证了颜色再生产也一致,同时两边也进行了涂层处理,所有加工工艺严格按照HD统一标准,否则将不予接受。
涂层系统主要基于化学聚酯方法,测试根据ECCA标准或其它国际通行的准则。
测试1、涂膜厚度(1)测试方法:ECCA T1(2)传统涂层: 7-15mm 每边通透金属涂层:4-10mm 每边特殊涂层:根据要求(3)每批差异性:10mm以下: ±2mm10mm以上:±4mm2. 镜面光泽色(1)测试方法: ECCA T2(2)传统绢光涂层: >70%传统特殊绢光涂层:25-50%特殊涂层:根据要求(3)每批差异性:20%以下:±3%20-50%:±5%50%以上:±7%3. 颜色差异性(1)测试方法: ECCA T3(CIELAB)(2)每批次之间色差:u 标准非金属色:DE£4 Unitsu 其它色:DL=±4 Units(3)每批次色差u标准非金属色:DE£2 Unitsu 其它色:DL=±2 Units4、铅硬性(1)测试方法: ECCA T4(2)传统涂层: Phh>F5、粘合性(1)测试方法:ISO2409,采用苏格兰胶带膜编号600,3/4"宽(2)传统涂层: 等于或好于100%6、抗盐雾(1)测试方法: ECCA T8(2)根据ASTM方法D714-56,经100小时的测试,从未保护的帘片边端或交叉处蔓延不超过2mm,起泡不超过F87、防潮性(1)测试方法:ECCA T9(2)根据ASTM方法D714-56,帘片经100小时的测试起泡不超过F88、色牢度(1)测试方法:DIN 54004(2)所有涂层色牢度最小为6产品特点1、选用AA6011铝镁硅合金材质帘片帘片强度高,弹性好,不易弯曲变形,经久耐用,整体性好。
SPECIFICATION DATA – ARO 65 with guide rails and motor driveTender specification HELLAARO 65Outdoor blind type ARO 65 with guide rails and motor driveExternal venetian blinds manufactured by HELLA, type ARO 65, with rails and motor or external venetian blinds with at least equivalent technical features are used.Offered manufacturer: ____________________Offered type: ____________________The following requirements are mandatory in order to minimise wear beyond the warranty period and to improve the optics:- All punchings in the slats have to be bordered, plastic-clips are not allowed- The slat guiding nipples have to be made of zinc die-cast with Collinox coating for greater wear resistance and no UV sensitivity- Plastic nipples are not allowed.The offered outdoor blinds have to fulfil the service life class 3 according to DIN EN 13659:2009-01Top railCold roll U-profile made of steel, bordered on both sides, galvanized surfaceDimension 58x56 mm- For easier installation and adjustment, the top rail has to be open at the bottom.- Top rail fixing: for easier installation galvanized vertical bracket with clip function. The vertical brackets can be positioned in any place of the top rail.- For design with angular top board: bracket with integrated holder for the hidden clamping of the top board. Optionally:- Top rail made of extruded aluminium, dimension 58x57 mm- Vertical bracket with insulation layer made of rubber for noise reduction.Square drive shaftMade of extruded aluminium 12x12mm with hexagon socket 7mm for the direct incorporation at the motor. For coupled element square drive shaft made of aluminium 12 x 12 mm with inner hole ø9 mm to accommodate the coupling (thus coupling remains permanently revisable)Bottom rail- Extruded powder-coated aluminium profile- Dimension 60x19 mm- Laterally closed by end caps made of plastic in grey or black, guided with metal pins in the guide rails on both sidesSlatsSlats bordered on both edges made of highly elastic special alloy, bend-proof, scratchproof and shockproof. Slat width 65mm, slat thickness approx. 0.45mm. Bordered lift tape punchings for a better protection against wear and tear of the lift tape. Ladder cord fixing by means of Omega punching in every slat for protecting against lateral slippage. The slats are kept at regular spacings by the ladder cord. The slat guiding nipples made of zinc die-cast with Collinox coating for greater wear resistance and no UV sensitivity are reciprocally connected in every slat in an impact resistant way. Slats packet in an offset way so that a smaller package height is reached.Surface:Glossy lacquering with polyester lacquer, free of heavy metals, suitable for facades. Colour choice according …HELLA slat colour chart for outdoor blinds / venetian blinds“.Slat guide lateral with guide railsGuide rails as single / double guide rail (FE22 / FD27) with groove for the distance spacers made of die-cast alu-minium, powder-coated, with plastic end caps. For optimum noise reduction, the blind is guided on both sides in a C-shaped, hinged guide profile made of plastic. The guide profile is weatherproof, UV-resistant and is secured in the guide rail against slipping. The variable spacers are made of 2 parts, a powder-coated distance bracket flange made of aluminium, and a clamping lock made of zinc with Collinox coating for greater wear resistance.Tender specification HELLATilt mechanismMaintenance free, encapsulated, Teflon bearings with turning roll and reel made of plastic. Segment tilting to pre-vent automatic adjustment of the slats. With the possibility for adjustments in order to compensate an off-track running of the bottom rail. By simply re-plugging the stop pins the changes of the tilting variants are possible with-out the disassembly of the blind.180° turn:The blind moves down with the slats closed towards the inside, smooth tilting process when changing the direc-tion of the movement.Ladder cordHigh-strength Terylen-polyester with Kevlar inlay in black or grey, low profile and long lifespan.Lift tape- Anti-friction coated for a run with minimum wear and tear and maximum UV-protection- Dimension 6,0x0,28 mm and tear strength 700 N- Guaranteed thickness tolerance in the 1/100 mm range, long service lifeMotor driveRaising and lowering the blind and tilting of the slats via concealed installed, maintenance-free and low-noise electric motor 230 V AC, 50 Hz, IP 54 with flanged planetary gear. For a better distribution of forces, the motors are to be installed as a centre motor with shaft outlet on both sides. This facilitates coupling in case of later changes in the room layout. Installed limit switch and thermal protection switch against overload of the motor. Mo-tors with adjustable upper or lower limit switches as well as additional upper external limit switches are used. Mo-tor inclusive Hirschman cable socket and connection cable. Tilting of the slats is enabled by lightly touching the switch in the respective direction. If several motors are to be operated with one switch, a control unit is required. Surface coatingVisible powder-coated aluminium parts in standard colours according to the …HEL LA colour chart for powder paint“. Special colours according to …HELLA colour chart powder coating“ for surcharge.Unit: pieceQuantity: ..............pcs. Price/pc: .............. Price total: ..............Optional additional equipment for HELLA outdoor blind type ARO 65 with guide rails and motor: (Please select and tick as appropriate)90° turn[ ]The blinds moves down with the slats closed towards the outside andmoves up with the slats opened horizontally, smooth tilting process whenchanging the direction of movement.Working positionThe curtain is lowered with an inclined slat position of about 50° (up to the[ ]lower limit stop). To close the curtain it is necessary to raise it briefly (ap-prox. 2 s) and to lower it afterwards. The curtain can be closed completelyin every position. Smooth tilting process when changing the direction ofmovement. Curtain goes up horizontally. Bearing in the same size, withoutadditional, attached reel.Tender specification HELLADaylight control 90° with working position (max. height 4000 mm):Lowering the curtain in working position. The slats in the upper part of the curtain are ap-prox. 50° inclined, in the lower part of the curtain the slats are closed. Raising the curtainwith a horizontal slat position in the upper part of the curtain, in the lower part of the curtainapprox. 20° inclined. The curtain can be closed completely.[ ]Daylight control 180° (max. height 4000 mm):The curtain is closed while moving down. The upper part of the curtain can be opened to90° at the maximum, whereas the lower part of the curtain remains closed. When raising,the upper part of the curtain is closed (tilted towards the inside). The lower part of the blindraises with horizontally positioned and maximum opened slats.Optional guide rails- Lateral guide rail FE22S- Single / double guide rail FE30 / FD32 with end cap andgroove for the spacers- Single / double guide rail FE50 / FD50 with end cap andgroove for the spacers- Guide rail FUP70 / FUP80 / FUP95 with sealing profilesat the back (for surface- / flush-mounted installation)[ ]Optional spacers- Fixed spacer with small/large base plate- Fixed spacer with transversely mounted large base plate - Fixed spacer with base plate on one side transversely mounted- Fixed spacer strengthened with large base plate for self-supporting units- Bracket for inner or outer corner [ ][ ]Ladder cord fixing in every slat:The top ladder cord in the middle has to be fixed in every slat with an OMEGA-punching inorder to avoid a twisting of the slat in the cord.[ ]Motor with Comfort tiltElero Comfort drive (230V) with slow tilting (5 U/min) for finer adjustment ofthe slat angles.[ ]Motor with obstacle detection when raising the blindsSomfy protect drive (230V) with obstacle detection and freezing protectionwhen raising the blinds.[ ]Radio drive with integrated receiver and Comfort tiltelero Comfort drive (230V) with integrated receiver and slow tilting (5U/min) for finer adjustment of the slat angles.[ ]Radio drive with integrated receiver and obstacle detection when raising the blindsSomfy io protect drive (230V) with integrated receiver and obstacle detec-[ ] tion when raising the blinds.Speed motor (up to max. 7m²):[ ] Comfort Speed with 50 U/min and slow tilting speed of 5 U/min for finer ad-justment of the slat angles.Emergency crank handle[ ] Motor with emergency crank handle:Motor drive JA NHK with emergency crank handle for opening the blind incase of power failure. Mechanical cut-off.SMI-Motor[ ] Motor with SMI interface:The JA Comfort SMI is a blind drive with feedback capability, electronic limitswitching and integrated SMI interface installed in a concealed position inaccordance with the SMI specification. The drive can communicate withcontrols via corresponding actuators with a BUS system (e.g. KNX, LON).Communication and power supply are provided via the 5-wire connectioncable with plug connector STAK 4.HELLA emergency-up control device with USV[ ] The HELLA emergency-up control device serves for the all pole breaking ofa single motor from a motor control device or actuator. In additional theemergency-up control device serves for a delayed all pole switching on ofan emergency power supply and for a delayed switching on of the emer-gency-up command. Shading devices that are provided with the HELLAemergency-up control device are designed for use in the secondary emer-gency route. A local fire protection officer must approve the admissibilityand applicability of the emergency-up control device for the second emer-gency route. The uninterruptible power supply (USV) for the HELLA emer-gency-up control device is suitable for mechanical and electrical motors(230V).Optional slat perforation[ ] Optional perforated slats with a hole diameter of 1.1 mm, centre-to-centredistance 3.46 mm and light penetration 9,2%.ONYX CENTER[ ] Central control unit in the building. It serves as an interface betweensmartphone and the individual control units as well as sensors and trans-mits control commands bidirectional via an 868 MHz radio standard. Con-nected via network cable with an existing Wi-Fi (WLAN). The control is pos-sible via smartphone via its network or, if the network offers internet access,via the internet. Supplied with 230V AC via a Euro plug, no additional volt-age conditioning necessary. The customer does installation of the controlunit. The central control unit gives status updates via status display. Byscanning the QR code at the bottom side of the device via the app, an en-crypted access to the control unit is providedONYX NODE[ ] One device per sun protection unit. Motor drive of the sun protection units:Standard capacitor motor (not included in the delivery). Further looping ofthe power supply via doubly present terminals is possible. Connection of anadditional commercially available venetian blind pushbutton is possible. Thecontrol device is mounted in a deep flush-mounted socket (min. 60 mm).The control device queries the motor status. The current position and incli-nation of the cover now are graphically displayed in the app. The controldevice communicates with the central control unit or the hand-held radiotransmitter/wall-mounted radio transmitter via an 868 MHz radio standard.Adding control devices with the help of the scanning mode in the ONYXapp.ONYX CONNECTOR[ ]One ONYX.CONNECTOR per curtain. Provided in the box of the sun pro-tection unit. The motor is directly plugged to the Hirschman cable socketSTAK 3 of the ONYX.CONNECTOR. Via the integrated Hirschman con-nector STAS 3, ONYX.CONNECTOR is directly plugged into an already ex-isting Hirschman cable socket STAK 3. Motor drive of the sun protectionunits: Standard capacitor motor (not included in the delivery). The con-nector queries the motor status. The current position and inclination aregraphically displayed in the app. ONYX.CONNECTOR communicates withthe central control unit or the hand-held radio transmitter / wall-mounted ra-dio transmitter via an 868 MHz radio standard. Adding control devices withthe help of the scanning mode in the ONYX app.ONYX CLICK[ ] Hand-held radio transmitter for controlling one or more ONYX control de-vices. Per channel, five devices can be taught-in; in total five channels areavailable. In combination with ONYX.CENTER, the number of devices perchannel is not limited. Weather sensors can be configured viaONYX.CLICK The configuration is done via Bluetooth with the ONYX app.Selecting the shading type of an ONYX control device by tapping (outdoorblinds) and raising or lowering (roller shutters). Channels are displayed incolours.ONYX WEATHER[ ]The weather sensor is provided with a wind sensor and a brightness sen-sor. Wind radio transmitter designed as a three-shell wind turbine with awind measuring range of 2-32 m/s. Measuring range of the brightness sen-sor: 0-120 klx. Automatic control of the assigned sun protection units, if thethreshold value is exceeded or not reached (wind resistance class, bright-ness value). The wind resistance class can be set individually for each blindvia the smart phone. The weather sensor is mounted on the facade andsupplied with 230 V AC voltage. The weather sensor communicates via an868 MHz radio standard with the central control unit or hand-held radiotransmitter/ wall-mounted radio transmitter. Adding the weather sensorthrough scan mode in the ONYX app. Integration of several weather sen-sors into one system is possible without any problems. IP rating 54Unit: pieceQuantity: ..............pcs. Price/pc: .............. Price total: ..............。
电动窗帘百叶产品简介格力电动百叶帘【功能特点】1格力电动百叶帘,使用格力百叶电机,以外接信号接收器和遥控器进行控制2、根据百叶帘面积的不同,可选择不同功率的电机。
3•使用卷线器和梯绳,实现叶片翻转和升降。
4、可实现手控、无线遥控、群控及智能控制。
5、适合家庭、酒店、办公室等场所使用。
【使用性能】1百叶帘片,有铝、竹、木等材质可供选择。
有多种颜色及花纹可调配。
2、叶片宽度有25mm、50mm可供选择。
3、叶片可调整为任意角度,实现光线调节4、单幅百叶最大面积达6平方.恒力电动卷帘【功能特点】1恒力电动卷帘,使用IS3100系列管状电机,以外接信接收器和无线遥控器进行控制;2恒智无线电动卷帘,使用IS3200系列管状电机,电机内置无线接收器,可直接用无线遥控器控制,无须外接控制器,安装方便。
3、均可实现手控、群控及智能控制功能。
4、根据卷帘面积不同,两种系列的卷帘,均有10N-50N的多种型号和功率的电机可供选择5、适合各种写字楼、会议室、展馆等场所使用。
【使用性能】1视安装场所和安装尺寸的实际情况,可实现一拖二、一拖三、一拖四;2、配套使用万向中座,一拖二两套卷帘夹角可在90度至180度之间调整。
3、配套使用钢丝导向,可保证高窗卷帘的平稳运行;亦可实现一定角度的斜面运行。
4、配套使用遮光槽,可进一步提高遮光性能。
5、没有窗帘盒的地方,可配套使用卷帘罩,美观大方。
6、应不同使用要求,可选用透光面料和全遮光面料。
瑞智220V/50W方形交流电机【产品特点】1本产品采用瑞智220V/50W方形交流电机。
负载能力高,单轨单机可负载50公斤。
2、手动功能:产品内设离合装置,手动/电动均可使用3、传动系统:采用内有加强钢丝的高品质同步带,耐磨耐拉,不扭曲变形。
可做直路及弧形轨道4、静音设计:采用静音技术设计,全密封润滑技术,噪音低,振动小5、使用方便:内置无线接收系统,无须外接信号接收器,无线遥控距离可达100米。
重庆捷世达门窗内置中空百叶玻璃一、产品介绍中空百叶玻璃窗它是传统的遮阳产品,一般采用人工拉绳或机械方法来开启或关闭。
依靠先进的技术,将百叶窗帘整体安装在中空玻璃内,采用磁力来控制中空玻璃内的百叶窗帘,可轻易升降或翻转180度。
该产品既节省了使用空间,又达到遮阳目的,还具有保温性和防噪音功能,同时给建筑物和室内以新颖的视觉。
无论夏天还是冬天,可调整百叶窗角度来达到遮阳或采光采暖,使空调能耗大幅降低。
据测算,百叶关闭状态,最高可达40%的节能效果。
由于采用双层钢化玻璃结构,抗风力及抗外击力较高,高层和沿海建筑采用较为合适。
该产品还可替代传统的隔断墙等。
百叶中空玻璃是将百叶安装在中空玻璃腔内的一种新产品,中空玻璃内的百叶可随意调整角度,使其全部透光,半透光或遮光,同时又能将百叶全部拉起,变成全部透光窗。
它尤其突出了中空玻璃独特的保温性,隔声性,防灰尘污染、安全性等优点,是解决建筑用窗遮阳性能的最佳理想产品。
产品特点具有合理使用空间:不须专门的百叶窗安装空间。
使空间更宽敞。
隔音效果强:通过宽阔的中空隔离层,确保创造安静的空间,强化隔音、隔热、保温、防风功能。
卫生环境好:阻隔灰尘与污染物质,创造令人心旷神怡的居住环境。
经济实用性:无须担心磨损与毁坏,可以长时间清洁干净地使用。
二、产品规格1、现有4+19A+4,4+19A+5,5+19A+5三种规格。
2、内置磁控中空百叶玻璃的尺寸规格:最大:(W)1000mm*(H)1500mm,总面积<1.5 平方最小:(W)400mm*(H)600mm3、铝合金叶片:厚度为为(0.21±0.02)mm;宽度为(15±0.1)mm4、按中空玻璃的总面积计算,中空玻璃不够1平方米按1平方计算。
三、产品特点1、节能性中空百叶玻璃是由优质双层钢化玻璃复合内置进口铝制百叶片及单手柄磁控机构制造而成。
在夏季,将百叶片调整到关闭状态时可以阻挡阳光的直接照射,阻隔冷热空气的对流,大幅度降低室内空调的能源消耗。