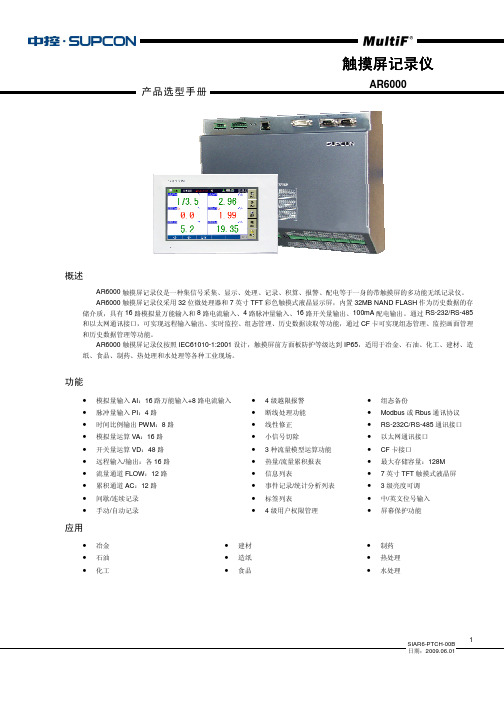
Scalar i6000
- 格式:pdf
- 大小:677.43 KB
- 文档页数:2


火星高科基于对存储备份领域多年的研究, 完全凭借自身的研发实力, 针对现阶段数据保护市场的需求特点, 推出了完全自主知识产权的系列产品——火星舱存储空间站 (Mars Storage Appliance)。
火星舱存储空间站系列产品包含火星舱备份一体机、火星舱虚拟磁带库、火星舱磁盘阵列、火星舱虚拟化设备、等全线存储产品。
作为一款国内领先的数据备份设备, 火星舱采用高性能的硬件配置, 与存储备份管理软件火星企业级跨平台数据备份软件 (Mars Backup Advanced 简称: MBA) 无缝结合, 经过反复测试及优化, 将两者有机的结合在一起。
无论是在硬件、软件的兼容性上, 还是在软件运行备份、恢复的效率上, 均可达到最佳状态。
火星舱具有最广泛的备份功能, 可满足大中型企业组织机构异构环境的复杂需求, 包括从 Windows、Linux 到Unix 操作系统平台, Oracle、Sybase、SQL Server、MySQL、ExchangServer、Domino 等各种主流数据库和应用软件, 支持各种物理环境和虚拟环境备份, 简化虚拟服务器的数据保护过程。
> 备份一体机的特点与优势内嵌跨平台的备份软件产品火星舱内嵌跨平台数据备份软件可以在用户多服务器、多备份源点、跨平台的复杂环境中有效地实施备份和恢复工作, 并且能够对 SAN 环境的良好支持, 更能实现跨平台 LAN-Free 和磁盘驱动器共享等高端备份应用需求, 是一套真正意义上的企业级备份软件。
目前, 广泛支持Windows、Unix、Linux 等多种操作系统平台, 并且可以完好支持跨越上述平台的复杂环境的备份和恢复作业。
远程数据备份恢复火星舱内嵌数据备份软件提供远程数据备份与恢复功能, 支持远程的数据库备份和文件系统备份, 支持一对一的灾难备份; 多对一的集中式备份。
通过采用数据压缩处理技术、断点续传技术、流量控制技术和双向缓冲技术, 减少了网络通信流量, 提高了数据传输的稳定性和高效性, 最大限度地增加数据吞吐量。

磁带库I6000(I11.2.1)库体升级在更新之前:1)阅读版本信息。
2)准备好mcb2功能代码文件,670q.gs08901.pkg。
3)注意:查看和这次升级相关的所有的技术文档。
4)在电脑上安装好最新版本的Field Service Utility(5-00421-12 v202A或更高)。
5)安装Java V1.6版本或者用浏览器i5和更高的版本。
6)下载好i11.2.1更新文件。
更新软件:1)从磁带库登录面板登录。
名称=service密码= 101011002)检查磁带库的时间Setup > Date and Time3)关闭磁带库,Operations > Change Mode… > Shutdown4)关闭磁带库后,重新开机。
5)在PC上开启AMC客户端确保PC上使用AMC相应版本的固件和在磁带库运行的版本一致。
输入的IP地址登录。
名称= service密码= 101011006)使用View 菜单选择物理磁带库。
7)离线磁带库Operations > Change Mode > Offline8)捕获的快照Tools > Capture Snapshot。
9)保存设置,Tools > Save/Restore…/Save 。
10)使用主机应用程序从驱动器弹出磁带。
如果不能从应用程序操作,使用AMC 客户端选择适当的分区,然后运行Operations > Drives > Unload。
11)关闭所有打开的Tickets,如存在问题,必须修复完后才能继续升级。
12)禁用Auto Teach 和Auto Inventory 如果已启用,在LMC > Setup > Physical Library ,禁用磁带库策略。
13)选择Tools > Update Software 。
14)选择Next > Download New Package 。

1y y Secure in-band and out-of-bandnetwork remote management y y Streamline installation andconfiguration with Zero Touch Provisioning y y Access to remote andunreachable locations using automatic network failover to cellular (and failback) capability y y Eliminates adaptors forCyclades™ and Cisco® pin-out conversions y y Compliance with datacenter access and securitypolicies – customizable, multiple access levels y y Integrated powermanagement – support for MPH2™ Rack PDUs and third-party power support y y Compatible with next-generationnetwork standards – IPv6y y Centralized managementusing Avocent DSView management software y y Strong dial-up and securedial-back using optionalbuilt-in modem y y Automatic event tracking andnotification of fault conditions y y Regulatory compliance andeasy trouble shooting – online and off-line data logging with time stamps y y FIPS 140-2 compliance: Basedon the FIPS 140-2 validated cryptographic module(s) (Certificate #1747)High-Performance Design and Advanced FeaturesThe Avocent ACS 6000 advanced console server series offers upgraded and advanced features that deliver scalable and high performance solutions for IT administrators. The console server features a high-speed processor platform with dual gigabit-Ethernet ports for redundancy and optional built-in modem. In addition, they feature an internal temperature sensor for device-level monitoring and configurable pin-outs for serial ports. The Avocent ACS 6000 advanced console server also offers robust software features to meet the requirements of the most demanding data center management applications. Features include automated discovery tools to ease identification of servers, routers, switches and power devices connected to any serial port, saving time at initialconfiguration and installation. To comply with existing data center network access policy, the Avocent ACS 6000 advanced console server provides customizable, multiple access levels for secure management.The console servers provide a complete solution for secure, remote control withadvanced console server features such as enhanced security, data logging and event monitoring. In addition, the Avocent ACS 6000 advanced console server supports next-generation network standards such as Internet Protocol version 6 (IPv6). Available in 4-, 8-, 16-, 32- and 48-port models that fit in 1U of rack space with single and dual, AC and DC power options. With or without modem, the ACS 6000 console server helpsmaximize IT asset productivity while providing scalability and reducing operational costs.The Avocent® ACS 6000 advanced console server series integrates cutting edgetechnologies, adaptive services and secure enterprise communications in order to offer IT professionals and network operations center (NOC) personnel the ability to perform secure, remote data center management and out-of-band management of IT assets from anywhere in the world. Using a hardened Linux® operating system and DSView™ management software, the Avocent ACS 6000 provides optimal performance, security,reliability, and a complete out-of-band management solution.Avocent® ACS 6048 Advanced Console ServerApplicationsy y Secure console and power managementy y Server and network management y y Secure access to test and development lab environments y y Telco central office and remote facilities2AV-12315 (R11/16) | Vertiv Headquarters, 1050 Dearborn Drive, Columbus, OH, 43085, USA© 2016 Vertiv Co. All rights reserved. Vertiv and the Vertiv logo are trademarks or registered trademarks of Vertiv Co. All other names and logos referred to are trade names, trademarks or registered trademarks of their respective owners. While every precaution has been taken to ensure accuracy and completeness herein, Vertiv Co. assumes no responsibility, and disclaims all liability, for damages resulting from use of this information or for any errors or omissions. Specifications are subject to change without notice.Hardware SpecificationsCPU PPC440EPx @ 533 MHz (PowerPC with Security Acceleration Engine)Memory128 MB NAND flash (embedded ICs on motherboard); 256 MB DDR-2 memory (embedded ICs on motherboard)Interfaces2 Gigabit (10/100/1000BT) Ethernet interfaces on RJ45; 1 RS-232 serialconsole port on RJ45; 1 AUX RS232 port on RJ45 OR internal modem V.92 port on RJ45 (RJ11 compatible); RS232 ports on RJ45; 1 USB 2.0 Host on Type A connector PowerInternal 100–240 VAC, 50/60 Hz Optional –48 VDC power supply; optional dual entry, redundant AC and DC power supplies Power UsageNominal voltage 120VAC: Typical 0.17A, 20W; Maximum 0.25A, 30WNominal voltage 230VAC: Typical 0.1A, 23W; Maximum 0.15A, 35W Nominal voltage -48VDC (20% tolerance); Typical 0.5A Operating Temp.32° to 122°F (0° to 50°C)Storage Temp.–4° to 158°F (–20° to 70°C)Humidity 20% to 80% noncondensing Non-Operating Humidity 5% to 80% relative humidityDimen-sions (W x D x H) 17.250 x 9.5 D x 1.75 in. (43.82 x 24.13 x 4.45 cm)Weight 6.6 lbsCertifi-cationsEmissions and Immunity: FCC Class B; CE Class A (EU); ICES-003 (Canada); VCCI (Japan); C-Tick (Australia); Customs Union (CU)Safety: UL (USA); cUL (Canada); EN-60950 (EU); CB; Customs Union (CU)In addition, the following certifications forspecific models: KCC (Korea)** Only specific models are certified to theabove certificationsFeaturesOperating System y y Embedded LinuxAccessibilityy y Zero Touch Provisioning (ZTP)y y In-band (Ethernet) and out-of-band (dial-upmodem) supporty y Built-in modem connectivityy y Allows for alternative access interfaces, such asmodem (v.92) or 4G through USB device Availabilityy y Automatic Ethernet failover using second gigabitEthernet port as the secondary portACS6008SAC-G2ACS 6000 8-port unit single AC power supplyACS6008DAC-G2ACS 6000 8-port unit dual AC power supplyACS6008MDAC-G2ACS 6000 8-port unit dual AC power supply with built-in modem ACS6016SAC-G2ACS 6000 16-port unit single AC power supplyACS6016DAC-G2ACS 6000 16-port unit dual AC power supplyACS6016MDAC-G2ACS 6000 16-port unit dual AC power supply with built-in modem ACS6032SAC-G2ACS 6000 32-port unit single AC power supplyACS6032DAC-G2ACS 6000 32-port unit dual AC power supplyACS6032MDAC-G2ACS 6000 32-port unit dual AC power supply with built-in modem ACS6048SAC-G2ACS 6000 48-port unit single AC power supplyACS6048DAC-G2ACS 6000 48-port unit dual AC power supplyACS6048MDAC-G2ACS 6000 48-port unit dual AC power supply with built-in modemDC Power Supply ModelsACS6008SDC-G2ACS 6000 8-port unit single DC power supplyACS6008MSDC-G2ACS 6000 8-port unit single DC power supply with built-in modem ACS6032DDC-G2ACS 6000 32-port unit dual DC power supplyACS6032MDDC-G2ACS 6000 32-port unit dual DC power supply with built-in modem ACS6048DDC-G2ACS 6000 48-port unit dual DC power supplyACS6048MDDC-G2ACS 6000 48-port unit dual DC power supply with built-in modemy y Dual power supplyy y Internal modem supporty y USB port support for modems, fiber and storage Securityy y The FIPS mode of operation uses an embeddedFIPS 140-2 certified OpenSSL cryptographic module (Certificate #1051)y y Preset security profiles–secure, moderate and open y y Custom security profilesy y X.509 SSH certificate support y y SSHv1 and SSHv2y y Local, RADIUS, TACACS+, LDAP/AD, NIS andKerberos authenticationy y Two-factor authentication (RSA SecurID®)y y One-Time Password (OTP) authentication y y Local, backup-user authentication supporty y PAP/CHAP and Extensible Authentication Protocol(EAP) authentication (for dial-up lines)y y Group authorization:TACACS+, RADIUS and LDAP; Port access; Power access; Appliance privilege y y I P packet and security filtering y y User-access lists per port y y System event syslog y y I PSec with NAT traversal support y y IP forwarding support y y Secure factory defaults y y S trong password enforcement Console Managementy y Sun break-safe (Solaris Ready Certified)y y Break-over SSH supporty y Off-line data buffering – local and remote (NFS/Syslog/DSView software)y y Level-based syslog filters y y T ime stamp and rotations for data buffering y y U nlimited number of simultaneous sessions y y S imultaneous access on the same port (portsniffing) with ability to toggley y Configurable event notification (e-mail, pager,SNMP trap)y y C ustomizable, global time zone supporty y Multiple and customizable user levels of access Port Accessy y Directly by server name or device name y y CLI Commandy y Simultaneous Telnet and SSH access y y HTTP/HTTPSSystem Managementy y Configuration wizard in Web for first-time users y y Auto-discovery for automatic deployment y y Command line interface (CLI)y y Web Management Interface (HTTP/HTTPS)y y SNMPy y Internal temperature sensorCablingy y CAT-5 compatible adapters for simpler cabling†y y Configurable Cyclades and Cisco pin-outs for serialports Upgradesy y Upgrades available on FTP site, no charge y y TFTP support for network bootOrdering DetailsAC Power Supply ModelsACS6004SAC-G2ACS 6000 4-port unit single AC power supplyACS6004DAC-G2ACS 6000 4-port unit dual AC power supplyACS6004MDAC-G2ACS 6000 4-port unit dual AC power supply with built-in modem。
Install the ArrayAttention!If you are installing more than one array, refer to the Hardware Guide available on HPE InfoSightfor information about your model.Go to InfoSight > Resources > Alletra 6000, Alletra 5000, Nimble Storage >Documentation > Hardware Guide .What you need for each array:•19-inch four-post rack. The provided rails fit both square-hole and unthreaded round-hole racks.Racks with a depth of 1200 mm best accommodate the length of the array chassis, providing ample space for cabling and ease of service. Racks with a depth of 1075 mm can be used but may provide limited space for cables and component access.•4U space available in the 19-inch rack•At least two Ethernet cables for management, one cable per controller •At least two cables, Ethernet or Fibre Channel, for data•One or two switches, depending on your array and network topology. Two 10GbE or Fibre Channel switches are recommended for high availability and redundancy.Before beginning, download and read the Release Notes, available on HPE InfoSight(https:// ). If you do not have an HPE InfoSight account, click Create Account and provide the required information.Visit the Welcome Center (/support/storage-welcomecenter ) for help setting up your HPE storage array.Note:•Install this product in restricted-access locations only, such as a dedicated equipment room or an electrical closet. Installation and maintenance must be carried out by qualified personnel.•Position the rack in a location with at least 800 mm rear clearance and 1000 mm front clearance for maintenance access.•Install the array with the front (drive side) facing the cold aisle and the back (controller side) facing the hot aisle in your environment.•Unpack and inspect the hardware.Save the original packaging.41BezelArray 25Outer rails Serial console cables3Power cables•Install the outer rail assemblies onto the rack.Note: To ensure that the array thumbscrews align correctly, align the rail assembly in exactly 4U of rack space. The bottom stud on the rail assembly inserts into the bottom hole of the bottom unit of the 4U rack space allotted for the array.a)Align the bottom stud of the rail at the position you want.Note the orientations embossed on the outer rail.b)Press the keeper latch and position the front studs in the rack. When the studs are engaged, release the keeper latch to secure the front of the rail in the rack.c)Align the back of the rail at the same rack position as the front.d)Position the back studs in the rack and press the keeper latch. When the studs are engaged, release the keeper latch to secure the back of the rail in the rack.e)Repeat steps a through d on the other side.The following diagram shows where the rail assemblies should be correctly installed in a rack.41Right rail assembly Left front rack post 25Left rail assembly Keeper latch3Right front rack post•Slide the chassis into the rack.a)Insert the chassis into the rack, back side first. Be sure the inner rails insert into the outer rails.b)Gently slide the chassis into position.When you hear a click, the inner rails have locked into the rail assembly.31Right front rack post Chassis24Left rail assembly Right rail assembly•Secure the chassis to the rack.The chassis has two handles. Each handle has a thumbscrew that holds the chassis to the rails so it does not slide out of the rack. Tighten the thumbscrew in each handle until secure.•Secure the bezel to the front of the chassis.a)Align the four retention pins on the bezel with the four mounting holes on the front of the chassis.b)Press gently but firmly until the bezel snaps into place.1Bezel 2Chassis•Cable the array for your desired network topology.a)Connect ports for management (commonly the onboard ports eth0a and eth0b).b)Connect ports for data according to your network topology and protocol (eth or fc).•For Ethernet, cable the same port on each controller to the same network switch and subnet.The two ports form an interface pair, and iSCSI initiators have a network path to both controllers.If your switches have multiple VLANs configured, make sure that each interface pair is connected to switch ports on the same VLAN.•For Fibre Channel, cable the same port on each controller to the same FC switch.See the Hardware Guide on HPE InfoSight for detailed network configuration examples.Figure 1:Array interface example (Ethernet and Fibre Channelports)71fc3a eth0a 28eth0b fc3b 93SAS Out eth1b 410eth1a SAS Out 115Serial porteth2a 6eth2bConnect the Power to the ArrayThe storage array must be installed in a rack or enclosure and the array must be connected to a network.•Plug the power cables into both power supplies.•Verify that the connection is secure.•Plug the other end of the power cables into the power circuit.To minimize the risk of both power supplies losing power simultaneously, connect each power cable to a different circuit.If the array does not come online automatically, press the power buttonon the front of the chassis.Note: This equipment has been tested and found to comply with the limits for a Class A digital device, pursuant to Part 15 of the FCC Rules. These limits are designed to provide reasonable protection against harmful interference when the equipment is operated in a commercial environment. This equipment generates, uses, and can radiate radio frequency energy and, if not installed and used in accordance with the instruction manual,may cause harmful interference to radio communications. Operation of this equipment in a residential area is likely to cause harmful interference in which case the user will be required to correct the interference at his own expense.Warning: This is a Class A product. In a domestic environment this product may cause radio interference in which case the user may be required to take adequate measures.See Safety and Compliance Information for Server, Storage, Power, Networking, and Rack Products , available at /support/Safety-Compliance-EnterpriseProducts for important safety, environmental, and regulatory information.PN: 960-0088-001 Revision C (09/06/2023)© 2023 Hewlett Packard Enterprise Development LP. All rights reserved.Page 1 of 2*960-0088-001*Configure the ArrayImportant! There are multiple ways to initially set up an array. This procedure describes settingup an array using HPE Storage Setup Manager for Windows, which is a component in the HPE Storage Toolkit for Windows. If you perform these steps from a laptop running Windows 7 or later,no other toolkit component besides HPE Storage Setup Manager for Windows can be installed on the laptop.Note:What you need on the Windows client:•Internet connection to HPE InfoSight •.NET Framework 4.5.2•Install the HPE Storage Toolkit for Windows on the Windows client.a)Download the toolkit from HPE InfoSight at https:// .Type your email address and password, and click Login . If you do not have a password, click Create Account .b)Choose Resources > Software .c)From the Software page, select Windows Toolkit and choose the latest version.Important!•Make sure that the toolkit version is compatible with the operating system version on your array. See the Validated Configuration Matrix, which is available on HPE InfoSight.•The Windows host used to initially configure the array must be on the same physical subnet as the array.d)Click the appropriate software link and save the toolkit installation package to a convenient place on your Windows host.The installation package has a name similar to Setup-NimbleNWT-x64-x.x.x.x.exe .Where x64 is the supported microprocessor and x.x.x.x is the version number.e)Download the Release Notes for the toolkit, available at https:// .Review the list of Windows Server hotfixes.f)On the Windows client, right-click the installer file and choose Run as administrator .g)Follow the prompts.You must accept the end user license agreement to install the toolkit.Choose Complete Installation and Yes to modify the Registry Keys.h)Click Yes to restart the Windows host.For information on which ports to open, see the GUI Administration Guide , the CLI Administration Guide , or the online help. The guides are available on HPE InfoSight.•Set up the array.a)In the Windows Start menu, choose HPE Storage > HPE Storage Setup Manager .b)Open the browser and select the array from the Windows setup manager list.Note: If the array is not visible in the setup manager, verify that the array is on the same subnet as the Windows host.c)In the Information dialog box, click OK .Note: Clicking OK closes the setup manager and continues the setup on the array through your web browser.d)You may see a warning similar to “There is a problem with this website ’s security certificate.” It is safe to ignore this warning and click Continue .If prompted, you can also download and accept the security certificate. Or create your own. See the cert command in the Command Reference , available on HPE InfoSight.e)In the License Agreement, read the agreement, scroll to the bottom, check the acknowledgment box, and then click Proceed .f)In the Array Setup screen, choose the appropriate group option and click Next .•If you create a new group, you must provide additional information. Later, you can add other arrays to this group.•If you join an existing group, choose its Group Name.When you chose to join an existing group, your browser automatically redirects to the login screen of the group leader array.g)Provide or change initial management settings and click Finish . Optional: Type the Group password and click Log In . The Add Array to Group dialog box opens.h)In the Successfully Initialized dialog box, click Continue . Your browser automatically redirects to the Management IP address of the array.Note: If the array does not initialize, check the cabling to the network switch and check the subnet mask.i)In the login screen, type the password you set and click Log In .From this point forward, you are in the operating system GUI.•Type the Network Addresses settings and click Next.For Management and Discovery (Management only for Fibre Channel):•Management IP address and subnet mask•For iSCSI: Discovery IP address and subnet mask•For FC: Data IP address and subnet mask (for group and replication traffic)•Default gateway IP addressNote: If you chose two dedicated networks as your network topology, the GUI requires you to specify different subnets for management and data.For Data:•Port type – Not configured, Data only, or Management + Data •Data IP address and subnet mask•Maximum Transmission Unit (MTU) – Standard, Jumbo, or Other •Frame size in bytes – User specified valueEnsure that your network switches support the selected MTU or frame size. The data port IP addresses are assigned to interface pairs, such as eth2a on controller A and eth2a on controller B.If one controller fails, the corresponding port on the remaining controller still has data access. At least one interface pair must be configured. However, a minimum of two is recommended.•Type the domain and DNS information and click Next.•Domain name - Enables the network to resolve IP addresses.•DNS servers - One per line, up to five.•Specify the time zone, type the NTP (time) server details, and click Next.•Select the time zone from the drop-down menu.•Type the hostname or IP address of the NTP server.•Type the support information and click Finish.•From Address - Identifies the array as the sender of email notification messages.•To Address - Recipients of the email notification messages.•Send data The array automatically periodically sends a health and performance report to HPE Support. Strongly recommended .•Diagnostics for Analytics (DNA) and Usage Analytics - You might see one or both of these features.They are both enabled by default. To disable these features, uncheck the box.•HTTP Proxy Server - If the network uses an HTTP proxy server for secure Internet connections,type the appropriate information.•Read the Setup Complete message and click Continue.Make sure you have the necessary ports open. The GUI home screen appears.•Configure the array with the GUI.See the GUI Administration Guide .Where to go next: See the GUI Administration Guide , the CLI Administration Guide , or the online helpto learn more about managing the array. For the latest release notes, go to HPE InfoSight.Copyright © 2023 Hewlett Packard Enterprise Development LP. All rights reserved.Page 2 of 2PN: 960-0088-001 Revision C (09/06/2023)。
数据的保护和保留是一项极艰巨的任务。
要想经济高效地满足快速且难以预期的数据增长要求,IT 员工势必得疲于应付。
同时,确保数据的长期安全和可用性进一步加剧了这一压力。
Scalar ® i6000 磁带库能够使这些问题迎刃而解,并
有助于简化您的业务运营。
i6000 的数据存储容量最高可扩展至 16PB ,足以满足大型
企业存储环境的使用需求。
按需扩容功能实现了快捷、灵The Quantum Scalar ® i500 is the intelligent scalable tape library
that gives growing midrange storage environments faster, easier, and more reliable data protection. It combines a modular design with continuous robotics to provide industry-leading scalability, performance, and reliability. The Scalar i500 includes Quantum’s
iLayer software, with proactive monitoring and remote diagnostics
a scalable, reliable, high-performance archive and effective long-term protection for years into the future, no matter how their storage needs evolve.。