hpessp固件升级文档
- 格式:doc
- 大小:827.50 KB
- 文档页数:9
第一章文档说明一、型号:此次建行全国FOS升级包括两种类型SanSwitch,4Gb和8Gb。
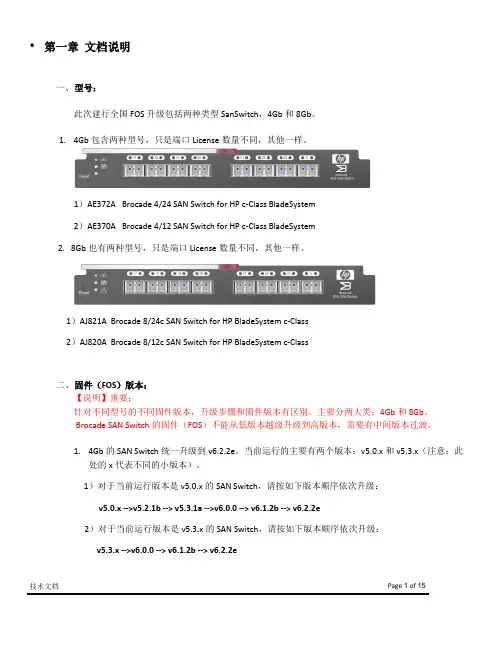
1.4Gb包含两种型号,只是端口License数量不同,其他一样。
1)AE372A Brocade 4/24 SAN Switch for HP c-Class BladeSystem2)AE370A Brocade 4/12 SAN Switch for HP c-Class BladeSystem2. 8Gb也有两种型号,只是端口License数量不同,其他一样。
1)AJ821A Brocade 8/24c SAN Switch for HP BladeSystem c-Class2)AJ820A Brocade 8/12c SAN Switch for HP BladeSystem c-Class二、固件(FOS)版本:【说明】重要:针对不同型号的不同固件版本,升级步骤和固件版本有区别。
主要分两大类:4Gb和8Gb。
Brocade SAN Switch的固件(FOS)不能从低版本越级升级到高版本,需要有中间版本过渡。
1.4Gb的SAN Switch统一升级到v6.2.2e。
当前运行的主要有两个版本:v5.0.x和v5.3.x(注意:此处的x代表不同的小版本)。
1)对于当前运行版本是v5.0.x的SAN Switch,请按如下版本顺序依次升级:v5.0.x -->v5.2.1b --> v5.3.1a -->v6.0.0 --> v6.1.2b --> v6.2.2e2)对于当前运行版本是v5.3.x的SAN Switch,请按如下版本顺序依次升级:v5.3.x -->v6.0.0 --> v6.1.2b --> v6.2.2e技术文档Page 1 of 153)对于除上述两种版本以外的SAN Switch,请截取上述版本顺序当中的版本进行:比如,当前如果是v6.0.x,则按照v6.0.x --> v6.1.2b --> v6.2.2e顺序进行。

HPE OmniStack 3.7.1 Interoperability GuideDocument type Page 3ContentsHPE SimpliVity 380 Gen9 and Gen10 Platform Firmware Interoperability (4)Hypervisor Interoperability (vSphere) (6)HPE OmniStack Hypervisor Interoperability with vSphere ESXi (6)VMware vCenter Interoperability (6)vSphere License Interoperability (7)HPE OmniStack Compatibility for Deployment and Upgrades (7)Supported Deployment Paths (7)Supported Upgrade Paths (7)HPE OmniStack Host Interoperability Within and Across Clusters (8)HPE OmniStack Component Build Versions (8)HPE SimpliVity 380 Gen9 and Gen10 Platform Firmware InteroperabilityThe following is a list of system firmware packages that are supported by the HPE SimpliVity 380 platform.FIRMWARE 3.6.2 3.7.0 3.7.1871790_001_spp-2016.10.0-SPP2016100.2016_1015.191.iso Y Y N*790-000107-lsi-a.iso Y Y N*790-000107-lsi-b.iso Y Y N790-000107-lsi-c.iso Y Y YSVT380SP-2017_0810.03.iso Y Y Y1. Firmware is available for download from the Hewlett Packard Enterprise Customer Support (/support/).A. * Indicates the iso is no longer available for download.2. Firmware packages do not contain firmware for HPE OmniStack Virtual Accelerator card (OVA). OVA firmware is installed/updatedautomatically as part of the HPE OmniStack software installation process.Note: The LSI Array Controller firmware required by the HPE OmniStack platform is listed below (it can be found after the specified HPE Server firmware version)FIRMWARE PACKAGE: 871790_001_spp-2016.10.0-SPP2016100.2016_1015.191.isoRELEASE DATE: 2017/04/07NOTES HPE SimpliVity 380 Gen9 Support OnlyFIRMWARE DETAILS: System ROM P89 v2.30Smart HBA H240 0 4.52iLO 2.50Power Mgnt Controller 1.0.9Broadcom NIC 2.17.6Intel NIC 1.10.8FIRMWARE PACKAGE: SVT380SP-2017_0810.03.isoRELEASE DATE: 2017/09/25NOTES HPE SimpliVity 380 Gen9 & Gen10 SupportFIRMWARE DETAILS: Gen9 System ROM P89 v2.42Gen10 System ROM u30 1.02Gen9 Smart HBA H240 5.52Gen10 HPE Smart Array E208i-p SR 1.06Gen10 HPE Smart Array P408i-a SR 1.06Gen9 iLO4 2.54FIRMWARE PACKAGE: SVT380SP-2017_0810.03.isoGen10 iLO5 1.10Gen9 Power Mgnt Controller 1.0.9Gen10 Power Mgnt Controller 1.0.2Broadcom NIC 2.18.15Intel NIC 1.12.18LSI FIRMWARE: *790-000107-lsi-a.isoRELEASE DATE: 2017/04/07NOTES HPE SimpliVity 380 Gen9 Support Only FIRMWARE DETAILS: LSI Package 24.18.0-0021LSI Gas Gauge 6071-04A* Indicates the iso is no longer available for download.LSI FIRMWARE: *790-000107-lsi-b.isoRELEASE DATE: 2017/06/12NOTES HPE SimpliVity 380 Gen9 Support Only FIRMWARE DETAILS: LSI Package 24.18.0-0021LSI Gas Gauge 6071-04ASAS Expander 3.01* Indicates the iso is no longer available for download.LSI FIRMWARE: 790-000107-lsi-c.isoRELEASE DATE: 2017/09/25NOTES HPE SimpliVity 380 Gen9 Support Only FIRMWARE DETAILS: LSI Package 24.21.0-0012LSI Gas Gauge 6071-04ASAS Expander 3.14Hypervisor Interoperability (vSphere)HPE OmniStack Hypervisor Interoperability with vSphere ESXiVSPHERE ESXI BUILD 3.6.2 3.7.0 3.7.1 SOURCE1ESXi 6.0 Patch 4 4600944 Y2Y2Y2HPEESXi 6.0 Express Patch 7a 5224934 Y2Y2Y2HPEESXi 6.0 Update 3a (ESXI 6.0 Patch 5)5572656 Y Y Y HPEESXi 6.5 4564106 Y2Y2Y2HPEESXi 6.5. Express Patch 1a 5224529 Y2Y2Y2HPEESXi 6.5 U15969303 Y Y Y HPE1. Source = Location from which to obtain the ESXi Package2. HPE SimpliVity 380 Gen9 Support Only3. All federated Compute Nodes must run vSphere ESXi version of the same major release as the HPE OmniStack Platform.4. For supported ESXI upgrade path, please refer to the VMware Interoperability Matrix.VMware vCenter InteroperabilityVMWARE VCENTER BUILD 3.6.2 3.7.0 3.7.1VCenter Server 6.0b 2776511 Y Y YvCenter Server 6.0 Update 1 3018524 Y Y YvCenter Server 6.0 Update 2a 4541947 Y Y YvCenter Server 6.0 Update 3a 5183549 Y Y YvCenter Server 6.0 Update 3b 5318200 Y1Y1Y1vCenter Server 6.5 4602587 Y Y YvCenter Server 6.5 0b 5178943 Y Y YvCenter Server 6.5 Update 1 5973321 Y Y YvCenter Server Appliance 6.0b 2776510 Y Y YvCenter Server Appliance 6.0 Update 1 3018523 Y Y YvCenter Server Appliance 6.0 Update 2a 4541948 Y Y YvCenter Server Appliance 6.0 Update 3a 5183552 Y Y YvCenter Server Appliance 6.0 Update 3b 5326079 Y1Y!Y!vCenter Server Appliance 6.5 4602587 Y Y YVMWARE VCENTER BUILD 3.6.2 3.7.0 3.7.1vCenter Server Appliance 6.5 0b 5178943 Y Y YvCenter Server Appliance 6.5 U1 5973321 Y Y Y1. Requires vSphere Web Client Plugin version 13.1.90 or higher2. For supported vCenter upgrade path, please refer to VMware Interoperability MatrixvSphere License InteroperabilityVSPHERE LICENSE 3.6.2 3.7.0 3.7.1vSphere Standard Y Y YVSphere Enterprise Plus Y Y YVSphere with Operations Management EnterprisePlusY Y YVSphere Essentials 1Y Y YvSphere Essentials Plus1Y Y YvSphere Remote Office Branch Office Y Y YvSphere Remote Office Branch Office Advanced Y Y Y1. Essentials/Essentials Plus license is restricted to 3 hosts maximum, does not support linked-mode vCenter, and does not supportVMware Storage Accelerated VAAI clones.HPE OmniStack Compatibility for Deployment and UpgradesSupported Deployment PathsRELEASE HPEPROLIANTDL380 GEN9SMALLFLASH HPEPROLIANTDL380 GEN9MEDIUMFLASHHPEPROLIANTDL380 GEN9LARGEFLASHHPEPROLIANTDL380GEN10X-SMALLHPEPROLIANTDL380GEN10-SMALLHPEPROLIANTDL380GEN10-MEDIUMHPEPROLIANTDL380GEN10-LARGE3.6.2 Y Y Y N N N N 3.7.0 Y Y Y N N N N 3.7.1 Y Y Y Y Y Y YSupported Upgrade PathsFROM\TO 3.7.0 3.7.13.6.2 Y Y3.7.0 YHPE OmniStack Host Interoperability Within and Across Clusters HPE OMNISTACK MODEL WITHIN THE SAME CLUSTERT ACROSS ALL CLUSTERSHPE OMNISTACK SMALL FLASH ALL HPE OmniStack Small FlashALL HPE OmniStack Small5OmniCube CN-2400-FOmniCube CN-24005ALL HPE OmniStack Models ALL OmniCube ModelsHPE OMNISTACK MEDIUM FLASH ALL HPE OmniStack MediumFlashOmniCube CN-3400-F ALL HPE OmniStack Models ALL OmniCube ModelsHPE OMNISTACK LARGE FLASH ALL HPE OmniStack Large FlashALL HPE OmniStack Large4ALL HPE OmniStack Medium4OmniCube CN-5400-FOmniCube CN-54004OmniCube CN-34004ALL HPE OmniStack Models ALL OmniCube Models1. Only models of equal socket count are supported in the same cluster.2. As a best practice, it’s recommended to use the same CPU model within a single cluster, for example, avoid mixing E5-2697v2 with E5-2697v3.3. All hosts in a cluster should contain equal amounts of CPU & Memory.4. Hybrid Medium and Large can be mixed with new Large Flash in the same cluster same federation.5. Hybrid Small can be mixed with new Small Flash in the same cluster in the same federation. (HPE OmniStack 3.7.1 only supports HPE SimpliVity380 Gen 9 and Gen 10 platforms.)HPE OmniStack Component Build VersionsVERSION HPEOMNISTACKSOFTWAREARBITERSOFTWAREVSPHERE WEBCLIENT PLUGINUPGRADEMANAGERDEPLOYMENTMANAGERDEPLOYINSTALLER3.6.2 3.6.2.2393.6.2.245 3.6.2.21 10.23.610.23.83.6.2.1383.6.2.1453.6.2.4943.6.2.5038.17.158.18.33.7.0 3.7.0.260 3.7.0.37 13.1.90 3.7.0.226 3.7.0.513 8.34.8 3.7.1 3.7.1.60 3.7.1.23 13.2.100 3.7.1.72 3.7.1.134 8.36.37HPE OmniStack 3.7.1 November 2017© Copyright 2017 Hewlett Packard Enterprise Development LP. The information contained herein is subject tochange without notice. The only warranties for Hewlett Packard Enterprise products and services are set forth in theexpress warranty statements accompanying such products and services. Nothing herein should be construed asconstituting an additional warranty. Hewlett Packard Enterprise shall not be liable for technical or editorial errors oromissions contained herein.This document contains confidential and/or legally privileged information. It is intended for Hewlett PackardEnterprise and Channel Partner Internal Use only. If you are not an intended recipient as identified on the frontcover of this document, you are strictly prohibited from reviewing, redistributing, disseminating, or in any other way Array using or relying on the contents of this document.November 2017。
HPE MSA STORAGE REASONS TO CALL GUIDECONTENTS1. Connect on a pain point (2)2. Motivate with what-if (2)3. Confirm the interest (2)4. Give the elevator pitch (2)5. Communicate the outcome (3)6. Qualify the opportunity (3)7. Ask for the meeting (3)Resources ......................................................................................................................................................................................................................................................................................................................................3Talking pointsCONFIDENTIAL | AUTHORIZED HPE PARTNER USE ONLY1. CONNECT ON A PAIN POINTa.Is your current HPE MSA (Gen3, 4, or 5) reaching or exceeding its intended service life, and is now time to upgrade?b.Is your existing HPE MSA (Gen3, 4, or 5) reaching its performance or capacity limitations?c.As an existing HPE MSA customer, do you want or need to take advantage of the new features of the HPE MSA Gen6 systems?d.Do you still have applications that are still utilizing direct-attached storage (DAS) but could be better utilized if they were usingshared storage serving multiple applications?e.Do you need to support the IT infrastructure at remote sites, branch offices, or departmental groups?f.Are you struggling with flat or declining IT budgets, yet need to provide more data services with less CAPEX?g.Do you have a growing or complex IT Infrastructure but do not have access to an in-house IT specialist?h.Do you need high-performance, easy-to-use shared storage, yet do not have a dedicated storage administrator?i.Are you happy with your current vendor support experience over the last 12 months?j.Are you getting the ideal data efficiency out of your storage? Do you wish you could store more data for less OPEX?2. MOTIVATE WITH WHAT-IFa.What if you could purchase a new HPE MSA Gen6 array with increased performance and improved data protection technology?b.What if you could purchase a hands-free storage array that any IT generalist could easily install, operate, repair, and upgrade?c.What if you can purchase a cost-effective, high performance (> 325K IOPS) hybrid storage array (SSDs + HDDs) starting atunder $12K?d.What if you could own a storage array that dynamically responds to changes in I/O in real time without intervention?e.What if your storage array provided improved data availability and could speed up rebuild times by more than 25X?f.What if you could eliminate idle/cold spares without risking availability?g.What if you could have access to a free health check tool that predicted failures before they happen, would check against bestpractices, and suggest simple-to-follow corrective actions?3. CONFIRM THE INTERESTWhat would be the impact to you and your business if you had a storage solution that could provide what we have discussed so far, and much more?4. GIVE THE ELEVATOR PITCHHewlett Packard Enterprise continues to invest in the HPE MSA storage platform. We are now on our 6th generation of HPE MSA storage systems. The HPE MSA storage family are flash-ready, hybrid storage systems designed to deliver hands-free, affordable application acceleration for small and remote office deployments. Don't let the low cost fool you. The HPE MSA gives you thecombination of simplicity, flexibility, and advanced features you may not expect in an entry-priced array. Start small and scale as needed with any combination of solid-state drives (SSDs), high-performance enterprise SAS HDDs, or lower-cost midline SAS HDDs. With the ability to deliver 325,000 IOPS, the new HPE MSA arrays are up to 45%1 faster than its prior generation with sizeable horsepower for even the most demanding workloads.5. COMMUNICATE THE OUTCOMEa.Built for speed: A new Gen6 RAID acceleration ASIC and controller architecture improve system performance by as much as 50% ascompared to HPE MSA Gen5. This improvement in IOPS and throughput help to lower system latencies enabling connected systems and users to experience better productivity.b.Automated performance tiering: Utilizing new HPE MSA Tiering v2.0 enhancements, hybrid storage configurations automaticallyrespond to I/O changes in real time to deliver up to 45% more workload application acceleration when compared HPE MSA Gen5.Automated Tiering v2.0 operates at the pool level, is always on, and is initiated by adding more than one drive type to the pool.c.Redefining RAID-based recovery for entry-level SAN storage: New HPE MSA DP+ data protection brings significant improvementsto traditional RAID technology including up to 25X faster rebuild performance2 (versus RAID 6), removal of idle drive spares, and configuration expansion at a more granular level (with as little as one drive per add).d.Intuitive user interface—no manuals needed: The HPE MSA Storage Management Utility (SMU v4) supports system configurationwith step-by-step guided workflows that help eliminate errors and dramatically improve the user experience.e.Simplified dashboard offers at-a-glance storage management: HPE MSA SMU v4 management enhancements allow user toquickly access important system information including alerts, capacity, performance, and activity.f.Avoid unplanned downtime with a few simple steps: The HPE MSA Health Check utility simplifies the tasks required toregularly check the health of your HPE MSA storage system. By simply uploading a log file from your HPE MSA array to thecloud-hosted HPE MSA Health Check utility, the application systematically checks for signs of noncompliance with multipleavailability-related best practices. Once completed, HPE MSA Health Check generates a report detailing your system’s healthand adherence to all best practices and known failure signatures. The report also provides detailed next-step guidance onsolving any issues.g.HPE ProLiant and HPE MSA—better together: The HPE MSA storage array has been designed for use with HPE ProLiant servers.With over 15 years of integrated selling, HPE MSA continues to serve as the entry-point for SAN storage supporting the entireportfolio of HPE ProLiant servers.6. QUALIFY THE OPPORTUNITYAssess the customer sense of urgency to solve the problem, if there’s budget planned, and when.a.Are you planning on a storage refresh in the next six months and are tired of disruptive upgrades?b.Are you due for a service renewal and may have to deal with escalating high support costs?c.Are you looking to streamline IT operations moving to an IT generalist model to support the stack?d.Are you deploying applications that have high requirements for performance/availability?7. ASK FOR THE MEETINGBased on our discussion today, I would like to set up another call with one of my storage experts to further discuss how HPE MSA Gen6 storage can address your IT infrastructure concerns.What date and time works best for you? Thanks, and have a great day.RESOURCES•HPE MSA Gen6 product page•HPE MSA Gen6 press release•HPE MSA Storage—Briefcase•Introducing HPE MSA Gen6 Storage: Hands-Free, High Performance, and Simpler than Ever•Introducing the HPE MSA Gen6 Storage Array | ChalkTalk•Competitive Analysis—HPE MSA Storage•Customer presentation with speaker notes—HPE MSA Gen6 Storage Arrays•FAQ—HPE MSA 1060 2060 2062 Storage•Solution brief—HPE MSA Gen6 Hybrid Storage•Technical Presentation—HPE MSA Gen6 Storage Arrays—Customer-facing•Technical Presentation—HPE MSA Gen6 Storage—Main Deck•HPE MSA 1060 Storage data sheet•HPE MSA 2060 Storage data sheet•HPE MSA 2062 Storage data sheet•SMB I.T. Solutions webpage© Copyright 2020 Hewlett Packard Enterprise Development LP. The information contained herein is subject to changewithout notice. The only warranties for Hewlett Packard Enterprise products and services are set forth in the express warrantystatements accompanying such products and services. Nothing herein should be construed as constituting an additional warranty.Hewlett Packard Enterprise shall not be liable for technical or editorial errors or omissions contained herein.。
HPE VMware Upgrade Pack1.4.3 Release NotesOctober 2021Legal and notice information© Copyright 2021 Hewlett Packard Enterprise Development LP Document History:Table of ContentsOverview (4)Summary of Changes (4)Important Notes (4)Enhancements (5)Support Removed (5)Supported Operating Systems (5)Prerequisites (5)Component Prerequisites (5)SUM Prerequisites (5)Limitations (5)Known Limitations (5)Download & Deployment (6)HPE VUP Download Page (https:///global/swpublishing/MTX-7e6aca0843e54a709e4095e6b6) (6)Installation (6)Installation Instructions (7)Additional Information for using the HPE VUP on VMware Operating Systems (8)Additional Resources (8)Using a PXE Server to Deploy Components from the full HPE VUP ISO over a network (8)Prerequisites (8)Setup (8)Configuring GRUB2 (9)Configuring ELILO (9)Configuring PXELINUX (9)Supported network file system protocols (11)Common Abbreviations (12)OverviewThe HPE VMware Upgrade Pack (VUP) 1.4.3 is a subset of the Service Pack for ProLiant that only supports ESXi 7.0 U3 on Gen10 and newer servers.The HPE VMware Upgrade Pack (VUP) 1.4.3 is a comprehensive systems software and firmware update solution, which is delivered as a single ISO image. This solution uses Smart Update Manager (SUM) as the deployment tool and is tested on HPE ProLiant Gen10 and newer servers as defined in the Server Support Matrix.The HPE VUP can be used as an SPP with HPE VMware Life Cycle Manager (vLCM) Plug-in Hardware Support Modules (HSM).∙HPE iLO Amplifier Pack HSM∙HPE OneView HSMFor a full list of HPE VUP Documentation, please review the HPE VUP Documentation.Summary of ChangesImportant NotesIncludes updated bootloader to address the UEFI Secure Boot Evasion Vulnerabilities. For more information see: https:///us/en/services/security-vulnerability.html.When using HPE OneView prior to version 5.00.00 and the HPE VUP 1.1A or later, an error may be seen during FW update of iLO5. For additional information, please review CA a00094676en_us.The HPE VUP does not contain Synergy specific components. Information on the Synergy custom SPP is available at:∙HPE Synergy Software Releases - Overview∙VMware OS Support Tool for HPE SynergyHPE StoreOnce Customers – Installation of the HPE VUP can cause problems on StoreOnce systems. Please go to the HPE Support Center to find the appropriate StoreOnce update.NOTE: Products sold prior to the November 1, 2015 separation of Hewlett-Packard Company into Hewlett Packard Enterprise Company and HP Inc. may have older product names and model numbers that differ from current models.EnhancementsThe 2021.05.0 SPP Production release contains components supporting the ProLiant, Apollo and Blades Gen9, Gen10 and Gen10 Plus server platforms and options. This HPE VUP is a maintenance release based on the 2021.05.0 SPP and contains updated firmware, software and driver support for:∙VMware ESXi 7.0 U3 for Gen10 and newer serversFor a complete list of components on the ISO, see the HPE VUP Contents Report on the ISO or the HPE VUP Documentation.Support Removed∙NoneSupported Operating SystemsThe following operating systems are supported for system software and firmware: ∙VMware ESXi 7.0 U3For more information on HPE Operating Systems and Virtualization Software Support for ProLiant Servers, please visit our OS Support Site.PrerequisitesComponent PrerequisitesTo determine prerequisite information, check the individual components.SUM PrerequisitesThe most current prerequisites for SUM can be found at the SUM documentation pagehttps:///servers/hpsum/documentation.LimitationsKnown LimitationsThe following is a select list of known issues and limitations relating to the smart components and SUM version delivered with this HPE VUP.Integrated Lights-Out (iLO) Repository update for components updateable by the Unified Extensible Firmware Interface (UEFI) do not install, if the "Reboot" Parameter in Smart Update Manager (SUM) is set to "Never." See this Customer Advisory for more details.While performing iLO5 updates on Linux OS, the user may see multiple Windows firmware components listed for installation. This is expected behavior.Drivers and/or enablement kits must be installed prior to detecting and updating some hardware and firmware - SUM may need to be run twice for all firmware components to be presented for an installation.Drivers and/or enablement kits must be installed prior to detecting and updating some hardware and firmware. There are several scenarios when SUM may need to be run twice for all firmware components to be presented for installation. This is due to a requirement that drivers are needed in order for SUM to discover some hardware and thus the needed firmware. After the drivers are installed for the first time and the system rebooted, SUM needs to be run again for all of the firmware components to be presented for installation.The following HPE Mellanox adapters support InfiniBand mode only:∙HPE Apollo InfiniBand EDR 100Gb 2-port 840z Mezzanine FIO Adapter (HPE Part Number: 843400-B21)∙HPE Apollo InfiniBand EDR 100Gb 2-port 841z Mezzanine Adapter (HPE Part Number: 872723-B21)∙HPE InfiniBand EDR 100Gb 1-port 841QSFP28 Adapter (HPE Part Number: 872725-B21)Drivers supporting InfiniBand mode of operation are not distributed via the HPE VUP. Mellanox drivers included in HPE VUP support “Ethernet + RoCE” mode only and have to be used only with those adapters supporting Ethernet mode of operation.Download & DeploymentThe HPE VUP can be downloaded from the HPE VUP Download page, which requires HPE Passport login.To ensure the integrity of your download, HPE recommends verifying your results with the following SHA-256 Checksum values:6261b5e8490c4b60e0a959ecefe840cd87d8abe3e18b210b3fcbb15ca89ac5de SPP-VUP143.2021_0915.21.isoc7146eaf4346bed66bb104d356588eb3053d20093837b54100750ef4d1ec3b9b SPP-VUP143.2021_0915.21.iso.sha2sum HPE VUP Download Page(https:///global/swpublishing/MTX-7e6aca0843e54a709e4095e6b6)The HPE VUP Download page enables downloading through the HPE My License Portal.InstallationThere are two methods for using the VMware Upgrade Pack to update your ProLiant servers: Online mode Remote Update and Offline mode.Online mode Remote Update- Runs on Windows or Linux hosted Operating System to remotely update client Operating system.∙Interactive mode - Follow the onscreen steps to update firmware components.To initiate deployment in interactive mode, run the launch_sum.bat (windows) orlaunch_sum.sh (Linux) script which is found in the root of the .iso image through client.Offline mode - Server is booted to the .iso image∙Interactive mode - Follow the onscreen steps to update firmware components.∙Automatic mode - Firmware components will be updated without interaction. Automatic mode will by default run firmware update without any user interaction after sitting 10 seconds at the menu screen when an HPE VUP .iso image is used to boot the server.Installation InstructionsFollow these steps to install the components found on this HPE VUP:1. Download the HPE VUP 1.4.3 .iso file from the HPE VUP download page:https:///global/swpublishing/MTX-3762cce274214ab8acb4a5dd9c2. Determine how to access the data on the ISO – bootable USB key, mounted ISO, etc. Usethe appropriate tool to obtain the ISO in the desired format.3. Determine how to initiate deployment to the targets using the HPE VUP – Offline mode orOnline mode:a Online mode - Runs on a Windows® or Linux hosted operating systemb Offline mode - Server boots from the HPE VUP ISO (Bootable ISO only)i Automatic mode - Firmware components update without interactionii Interactive mode - Onscreen instructions guide the user to update firmwarecomponents4. Initiate deployment.To initiate deployment in online mode:∙From the HPE VUP folder:o Windows: launch_sum.bato Linux: ./launch_sum∙For VMware hosts, select the host to update as a remote target. Online firmware update on a Gen10 VMware host requires the iSUT for ESXi software to be installed on the VMware host.∙To review the EULA, locate README.html which is found in the root of the ISO.For more information, see the SUM User Guide and HPE ProLiant Best Practices Implementation Guide. https:///servers/SUM/documentationTo initiate deployment in Offline mode:∙Boot the server to the HPE VUP using one of the supported methods including mounting the ISO or using a bootable USB key.∙Select either Automatic mode or Interactive mode.o If Automatic mode is selected, the firmware will be automatically updated on the server without any further interaction.o If Interactive mode is selected, follow the instructions on the screen.∙Select the Firmware Update option on the screen to start SUMAdditional Information for using the HPE VUP on VMware Operating SystemsThe HPE VUP can deploy drivers and firmware to a Gen10 system running a supported VMware operating system in an online mode. Drivers are also available at Software Delivery Repository - vibsdepot.Additional ResourcesUsing a PXE Server to Deploy Components from the full HPE VUP ISO over a networkFollow these steps to use a PXE server to deploy components from the full HPE VUP ISO over a network.The files needed to configure the menu system for use with a ‘pxe’ server can be found in the PXE directory on the full HPE VUP ISO.PrerequisitesThe following is required before proceeding with the configuration:∙The user must have a good working knowledge of PXE and TFTP.∙ A network with a DHCP server on it.∙ A TFTP server configured on the same network as the DHCP server.∙ A network file server hosting the ISO images that can be accessed by a PXE booted system.∙Either PXELINUX (/wiki/index.php/PXELINUX) [For legacy boot mode] or GRUB2 (https:///software/grub/) [For UEFI and legacy boot mode] The use of a Linux TFTP server and the TFTP package/pub/software/network/tftp/is assumed. Other TFTP servers should work similarly.SetupBefore proceeding with the configuration, ensure that the TFTP server as well as the PXELINUX or GRUB2 configuration are setup and configured properly. ELILO(/projects/elilo/files/) may be used also. GRUB2 is recommended for UEFI boot mode, legacy boot mode, or mixed environments where both legacy and UEFI boot mode support are required.To set up PXE boot for the HPE VUP:1. Copy the HPE VUP ISO image to the network file system, and note its location. NFS andWindows® file shares as well as HTTP connections are supported.2. For this example, the NFS path to the ISO image used is192.168.0.99/path/to/VUP/image/(VUPfilename).iso. Test the network file system to ensure that it is accessible before proceeding.3. The /pxe directory of the ISO image will need to be accessed, either by burning the ISOimage, mounting the ISO image, or extracting it using a third-party tool.4. Copy all the files from the /pxe directory of the ISO image to the TFTP server so that they areaccessible by the TFTP software. See important instructions and information in the/pxe/README.txt file (for legacy boot mode PXELINUX configuration).Configuring GRUB2Follow these steps to configure GRUB2:1. Run the command grub2-mknetdir --net-directory=DIR where DIR is the root of the TFTPserver.2. Configure DHCP using the helpful output of the grub2-mknetdir command above (arch =00:07 for UEFI boot mode and arch = 00:00 for legacy boot mode).3. Edit the grub.cfg files on the TFTP server to set the appropriate paths to the kernel vmlinuzimage file and the initial ramdisk initrd.img image file which were copied to the TFTP server from the HPE VUP ISO /pxe directory.Configuring ELILOFollow these steps to configure ELILO:1. Add an EFI folder on the TFTP server which contains bootx64.efi, elilomenu.msg, andelilo.conf.2. Add details in elilo.conf as it is given for configuring pxelinux.cfg (see below).3. Change the DHCP configuration as given below:if option arch = 00:07 {filename "pxelinux/bootx64.efi";} else {filename "pxelinux.0";}Configuring PXELINUXFollow these steps to configure PXELINUX:1. Using the isolinux.cfg file from the /system/ directory of the ISO as a guide, copy the labeledtargets to the PXELINUX configuration file. The entire file does not need to be included:label sosMENU LABEL Automatic Firmware Update Version 2020.03.0kernel vmlinuzappend initrd=initrd.img media=cdrom root=/dev/ram0 splash quiet hp_fibre cdcacheshowopts TYPE=AUTOMATIC AUTOPOWEROFFONSUCCESS=noAUTOREBOOTONSUCCESS=yeslabel vsosMENU LABEL Interactive Firmware Update Version 2020.03.0kernel vmlinuzappend initrd=initrd.img media=cdrom root=/dev/ram0 splash quiet hp_fibre cdcacheshowopts TYPE=MANUAL AUTOPOWEROFFONSUCCESS=nolabel sos_poweroffMENU HIDE Automatic & POWEROFF Firmware Update Version 2020.03.0kernel vmlinuzappend initrd=initrd.img media=cdrom root=/dev/ram0 splash quiet hp_fibre cdcacheshowopts TYPE=AUTOMATIC hp_poweroffThe paths to files on the TFTP server are vmlinuz and initrd.img. They must be modified to include any directories or naming conventions that are on the TFTP server.2. Replace “media=cdrom” with “media=net” on the append line3. Specify the ISO image path. For the PXE booted server to find the ISO Image, add the ISOImage path to the append line in the PXELINUX configuration file. Add the followingarguments:iso1=nfs://192.168.0.99/path/to/VUP/image/(VUPfilename).isoiso1mnt=/mnt/bootdeviceThe iso1 parameter helps the PXE booted HPE VUP locate the ISO image. The iso1mnt parameter tells the PXE booted HPE VUP where the iso1 image must be mounted.The final configuration file must be similar to the following example:label sosMENU LABEL Automatic Firmware Update Version 2020.03.0kernel vmlinuzappend initrd=initrd.img media=net root=/dev/ram0 splash quiet hp_fibre showoptsTYPE=AUTOMATIC AUTOPOWEROFFONSUCCESS=noAUTOREBOOTONSUCCESS=yesiso1=nfs://192.168.0.99:/path/to/VUP/image/(VUPfilename).isoiso1mnt=/mnt/bootdevicelabel vsosMENU LABEL Interactive Firmware Update Version 2020.03.0kernel vmlinuzappend initrd=initrd.img media=net root=/dev/ram0 splash quiet hp_fibre showoptsTYPE=MANUAL AUTOPOWEROFFONSUCCESS=no iso1=nfs://192.168.0.99:/path/to/VUP/image/(VUPfilename).isoiso1mnt=/mnt/bootdevicelabel sos_poweroffMENU HIDE Automatic & POWEROFF Firmware Update Version 2020.03.0kernel vmlinuzappend initrd=initrd.img media=net root=/dev/ram0 splash quiet hp_fibre showoptsTYPE=AUTOMATIC hp_poweroffiso1=nfs://192.168.0.99:/path/to/VUP/image/(VUPfilename).isoiso1mnt=/mnt/bootdeviceAdditional ISO images can be added by specifying the additional iso# and iso#mnt arguments, for example, iso2=/path/to/iso2.iso iso2mnt=/mnt/iso2.Supported network file system protocolsThe following network file system protocols are supported for use with PXE booting:NFS:iso1=nfs://192.168.0.99/path/to/VUP/image/(VUPfilename).isoiso1mnt=/mnt/bootdeviceNFS volumes are mounted with the following options:o-o roo nolockThe mount options can be explicitly set with the iso#opts parameteriso1opts="rsize=32768,ro,nolock"Windows® operating systems:iso1=cifs://192.168.0.99/share/path/to/VUP/image/ (VUPfilename).isoiso1mnt=/mnt/bootdeviceWindows® operating systems with login credentials:iso1=cifs://user:****************.0.99/share/path/to/VUP/image/(VUPfilename).isoiso1mnt=/mnt/bootdeviceHTTP:iso1=http://192.168.0.99/path/to/VUP/image/(VUPfilename).isoiso1mnt=/mnt/bootdeviceOnce these steps have been completed, the HPE VUP components are ready to be deployed using the PXE boot functionality.Common Abbreviations。

作者:zero 裂缝修订:2019.10.15 HP GEN9系列升降级固件图文详细教程HP Gen9服务器可以在UEFI BIOS中对BIOS、阵列卡、网卡和光纤卡进行固件的升级或降级操作,适用于用户设备允许重启情况下、而且用户不想要在系统下或者不愿下载spp盘的时候,此操作快速方便。
(在最后也大概叙述了下系统下升级的方法)一、开机自检中——按F9,进入BIOS,选择embedded application——回车,选择firmware updates——回车,确认可以升级的固件的有那些。
(下图中显示可升级的有BIOS、阵列卡、网卡、HBA卡)1、2、3、二、查看当前各个固件版本:开机按F9进入BIOS中,选择system information/firmware infor mation中查看。
三、通过上图确认BIOS固件是v2.52版本,尝试降级BIOS固件到v2.30版本测试:1.开机按F9进入BIOS中,选择embedded application/firmware updates/system ROM。
2.用上下键选择到select a firmware file,按回车键。
3.通过ILO的virtual drive选项下的Folder,将v2.30版本的BIOS文件解压缩好的文件夹挂载上,选择virtual drives选项里的Folder选项。
4.浏览找到已经解压缩好的v2.30版本BIOS固件文件夹,点击确定。
5.用上下箭头选择到[ILO FOLDER] iLO Virtual USB 1:HP iLO Virtual USB Key,选中到v2. 30版本的BIOS:以.flash为结尾的升级文件。
6.按回车键后,显示正在加载文件,需要等待几分钟。
7.加载完成后,在Selected firmware file中正确识别到之前上传的v2.30版本BIOS的文件名。
8.用上下箭头选中到Start firmware update后,按回车键开始升级,有升级的百分比,很快提示升级成功。
HP服务器firmware升级方法技术文档 Page 2 of 38文档资料信息文档资料信息文档名称文档名称:: HP 服务器firmware 升级方法升级方法 准备者准备者:: 准备日期准备日期:: 文档版本号文档版本号:: 1.01.0文档版本日期文档版本日期:: 2011年8月22日 审定者审定者::审定日期审定日期::注意事项注意事项本报告中的观点和决定都不代表任何官方立场。
它仅用于交流科技信息。
技术文档 Page 3 of 38目录目录第一章第一章 下载下载 HP SMART UPDATE FIR HP SMART UPDATE FIR HP SMART UPDATE FIRMWARE DVD MWARE DVD 镜像文件.........................................................................................................5 第二章第二章 安装安装 HP USB KEY UTILITY HP USB KEY UTILITY HP USB KEY UTILITY FOR WINDOWS FOR WINDOWS ......................................................................................................................9 第三章第三章 制作制作 HP SMART UPDATE FIR HP SMART UPDATE FIR HP SMART UPDATE FIRMWARE USB KEY MWARE USB KEY ................................................................................................................14 第四章第四章 下载当前最新的FIRMWARE 文件并添加到HP SMART UPDATE FIRE HP SMART UPDATE FIREMWARE USB KEY MWARE USB KEY .................................................22 第五章第五章 用 HP SMART UPDATE USB HP SMART UPDATE USB KEY KEY 升级FIRMWARE (26)第六章 验证FIRMWARE 升级是否已经完成用 (33)HP Smart Update Firmware USB Key使用HP Smart Update Firmware USB Key升级对HP Proliant server进行firmware升级使用HP USB Key Utility 制作HP Smart Update Firmware USB Key对HP Proliant server进行firmware 升级,优点是可以将比HP Smart Update Firmware DVD光盘更新版本的firmware文件添加到USB Key 中来进行升级,以确保新安装的HP Prolinat服务器的firmware版本保持为当前最新版本。
如何更新HP PRIME图形计算器固件
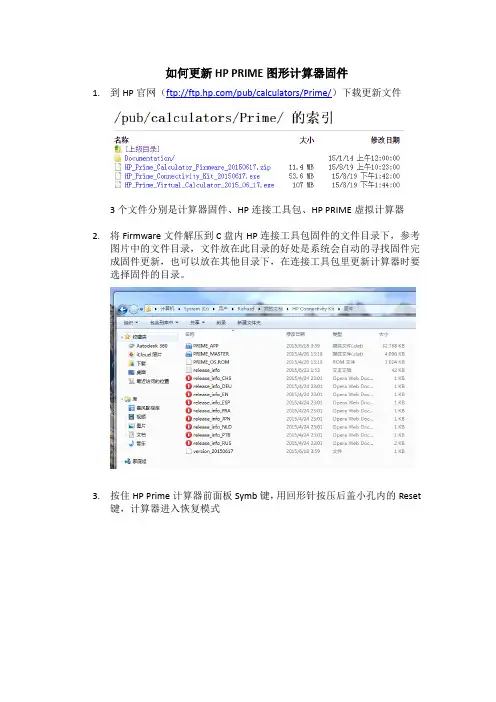
1.到HP官网(ftp:///pub/calculators/Prime/)下载更新文件
3个文件分别是计算器固件、HP连接工具包、HP PRIME虚拟计算器2.将Firmware文件解压到C盘内HP连接工具包固件的文件目录下,参考
图片中的文件目录,文件放在此目录的好处是系统会自动的寻找固件完成固件更新,也可以放在其他目录下,在连接工具包里更新计算器时要选择固件的目录。
3.按住HP Prime计算器前面板Symb键,用回形针按压后盖小孔内的Reset
键,计算器进入恢复模式
4.连接好USB电缆后打开HP连接工具包,在帮助菜单里选择更新计算器,
固件更新过程中电脑会跳出提示找不到USB驱动程序或不能安装驱动程序等提示,不用理它,直到固件更新完成
5.固件更新完成后计算器会自动重启,可在HP PRIME帮助中关于HP PRIME
栏里看到新版本的信息。
HP Operations Smart Plug-in DVD用于 OVO for Windows® 7.50 和 HPOM for Windows 8.10安装和升级指南生产部件号:B7491-961072008 年 10 月法律声明担保HP 产品和服务的唯一担保见相关产品和服务随附的明示担保声明中的规定。
本文的任何信息都不应视为构成另外的担保。
对于本文的任何技术上或编辑时的错误或疏忽,HP 概不负责。
本文档所包含的信息如有更改,恕不另行通知。
有限权利说明机密的计算机软件。
必须从 HP 获得有效许可才能拥有所有权、使用权或复制权。
根据 FAR 12.211和 12.212,商业计算机软件、计算机软件文档和商业项目的技术数据已按照供应商的标准商业许可授权给美国政府。
版权声明© Copyright 2008 Hewlett-Packard Development Company, L.P.商标声明Adobe®是 Adobe Systems Incorporated 的商标。
运行在所有 HP 9000 计算机上的 HP-UX 10.20 及更高发行版以及 HP-UX 11.00 及更高发行版(包括 32 位和 64 位配置)都是 Open Group UNIX 95 的品牌产品。
Java™ 是 Sun Microsystems, Inc. 在美国的商标。
Microsoft® 是 Microsoft Corporation 在美国的注册商标。
Oracle® 是 Oracle Corporation (Redwood City, California) 在美国的注册商标。
Oracle Reports™、Oracle7™ 和 Oracle7 Server™ 是 Oracle Corporation (Redwood City, California) 的商标。
升级FW一、什么是FW,为什么要升级FW固件(firmware)是指设备内部保存的设备“驱动程序”,通过固件,操作系统才能按照标准的设备驱动实现特定机器的运行动作。
(可以理解为集成在机器主板上,配合打印机驱动实现打印机运行动作的内部程序,也就是固化在硬件上的软件)。
升级FW主要是为了解决兼容性问题。
对于任何已生产的软、硬件,都有可能存在一些缺陷,所以可以通过更新Firmware来修正以前版本中存在的错误、漏洞或不足。
二、对于哪些故障现象考虑升级FW●打印的过程中报错49.xx或者79.xx(排除打印作业或文档过大,内存溢出的原因)●2055的4个issue●手动设置的IP无法保存●打印某些特殊格式文件、特殊软件报错●打印机一些特定的硬件问题也会使用升级FW来解决,例如:M1005报scanner error,M425 ADF扫描有问题等等三、如何查询下载FW1、打印配置页查看机器当前的FW版本。
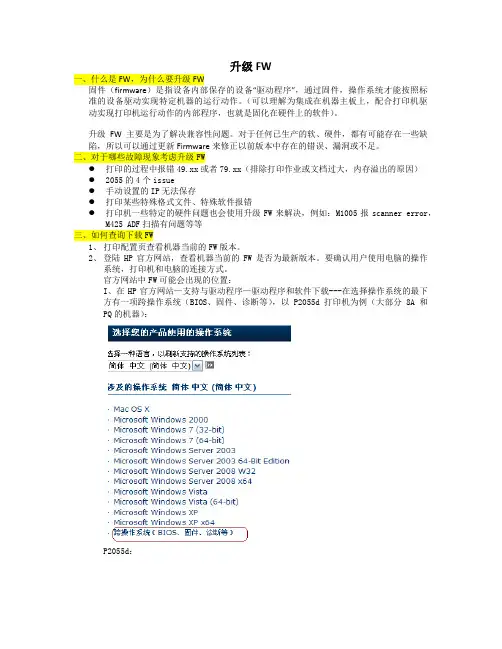
2、登陆HP官方网站,查看机器当前的FW是否为最新版本。
要确认用户使用电脑的操作系统,打印机和电脑的连接方式。
官方网站中FW可能会出现的位置:I、在HP官方网站—支持与驱动程序—驱动程序和软件下载---在选择操作系统的最下方有一项跨操作系统(BIOS、固件、诊断等),以P2055d打印机为例(大部分8A和PQ的机器):P2055d:P2055dn/P2055X:如果没有写明操作系统,在点击了“HP LaserJet P2055d 固件升级工具”后进入的界面就可以看到使用的操作系统版本。
如果写明操作系统,需要选择用户使用的对应的操作系统(以5100le为例)II、在HP官方网站—支持与驱动程序—驱动程序和软件下载---选择操作系统的最后出现固件的相关选项,以1522nf机器为例(大部分MA机器)四、下载和升级FW的注意事项1、下载时不要使用迅雷、快车等专业下载软件,使用本地另存为的方式保存2、带用户升级或用户自行升级FW时,告知用户升级FW存风险,在升级之前需要仔细阅读下载界面的注意事项、安装说明。
Reducing the Frequency of Server UpdatesDue to customer feedback to reduce the frequency of server updates, specifically for older server generations, HPE releases two types of SPPs.1. A “Production SPP” with support for the “production server generations”.2.Multiple generati on specific “Post-Production SPPs” with support for one specific “post-productionserver generation” (e.g. Gen8 only Post-Production SPP that contains the firmware and drivers forGen8 only).Production SPPThe production server generations are the server generations where HPE is adding support for new technology, features, options and new major OS/hypervisor versions. All of which involve adding new functionality to or modifying existing functionality in the firmware, drivers, and system software and releasing updated versions.Firmware, drivers, and system software updates for the “production server generations” may include bug fixes, security updates, plus new features, functionality, and new OS/hypervisor version support and require more frequent updates and testing.Because the updates contain new functionality, bug fixes, and security updates, HPE recommends updating production server generations on a yearly cadence.Post-Production SPPThe post-production server generations are the server generations where HPE is no longer adding support for new technology, features, options and new major OS/hypervisor versions. When a server generation is in post-production, modifications to the firmware, drivers, and system software for that server generation is limited to bug fixes and security updates.Smart Component updates during the post-production phase of a server generation as less frequent and are only released to resolve an issue.Because updates are only released to resolve specific issues, HPE recommends updating to post-production SPP and then applying only the “hot fixes” that apply to your server models, OS/hypervisor versions, and environment.Post-productions SPPs are supported as long as HPE supports that server generation and you do not need to perform yearly updates on post-production server generations.Gen10 Gen9 Gen8 G7SPP Classification Production Post-Production Post-Production Post-Production Entitlement required No Yes Yes YesLogin required Yes Yes Yes YesSPP Release Frequency 2-4X per year(March, September +select new productreleases)Once(All updates released ashot fixes and/orsupplements)Once(All updates releasedas hot fixes and/orsupplements)Once(All updates releasedas hot fixes and/orsupplements)New OS support ✓X X X New Device support ✓X X X New functionality ✓X X X Bug fixes ✓✓✓✓Security Updates ✓✓✓✓RecommendedUpdate Frequency Yearly Only to resolve anissueOnly to resolve anissueOnly to resolve anissueComponent Update Path Testing 1 yearThrough the end of serversupportThrough the end ofserver supportThrough the end ofserver supportSPP to use Latest Production SPP Gen9 Post-Production Gen8 Post-Production G7 Post-Production Downloading an SPPThe Gen10 production SPPs can be downloaded using HPE passport account, without the need for active warranty or support agreementThe Gen9/Gen10 production SPP and Gen9 post-production SPP downloads require an active warranty or support agreement (see More Information on Access to HPE Support Materials for more details).HPE provides several methods to download the SPP.•SPP Custom Download (/servers/spp/custom) –HPE’s preferred method for downloading a production or post-production SPP.•SPP Download Page (/servers/spp/download) – which also provides access to the SPP release documentation, hot fixes and advisories, and FAQs.•HPE Support Center (/support)•Software Deliver Repository (SDR) (/SDR/) – YUM repository containing the Smart Components.How do I know if updates have been released for a Post-Production SPP?The “Hot Fixes and Advisory” section of the SPP Download page provides a list of the hot fixes and advisories for the selected SPP (production and post-production).Is there release documentation for each Post-Production SPP?Yes, the “Documentation” sec tion of the SPP Download page contains the SPP documentation (release notes, server support guide, contents report, and component notes) for the Production and Post-Production SPPs.。
HP服务器firmware升级方法技术文档 Page 2 of 38文档资料信息文档资料信息文档名称文档名称:: HP 服务器firmware 升级方法升级方法 准备者准备者:: 准备日期准备日期:: 文档版本号文档版本号:: 1.01.0文档版本日期文档版本日期:: 2011年8月22日 审定者审定者::审定日期审定日期::注意事项注意事项本报告中的观点和决定都不代表任何官方立场。
它仅用于交流科技信息。
技术文档 Page 3 of 38目录目录第一章第一章 下载下载 HP SMART UPDATE FIR HP SMART UPDATE FIR HP SMART UPDATE FIRMWARE DVD MWARE DVD 镜像文件.........................................................................................................5 第二章第二章 安装安装 HP USB KEY UTILITY HP USB KEY UTILITY HP USB KEY UTILITY FOR WINDOWS FOR WINDOWS ......................................................................................................................9 第三章第三章 制作制作 HP SMART UPDATE FIR HP SMART UPDATE FIR HP SMART UPDATE FIRMWARE USB KEY MWARE USB KEY ................................................................................................................14 第四章第四章 下载当前最新的FIRMWARE 文件并添加到HP SMART UPDATE FIRE HP SMART UPDATE FIREMWARE USB KEY MWARE USB KEY .................................................22 第五章第五章 用 HP SMART UPDATE USB HP SMART UPDATE USB KEY KEY 升级FIRMWARE (26)第六章 验证FIRMWARE 升级是否已经完成用 (33)HP Smart Update Firmware USB Key使用HP Smart Update Firmware USB Key升级对HP Proliant server进行firmware升级使用HP USB Key Utility 制作HP Smart Update Firmware USB Key对HP Proliant server进行firmware 升级,优点是可以将比HP Smart Update Firmware DVD光盘更新版本的firmware文件添加到USB Key 中来进行升级,以确保新安装的HP Prolinat服务器的firmware版本保持为当前最新版本。
FutureSmart Firmware固件升级方法及注意事项
下载固件文件,解压后,将其中的后缀名为.bdl的文件复制到U盘(建议U盘空的8G以下)中。
在打印机的预启动菜单中使用U盘升级固件:
1.将固件文件xxxx.bdl复制到U盘中。
2.关闭打印机。
拔下网线,电话线。
开机,等面板出现1/8时,点击hp log进入预启
动菜单
3.选择Administrator
4.找到Download
5.插入带有固件文件的U盘。
如果提示“No USB Thumb drive files found”(没
有发现U盘),需要重新拔插U盘。
6.选择USB Thumb drive
7.选择正确的固件.bdl文件。
8.固件文件会开始复制,整个升级过程会持续约到显示“closing repository”时,
请一直按返回键返回,直到显示Continue,选择继续,机器将自动启动。
注意事项:
1.在升级过程中,不要对打印机做任何操作,包括关闭或重启打印机,也不要向打印
机发送打印命令,为了确保升级的成功建议升级固件之前先将网线从打印机上拔掉。
2.请注意升级在一些环境下需要十分钟或更多时间才能完成,进度条走完不要马上拔
U盘,升级完成打印机将自动重启,重启之后等到打印机屏幕显示就绪的时候再拔
U盘。
升级和维修指南本文档中的内容可随时更改,恕不另行通知。
Hewlett-Packard®公司对于本资料不作任何保证,包括但不限于对有特定目的的商业活动或适用性的隐含保证。
HP对因本资料中的错误或由于提供、操作或使用本资料而偶然发生或随之而来的损坏,概不承担责任。
对于在非HP提供的设备上HP软件的使用和可靠性,HP概不负责。
本文档包括的所有权信息均受版权保护。
版权所有。
未经HP事先书面许可,不得将本文档的任何部分影印、复制或翻译成其他语言。
Hewlett-Packard CompanyP.O. Box 4010Cupertino, CA 95015-4010USACopyright © 2005 Hewlett-Packard Development Company, L.P.版权所有。
此产品使用了受版权保护的技术,应Macrovision公司和其他权利持有人为保护其美国专利和其他知识产权的要求,我们采取了一些保护措施。
在使用此版权保护技术之前必须得到Macrovision公司的授权,且只能作为家用和其他受限的观赏用途,除非得到Macrovision公司的授权才能另作他用。
禁止反编译。
根据美国专利号 4,631,603、4,577,216、4,819,098和4,907,093的许可要求,与之相关的产品只能作为受限观赏用途。
Microsoft和Windows是Microsoft Corporation在美国的注册商标。
HP 支持科技产品在法律允许范围内的使用,我们不认可、也不鼓励我们的产品被用于著作权法所不允许的目的。
目录安全信息 (1)拆卸和封装电脑 (1)准备工作 (1)拆卸电脑之前 (2)封装电脑之后 (2)拆卸侧面板 (2)装回侧面板 (3)拆卸前面板 (3)装回前面板 (3)找出电脑机箱内各组件的位置 (4)拆卸和更换驱动器 (4)拆卸光驱 (4)装回或添加光驱 (5)拆卸读卡器 (5)安装读卡器 (6)拆卸硬盘 (6)装回硬盘 (8)添加内存 (9)拆卸内存条 (9)安装内存条 (9)拆卸和安装扩充卡 (10)拆卸扩充卡 (10)安装扩充卡 (11)更换电池 (11)升级和维修指南iiiiv升级和维修指南安全信息本产品还未进行与 “IT” 电源系统(按照IEC 60950标准,不直接接地的交流分布式系统)连接的评估。
HP Service ManagerFor the supported Windows® and Linux® operating systems Software Version: 9.40Customized output from:Installation and Upgrade Documentation CenterSoftware Release Date: December 2014Legal NoticesWarrantyThe only warranties for HP products and services are set forth in the express warranty statements accompanying such products and services. Nothing herein should be construed as constituting an additional warranty. HP shall not be liable for technical or editorial errors or omissions contained herein.The information contained herein is subject to change without notice.Restricted Rights LegendConfidential computer software. Valid license from HP required for possession, use or copying. Consistent with FAR 12.211 and 12.212, Commercial Computer Software, Computer Software Documentation, and Technical Data for Commercial Items are licensed to the U.S. Government under vendor's standard commercial license.Copyright Notice© 1994-2014 Hewlett-Packard Development Company, L.P.Trademark NoticesAdobe® is a trademark of Adobe Systems Incorporated.Microsoft® and Windows® are U.S. registered trademarks of Microsoft Corporation.Oracle and Java are registered trademarks of Oracle and/or its affiliates.UNIX® is a registered trademark of The Open Group.Linux® is the registered trademark of Linus Torvalds in the U.S. and other countries.For a complete list of open source and third party acknowledgements, visit the HP Software Support Online web site and search for the product manual called HP Service Manager Open Source and Third Party License Agreements.Documentation UpdatesThe title page of this document contains the following identifying information:•Software Version number, which indicates the software version.•Document Release Date, which changes each time the document is updated.•Software Release Date, which indicates the release date of this version of the software.To check for recent updates or to verify that you are using the most recent edition of a document, go to: https://This site requires that you register for an HP Passport and sign in. To register for an HP Passport ID, go to: /passport-registration.htmlOr click the New users - please register link on the HP Passport login page.You will also receive updated or new editions if you subscribe to the appropriate product support service. Contact your HP sales representative for details.SupportVisit the HP Software Support Online website at: https://This website provides contact information and details about the products, services, and support that HP Software offers.HP Software online support provides customer self-solve capabilities. It provides a fast and efficient way to access interactive technical support tools needed to manage your business. As a valued support customer, you can benefit by using the support website to:•Search for knowledge documents of interest•Submit and track support cases and enhancement requests•Download software patches•Manage support contracts•Look up HP support contacts•Review information about available services•Enter into discussions with other software customers•Research and register for software trainingMost of the support areas require that you register as an HP Passport user and sign in. Many also require a support contract. To register for an HP Passport ID, go to:/passport-registration.htmlTo find more information about access levels, go to:/new_access_levels.jspHP Software Solutions Now accesses the HPSW Solution and Integration Portal website. This site enables you to explore HP Product Solutions to meet your business needs, includes a full list of Integrations between HP Products, as well as a listing of ITIL Processes. The URL for this website is /sc/solutions/index.jspCheck your selectionsThe following steps are customized according to your selections. Check that your selections are correct.•Understand the upgrade process of the core components (server, clients, and applications)•Install or upgrade the binaries (server and clients)•Install or upgrade the applications•Major upgradeUnderstand the installation or upgrade process of the core componentsProcess of a major upgradeThe following diagram illustrates the process of a major upgrade.The following explains the high-level steps of the major upgrade process. For more detailed information of each step, see the Interactive Applications Upgrade Guide.Step 1. Create a development system by duplicating your production system.You will run an out-of-box upgrade on this system, and then fix errors and resolveconflicts. Make sure the development system meets the requirements in the support matrix of the target upgrade version, and copy your production data to the development system.Step 2. Prepare the development system for an upgrade.Prepare the data and binaries (server and client) of the development system for anupgrade.1.Purge and archive unnecessary data to optimize upgrade performance.Purge and archive unnecessary data in the following files (which may contain largeamounts of data): mail, msglog, syslog, spool, eventin, eventout, schedule,sysperform, and devaudit (on a production system, development auditing should beturned off).For information about purging and archiving records, see the Service Manager HelpCenter.2.Meet database requirements.a.Keep the table space name same as the production system for an Oracle database.b.Convert all column names to uppercase for a case-sensitive database.c.Remove some indexes and constraints.3.Purge the existing upgrade files.If you have run an applications upgrade in the past, there may be some artifacts leftover from upgrade processing that need to be removed.4.Upgrade your Service Manager server and client to the latest version.5.Update the server configuration files (sm.cfg and sm.ini).Before running the Upgrade Utility, you need to make changes to the Service Manager configuration files before running the Upgrade Utility. Record all changes that youhave made so that you can revert them to the original status after the upgrade.Step 3. Run an out-of-box upgrade on the development system.1.Check the size of the applications upgrade data, and compare it with the out-of-boxupgrade package to make sure the downloaded data has no problems.2.Load the preupg.bin applications upgrade file from the out-of-box upgrade package.3.Run the SQL Compare Utility to get a report on new fields that are to be merged intothe existing tables. Work with your database administrator to evaluate the impact on the database and make necessary changes to the database.Note: The SQL compare utility is an informational tool that compares your existingtable fields and unique keys information with those of the Service Manager versionyou are upgrading to, and then reports the new and modified fields and uniquekeys that will merge into the existing tables.4.Load the transfer.bin applications upgrade file from the out-of-box upgrade package.5.Log off and then log back in.6.Run the Data Scan Utility to scan and fix incorrect data.7.Apply the out-of-box upgrade package to the development system.8.Log out, restart the server, and then log back in.9.Fix all exceptions in the except.log file, and verify your fixes.10.Resolve all conflicts in the upgraderesults table, and verify your conflict resolutionresults.11.Return the development system to normal operation, and test the upgradeddevelopment system (functional testing).Step 4. Create a custom upgrade package in the development system.Now you have resolved all the exceptions and conflicts. It is necessary to package all the reconciled objects together into a "custom upgrade" so that they can be moved into the production environment automatically.Step 5. Create a test system by duplicating your production system.You need to apply the newly-created custom upgrade to your test system for useracceptance testing. Make sure the test system meets the requirements in the support matrix of the target upgrade version, and then copy your production data to the test system.Step 6. Prepare the test system for an upgrade.Follow the same steps for the development system, as described in step 2.Step 7. Apply the custom upgrade package to the test system.1.Upgrade the Service Manager server and client to the latest version for your testsystem.2.Run the purge tool to remove temporary objects that were generated by the UpgradeUtility.3.Load applications upgrade files preupg.bin and transfer.bin from the custom upgradepackage.4.Log off and then log back in.5.Run the Data Scan Utility to scan and fix incorrect data.6.Apply the custom upgrade package to the test system.7.Fix all exceptions in the except.log file, and verify your fixes.8.Resolve all "Error" results in the upgraderesults table, and verify your resolutionresults.9.Return the test system to normal operation, and test the custom upgrade.Test all features that your users will access. Pay particular attention to areas thatwere modified on your system.Step 8. Prepare the production system for an upgrade.Follow the same steps for the development system, as described in step 2.Step 9. Apply the customer upgrade package to your production system.Make sure you have thoroughly tested the custom upgrade, before you apply the newly-created custom upgrade to your production system. This process is identical to the one you followed when applying your upgrade to your test system.Note: The production system should not be available to users while you are applyingthe custom upgrade.Step 10. Clean up upgrade objects in the production system.Run the purge tool to remove temporary objects that were generated by the UpgradeUtility.Upgrade the binariesBefore you can upgrade the applications, you must upgrade the binaries.A major upgrade of the binaries includes your Service Manager server, database, Windowsclient, and web client (including your web application server). For details, see the Service Manager 9.40 Interactive Installation Guide.Component DescriptionServer1.Before you proceed, make sure you have a supported databaseinstalled. For a list of supported databases, see the HP ServiceManager Support Matrix. If your existing database is notsupported, upgrade your database by following the instructions inyour specific database documentation.2.Install the Service Manager 9.40 server.WindowsInstall the Service Manager 9.40 Windows client.clientWeb tier Before you proceed, make sure you have deployed a supported web application server. For a list of supported web application servers,see the HP Service Manager Support Matrix.Deploy the Service Manager 9.40 web tier on the web applicationserver.Note: After your binaries upgrade, you must install theQCCR1E114612_SM940_SM930.unl unload file. Otherwise, the System Navigator does not work. For more information about how to install an unload file using the Windows client, refer to the Installation notes > Application Unload installation section in the HP Service Manager 9.40 Release Notes.Upgrade the applicationsThe following diagram illustrates the HP Service Manager 9.40 applications upgrade paths.Note: If you are using SC6.2x or SM7.0x, you must firstly upgrade the applications version to 9.3x before you can further upgrade to SM9.40 applications. Refer to Applications Upgrade Guide (from SC6.2x) and Applications Upgrade Guide (from SM7.0x) for more information.Follow these steps to run the Upgrade Utility with the Upgrade package to upgrade your applications from version SM7.1x/9.2x/9.3x:1.Make sure you have upgraded your Service Manager server and clients to version 9.40.For details, see the Service Manager 9.40 Interactive Installation Guide.2.Run the SM9.40 Upgrade Utility with the Upgrade package.For details, see the Service Manager 9.40 Interactive Applications Upgrade Guide or the upgrade guide in PDF format for your specific version:◾Applications Upgrade Guide (from SM7.1x)◾Applications Upgrade Guide (from SM9.2x)◾Applications Upgrade Guide (from SM9.3x without Process Designer Content Pack installed)◾Applications Upgrade Guide (from SM9.3x with Process Designer Content Pack 9.30.3 installed)Also, see the following sample lists for the detailed information about the added or updated objects for your specific version:◾List of objects added or updated (from SM7.11)◾List of objects added or updated (from SM9.20)◾List of objects added or updated (from SM9.30 without Process Designer Content Pack installed)◾List of objects added or updated (from SM9.31 with Process Designer Content Pack9.30.3 installed)3.If you are upgrading from SM7.1x/9.2x/9.3x without Process Designer Content Packinstalled, follow these steps to execute the migration script for SLA:a.Log on to Service Manager as a system administrator.b.Type db in the Service Manager command line to open Database Manager.c.Type migrationSetting in the Table field, and then click Search to open theData Migration Tool form.d.Click Search to find existing migration scripts.e.Click Legacy SLA to new Agreement.f.On the Migration Script setting detail form, click Migrate Data to run the migrationscript.4.If you are upgrading from SM9.3x with Process Designer Content Pack 9.30.3 installed,run the Process Designer Data Migration Tool to manually migrate data to the PD-enabled environment.For details, see the HP Service Manager Process Designer Migration Guide.© 1994-2014 Hewlett-Packard Development Company, L.P.。
第一章文档说明一、型号:此次建行全国FOS升级包括两种类型SanSwitch,4Gb和8Gb。
1.4Gb包含两种型号,只是端口License数量不同,其他一样。
1)AE372A Brocade 4/24 SAN Switch for HP c-Class BladeSystem2)AE370A Brocade 4/12 SAN Switch for HP c-Class BladeSystem2. 8Gb也有两种型号,只是端口License数量不同,其他一样。
1)AJ821A Brocade 8/24c SAN Switch for HP BladeSystem c-Class2)AJ820A Brocade 8/12c SAN Switch for HP BladeSystem c-Class二、固件(FOS)版本:【说明】重要:针对不同型号的不同固件版本,升级步骤和固件版本有区别。
主要分两大类:4Gb和8Gb。
Brocade SAN Switch的固件(FOS)不能从低版本越级升级到高版本,需要有中间版本过渡。
1.4Gb的SAN Switch统一升级到v6.2.2e。
当前运行的主要有两个版本:v5.0.x和v5.3.x(注意:此处的x代表不同的小版本)。
1)对于当前运行版本是v5.0.x的SAN Switch,请按如下版本顺序依次升级:v5.0.x -->v5.2.1b --> v5.3.1a -->v6.0.0 --> v6.1.2b --> v6.2.2e2)对于当前运行版本是v5.3.x的SAN Switch,请按如下版本顺序依次升级:v5.3.x -->v6.0.0 --> v6.1.2b --> v6.2.2e技术文档Page 1 of 153)对于除上述两种版本以外的SAN Switch,请截取上述版本顺序当中的版本进行:比如,当前如果是v6.0.x,则按照v6.0.x --> v6.1.2b --> v6.2.2e顺序进行。
步骤:
1. 下载SPP image
2. Ilo中,使用virtual CD-DVD调用下载好的image
3. 执行’’文件
4. 进入SPP图形界面,选择想要更换新的firmware、driver、software等
1. – Download
2. 点击’HP Service Pack for ProLiant’
点击’Documentation’,需要查看的4个文档
Release Notes :部署前需要需要注意事项
Component Release Notes:查看Driver 、Firmware、Software -等版本信息Contents Report:每个软件是否要更新以及更新的重要性、文件名字等Server Support Guide:每个版本的的软件对应哪些代的机器
到hp\swpackages 下,双击’’执行批处理文件
系统会自动弹出黑色对话框
大概10min,系统会自动弹出IE浏览器窗口,点击Localhost Guided
Update
选择interactive——单击OK(注意:如果选在Automatic,则自动开始更新全部的驱动、固件等)
进入Step1,localhost process…开始释放之前iso中的文件
这是一个漫长的过程;
在整个过程中next键是灰色,即无法点击;
如果不小心关闭了浏览器网页,可以通
过
,
Force,表示现在的SPP里面的版本与已经安装的版本相同或者更低Selected,表示现在的SPP里面的版本与已经安装的版本更高
注意:当选中Force或者Selected,按钮标识,会由左面变到右面
进入step3,当进程走完,点击Start
Over
到此安装完成。
注意:安装完成之后,建议重新启动server,以便其他的驱动或者固件等能够正常使用。