Dodson_ERM_3.27.08[1]
- 格式:pdf
- 大小:304.86 KB
- 文档页数:41

Legal and notice information© Copyright 2015- 2017 Hewlett Packard Enterprise Development LP Document H istory:Released DescriptionJune 2022 Final VersionTable of ContentsOverview (4)Update recommendation (4)Alignment (4)Summary of Changes (4)Important Notes (4)Release Summary (4)Prerequisites (5)Running SUM on Linux (5)Deployment Instructions (6)Component Release Notes (6)Content Notes (8)RHEL8.6 Supplement for Gen9 SPP Contents (8)OverviewA Service Pack for ProLiant (SPP) Supplement is a software bundle. It may include support for anew operating system update excluded in SPP but functions with the SPP components. TheSupplement will provide support for functionality that is required outside a normal SPP release cycle allowing HPE to deliver support, so customers do not have to wait on a complete SPP’s availability.Each SPP Supplement’s version number will match the version of its corresponding SPP.Supplement Release Notes will be available and will include information on the components in thebundle. If the Supplement’s contents include Linux components, the components will also beavailable on the Linux Software Delivery Repository (SDR).Once released, the functionality of the SPP Supplement contents is included in the next availableSPP.Hot Fixes associated with an SPP may work with an SPP Supplement. Please review the Hot Fix to verify if it has support for the operating system that is supported in the Supplement. For moreinformation on SPP Hot Fixes, please see the SPP Release Notes located on the SPP InformationLibrary page.This is the Red Hat Enterprise Linux (RHEL) 8.6 Supplement for Gen9.0 Post Production ServicePack for ProLiant 2022.03.0.For more information on which servers are supported with RHEL 8.6, please visit our OS SupportSite at: SPP OS Support Guide.RHEL8.6 Supplement for Gen9.0 SPP version 2022.03.0 Bundle containing software components Filename: supspp-2022.03.rhel8.6.en.tar.gzUpdate recommendationOptional - Users should update to this version if their system is affected by one of the documented fixes or if there is a desire to utilize any of the enhanced functionality provided by this version.AlignmentGen9 Service Pack for ProLiant 2022.03.0Summary of ChangesImportant NotesWhen the terms, Supplement, Service Pack for ProLiant or SPP are used throughout this document,they refer to all the deliverables in the Table in the Overview Section unless explicitly stated.Before deploying any components to a system, be sure that a recent backup of the system isavailable in the event the deployment procedure fails.Release SummaryThe summary of this Red Hat Enterprise Linux (RHEL) 8.6 Supplement for Service Pack for ProLiantrelease is:Added support for Red Hat Enterprise Linux 8.5This Supplement corresponds with SPP 2022.03.0. Drivers either found in SPP 2022.03.0 or deliveredwith the RHEL 8.4 distribution can be used.However, the drivers found in the initial release (SPP2022.03.0) may not contain all the HPE value added features that are available in the Supplement. These features will be added in a future SPP release.All components delivered in this Supplement to the Service Pack for ProLiant (SPP) are tested together and meet the dependencies of the other components in the Service Pack for ProLiant.Systems using software and firmware components delivered with the following products should be able to easily migrate to the components in this supplement:Service Pack for ProLiant 2022.03.02021.10.02021.05.02020.09.2Note: The users may see the “thawing” state in the systemd message console because the systemd doesn’t set the default value correctly, especially after a restart or reload services.PrerequisitesRunning SUM on LinuxBefore deploying software updates on a target system, be sure that a recent backup of the target system is available in the event the deployment procedure fails.To successfully deploy SUM on remote target systems based on a Linux operating system, the following must be available:•libcrypt.so•libcrypt.so.1•/usr/lib/libqlsdm.so•/usr/lib64/libqlsdm-x86_64.so•/lib/cim/libqlsdm.so•/usr/lib/libemsdm.so•/usr/lib64/libemsdm.so•/lib/cim/libemsdm.so•/usr/lib/bfahbaapi.so•/usr/lib64/bfahbaapi.so•/lib/cim/bfahbaapi.so•linux-vdso.so.1•/lib64/libcrypt.so.1•/lib64/libpthread.so.0•/lib64/libz.so.1•/lib64/libdl.so.2•/lib64/librt.so.1•/usr/lib64/libstdc++.so.6•/lib64/libm.so.6•/lib64/libgcc_s.so.1•/lib64/libc.so.6•/ lib64/ld-linux-x86-64.so.2Deployment InstructionsThe Supplement is designed for use after the operating system is installed. This enables the updating ofdrivers, and the installation of HPE utilities (such as Health and iLO drivers), and agents (Server, NIC,and Storage).Using the SPP Supplement and its corresponding SPP on a supported Linux operating system. Enablesthe choice of either standard Linux installation tools (YUM/Zypper) or HPE management tools(SUM/OneView) to do the following:•Use the software and firmware provided in the Supplement and the SPP.•Use the firmware provided in the SPP and get the software from the Software DeliveryRepository at https:///SDR.•Use the firmware and software utilities provided in the SPP and get the drivers from the operating system distro.When appropriate for any given deployment, components can be combined into a single ISO using SUMcustom baseline or applied as separate packages.To upload selected components to the iLO Repository and create an install set, select Save Components as an Install set on iLO Repository. SUM automatically creates a default name and description, but you can edit the name and description for the install set. You can use this install set to roll back the server components at a future time. The name and description are limited to 63 characters, and the only special charactersallowed are - and _.Component Release NotesDriver - Storage ControllerSoftware - System ManagementDriver - Storage Controller Top HPE ProLiant Smart Array Controller (64-bit) Driver for Red Hat Enterprise Linux 8 (64-bit)Version: 3.4.20-211(Recommended)Filename: kmod-hpsa-3.4.20-211.rhel8u4.x86_psig; kmod-hpsa-3.4.20-211.rhel8u4.x86_64.rpm; kmod-hpsa-3.4.20-211.rhel8u5.x86_psig; kmod-hpsa-3.4.20-211.rhel8u5.x86_64.rpmEnhancementsAdded RHEL8.5 supportSoftware - System Management Top HPE ProLiant Agentless Management Service for Red Hat Enterprise Linux 8 ServerVersion: 2.10.5(Optional)Filename: hp-ams-2.10.5-888.1.rhel8.x86_psig; hp-ams-2.10.5-888.1.rhel8.x86_64.rpmPrerequisiteso hp-ams supported on HPE ProLiant Gen8 and Gen9 Servers.o hp-ams provides information to the HPE iLO 4 service providing SNMP support.o SNMP PASS-THRU on the HPE iLO 4 MUST be disabled, and SNMP should be configured on the HPE iLO 4. The HPE iLO 4 may need to be reset after changing these settings.o Requirements:▪Minimum HPE iLO 4 Firmware Version = 1.05▪Minimum supported OS Versions = Red Hat Enterprise Linux 5.6, Red Hat Enterprise Linux 6.0,SuSE Linux Enterprise Server 10 SP4, SuSE Linux Enterprise Server 11 SP1FixesFixed the following items:o Addressed issue where the NIC port status or IML record when NIC port link status changes from "Unknown"to "OK". Updated the SNMP trap to make iLO/IML record the correct link port status.HPE SNMP Agents for Red Hat Enterprise Linux 8 ServerVersion: 10.9.4(Optional)Filename: hp-snmp-agents-10.94-689.8.rhel8.x86_psig; hp-snmp-agents-10.94-689.8.rhel8.x86_64.rpm PrerequisitesThe hp-health and hp-snmp-agents run as 32 bit applications in the x86_64 environment. The Linux kernel 32 bit compatibility must be enabled (usual default for Linux) and the 32 bit compatibility libraries must be present.To get the list of all dependency files for hp-snmp-agents type:rpm –qp –-requires hp-snmp-agents-<version>.rpmFixesFixed the following items:o The hp-snmp-agent may show "NAME="SLES"" as OS description for all the SLES15 and subversion.o The user may see the incorrect status for the connected NIC ports due to missing the ifconfig system command in SLES15 and subversion.o The user may see interface information is missing on the SMH page due to the hp-snmp-agent for SLES 15 missing the systemd rpm during the package build.HPE System Health Application and Command Line Utilities for Red Hat Enterprise Linux 8 ServerVersion: 10.9.3(Optional)Filename: hp-health-10.93-307.4.rhel8.x86_psig; hp-health-10.93-307.4.rhel8.x86_64.rpmPrerequisitesThe hp-health and hp-snmp-agents run as 32 bit applications in the x86_64 environment. The Linux kernel 32 bit compatibility must be enabled (usual default for Linux) and the 32 bit compatibility libraries must be present.To get the list of all dependency files for hp-health, type:rpm –qp –requires hp-health-< version >.rpmFixesFixed the following items:o The hpasmcli utility may show DIMM status as "N/A" due to the SMBIOS data entry not correctly initializing the DIMM information.HPE System Management Homepage Templates for LinuxVersion: 10.8.1(Optional)Filename: hp-smh-templates-10.8.1-1487.3.noarch.rpmPrerequisitesThe hp-smh-templates RPM install will fail, if all dependencies are not installed. The administrator can verify the list of dependencies required by running this command. If the repositories being used by yum or zypper, includes these dependencies, the installation tool will automatically retrieve them. However if they are not present, the user must manually install them prior to proceeding with the RPM install.To get the list of all dependency files for hp-smh-templates type:rpm –qp –-requires hp-smh-templates-<version>.rpmFixesInitial support for Red Hat Enterprise Linux 8 ServerContent NotesRHEL8.6 Supplement for Gen9 SPP ContentsThis table lists all of the software and firmware on this RHEL8.6 Supplement for Gen9 SPP. For more information on this deliverable go to /servers/spp/download.ProductCategory Component Title Version Release Date FilenameApplication - System Management Integrated Smart UpdateTools for Linux x64 2.9.1.021 October2021sut-2.9.1-22.linux.x86_64.rpmDriver - Storage Controller HPE ProLiant Smart ArrayController (64-bit) Driverfor Red Hat EnterpriseLinux 8 (64-bit)3.4.20-218 06 May 2022kmod-hpsa-3.4.20-218.rhel8u5.x86_64.rpmkmod-hpsa-3.4.20-218.rhel8u6.x86_64.rpmDriver - Storage Controller HPE Dynamic Smart ArrayB140i SATA RAIDController Driver for Red1.2.10-211 06 May 2022 kmod-hpdsa-1.2.10-211.rhel8u6.x86_64.rpmHat Enterprise Linux 8 (64-bit)kmod-hpdsa-1.2.10-211.rhel8u5.x86_64.rpmDriver - Storage Controller HPE ProLiant Smart ArrayController (64-bit) Driverfor Red Hat EnterpriseLinux 8 (64-bit)3.4.20-211 03 December2021kmod-hpsa-3.4.20-211.rhel8u5.x86_64.rpmkmod-hpsa-3.4.20-211.rhel8u4.x86_64.rpmSoftware - Driver Update HPE Dynamic Smart ArrayB140i SATA RAIDController Driver for RedHat Enterprise Linux 8(64-bit)1.2.10-211 07 May 2022Software - System Management HPE SNMP Agents for RedHat Enterprise Linux 8Server10.9.4 28 August2021hp-snmp-agents-10.94-689.8.rhel8.x86_64.rpmSoftware - System Management HPE System ManagementHomepage Templates forLinux10.8.1 15 February2019hp-smh-templates-10.8.1-1487.3.noarch.rpmSoftware - System Management HPE ProLiant AgentlessManagement Service forRed Hat Enterprise Linux8 Server2.10.503 January2022hp-ams-2.10.5-888.1.rhel8.x86_64.rpmSoftware - System Management HPE System HealthApplication and CommandLine Utilities for Red HatEnterprise Linux 8 Server10.9.3 10 April 2021 hp-health-10.93-307.4.rhel8.x86_64.rpmSoftware - Lights-Out Management HPE Lights-Out OnlineConfiguration Utility forLinux (AMD64/EM64T)5.7.0-0 03 January2022hponcfg-5.7.0-0.x86_64.rpmThere are 10 items in this table.© Copyright 2021 Hewlett Packard Enterprise Development LP。

condainstall出错在下载包时出现下⾯的错误:userdeMBP:pytorch user$ conda install -n deeplearning matplotlibSolving environment: failedCondaHTTPError: HTTP 000 CONNECTION FAILED for url <https:///pkgs/main/osx-64/repodata.json.bz2>Elapsed: -An HTTP error occurred when trying to retrieve this URL.HTTP errors are often intermittent, and a simple retry will get you on your way.If your current network has https:// blocked, please filea support request with your network engineering team.ConnectionError(MaxRetryError('HTTPSConnectionPool(host=\'\', port=443): Max retries exceeded with url: /pkgs/main/osx-64/repodata.json.bz2 (Caused by ReadTimeoutError("HTTPSConnectionPool(host=\'repo.anaconda.co ⼀开始是调⽤config命令去设置清华的镜像:conda config --add channels https:///anaconda/pkgs/free/cconda config --set show_channel_urls yes //设置配置中的参数conda config --add channels https:///anaconda/cloud/conda-forge/conda config --add channels https:///anaconda/cloud/msys2/但是还是出错:(deeplearning) userdeMBP:~ user$ conda install matplotlibSolving environment: failedCondaHTTPError: HTTP 404 NOT FOUND for url <https:///anaconda/pkgs/free/c/noarch/repodata.json>Elapsed: 00:00.226091The remote server could not find the noarch directory for therequested channel with url: https:///anaconda/pkgs/free/cAs of conda 4.3, a valid channel must contain a `noarch/repodata.json` andassociated `noarch/repodata.json.bz2` file, even if `noarch/repodata.json` isempty. please request that the channel administrator create`noarch/repodata.json` and associated `noarch/repodata.json.bz2` files.$ mkdir noarch$ echo '{}' > noarch/repodata.json$ bzip2 -k noarch/repodata.jsonYou will need to adjust your conda configuration to proceed.Use `conda config --show channels` to view your configuration's current state.Further configuration help can be found at <https://conda.io/docs/config.html>.后⾯发现可能是这个镜像的问题,打开本地的.condrac⽂件,将设置的channels改成:- https:///anaconda/pkgs/main/- https:///anaconda/cloud/bioconda/后⾯再运⾏就发现成功了(deeplearning) userdeMBP:~ user$ conda install matplotlibSolving environment: done==> WARNING: A newer version of conda exists. <==current version: 4.5.12latest version: 4.6.8Please update conda by running$ conda update -n base -c defaults conda## Package Plan ##environment location: /anaconda3/envs/deeplearningadded / updated specs:- matplotlibThe following packages will be downloaded:package | build---------------------------|-----------------tornado-5.1.1 | py37h1de35cc_0 661 KB https:///anaconda/pkgs/mainmatplotlib-3.0.2 | py37h54f8f79_0 6.5 MB https:///anaconda/pkgs/mainkiwisolver-1.0.1 | py37h0a44026_0 56 KB https:///anaconda/pkgs/mainpyparsing-2.3.1 | py37_0 105 KB https:///anaconda/pkgs/mainpytz-2018.9 | py37_0 268 KB https:///anaconda/pkgs/maincycler-0.10.0 | py37_0 14 KB https:///anaconda/pkgs/mainca-certificates-2019.1.23 | 0126 KB https:///anaconda/pkgs/mainopenssl-1.1.1b | h1de35cc_1 3.4 MB https:///anaconda/pkgs/mainpython-dateutil-2.8.0 | py37_0 281 KB https:///anaconda/pkgs/maincertifi-2019.3.9 | py37_0 155 KB https:///anaconda/pkgs/main------------------------------------------------------------Total: 11.6 MBThe following NEW packages will be INSTALLED:cycler: 0.10.0-py37_0 https:///anaconda/pkgs/mainkiwisolver: 1.0.1-py37h0a44026_0 https:///anaconda/pkgs/mainmatplotlib: 3.0.2-py37h54f8f79_0 https:///anaconda/pkgs/mainpyparsing: 2.3.1-py37_0 https:///anaconda/pkgs/mainpython-dateutil: 2.8.0-py37_0 https:///anaconda/pkgs/mainpytz: 2018.9-py37_0 https:///anaconda/pkgs/maintornado: 5.1.1-py37h1de35cc_0 https:///anaconda/pkgs/mainThe following packages will be UPDATED:ca-certificates: 2019.1.23-0 defaults --> 2019.1.23-0 https:///anaconda/pkgs/maincertifi: 2019.3.9-py37_0 defaults --> 2019.3.9-py37_0 https:///anaconda/pkgs/mainopenssl: 1.1.1b-h1de35cc_1 defaults --> 1.1.1b-h1de35cc_1 https:///anaconda/pkgs/mainProceed ([y]/n)? y...Preparing transaction: doneVerifying transaction: doneExecuting transaction: done之后如果设置了另⼀个函数再次进⾏install时,明明之前已经更改了channels,但如果还是遇见了这样的问题:(deeplearning2) userdeMBP:neural transfer user$ conda install matplotlibSolving environment: failedCondaHTTPError: HTTP 000 CONNECTION FAILED for url <https:///pkgs/r/osx-64/repodata.json.bz2>解决办法就是退出该环境,使⽤-n来指明下载的环境,这样就不会出现这样的问题了:userdeMBP:pytorch user$ conda install -n deeplearning2 matplotlib但是最好还是直接进⼊该环境下,使⽤pip install来安装包,不容易出错。

IBM X-Server日志收集方法-------------------------------MemoryMinidump---------------------------------Minidump调试方法:1. 到/whdc/devtools/debugging/default.mspx下载dbg_x86_6.9.3.113.msi2. 建立临时目录c:\temp3. 启动windbg,打开file->symbol file path (ctrl+s),输入SRV*c:\temp*/download/symbols,确定4. 打开file->open crash dump (ctrl+d),打开%systemroot%\Minidump目录下dmp后缀的文件5. 在左下角状态提示“kd>”后,输入“!analyze -v”,回车,下面会出现分析结果-------------------------------BMC日志---------------------------------收集BMC日志需要您准备一台笔记本和一根交叉网线连接到服务器的网络1口。
一、BMC收集1. 到IBM网站(/systems/support/supportsite.wss/docdisplay?ln docid=MIGR-64636&brandind=5000008)下载一个压缩包osa_utl_smbr_2.0.24.1_anyos_noarch.zip,下载好之后解压,将windows下的SMBridge安装程序拷贝到笔记本中。
2. 在服务器BIOS中设置BMC的IP地址。
重启服务器,按F1进BIOS,依次选择Advanced Setup-> Baseboard Management Controller (BMC) Settings -> BMC Network Configuration,将IP地址获取方式改为静态,IP地址为10.1.1.97;子网掩码是255.255.255.0。
LTP工具说明1LTP测试套件 (3)1.1简介 (3)1.2源目录结构 (3)2LTP安装 (4)2.1下载 (4)2.2编译 (4)2.3安装说明 (5)3LTP测试套件结构说明 (6)3.1概述 (6)3.2目录介绍 (6)3.3LTP执行原理 (6)4LTP测试套件测试内容 (7)4.1LTP测试套件测试内容 (7)4.1.1commands (7)4.1.2kernel (7)4.1.3kdump (8)4.1.4network (8)4.1.5realtime (8)4.1.6open_posix_testsuite (8)4.1.7misc (8)4.2测试方法说明 (8)4.2.1commands模块内容描述及实现方法 (8)4.2.2kernel (10)4.2.3network (15)4.2.4open_posix_testsuite (17)4.2.5realtime (18)5LTP测试套件配置详细 (19)5.1networktests.sh脚本配置 (19)5.2networkstress.sh配置 (23)5.3open_posix_testsuite测试套件 (28)5.4realtime配置 (29)5.5mm脚本的配置 (30)5.6io脚本配置 (30)5.7filecaps的配置 (30)5.8tpm_tools的配置 (31)5.9tcore的配置 (31)5.10io_floppy的配置 (31)5.11io_cd 的配置 (32)5.12cpuhotplug的配置 (32)5.13adp.sh的配置 (33)5.14autofs1.sh和autofs4.sh的配置 (34)5.15exportfs.sh的配置 (34)5.16isofs.sh的配置 (34)5.17ltpdmmapper.sh的配置 (35)5.18ltpfslvm.sh的配置及要求 (36)5.19ltpfsnolvn.sh的配置及要求 (36)5.20ltp-scsi_debug.sh的配置及要求 (37)5.21sysfs.sh的配置及要求 (37)5.22rpctirpc的配置及要求 (37)5.23test_selinux.sh的配置及要求 (39)5.24smack的配置和要求 (40)5.25perfcounters的配置及要求 (41)5.26can的配置及要求 (41)5.27test_robind.sh的配置 (42)6LTP测试套件使用说明 (43)6.1概述 (43)6.2测试方法 (44)6.2.1初始测试 (44)6.2.2压力测试 (47)1LTP测试套件1.1简介LTP(Linux Test Project)是SGI、IBM、OSDL和Bull合作的项目,目的是为开源社区提供一个测试套件,用来验证Linux系统可靠性、健壮性和稳定性。

Discovery软件其实就是一个工作平台,也就是将传统的地质制图工作作成了一体化的平台,如果你是初学者,那么,你可以多跑软件流程,同时,结合你具体的工区(project),来作练习。
如果你有较长的工作时间(油田研究院或者采油厂地质研究所),那么,在你加载完基本数据后,你就可以作很多基础的工作了。
比如,砂体厚度(储层)平面图,地层厚度、物性(孔隙度,渗透率)等等,这样会比传统的工作方法(手工)效率高很多。
关于具体的工作流程,Discovery软件中在建立工区时有个Workflow,Discovery 软件包括地震解释(SV)、测井解释(Prizm)、平面图(Goatlas)剖面图(Xsection),简单的叠后处理(Pstax),正演(GMAPlus),以及坐标系统,井数据库等等模块,但确实没有反演(Inversion)模块。
1、可是现在我的断层文件中只有Inline,Crossline,Faultname,time四列,没有X,Y坐标信息,还能加入马?我看你给的头文件中也没有提到Inline,Crossline。
其他的比如解释者等信息可以不加马?SV中加载断层文件确实比较复杂,在SV中加载断层文件(Fault Trace)必须要有X Y 坐标,反而没有InLine和CRLIne却是可以的。
这与一般的地震解释和反演软件有所区别。
也可以说是SV的一个缺点。
解决只有InLine和CrLine而没有X,Y的断层文件(Fault Trace)的办法有两个:(1)重新让解释人员给你输出,呵呵,这个办法最简单了:)(2)自己转换线道号为XY坐标,自己或者照别人编一个就行了,实在不会的话,在Excell里也可以转化的,转换的办法就是简单的集合运算,呵呵,我就不详细解释了:)提示:最好的办法还是按照我上次说的用默认格式输入,要不,你的断层(Fault segment)可能会出现混乱!2、层位和断层ASC码文件格式是:断层:fycWX1002 262 650 2062 7 1层位; 363(Inline) 415(Crossline) 1992(Time)断层和层位都没有X,Y坐标在Seisvision-》Horizon—》Horizon import中需要设置那些参数才能导入层位和断层。

python-ldap 用法-回复如何使用pythonldapPython是一种功能强大且广泛使用的编程语言,在许多领域都有着广泛的应用,其中包括与LDAP(轻量级目录访问协议)服务器交互。
LDAP 是一种协议,用于在网络上访问和维护目录信息。
Pythonldap是一个用于与LDAP服务器进行通信的Python模块,它提供了一种简便的方式来连接、查询和维护LDAP服务器中的目录信息。
本文将一步一步地介绍如何使用pythonldap模块。
第一步:安装pythonldap模块要使用pythonldap模块,首先需要安装它。
可以通过使用pip来安装pythonldap模块。
打开终端(对于Windows用户,是命令提示符)并输入以下命令:pip install python-ldap这将会从Python Package Index(PyPI)下载并安装pythonldap模块。
请注意,安装pythonldap模块时可能会遇到一些依赖关系问题,这需要根据您的操作系统进行解决。
通常情况下,pip会自动解决依赖关系并安装必需的软件包。
第二步:导入pythonldap模块安装完pythonldap模块后,就可以在Python脚本中导入它。
在您的Python脚本的顶部添加以下代码:pythonimport ldap这将会导入pythonldap模块,使您能够使用其中的功能。
第三步:建立与LDAP服务器的连接在与LDAP服务器进行交互之前,需要建立一个连接。
使用pythonldap 模块的`ldap.initialize()`函数来建立连接。
以下是一个示例代码:pythonldap_server = 'ldap:myldapserver' # 替换成您的LDAP服务器地址conn = ldap.initialize(ldap_server)这将会建立与指定LDAP服务器的连接。
请确保将`ldap_server`变量替换为您实际的LDAP服务器地址。

一.HDLM配置的准备工作1.拷贝文件集到AIX目录下(/usr/sys/inst.images).#mount –rv cdrfs /dev/cd0 /m nt# cd /m nt/aix_odm/V5.0.0.1# cp HDS_FC_ODM2.bff /usr/sys/inst.images2.创建.toc 文件# cd /usr/sys/inst.images# inutoc .3.用installp 安装AIX 支持的文件集a) # smitty install -choose 5.0.0.1 AIX Support for Hitachi Disk Arraysb) Select option “Install and Update Software”c) Select option “Install Software”d) When prompted for “Input Device / directory for software” , type:/usr/sys/inst.imagese) 用F4 键列出安装的软件包f) 将光标移到需安装的软件,再按F7键,此时,在其左边出现一个“>”--> 5.0.0.1 AIX Support for Hitachi Disk Arrays按“Enter” 键开始安装4.从5.0.0.1升级到5.0.0.4版本:1)拷贝安装的文件集到AIX 目录下(/usr/sys/inst.images).# cd /cdrom/aix_odm/V5.0.0.4u# cp HDS_FC_ODMUPD_5004U /usr/sys/inst.images2)创建新的 .toc 文件# cd /usr/sys/inst.im ages# inutoc .3)安装AIX 支持的文件集a) # sm itty install -choose 5.0.0.1 AIX Support for Hitachi DiskArraysb) Select option “Install and Update Software”c) Select option “Install Software”d) When prompted fo r “Input Device / directory for software” , type:/usr/sys/inst.imagese) 用F4 键列出要安装的文件f) 将光标移到需安装的软件,再按F7 key ,此时,在其左边出现一个“>”--> 5.0.0.4 AIX Support for Hitachi Disk Arrays按“Enter” 键开始安装5.删除HDS 已经定义的其它FC SCSI设备# rmdev -dl fcs0 -R 删除HBA-0上的设备;# rmdev -dl fcs1 -R 删除HBA-1上的设备;6.让系统重新认一下设备;# cfgm gr ;# lsdev -Cc disk 再次显示;二.HDLM的安装1.以root用户登陆.2.将CD-ROM 放入光驱.,但不要mount3.# mkdir /var/DLM# echo "PPQ4567IRSTXYZFGH9EE" > /var/DLM/dlm.lic_key PPQ4567IRSTXYZFGH9EE是HDLM的Lisence Key.4.执行安装命令# installp -aXgd /dev/cd0 all5.按照提示进行安装6.确认DLManager.rte已经安装# lslpp -L DLManager.rte7.加入环境变量# PATH=$PATH:/usr/DynamicLinkManager/bin# export PATH8.启动HDLM configuration m anager.执行# /usr/DynamicLinkManager/bin/dlm cfgmgr也可用startsrc进行启动:启动HDLM命令:startsrc –s DLMManager;停止HDLM命令:stopsrc –s DLMManager。
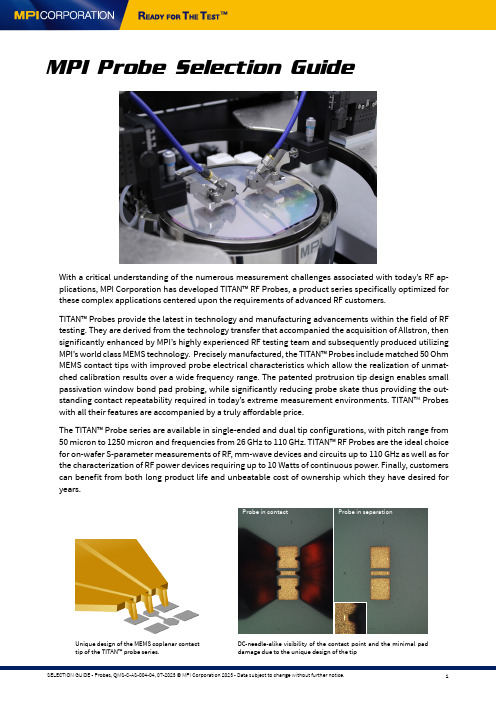
MPI Probe Selection GuideWith a critical understanding of the numerous measurement challenges associated with today’s RF ap-plications, MPI Corporation has developed TITAN™ RF Probes, a product series specifically optimized for these complex applications centered upon the requirements of advanced RF customers.TITAN™ Probes provide the latest in technology and manufacturing advancements within the field of RF testing. They are derived from the technology transfer that accompanied the acquisition of Allstron, then significantly enhanced by MPI’s highly experienced RF testing team and subsequently produced utilizing MPI’s world class MEMS technology. Precisely manufactured, the TITAN™ Probes include matched 50 Ohm MEMS contact tips with improved probe electrical characteristics which allow the realization of unmat -ched calibration results over a wide frequency range. The patented protrusion tip design enables small passivation window bond pad probing, while significantly reducing probe skate thus providing the out -standing contact repeatability required in today’s extreme measurement environments. TITAN TM Probes with all their features are accompanied by a truly affordable price.The TITAN™ Probe series are available in single-ended and dual tip configurations, with pitch range from 50 micron to 1250 micron and frequencies from 26 GHz to 110 GHz. TITAN™ RF Probes are the ideal choice for on-wafer S-parameter measurements of RF, mm-wave devices and circuits up to 110 GHz as well as for the characterization of RF power devices requiring up to 10 Watts of continuous power. Finally, customers can benefit from both long product life and unbeatable cost of ownership which they have desired foryears.Unique design of the MEMS coplanar contacttip of the TITAN™ probe series.DC-needle-alike visibility of the contact point and the minimal paddamage due to the unique design of the tipAC2-2 Thru S11 Repeatability. Semi-Automated System.-100-80-60-40-200 S 11 E r r o r M a g n i t u d e (d B )Frequency (GHz)Another advantage of the TITAN™ probe is its superior contact repeatability, which is comparable with the entire system trace noise when measured on the semi-automated system and on gold contact pads.CROSSTALKCrosstalk of TITAN™ probes on the short and the bare ceramic open standard of 150 micron spacing compared to conventional 110 GHz probe technologies. Results are corrected by the multiline TRL calibration. All probes are of GSG configuration and 100 micron pitch.-80-60-40-200Crosstalk on Open. Multiline TRL Calibration.M a g (S21) (d B )Frequency (GHz)-80-60-40-200Crosstalk on Short. Multiline TRL Calibration.M a g (S21) (d B )Frequency (GHz)The maximal probe c ontac t repeatability error of the c alibrate S11-parameter of the AC2-2 thru standard by T110 probes. Semi-automated system. Ten contact circles.Cantilever needle material Ni alloy Body materialAl alloy Contact pressure @2 mils overtravel 20 g Lifetime, touchdowns> 1,000,000Ground and signal alignment error [1]± 3 µm [1]Planarity error [1] ± 3 µm [1]Contact footprint width < 30 µm Contact resistance on Au < 3 mΩThermal range-60 to 175 °CMechanical CharacteristicsAC2-2 Thru S21 Repeatability. Manual TS50 System.-100-80-60-40-200S 21 E r r o r M a g n i t u d e (d B )Frequency (GHz)MECHANICAL CHARACTERISTICSThe maximal probe c ontac t repeatability error of the c alibrate S21-parameter of the AC2-2 thru standard by T50 probes. Manual probe system TS50.26 GHZ PROBES FOR WIRELESS APPLICATIONSUnderstanding customer needs to reduce the cost of development and product testing for the high competitive wireless application market, MPI offers low-cost yet high-performance RF probes. The specifically developed SMA connector and its outstanding transmission of electro-magnetic waves through the probe design make these probes suitable for applications frequencies up to 26 GHz. The available pitch range is from 50 micron to 1250 micron with GS/SG and GSG probe tip configurations. TITAN™ 26 GHz probes are the ideal choice for measurement needs when developing components for WiFi, Bluetooth, and 3G/4G commercial wireless applications as well as for student education.Characteristic Impedance 50 ΩFrequency rangeDC to 26 GHz Insertion loss (GSG configuration)1< 0.4 dB Return loss (GSG configuration)1> 16 dB DC current ≤ 1 A DC voltage ≤ 100 V RF power, @10 GHz≤ 5 WTypical Electrical Characteristics26 GHz Probe Model: T26Connector SMAPitch range50 µm to 1250 µm Standard pitch step from 50 µm to 450 µm from 500 µm to 1250 µm25 µm step 50 µm stepAvailable for 90 µm pitch Tip configurations GSG, GS, SG Connector angleV-Style: 90-degree A-Style: 45-degreeMechanical CharacteristicsT26 probe, A-Style of the connectorTypical Electrical Characteristics: 26 GHz GSG probe, 250 micron pitchPROBES FOR DEVICE AND IC CHARACTERIZATION UP TO 110 GHZTITAN™ probes realize a unique combination of the micro-coaxial cable based probe technology and MEMS fabricated probe tip. A perfectly matched characteristic impedance of the coplanar probe tips and optimized signal transmission across the entire probe down to the pads of the device under test (DUT) result in excellent probe electrical characteristics. At the same time, the unique design of the probe tip provides minimal probe forward skate on any type of pad metallization material, therefo -re achieving accurate and repeatable measurement up to 110 GHz. TITAN™ probes are suitable for probing on small pads with long probe lifetime and low cost of ownership.The TITAN™ probe family contains dual probes for engineering and design debug of RF and mm-wave IC’s as well as high-end mm-wave range probes for S-parameter characterization up to 110 GHz for modeling of high-performance microwave devices.Characteristic Impedance 50 ΩFrequency rangeDC to 40 GHz Insertion loss (GSG configuration)1< 0.6 dB Return loss (GSG configuration)1> 18 dB DC current ≤ 1 A DC voltage ≤ 100 V RF power, @10 GHz≤ 5 WTypical Electrical Characteristics40 GHz Probe Model: T40Connector K (2.92 mm)Pitch range50 µm to 500 µmStandard pitch step For GSG configuration:from 50 µm to 450 µm from 500 µm to 800 µmFor GS/SG configuration:from 50 µm to 450 µm 25 µm step 50 µm stepAvailable for 90 µm pitch25 µm stepAvailable for 90/500 µm pitch Tip configurations GSG, GS, SG Connector angleV-Style: 90-degree A-Style: 45-degreeMechanical CharacteristicsTypical Electrical Characteristics: 40 GHz GSG probe, 150 micron pitchT40 probe, A-Style of the connectorCharacteristic Impedance50 ΩFrequency range DC to 50 GHz Insertion loss (GSG configuration)1< 0.6 dB Return loss (GSG configuration)1> 17 dBDC current≤ 1 ADC voltage≤ 100 VRF power, @10 GHz≤ 5 W Typical Electrical Characteristics Connector Q (2.4 mm)Pitch range50 µm to 250 µm Standard pitch stepFor GSG configuration: from 50 µm to 450 µm For GS/SG configuration: from 50 µm to 450 µm 25 µm stepAvailable for 90/500/550 µm pitch 25 µm stepAvailable for 90/500 µm pitchTip configurations GSG, GS, SG Connector angle V-Style: 90-degreeA-Style: 45-degreeMechanical CharacteristicsT50 probe, A-Style of the connectorTypical Electrical Characteristics: 50 GHz GSG probe, 150 micron pitchCharacteristic Impedance50 ΩFrequency range DC to 67 GHz Insertion loss (GSG configuration)1< 0.8 dB Return loss (GSG configuration)1> 16 dBDC current≤ 1 ADC voltage≤ 100 VRF power, @10 GHz≤ 5 W Typical Electrical Characteristics Connector V (1.85 mm)Pitch range50 µm to 250 µm Standard pitch stepFor GSG configuration: from 50 µm to 400 µm For GS/SG configuration: from 50 µm to 250 µm 25 µm step Available for 90 µm pitch25 µm step Available for 90 µm pitchTip configurations GSG Connector angle V-Style: 90-degreeA-Style: 45-degreeMechanical CharacteristicsT67 probe, A-Style of the connectorTypical Electrical Characteristics: 67 GHz GSG probe, 100 micron pitchCharacteristic Impedance 50 ΩFrequency rangeDC to 110 GHz Insertion loss (GSG configuration)1< 1.2 dB Return loss (GSG configuration)1> 14 dB DC current ≤ 1 A DC voltage ≤ 100 V RF power, @10 GHz≤ 5 WTypical Electrical CharacteristicsMechanical CharacteristicsTypical Electrical Characteristics: 110 GHz GSG probe, 100 micron pitchT110 probe, A-Style of the connectorCharacteristic impedance50 ΩFrequency range DC to 220 GHz Insertion loss (GSG configuration)1< 5 dB Connector end return loss(GSG configuration)1> 9 dBTip end return loss(GSG configuration)1> 13 dBDC current≤ 1.5 ADC voltage≤ 50 V Typical Electrical CharacteristicsConnector Broadband interface Pitch range50/75/90/100/125 µm Temperature range -40 ~ 150 ºC Contact width15 µmquadrant compatible(allowing corner pads)Yes recommended pad size20 µm x 20 µm recommended OT (overtravel)15 µmcontact resistance(on Al at 20 ºC using 15 µm OT)< 45 mΩlifetime touchdowns(on Al at 20 ºC using 15 µm OT)> 200,000Mechanical CharacteristicsT220 probe, broadband interface Typical Performance (at 20 ºC for 100 µm pitch)BODY DIMENSIONS PROBES Single-Ended V-StyleT220 GHz Probe1.161.1628.328437.455.6512.5527.73Single-Ended A-StyleCALIBRATION SUBSTRATESAC-series of calibration standard substrates offers up to 26 standard sets for wafer-level SOL T, LRM probe-tip cali -bration for GS/SG and GSG probes. Five coplanar lines provide the broadband reference multiline TRL calibration as well as accurate verification of conventional methods. Right-angled reciprocal elements are added to support the SOLR calibration of the system with the right-angled configuration of RF probes. A calibration substrate for wide-pitch probes is also available.Material Alumina Elements designCoplanarSupported calibration methods SOLT, LRM, SOLR, TRL and multiline TRL Thickness 635 µmSizeAC2-2 : 16.5 x 12.5 mm AC3 : 16.5 x 12.5 mm AC5 : 22.5 x 15 mm Effective velocity factor @20 GHz0.45Nominal line characteristic impedance @20 GHz 50 ΩNominal resistance of the load 50 ΩTypical load trimming accuracy error ± 0.3 %Open standardAu pads on substrate Calibration verification elements Yes Ruler scale 0 to 3 mm Ruler step size100 µmCalibration substrate AC2-2Probe Configuration GSGSupported probe pitch100 to 250 µm Number of SOL T standard groups 26Number of verification and calibration lines5Calibration substrate AC-3Probe Configuration GS/SG Supported probe pitch50 to 250 µm Number of SOL T standard groups 26Number of verification and calibration lines5Calibration substrate AC-5Probe Configuration GSG, GS/SG Supported probe pitch250 to 1250 µm Number of SOL T standard groups GSG : 7GS : 7SG : 7Open standardOn bare ceramic Number of verification and calibration linesGSG : 2GS : 1Typical characteristics of the coplanar line standard of AC2-2 calibration substrate measured using T110-GSG100 probes, and methods recommended by the National Institute of Standard and Technologies [2, 3].2468(d B /c m )F requency (G Hz)α-6-4-202I m a g (Z 0) ()F requency (G Hz)AC2-2 W#006 and T110A-GSG100Ω2.202.222.242.262.282.30 (u n i t l e s s )F requency (G Hz)β/βо4045505560R e a l (Z 0) ()F requency (G Hz)ΩTypical Electrical CharacteristicsMPI QAlibria® RF CALIBRATION SOFTWAREMPI QAlibria® RF calibration software has been designed to simplify complex and tedious RF system calibration tasks. By implementing a progressive disclosure methodology and realizing intuitive touch operation, QAlibria® provides crisp and clear guidance to the RF calibration process, minimizing con-figuration mistakes and helping to obtain accurate calibration results in fastest time. In addition, its concept of multiple GUI’s offers full access to all configuration settings and tweaks for advanced users. QAlibria® offers industry standard and advanced calibration methods. Furthermore, QAlibria® is integrated with the NIST StatistiCal™ calibration packages, ensuring easy access to the NIST mul-tiline TRL metrology-level calibration and uncertainty analysis.MPI Qalibria® supports a multi-language GUI, eliminating any evitable operation risks and inconvenience.SpecificationsRF AND MICROWAVE CABLESMPI offers an excellent selection of flexible cables and acces-sories for RF and mm-wave measurement applications forcomplete RF probe system integration.CablesHigh-quality cable assemblies with SMA and 3.5 mm connectorsprovide the best value for money, completing the entry-level RFsystems for measurement applications up to 26 GHz. Phase stab-le high-end flexible cable assemblies with high-precision 2.92, 2.4, 1.85 and 1 mm connectors guarantee high stability, accuracy and repeatability of the calibration and measurement for DC applications up to 110 GHz.MPI offers these cable assemblies in two standard lengths of 120 and 80 cm, matching the probe system’s footprint and the location of the VNA.Cables Ordering InformationMRC-18SMA-MF-80018 GHz SMA flex cable SMA (male) - SMA (female), 80 cmMRC-18SMA-MF-120018 GHz SMA flex cable SMA (male) - SMA (female), 120 cmMRC-26SMA-MF-80026 GHz SMA flex cable SMA (male) - SMA (female), 80 cmMRC-26SMA-MF-120026 GHz SMA flex cable SMA (male) - SMA (female), 120 cmMRC-40K-MF-80040 GHz flex cable 2.92 mm (K) connector, male-female, 80 cm longMRC-40K-MF-120040 GHz flex cable 2.92 mm (K) connector, male-female, 120 cm longMRC-50Q-MF-80050 GHz flex cable 2.4 mm (Q) connector, male-female , 80 cm longMRC-50Q-MF-120050 GHz flex cable 2.4 mm (Q) connector, male-female , 120 cm longMRC-67V-MF-80067 GHz flex cable 1.85 mm (V) connector, male-female, 80 cm longMRC-67V-MF-120067 GHz flex cable 1.85 mm (V) connector, male-female, 120 cm longMMC-40K-MF-80040 GHz precision flex cable 2.92 mm (K) connector, male-female, 80 cm long MMC-40K-MF-120040 GHz precision flex cable 2.92 mm (K) connector, male-female, 120 cm long MMC-50Q-MF-80050 GHz precision flex cable 2.4 mm (Q) connector, male-female , 80 cm long MMC-50Q-MF-120050 GHz precision flex cable 2.4 mm (Q) connector, male-female , 120 cm long MMC-67V-MF-80067 GHz precision flex cable 1.85 mm (V) connector, male-female, 80 cm long MMC-67V-MF-120067 GHz precision flex cable 1.85 mm (V) connector, male-female, 120 cm long MMC-110A-MF-250110 GHz precision flex cable 1 mm (A) connector, male-female, 25 cm longMPI Global PresenceDirect contact:Asia region: ****************************EMEA region: ******************************America region: ********************************MPI global presence: for your local support, please find the right contact here:/ast/support/local-support-worldwide© 2023 Copyright MPI Corporation. All rights reserved.[1] [2][3] REFERENCESParameter may vary depending upon tip configuration and pitch.R. B. Marks and D. F. Williams, "Characteristic impedance determination using propagation constant measu -rement," IEEE Microwave and Guided Wave Letters, vol. 1, pp. 141-143, June 1991.D. F. Williams and R. B. Marks, "Transmission line capacitance measurement," Microwave and Guided WaveLetters, IEEE, vol. 1, pp. 243-245, 1991.AdaptersHigh-In addition, high-quality RF and high-end mm-wave range adapters are offered to address challenges ofregular system reconfiguration and integration with different type of test instrumentation. MRA-NM-350F RF 11 GHz adapter N(male) - 3.5 (male), straight MRA-NM-350M RF 11 GHz adapter N(male) - 3.5 (female), straightMPA-350M-350F Precision 26 GHz adapter 3.5 mm (male) - 3.5 mm (female), straight MPA-350F-350F Precision 26 GHz adapter 3.5 mm (female) - 3.5 mm (female), straight MPA-350M-350M Precision 26 GHz adapter 3.5 mm (male) - 3.5 mm (male), straight MPA-292M-240F Precision 40 GHz adapter 2.92 mm (male) - 2.4 mm (female), straight MPA-292F-240M Precision 40 GHz adapter 2.92 mm (female) - 2.4 mm (male), straight MPA-292M-292F Precision 40 GHz adapter 2.92 mm (male) - 2.92 mm (female), straight MPA-292F-292F Precision 40 GHz adapter 2.92 mm (female) - 2.92 mm (female), straight MPA-292M-292M Precision 40 GHz adapter 2.92 mm (male) - 2.92 mm (male), straight MPA-240M-240F Precision 50 GHz adapter 2.4 mm (male) - 2.4 mm (female), straight MPA-240F-240F Precision 50 GHz adapter 2.4 mm (female) - 2.4 mm (female), straight MPA-240M-240M Precision 50 GHz adapter 2.4 mm (male) - 2.4 mm (male), straight MPA-185M-185F Precision 67 GHz adapter 1.85 mm (male) -1.85 mm (female), straight MPA-185F-185F Precision 67 GHz adapter 1.85 mm (female) -1.85 mm (female), straight MPA-185M-185M Precision 67 GHz adapter 1.85 mm (male) -1.85 mm (male), straight MPA-185M-100FPrecision 67 GHz adapter 1.85 mm (male) -1.00 mm (female), straightDisclaimer: TITAN Probe, QAlibria are trademarks of MPI Corporation, Taiwan. StatistiCal is a trademark of National Institute of Standards and Technology (NIST), USA. All other trademarks are the property of their respective owners. Data subject to change without notice.。

Installation GuideTable of ContentsChapter 1. Overview (1)Chapter 2. Hardware And Software Requirements (2)2.1. Hardware Requirements (2)2.2. Software Requirements (2)Chapter 3. Installation (4)3.1. Downloading NVSHMEM (4)3.2. Building And Installing NVSHMEM (4)3.3. Using NVSHMEM In Your Applications (5)3.3.1. Launching NVSHMEM Programs (5)3.3.2. Using NVSHMEM With Your C Or C++ Program (6)3.3.3. Using NVSHMEM With Your MPI or OpenSHMEM Program (6)3.4. Running Performance Tests (7)3.5. "Hello World" Example (8)Chapter 4. Support (10)Chapter 1.OverviewNVIDIA® NVSHMEM™ is a programming interface that implements a Partitioned Global Address Space (PGAS) model across a cluster of NVIDIA GPUs. NVSHMEM provides an easy-to-use interface to allocate memory that is symmetrically distributed across the GPUs. In addition to a CPU-side interface, NVSHMEM also provides a CUDA kernel-side interface that allows CUDA® threads to access any location in the symmetrically-distributed memory.Chapter 2.Hardware And SoftwareRequirementsNVIDIA® NVSHMEM™ has the following hardware and software requirements.2.1. Hardware RequirementsNVSHMEM requires the following hardware:‣The x86_64 or ppc64le CPU architectures.‣NVIDIA Data Center GPU of the NVIDIA Volta™ GPU architecture or later.For a complete list, refer to https:///cuda-gpus.‣All GPUs must be P2P-connected via NVLink/PCIe or via GPUDirect RDMA over InfiniBand/ RoCE with a Mellanox adapter (CX-4 or later).Support for atomics requires a NVLink connection or a GPUDirect RDMA connection and GDRCopy. See Software Requirements for more information.2.2. Software RequirementsNVSHMEM requires the following software:‣64-bit Linux.For a complete compatibility matrix, see the NVIDIA CUDA Installation Guide for Linux .‣ A C++ Compiler with C++11 support.‣CUDA 10.2 or later.‣Mellanox OFED.‣nv_peer_mem for GPUDirect RDMA.‣PMI-1 (for example, Hydra), PMI-2 (for example, slurm), or a PMIx compatible launcher.‣GDRCopy v2.0 or newer.This software is required for atomics support on non-NVLink connections.‣(Optional) UCX version 1.10.0 or later.Hardware And Software RequirementsThis software is required to build the UCX transport.Note: UCX must be configured with --enable-mt and --with-dm.‣(Optional): NCCL 2.0 or later.‣(Optional): PMIx 3.1.5 or later.Chapter 3.Installation3.1. Downloading NVSHMEMProcedureDownload and extract the NVSHMEM txz archive from https:///compute/redist/nvshmem/version-number/source..The extracted directory contains the following files and subdirectories:3.2. Building And Installing NVSHMEM Procedure1.Set the CUDA_HOME environment variable to point to the CUDA Toolkit.2.Set the GDRCOPY_HOME environment variable to point to the GDRCopy installation.To build without GDRCopy, set the environmental variable to NVSHMEM_USE_GDRCOPY=0.Note: Without GDRCopy, atomics are only supported across NVLink connections.3.If MPI and/or SHMEM support is required, set NVSHMEM_MPI_SUPPORT=1 and/or NVSHMEM_SHMEM_SUPPORT=1.4.Set the MPI_HOME and SHMEM_HOME environment variables to point to the MPI andOpenSHMEM installations, respectively.5.By default, the location of mpicc that is used during NVSHMEM compilation is set to $MPI_HOME/bin/mpicc.This location can be overridden by specifying MPICC=<path/to/mpicc> in theenvironment.Note: Here is some additional information:‣When using Open MPI and OSHMEM, the paths are the same.‣To use OSHMEM, Open MPI needs to be built with UCX support.‣NVSHMEM has been tested with Open MPI 4.0.1 and UCX 1.10.‣Other MPI and OpenSHMEM installations should work.‣By default, MPI support is enabled, and OpenSHMEM support is disabled.6.Optional: To enable UCX support, set NVSHMEM_UCX_SUPPORT=1 and UCX_HOME to theinstalled UCX directory.7.Optional: To enable NCCL support, set NVSHMEM_USE_NCCL=1 and NCCL_HOME to theinstalled NCCL directory.8.Optional: To enable PMIx support, set NVSHMEM_PMIX_SUPPORT=1 and PMIX_HOME to theinstalled PMIx directory.9.Optional: Configure the default bootstrap:‣The PMI bootstrap method can be selected by using the NVSHMEM_BOOTSTRAP_PMI environment variable.PMI-1, which can be used with the Hydra launcher, is the default PMI standard that is used by NVSHMEM.‣To select PMIx as the default PMI interface, set NVSHMEM_DEFAULT_PMIX=1.‣To select PMI-2 as the default PMI interface, set NVSHMEM_DEFAULT_PMI2=1.10.Set NVSHMEM_PREFIX to specify the location where NVSHMEM will be installed.11.To build and install the library, run make -j install.3.3. Using NVSHMEM In Your Applications 3.3.1. Launching NVSHMEM ProgramsNVSHMEM supports the following methods to launch your application:‣Use of a PMI-1 compatible launcher, such as Hydra.‣Use of a PMI-2 compatible launcher, such as Slurm.‣Use of a PMIx compatible launcher, such as Slurm or Open MPI mpirun.‣Launching as part of an existing MPI application.‣Launching as part of an existing OpenSHMEM application.The PMI-1 and PMI-2 clients are in NVSHMEM and are automatically built as part of thebuild process. A PMIx client must be provided by the user by installing Open PMIx or byusing the PMIx client that is installed by Open MPI or Slurm. When you build Open MPI, include the --enable-install-libpmix configure option. When you build NVSHMEM, set NVSHMEM_PMIX_SUPPORT=1 and PMIX_HOME=/path/to/openmpi.To select the correct PMI library at runtime, set NVSHMEM_BOOTSTRAP_PMI to PMI, PMI-2, or PMIx. To bootstrap NVSHMEM by using MPI or OpenSHMEM, launch the application in the typical way and call the nvshmemx_init_attr function to inform NVSHMEM that NVSHMEM is running as part of an existing MPI or OpenSHMEM job.3.3.2. Using NVSHMEM With Your C Or C++ProgramProcedure1.Include nvshmem.h and nvshmemx.h from include/.2.Point to the include/ and lib/ paths.3.NVSHMEM users: If your C or C++ program only uses NVSHMEM, install Hydra ProcessManager using the install_hydra.sh bash script under the scripts/ directory.a).Provide the download and install location as arguments, for example:./install_hydra.sh <download_path> <install_path>b).To run the NVSHMEM job, use nvshmrun launcher, which is located under bin/ in theHydra install path.3.3.3. Using NVSHMEM With Your MPI orOpenSHMEM ProgramHere is some information about how to use NVSHMEM with your MPI or OpenSHMEM program.Note: The only currently tested MPI library is Open MPI, but any standard compliant MPI libraryshould work.To run a Hybrid MPI + NVSHMEM program, use the mpirun launcher in the MPI installation. Similarly, NVSHMEM can be used from OpenSHMEM programs, but you cannot use the launchers in the NVSHMEM package. The only currently tested OpenSHMEM version is OSHMEM in Open MPI. Other OpenSHMEM implementations, such as Sandia OpenSHMEM (SOS) should also work. To run the hybrid OpenSHMEM/NVSHMEM job, use the oshrun launcher in the OpenMPI installation or follow the launcher specification of your OpenSHMEMlibrary. The nvshmemx_init_attr initialization routine must be used to enable the OpenSHMEM bootstrap.NVSHMEM relies on a plugin system for bootstrapping with MPI. By default, an MPI bootstrap plugin is built for NVSHMEM and is installed in $(NVSHMEM_BUILDDIR)/lib. If this directory is not in your dynamic linker search path, you might need to add it to $LD_LIBRARY_PATH. This MPI plugin is selected automatically at runtime if the nvshmemx_init_attr initialization function is used to request the MPI bootstrap, or if NVSHMEM_BOOTSTRAP=”MPI” is set.The source code of the MPI bootstrap plugin is installed in $(NVSHMEM_BUILDDIR)/share/ nvshmem/src/bootstrap-plugins and can be built separately from the NVSHMEM library (for example, to support additional MPI libraries). Custom bootstrap plugins are also possible and should implement the interface that is defined in $(NVSHMEM_BUILDDIR)/include/ nvshmem_bootstrap.h. Plugins must be built as relocatable shared objects. After the external plugin library is built, it can be specified to NVSHMEM at runtime by specifying NVSHMEM_BOOTSTRAP=”plugin” and NVSHMEM_BOOTSTRAP_PLUGIN=”[name of plugin]”. For example, NVSHMEM_BOOTSTRAP=”MPI” is equal to NVSHMEM_BOOTSTRAP=”plugin” and NVSHMEM_BOOTSTRAP_PLUGIN=”nvshem_bootstrap_mpi.so”.3.4. Running Performance TestsBefore you can run performance tests, you first must build them.Procedure1.If the NVSHMEM library was built with NVSHMEM_MPI_SUPPORT=1, set the CUDA_HOME, NVSHMEM_HOME and MPI_HOME environment variables to build NVSHMEM performance tests:CUDA_HOME=<path to supported CUDA installation>NVSHMEM_HOME=<path to directory where NVSHMEM is installed>MPI_HOME=<path to MPI installation>If you have built NVSHMEM with MPI and OpenSHMEM support (NVSHMEM_MPI_SUPPORT=1 and NVSHMEM_SHMEM_SUPPORT=1) when you build perftest/, MPI and OpenSHMEMsupport must be enabled.Build without SHMEM interoperability: To build NVSHMEM performance tests without SHMEM interoperability, set the environment variable NVSHMEM_SHMEM_SUPPORT to 0. By default, performance tests are installed under perftest/perftest_install. To install toa different path, set NVSHMEM_PERFTEST_INSTALL to point to the correct path.2.Update LD_LIBRARY_PATH to point to $CUDA_HOME/lib64 and $MPI_HOME/lib.3.Assuming Hydra is installed under HYDRA_HOME, run performance tests as NVSHMEM jobs,hybrid MPI+NVSHMEM jobs, or hybrid OpenSHMEM+NVSHMEM jobs with the following commands (using perftest/device/pt-to-pt/put.cu as an example):NVSHMEM job using Hydra (PMI-1):$HYDRA_HOME/bin/nvshmrun -n <up to number of P2P or InfiniBandNIC accessible GPUs>$NVSHMEM_PERFTEST_INSTALL/device/pt-to-pt/shmem_put_bwNVSHMEM job using slurm:srun -n <up to number of P2P or InfiniBand NIC accessible GPUs>$NVSHMEM_PERFTEST_INSTALL/device/pt-to-pt/shmem_put_bwNote: When slurm was built with a PMI that does not match the default of NVSHMEM, forexample, if slurm was built with PMIx support and NVSHMEM_DEFAULT_PMIX=1 was not setwhen building NVSHMEM, NVSHMEM_BOOTSTRAP_PMI can be used to override the default.Possible values are PMIX, PMI-2, and PMI.Hybrid MPI/NVSHMEM job:$MPI_HOME/bin/mpirun -n <up to number of GPUs accessible by P2Por InfiniBand NIC> -x NVSHMEMTEST_USE_MPI_LAUNCHER=1$NVSHMEM_PERFTEST_INSTALL/device/pt-to-pt/shmem_put_bwHybrid OpenSHMEM/NVSHMEM job:$MPI_HOME/bin/oshrun -n <up to number of GPUs accessible by P2Por InfiniBand NIC> -x USE_SHMEM_IN_TEST=1$NVSHMEM_PERFTEST_INSTALL/device/pt-to-pt/shmem_put_bw3.5. "Hello World" ExampleProcedure1.Save the following code as nvshmemHelloWorld.cu:#include <stdio.h>#include <cuda.h>#include <nvshmem.h>#include <nvshmemx.h>__global__ void simple_shift(int *destination) {int mype = nvshmem_my_pe();int npes = nvshmem_n_pes();int peer = (mype + 1) % npes;nvshmem_int_p(destination, mype, peer);}int main(void) {int mype_node, msg;cudaStream_t stream;nvshmem_init();mype_node = nvshmem_team_my_pe(NVSHMEMX_TEAM_NODE);cudaSetDevice(mype_node);cudaStreamCreate(&stream);int *destination = (int *) nvshmem_malloc(sizeof(int));simple_shift<<<1, 1, 0, stream>>>(destination);nvshmemx_barrier_all_on_stream(stream);cudaMemcpyAsync(&msg, destination, sizeof(int), cudaMemcpyDeviceToHost, stream);cudaStreamSynchronize(stream);printf("%d: received message %d\n", nvshmem_my_pe(), msg);nvshmem_free(destination);nvshmem_finalize();return 0;}2.Build nvshmemHelloWorld.cu with the following command:Installationnvcc -rdc=true -ccbin g++ -gencode=$NVCC_GENCODE -I $NVSHMEM_HOME/includenvshmemHelloWorld.cu -o nvshmemHelloWorld.out -L $NVSHMEM_HOME/lib -lnvshmem -lcudaWhere arch=compute_70,code=sm_70 is the value of NVCC_GENCODE for V100 GPUs.3.Run the nvshmemHelloWorld sample with one of the following commands:‣When running on one host with 2 GPUs (connected by PCI-E, NVLink or Infiniband): $HYDRA_HOME/bin/nvshmrun -n 2 -ppn 2 ./nvshmemHelloWorld.out‣When running on two hosts with 1 GPU per host that is connected by InfiniBand:$HYDRA_HOME/bin/nvshmrun -n 2 -ppn 1 –-hosts hostname1,hostname2 ./nvshmemHelloWorld.outChapter 4.SupportReport bugs and submit feature requests by using NVONLINE or by emailing ******************.NoticeThis document is provided for information purposes only and shall not be regarded as a warranty of a certain functionality, condition, or quality of a product. NVIDIA Corporation (“NVIDIA”) makes no representations or warranties, expressed or implied, as to the accuracy or completeness of the information contained in this document and assumes no responsibility for any errors contained herein. NVIDIA shall have no liability for the consequences or use of such information or for any infringement of patents or other rights of third parties that may result from its use. This document is not a commitment to develop, release, or deliver any Material (defined below), code, or functionality.This document is provided for information purposes only and shall not be regarded as a warranty of a certain functionality, condition, or quality of a product. NVIDIA Corporation (“NVIDIA”) makes no representations or warranties, expressed or implied, as to the accuracy or completeness of the information contained in this document and assumes no responsibility for any errors contained herein. NVIDIA shall have no liability for the consequences or use of such information or for any infringement of patents or other rights of third parties that may result from its use. This document is not a commitment to develop, release, or deliver any Material (defined below), code, or functionality.Customer should obtain the latest relevant information before placing orders and should verify that such information is current and complete.NVIDIA products are sold subject to the NVIDIA standard terms and conditions of sale supplied at the time of order acknowledgement, unless otherwise agreed in an individual sales agreement signed by authorized representatives of NVIDIA and customer (“Terms of Sale”). NVIDIA hereby expressly objects to applying any customer general terms and conditions with regards to the purchase of the NVIDIA product referenced in this document. No contractual obligations are formed either directly or indirectly by this document.NVIDIA products are not designed, authorized, or warranted to be suitable for use in medical, military, aircraft, space, or life support equipment, nor in applications where failure or malfunction of the NVIDIA product can reasonably be expected to result in personal injury, death, or property or environmental damage. NVIDIA accepts no liability for inclusion and/or use of NVIDIA products in such equipment or applications and therefore such inclusion and/or use is at customer’s own risk. NVIDIA makes no representation or warranty that products based on this document will be suitable for any specified use. Testing of all parameters of each product is not necessarily performed by NVIDIA. It is customer’s sole responsibility to evaluate and determine the applicability of any information contained in this document, ensure the product is suitable and fit for the application planned by customer, and perform the necessary testing for the application in order to avoid a default of the application or the product. Weaknesses in customer’s product designs may affect the quality and reliability of the NVIDIA product and may result in additional or different conditions and/or requirements beyond those contained in this document. NVIDIA accepts no liability related to any default, damage, costs, or problem which may be based on or attributable to: (i) the use of the NVIDIA product in any manner that is contrary to this document or (ii) customer product designs.VESA DisplayPortDisplayPort and DisplayPort Compliance Logo, DisplayPort Compliance Logo for Dual-mode Sources, and DisplayPort Compliance Logo for Active Cables are trademarks owned by the Video Electronics Standards Association in the United States and other countries.HDMIHDMI, the HDMI logo, and High-Definition Multimedia Interface are trademarks or registered trademarks of HDMI Licensing LLC.OpenCLOpenCL is a trademark of Apple Inc. used under license to the Khronos Group Inc.TrademarksNVIDIA, the NVIDIA logo, and CUDA, CUDA Toolkit, GPU, Kepler, Mellanox, NVLink, NVSHMEM, and Tesla are trademarks and/or registered trademarks of NVIDIA Corporation in the United States and other countries. Other company and product names may be trademarks of the respective companies with which they are associated.Copyright© 2019-2021 NVIDIA Corporation. All rights reserved.。

#renishawUser guideContentsSafety information . . . . . . . . . . . . . . . . . . . . . . . . . . . . . . . . . . . . . . . . . . . . . . . . . . . . . . . . . . . . . . . . . . . . .4 Regulatory information . . . . . . . . . . . . . . . . . . . . . . . . . . . . . . . . . . . . . . . . . . . . . . . . . . . . . . . . . . . . . . . . .5 Disclaimer . . . . . . . . . . . . . . . . . . . . . . . . . . . . . . . . . . . . . . . . . . . . . . . . . . . . . . . . . . . . . . . . . . . . . .5 T rade marks . . . . . . . . . . . . . . . . . . . . . . . . . . . . . . . . . . . . . . . . . . . . . . . . . . . . . . . . . . . . . . . . . . . .5 Warranty . . . . . . . . . . . . . . . . . . . . . . . . . . . . . . . . . . . . . . . . . . . . . . . . . . . . . . . . . . . . . . . . . . . . . . .5 Disposal of waste electrical and electronic equipment . . . . . . . . . . . . . . . . . . . . . . . . . . . . . . . . . . . .5 EU declaration of conformity . . . . . . . . . . . . . . . . . . . . . . . . . . . . . . . . . . . . . . . . . . . . . . . . . . . . . . .5 REACH regulation . . . . . . . . . . . . . . . . . . . . . . . . . . . . . . . . . . . . . . . . . . . . . . . . . . . . . . . . . . . . . . .5 China RoHS . . . . . . . . . . . . . . . . . . . . . . . . . . . . . . . . . . . . . . . . . . . . . . . . . . . . . . . . . . . . . . . . . . . .5 The United States of America (USA) . . . . . . . . . . . . . . . . . . . . . . . . . . . . . . . . . . . . . . . . . . . . . . . . . 6 Introduction . . . . . . . . . . . . . . . . . . . . . . . . . . . . . . . . . . . . . . . . . . . . . . . . . . . . . . . . . . . . . . . . . . . . . . . . . .7 EQ-IO Interface Unit . . . . . . . . . . . . . . . . . . . . . . . . . . . . . . . . . . . . . . . . . . . . . . . . . . . . . . . . . . . . . . . . . . .8 Specifications . . . . . . . . . . . . . . . . . . . . . . . . . . . . . . . . . . . . . . . . . . . . . . . . . . . . . . . . . . . . . . . . . . . . . . . .9 Operating parameters . . . . . . . . . . . . . . . . . . . . . . . . . . . . . . . . . . . . . . . . . . . . . . . . . . . . . . . . . . . .9 Input stage . . . . . . . . . . . . . . . . . . . . . . . . . . . . . . . . . . . . . . . . . . . . . . . . . . . . . . . . . . . . . . . . . . . .10 Output stage . . . . . . . . . . . . . . . . . . . . . . . . . . . . . . . . . . . . . . . . . . . . . . . . . . . . . . . . . . . . . . . . . . .11 Connections configuration . . . . . . . . . . . . . . . . . . . . . . . . . . . . . . . . . . . . . . . . . . . . . . . . . . . . . . . . . . . . .12 Equivalent circuit . . . . . . . . . . . . . . . . . . . . . . . . . . . . . . . . . . . . . . . . . . . . . . . . . . . . . . . . . . . . . . . . . . . .13 Using two EQ-IO interface units . . . . . . . . . . . . . . . . . . . . . . . . . . . . . . . . . . . . . . . . . . . . . . . . . . . . . . . . .14Safety information• Essential safety measures required whilst using Equator in an automated work cell are outlined in this section .It is the responsibility of the customer to ensure that all relevant safety precautions are in place before taking this equipment into service .• It is the responsibility of the customer to arrange for training of the operator of a robot system to recognise and respond to known hazards associated with the automated system and to be aware of the recommended operating procedures for the particular application .• Persons responsible for installing the system (including the Equator, its EQ-IO interface unit and any external devices wired into it) must be competent and familiar with the recommended programming procedures for the application and the robot installation .Programming and control of externalequipment is entirely the responsibility of the customer .Good engineering practices and local,appropriate regulations/standards should be adhered to .WARNING: The EQ-IO interface unit (A-5923-0100, A-5923-0110) must never be used for Stop circuitry . Warning: The Equator must always be the cell slave, accepting commands from the master .Renishaw will not accept responsibility for incorrect use of the Equator and EQ-IO interface unit .• The EQ-IO interface unit must be unpowered during installation/cabling .• Reasonable protection must be given against ESD (ElectroStatic Discharge) .• Ensure mating connectors are plugged into their respective sockets, to prevent damage to connected equipment .• Before running the system in automatic mode, the 'Send Outputs/Receive Inputs' function in EZ-IO should be used to test individual I/O lines, preventing any wiring mistakes to cause unwanted motion .• Electrical connections and mappings of input and output signals must be designed to ensure that no motion occurs in the event of cable damage .• During installation and at regular intervals, visual checks of the Equator, EQ-IO interface unit, cell master and cables must be completed prior to operation .WARNING: Outputs should be wired so that there is no external/system motion in the open state .Inputs should be wired so that there is no Equator motion in the undriven state .Regulatory informationDisclaimerRENISHAW HAS MADE CONSIDERABLEEFFORTS TO ENSURE THE CONTENT OF THIS DOCUMENT IS CORRECT A T THE DATE OF PUBLICATION BUT MAKES NO WARRANTIES OR REPRESENT A TIONS REGARDING THE CONTENT . RENISHAW EXCLUDESLIABILITY , HOWSOEVER ARISING, FOR ANY INACCURACIES IN THIS DOCUMENT .Trade marksRENISHAW and the probe symbol used in the RENISHAW logo are registered trade marks of Renishaw plc in the United Kingdom and other countries . apply innovation and names and designations of other Renishaw products andtechnologies are trade marks of Renishaw plc or its subsidiaries .All other brand names and product names used in this document are trade names, trade marks, or registered trade marks of their respective owners .WarrantyEquipment requiring attention under warranty must be returned to your equipment supplier .Unless otherwise specifically agreed in writing between you and Renishaw, if you purchased the equipment from a Renishaw company the warranty provisions contained in Renishaw’s CONDITIONS OF SALE apply . Y ou should consult theseconditions in order to find out the details of your warranty but in summary the main exclusions from the warranty are if the equipment has been:•neglected, mishandled or inappropriately used; or•modified or altered in any way except with the prior written agreement of Renishaw .If you purchased the equipment from any other supplier, you should contact them to find out whatrepairs are covered by their warranty .Disposal of waste electrical and electronic equipmentThe use of this symbol on Renishaw products and/or accompanying documentation indicates that the product should not be mixed withgeneral household waste upon disposal . It is the responsibility of the end user to dispose of this product at a designated collection point for waste electrical and electronic equipment (WEEE) to enable reuse or recycling . Correct disposal of this product will help to save valuable resources and prevent potential negative effects on theenvironment . For more information, please contact your local waste disposal service or Renishaw distributor .EU declaration of conformityRenishaw plc hereby declares that the, EQ-IO Equator Interface Unit is in compliance with the essential requirements and other relevant provisions of the applicable EU directives . Contact Renishaw plc or visit www .renishaw .com/equatorproductguides for the full EU declaration of conformity .REACH regulationInformation required by Article 33(1) of Regulation (EC) No . 1907/2006 (“REACH”) relating to products containing substances of very high concern(SVHCs) is available at: www .renishaw .com/REACHChina RoHSFor more information on China RoHS, visit: www .renishaw .com/ChinaRoHSGAUGINGThe United States of America (USA)Information to user (FCC Section 15.105)This equipment has been tested and found to comply with the limits for a class A digital device, pursuant to part 15 of the FCC rules .These limits are designed to provide reasonable protection against harmful interference when the equipment is operated in a commercial environment .This equipment generates, uses and can radiate radio frequency energy and, if not installed and used in accordance with the installation manual, may cause harmful interference to radio communications . Operation of this equipment in a residential area is likely to cause harmful interference, in which case you will be required to correct the interference at your expense .Information to user (FCC Section 15.21)The user is cautioned that any changes or modifications not expressly approved by Renishaw plc or authorised representative could void the user’s authority to operate the equipment .IntroductionThe Equator™ automation kit consists of EQ-IO interface units and the EZ-IO software which runs on the Equator Controller .The kit is designed to provide an interface between the Equator and external equipment e .g .PLC's (Programmable Logic Controllers), machine tools, robots, loading systems, etc .The flexibility of a digital I/O connection allows the Equator to be commissioned on a variety of different types of automated work-cells .Common applications include part loading and unloading performed by a robot .In these applications, a pneumatic or electrically driven fixture is often used to ensure that the partbeing loaded is placed in the correct position and orientation in order to achieve highly repeatable measurements .Once the part has been measured, the EZ-IO software signals whether the part is inside or outside the specified tolerances. Based on this information, the robot can take different actions.If required, a PLC may be programmed to handle manual selection of operations .In this case, a button console would be used to send signals to the Equator to start the measurement cycle .As an alternative, a button console could be connected to the Equator to control component loading/unloading .EZ-IO's built in custom signal facility allows for customisation of digital I/O to allow inputs and outputs to be directly controlled from the DMIS program .This could be for switching outputs such as status lights, audible alarms etc .or inputs such as start buttons or to other devices such as PLCs or Machine Tool Controllers .Input and output signals interpreted by MODUS only, are not subject to the same signal checks that are within EZ-IO .EQ-IO Interface Unit• The hardware consists of the EQ-IO interface unit (A-5923-0110, A-5923-0100) .• A-5923-0110 is EZ-IO licensed and A-5923-0100 is unlicensed .The secondary, unlicensed unit is used to extend the number of lines available, see detailed information in the 'Using two EQ-IOinterface units' section .V .4• A 3 m USB type A to USB type B cable is supplied to connect the EQ-IO interface unit to the Equator Controller. Maximum length of the USB cable, as defined by the USB 2.0 specification, is 5 m. NOTE: It is strongly advised that USB signal repeaters are avoided, as they can suffer from interference .CAUTION: The EQ-IO – Interface unit requires one of the following versions of the Equator Software Suite: Equator Software Suite version 1 .5 .6 with 1 .5 .6 .3 patch appliedEquator Software Suite version 1 .5 .7 or laterNOTE: For Equator Software Suite versions pre 1 .5 .6, please contact your local Renishaw representative A-5923-0110 (EZ-IO licensed)A-5923-0100 (Unlicensed)V .4V .4Specifications Operating parametersInput stage• The EQ-IO input stage accepts 8-24 V logic signals, typically from a PLC or other control logic .• If a 24 V output stage is used by the host, the 0 V (ground) signals should be wired directly to the host interface as shown .• If a relay, switch, or other volt-free contact is used by the host, it will be necessary to wire the input as shown .Output stage• The EQ-IO output stage has volt-free, relay style, normally open contacts with internal pull-up resistors connected to the OUTPULL pin .*Measured to OUTCOM .• If a +3 .3 V to +24 V logic input stage is used by the connected PLC/machine, the 0 V (ground) and signals should be wired directly to the receiving interface as shown .• The output stage may also be used to switch loads such as relays or LED indicators as shown .Connections configurationEquivalent circuit• The drawings below show the internal circuits of the input and output stages .NOTE: The output stage is fitted with 100 mA self-resettable fuse. In the event of a fault, remove power, correct problem and then reconnect .The fuse requires a couple of minutes to cool down before it resets .Using two EQ-IO interface units•A secondary, unlicensed, EQ-IO interface unit (A-5923-0100), may be used to facilitate additional lines for DMIS Part Program selection . Each EQ-IO interface unit must be connected to an individual USB port .USB ports available on the Equator Controller are shown below .The Equator Software Suite version can be found in the settings screen . To open the settings screen, click on the settings button in the toolbar .Equator ControllerVersion 06Equator Controller Versions 07 & 08USB ports for keyboard andmouseUSB ports forEQ-IOTHE EQ-IO – INTERFACE UNIT (VERSION 4 OR LATER) REQUIRES ONE OF THE FOLLOWING VERSIONS OF THE EQUATOR SOFTWARE SUITE:Equator Software Suite version 1 .5 .6 with 1 .5 .6 .3 patch applied Equator Software Suite version 1 .5 .7 or laterFor Equator Software Suite versions pre 1 .5 .6, please contact your local Renishaw representative .© 2021 Renishaw plc . All rights reserved . RENISHAW® and the probe symbol are registered trade marks of Renishaw plc . Renishaw product names, designations and the mark ‘apply innovation’ are trade marks of Renishaw plc or its subsidiaries . Other brand, product or company names are trade marks of their respective owners .Renishaw plc . Registered in England and Wales . Company no: 1106260 . Registered office: New Mills, Wotton-under-Edge, Glos, GL12 8JR, UK . WHILE CONSIDERABLE EFFORT WAS MADE TO VERIFY THE ACCURACY OF THIS DOCUMENT A T PUBLICA TION, ALL WARRANTIES, CONDITIONS, REPRESENT ATIONS AND LIABILITY , HOWSOEVER ARISING, ARE EXCLUDED TO THE EXTENT PERMITTED BY LAW .+44 (0) 1453 524524***************Issued: 11 .2019Part no .: H-5923-8540-02-AORIGINAL LANGUAGE。

emp3r0r用法简介emp3r0r是一款开源的红队工具,用于进行网络渗透测试和攻击模拟。
它提供了一套功能强大的特性,包括远程命令执行、横向移动、权限提升等,可帮助安全专业人员评估网络的安全性。
安装emp3r0r的安装非常简单,只需按照以下步骤进行操作:1.克隆emp3r0r的GitHub仓库:git clone2.进入emp3r0r目录:cd emp3r0r3.安装所需的依赖项:pip3 install -r requirements.txt4.启动emp3r0r:./emp3r0r.py功能特性emp3r0r提供了多种功能特性,以下是其中一些主要功能的介绍:1. 远程命令执行emp3r0r允许用户在目标主机上执行任意命令,从而获取目标主机的信息或执行特定任务。
用户可以通过emp3r0r的命令行界面或使用自定义的脚本来执行命令。
以下是一个示例,展示了如何在目标主机上执行命令:> shell lsDesktop Documents Downloads Music Pictures Public Templates Videos2. 横向移动emp3r0r支持横向移动,即从一个受感染的主机向其他主机传播。
这使得攻击者可以在网络中迅速扩大攻击面,获取更多的目标主机。
以下是一个示例,展示了如何在目标网络中进行横向移动:> lateral_movement[*] Starting lateral movement...[*] Found potential targets: 192.168.1.10, 192.168.1.20[*] Selecting target: 192.168.1.10[*] Exploiting target...[*] Lateral movement successful!3. 权限提升emp3r0r提供了多种权限提升的技术,用于获取更高的权限以执行受限任务。
这些技术包括提升当前用户的权限、利用漏洞进行提权等。

OrthoAnalysis 軟體使用手冊Version 3.1Copyright © by 2020 Inteware. All rights reserved.目錄1.關於 ORTHOANALYSIS (1)1.1 系統要求1.2 使用者帳戶控制設定1.3 NVidia顯卡設定1.4DPI設定2. 使用者介面 (5)2.1 工具列說明2.2 滑鼠操作方式2.3 設定2.4 附件資料庫3. 專案管理 (9)3.1 新增病患3.2 開啟訂單3.3 匯入/匯出4. 模型編輯 (14)4.1 定位階段4.1.1定義咬合面 (15)4.1.2 照片與牙齒模型定位 (17)4.1.3 頭顱與牙齒模型定位 (22)4.2編輯階段4.2.1 裁切模型 (25)4.2.2 變形與網格編輯功能 (28)4.3 定義階段4.4 調整階段4.5 後修階段5. 排牙 (39)5.1 建立排牙計畫5.2 療程規劃5.2.1 目標設定 (42)5.2.2階段規劃 (46)5.2.3細部步驟 (48)5.2.4 磨牙(IPR) (51)5.2.5 附件 (52)5.2.6 拔牙 (53)5.3 輔助工具5.4 模型量測5.5 規劃輸出5.6 建立薄殼牙套1.關於OrthoAnalysis簡介OrthoAnalysis是一套專門為齒顎矯正專業人員量身設計的數位矯正治療規劃軟體。
透過OrthoAnalysis醫師可在矯正治療前進行牙齒移動策略規劃,藉由3D立體模型的呈現,本軟體提供設定咬合點、裁切牙肉、定義齒軸、調整邊界、調整牙根、模擬拔牙、磨牙與牙齒移動狀態等便利性,讓醫生在使用這套軟體的時候,可以事先預知治療結果與規劃治療程式,提高齒顎矯正治療的正確性與精准度。
目標用途OrthoAnalysis軟體旨在提供矯正模型設計和輸出、檢查、分析和模擬治療。
OrthoAnalysis軟體的使用要求為使用者須接受矯正學方面的必要培訓和具備相關領域知識,並且需要接受軟體使用的專門訓練。

注意本教程是在XP系统条件下测试,不适用于其他系统!高手精简版:SYSWELD10 安装教程:1.安装SFU35SEL_EN(它是在windows下模拟Unix环境的软件)!2.安装EXCEED,我在网上找到的是EXCEED .10.0,安装的时候要注意:先把时间改为2005年,然后安装。
先安装hs-h1032这个文件中的,再安装hs-h3d32文件中的。
把时间调回.3.接下来装sysweld了:(1).将pam_lmd.lic中SERVER HOST 27000的HOST用自己电脑名称替代,保存;(2).新建系统变量:PAM_LMD_LICENSE_FILE=27000@你的电脑名;(3).双击setup.exe安装sysweld;(4).将lic文件拷到C盘根目录下的flexlm文件夹下(5).配置lmtools详细版SYSWELD10 安装教程准备工作:选择你你想要安装软件的位置,创建3个文件夹,注意不要出现中文,破解软件禁忌!1.安装SFU35SEL_EN(它是在windows下模拟Unix环境的软件)!点击下面的图标将SFU35SEL_EN安装到文件夹1.2.安装EXCEED。
安装的时候要注意:先把时间改为2005年,然后安装。
先安装hs-h1032这个文件中的,再安装hs-h3d32文件中的,安装位置为文件夹2。
【破解成功后把时间调回. 】3.接下来装sysweld了:(1).将pam_lmd.lic【sysweld2010_CRACK_Win_SSQ文件夹中】中SERVER HOST 27000的HOST用自己电脑名称替代,保存;【本人电脑中安装了CA TIA软件,所以pam_lmd.lic显示成那种图标】电脑名在我的电脑\右键\计算机名页面下的完整的计算机名称替代后结果为(2).新建系统变量:PAM_LMD_LICENSE_FILE=27000@你的电脑名;我的电脑\右键\高级\环境变量变量名: PAM_LMD_LICENSE_FILE变量值为; D:\Program Files\AAAAAA\3\flexlm\pam_lmd.lic 【D:\Program Files\AAAAAA\3为你要安装sysweld的位置】(3).双击setup.exe安装sysweld;将sysweld安装到D:\Program Files\AAAAAA\3(4).将lic文件拷到D:\Program Files\AAAAAA\3\Flexlm文件夹下;将sysweld2010_CRACK_Win_SSQ\CRACK_Win_SSQ\CRACK_Win_SSQ\Win32中3个文件复制到D:\Program Files\AAAAAA\3\win32中。


miniupnpd初略理解和实际使⽤NAT-PMP:NAT端⼝映射协议(英语:NAT Port Mapping Protocol,缩写NAT-PMP)苹果开发的协议Port Control Protocol (PCP) port control protocol, the successor of NAT-PMP(PCP是NAT-PMP继承者)FreeBSD 有三種內建於基礎系統的防⽕牆:PF, IPFW 與IPFILTER 即IPFminiupnpd的论坛可以找到使⽤⽅法涉及在debian9以及centos7下开启upnp server服务1)apt-cache search upnp找到miniupnpd2)apt-get install miniupnpd后出现配置窗⼝(⽂字性的配置窗⼝),在配置的过程中丢失了ssh登陆窗⼝(⽹络不好的原因)3)apt-get remove miniupnpdReading package lists... DoneBuilding dependency treeReading state information... DonePackage 'miniupnpd' is not installed, so not removedE: Could not get lock /var/cache/apt/archives/lock - open (11: Resource temporarily unavailable)E: Unable to lock directory /var/cache/apt/archives/其中 /var/cache/apt/archives/是下载deb包的⽬录⼿动删除rm -rf /var/cache/apt/archives/lock接着重新安装apt-get install miniupnpd4)apt install⼜出现错误Adding group uuidd' (GID 115) ... Done. Warning: The home dir /run/uuidd you specified can't be accessed: No such file or directory Adding system user uuidd' (UID 109) ... Adding new user uuidd' (UID 109) with group uuidd' ...Not creating home directory `/run/uuidd'.Created symlink /etc/systemd/system/sockets.target.wants/uuidd.socket → /lib/systemd/system/uuidd.socket.Processing triggers for systemd (232-25+deb9u11) ...Processing triggers for man-db (2.7.6.1-2) ...Setting up net-tools (1.60+git20161116.90da8a0-1) ...Setting up miniupnpd (1.8.20140523-4.1+deb9u2) ...debconf: DbDriver "config": /var/cache/debconf/config.dat is locked by another process: Resource temporarily unavailabledpkg: error processing package miniupnpd (--configure):subprocess installed post-installation script returned error exit status 1Processing triggers for systemd (232-25+deb9u11) ...Errors were encountered while processing:miniupnpdE: Sub-process /usr/bin/dpkg returned an error code (1)以上处理apt-get remove miniupnpd 接着apt-get install miniupnpd5)配置使⽤:man miniupnpd如下:NAMEminiupnpd - UPnP Internet Gateway Device DaemonSYNOPSISminiupnpd [-f file] [-i interface] [-o address] [-a address] [-p port] [-d] [-L] [-U] [-u uuid][-s serial] [-m model_number] [-q queue] [-t interval] [-P file] [-B down up] [-w url]DESCRIPTIONminiupnpd act as a UPnP Internet Gateway Device. It is designed to run on the gateway between theinternet and a NAT'ed LAN. It provides an interface, as defined in the UPnP standard, for enablingclients on the LAN to ask for port redirections.OPTIONS-f fileload the config from file. default is /etc/miniupnpd.conf.-i interfaceinterface used to connect to the internet.-o addressaddress used to connect to the internet. default address of the interface will be used ifnot specified.-a addressaddress on the LAN. -a option can by used multiple time if LAN is subdivised in severalsubnetworks.-p portport used for HTTP.-d debug mode : do not go to background, output messages on console and do not filter out lowpriority messages.-L set packet log in pf on-q queueset ALTQ queue in pf. filter rules must be enabled for this option to have any effect.-U report system uptime instead of daemon uptime to clients.-u uuidset the uuid of the UPnP Internet Gateway Device.-s serialserial number for the UPnP Internet Gateway Device.-m numbermodel number for the UPnP Internet Gateway Device.-t intervalSSDP notify interval in seconds : SSDP announce messages will be broadcasted at this inter‐ val.-P filepid file. default is /var/run/miniupnpd.pid-B down updownload and upload bitrates reported to clients.-w url presentation url. default is first address on LAN, port 80.miniupnpd配置⽂件在 /etc/default/miniupnpd 和 /etc/miniupnpd/miniupnpd.conf其中/etc/miniupnpd/iptables_init.sh -----------------------------------------------------------------#! /bin/sh# $Id: iptables_init.sh,v 1.8 2014/04/15 13:45:08 nanard Exp $IPTABLES="`which iptables`" || exit 1IP="`which ip`" || exit 1#change this parameters :#EXTIF=eth0EXTIF="`LC_ALL=C $IP -4 route | grep 'default' | sed -e 's/.*dev[[:space:]]*//' -e 's/[[:space:]].*//'`" || exit 1 EXTIP="`LC_ALL=C $IP -4 addr show $EXTIF | awk '/inet/ { print $2 }' | cut -d "/" -f 1`"echo "External IP = $EXTIP"#adding the MINIUPNPD chain for nat$IPTABLES -t nat -N MINIUPNPD#adding the rule to MINIUPNPD#$IPTABLES -t nat -A PREROUTING -d $EXTIP -i $EXTIF -j MINIUPNPD$IPTABLES -t nat -A PREROUTING -i $EXTIF -j MINIUPNPD#adding the MINIUPNPD chain for mangle$IPTABLES -t mangle -N MINIUPNPD$IPTABLES -t mangle -A PREROUTING -i $EXTIF -j MINIUPNPD#adding the MINIUPNPD chain for filter$IPTABLES -t filter -N MINIUPNPD#adding the rule to MINIUPNPD$IPTABLES -t filter -A FORWARD -i $EXTIF ! -o $EXTIF -j MINIUPNPD#adding the MINIUPNPD chain for nat$IPTABLES -t nat -N MINIUPNPD-PCP-PEER$IPTABLES -t nat -A POSTROUTING -o $EXTIF -j MINIUPNPD-PCP-PEER其中/etc/miniupnpd/miniupnpd.conf-------------------------------------------------------------------------# WAN network interfaceext_ifname=eth1#ext_ifname=xl1# if the WAN interface has several IP addresses, you# can specify the one to use below#ext_ip=# LAN network interfaces IPs / networks# there can be multiple listening ips for SSDP traffic.# should be under the form nnn.nnn.nnn.nnn/nn# It can also be the network interface name (ie "eth0")# It if mandatory to use the network interface name to enable IPv6# HTTP is available on all interfaces.# When MULTIPLE_EXTERNAL_IP is enabled, the external ip# address associated with the subnet follows. for example :# listening_ip=192.168.0.1/24 88.22.44.13#listening_ip=192.168.0.1/24listening_ip=192.168.10.109/24#listening_ip=eth0# port for HTTP (descriptions and SOAP) traffic. set 0 for autoselect.http_port=0# port for HTTPS. set to 0 for autoselect (default)#https_port=0# path to the unix socket used to communicate with MiniSSDPd# If running, MiniSSDPd will manage M-SEARCH answering.# default is /var/run/minissdpd.sock#minissdpdsocket=/var/run/minissdpd.sock# enable NAT-PMP support (default is no)enable_natpmp=yes# enable UPNP support (default is yes)enable_upnp=yes# configure minimal and maximal lifetime of the port mapping in seconds# 120s and 86400s (24h) are suggested values from PCP-basemin_lifetime=120max_lifetime=86400# chain names for netfilter (not used for pf or ipf).# default is MINIUPNPD for both#upnp_forward_chain=forwardUPnP#upnp_nat_chain=UPnP# lease file location#lease_file=/var/log/upnp.leases# to enable the next few runtime options, see compile time# ENABLE_MANUFACTURER_INFO_CONFIGURATION (config.h)# name of this service, default is "`uname -s` router"#friendly_name=MiniUPnPd router# manufacturer name, default is "`uname -s`"#manufacturer_name=Manufacturer corp# manufacturer url, default is URL of OS verndor#manufacturer_url=http://miniupnp.free.fr/# model name, default is "`uname -s` router"#model_name=Router Model# model description, default is "`uname -s` router"#model_description=Very Secure Router - Model# model url, default is URL of OS vendor#model_url=http://miniupnp.free.fr/# bitrates reported by daemon in bits per secondbitrate_up=1000000bitrate_down=10000000# "secure" mode : when enabled, UPnP client are allowed to add mappings only # to their IP.#secure_mode=yessecure_mode=no# default presentation url is http address on port 80# If set to an empty string, no presentationURL element will appear# in the XML description of the device, which prevents MS Windows# from displaying an icon in the "Network Connections" panel.#presentation_url=http://www.mylan/index.php# report system uptime instead of daemon uptimesystem_uptime=yes# notify interval in seconds. default is 30 seconds.#notify_interval=240notify_interval=60# unused rules cleaning.# never remove any rule before this threshold for the number# of redirections is exceeded. default to 20#clean_ruleset_threshold=10# clean process work interval in seconds. default to 0 (disabled).# a 600 seconds (10 minutes) interval makes senseclean_ruleset_interval=600# log packets in pf (default is no)#packet_log=no# anchor name in pf (default is miniupnpd)#anchor=miniupnpd# ALTQ queue in pf# filter rules must be used for this to be used.# compile with PF_ENABLE_FILTER_RULES (see config.h file)#queue=queue_name1# tag name in pf#tag=tag_name1# make filter rules in pf quick or not. default is yes# active when compiled with PF_ENABLE_FILTER_RULES (see config.h file) #quickrules=no# uuid : generate your own with "make genuuid"uuid=33d9b85d-f8ad-4164-9111-283b7c74acb4# serial and model number the daemon will report to clients# in its XML descriptionserial=12345678model_number=1# UPnP permission rules# (allow|deny) (external port range) ip/mask (internal port range)# A port range is <min port>-<max port> or <port> if there is only# one port in the range.# ip/mask format must be nn.nn.nn.nn/nn# it is advised to only allow redirection of port above 1024# and to finish the rule set with "deny 0-65535 0.0.0.0/0 0-65535"allow 1024-65535 192.168.0.0/24 1024-65535allow 1024-65535 192.168.1.0/24 1024-65535allow 1024-65535 192.168.0.0/23 22allow 12345 192.168.7.113/32 54321deny 0-65535 0.0.0.0/0 0-65535root@ca:/etc/miniupnpd# cat /etc/default/miniupnpd -------------------------------------------------------------# Set to 1 to start the daemon. Desactivated by default, because# you don't want the outside to control your UPnP router, and# as a consequence MiniUPnPd_LISTENING_IP should be set to a# reasonable value before enabling the daemon.START_DAEMON=0# Define here the external interface connected to the WAN (eg: the public# IP address NIC)MiniUPnPd_EXTERNAL_INTERFACE=vmbr3# IP that the daemon should listen on.# Note that you do *not* want this to be 0.0.0.0, as you don't want# your MiniUPnPd to be controled by anyone on the internet.MiniUPnPd_LISTENING_IP=100.73.73.1# This defines other options which you might want to use when# starting MiniUPnPd. Note that the -S option is important:# -S sets "secure" mode : clients can only add mappings to their own ip# (see man page)MiniUPnPd_OTHER_OPTIONS="-N -f /etc/miniupnpd/miniupnpd.conf"# If this option is defined, then the init script will initialize# the ipv6 tables.MiniUPnPd_ip6tables_enable=no疑问:1)MiniUPnPd_LISTENING_IP=100.73.73.1(在/etc/default/miniupnpd中)和listening_ip (在/etc/miniupnpd/miniupnpd.conf中)可否设置多个??MiniUPnPd_LISTENING_IP实质就是shell变量,可以在/etc/default/miniupnpd中每单⾏设置1个,也就是说设置多个,但只有最后⼀⾏设置才会⽣效listening_ip可以设置多个如下:listening_ip=bridge0 em0 wlan0 也可以单独写多⾏listening_ip摘录如下:LAN network interfaces IPs / networks# There can be multiple listening IPs for SSDP traffic, in that case# use multiple 'listening_ip=...' lines, one for each network interface.# It can be IP address or network interface name (ie. "eth0")# It is mandatory to use the network interface name in order to enable IPv6# HTTP is available on all interfaces.# When MULTIPLE_EXTERNAL_IP is enabled, the external IP# address associated with the subnet follows. For example:# listening_ip=192.168.0.1/24 88.22.44.13# When MULTIPLE_EXTERNAL_IP is disabled, you can list associated network# interfaces (for bridges)# listening_ip=bridge0 em0 wlan0#listening_ip=192.168.0.1/24#listening_ip=10.5.0.0/16#listening_ip=eth0# CAUTION: mixing up WAN and LAN interfaces may introduce security risks!# Be sure to assign the correct interfaces to LAN and WAN and consider# implementing UPnP permission rules at the bottom of this configuration file2)/etc/default/miniupnpd和/etc/miniupnpd/miniupnpd.conf之间的关系root@ca:~# systemctl status miniupnpd● miniupnpd.service - LSB: daemon providing UPnP Internet Gateway Device (IGD) servicesLoaded: loaded (/etc/init.d/miniupnpd; generated; vendor preset: enabled)Active: active (exited) since Tue 2020-10-27 19:40:47 CST; 5h 22min agoDocs: man:systemd-sysv-generator(8)Process: 23818 ExecStart=/etc/init.d/miniupnpd start (code=exited, status=0/SUCCESS)Tasks: 0 (limit: 6144)Memory: 0BCPU: 0CGroup: /system.slice/miniupnpd.serviceOct 27 19:40:47 ca systemd[1]: Starting LSB: daemon providing UPnP Internet Gateway Device (IGD) services...Oct 27 19:40:47 ca miniupnpd[23818]: MiniUPnPd: /etc/default/miniupnpd isn't set to START_DAEMON=1: exiting:Oct 27 19:40:47 ca systemd[1]: Started LSB: daemon providing UPnP Internet Gateway Device (IGD) services.解析上⾯的状态为什么是active (exited)MiniUPnPd: /etc/default/miniupnpd isn't set to START_DAEMON=1 所以退出root@ca:~# less /usr/share/doc/miniupnpd/examples/miniupnpd.default 对应/etc/default/miniupnpd 模板⽂件root@ca:~# less /usr/share/doc/miniupnpd/examples/miniupnpd.conf 对应/etc/miniupnpd/miniupnpd.conf模板⽂件,可以看到如下:# WAN network interface. If not supplied here, then# we're going to use /etc/default/miniupnpd#ext_ifname=eth0上⾯说的很清楚,外⽹卡设置优先使⽤/etc/miniupnpd/miniupnpd.conf中配置,否者使⽤/etc/default/miniupnpd中配置3)⼿动运⾏miniupnpd,如下:⼿动运⾏后是否不会⾃动⽣成iptables规则?????不会⾃动⽣成除⾮⾃⼰写iptables规则root@ca:~# miniupnpd -i vmbr3 -a 100.73.73.1/24 -dError: please specify LAN network interface by name instead of IPv4 address : 100.73.73.1/24can't parse "100.73.73.1/24" as a valid interface nameUsage:miniupnpd [-f config_file] [-i ext_ifname] [-o ext_ip][-a listening_ip] [-p port] [-d] [-U] [-S] [-N][-u uuid] [-s serial] [-m model_number][-t notify_interval] [-P pid_filename] [-B down up] [-w url] [-r clean_ruleset_interval][-A "permission rule"]Notes:There can be one or several listening_ips.Notify interval is in seconds. Default is 30 seconds.Default pid file is '/var/run/miniupnpd.pid'.Default config file is '/etc/miniupnpd.conf'.With -d miniupnpd will run as a standard program.-S sets "secure" mode : clients can only add mappings to their own ip-U causes miniupnpd to report system uptime instead of daemon uptime.-N enable NAT-PMP functionality.-B sets bitrates reported by daemon in bits per second.-w sets the presentation url. Default is http address on port 80-A use following syntax for permission rules :(allow|deny) (external port range) ip/mask (internal port range)examples :"allow 1024-65535 192.168.1.0/24 1024-65535""deny 0-65535 0.0.0.0/0 0-65535"-h prints this help and quits.经过查询miniupnpd的版本如下:root@ca:~# apt list --installed | grep miniminiupnpd/oldstable,now 1.8.20140523-4.1+deb9u2 amd64 [installed]在⽹上搜索发现1.8版本存在这个问题,但是已经在2.0版本上进⾏了修复,参考:再次⼿动运⾏miniupnpd -i vmbr3 -a vmbr2 -a vmbr4 -S -w 8100 -A "allow 61000-62000 100.73.73.0/24 1024-65535" -A "allow 63000-64000 100.72.139.0/24 1024-65535" -A "deny 0-65535 0.0.0.0/0 0-65535" -d 提⽰如下:miniupnpd[20305]: Starting UPnP-IGD with external interface vmbr3miniupnpd[20305]: HTTP listening on port 44989miniupnpd[20305]: no HTTP IPv6 address, disabling IPv6miniupnpd[20305]: get_lan_for_peer(): 166.111.188.90:62262 not found !miniupnpd[20305]: SSDP packet sender 166.111.188.90:62262 not from a LAN, ignoringminiupnpd[20305]: get_lan_for_peer(): 166.111.188.148:53699 not found !miniupnpd[20305]: SSDP packet sender 166.111.188.148:53699 not from a LAN, ignoring再次miniupnpd -i vmbr3 -a vmbr2 vmbr4 -S -w 8100 -A "allow 61000-62000 100.73.73.0/24 1024-65535" -A "allow 63000-64000 100.72.139.0/24 1024-65535" -A "deny 0-65535 0.0.0.0/0 0-65535" -d 提⽰如下:Unknown option: vmbr4再次miniupnpd -i vmbr3 -a "vmbr2 vmbr4" -S -w 8100 -A "allow 61000-62000 100.73.73.0/24 1024-65535" -A "allow 63000-64000 100.72.139.0/24 1024-65535" -A "deny 0-65535 0.0.0.0/0 0-65535" -d 如下:miniupnpd[32556]: Starting UPnP-IGD with external interface vmbr3miniupnpd[32556]: HTTP listening on port 39751miniupnpd[32556]: no HTTP IPv6 address, disabling IPv6miniupnpd[32556]: get_lan_for_peer(): 166.111.188.114:51535 not found !miniupnpd[32556]: SSDP packet sender 166.111.188.114:51535 not from a LAN, ignoringminiupnpd[32556]: get_lan_for_peer(): 166.111.188.109:64453 not found !miniupnpd[32556]: SSDP packet sender 166.111.188.109:64453 not from a LAN, ignoringminiupnpd[32556]: get_lan_for_peer(): 166.111.188.142:49673 not found !miniupnpd[32556]: SSDP packet sender 166.111.188.142:49673 not from a LAN, ignoringminiupnpd[32556]: get_lan_for_peer(): 166.111.188.142:49674 not foundminiupnpd[32556]: get_lan_for_peer(): 166.111.188.87:57106 not found !miniupnpd[32556]: SSDP packet sender 166.111.188.87:57106 not from a LAN, ignoringminiupnpd[32556]: get_lan_for_peer(): 100.72.139.183:50622 found in LAN vmbr2 100.72.139.4miniupnpd[32556]: get_lan_for_peer(): 100.72.139.183:50622 found in LAN vmbr2 100.72.139.4miniupnpd[32556]: get_lan_for_peer(): 100.72.139.183:50622 found in LAN vmbr2 100.72.139.4miniupnpd[32556]: get_lan_for_peer(): 100.72.139.183:57298 found in LAN vmbr2 100.72.139.4从上⾯看出-a "vmbr2 vmbr4" 在vmbr2接⼝上⽣效了,但不知道在vmbr4上⽣效没??应该是存在问题的,还是应该将-a "vmbr2 vmbr4" 写成-a vmbr2 -a vmbr4其中-a参数还存在vmbr2/24 这种使⽤⽅式参考https:///miniupnp/miniupnp/issues/2744)探寻miniupnpd的启动脚本:/run/systemd/te/multi-user.target.wants/miniupnpd.service 在其内容中看到如下:ExecStart=/etc/init.d/miniupnpd start看下less /etc/init.d/miniupnpd 内容如下:#!/bin/sh### BEGIN INIT INFO# Provides: miniupnpd# Required-Start: $remote_fs# Required-Stop: $remote_fs# Should-Start: $local_fs $network $time# Should-Stop: $local_fs $network $time# Default-Start: 2 3 4 5# Default-Stop: 0 1 6# Short-Description: daemon providing UPnP Internet Gateway Device (IGD) services# Description: MiniUPnPd is a small daemon providing UPnP Internet Gateway# Device (IGD) services to your network. UPnP and NAT-PMP are# used to improve internet connectivity for devices behind a# NAT router. Any peer to peer network application such as# games, IM, etc. can benefit from a NAT router supporting# UPnP and/or NAT-PMP.### END INIT INFO. /lib/lsb/init-functionsDAEMON_NAME="MiniUPnPd"DAEMON_SERVICE_NAME="UPnP devices daemon"IPTABLES="/sbin/iptables"IP6TABLES="/sbin/ip6tables"MINIUPNPD="/usr/sbin/miniupnpd"IP="/bin/ip"if [ -r /lib/init/vars.sh ]then. /lib/init/vars.shfi# Make sure the package hasn't been removed but not purgedif ! [ -x ${MINIUPNPD} ] && [ -x ${IPTABLES} ] && [ -x ${IP} ]thenexit 0fiif [ -f "/etc/default/miniupnpd" ]then. /etc/default/miniupnpdelselog_daemon_msg "${DAEMON_NAME}: Default file not found: exiting"log_end_msg 1exit 0fiif [ "${START_DAEMON}" != "1" ]thenlog_daemon_msg "${DAEMON_NAME}: /etc/default/miniupnpd isn't set to START_DAEMON=1: exiting"log_end_msg 1exit 0fiif [ -z "${MiniUPnPd_EXTERNAL_INTERFACE}" ]thenlog_daemon_msg "${DAEMON_NAME}: no interface defined: exiting"log_end_msg 1exit 0fiif [ -z "${MiniUPnPd_LISTENING_IP}" ]thenlog_daemon_msg "${DAEMON_NAME}: no listening IP defined: exiting"log_end_msg 1exit 0fiEXTIP="$(LC_ALL=C ${IP} addr show ${MiniUPnPd_EXTERNAL_INTERFACE} | grep "inet " | awk '{ print $2 }' | cut -d"/" -f1)" ip6tables_init_fw_tables (){if [ -z "${EXTIP6}" ] ; thenreturnfiN6DIRTY="$(LC_ALL=C ${IP6TABLES} -L -n | grep 'MINIUPNPD' | awk '{ printf $1 }')"if [ "${N6DIRTY}" = "MINIUPNPDChain" ]then${IP6TABLES} -F MINIUPNPDelif [ "${N6DIRTY}" = "Chain" ]then${IP6TABLES} -A FORWARD -i ${MiniUPnPd_EXTERNAL_INTERFACE} -j MINIUPNPD${IP6TABLES} -F MINIUPNPDelse${IP6TABLES} -N MINIUPNPD${IP6TABLES} -A FORWARD -i ${MiniUPnPd_EXTERNAL_INTERFACE} -j MINIUPNPDfi}iptables_init_nat_tables (){# Initialize the PREROUTING chain firstNDIRTY="$(LC_ALL=C ${IPTABLES} -t nat -L -n | grep 'MINIUPNPD' | awk '{ printf $1 }')"if [ "${NDIRTY}" = "MINIUPNPDChain" ]then# Nat table dirty; Cleaning...${IPTABLES} -t nat -F MINIUPNPDelif [ "${NDIRTY}" = "Chain" ]then# Dirty NAT chain but no reference..?${IPTABLES} -t nat -A PREROUTING -d ${EXTIP} -i ${MiniUPnPd_EXTERNAL_INTERFACE} -j MINIUPNPD${IPTABLES} -t nat -F MINIUPNPDelse# NAT table clean..initalizing..${IPTABLES} -t nat -N MINIUPNPD${IPTABLES} -t nat -A PREROUTING -d ${EXTIP} -i ${MiniUPnPd_EXTERNAL_INTERFACE} -j MINIUPNPDfi# then do the FORWARD chainFDIRTY="$(LC_ALL=C ${IPTABLES} -t filter -L -n | grep 'MINIUPNPD' | awk '{ printf $1 }')"if [ "${FDIRTY}" = "MINIUPNPDChain" ]then# Filter table dirty; Cleaning...${IPTABLES} -t filter -F MINIUPNPDelif [ "${FDIRTY}" = "Chain" ]then# Dirty filter chain but no reference..? Fixsted.${IPTABLES} -t filter -I FORWARD -i ${MiniUPnPd_EXTERNAL_INTERFACE} ! -o ${MiniUPnPd_EXTERNAL_INTERFACE} -j MINIUPNPD${IPTABLES} -t filter -F MINIUPNPDelse# Filter table clean..initalizing..${IPTABLES} -t filter -N MINIUPNPD${IPTABLES} -t filter -I FORWARD -i ${MiniUPnPd_EXTERNAL_INTERFACE} ! -o ${MiniUPnPd_EXTERNAL_INTERFACE} -j MINIUPNPDfi}ip6tables_stop_fw_tables (){N6DIRTY="$(LC_ALL=C ${IP6TABLES} -L -n | grep 'MINIUPNPD' | awk '{ printf $1 }')"if [ "${N6DIRTY}" = "MINIUPNPDChain" ]then${IP6TABLES} -F MINIUPNPD || true${IP6TABLES} -D FORWARD -i ${MiniUPnPd_EXTERNAL_INTERFACE} -j MINIUPNPD || true${IP6TABLES} -X MINIUPNPD || trueelif [ "${NDIRTY}" = "Chain" ]then${IP6TABLES} -F MINIUPNPD || true${IP6TABLES} -X MINIUPNPD || truefi}iptables_stop_nat_tables (){# Clean the nat tablesNDIRTY="$(LC_ALL=C ${IPTABLES} -t nat -L -n | grep 'MINIUPNPD' | awk '{ printf $1 }')"if [ "${NDIRTY}" = "MINIUPNPDChain" ]then${IPTABLES} -t nat -F MINIUPNPD || true${IPTABLES} -t nat -D PREROUTING -d ${EXTIP} -i ${MiniUPnPd_EXTERNAL_INTERFACE} -j MINIUPNPD || true${IPTABLES} -t nat -X MINIUPNPD || trueelif [ "${NDIRTY}" = "Chain" ]then${IPTABLES} -t nat -F MINIUPNPD || true${IPTABLES} -t nat -X MINIUPNPD || truefi# Clean the filter tablesFDIRTY="$(LC_ALL=C ${IPTABLES} -t filter -L -n | grep 'MINIUPNPD' | awk '{ printf $1 }')"if [ "${FDIRTY}" = "MINIUPNPDChain" ]then${IPTABLES} -t filter -F MINIUPNPD || true${IPTABLES} -t filter -D FORWARD -i ${MiniUPnPd_EXTERNAL_INTERFACE} ! -o ${MiniUPnPd_EXTERNAL_INTERFACE} -j MINIUPNPD || true${IPTABLES} -t filter -X MINIUPNPD || trueelif [ "${FDIRTY}" = "Chain" ]then${IPTABLES} -t filter -F MINIUPNPD || true${IPTABLES} -t filter -X MINIUPNPD || truefi}case "${1}" instart)iptables_init_nat_tablesif [ "${MiniUPnPd_ip6tables_enable}" = "yes" ] ; then ip6tables_init_fw_tables ; filog_daemon_msg "Starting ${DAEMON_SERVICE_NAME}" ${DAEMON_NAME}start-stop-daemon -q --start --exec "/usr/sbin/miniupnpd" -- -i ${MiniUPnPd_EXTERNAL_INTERFACE} -o ${EXTIP} -a ${MiniUPnPd_LISTENING_IP} ${MiniUPnPd_OTHER_OPTIONS} RET="${?}"case "${RET}" in0|1)log_end_msg 0;;*)log_end_msg 1exit 1;;esac;;stop)log_daemon_msg "Stopping ${DAEMON_SERVICE_NAME}" ${DAEMON_NAME}start-stop-daemon -q --stop --oknodo --pidfile /var/run/miniupnpd.pidRET="${?}"iptables_stop_nat_tablesif [ "${MiniUPnPd_ip6tables_enable}" = "yes" ] ; then ip6tables_stop_fw_tables ; ficase "${RET}" in0|1)log_end_msg 0;;*)log_end_msg 1exit 1;;esac;;restart|force-reload)${0} stopsleep 1${0} start;;status)status_of_proc "/usr/sbin/minissdpd" "MiniUPnPd"exit ${?};;*)echo "Usage: ${0} {start|stop|restart|status}"exit 1;;esacexit 0分析以上脚本当start时,最重要的是以下这句start-stop-daemon -q --start --exec "/usr/sbin/miniupnpd" -- -i ${MiniUPnPd_EXTERNAL_INTERFACE} -o ${EXTIP} -a ${MiniUPnPd_LISTENING_IP} ${MiniUPnPd_OTHER_OPTIONS}其中参数MiniUPnPd_OTHER_OPTIONS值为-N -f /etc/miniupnpd/miniupnpd ,-a参数可以有多个,所以 -a ${MiniUPnPd_LISTENING_IP}和/etc/miniupnpd/miniupnpd ⾥的listening_ip参数应该可以共存。

oracle在linux安装报错问题⾃⼰在CentOS安装oracle 11g报如下错误,参考/s/blog_7249058501014az8.html1.1 ins_ctx.mk问题[oracle@xd logs]$ tail installActions2012-05-05_01-20-00PM.logINFO: collect2: ld returned 1 exit statusINFO: make: *** [ctxhx] Error 1INFO: End output from spawned process.INFO: ----------------------------------INFO: Exception thrown from action: makeException Name: MakefileExceptionException String: Error in invoking target'install' of makefile '/u01/app/oracle/product/10.2.0/db_1/ctx/lib/ins_ctx.mk'.See'/u01/app/oracle/oraInventory/logs/installActions2012-05-05_01-20-00PM.log'for details.Exception Severity: 1[oracle@xd logs]$ yum install gccLoaded plugins: fastestmirror,refresh-packagekit, securityYou need to be root to perform thiscommand.[oracle@xd logs]$ rpm -qa --queryformat"%{NAME}-%{VERSION}-%{RELEASE} (%{ARCH})\n" | grep libgcclibgcc-4.4.6-3.el6 (i686)libgcc-4.4.6-3.el6 (x86_64)1.2 ins_rdbms.mk问题[oracle@xd logs]$ tail installActions2012-05-05_01-20-00PM.logINFO: make[1]: Leaving directory`/u01/app/oracle/product/10.2.0/db_1/rdbms/lib'INFO: make: *** [extproc32] Error 2INFO: End output from spawned process.INFO: ----------------------------------INFO: Exception thrown from action: makeException Name: MakefileExceptionException String: Error in invoking target'all_no_orcl' of makefile'/u01/app/oracle/product/10.2.0/db_1/rdbms/lib/ins_rdbms.mk'.See '/u01/app/oracle/oraInventory/logs/installActions2012-05-05_01-20-00PM.log'for details.Exception Severity: 11.3 ins_emdb.mk问题[oracle@xd logs]$ tail installActions2012-05-05_01-20-00PM.logINFO: make[1]: Leaving directory `/u01/app/oracle/product/10.2.0/db_1/sysman/lib'INFO: make: *** [nmccollector] Error 2INFO: End output from spawned process.INFO: ----------------------------------INFO: Exception thrown from action: makeException Name: MakefileExceptionException String: Error in invoking target'collector' of makefile'/u01/app/oracle/product/10.2.0/db_1/sysman/lib/ins_emdb.mk'. See'/u01/app/oracle/oraInventory/logs/installActions2012-05-05_01-20-00PM.log' fordetails.Exception Severity: 11.4 ins_net_client.mk问题[oracle@xd logs]$ tailinstallActions2012-05-05_01-51-59PM.logINFO: /usr/bin/ar:/u01/app/oracle/product/10.2.0/db_1/lib32/nnfgt.o: No such file or directoryINFO: make: *** [nnfgt.o] Error 1INFO: End output from spawned process.INFO: ----------------------------------INFO: Exception thrown from action: makeException Name: MakefileExceptionException String: Error in invoking target'nnfgt.o' ofmakefile'/u01/app/oracle/product/10.2.0/db_1/network/lib/ins_net_client.mk'.See'/u01/app/oracle/oraInventory/logs/installActions2012-05-05_01-51-59PM.log' fordetails.Exception Severity: 11.5 ins_precomp.mk问题[oracle@xd logs]$ tailinstallActions2012-05-05_01-51-59PM.logINFO: /bin/chmod: cannot access`/u01/app/oracle/product/10.2.0/db_1/precomp/lib/proc': No such file ordirectoryINFO: make: ***[/u01/app/oracle/product/10.2.0/db_1/precomp/lib/proc] Error 1INFO: End output from spawned process.INFO: ----------------------------------INFO: Exception thrown from action: makeException Name: MakefileExceptionException String: Error in invoking target'relink' ofmakefile'/u01/app/oracle/product/10.2.0/db_1/precomp/lib/ins_precomp.mk'.See'/u01/app/oracle/oraInventory/logs/installActions2012-05-05_01-51-59PM.log' fordetails.Exception Severity: 11.6 ins_plsql.mk问题[oracle@xd logs]$ tailinstallActions2012-05-05_01-51-59PM.logcollect2: ld returned 1 exit statusINFO: make: *** [wrap] Error 1INFO: End output from spawned process.INFO: ----------------------------------INFO: Exception thrown from action: makeException Name: MakefileExceptionException String: Error in invoking target'install' of makefile'/u01/app/oracle/product/10.2.0/db_1/plsql/lib/ins_plsql.mk'.See'/u01/app/oracle/oraInventory/logs/installActions2012-05-05_01-51-59PM.log' fordetails.Exception Severity: 11.7 ins_net_server.mk问题[oracle@xd logs]$ tailinstallActions2012-05-05_01-51-59PM.logcollect2: ld returned 1 exit statusINFO: make: *** [tnslsnr] Error 1INFO: End output from spawned process.INFO: ----------------------------------INFO: Exception thrown from action: makeException Name: MakefileExceptionException String: Error in invoking target'install' ofmakefile'/u01/app/oracle/product/10.2.0/db_1/network/lib/ins_net_server.mk'.See'/u01/app/oracle/oraInventory/logs/installActions2012-05-05_01-51-59PM.log' fordetails. Exception Severity: 11.8 ins_nau.mk问题[oracle@xd logs]$ tailinstallActions2012-05-05_01-51-59PM.logINFO: ld returned 1 exit statusINFO: make: *** [oklist] Error 1INFO: End output from spawned process.INFO: ----------------------------------INFO: Exception thrown from action: makeException Name: MakefileExceptionException String: Error in invoking target'ioklist iokinit iokdstry' ofmakefile'/u01/app/oracle/product/10.2.0/db_1/network/lib/ins_nau.mk'.See'/u01/app/oracle/oraInventory/logs/installActions2012-05-05_01-51-59PM.log' fordetails. Exception Severity: 11.9 ins_ldap.mk问题[oracle@xd logs]$ tailinstallActions2012-05-05_01-51-59PM.logcollect2: ld returned 1 exit statusINFO: make: *** [ldapadd] Error 1INFO: End output from spawned process.INFO: ----------------------------------INFO: Exception thrown from action: makeException Name: MakefileExceptionException String: Error in invoking target'clientonlyinstall' ofmakefile'/u01/app/oracle/product/10.2.0/db_1/ldap/lib/ins_ldap.mk'.See'/u01/app/oracle/oraInventory/logs/installActions2012-05-05_01-51-59PM.log' fordetails. Exception Severity: 11.10 ins_srvm.mk问题[oracle@xd logs]$ tailinstallActions2012-05-05_01-51-59PM.logINFO: ld returned 1 exit statusINFO: make: *** [rawutl] Error 1INFO: End output from spawned process.INFO: ----------------------------------INFO: Exception thrown from action: makeException Name: MakefileExceptionException String: Error in invoking target'install' of makefile'/u01/app/oracle/product/10.2.0/db_1/srvm/lib/ins_srvm.mk'. See'/u01/app/oracle/oraInventory/logs/installActions2012-05-05_01-51-59PM.log' fordetails.Exception Severity: 11.11 ins_has.mk问题[oracle@xd logs]$ tailinstallActions2012-05-05_01-51-59PM.logcollect2: ld returned 1 exit statusINFO: make: *** [/u01/app/oracle/product/10.2.0/db_1/racg/lib/racgmain]Error 1INFO: End output from spawned process.INFO: ----------------------------------INFO: Exception thrown from action: makeException Name: MakefileException因为之前没有在CentOS 6.2 上安装过Oracle,所以开始也是争对具体情况去分析,饶了⼀圈之后,最终定位是安装之前少包了,才导致在安装过程中⼀些Binary Options不能进⾏link。

MLdonkey与sancho linux版本安装使用及设置MLdonkey被誉为速度最快的电驴,同时支持很多种P2P的下载协议,包括edonkey2000、gnutella、gnutella2、bt、FileTP等等。
网上有很多安装和设置的文章,但是有点乱,有些也不够完整,今天有空将它整理如下一.安装mldonkey:解压缩mldonkey源代码并进入其目录,然后$ sudo apt-get install ocaml$ ./configure$ make$ make install(使用新版本的mldonkey源代码编译安装后已不会有下载后文件名不支持中文的问题)二.安装sancho:sancho是mldonkey最好用的一个前端,下载回来的sancho只有一个文件,是一个脚本,先右键单击它,找到属性-权限部分,钩上“可执行”,然后在终端中运行之:$ ./sancho-*-linux-gtk.sh然后会显示Extract to directory [<sancho-*-linux-gtk>]:输入自定义安装目录,随便你,我安装在/usr/local/sancho稍等一会就装好了,在/usr/local/sancho/下有个sancho,双击它就能运行sancho三.sancho设置先运行mlnet,在/usr/local/bin或/usr/bin下,然后运行sancho,首次运行会有配置向导,需要设置mlnet位置。
在sancho里面也可以设置mlnet的运行路径在工具->首选项->sancho:主要->可选的可执行core 那里填上你的mlnet路径。
这样以后就可以直接启动sancho。
设置中文: 在工具->首选项->sancho:主要->使用本地文件选择zh-CN,重启sancho后即为中文。
在工具->首选项->Main 设置client_name 推荐设置成[CHN][VeryCD]yourname的形式,支持中文。

informer模型代码Informer模型是一种用于时序预测任务的深度学习模型,可以用于预测多个时间步长的未来值。
它采用自注意力机制来建模输入序列的长期依赖关系,并结合了一些新的技术来增强其性能。
Informer模型代码可以使用Python编写,并使用TensorFlow或PyTorch等深度学习框架实现。
下面是一个使用PyTorch实现Informer模型的代码示例:```import torchimport torch.nn as nnimport torch.nn.functional as Fclass Encoder(nn.Module):def __init__(self, input_size, d_model, n_heads, e_layers, d_ff, dropout):super().__init__()self.input_size = input_sizeself.d_model = d_modelself.n_heads = n_headsself.e_layers = e_layersself.d_ff = d_ffself.dropout = dropoutself.embed = nn.Linear(input_size, d_model)yers = nn.ModuleList([EncoderLayer(d_model,n_heads, d_ff, dropout) for _ in range(e_layers)])self.norm = yerNorm(d_model)def forward(self, x):x = self.embed(x)for i in range(self.e_layers):x = yers[i](x)return self.norm(x)class EncoderLayer(nn.Module):def __init__(self, d_model, n_heads, d_ff, dropout):super().__init__()self.attn = MultiHeadAttention(d_model, n_heads, dropout) self.norm1 = yerNorm(d_model)self.mlp = PositionwiseFeedForward(d_model, d_ff, dropout)self.norm2 = yerNorm(d_model)self.dropout = nn.Dropout(dropout)def forward(self, x):x = x + self.dropout(self.attn(x))x = self.norm1(x)x = x + self.dropout(self.mlp(x))x = self.norm2(x)return xclass MultiHeadAttention(nn.Module):def __init__(self, d_model, n_heads, dropout):super().__init__()self.d_model = d_modelself.n_heads = n_headsself.head_size = d_model // n_headsself.query = nn.Linear(d_model, d_model)self.key = nn.Linear(d_model, d_model)self.value = nn.Linear(d_model, d_model)self.dropout = nn.Dropout(dropout)def forward(self, x):batch_size, seq_len, _ = x.size()q = self.query(x).view(batch_size, seq_len, self.n_heads, self.head_size).transpose(1, 2)k = self.key(x).view(batch_size, seq_len, self.n_heads, self.head_size).transpose(1, 2)v = self.value(x).view(batch_size, seq_len, self.n_heads, self.head_size).transpose(1, 2)attn_scores = torch.matmul(q, k.transpose(-2, -1)) / self.head_size ** 0.5attn_probs = F.softmax(attn_scores, dim=-1)attn_probs = self.dropout(attn_probs)x = torch.matmul(attn_probs, v)x = x.transpose(1, 2).contiguous().view(batch_size, seq_len, self.d_model)return xclass PositionwiseFeedForward(nn.Module):def __init__(self, d_model, d_ff, dropout):super().__init__()self.fc1 = nn.Linear(d_model, d_ff)self.fc2 = nn.Linear(d_ff, d_model)self.dropout = nn.Dropout(dropout)def forward(self, x):x = self.dropout(F.relu(self.fc1(x)))x = self.fc2(x)return xclass Informer(nn.Module):def __init__(self, input_size, output_size, enc_in, dec_in, c_out, factor, d_model, n_heads, e_layers, d_ff, dropout):super().__init__()self.input_size = input_sizeself.output_size = output_sizeself.enc_in = enc_inself.dec_in = dec_inself.c_out = c_outself.factor = factorself.d_model = d_modelself.n_heads = n_headsself.e_layers = e_layersself.d_ff = d_ffself.dropout = dropoutself.encoder = Encoder(input_size, d_model, n_heads,e_layers, d_ff, dropout)self.enc_linear = nn.Linear(d_model, c_out)self.pos_encoder = PositionalEncoding(d_model, dropout) self.decoder = Decoder(output_size, dec_in, d_model,n_heads, e_layers, d_ff, dropout)self.dec_linear = nn.Linear(d_model, output_size)self.dropout = nn.Dropout(dropout)def forward(self, x):enc_in = x[:, :self.enc_in, :]dec_in = x[:, self.enc_in:self.enc_in + self.dec_in, :] dec_out = x[:, self.enc_in + self.dec_in:, :]enc_in = self.enc_linear(enc_in)enc_in = self.pos_encoder(enc_in)enc_out = self.encoder(enc_in)dec_in = self.pos_encoder(dec_in)dec_out = self.decoder(dec_in, enc_out)dec_out = self.dec_linear(dec_out)dec_out = dec_out[:, -self.output_size * self.factor:, :] dec_out = dec_out.view(-1, self.output_size, self.factor, self.c_out)dec_out = dec_out.mean(dim=-2)return dec_outclass Decoder(nn.Module):def __init__(self, output_size, dec_in, d_model, n_heads, e_layers, d_ff, dropout):super().__init__()self.output_size = output_sizeself.dec_in = dec_inself.d_model = d_modelself.n_heads = n_headsself.e_layers = e_layersself.d_ff = d_ffself.dropout = dropoutself.embed = nn.Linear(output_size, d_model)yers = nn.ModuleList([DecoderLayer(d_model,n_heads, d_ff, dropout) for _ in range(e_layers)])self.norm = yerNorm(d_model)def forward(self, x, enc_out):x = self.embed(x)for i in range(self.e_layers):x = yers[i](x, enc_out)return self.norm(x)class DecoderLayer(nn.Module):def __init__(self, d_model, n_heads, d_ff, dropout): super().__init__()self.attn1 = MultiHeadAttention(d_model, n_heads, dropout)self.norm1 = yerNorm(d_model)self.attn2 = MultiHeadAttention(d_model, n_heads, dropout)self.norm2 = yerNorm(d_model)self.mlp = PositionwiseFeedForward(d_model, d_ff, dropout)self.norm3 = yerNorm(d_model)self.dropout = nn.Dropout(dropout)def forward(self, x, enc_out):x = x + self.dropout(self.attn1(x))x = self.norm1(x)x = x + self.dropout(self.attn2(x, kv=enc_out))x = self.norm2(x)x = x + self.dropout(self.mlp(x))x = self.norm3(x)return xclass PositionalEncoding(nn.Module):def __init__(self, d_model, dropout, max_len=5000):super().__init__()self.dropout = nn.Dropout(dropout)pe = torch.zeros(max_len, d_model)position = torch.arange(0, max_len,dtype=torch.float).unsqueeze(1)div_term = torch.exp(torch.arange(0, d_model, 2).float() * (-math.log(10000.0) / d_model))pe[:, 0::2] = torch.sin(position * div_term)pe[:, 1::2] = torch.cos(position * div_term)pe = pe.unsqueeze(0).transpose(0, 1)self.register_buffer('pe', pe)def forward(self, x):x = x + self.pe[:x.size(0), :]return self.dropout(x)```这段代码实现了Informer模型的所有组件,包括编码器、解码器、多头注意力、前馈网络和位置编码等。

Package‘RIdeogram’October12,2022Type PackageTitle Drawing SVG Graphics to Visualize and Map Genome-Wide Data onIdiogramsVersion0.2.2Maintainer Zhaodong Hao<*****************>Description For whole-genome analysis,idiograms are virtually the most intuitive and effec-tive way to map and visualize the genome-wide information.RIdeogram was developed to visu-alize and map whole-genome data on idiograms with no restriction of species.License Artistic-2.0Encoding UTF-8LazyData trueDepends R(>=3.5.0)Imports ggplot2,grDevices,grImport2,rsvg,scales,tools,tidyr,utilsRoxygenNote6.1.1Suggests knitr,rmarkdownVignetteBuilder knitrNeedsCompilation noAuthor Zhaodong Hao[aut,cre],Dekang Lv[aut],Ying Ge[aut],Jisen Shi[aut],Weijers Dolf[aut],Guangchuang Yu[aut],Jinhui Chen[aut]Repository CRANDate/Publication2020-01-2011:20:02UTC12convertSVG R topics documented:convertSVG (2)Fst_between_CE_and_CW (3)gene_density (4)GFFex (4)human_karyotype (5)ideogram (5)karyotype_dual_comparison (6)karyotype_ternary_comparison (7)liriodendron_karyotype (7)LTR_density (8)Pi_for_CE (8)Pi_for_CE_and_CW (9)Random_RNAs_500 (9)synteny_dual_comparison (10)synteny_ternary_comparison (10)synteny_ternary_comparison_graident (11)Index12 convertSVG convertSVGDescriptionconvert svg to png or other formatUsageconvertSVG(svg,file="chromosome",device=NULL,width=8.2677,height=11.6929,dpi=300)svg2pdf(svg,file="chromosome",width=8.2677,height=11.6929,dpi=300)svg2png(svg,file="chromosome",width=8.2677,height=11.6929,dpi=300)svg2tiff(svg,file="chromosome",width=8.2677,height=11.6929,dpi=300)svg2jpg(svg,file="chromosome",width=8.2677,height=11.6929,dpi=300)Fst_between_CE_and_CW3 Argumentssvg svgfilefile outputfile namedevice target formatwidth output widthheight output heightdpi output dpiValueinvisible grob objectAuthor(s)Zhaodong Hao,Dekang Lv,Ying Ge,Jisen Shi,Dolf Weijers,Guangchuang Yu,Jinhui Chen Fst_between_CE_and_CW Fst between two Liriodendron groupsDescriptionFst values between China east and west groups of Liriodendron chinense and being calculated in a 2-Mb sliding window with a1-Mb stepUsagedata(Fst_between_CE_and_CW)Formatdata frameSourceNature Plants,doi:10.1038/s41477-018-0323-64GFFex gene_density Gene distribution across the human genomeDescriptionGene numbers was counted with a window of1MbUsagedata(gene_density)Formatdata frameSourceGencode(https:///)GFFex GFFexDescriptionextract some specific feature information from a gfffileUsageGFFex(input,karyotype,feature="gene",window=1e+06)Argumentsinput gfffilekaryotype karyotypefilefeature feature namewindow window sizeValuedataframeAuthor(s)Zhaodong Hao,Dekang Lv,Ying Ge,Jisen Shi,Dolf Weijers,Guangchuang Yu,Jinhui Chenhuman_karyotype5 human_karyotype Karyotype information of the human genomeDescriptionThe version of this geome is gencode.v29.Usagedata(human_karyotype)Formatdata frameSourceGencode(https:///)ideogram ideogramDescriptionideogram with overlaid heatmap annotation and optional track labelUsageideogram(karyotype,overlaid=NULL,label=NULL,label_type=NULL,synteny=NULL,colorset1=c("#4575b4","#ffffbf","#d73027"),colorset2=c("#b35806","#f7f7f7","#542788"),width=170,Lx=160,Ly=35,output="chromosome.svg")Argumentskaryotype karyotype dataoverlaid overlaid datalabel track label datalabel_type track label type,only support four types:marker,heatmap,line and polygon synteny synteny datacolorset1overlaid heatmap colorcolorset2label heatmap colorwidth width of plot regionLx position of legend(x)Ly position of legend(y)output outputfile,only svg is supported6karyotype_dual_comparisonValueoutputfileAuthor(s)Zhaodong Hao,Dekang Lv,Ying Ge,Jisen Shi,Dolf Weijers,Guangchuang Yu,Jinhui Chen Examples#Loading the packagerequire(RIdeogram)#Loading the testing datadata(human_karyotype,package="RIdeogram")data(gene_density,package="RIdeogram")data(Random_RNAs_500,package="RIdeogram")#Checking the data formathead(human_karyotype)head(gene_density)head(Random_RNAs_500)#Running the function(Remove"#"before you run the following codes)#ideogram(karyotype=human_karyotype)#convertSVG("chromosome.svg",device="png")#Then,you will find a SVG file and a PNG file in your Working Directory.karyotype_dual_comparisonKaryotype for two genome comparisonDescriptionGrape and Populus genomesUsagedata(karyotype_dual_comparison)Formatdata frameSourceMCscankaryotype_ternary_comparison7karyotype_ternary_comparisonKaryotype for three genome comparisonDescriptionAmborella,Grape and Liriodendron genomesUsagedata(karyotype_ternary_comparison)Formatdata frameSourceMCscanliriodendron_karyotypeKaryotype information of the Liriodendron genomeDescriptionLiriodendron chinense genomeUsagedata(liriodendron_karyotype)Formatdata frameSourceNature Plants,doi:10.1038/s41477-018-0323-68Pi_for_CE LTR_density LTR distribution across the human genomeDescriptionLTR numbers was counted with a window of1MbUsagedata(LTR_density)Formatdata frameSourceUCSC(/index.html)Pi_for_CE Pi of one Liriodendron groupDescriptionPi values of the China east group of Liriodendron chinense and being calculated in a2-Mb sliding window with a1-Mb stepUsagedata(Pi_for_CE)Formatdata frameSourceNature Plants,doi:10.1038/s41477-018-0323-6Pi_for_CE_and_CW9 Pi_for_CE_and_CW Pi of two Liriodendron groupsDescriptionPi values of the China east and west groups of Liriodendron chinense and being calculated in a 2-Mb sliding window with a1-Mb stepUsagedata(Pi_for_CE_and_CW)Formatdata frameSourceNature Plants,doi:10.1038/s41477-018-0323-6Random_RNAs_500500RNAs’positionDescription500RNAs randomly selected from all tRNAs,rRNAs and miRNA in the human genome.Usagedata(Random_RNAs_500)Formatdata frameSourceGencode(https:///)10synteny_ternary_comparisonsynteny_dual_comparisonSynteny for two genome comparisonDescriptionGenome Synteny between Grape and PopulusUsagedata(synteny_dual_comparison)Formatdata frameSourceMCscansynteny_ternary_comparisonSynteny for three genome comparisonDescriptionGenome Synteny among Amborella,Grape and LiriodendronUsagedata(synteny_ternary_comparison)Formatdata frameSourceMCscansynteny_ternary_comparison_graident11synteny_ternary_comparison_graidentSynteny for three genome comparison with gradientfillDescriptionGenome Synteny among Amborella,Grape and Liriodendron with gradientfillUsagedata(synteny_ternary_comparison_graident)Formatdata frameSourceMCscanIndex∗datasetsFst_between_CE_and_CW,3gene_density,4human_karyotype,5karyotype_dual_comparison,6karyotype_ternary_comparison,7liriodendron_karyotype,7LTR_density,8Pi_for_CE,8Pi_for_CE_and_CW,9Random_RNAs_500,9synteny_dual_comparison,10synteny_ternary_comparison,10synteny_ternary_comparison_graident, 11convertSVG,2Fst_between_CE_and_CW,3gene_density,4GFFex,4human_karyotype,5ideogram,5karyotype_dual_comparison,6karyotype_ternary_comparison,7 liriodendron_karyotype,7LTR_density,8Pi_for_CE,8Pi_for_CE_and_CW,9Random_RNAs_500,9svg2jpg(convertSVG),2svg2pdf(convertSVG),2svg2png(convertSVG),2svg2tiff(convertSVG),2synteny_dual_comparison,10synteny_ternary_comparison,10synteny_ternary_comparison_graident,1112。