GPON开局及业务开通配置脚本
- 格式:docx
- 大小:13.11 KB
- 文档页数:8

-----------------------------------第一步:系统配置-------------------------------------------------------------------------------------->>User//输入用户名>>User//输入密码>>MA5680T>//进入普通模式>>MA5680T//进入超级模式>>MA5680T(config)//切换成本地语言>>MA5680T(config)#displayboard0#switchlanguage-mode#configenablepassword:adminname:root//查看所有单板,如果有“待确认”单板,请用下一命令>>MA5680T(config)//确认所有单板>>MA5680T(config)//设备命名>>MA5680T(config)#terminal//修改用户密码#boardconfirm0#sysname*********************userpassword>>MA5680T(config) #terminal//创建新用户名/密码username>>(config)#autosaveintervalon//打开自动保存------------------------------第二步:配置管理数据------------------------------------------------------------------------------------->>MA5680T(config)#vlanxxstandard//创建管理VLAN (一般选standard类型)>>MA5680T(config)#portvlanxx0/190//在上行口透传管理VLAN(上行端口,5680T上行端口共4个,分别为0/19 0,0/19 1,0/20 0,0/20 1)>>MA5680T(config)#vlanxx(xxtoxx)smart//创建业务VLAN (一般选SMART类型)>>MA5680T(config)#portvlanxx(xxtoxx)0/190//在上行口透传业务VLAN到上行端口>>MA5680T(config)#//创建VLAN三层虚接口>>(config-if-vlanif40)#ipaddressxxx.xxx.xxx.xxx.xxx.xxx.xxx//配置管理IP地址>>(config-if-vlanif40)#descriptionxxxxxxxxxxxxxxxxxx//对上层端口进行描述>>//退出接口,返回上层(config-if-vlanif40)#quitinterfacevlanifxx>>(config)#iproute-static0.0.0.00.0.0.0xxx.xxx.xxx.xxx//配置缺省路由Intface giu 0/20Auto-neg 0 disableSpeed 0 1000quit-----------------------------------第三步:配置ONT---------------------------------------------------------------------------------------步骤一:配置DBA模板(DBA就是动态分配带宽机制)>>(config)#dba-profileaddprofile-id18profile-name"100M"type2assure102400//1:8分光器流量模版>>(config)#dba-profileaddprofile-id116profile-name"77M"type2assure67968//1:16分光器流量模版>>(config)#dba-profileaddprofile-id132profile-name"40M"type2assure36672//1:32分光器流量模版步骤二:配置线路模板(基于优先级映射方式)>> (config)#ont-lineprofile gpon profile-id 100 profile-name"1:8_ONU">>(config-gpon-lineprofile-100)#mapping-modepriority//设置映射类型为优先级映射//以下用于创建通道:>> (config-gpon-lineprofile-100)#tcont 0 dba-profile-id 100>>(config-gpon-lineprofile-100)#gemadd0ethtcont0//添加GEM port>> (config-gpon-lineprofile-100)#gem add 1 eth tcont 0>> (config-gpon-lineprofile-100)#gem add 2 eth tcont 0>> (config-gpon-lineprofile-100)#gem add 3 eth tcont 0>>(config-gpon-lineprofile-100)#gemmapping00priority0//设置优先级映射关系>> (config-gpon-lineprofile-100)#gem mapping 1 0 priority 4>> (config-gpon-lineprofile-100)#gem mapping 2 0 priority 3>> (config-gpon-lineprofile-100)#gem mapping 3 0 priority 6>> (config-gpon-lineprofile-100)#quit>>(config)#ont-lineprofilegponprofile-id200profile-name"1:16_ONU">> (config-gpon-lineprofile-200)#mapping-mode priority>> (config-gpon-lineprofile-200)#tcont 0 dba-profile-id 200>> (config-gpon-lineprofile-200)#gem add 0 eth tcont 0>> (config-gpon-lineprofile-200)#gem add 1 eth tcont 0>> (config-gpon-lineprofile-200)#gem add 2 eth tcont 0>> (config-gpon-lineprofile-200)#gem add 3 eth tcont 0>> (config-gpon-lineprofile-200)#gem mapping 0 0 priority 0>> (config-gpon-lineprofile-200)#gem mapping 1 0 priority 4>> (config-gpon-lineprofile-200)#gem mapping 2 2 priority 3>> (config-gpon-lineprofile-200)#gem mapping 3 0 priority 6>> (config-gpon-lineprofile-200)#quit>>(config)#ont-lineprofilegponprofile-id300profile-name"1:32_ONU">> (config-gpon-lineprofile-300)#mapping-mode priority>> (config-gpon-lineprofile-300)#tcont 0 dba-profile-id 300>> (config-gpon-lineprofile-300)#gem add 0 eth tcont 0>> (config-gpon-lineprofile-300)#gem add 1 eth tcont 0>> (config-gpon-lineprofile-300)#gem add 2 eth tcont 0>> (config-gpon-lineprofile-300)#gem add 3 eth tcont 0>> (config-gpon-lineprofile-300)#gem mapping 0 0 priority 0>> (config-gpon-lineprofile-300)#gem mapping 1 0 priority 4>> (config-gpon-lineprofile-300)#gem mapping 2 2 priority 3>> (config-gpon-lineprofile-300)#gem mapping 3 0 priority 6>> (config-gpon-lineprofile-300)#quit---------------------第四步:注册ONT,并设置其管理IP--------------------------------------------------------------------------->>MA5680T(config)#interface gpon0/1//进入业务单板>>MA5680T(config-if-gpon-0/1)#portxont-auto-findenable//开启端口(0-3或0-7)的自动发现ONT功能>>MA5680T(config-if-gpon-0/1)#display//查看x端口下自动发现的设备命令显示:Command:display ont autofind 0------------------------------------------------------------------------NumberF/ S/ PSNPassword------------------------------------------------------------------------10/ 7/ B402AC41------------------------------------------------------------------------ontautofindx>>MA5680T(config-if-gpon-0/1)#ont addx(端口号)x(ONT编号)sn-authxxxxxxxx(设备序列号)snmpont-lineprofile-id200descxx//ONT编号按照光分器不同而取值范围不同,分别为0-7、0-15、0-31,顺序无所谓,不发生重复即可。

GPON产品配置命令1 创建DBA模板dba-profile add profile-id 10 type3 assure 10240 max 102400 //创建dba模板2 创建线路模板绑定通道绑定gem并映射管理和业务Vlanont-lineprofile gpon profile-id 1 //创建线路模板tcont 1 dba-profile-id 10 //通道绑定dba模板gem add 0 eth tcont 1 //gem 0 绑定通道 1gem add 1 eth tcont 1 //gem 1 绑定通道 1gem mapping 0 0 vlan 100 //gem 映射管理Vlan (0 0 表示 gem 0 映射索引 0 )gem mapping 1 0 vlan 1002 //gem 映射业务Vlancommit //保存quit //退出3 创建管理和业务Vlan并在上行口透传vlan 100 smart //创建管理Vlanvlan 1002 smart //创建业务Vlanport vlan 100 0/9 1 //上行口透传管理Vlanport vlan 1002 0/9 1 //上行口透传业务Vlan4 添加ont绑定线路模板设置下发信息interface gpon 0/3 //进入gpon端口port ont 0 autofind enable //开启自动发现ontdisplay ont autofind 0 //显示发现的ontont add 0 0 sn-auth 48575443B151E703 snmp ont-lineprofile-id 1 //添加ont并绑定线路模板ont ipconfig 0 0 static ip-address 192.168.0.5 mask 255.255.255.0 gateway 192.168.0.254 vlan 100 //下发ont地址、掩码、网关、管理Vlanquit //退出5 开通管理和业务虚端口service-port vlan 100 gpon 0/3/0 ont 0 gemport 0 multi-service user-vlan 100 //开通管理虚端口service-port vlan 1002 gpon 0/3/0 ont 0 gemport 1 multi-service user-vlan 1002 //开通业务虚端口telnet 192.168.0.5ONU数据:6 创建业务Vlan并透传vlan 1002 smart //创建业务Vlanport vlan 1002 0/0 1 //透传业务Vlan7 开通业务虚端口service-port vlan 1002 eth 0/1/1 multi-service user-vlan untagged rx-cttr 6 tx-cttr 6 //开通业务虚端口。

GPON业务开局指导手册前言读者对象本文档从业务应用出发,对设备提供的基本功能进行调测与验证,通过具体配置示例介绍了业务配置过程,确保设备稳定、可靠的投入网上运行阅读本文档能指导用户掌握GPON系列产品各类业务的配置过程本文档主要适用于以下工程师:安装调试工程师数据配置工程师系统维护工程师缩略语TR-069CPE WAN M ANAGEMENT P ROTOCOL CPE广域网管理协议T-CONT T RANSMISSION C ONTAINER 传输容器GEM GPON E NCAPSULATION M ETHOD GPON封装模式OMCI ONT M ANAGEMENT AND C ONTROL I NTERFACE ONT管理控制协议ACS A UTO-C ONFIGURATION S ERVER 自动配置服务器修订记录修订记录累积了每次文档更新的说明,最新版本文档包含以前所有文档版本的更新内容文档版本01(2014-02-07)目录GPON业务开局指导手册 (1)前言 (1)1.配置FTTx业务示例(GPON接入) (3)1.1配置FTTB/FTTC业务(SFU) (3)1.2配置FTTH业务(HGU) (5)1.配置FTTx业务示例(GPON接入)本章以示例方式介绍了不同FTT X组网场景中上网业务在GPON接入方式下的配置1.1配置FTTB/FTTC业务(SFU)本章介绍上网业务在FTTB/FTTC场景下的配置。
需要特别注意的是,当下联交换机时,我司SFU只能用于保证基本的组播、IP服务链路通过作用,处理能力不能达到普通二层交换机的程度,过于复杂的接入需要更高级别的SFU或MDU.1.1.1背景信息在FTTB/FTTC场景下,用户可以通过LAN、xDSL等多种接入方式接入到ONU,再由ONU通过GPON方式接入到OLT,实现上网业务、语音业务、IPTV业务1.1.2FTTB/FTTC典型组网图1.1.3数据规划Internet VLAN:100上行端口:eth 0/10下行PON口:pon 0/51.1.4业务配置流程步骤1:自动发现并注册ONUGPON(config-if-pon-0/5)#ont-auto-findGPON(config-if-pon-0/5)#ont-auto-auth步骤2:创建各种业务VLAN并包含上下行端口GPON(config)#vlan 100,200,300GPON(config-if-vlan)#switchport ethernet 0/10Add VLAN port successfully.GPON(config-if-vlan)#switchport pon 0/5Add VLAN port successfully.步骤3:在上下行端口允许对应业务vlan通过GPON(config)#interface ethernet 0/10GPON(config-if-ethernet-0/10)#switchport hybrid tagged vlan 100 GPON(config)#interface pon 0/5GPON(config-if-pon-0/5)#switchport hybrid tagged vlan 100步骤4:配置DBA模板GPON(config)#profile dba name test type 4 max步骤5:配置TCONT、GEMPort以及Service-port映射关系GPON(config)#ont 0/5/1GPON(ont-0/5/1)#tcont 1GPON(ont-0/5/1-tcont-1)#gemportid 1GPON(ont-0/5/1-tcont-1)#exGPON(ont-0/5/1)#service-port 1GPON(ont-0/5/1-service-port-1)#mapping gemportid 1步骤6:绑定DBA模板GPON(ont-0/5/1-tcont-1)#bind profile dba name test步骤7:创建业务vlan并绑定到Service-portGPON(ont-0/5/1-service-port-1)#vlan 1001.1.5结果验证PC与城域网业务连通,各种业务正常1.2配置FTTH业务(HGU)本章介绍上网业务在FTTH场景下的配置1.2.1背景信息在FTTH场景下,用户通过ONU以GPON接入方式接入到OLT,实现上网FTTH典型组网1.2.2数据规划TR-069 VLAN:10Internet VLAN:100上行端口:eth 0/10下行PON口:pon 0/5ACS:10.1.1.253DHCP Server:10.1.1.2541.2.3HGU与SFU配置区别在GPON系统中,SFU一般采用OMCI(GPON标准管理协议)进行管理与配置,HGU一般采用TR-069方式进行管理与配置,因此需要引入ACS服务器,并且安装ACS集中管理软件,OLT只配置对应WAN连接的数据通道,其他业务配置由ACS自动完成1.2.4业务配置流程步骤1:自动发现并注册ONUGPON(config-if-pon-0/5)#ont-auto-findGPON(config-if-pon-0/5)#ont-auto-auth步骤2:创建各种业务VLAN并包含上下行端口GPON(config)#vlan 10,100,200,300GPON(config-if-vlan)#switchport ethernet 0/10Add VLAN port successfully.GPON(config-if-vlan)#switchport pon 0/5Add VLAN port successfully.步骤3:在上下行端口允许对应业务vlan通过GPON(config)#interface ethernet 0/10GPON(config-if-ethernet-0/10)#switchport hybrid tagged vlan 10,100GPON(config)#interface pon 0/5GPON(config-if-pon-0/5)#switchport hybrid tagged vlan 10,100步骤4:配置DBA模板GPON(config)#profile dba name test type 4 max步骤5:配置TCONT、GEMPort以及Service-port映射关系GPON(config)#ont 0/5/1GPON(ont-0/5/1)#tcont 1GPON(ont-0/5/1-tcont-1)#gemportid 1GPON(ont-0/5/1-tcont-1)#exGPON(ont-0/5/1)#service-port 1GPON(ont-0/5/1-service-port-1)#mapping gemportid 1GPON(ont-0/5/1-service-port-1)#vlan 10GPON(ont-0/5/1)#tcont 2GPON(ont-0/5/1-tcont-1)#gemportid 2GPON(ont-0/5/1-tcont-1)#exGPON(ont-0/5/1)#service-port 2GPON(ont-0/5/1-service-port-2)#mapping gemportid 2GPON(ont-0/5/1-service-port-2)#vlan 100步骤6:绑定DBA模板GPON(ont-0/5/1-tcont-1)#bind profile dba name test步骤7:PC连接HGU LAN口,登录HGU(LAN口默认地址192.168.1.1,用户名/密码:admin/123456)步骤8:创建TR-069 WAN连接,连接方式选择DHCP步骤9:查看TR-069 WAN连接状态步骤10:指定ACS服务器的URL步骤11:启动ACS服务器端步骤12:启动ACS客户端,输入用户名/密码(admin/123456),点击登录步骤13:在ACS上创建Internet业务模板,并执行配置下发增加配置模板部署配置模板到设备检查配置任务执行结果1.2.5结果验证ONU下挂PC与城域网连通,Internet业务正常。

GPON开局配置实例(F600)(已修改更新)GPON开局配置实例(F600)编者:审核:中兴通讯固⽹上海⽤服部⽬录GPON的数据规划与配置实例(F600) (1)1.1GPON组⽹及硬件配置 (1)1.2数据规划 (1)1.2.1 带内IP地址的规划 (1)1.2.2 带宽分配 (2)1.2.3 业务VLAN的规划 (2)1.2.4 优先级设置 (2)1.2.5 端⼝规划 (2)1.3登录指导 (3)1.4数据备份及初始化 (3)1.4.1 查看⽂件及⽂件夹内容 (3)1.4.2 备份数据 (4)1.4.3 清空数据 (4)1.5系统单板、机框配置 (5)1.6ONU/ONT注册配置 (6)1.6.1 查看9槽位1端⼝下未配置的ONU/ONT (6)1.6.2 注册ONU (6)1.6.3 显⽰ONU状态 (7)1.6.4 查看ONU版本 (7)1.7⽹管配置 (7)1.7.1 配置带内⽹管 (8)1.7.2 带外管理IP配置 (8)1.8业务配置 (10)1.8.1 单播业务配置 (10)1.8.2 组播业务配置 (12)1.8.3 配置gemport的下⾏限速 (16)1.9F600升级步骤 (17)1.9.1 配置FTP Server的⽤户名和密码 (17)1.9.2 升级F600版本 (17)1.9.3 查询版本状态 (19)1.10C220升级步骤 (19)1.10.1 ZXA10 C220各单板版本⽂件 (19)1.10.2 配置FTP Server的⽤户名和密码 (20)1.10.3 主控板升级 (20)1.10.4 线卡升级 (21)1.10.5 查看版本信息 (21)1.10.6 版本下载完成后重起 (23)GPON的数据规划与配置实例(F600)1.1 GPON 组⽹及硬件配置OLT上6号槽位EIGM出⼀个千兆电⼝作为上联,9号槽位GPTBB可以提供2个GPON ⼝连接ONU.7,8号槽位插GCSA(控制交换板)ONU 600可以提供4个FE⼝。
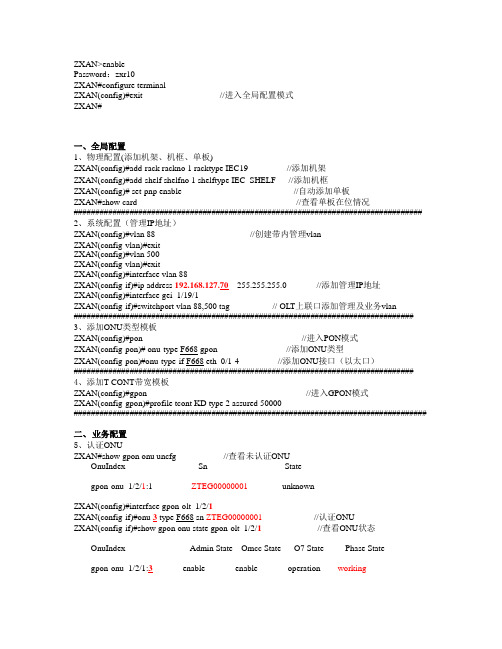
ZXAN>enablePassword:zxr10ZXAN#configure terminalZXAN(config)#exit //进入全局配置模式ZXAN#一、全局配置1、物理配置(添加机架、机框、单板)ZXAN(config)#add-rack rackno 1 racktype IEC19 //添加机架ZXAN(config)#add-shelf shelfno 1 shelftype IEC_SHELF //添加机框ZXAN(config)# set-pnp enable //自动添加单板ZXAN#show card //查看单板在位情况################################################################################# 2、系统配置(管理IP地址)ZXAN(config)#vlan 88 //创建带内管理vlanZXAN(config-vlan)#exitZXAN(config)#vlan 500ZXAN(config-vlan)#exitZXAN(config)#interface vlan 88ZXAN(config-if)#ip address 192.168.127.70255.255.255.0//添加管理IP地址ZXAN(config)#interface gei_1/19/1ZXAN(config-if)#switchport vlan 88,500 tag // OLT上联口添加管理及业务vlan############################################################################### 3、添加ONU类型模板ZXAN(config)#pon//进入PON模式ZXAN(config-pon)# onu-type F668 gpon//添加ONU类型ZXAN(config-pon)#onu-type-if F668 eth_0/1-4 //添加ONU接口(以太口)############################################################################### 4、添加T-CONT带宽模板ZXAN(config)#gpon//进入GPON模式ZXAN(config-gpon)#profile tcont KD type 2 assured 50000##################################################################################二、业务配置5、认证ONUZXAN#show gpon onu uncfg//查看未认证ONUOnuIndex Sn State---------------------------------------------------------------------gpon-onu_1/2/1:1 ZTEG00000001unknownZXAN(config)#interface gpon-olt_1/2/1ZXAN(config-if)#onu 3 type F668 sn ZTEG00000001 //认证ONUZXAN(config-if)#show gpon onu state gpon-olt_1/2/1//查看ONU状态OnuIndex Admin State Omcc State O7 State Phase State----------------------------------------------------------------------------gpon-onu_1/2/1:3enable enable operation working############################################################################### 6、配置T-CONT/GEMportZXAN(config)#interface gpon-onu_1/2/1:3//进入PON-ONU接口ZXAN(config-if)#tcont 1 profile KD//添加TCONT 1 使用带宽模板为KDZXAN(config-if)#gemport 1 unicast tcont 1 //添加GEMport 1 使用tcont 1############################################################################### 7、ONU 侧业务流映射ZXAN(config)#pon-onu-mng gpon-onu_1/2/1:3//进入ONU远程配置模式ZXAN(gpon-onu-mng)#service KD type internet gemport 1 vlan 500 //宽带业务映射ZXAN(gpon-onu-mng)#vlan port eth_0/1 mode tag vlan 500 priority 0 //ONU用户口业务vlan ############################################################################### 8、OLT 侧业务流映射ZXAN(config)#interface gpon-onu_1/2/1:3ZXAN(config-if)#service-port 1 vport 1 user-vlan 500 vlan 500###############################################################################验证:PPPoE用户名,密码:adsl1@local/adsl1。

烽火GPON开通指导手册一、OLT开通21、现场配置OLT的管理VLAN22、网管上添加网元21〕进入编辑模式22〕添加逻辑域23〕添加AN5516-01 系统34〕增加模块35〕检测物理配置36〕卡授权37〕校时38)设置告警接收地址39〕时间管理配置3二、ONU开通步骤41〕配置局端VLAN〔新增SVLAN时〕42〕配置QINQ模板〔双层VLAN情况〕43〕ONU授权44〕修改ONU名称45〕配置ONU带宽46〕ONU端口业务配置4三、ONU开通〔语音业务〕51〕局端VLAN〔新增VLAN时〕52〕NGN上联接口配置53〕NGN上联用户数据配置54〕GPON业务带宽配置55〕ONU业务配置5四、开通后配置和通道检查〔命令行〕51〕登陆GC4B盘和ONU方法52〕检查ONU配置〔ONU上〕53〕检查ONU配置〔GC4B盘上〕64〕检查ONU配置〔主控盘HSWA上〕6五、开通后通道检查〔网管〕61〕ONU上学习MAC地址情况:62〕OLT上学习MAC地址:6六、告警61〕常见告警62〕告警屏蔽6七、定期备份61〕OLT配置备份6A〕翻开WFTP软件7B〕从网管导出配置72〕数据库备份7附:一、烽火GPON设备介绍:7二、小技巧:71、ONU查询72、导入网管配置方法:81〕进入编辑模式82〕导入配置数据8一、OLT开通1、现场配置OLT的管理VLAN串口命令行设置管理vlan的命令:GEPON //第一层用户名GEPON //第一层密码EN //第一层用户名GEPON //第一层用户名cd device //进入device目录下set uplink port 19:1 enable //翻开19槽第一口set uplink port 19:1 auto_negotiation enable //翻开自协商功能cd service //进入service目录下set manage vlan name manage vid 3000 inputport 19:1 tagged//配置管理VLAN和上联端口set manage vlan name manage//配置管理IP、掩码和网关cd .. //退到根目录下//设置本地EMS口IP(用于本地接网管管理)hostname ZJQ*TZ_OLT1 //修改系统名称SAVE //保存到此配置完成,命令的详细解释请看附件:2、网管上添加网元1〕进入编辑模式点击快捷图标,点击后图标周围有蓝框:2〕添加逻辑域增加逻辑域可以方便进展区域管理,可以分权分域管理,不同用户管理不同的区域。
第一次登录MA5680T 默认用户名:root 密码:admin(conf)#display version(conf)#display board 0 //第一次加电当单板Auto_find 状态,需要确认所有单板(confter)#board confirm 0创建VLAN(conf)#vlan 4000 standard(conf)#int vlanif 4000(config-if-vlanif4000)#ip address 10.216.136.3 26(conf)#vlan 331 smart(conf)#vlan attrib 331 stacking(conf)# port vlan 331 0/17 0(conf)# ip route-static 0.0.0.0 0.0.0.0 10.216.136.1链路捆绑:(conf)# link-aggregation 0/17 0 0/18 0 egress-ingress workmode lacp-static1.创建DBA模板:(conf)#dba-profile add profile-id 20 profile-name MA5671-RF8 type3 assure 10240 max 20480 auto-confirm enable2.建立线路模板:ONT线路模板40中,配置GEM Index 1绑定T-CONT 1,用于承载ETH业务.gem mapping命令用于建立GEM Port与ONT侧业务的映射,即建立GEM Port与ONT用户接口数据流的映射关系。
执行此命令后,将会建立映射规划关系,对应的GEM Port才能用于承载业务。
(conf)#ont line-profile epon profile-id 40(conf-epon-lineprofile--20)# tcont 1 dba- profile-id 20 //每个GPON ONT线路模板下T-CONT 的最大为8(conf-epon-lineprofile--20)#gem add 1 eth tcont 1 //将ID为1的GEM Port与ID为1的T-CONT绑定。
GPON数据配置脚本1.MA5680T(config)#display ont autofind all gpon //查询上线未注册的ONU//2.MA5680T(config)#interface gpon 0/1 //进入PON板模式//3.MA5680T(config-if-gpon-0/1)#ont confirm 3 ontid 0 sn-auth 3230313120F75242 profile-id 20 description LianXi_MA5620G//在相应PON口增加注册上线的ONU//4.MA5680T(config-if-gpon-0/1)#ont ipconfig 3 0 static ip-address 10.35.10.10 mask 255.255.255.0 gateway 10.35.10.1 //下发ONU 管理地址//4.MA5680T(config-if-gpon-0/1)#ont port vlan 3 0 iphost 100 //ONU映射管理VLAN4.MA5680T(config-if-gpon-0/1)#tcont bind-profile 3 0 1 profile-id 11 //绑定流量模板//5.MA5680T(config-if-gpon-0/1)#gemport add 3 gemportid 128 eth //配置gemport//6.MA5680T(config-if-gpon-0/1)#gemport add 3 gemportid 129 eth //配置gemport//7.MA5680T(config-if-gpon-0/1)#ont gemport bind 3 0 128 1flow-car //gemport绑定tcont带宽//8.MA5680T(config-if-gpon-0/1)#ont gemport bind 3 0 129 1 flow-car //gemport绑定tcont带宽//9.MA5680T(config-if-gpon-0/1)#ont gemport mapping 3 0 128 vlan 3006 204800 409600 //gemport配置业务流VLAN映射//10.MA5680T(config-if-gpon-0/1)#ont gemport mapping 3 0 129 vlan 100 10240 10240 //gemport配置管理流VLAN映射//11.MA5680T(config)#service-port vlan 3006 gpon 0/1/3 gemport 128 multi-service user-vlan 3006 rx-cttr 6 tx-cttr 6 //配置业务流//12.MA5680T(config)#service-port vlan 100 gpon 0/1/3 gemport 129 multi-service user-vlan 100 rx-cttr 6 tx-cttr 6 //配置业务流//13.MA5680T(config)#display board 0/1------------------------------------------------------------------------------框/槽/端口 ONT 序列号控制运行配置匹配 DBA编号标志标志状态状态方式------------------------------------------------------------------------------0/ 1/3 0 3230313120F75242 激活在线正常不匹配 SR------------------------------------------------------------------------------14.MA5680T(config)#display service-port port 0/1/3命令:display service-port port 0/1/3---------------------------------------------------------------------------索引 VLAN VLAN 端口框/槽/端口 VPI VCI 业务参数 RX TX 状态ID 属性类型---------------------------------------------------------------------------12 3006 common gpon 0 /1 /3 128 - vlan 3006 6 6 正常13 100 common gpon 0 /1 /3 129 - vlan 100 6 6 正常---------------------------------------------------------------------------15.MA5680T(config)#undo service-port port 0/1/3 gemport 12816.MA5680T(config)#undo service-port port 0/1/3 gemport 12917.MA5680T(config)#display service-port port 0/1/3失败: 没有业务虚端口可以操作18.MA5680T(config-if-gpon-0/1)# undo ont gemport mapping 3 0 12819.MA5680T(config-if-gpon-0/1)# undo ont gemport mapping 3 0 129删除映射成功:120.MA5680T(config-if-gpon-0/1)#undo ont gemport bind 3 0 12821.MA5680T(config-if-gpon-0/1)#undo ont gemport bind 3 0 129GEM port去绑定成功22.MA5680T(config-if-gpon-0/1)#gemport delete 3 gemportid 12823.MA5680T(config-if-gpon-0/1)#gemport delete 3 gemportid 129GEM port删除成功 : 124.MA5680T(config-if-gpon-0/1)#undo tcont bind-profile 3 0 1T-CONT 解除绑定模板成功25.MA5680T(config-if-gpon-0/1)#ont delete 3 0可以被删除的ONT数目: 1, 成功数目: 1ONU数据配置:1.MA5626G(config)#display current-configuration2.MA5626G(config)# undo service-port all3.MA5626G(config)#vlan 30064.MA5626G(config)#port vlan 3006 0/0 15.MA5626G(config)#service-port vlan 3006 eth 0/1/1 user-vlan untagged rx-cttr 6 tx-cttr 6service-port vlan 3006 eth 0/1/2 user-vlan untagged rx-cttr 6 tx-cttr 6service-port vlan 3006 eth 0/1/3 user-vlan untagged rx-cttr 6 tx-cttr 6service-port vlan 3006 eth 0/1/4 user-vlan untagged rx-cttr 6 tx-cttr 6service-port vlan 3006 eth 0/1/5 user-vlan untagged rx-cttr 6 tx-cttr 6service-port vlan 3006 eth 0/1/6 user-vlan untagged rx-cttr 6 tx-cttr 6service-port vlan 3006 eth 0/1/7 user-vlan untagged rx-cttr 6 tx-cttr 6service-port vlan 3006 eth 0/1/8 user-vlan untagged rx-cttr 6 tx-cttr 6service-port vlan 3006 eth 0/1/9 user-vlan untagged rx-cttr 6 tx-cttr 6service-port vlan 3006 eth 0/1/10 user-vlan untagged rx-cttr 6 tx-cttr 6service-port vlan 3006 eth 0/1/11 user-vlan untagged rx-cttr 6 tx-cttr 6service-port vlan 3006 eth 0/1/12 user-vlan untagged rx-cttr 6 tx-cttr 6service-port vlan 3006 eth 0/1/13 user-vlan untagged rx-cttr 6 tx-cttr 6service-port vlan 3006 eth 0/1/14 user-vlan untagged rx-cttr 6 tx-cttr 6service-port vlan 3006 eth 0/1/15 user-vlan untagged rx-cttr 6 tx-cttr 6service-port vlan 3006 eth 0/1/16 user-vlan untagged rx-cttr 6 tx-cttr 6service-port vlan 3006 eth 0/1/17 user-vlan untagged rx-cttr 6 tx-cttr 6service-port vlan 3006 eth 0/1/18 user-vlan untagged rx-cttr 6 tx-cttr 6service-port vlan 3006 eth 0/1/19 user-vlan untagged rx-cttr 6 tx-cttr 6service-port vlan 3006 eth 0/1/20 user-vlan untagged rx-cttr 6 tx-cttr 6service-port vlan 3006 eth 0/1/21 user-vlan untagged rx-cttr 6 tx-cttr 6service-port vlan 3006 eth 0/1/22 user-vlan untagged rx-cttr 6 tx-cttr 6service-port vlan 3006 eth 0/1/23 user-vlan untagged rx-cttr 6 tx-cttr 6service-port vlan 3006 eth 0/1/24 user-vlan untagged rx-cttr 6 tx-cttr 66.save删除数据1.undo service-port all2.MA5626G(config)#undo port vlan 3006 0/0 13.MA5626G(config)#undo vlan 3006。
GPON开局配置指南(F822)(C300V1[1].0.0T8)内部公开▲1.6.3.8 配置ONU上的组播数据1. 进入ONU远程管理模式,在F822的GPUA子卡上建立组播vlan 201。
ZXAN(config)# pon-onu-mng gpon-onu_1/4/1:64 ZXAN(gpon-onu-mng)# flow mode 255 tag-filter vid-filter untag-filter discard ZXAN(gpon-onu-mng)# flow 255 priority 0 vid 201 ZXAN(gpon-onu-mng)# exit2. 在OLT侧通过ONU的带内管理通道,telnet到ONU上,配置F822本地的组播数据。
这里使用以太网口fei_0/1/3,作为组播业务接口。
F822-C300(config)#igmp onu-mode snooping F822-C300(config)#interface fei_0/2/3 F822-C300(config-if)#switchport vlan 201 tag F822-C300(config-if)#igmp mvlan 201 F822-C300(config-if)#igmp max-group 255 F822-C300(config-if)#igmp fast-leave enable F822-C300(config-if)#igmp tag-stripe disable F822-C300(config-if)#igmp mvlan-translate disable F822-C300(config-if)#exit如果该FE接口,直接和计算机相连,则需要将vlan 201配置为default vlan,如下:F822-C300(config)#interface fei_0/1/3F822-C300(config-if)#switchport default vlan 201 F822-C300(config-if)#exit 1.6.3.9 配置虚端口VLAN1. 进入ONU接口模式。
第一步:系统配置>>User// 输入用户名>>User// 输入密码>>MA5680T>// 进入普通模式>>MA5680T// 进入超级模式>>MA5680T(config)// 切换成本地语言>>MA5680T(config)#displayboard0#switchlanguage-mode#configenablepassword:adminname:root// 查看所有单板,如果有“待确认”单板,请用下一命令>>MA5680T(config)// 确认所有单板>>MA5680T(config)// 设备命名>>MA5680T(config)#terminal// 修改用户密码#boardconfirm0#sysname*********************userpassword>>MA5680T(config)#terminal//创建新用户名/密码username>>(config)#autosaveintervalon〃打开自动保存------------------- 第二步:配置管理数据---------------------------- ---------------------------------------- >>MA5680T(config)#vlanxxstandard/创建管理VLAN(一般选standard 类型)>>MA5680T(config)#portvlanxx0/190〃在上行口透传管理VLAN上行端口,5680T上行端口共4 个,分别为0/19 0,0/19 1,0/20 0,0/20 1)>>MA5680T(config)#vlanxx(xxtoxx)smart〃创建业务VLAN 一般选SMART类型)>>MA5680T(config)#portvlanxx(xxtoxx)0/190〃在上行口透传业务VLAN到上行端口>>MA5680T(config)#//创建VLAN三层虚接口>>(config-if-vlanif40)#ipaddressxxx.xxx.xxx.xxxxxx.xxx.xxx.xx>配£置管理IP地址>>(config-if-vlanif40)#descriptionxxxxxxxxxxxxxxxxxxxxxxxxxxxxxxxxxx对上层端口进行描述>>// 退出接口,返回上层(config-if-vlanif40)#quitinterfacevlanifxx>>(config)#iproute-static0.0.0.00.0.0.0xxx.xxx.xxx.xxx// 配置缺省路由---------------------- 第三步:配置ONT ---------------------------------------------步骤一:配置DBA模板(DBA就是动态分配带宽机制)>>(config)#dba-profileaddprofile-id18profile-name"100M"type2assure102400//1 :8 分光器流量模版>>(config)#dba-profileaddprofile-id116profile-name"77M"type2assure67968//1 :16 分光器流量模版>>(config)#dba-profileaddprofile-id132profile-name"40M"type2assure36672//1 :32 分光器流量模版步骤二:配置线路模板(基于优先级映射方式)>> (config)#ont-lineprofile gpon profile-id 100 profile-name "1:8_ONU">>(config-gpon-lineprofile-100)#mapping-modepriority// 设置映射类型为优先级映射// 以下用于创建通道:>> (config-gpon-lineprofile-100)#tcont 0 dba-profile-id 100>>(config-gpon-lineprofile-100)#gemadd0ethtcont0// 添加GEM port>> (config-gpon-lineprofile-100)#gem add 1 eth tcont 0>> (config-gpon-lineprofile-100)#gem add 2 eth tcont 0>> (config-gpon- lineprofile-100)#gem add 3 eth tcont 0>>(config-gpon-lineprofile-100)#gemmapping00priority0// 设置优先级映射关系>> (config-gpon-lineprofile-100)#gem mapping 1 0 priority 4>> (config-gpon-lineprofile-100)#gem mapping 2 0 priority 3>> (config-gpon-lineprofile-100)#gem mapping 3 0 priority 6>>(config-gpon-lineprofile-100)#commit// 退出之前保存线路模版配置,否则配置无效。
>> (config-gpon-lineprofile-100)#quit>>(config)#ont-lineprofilegponprofile-id200profile-name"1:16_ONU">> (config-gpon-lineprofile-200)#mapping-mode priority>> (config-gpon-lineprofile-200)#tcont 0 dba-profile-id 200>> (config-gpon-lineprofile-200)#gem add 0 eth tcont 0>> (config-gpon-lineprofile-200)#gem add 1 eth tcont 0>> (config-gpon-lineprofile-200)#gem add 2 eth tcont 0>> (config-gpon-lineprofile-200)#gem add 3 eth tcont 0>> (config-gpon-lineprofile-200)#gem mapping 0 0 priority 0>> (config-gpon-lineprofile-200)#gem mapping 1 0 priority 4>> (config-gpon-lineprofile-200)#gem mapping 2 2 priority 3>> (config-gpon-lineprofile-200)#gem mapping 3 0 priority 6>> (config-gpon-lineprofile-200)#commit>> (config-gpon-lineprofile-200)#quit>>(config)#ont-lineprofilegponprofile-id300profile-name"1:32_ONU">> (config-gpon-lineprofile-300)#mapping-mode priority>> (config-gpon-lineprofile-300)#tcont 0 dba-profile-id 300>> (config-gpon-lineprofile-300)#gem add 0 eth tcont 0>> (config-gpon-lineprofile-300)#gem add 1 eth tcont 0>> (config-gpon-lineprofile-300)#gem add 2 eth tcont 0>> (config-gpon-lineprofile-300)#gem add 3 eth tcont 0>> (config-gpon-lineprofile-300)#gem mapping 0 0 priority 0>> (config-gpon-lineprofile-300)#gem mapping 1 0 priority 4>> (config-gpon-lineprofile-300)#gem mapping 2 2 priority 3>> (config-gpon-lineprofile-300)#gem mapping 3 0 priority 6>> (config-gpon-lineprofile-300)#commit>> (config-gpon-lineprofile-300)#quit------------- 第四步:注册ONT,并设置其管理 ------------------------ >>MA5680T(config)#interface gpon0/1// 进入业务单板>>MA5680T(config-if-gpon-0/1)#portxont-auto-findenable//开启端口(0-3或0-7)的自动发现ONT功能>>MA5680T(config-if-gpon-0/1)#displayontautofindIPx// 查看x 端口下自动发现的设备命令显示:Command:display ont autofind 0NumberF/ S/ PSNPassword10/ 7/ 032303131B402AC41>>MA5680T(config-if-gpon-0/1)#ont addx (端口号)x (ONT编号)sn- authxxxxxxxxxxxxxxx)设备序列号)snmpont-lineprofile-id200descxxxx//ONT 编号按照光分器不同而取值范围不同,分别为0-7、0-15、0-31,顺序无所谓,不发生重复即可。