12月1日 Team A 安装方案(终稿)
- 格式:doc
- 大小:9.04 MB
- 文档页数:88
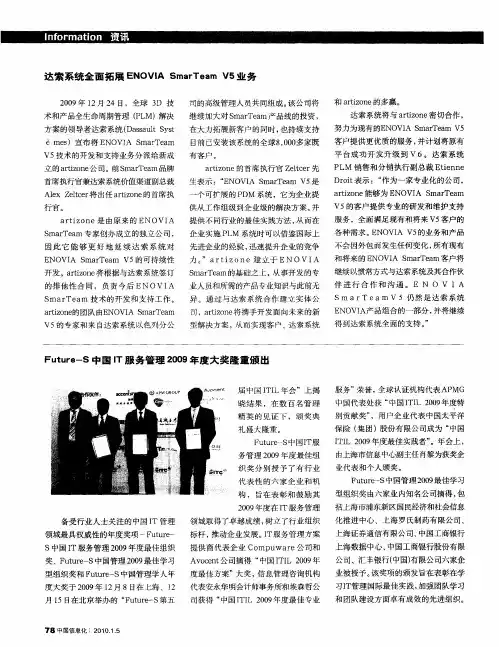
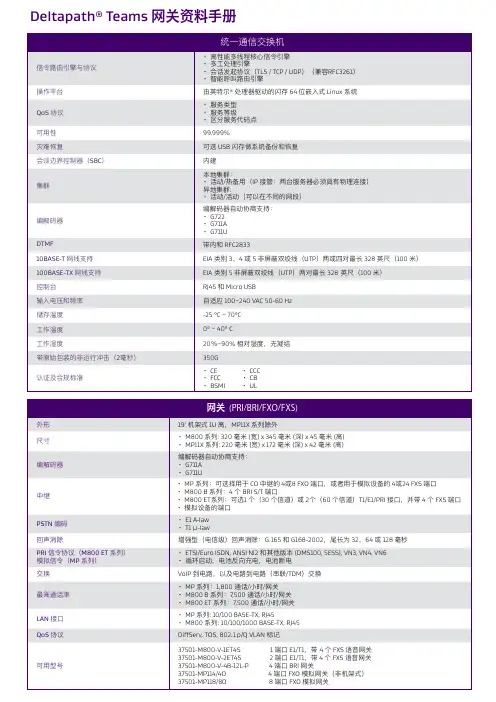
Deltapath® Teams 网关资料手册• 19’ 机架式• 1 U 高• 443 毫米(宽)x 406.8 毫米(深)x 44 毫米(高)• 19’ 机架式• 1U 高• 434 毫米(宽)x 606.47 毫米(深)x 42.8 毫米(高)1冗余 + 1热插拔电源模组关于 DeltapathDeltapath 将企业从阻碍有效通信的藩篱中解放出来,并通过创新的技术,满足企业所需所想,革新企业的通信方式。
我们专注于将不同的通信平台、音频和视频设备、电话、台式机和移动设备整合在一起,通过这样的解决方案使通信变得容易且直观。
我们相信,每个解决方案都应体现简单之美,并为用户提供及时且触手可及的通信方式。
© 2020 Deltapath Inc. All rights reserved. Deltapath, the Deltapath logo, are registered trademarks of Deltapath, Inc. All other trademarks are property of their respective owners. No portion hereof may be reproduced or transmitted in any form or by any means, for any purpose other than the recipient’s personal use, without the express written permission of Deltapath. Deltapath reserves the right to change, modify, transfer, or otherwise revise this publication without notice.订购信息如欲了解更多有关 Deltapath Teams 网关的资讯,请联系我们的Deltapath 销售代表。
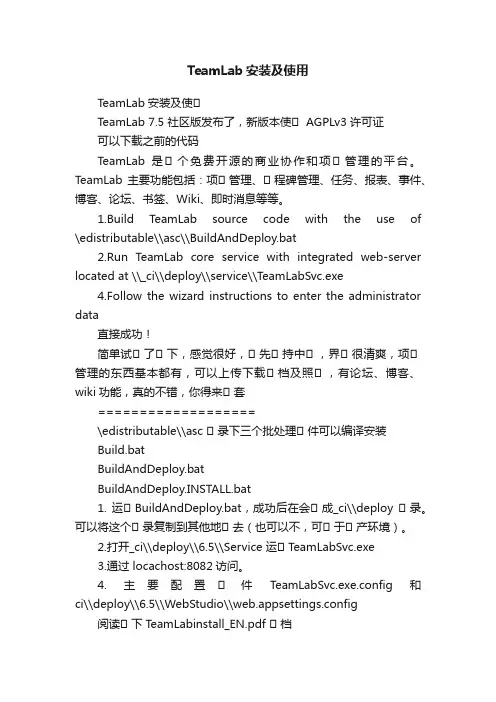
TeamLab安装及使用TeamLab安装及使⽤TeamLab 7.5 社区版发布了,新版本使⽤ AGPLv3 许可证可以下载之前的代码TeamLab 是⽤个免费开源的商业协作和项⽤管理的平台。
TeamLab 主要功能包括:项⽤管理、⽤程碑管理、任务、报表、事件、博客、论坛、书签、Wiki、即时消息等等。
1.Build TeamLab source code with the use of \edistributable\\asc\\BuildAndDeploy.bat2.Run TeamLab core service with integrated web-server located at \\_ci\\deploy\\service\\TeamLabSvc.exe4.Follow the wizard instructions to enter the administrator data直接成功!简单试⽤了⽤下,感觉很好,⽤先⽤持中⽤,界⽤很清爽,项⽤管理的东西基本都有,可以上传下载⽤档及照⽤,有论坛、博客、wiki功能,真的不错,你得来⽤套===================\edistributable\\asc ⽤录下三个批处理⽤件可以编译安装Build.batBuildAndDeploy.batBuildAndDeploy.INSTALL.bat1. 运⽤BuildAndDeploy.bat,成功后在会⽤成_ci\\deploy ⽤录。
可以将这个⽤录复制到其他地⽤去(也可以不,可⽤于⽤产环境)。
2.打开_ci\\deploy\\6.5\\Service 运⽤TeamLabSvc.exe3.通过 locachost:8082访问。
4. 主要配置⽤件TeamLabSvc.exe.config 和ci\\deploy\\6.5\\WebStudio\\web.appsettings.config阅读⽤下T eamLabinstall_EN.pdf ⽤档====================================== ========================================= 安装遇到遇到的问题:警告1 “LIB 环境变量”“C:\\Program Files\\Microsoft Visual Studio\\VC98\\mfc\\lib”问题分析:由于原来安装VC6和VB6。

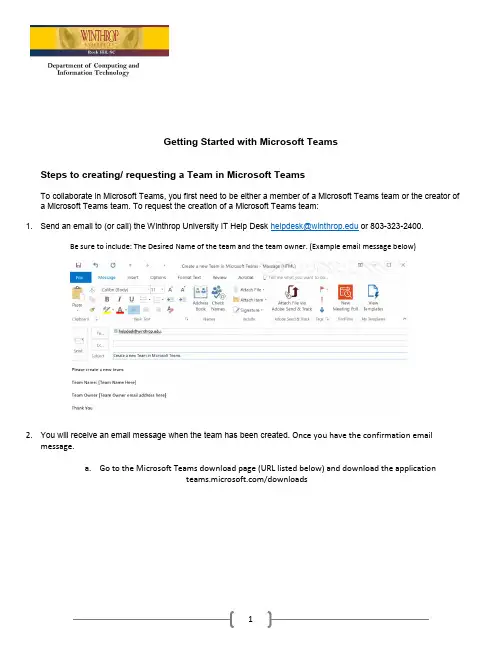
Getting Started with Microsoft TeamsSteps to creating/ requesting a Team in Microsoft TeamsTo collaborate in Microsoft Teams, you first need to be either a member of a Microsoft Teams team or the creator ofa Microsoft Teams team. To request the creation of a Microsoft Teams team:1. Send an email to (or call) the Winthrop University IT Help Desk ********************* or 803-323-2400.Be sure to include: The Desired Name of the team and the team owner. (Example email message below)2.You will receive an email message when the team has been created. Once you have the confirmation emailmessage.a.Go to the Microsoft Teams download page (URL listed below) and download the application/downloads1.Click the “Download Teams” button2.The Teams Application will be downloaded3.Once the download is completed, click on the Teams installer executable4.The Microsoft Teams application will begin to install5.Once complete you will get the Microsoft Teams login screen6.Microsoft Teams will load and openSteps to using Microsoft TeamsUnderstanding the Microsoft Teams Window•App bar: Here you can navigate to the various sections in Microsoft Teams. From the top, you’ll see the following icons:o Activity is where you’ll find mentions, replies, and other notifications.o Chat is where you’ll see your recent one-on-one or group chats and your Contacts list.o Teams displays all the Teams you are a member of.o Meetings is synched with your Outlook calendar and displays all your upcoming meetings.o Files aggregates all the files from all the Teams you are a member of. It is also where you access your personal OneDrive for Business storage.o[…] includes links to apps that are tied to Teams and the channels within Teams.o Store takes you to apps and services that can be integrated into Teams.o Feedback takes you to the Microsoft Teams user voice page where you can leave feedback about the service.•Teams section: Above, the Teams icon is selected in the App bar, so the list of the teams we are members of are displayed here.•Channel: A dedicated section within a Team to organize conversations and tasks into specific topics or projects.•Join a Team button: Clicking this button takes you through the process of joining a team. This button is only visible when the Teams icon is selected in the App bar.•New Chat button: Clicking this button selects the Chat icon in the App bar and allows you to start a new chat with an individual or a group.•Command bar: This bar at the top is used to query apps or perform a search in Teams.•Tabs: Switch between different Teams pages with these tabs. Conversations and Files are automatically included; the + sign tab allows you to add shortcuts to content in Teams.•Channel Conversations: This section displays all the conversations in the selected channel. Chats in Channel Conversations are persistent, so if you’ve been away, it’s easy to scroll through to get caught up when you get back. Chats can include visual indicators such as the @mention, which indicates that the chat specifically mentions a user, or a red bang to indicate high importance. Take note that chats are open by design so everyone in the team has visibility to the conversation to help speed up the decision-making process when needed.•Compose box: This is where you can type a message to start a conversation. You can send a quick chat or expand the Compose box to access rich formatting tools.•Send icon: When you’re ready to share your chat, click the Send icon to post your chat to the teamGetting help from the Microsoft Teams Command barMicrosoft Teams is intuitive to use, but you if you need quick assistance, the Command bar is your one-stop destination for help. You can do a search across conversations, users, files, and apps. For example, if you enter the word “launch” in the command bar, the left pane will display the search results grouped by Messages, People, and Files.Chatting in Microsoft TeamsTo start a chat, click on the Compose Box and start typing your message while in either the Activity, Chat, or Teams sections. When you’re done, click the Send icon to post your message. Depending on the culture of your team, you can spice up your chats with emoji’s, Giphys, or stickers. You’ll find a variety of options when you click these icons below the Compose Box.Sharing files in Microsoft Teams1. Select Teams from the App bar.2. Compose a message in the Compose box from a channel.3. Click the Attach icon (it looks like a paperclip) below the Compose box and select the source for theattachment you want to share.4.Select the file from the source and upload it. The file you uploaded will now be embedded in the message.5. Click the Send icon (it looks like an airplane) to post your message. The file you shared will also show up inthe Files tab.6. Alternatively, you can go directly to the Files tab and click the Upload button to upload a file. Once the file isuploaded, click the name of the file to open it. Once opened, you can start a conversation with othersregarding the document.Opening a file inSharePoint fromTeams.Meeting and conferencing using Microsoft TeamsImpromptu MeetingLet’s say for example you are chatting with three members of your team about an issue. After a lengthy back and forth and waiting times in between, you decided it’s much faster to just get on a call and talk about the issue. To start an impromptu meeting:1. Reply to the conversation thread and click the Video icon that appears at the bottom of the Compose box.2. From the video window that pops up, enter a subject for your call.3. Toggle the video camera on or off to choose between sharing your video or just audio.4. Click Meet Now to start the conference.5. When you’re done with the meeting, click the red phone icon to end the call and leave the meeting.A conference window will open with a pane on the right where you can invite others to join the meeting.Scheduling a Microsoft Teams meetingYou can set up a formal meeting ahead of time and give the invited participants enough notice about a meeting. Like Outlook, formal meeting requests in Teams include a Meeting Title (the equivalent of Subject in Outlook), Location, Start and End Date or Time, Details, and a list of participants. In Teams, you can select a channel to meet in. When a channel is selected, artifacts from the meeting are posted in the channel.To schedule a Teams meeting:1.Click Meetings from the Apps bar.2.Click the Schedule a Meeting button that appears at the bottom of the left pane.3.From the New meeting window, enter the Title, Location, Start and End Date/Time, Details, Channel, and the namesof the people you want to invite to the meeting.Optionally, you can add a channel for the meeting.4.If you want to check people’s availability, click Schedule Assistant above the Details section to display yourparticipants’ availability based on their Outlook calendars.5.Click the Schedule a Meeting button.The meeting is now scheduled and will appear in the Meetings section in Teams as well as in your Outlook calendar.Microsoft Teams University – Free Training Faculty / Staff Collaboration Videos Faculty and Staff Collaboration Microsoft Teams University EducatorsTeams University course collaborationTeams Scenarios for Higher EdOutlined below are downloadable training resources:Getting Started with Teams for Education PowerPoint Presentation Welcome to Microsoft Teams PowerPoint Presentation。
================================================================================================================================================================EON ALTAR游戏指南包括季节1 ================================================================================================================================================================================================================================================关于本指南================================================================================本指南的组织**************************本文包括有关Windows / Mac电脑的Eon Altar的十一章。
这些主题是1)有关游戏的一般信息,你的技术问题可能碰到和FAQ,2)关于如何控制游戏的基础知识,3)英雄和他们的能力,能力和装备,4)敌人和盟友,5)战术,6)资源和制作/抢劫物品,7)地图,8)故事的任务,9)成就,10)战斗竞技场,和11)本指南的版本历史。
目标受众*****************这个文本是一个内存帮助和参考,以防您需要搜索一些游戏过程中的信息。
你可以找到有用的提示和其他信息通过您的网络浏览器使用单词搜索。
尝试例如搜索爆炸射弹,齿轮槽,阻挡,有趣的攻击,多重打击和光芒四射的攻击。
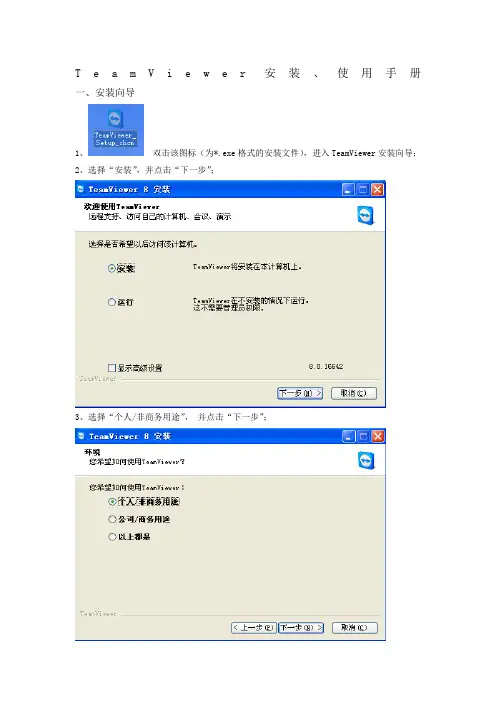
T e a m V i e w e r安装、使用手册一、安装向导
1、双击该图标(为*.exe格式的安装文件),进入TeamViewer安装向导;
2、选择“安装”,并点击“下一步”;
3、选择“个人/非商务用途”,并点击“下一步”;
4、选择“我接受‘许可证协议’中的条款”与“我同意仅将TeamViewer用于非商业用途及私人用途”,并点击“下一步”;
5、选择“无(缺省)”,并点击“完成”。
等待1-3分钟,自动安装过程将自行完成。
二、TeamViewer使用向导
1、双击该图标(为*.exe格式的快捷方式),进入TeamViewer软件;
2、在软件左上方选择“连接—设置无人值守访问……”,并点击,以进入设置向导;
3、进入“无人值守访问”后,直接点击“下一步”;
4、“定义个人密码”(计算机名使用默认就好),点击“下一步”;
5、选择“我现在不想创建TeamViewer账户”,点击“下一步”;
6、记下ID号以及第4步所设置的密码,点击“完成”。
注:在安装TeamViewer软件的时候不要使用杀毒软件阻止TeamViewer的相关系统设置,让该软件开机启动。
苏州金石投资管理股份有限公司
2013年2月25日。
![大学英语四课后练习答案及详解[终稿]](https://uimg.taocdn.com/e66a370ba66e58fafab069dc5022aaea998f41f6.webp)
大学英语四课后练习答案及详解目录Unit One Fighting with the Forces of NatureUnit Two Smart CarsUnit Three Job InterviewUnit Four The Multicultural SocietyUnit Five CrueltyUnit Six The Pace of LifeUnit Seven T errorismUnit Eight TravelUnit One Fighting with the Forces of NatureComprehension Text organization 1.2.Language FocusV ocabulary1.1) alliance译文:劳动党以与其他较小党派结成战术同盟为根本的竞选策略已被证明是成功之举。
2) heroic译文:举国上下都在庆祝纽约消防队员在“9.11”事件中营救落难者的英勇行为。
3) stroke译文:意外的好运使得被埋于瓦砾堆下逾26个小时之久的詹尼勒活着走出来。
4) limp译文:我的兄弟受伤不重,但是他的腿骨折了,因而不得不在几周时间里都跛行。
5) minus译文:飞机面临着一次零下65摄氏度和零上120摄氏度的考验。
6) regions译文:我国将运用税收优惠政策来吸引一些公司到我国的西部地区而不是东部沿海投资。
7) declarations译文:开幕式的讲话听起来不像是和平献礼而更像是宣战。
8) siege译文:经过警方的三天包围,占据饭店的恐怖分子不得不妥协了。
9) raw译文:我们刚一走出飞机踏上草原就感受到一阵刺骨阴冷的寒风。
10) retreat译文:敌机的攻击迫使坦克从这座城市撤退了。
11) have taken their toll译文:过去几个月里令人烦恼的一些问题已影响到了她的健康,她的眼睛下面出现了黑眼圈。
12) In the case of译文:周末上班的员工拿双薪,国庆节上班的员工则拿正常工资的三倍。

Quest NetVault Backup12.1Quest® NetVault® Backup 12.1发行说明2018 年 9 月这些发行说明提供了有关 Quest® NetVault® Backup 发行的信息。
主题:•关于本次发行•新增特性•增强功能•已解决的问题•已知问题•系统要求•产品授权•升级和安装说明•更多资源•全球化•关于我们关于本次发行Quest NetVault Backup(简称为 NetVault Backup)提供市场上最先进的跨平台数据保护功能,而且极容易使用,即装即用,还非常易于扩展。
NetVault Backup 允许您从一个直观的用户界面同时保护物理和虚拟环境中的数据及应用程序,可以保护分布在大量服务器上的 PB 级的数据。
NetVault Backup 还有一个特色是可提供异构支持,以便您可以保护各种操作系统、应用程序、数据库、处理器架构和网络存储设备上的数据。
这种跨平台多功能性可让您轻松调整 NetVault Backup,以便与不断变化和发展的 IT 基础设施环境保持一致。
NetVault Backup12.1 是次要版本,包含增强特性和功能。
如需完整的产品文档,请访问https:///zh-cn/technical-documents。
新增特性NetVault Backup12.1 新增特性:•增加了对 Quest® Foglight®for Virtualization、Enterprise Edition 8.8 或更高版本的支持。
•增加了对在基于 Linux 的计算机上推送安装的支持。
(DNAD-703)•增加了对作为托管服务提供商 (MSP) 的支持。
(NVBU-17607)•增加了对使用轻型目录访问协议 (LDAP)将 Active Directory (AD) 与 Linux 集成的支持。
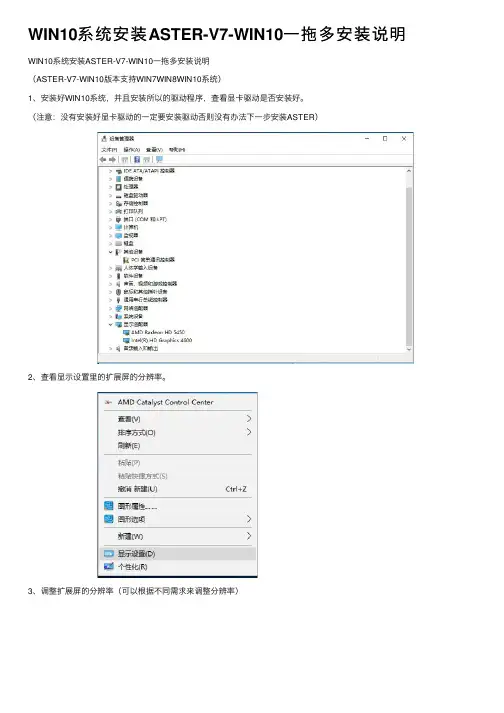
WIN10系统安装ASTER-V7-WIN10⼀拖多安装说明WIN10系统安装ASTER-V7-WIN10⼀拖多安装说明(ASTER-V7-WIN10版本⽀持WIN7WIN8WIN10系统)1、安装好WIN10系统,并且安装所以的驱动程序,查看显卡驱动是否安装好。
(注意:没有安装好显卡驱动的⼀定要安装驱动否则没有办法下⼀步安装ASTER)2、查看显⽰设置⾥的扩展屏的分辨率。
3、调整扩展屏的分辨率(可以根据不同需求来调整分辨率)4、这⾥我是将分辨率调整成⼀样⼤⼩的。
5、将分辨率调整好过后点应⽤。
6、应⽤好后在点保存更改。
那我们可以添加⽤户账户数。
8、选择添加⼀个没有Microsoft帐户的⽤户,点击下⼀步。
9、创建帐户。
10、输⼊账户的名称。
11、帐户就已经创建好了,下⾯将安装ASTER程序。
12、选择安装ASTER-V7-WIN10-SETUP程序13、ASTER-V7-WIN10这是语⾔选择这⾥我选English,点击OK。
14、选择Next。
15、在选择Next。
16、选择I agree to these terms and conditions打勾,在选择Next。
17、选择O打勾在点击Install下⼀步。
18、选择NO,I will restart Windows later不重启电脑,在点击Finish完成19、打开ASTER控制⾯板程序。
20、选择⼀拖多的⼯作的⽤户数,如⼀拖四的那下在要打开四个⽤户数,1-4打开。
21、选择打开。
22、4个⽤户数都打开了。
23、添加每个ASTER⼀拖多⼯作站,⽤不同的WIN账户登录。
24、这⾥我们选择(⼯作站1)⽤U1帐户登录。
24、选择好帐户点击OK应⽤。
25、以上的步骤省略不在说明了,每个⼯作站现在都对应不同的WIN账户登录,选择Automatically run ASTER workplacse on system startup每次开机启动ASTER程序。

软件系统部署方案目录一、内容概括 (2)1.1 编写目的 (3)1.2 背景介绍 (3)1.3 部署原则 (4)二、需求分析 (5)2.1 功能需求 (6)2.2 性能需求 (7)2.3 安全性需求 (8)2.4 可维护性需求 (9)三、环境准备 (11)3.1 硬件环境 (12)3.2 软件环境 (12)3.3 网络环境 (14)四、部署步骤 (15)4.1 服务器配置 (16)4.2 软件安装与配置 (18)4.3 数据库部署 (18)4.4 系统测试 (19)4.5 部署上线 (21)五、风险管理 (22)5.1 技术风险 (22)5.2 网络风险 (23)5.3 安全风险 (25)5.4 其他风险 (26)六、运维管理 (27)6.1 监控与日志 (28)6.2 故障排查与处理 (29)6.3 定期维护 (30)6.4 安全策略更新 (31)七、培训与支持 (32)7.1 用户培训 (33)7.2 技术支持 (35)7.3 售后服务 (36)八、总结与展望 (37)8.1 实施效果 (38)8.2 后续工作 (39)8.3 发展规划 (40)一、内容概括本文档旨在提供一个全面且详细的软件系统部署方案,以确保系统的顺利、高效部署,并满足业务需求。
方案涵盖了从前期准备到后期维护的各个阶段,包括系统评估、环境搭建、资源配置、安装与配置、测试、用户培训、上线以及后续监控与优化等关键步骤。
在系统评估阶段,我们会对现有系统进行全面检查,识别潜在的问题和挑战,为后续部署提供决策依据。
环境搭建环节,我们将根据系统需求选择合适的硬件和网络环境,并确保环境的稳定性和可扩展性。
资源配置部分,则会根据系统需求合理分配服务器、数据库等资源,以满足系统运行所需。
安装与配置阶段,我们将按照预定的软件版本和配置要求进行系统安装,并进行必要的配置,以确保系统的稳定性和性能。
测试环节将覆盖系统的主要功能,通过全面的测试来发现并修复潜在的问题,提高系统的可靠性和稳定性。
Informatica 安装手册版本:V1.0All rights reserved版权所有侵权必究文档修订记录目录1简介 (4)1.1编写目的 (4)1.2范围 (4)2运行环境 (4)2.1硬件平台 (4)2.2软件平台 (4)3使用者 (4)4BUILD版本须知 (6)5数据库搭建 (6)5.1创建数据库实例 (6)5.2创建数据库表空间、用户和角色 (6)5.2.1创建表空间 (6)5.2.2创建用户 (6)6INFORMATICA POWERCENTER8.5.1 安装 (9)6.1准备工作 (9)6.2开始安装 (10)6.2.1上传Informatica安装介质和license.key到服务器上 (10)6.2.2Informatica安装过程 (10)6.3环境变量配置 (16)6.4启停服务 (17)7INFORMATICA配置 (18)7.1.1登陆PowerCenter Administrator Console (18)7.1.2创建Repository Service (19)7.1.3创建Integration Service (20)7.1.4客户端连接配置 (22)7.1.5建立Folder (24)7.1.6创建连接串 (26)7.1.7导入ETL开发程序 (28)7.1.8Assign Integration Service (33)7.2修改I NFORMA TICA知识库配置文件 (34)1 简介1.1 编写目的本文档详细说明了Informatica的安装步骤。
通过该文档,Informatica的最终使用者将能够顺利的搭建Informatica的运行环境。
1.2 范围该文档适用环境的相关部署人员,文档使用者需要对UNIX、Linux、Aix、Weblogic和ORACLE比较熟悉,如有必要请参考相关文档。
2 运行环境2.1 硬件平台无。
2.2 软件平台服务器⏹IBM AIX,Linux,Windows,HP-UX。
医院供应中心消毒物品追溯管理系统方案建议书三亚是人民医院CSSD可追溯信息管理系统技术方案书建议杭州美美软件开发有限公司2014年12月医院供应中心消毒物品追溯管理系统方案建议书目录第一章项目综述 .....................................................5 1.1 项目背景分析 (5)1.2 项目建设目标 (6)1.3 项目实施建议 (8)第二章技术方案建议 .................................................9 2.1 技术设计原则 (9)2.1.1 规范性 (9)2.1.2 安全性 (10)2.1.3 严谨性 (10)2.1.4 实用性 (10)2.1.5 先进性 (10)2.1.6 专业性 (11)2.1.7 灵活性 (11)2.1.8 可扩展性 (11)2.2 系统平台方案 (11)2.2.1 项目组网方案 (11)2.2.2 网络通信建议 (12)2.2.3 数据库服务器建议 (13)2.2.4 数据存储和备份建议........................................ 13 2.3 技术实现原理 ................................................. 13 2.4 运营扩展管理建议 ............................................. 16 2.4.1 手术室管理建议............................................ 16 2.4.2 内镜洗消中心.............................................. 17 2.4.3 区域消毒供应中心.......................................... 18 第三章消毒物品包管理 .............................................. 193.1 CSSD消毒物品包 ............................................... 19 3.1.1 标签设计.................................................. 19 3.1.2 作业流程.................................................. 20 3.1.3 篮筐标识.. (20)杭州美美科技有限责任公司第2页/共47页医院供应中心消毒物品追溯管理系统方案建议书3.2 手术室消毒物品包 .............................................21 3.2.1 标签设计 (21)3.2.2 作业流程 (21)3.2.3 篮筐标识 (22)3.3 寄消包管理 (22)3.4 一次性物品 ...................................................23 3.5 外来器械管理 (23)3.6 实验包管理 (24)3.7 贵重器械追溯 .................................................25 第四章美美软件介绍及价格 ..........................................26 4.1 软件模块介绍 (26)4.2 主要模块介绍 (28)4.2.1 器械包采编管理 (28)4.2.2 消毒灭菌流程介绍 (29)4.2.3 手术科室管理.............................................. 314.2.4 业务数据调整. (33)4.2.5 护士长信息桌面 (35)4.2.6 消毒物品质量追溯 (36)4.3 软件价格 (37)第五章项目硬件配置建议 ............................................37 5.1 CSSD平面布局 .................................................38 5.2 项目需求描述 (38)5.3 设备配置需求 (38)5.4 数据库服务器 ................................................. 405.5 CSSD无线网络 . (41)5.6 专业设备方案建议 (41)5.6.1 规范性 (41)5.6.2 工作移动性 (41)5.6.3 信息安全性 (41)5.6.4 卫生安全性 (42)杭州美美科技有限责任公司第3页/共47页医院供应中心消毒物品追溯管理系统方案建议书5.6.5 可扩展性 (42)5.6.6 数据采集能力 (42)5.7 设备选型建议及参数说明 (42)5.7.1 一体化工作站 (42)5.7.2 无线数据采集终端 (43)5.7.3 二维有线扫描枪 (44)5.7.4 标签打印机 (46)杭州美美科技有限责任公司第4页/共47页医院供应中心消毒物品追溯管理系统方案建议书第一章项目综述1.1项目背景分析医院感染是影响医疗质量的重要问题,也是当前医院管理中的难题。
SmarTeam V5R11安装手册注意事宜:1、安装服务器的时候,最好是使用新安装的系统。
2、客户端的安装,以超级管理员的身份登陆,进行链接数据库。
3、Windows补丁程序要在安装smartam服务器后再打。
4、先安装License 。
并检测后,才可以安装。
5、保证网络畅通。
服务器安装一、操作系统(包括硬件驱动程序)安装步骤特别建议:服务器最少要划分为2个分区,分区格式为NTFS。
C区安装操作系统以及某些通用的应用程序,D区安装数据库程序、SmarTeam程序。
1、服务器连接到以太局域网络的交换机上。
(如果不连接,Windows 2000 server将不能正常安装。
)2、调整BIOS为CD-ROM启动,将Windows 2000 server安装光盘放入,开始依照提示安装。
在提示设置Administrator的密码时,最好设置。
在网络组件安装时,注意选择“不在有域的网络上”一项(在操作系统安装完成后再配置)。
3、操作系统启动正常后,安装相应的硬件驱动程序(显卡、网卡是必须的)。
再按统一规则配置网卡的IP地址、子网掩码、默认网关、DNS。
4、启动Windows2000配置服务器,打开Active Directory向导,依照提示设置本服务器的域名(例如pdmserver),并安装DNS服务。
6、启动管理工具Active Directory用户和计算机,设置客户机需要的登录帐号、口令和权限。
例如(pdmuser …… )注意:安装过程中,根据提示勤快地重新启动机器是必要的,有时候即使没有提示也要重启。
7、对于涉密电脑要另外设置登陆域的用户名。
二、应用程序安装步骤1、运行LUM安装光盘winintel目录下的arkwin465.exe文件,默认安装在C:\IFOR下,同时在开始\程序菜单下增加了License Use Runtime项,主要的License配置程序就在这里。
第一步,启动Windows开始菜单License Use Runtime里的Configuration Tool 工具,在选择configure As页中选择Network License(NetworkLS);(取消系统默认的选项),在Direct binding页中Server Configuration\栏中选择TCP/IP,并在Name框中填写服务器的IP地址,再点击Add按钮;在Start up页中选择Start services at system startup。
目录第一章网络建设需求分析 (3)1。
1网络需求分析 (3)1.2网络设计原则 (3)第二章网络建设方案 (6)2.1方案特点 (6)2.2网络拓扑设计 (7)2。
3组网选型说明 (7)2。
4主要网络设备介绍 (9)2.4。
1 H3C S7500E系列高端多业务以太网交换机 (9)2.4。
2 H3C S5120—EI系列以太网交换机 (16)2。
4.3 H3C MSR50系列多业务开放路由器 (22)2。
4.4 H3C UTM统一威胁管理安全产品 (31)2.5网络规划方案说明 (41)2.5。
1 VLAN安全设计 (41)2.5.2 防网络病毒设计 (42)2.5。
3 防网络攻击设计 (44)2。
5.4 IRF2虚拟化设计 (49)2.6IP地址规划设计 (50)2。
7网络优化 (52)2.7.1 IP优先级划分 (53)2.7.2 QoS策略规划 (54)2。
7.3 QoS数据分类 (54)2。
7.4 QoS拥塞管理与拥塞避免 (55)第三章网络管理建议设计 (56)3。
1网络管理软件的要求 (56)3.2网络管理解决方案 (57)第四章设备清单 (60)4.1办公内网设备清单 (60)4。
2办公外网设备清单 (62)4.3住宅楼网设备清单 (63)第五章售后服务 (64)5.1服务保障 (64)5。
2故障的申报和处理流程 (66)5.3维修和更换服务 (68)5.4用户投诉流程 (68)第六章项目培训 (69)6.1培训目标与人员要求 (69)6。
1。
1 培训目标 (69)6.1。
2 培训人员要求 (69)6.2培训方式及内容 (69)6.2.1 现场培训 (69)第七章项目管理及实施 (71)7。
1工程作业流程 (71)7.1.1 编制工程设计方案 (71)7.1。
2 确定工程组织结构 (72)7.1。
3 工程施工详细设计 (72)7.1.4 设备采购与进场 (72)7。
1。
5 施工准备 (72)7.1。
1.1 2-tier客户端静默安装1.1.1 前言本节描述2-tier客户端在Windows平台的安装过程,安装机器为:10.108.200.51、10.108.200.52、10.108.200.53、10.108.200.54。
基本内容:A)2-tier客户端安装前提:B)确认安装路径拥有足够的空间1.1.2生成静默配置文件1)以Admin权限登录操作系统;2)获取安装介质路径,如果路径为网络路径,请映射成为本地硬盘;3)浏览安装介质,双击“tem.bat”文件,启动“Teamcenter Environment Manager(TEM)环境管理器”;4)选择“语言”,点击“确定”;5)选择“设置一个静默安装分发”,点击“下一步”;6)点击“下一步”;7)选择“静默配置文件”目录,点击“下一步”;8)点击“下一步”;9)选择“两层结构胖客户端”,点击“下一步”;10)选择功能部件“Teamcenter 两层胖客户端”,点击“下一步”;11)选择“FMS_HOME的推荐值”,点击“下一步”;12)输入“FCC父项的主机为:10.108.200.52”,点击“下一步”;13)选择“规范名称为:GBK”,点击“下一步”;14)点击“添加”,输入“TC_DATA的目录和名称”;16)点击“下一步”;18)点击“下一步”;20)生成“静默配置文件”,点击“关闭”;1.1.3运行静默配置文件1)以Admin权限登录操作系统;2)获取静默配置文件silent.xml的路径和安装介质路径,如果路径为网络路径,请映射成为本地硬盘;3)在命令行中输入图中内容,进行安装2-tier客户端;。
目录Contents第一节编制依据Reference (4)第二节工程概况General Information of the Project (5)2.1概况 Condition (5)2.2现场情况Site Condition (6)2.3工程特点 Characteristic of Project (7)第三节劳力及机具资源配置情况State of resource layout for labor and equipment (8)3.1 劳动力资源配置表labor configuration table (8)3.2机具配备动态计划表equipment configuration state schedule (9)第四节钢结构安装工艺Steel Structure Installation Techeniques (10)4.1安装思路 (10)4.2钢结构安装工艺流程Installation Workflow in Steel Structure (10)4.3 PART-A&C吊装顺序及工况分析Arrangement to PART-A&C Crane and Walking Way; (29)4.4吊机性能表 (30)4.5吊机行走路线图 (33)4.6 PART-A&C 钢柱吊装立面及平面图;The façade and plan for lifting of column (35)4.7 PART-A&C 最重的钢梁吊示意图;The schematic plan for lifting of the heaviest beam (35)4.8 139.8米标高梁吊装立面图;The façade for the beam which elevation is 139.8m (35)第五节垫板及二次灌浆施工艺The shim plate and construction process for concrete and the second time grouting .. (39)5.1垫板工艺要求 the requirement for the shim plate process (39)5.2二次灌浆施工艺 construction process the second time grouting (40)5.3养护Maintains (41)第六节高强螺栓施工工艺High Strengthen Bolt W orkingProcess (41)6.1 一般规定 General requirement (41)6.2安装前的检查工作inspection working before installation (43)6.3质量标准 Quality standard (51)6.4应注意的质量问题 Quality issues with attention required (53)6.5质量记录 Quality record (54)第七节焊接施工工艺Welding Techniques (54)7.1准备工作 Preparation Work (55)7.2焊接工艺 Welding Techniques (55)7.3焊接工作质量控制 Welding Quality Control (57)第八节油漆涂装施工工艺Painting work construction job .578.1涂装工艺Painting Technique (57)8.1.1工艺流程图Process Flow Diagram (PFD) (57)8.1.2涂装工艺Painting Technique ......................错误!未定义书签。
8.1.3构件表面处理Member Surface Treatment ............错误!未定义书签。
8.1.4油漆修补涂装Repairing Paint .....................错误!未定义书签。
8.2质量控制和质量保证措施Quality Measures .............错误!未定义书签。
8.3安保措施 HSE Measures ..............................错误!未定义书签。
第九节测量方案 (66)9.1准备工作Preparation Work (66)axes setting-out (67)9.2平面控制网的建立 Set-up of horizontal control network (69)9.3高程控制网的建立 (71)9.4钢柱控制测量 control measure of column (72)9.5沉降观察测量Measurement to Settlement (74)9.6测量精度保证措施Main Measurement to ensure the precision of the Measurement (76)9.7工程测量记录The Record in the Construction Measurement (76)第十节质量技术措施Quality Measures (77)10.1工程施工质量目标Project Construction Quality Target (77)10.2工程施工质量控制总体思路Guideline of project construction quality control (77)第十一节安全技术措施Safety measures (80)11.1安全操作平台 Safety Operation Platform (80)11.2爬梯 ladders (81)11.3生命绳 life line (84)第十二节安全管理措施Safety Management Measures (87)12.1作业人员的管理 Management of Operation Personnel (87)12.2机具管理 Management of Machinery and Tools (87)12.3临时用电的管理 Management of Temporary Electricity Supply (87)12.4脚手架的管理 Management of Scaffold (88)12.5进场道路的管理 Management of Entering Road (88)12.6劳防用品的管理 Management of PPE (88)12.7风险预知管理Risk Prediction Management (88)第一节编制依据 Reference1.1本工程招标文件;The bid document for the project1.2道康宁公司相关技术标准、规范及管理程序;The Dow Corning’s relevant technical standard, the specification andmanagement program.1.3东洋工程公司相关管理程序、技术标准;Toyo Engineering Corporation’s relevant management program and technicalspecification.1.4江苏省及张家港地区现行的相关地方标准、规范;The relevant location standard and specification which belongs to Jiangsuprovince and Zhangjiagang area.1.5.宝冶建设有限公司相关管理程序及企业标准Baoye Construction Corp.Ltd.’s management program and standard1.6相关标准及规范,部分摘录如下:The country’s relevant standard and the specification, as following: 《张家港油漆涂装标准》 09.061.000;《Zhangjiagang standard for painting and protective coatings》09.061.000;《建筑工程设计文件编深度规定》2003版;《Construction engineering design document》-2003《建筑结构可靠度设计统一标准》GB 50068-2001;《Construction struction standard》-GB 50068-2001;《建筑结构荷载规范》GB 50009-2001;《Construction struction load specification》-GB 50009-2001;《钢结构设计规范》GB50017-2003《Steel Structure Designing Specification 》GB50017-2003《建筑抗震设计规范》GB 50011-2001《Impermeability of construction design specifications》GB 50011-2001《钢结构防火涂料应用技术规程》CECS 24-90《Steel structure fire retardant coating application technology point of order》CECS 24-90《碳素结构钢》GB /T 700-88《Carbon Structural Steel》GB /T 700-88《钢结构用高强度扭剪型大六角头螺栓》 GB 1228~1231-91《High-strength steel structure with twisting hexagonal Shear big-head bolt》GB 1228~1231-91《大六角头螺母,垫圈等技术条件》The large hexagonal nut, washer, and other technical conditions《钢结构工程施工质量验收规范》 GB 50205-2001《Steel Structure Project Construction Acceptance Specification 》(GB50205-2001)《建筑钢结构焊接技术规程》JGJ81-2002《Architectural Steel Structure Welding Technology Specifications》JGJ81-2002 《钢结构高强度螺栓连接的设计、施工及验收规范》 JGJ 82-91《Steel Structure High Strength Bolt Designing, Construction and Acceptance Specification》(JGJ82—1991)《石油化工企业设计防火规范》 GB 50160-92 (1999年版)《Petrochemical companies code for fire protection design》GB 50160-92 (1999) 《工程测量规范》GB50026-2007Construction Survey Specification, GB50026-2007第二节工程概况General Information of the Project2.1概况 Condition工程名称:道康宁(张家港)有限公司19万吨/年有机硅聚硅氧烷项目(二期)工程Project Name: Dow Corning 190kt/a Siloxane Project in Zhangjiagang(Phase 2)建设单位:道康宁(张家港)有限公司Owner: Dow Corning (Zhangjiagang) Corp. Ltd.管理单位:东洋管理公司Management Company: AKER KVAERNER and TOYO ENGINEERING Corporation设计单位:天津市化工设计院Designer: China Tianjin Chemical Engineering Design Institute监理单位:上海协同工程造价监理咨询有限公司Supervising Company: Shanghai TJU Engineer Service Co., Ltd施工单位:上海宝冶建设有限公司Contractor: Shanghai Baoye Construction Corp. Ltd.道康宁(张家港)有机硅有限公司为美国道康宁在中国境内的全资子公司,位于江苏省张家港保税区附属区扬子江国际化学工业园内。