思科交换机配置教程详解
- 格式:doc
- 大小:22.00 KB
- 文档页数:4
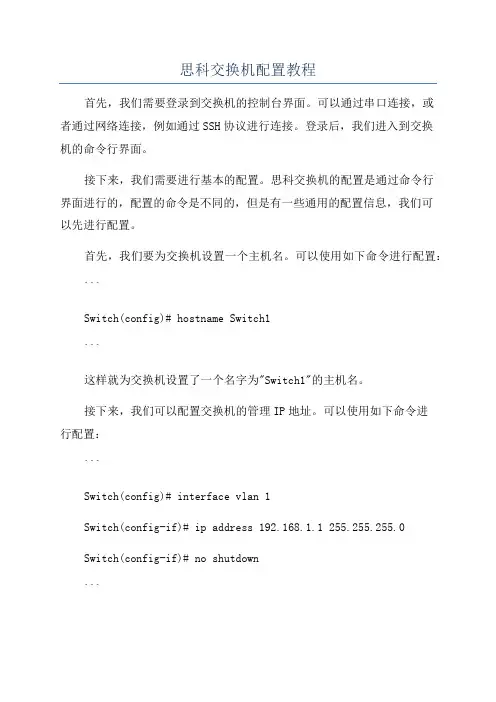
思科交换机配置教程首先,我们需要登录到交换机的控制台界面。
可以通过串口连接,或者通过网络连接,例如通过SSH协议进行连接。
登录后,我们进入到交换机的命令行界面。
接下来,我们需要进行基本的配置。
思科交换机的配置是通过命令行界面进行的,配置的命令是不同的,但是有一些通用的配置信息,我们可以先进行配置。
首先,我们要为交换机设置一个主机名。
可以使用如下命令进行配置:```Switch(config)# hostname Switch1```这样就为交换机设置了一个名字为"Switch1"的主机名。
接下来,我们可以配置交换机的管理IP地址。
可以使用如下命令进行配置:```Switch(config)# interface vlan 1Switch(config-if)# ip address 192.168.1.1 255.255.255.0Switch(config-if)# no shutdown```这样就为交换机的VLAN1接口配置了一个IP地址为192.168.1.1,子网掩码为255.255.255.0,并且启用了这个接口。
除了基本配置信息,我们还需要进行一些其他的配置,例如VLAN的配置。
VLAN是虚拟局域网的意思,可以将交换机的端口划分到不同的VLAN中,实现不同VLAN之间的隔离。
可以使用如下命令进行VLAN的配置:```Switch(config)# vlan 10Switch(config-vlan)# name VLAN10Switch(config-vlan)# exitSwitch(config)# interface fastEthernet 0/1Switch(config-if)# switchport access vlan 10Switch(config-if)# exit```这样就创建了一个编号为10的VLAN,名称为"VLAN10"。
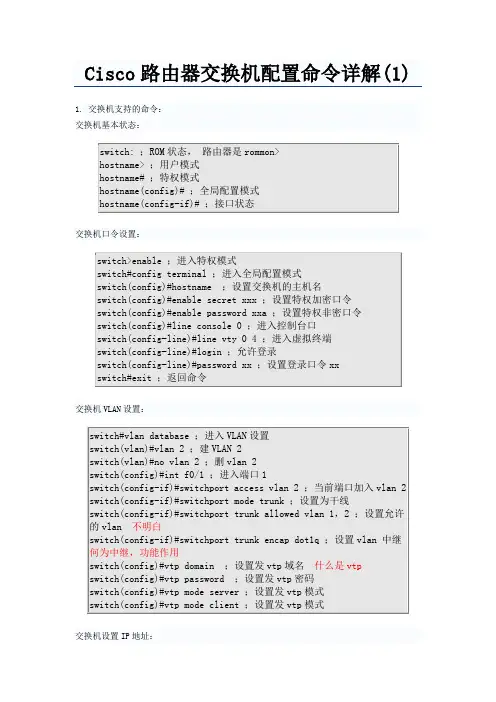
1. 交换机支持的命令:交换机基本状态:交换机口令设置:交换机VLAN设置:交换机设置IP地址:交换机显示命令:2. 路由器支持的命令:路由器显示命令:路由器口令设置:路由器配置:路由器文件操作:静态路由:动态路由:帧中继命令:基本访问控制列表:删除访问控制例表:router(config)#no access-list 102router(config-if)#no ip access-group 101 in 路由器的nat配置外部网关协议配置:配置PPP验证:3.PIX防火墙命令1. 交换机支持的命令:交换机基本状态:switch: ;ROM状态,路由器是rommon>hostname> ;用户模式hostname# ;特权模式hostname(config)# ;全局配置模式hostname(config-if)# ;接口状态交换机口令设置:switch>enable ;进入特权模式switch#config terminal ;进入全局配置模式switch(config)#hostname ;设置交换机的主机名switch(config)#enable secret xxx ;设置特权加密口令switch(config)#enable password xxa ;设置特权非密口令switch(config)#line console 0 ;进入控制台口switch(config-line)#line vty 0 4 ;进入虚拟终端switch(config-line)#login ;允许登录switch(config-line)#password xx ;设置登录口令xxswitch#exit ;返回命令交换机VLAN设置:switch#vlan database ;进入VLAN设置switch(vlan)#vlan 2 ;建VLAN 2switch(vlan)#no vlan 2 ;删vlan 2switch(config)#int f0/1 ;进入端口1switch(config-if)#switchport access vlan 2 ;当前端口加入vlan 2 switch(config-if)#switchport mode trunk ;设置为干线switch(config-if)#switchport trunk allowed vlan 1,2 ;设置允许的vlan switch(config-if)#switchport trunk encap dot1q ;设置vlan 中继switch(config)#vtp domain ;设置发vtp域名switch(config)#vtp password ;设置发vtp密码switch(config)#vtp mode server ;设置发vtp模式switch(config)#vtp mode client ;设置发vtp模式交换机设置IP地址:switch(config)#interface vlan 1 ;进入vlan 1switch(config-if)#ip address ;设置IP地址switch(config)#ip default-gateway ;设置默认网关switch#dir flash: ;查看闪存交换机显示命令:switch#write ;保存配置信息switch#show vtp ;查看vtp配置信息switch#show run ;查看当前配置信息switch#show vlan ;查看vlan配置信息switch#show interface ;查看端口信息switch#show int f0/0 ;查看指定端口信息2. 路由器支持的命令:路由器显示命令:router#show run ;显示配置信息router#show interface ;显示接口信息router#show ip route ;显示路由信息router#show cdp nei ;显示邻居信息router#reload ;重新起动路由器口令设置:router>enable ;进入特权模式router#config terminal ;进入全局配置模式router(config)#hostname ;设置交换机的主机名router(config)#enable secret xxx ;设置特权加密口令router(config)#enable password xxb ;设置特权非密口令router(config)#line console 0 ;进入控制台口router(config-line)#line vty 0 4 ;进入虚拟终端router(config-line)#login ;要求口令验证router(config-line)#password xx ;设置登录口令xxrouter(config)#(Ctrl+z) ;返回特权模式router#exit ;返回命令路由器配置:router(config)#int s0/0 ;进入Serail接口router(config-if)#no shutdown ;激活当前接口router(config-if)#clock rate 64000 ;设置同步时钟router(config-if)#ip address ;设置IP地址router(config-if)#ip address second ;设置第二个IProuter(config-if)#int f0/0.1 ;进入子接口router(config-subif.1)#ip address ;设置子接口IProuter(config-subif.1)#encapsulation dot1q ;绑定vlan中继协议router(config)#config-register 0x2142 ;跳过配置文件router(config)#config-register 0x2102 ;正常使用配置文件router#reload ;重新引导路由器文件操作:router#copy running-config startup-config ;保存配置router#copy running-config tftp ;保存配置到tftprouter#copy startup-config tftp ;开机配置存到tftprouter#copy tftp flash: ;下传文件到flashrouter#copy tftp startup-config;下载配置文件ROM状态:Ctrl+Break ;进入ROM监控状态rommon>confreg 0x2142 ;跳过配置文件rommon>confreg 0x2102 ;恢复配置文件rommon>reset ;重新引导rommon>copy xmodem: flash: ;从console传输文件rommon>IP_ADDRESS=10.65.1.2 ;设置路由器IPrommon>IP_SUBNET_MASK=255.255.0.0 ;设置路由器掩码rommon>TFTP_SERVER=10.65.1.1 ;指定TFTP服务器IPrommon>TFTP_FILE=c2600.bin ;指定下载的文件rommon>tftpdnld ;从tftp下载rommon>dir flash: ;查看闪存内容rommon>boot ;引导IOS静态路由:ip route ;命令格式router(config)#ip route 2.0.0.0 255.0.0.0 1.1.1.2 ;静态路由举例router(config)#ip route 0.0.0.0 0.0.0.0 1.1.1.2 ;默认路由举例动态路由:router(config)#ip routing ;启动路由转发router(config)#router rip ;启动RIP路由协议。
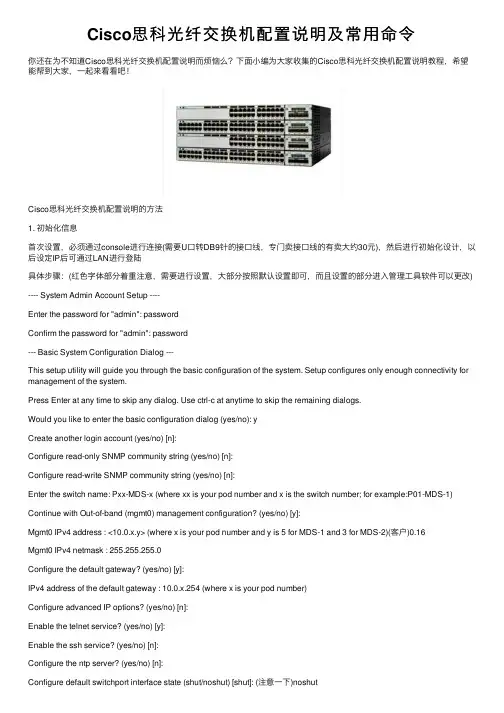
Cisco思科光纤交换机配置说明及常⽤命令你还在为不知道Cisco思科光纤交换机配置说明⽽烦恼么?下⾯⼩编为⼤家收集的Cisco思科光纤交换机配置说明教程,希望能帮到⼤家,⼀起来看看吧!Cisco思科光纤交换机配置说明的⽅法1. 初始化信息⾸次设置,必须通过console进⾏连接(需要U⼝转DB9针的接⼝线,专门卖接⼝线的有卖⼤约30元),然后进⾏初始化设计,以后设定IP后可通过LAN进⾏登陆具体步骤:(红⾊字体部分着重注意,需要进⾏设置,⼤部分按照默认设置即可,⽽且设置的部分进⼊管理⼯具软件可以更改)---- System Admin Account Setup ----Enter the password for "admin": passwordConfirm the password for "admin": password--- Basic System Configuration Dialog ---This setup utility will guide you through the basic configuration of the system. Setup configures only enough connectivity for management of the system.Press Enter at any time to skip any dialog. Use ctrl-c at anytime to skip the remaining dialogs.Would you like to enter the basic configuration dialog (yes/no): yCreate another login account (yes/no) [n]:Configure read-only SNMP community string (yes/no) [n]:Configure read-write SNMP community string (yes/no) [n]:Enter the switch name: Pxx-MDS-x (where xx is your pod number and x is the switch number; for example:P01-MDS-1) Continue with Out-of-band (mgmt0) management configuration? (yes/no) [y]:Mgmt0 IPv4 address : <10.0.x.y> (where x is your pod number and y is 5 for MDS-1 and 3 for MDS-2)(客户)0.16Mgmt0 IPv4 netmask : 255.255.255.0Configure the default gateway? (yes/no) [y]:IPv4 address of the default gateway : 10.0.x.254 (where x is your pod number)Configure advanced IP options? (yes/no) [n]:Enable the telnet service? (yes/no) [y]:Enable the ssh service? (yes/no) [n]:Configure the ntp server? (yes/no) [n]:Configure default switchport interface state (shut/noshut) [shut]: (注意⼀下)noshutConfigure default switchport trunk mode (on/off/auto) [on]:Configure default zone policy (permit/deny) [deny]:Enable full zoneset distribution (yes/no) [n]:NOTE:初始设定的配置对新的VSAN起作⽤,即原始VSAN1⽆这些配置解决办法:1 zone default-zone permit VSAN2 新建 NEW VSAN2 将port转移VSAN2⾥⾯。
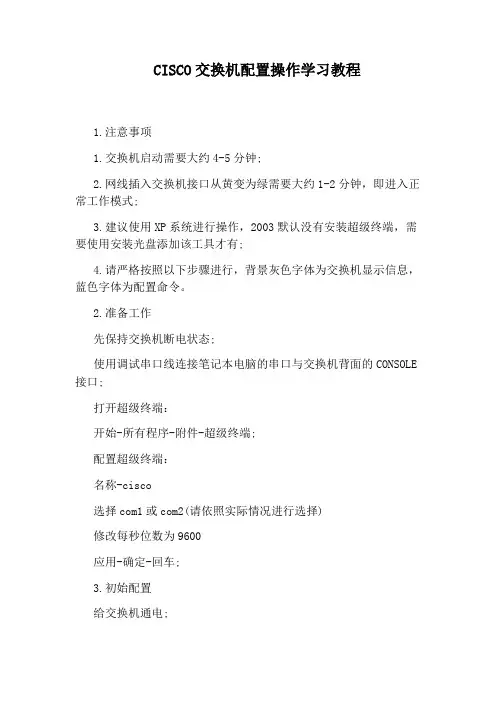
CISCO交换机配置操作学习教程1.注意事项1.交换机启动需要大约4-5分钟;2.网线插入交换机接口从黄变为绿需要大约1-2分钟,即进入正常工作模式;3.建议使用XP系统进行操作,2003默认没有安装超级终端,需要使用安装光盘添加该工具才有;4.请严格按照以下步骤进行,背景灰色字体为交换机显示信息,蓝色字体为配置命令。
2.准备工作先保持交换机断电状态;使用调试串口线连接笔记本电脑的串口与交换机背面的CONSOLE 接口;打开超级终端:开始-所有程序-附件-超级终端;配置超级终端:名称-cisco选择com1或com2(请依照实际情况进行选择)修改每秒位数为9600应用-确定-回车;3.初始配置给交换机通电;片刻后会看到交换机的启动信息,直到出现以下配置选项:Wouldyouliketoterminateautoinstall?[yes]:noWouldyouliketoentertheinitialconfigurationdialog?[yes/no ]:noWouldyouliketoterminateautoinstall?[yes]:no4.出现命令窗口Switch>5.备份出厂配置Switch>en进入特权模式Switch#copyrunning-configsfbak-configDestinationfilename[sfbak-config]?回车片刻后会出现:1204bytescopiedin0.529secs(2276bytes/sec)表示文件备份成功。
6.配置账号密码Switch#configureterminal进入配置子模式Switch(config)#enablepasswordcisco设置PASSWORD密码为ciscoSwitch(config)#enablesecretcisco设置SECRET密码为ciscoSwitch(config)#exit片刻后会出现:00:11:26:%SYS-5-CONFIG_I:Configuredfromconsolebyconsole表示将配置保存到了内存中,在后面的配置过程中会出现类似的信息,属于正常现象。
思科Cisco交换机配置手册配置教程配置接口特性这一章详细说明交换机上的接口和描述怎么配置他们。
这章有以下这些内容:●理解接口类型●使用接口命令●配置二层接口●监控和维护第二层接口●配置第三从接口注意:需要完整的有关该章的语法和应用信息,请参考Catalyst 3550 Multilayer Switch Command Reference和Cisco IOS Interface Command Referencefor Release 12.1.理解接口类型这个部分描述了不同的接口类型,以及其它章节所包括的详细配置这些接口的一些参考内容。
其他章节描述了物理接口特性的配置过程。
这部分包括:基于端口的VLAN (Port-Based VLANs)交换端口(Switch Ports)以太网通道端口组(EtherChannel Port Groups)交换虚拟接口(Switch Virtual Interfaces)被路由端口(Routed Ports)连接接口(Connecting Interfaces)基于端口的VLAN (Port-based Vlans)一个Vlan是一个按功能、组、或者应用被逻辑分段的交换网络,并不考虑使用者的物理位置。
要更多关于Vlan的信息请看“Configuring VLANS”。
一个端口上接受到的包被发往属于同一个Vlan的接收端口。
没有一个第三层的设备路由Vlan间的流量,不同Vlan的网络设备无法通讯。
为了配置普通范围(Normal-range) Vlan(Vlan IDs 1-1005),使用命令:config-vlan模式(global) vlan vlan-id或vlan-configuration模式(exec) vlan database针对Vlan ID 1-1005的vlan-configration模式被保存在vlan数据库中。
为配置扩展范围(extended-range)Vlans (Vlan ID 1006-4094),你必须使用config-vlan模式,并把VTP的模式设为transparent透明模式。
思科交换机的基本配置随着Internet的高速发展,网络规模不断膨胀,对于从事网络专业的学生熟练掌握路由器和交换机的配置已显得十分重要。
接下来是小编为大家收集的思科交换机的基本配置方法,希望能帮到大家。
思科交换机的基本配置的方法一、交换机的基本配置Author:chenchao in ZJNU从本篇文章开始,将连载大概8-9篇自己学习交换与路由的实验报告,但是怕自己能力不行,会出现错误,所以,先载两篇文章,依次为:交换机的基本配置;路由器基本配置。
本篇为交换机的基本配置,使用的仿真软件是Cisco的一款免费软件:Cisco Packet Tracer。
想学习的可以在百度自行下载。
下面开始附上实验过程:实验环境:Cisco 2950交换机1台,Console电缆1根,PC机一台,网线1根。
连接如下图所示:实验步骤:一、交换机的带外配置;1、在用户模式、特权模式、全局模式、接口模式之间转换;Switch>enableSwitch#configure terminalEnter configuration commands, one perline. End with CNTL/Z.Switch(config)#interface FastEthernet 0/1Switch(config-if)#exitSwitch(config)#exitSwitch#%SYS-5-CONFIG_I: Configured from console byconsoleSwitch#exitSwitch con0 is now availablePress RETURN to get started.Switch>2、将交换机的名称改为“student”;Switch(config)#hostname studentstudent(config)#3、为交换机各个模式设置密码“cisco”;特权模式下的密码保护student#enablestudent#configure tEnter configuration commands, one perline. End with CNTL/Z.student(config)#enable password ciscostudent(config)#enable secret cisco1远程登录口令设置student#configure tEnter configuration commands, one perline. End with CNTL/Z.student(config)#line console 0student(config-line)#line vty 0 4student(config-line)#password cisco2student(config-line)#loginstudent(config-line)#student#4、为交换机制定一个IP地址10.10.10.X/24;student#configConfiguring from terminal, memory, ornetwork [terminal]?Enter configuration commands, one perline. End with CNTL/Z.student(config)#interface vlan 1student(config-if)#ip address 10.10.10.1255.0.0.05、开启交换机的Telnet服务功能,建立Telnet用户admin,口令cisco,并制定只能从10.10.10.y/24登录Telnet服务器;student#student#configure tEnter configuration commands, one perline. End with CNTL/Z.student(config)#user admin password 0 ciscostudent(config)#6、查看配置情况;student>enablePassword:student#show running-cBuilding configuration...hostname student!enable secret 5$1$mERr$q.MA2tj.WFptzvbifq/1i.enable password cisco!!username admin password 0 ciscointerface Vlan1ipaddress 10.10.10.1 255.0.0.0!!line con 0!line vty 0 4password cisco2loginline vty 5 15login!!End二、交换机的端口配置:1、配置接口的描述、关闭借口、启动接口、配置接口的速度为100Mbps、配置接口工作模式为全双工、配置接口的流程控制;student#configure terminalEnter configuration commands, one perline. End with CNTL/Z.student(config)#interface FastEthernet0/1student(config-if)#shutdown%LINK-5-CHANGED: Interface FastEthernet0/1,changed state to administratively down%LINEPROTO-5-UPDOWN: Line protocol onInterface FastEthernet0/1, changed state to down%LINEPROTO-5-UPDOWN: Line protocol onInterface Vlan1, changed state to downstudent(config-if)#student(config-if)#exitstudent(config)#interface FastEthernet0/1student(config-if)#no shutdown%LINK-5-CHANGED: Interface FastEthernet0/1,changed state to up%LINEPROTO-5-UPDOWN: Line protocol onInterface FastEthernet0/1, changed state to up%LINEPROTO-5-UPDOWN: Line protocol onInterface Vlan1, changed state to upstudent(config-if)#speed 100student(config-if)#duplex full%LINK-5-CHANGED: Interface FastEthernet0/1,changed state to down%LINEPROTO-5-UPDOWN: Line protocol onInterface FastEthernet0/1, changed state to down%LINEPROTO-5-UPDOWN: Line protocol onInterface Vlan1, changed state to downstudent(config-if)#2、配置接口FastEthernet0/10为Access口;student#student#configure terminalEnter configuration commands, one perline. End with CNTL/Z.student(config)#interface FastEthernet0/10student(config-if)#switchport mode accessstudent(config-if)#3、配置接口FastEthernet0/12为Trunk口;student#student#configure tEnter configuration commands, one perline. End with CNTL/Z.student(config)#interface fastethernet0/12student(config-if)#switchport mode Trunkstudent(config-if)#end4、查看配置情况;!interface FastEthernet0/1duplex fullspeed100!!interface FastEthernet0/9!interface FastEthernet0/10switchport mode access!interface FastEthernet0/11!interface FastEthernet0/12switchport mode trunk!student#show running-cBuilding configuration...Current configuration : 1275 bytes!version 12.1no service timestamps log datetime msecno service timestamps debug datetime msec no service password-encryption!hostname student!enable secret 5$1$mERr$q.MA2tj.WFptzvbifq/1i. enable password cisco!!username admin password 0 cisco!!duplex fullspeed 100!interface FastEthernet0/2 !interface FastEthernet0/3 !interface FastEthernet0/4 !interface FastEthernet0/5 !interface FastEthernet0/6 !interface FastEthernet0/7 !interface FastEthernet0/8 !interface FastEthernet0/9 !interface FastEthernet0/10 switchport mode access !interface FastEthernet0/11 !interface FastEthernet0/12 switchport mode trunk!interface FastEthernet0/13 !!interface FastEthernet0/15!interface FastEthernet0/16!interface FastEthernet0/17!interface FastEthernet0/18!interface FastEthernet0/19!interface FastEthernet0/20!interface FastEthernet0/21!interface FastEthernet0/22!interface FastEthernet0/23!interface FastEthernet0/24!interface GigabitEthernet1/1 !interface GigabitEthernet1/2 !interface Vlan1ipaddress 10.10.10.1 255.0.0.0 !!line con 0!line vty 0 4password cisco2loginline vty 5 15login!!end看了“思科交换机的基本配置”还想看:。
CISCO交换机基本配置和使用概述CISCO交换机是一种常用的网络设备,用于构建局域网(Local Area Network,LAN)。
它可以通过物理线路的连接,将多台计算机或其他网络设备连接到同一个网络中,实现数据的传输和共享。
CISCO交换机的基本配置包括IP地址的配置、VLAN的配置、端口配置、安全性配置等。
接下来,我们将对这些配置进行详细说明。
首先,IP地址的配置是CISCO交换机的基本操作之一。
通过配置IP地址,我们可以对交换机进行管理和监控。
具体的配置步骤如下:1. 进入交换机的配置模式。
在命令行界面输入"enable"命令,进入特权模式。
2. 进入全局配置模式。
在特权模式下输入"configure terminal"命令,进入全局配置模式。
3. 配置交换机的IP地址。
在全局配置模式下输入"interfacevlan 1"命令,进入虚拟局域网1的接口配置模式。
然后输入"ip address 192.168.1.1 255.255.255.0"命令,配置交换机的IP地址和子网掩码。
4. 保存配置并退出。
在接口配置模式下输入"exit"命令,返回到全局配置模式。
然后输入"exit"命令,返回到特权模式。
最后输入"copy running-config startup-config"命令,保存配置到闪存中。
其次,VLAN的配置是CISCO交换机的关键配置之一。
通过配置VLAN,我们可以将交换机的端口划分为不同的虚拟局域网,实现数据的隔离和安全。
1. 进入交换机的配置模式。
同样,在特权模式下输入"configure terminal"命令,进入全局配置模式。
2. 创建VLAN。
在全局配置模式下输入"vlan 10"命令,创建一个编号为10的VLAN。


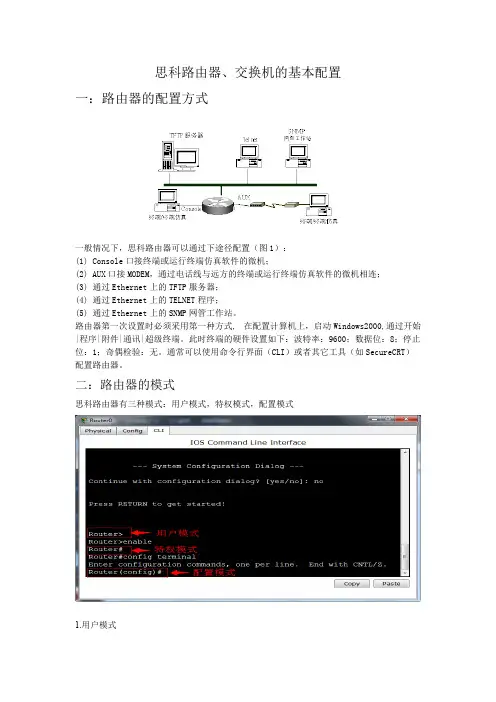
思科路由器、交换机的基本配置一:路由器的配置方式一般情况下,思科路由器可以通过下途径配置(图1):(1)Console口接终端或运行终端仿真软件的微机;(2)AUX口接MODEM,通过电话线与远方的终端或运行终端仿真软件的微机相连;(3)通过Ethernet上的TFTP服务器;(4)通过Ethernet上的TELNET程序;(5)通过Ethernet上的SNMP网管工作站。
路由器第一次设置时必须采用第一种方式, 在配置计算机上,启动Windows2000,通过开始|程序|附件|通讯|超级终端。
此时终端的硬件设置如下:波特率:9600;数据位:8;停止位:1;奇偶检验:无。
通常可以使用命令行界面(CLI)或者其它工具(如SecureCRT)配置路由器。
二:路由器的模式思科路由器有三种模式:用户模式,特权模式,配置模式1.用户模式当登录路由器后,系统自动进入用户EXEC命令模式。
例如:Router>在用户模式状态下,用户只能查看路由器的连接状态和基本信息,访问其他网络和主机,但是不能对路由器进行配置,不能看到更改路由器的设置内容。
2.特权模式在用户EXEC模式下,键入“enable”命令,即可进入特权EXEC模式。
例如:Router>enableRouter#Router#exit 退回到用户模式Router>特权模式可以执行用户模式下的所有命令,还可以看到更改路由器的设置内容,能够运行用于测试网络、检查系统的命令。
可以使用“configure”命令进入其他的配置模式。
3.全局配置模式在全局配置模式下可以配置路由器的全局性参数,更改已有配置。
要进入全局配置模式,必须首先进入特权模式,然后使用“configure”命令进入全局配置模式。
Router#configure terminal 也可使用命令缩写Router#conf tRouter(config)#可以使用“exit”、“end”命令或者键入“Ctrl-Z”返回特权模式状态。
思科Cisco交换机配置——端⼝安全配置实验案例图⽂详解本⽂讲述了思科Cisco交换机端⼝安全配置实验。
分享给⼤家供⼤家参考,具体如下:⼀、实验⽬的:在交换机f0/1端⼝上设置安全配置,使PC1和PC2两台机中只有⼀台机器能够正常通信,另⼀台通信时端⼝则会⾃动关闭⼆、拓扑图如下三、实验步骤:1、先给各台主机配置IP地址(PC1、PC2、PC3)记录PC1或PC2的其中⼀台主机的mac地址2、配置交换机S1enable --进⼊特权模式config terminal --进⼊全局配置模式hostname S2 --修改交换机名为S1interface f0/1 --进⼊到f0/1端⼝shutdown --关闭f0/1端⼝switchport mode access --修改端⼝模式switchport port-security --修改端⼝为安全模式switchport port-security maximum 1 --配置mac地址最⼤数量为1switchport port-security violation shutdown --配置违反安全设置后的处理动作为关闭端⼝switchport port-security mac-address 0009.7C2D.DC67 --将PC1或PC2其中⼀台的mac地址与端⼝绑定no shutdown --激活端⼝end --返回特权模式copy running-config startup-config --保存配置3、分别测试PC1和PC2主机PingPC3主机PC1:正常PIng通PC2:不能正常Ping通违反端⼝安全导致端⼝关闭(如下图,),若想再次启动需要进⼊到f0/1端⼝先shutdown再no shutdown启动:S1:enable --进⼊特权模式config terminal --进⼊全局配置模式interface f0/1 --进⼊f0/1端⼝shutdown --关闭f0/1端⼝no shutdown --激活f0/1端⼝。
1. 交换机支持的命令:交换机基本状态:switch: ;ROM 状态,路由器是rommon>hostname> ; 用户模式hostname# ; 特权模式hostname(config)# ; 全局配置模式hostname(config-if)# ; 接口状态交换机口令设置:switch>enable ; 进入特权模式switch#config terminal ; 进入全局配置模式switch(config)#hostname ; 设置交换机的主机名switch(config)#enable secret xxx ; 设置特权加密口令switch(config)#enable password xxa ; 设置特权非密口令switch(config)#line console 0 ; 进入控制台口switch(config-line)#line vty 0 4 ; 进入虚拟终端switch(config-line)#login ; 允许登录switch(config-line)#password xx ; 设置登录口令xxswitch#exit ; 返回命令精选文库vla n switch#vla n database ;switch(vla n)#vla n 2 ;switch(vla n)#no via n 2 ;switch(co nfig)# int fO/1 ;进入VLAN设置建VLAN 2删vlan 2进入端口 1switch(co nfig-if)#switch portaccess vla n 2 ;switch(co nfig-if)#switch port mode trunk ;switch(co nfig-if)#switch port trunk allowed vla n 1switch(c on fig-if)#switch port trunk encap dot1q ;switch(co nfig)#vt p domai n ;switch(c on fig)#vt p p assword ;switch(c on fig)#vt p mode server ;switch(co nfig)#vt p mode clie nt ;交换机设置IP地址:switch(co nfig)#i nterface vla n 1 ;switch(c on fig-if)# ip address ;switch(c on fig)# ip default-gateway ;当前端口加入vlan 2设置为干线设置发vtp域名设置发vtp密码设置发vtp模式设置发vtp模式进入vlan 1设置IP地址设置默认网关,2;设置允许的设置vlan中继交换机VLAN设置:精选文库switch#dir flash:; 查看闪存交换机显示命令:switch#write ; 保存配置信息switch#show vtp ; 查看vtp配置信息switch#show run ; 查看当前配置信息switch#show via n ; 查看vian配置信息switch#show in terface ; 查看端口信息switch#show int fO/0 ; 查看指定端口信息2.路由器支持的命令:路由器显示命令:router#show run ; 显示配置信息router#show in terface ; 显示接口信息router#show ip route ; 显示路由信息router#showcd p nei ; 显示邻居信息router#reload ;重新起动路由器口令设置:router>e nable ; 进入特权模式router#c onfig term inal ; 进入全局配置模式router(c on fig)#host name ; 设置交换机的主机名router(c on fig)#e nable secret xxx ; 设置特权加密口令router(c on fig)#e nable p assword xxb ; 设置特权非密口令router(c on fig)#li ne con sole 0 ; 进入控制台口router(c on fig-li ne)#li ne vty 0 4 ; 进入虚拟终端router(c on fig-li ne)#logi n ; 要求口令验证router(c on fig-li ne)# password xx ; 设置登录口令xxrouter(c on fig)#(Ctrl+z); 返回特权模式router#exit ; 返回命令路由器配置:router(c on fig)#i nt sO/0 ; 进入Serail接口router(c on fig-if)# no shutdow n ; 激活当前接口router(co nfig-if)#clock rate 64000 ; 设置同步时钟router(c on fig-if)# ip address ; 设置IP地址router(c on fig-if)#i p address sec ond ; 设置第二个IP router(co nfig-if)#i nt f0/0.1 ; 进入子接口router(c on fig-subif.1)# ip address ; 设置子接口IProuter(c on fig-subif.1)#e neap sulati on dotlq ; 绑定vian中继协议router(c on fig)#c on fig-register 0x2142 ; 跳过配置文件router(c on fig)#c on fig-register 0x2102 ; 正常使用配置文件router#reload ; 重新引导路由器文件操作:router#c opy runnin g-c onfig start up-config ; 保存配置router#c opy runnin g-c onfig tftp ; 保存配置到tftprouter#c opy start up-config tftp ; 开机配置存到tftprouter#c opy tftp flash:; 下传文件到flashrouter#c opy tftp start up-config; 下载配置文件ROM状态:Ctrl+Break ; 进入ROM监控状态rommon>confreg 0x2142 ; 跳过配置文件rommon>confreg 0x2102 ; 恢复配置文件rommon> reset ;重新引导rommon>copy xmodem: flash:;从con sole传输文件rommo n>IP_ADDRESS=10.65.1.2 ; 设置路由器IPrommo n>IP_SUBNET_MASK=255.255.0.0 ; 设置路由器掩码rommon> TFT P_SERVER=10.65.1.1 ; 指定TFTP服务器IP rommo n>TFT P_FILE=c2600.bin ; 指定下载的文件rommon>tftpdnld ; 从tftp 下载rommon> dir flash:; 查看闪存内容rommon>boot ; 弓丨导IOS。
1.1路由器的几个操作模式Router>//用户模式Router>enable//用户模式敲入enable进入特权模式Router#configure terminal//特权模式敲入configure terminal进入全局配置模式Router(config)#interface ethernet 0//配置模式敲入interface+接口类型+接口编号,进入接口配置模式(如:interface serial 0 或是interface serial 0/1 ,interface fast1/1,接口编号是多少具体要看是哪个型号的设备)Router (config)#interface range fa 0/2 – 5//利用range可以一次操作多个端口Router(config-if)#exit //从接口模式退出到配置模式Router(config)#exit//从配置模式退出到特权模式注意:任何时候按Ctrl-z或是end都会退出到特权模式1.2命名主机名Router(config)#hostname 主机名//路由默认主机名为Router,交换机为switch如:Router(config)#hostname Wisdom//设置主机名是WisdomWisdom(config)#1.3给路由器设置时间Wisdom(config)#clock set 23:46:50 sep 4 2006Wisdom#show clock//用show clock 命令查看时间1.8.利用TELNET来管理网络首先通CONSOLE口控制R1,控制R1后通过TELNET到R2,R3,对R2,R3进行管理.在R1上实验:R1#telnet 12.1.1.2//从R1 TELNET到R2R2>按<Ctrl-Shift-6>x 切换回R1R1#telnet 13.1.1.3//从R1 TELNET到R3R3>按<Ctrl-Shift-6>x 切换回R1R1#show sessions//在R1上查看打开了多少个TELNET的会话Conn Host Address Byte Idle Conn Name1 12.1.1.2 12.1.1.2 0 0 12.1.1.2* 2 13.1.1.3 13.1.1.3 0 0 13.1.1.3R1#resume 2//重新连接到R3R3>按<Ctrl-Shift-6>x 切换回R1R1#R1#disconnect 1//从R1是主动断开到R2的连接(断开一个TELNET的会话)在R2上实验:R2#show users//在R2上查看有谁登录到路由器Line User Host(s) Idle Location* 0 con 0 idle 00:00:002 vty 0 idle 00:01:52 12.1.1.1R2#clear line 2//发现有人TELNET过来,把他清除R2#show usersLine User Host(s) Idle Location* 0 con 0 idle 00:00:00注意:Show session和show user的区别Disconnect 和Clear line的区别Ctrl+shift+6 x 和resume1.9 PING、TraceRoute、Debug、Sysloga.使用PING命令R1#ping 12.1.1.2如果ping的结果是!!!!!则表明网络正常.如果ping的结果是…..则表明网络不通.如果ping的结果是U.U.U则表明下一跳不可达.b.使用traceroute命令, 在网络层上追踪源到目的地址所经过的路由器.(或是数据包经过的路径)例:R2#traceroute 33.1.1.3Tracing the route to 33.1.1.31 12.1.1.1 4 msec 4 msec 4 msec2 13.1.1.34 msec 4 msec *//从以上可以看出从R2 到达33.1.1.3经过了12.1.1.1和13.1.1.3两个路由器例:………………………………………………………………………………………………………………….3.3使用串口管理交换机。
思科交换机配置教程详解你还在为不知道思科交换机配置教程详解而烦恼么?接下来是小编为大家收集的思科交换机配置教程详解教程,希望能帮到大家。
思科交换机配置教程详解的方法1、基本概念介绍IOS: 互联网操作系统,也是交换机和路由器中用的操作系统VLAN: 虚拟lanVTP: VLAN TRUNK PROTOCOLDHCP: 动态主机配置协议ACL:访问控制列表三层交换机:具有三层路由转发能力的交换机2、密码、登陆等基本配置本节介绍的内容为cisco路由器或者交换机的基本配置,在目前版本的cisco交换机或路由器上的这些命令是通用的。
本教程用的是cisco的模拟器做的介绍,一些具体的端口显示或许与你们实际的设备不符,但这并不影响基本配置命令的执行。
3、cisco设备端口配置详解4、vlan的规划及配置在本节中我们讲解vlan的规划及具体的配置命令。
在此例中我们用的是vtp(VLAN Trunking Protocol)server的模式,在这种模式中我们需要配置核心交换机的vtp模式为server,各接入交换机的vtp模式为cilent,那么配置完成后接入交换机会通过trunk口自动从核心交换机学习到所有的vlan配置信息。
在接入交换机中只需要添加相应的端口即可,这样易于管理与部署。
具体的配置命令我们通过两小节来演示:4.1 核心交换机的相关配置4.2 接入交换机的相关配置5、配置交换机的路由功能说明:只有在三层交换机上才有路由功能,其他的二层接入交换机要想在不同的vlan之间传送数据需要通过trunk口到核心交换机上进行完路由交换后才可以。
6、配置交换机的DHCP功能7、常用排错命令看了“思科交换机配置教程详解”还看了:1.思科交换机的基本配置详解2.思科交换机配置命令教程3.Cisco 2960交换机的基础安装配置教程4.思科模拟器交换机的基本配置方法5.Cisco常用的路由器交换机配置命令6.Cisco交换机初始化配置的教程。
思科交换机配置教程详解
你还在为不知道思科交换机配置教程详解而烦恼么?接下来是小编为大家收集的思科交换机配置教程详解教程,希望能帮到大家。
思科交换机配置教程详解的方法
1、基本概念介绍
IOS: 互联网操作系统,也是交换机和路由器中用的操作系统
VLAN: 虚拟lan
VTP: VLAN TRUNK PROTOCOL
DHCP: 动态主机配置协议
ACL:访问控制列表
三层交换机:具有三层路由转发能力的交换机
2、密码、登陆等基本配置
本节介绍的内容为cisco路由器或者交换机的基本配置,在目前版本的cisco交换机或路由器上的这些命令是通用的。
本教程用的是cisco的模拟器做的介绍,一些具体的端口显示或许与你们实际的设备不符,但这并不影响基本配置命令的执行。
3、cisco设备端口配置详解
4、vlan的规划及配置
在本节中我们讲解vlan的规划及具体的配置命令。
在此例中我们用的是vtp(VLAN Trunking Protocol)server的模式,在这种模式中我们需要配置核心交换机的vtp模式为server,各接入交换机的vtp模式为cilent,那么配置完成后接入交换机会通过trunk口自动从核心交换机学习到所有的vlan配置信息。
在接入交换机中只
需要添加相应的端口即可,这样易于管理与部署。
具体的配置命令我们通过两小节来演示:
4.1 核心交换机的相关配置
4.2 接入交换机的相关配置
5、配置交换机的路由功能
说明:只有在三层交换机上才有路由功能,其他的二层接入交换机要想在不同的vlan之间传送数据需要通过trunk口到核心交换机上进行完路由交换后才可以。
6、配置交换机的DHCP功能
7、常用排错命令
看了“思科交换机配置教程详解”还看了:
1.思科交换机的基本配置详解
2.思科交换机配置命令教程
3.Cisco 2960交换机的基础安装配置教程
4.思科模拟器交换机的基本配置方法
5.Cisco常用的路由器交换机配置命令
6.Cisco交换机初始化配置的教程。