超低频音乐振动器:重新定义音乐内涵,给您打造一个超级震撼的家庭影院!
- 格式:pdf
- 大小:269.52 KB
- 文档页数:4
1.均衡器的调整方法:超低音:20Hz-40Hz,适当时声音强而有力。
能控制雷声、低音鼓、管风琴和贝司的声音。
过度提升会使音乐变得混浊不清。
低音:40Hz-150Hz,是声音的基础部份,其能量占整个音频能量的70%,是表现音乐风格的重要成份。
适当时,低音张弛得宜,声音丰满柔和,不足时声音单薄,150Hz,过度提升时会使声音发闷,明亮度下降,鼻音增强。
中低音:150Hz-500Hz,是声音的结构部分,人声位于这个位置,不足时,演唱声会被音乐淹没,声音软而无力,适当提升时会感到浑厚有力,提高声音的力度和响度。
提升过度时会使低音变得生硬,300Hz处过度提升3-6dB,如再加上混响,则会严重影响声音的清晰度。
中音:500Hz-2KHz,包含大多数乐器的低次谐波和泛音,是小军鼓和打击乐器的特征音。
适当时声音透彻明亮,不足时声音朦胧。
过度提升时会产生类似电话的声音。
中高音:2KHz-5KHz,是弦乐的特征音(拉弦乐的弓与弦的摩搡声,弹拔乐的手指触弦的声音某)。
不足时声音的穿透力下降,过强时会掩蔽语言音节的识别。
高音:7KHz-8KHz,是影响声音层次感的频率。
过度提升会使短笛、长笛声音突出,语言的齿音加重和音色发毛。
极高音:8KHz-10KHz合适时,三角铁和立叉的金属感通透率高,沙钟的节奏清晰可辨。
过度提升会使声音不自然,易烧毁高频单元。
2.平衡悦耳的声音应是:150Hz以下(低音)应是丰满、柔和而富有弹性;150Hz-50Hz(中低音)应是浑厚有力百不混浊;500Hz-5KHz(中高音)应是明亮透彻而不生硬;5KHz以上(高音)应是纤细,园顺而不尖锐刺耳。
整个频响特性平直时:声音自然丰满而有弹性,层次清晰园顺悦耳。
频响多峰谷时:声音粗糙混浊,高音刺耳发毛,无层次感扩声易发生反馈啸叫。
3.频率的音感特征:30~60Hz 沉闷如没有相当大的响度,人耳很难感觉。
60~100Hz 沉重 80Hz附近能产生极强的“重感”效果,响度很高也不会给人舒服的感觉,可给人以强烈的刺激作用。
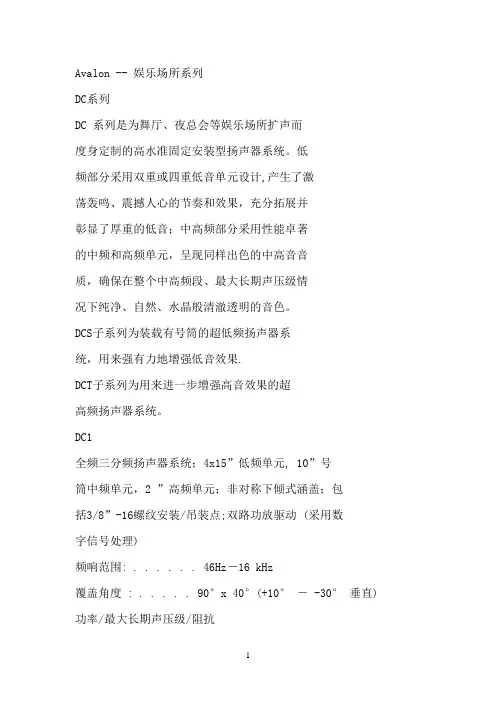
Avalon -- 娱乐场所系列DC系列DC 系列是为舞厅、夜总会等娱乐场所扩声而度身定制的高水准固定安装型扬声器系统。
低频部分采用双重或四重低音单元设计,产生了激荡轰鸣、震撼人心的节奏和效果,充分拓展并彰显了厚重的低音;中高频部分采用性能卓著的中频和高频单元,呈现同样出色的中高音音质,确保在整个中高频段、最大长期声压级情况下纯净、自然、水晶般清澈透明的音色。
DCS子系列为装载有号筒的超低频扬声器系统,用来强有力地增强低音效果.DCT子系列为用来进一步增强高音效果的超高频扬声器系统。
DC1全频三分频扬声器系统;4x15”低频单元, 10”号筒中频单元,2 ”高频单元;非对称下倾式涵盖;包括3/8”-16螺纹安装/吊装点;双路功放驱动 (采用数字信号处理)频响范围: . . . . . . 46Hz-16 kHz覆盖角度 : . . . . . 90°x 40°(+10°- -30°垂直) 功率/最大长期声压级/阻抗低频1: . . . . . . . . 1600W/129dB/4Ω低频2: . . . . . . . . 1600W/129dB/4Ω低频1+ 低频2: . .3200W/135dB/2Ω中频/高频: . . . . .350 W/133dB/8Ω连接: . . . . . . . . . . NL4和NL8 Speakon尺寸(mm): . . . . . 1016高x1770前/1133后宽x652深重量(kg): . . . . . . .182.3产品编号: . . . . . . .999968选件DC1系统悬吊杆将低频部分与中/高频部分固定为一体 , 每一DC1系统需要2个产品编号 . . . . . . . 179114DC2全频三分频扬声器系统;2x15”低频单元, 10”号筒中频单元,1.4 ”高频单元;配有3/8”-16螺纹安装/吊装点; 双路功放驱动 (采用数字信号处理)频响范围: . . . . . . 45 Hz - 18 kHz覆盖角度 : . . . . . .90° x 40°功率/最大长期声压级/阻抗低频: . . . . . . . . . 1600W/132dB/4Ω中频/高频: . . . . 350 W/133dB/8Ω连接: . . . . . . . . . . NL4 Speakon尺寸(mm): . . . . . 572前高/489后高x1449宽x483 深重量(kg): . . . . . . 86.4产品编号 . . . . . . . 999969DC3全频三分频扬声器系统;2x12”低频单元, 8”号筒中频单元,1”高频单元;配有3/8”-16螺纹安装/吊装点;双路功放驱动 (采用数字信号处理)频响范围: . . . . . . 50 Hz - 18 kHz覆盖角度 : . . . . . 90°x 40°功率/最大长期声压级/阻抗低频: . . . . . . . . . 800W/128dB/4Ω中频/高频: . . . . 250W/128dB/8Ω连接: . . . . . . . . . . NL4 Speakon尺寸(mm): . . . . . 476前/406后高x 1321宽 x406 深重量(kg): . . . . . . 54.5产品编号 . . . . . . .999970DC4全频三分频扬声器系统;2x12”低频单元, 8”中频单元1 ”高频单元;配有3/8”-16螺纹安装/吊装点;双路功放驱动 (采用数字信号处理)频响范围: . . . . . . . 45 Hz - 17.5kHz覆盖角度 : . . . . . . 90° x 40°功率/最大长期声压级/阻抗低频: . . . . . . . . . . .800W/128dB/4Ω中频/高频: . . . . . .220W/120dB/8Ω连接: . . . . . . . . . . . NL4 Speakon尺寸(mm): . . . . . . 486前/354后高 x959宽 x 508 深重量(kg): . . . . . . . .45产品编号 . . . . . . . . 999937DC5全频二分频扬声器系统;12”低频单元;1.4 ”高频单元;配有3/8”-16螺纹安装/吊装点;单路功放驱动频响范围: . . . . . . . .50 Hz - 18 kHz覆盖角度 : . . . . . . .90°x 45°功率/最大长期声压级/阻抗全频: . . . . . . . . . . 500W/124dB/8Ω连接: . . . . . . . . . . . NL4 Speakon尺寸(mm): . . . . . . 395前/306后高 x 762宽 x 346深重量(kg): . . . . . . . .29.5产品编号 . . . . . . . . 999972DC6全频二分频扬声器系统;2x8”低频单元, 1”高频单元;包括3/8”-16螺纹安装/吊装点;单路功放驱动频响范围: . . . . . . .50 Hz - 19 kHz覆盖角度 : . . . . . . 90° x 60°功率/最大长期声压级/阻抗全频: . . . . . . . . . . . 400W/121dB/4Ω连接: . . . . . . . . . . . NL4 Speakon尺寸(mm): . . . . . . 270前高/189后高x762宽x297深重量(kg): . . . . . . . .25.5kg产品编号 . . . . . . . . 997207D C S 系列EAW工程师发现,现代舞厅音乐的频谱具有这样一个特点:50Hz至60Hz低频段的声压级要比其他频段高出10-20dB。
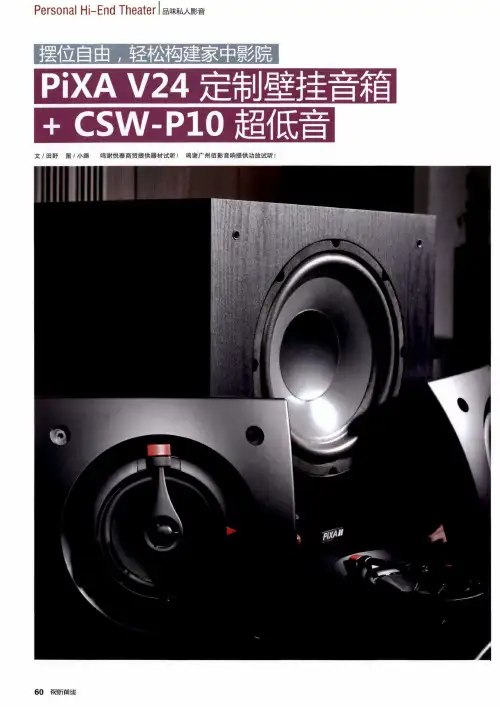
Personal Hi-End Theater丨品味私人影音文/田野图/小路鸣谢悦泰商贸提供器材试听!鸣谢广州佰影音响提供功放试听!60嘶前建之前我所接触过的音箱,都是一般尺寸的书架箱、落地箱,偶尔会有特别小巧的,但仍属于一般音箱的范畴。
而那些挂墙、入墙的定制安装类音箱,我只在展会上见过,还没有亲自使用过。
毕竟它们从外观上、结构上都与一般音箱大相径庭,从而感觉相当新鲜。
恰好悦泰商贸送来一套5件PiXAV24音箱,让我满足了好奇心,可以好好研究这些定制音箱的能耐。
►灵活、轻便定制音箱通常会与装修挂钩,通过各种方法将线材、音箱隐藏,融入家居和环境之中。
现在很多音箱设计美观时尚,能与装修风格融洽搭配,而一些用户则更希望它们能够低调隐蔽,不必像一般音箱那样摆放在地上、桌面上,然后线材外露,这个情况就更适合使用定制音箱。
定制音箱能够节省更多空间,同时又能保持环境的原貌。
定制音箱通常都是入墙或者挂墙安装,也许听起来很麻烦,但厂商都会为定制音箱设计各种底座支架让定制音箱更容易安装。
成立于1973年的美国PiXA(碧尚)有着40多年的高端音响制造经验。
现有产品包括各式传统音箱、定制音箱、监听音箱到内建功放的搭配客厅电视的SoundBar桌面/壁挂音箱系列。
我们曾经测试过PiXA的家庭影院、Soundbar等产品,定制音箱还是头一回见到。
打开V24的包装,马上看到一个流线型的网罩和其下方小巧别致的V24。
V24有三种网罩颜色可选,标配是白色,我们测试的是黑色,另有一个茶色可选购。
PiXA给V24定位的是多用途时尚定制音箱,既可商用又可家用。
虽然归类到定制音箱,不过V24并没有外露的单元,它有独立的箱体,无需嵌入墙体中安装。
固定V24的方法是靠钉或螺丝和V24背后卡樺的嵌合。
卡樺有一个90度的直角槽,将钉子或螺丝嵌入其中就相当稳固了,在不能钉钉子螺丝的地方可配合另购的安装支架。
V24只有40mm厚(不带网罩),1.7kg重,极为轻便,固定到天花板上作为吸顶音箱也不会有掉落的担忧,将之挂在墙上或天花板上,也不会凸出太多。
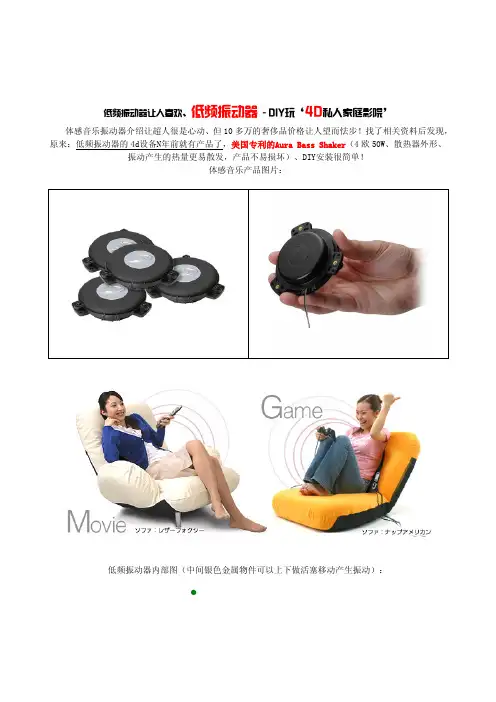
音乐进入体感时代...低频振动器让人喜欢、低频振动器 - DIY玩‘4D 私人家庭影院’体感音乐振动器介绍让超人很是心动、但10多万的奢侈品价格让人望而怯步!找了相关资料后发现,原来:低频振动器的4d设备N年前就有产品了,美国专利的Aura Bass Shaker (4欧50W、散热器外形、振动产生的热量更易散发,产品不易损坏)、DIY安装很简单!体感音乐产品图片:•低频振动器内部图(中间银色金属物件可以上下做活塞移动产生振动):体感音乐 重新定义声音的艺术低频振动器参数、安装平面图:适用多种产品:如游戏机、玩飞车游戏时,能体验到飞车时的速度与激情,疯狂的游戏玩家使用后带来更为真实的驾驶感受、另人更加兴奋、更过瘾......喜欢上的士高酒吧的年轻人,在舞台上的感觉同地上完全不一样、因舞台下面安装了这种低频振动器、震撼了整个舞台、站在上面就能让人很hi、兴奋得手舞足蹈......低频振动器在游戏机上:功放---超人刚好有2台ada 6150. 12声道处理能力,现在自己mc12前级,接入5个声道;还闲置一堆声道,这次英雄有用武之地了!6150 8欧 150瓦负载能力、搞2个低频震动器,十分轻松!把6150变成炮放了...呵呵!无独有偶,mc12强大的低频管理发挥出优势。
Sub+r给113负责衔接,听感,氛围,吹。
Sub+l 通过6150后级给低频振动器。
图(2根sub3插入mc12的 sub r和sub l):图(Sub 3的另一头到了6150后级,然后喇叭线到低频振动器):沙发下安装图(加一块稍大些受力板、能让振动效果更好的传送):密封式沙发安装图:DIY动感私人家庭影院后体验:1、看<<X战警>>、通过低频振动器增加了低频场景时的‘真实’效果、让自己如同进入片影中的场景,子弹、爆炸就在身边一样,更刺激更有趣...!2、这个‘东东’不会发声;Mc12释放粉红测试音,Bass Shaker不会发出低频噪音;但是有极轻微的呜呜声音(看恐怖片时不要因此产生幼觉哟!),超人分析是单元上下活塞运动的声音、那么不会发声就不会产生相位和f113之间的干扰,这个是超人购买Bass Shaker以前最大的担心;3、Bass Shaker根据不同的低频频段,振动强弱不同。

作为一个音乐爱好者,无论是欣赏音乐还是享受音乐的过程,选择合适的音乐设备至关重要。
下面为大家推荐五款最佳音乐设备,让你的音乐体验更上一层楼!
首先,我们推荐的是“重低音炮”——这款音响能够让你感受到音乐中最深沉的低音,仿佛整个房间都在摇摆。
不仅如此,它还可以在情人节时帮你传递心跳声,同时也是打击乌鸦和渣男的利器!
其次,我们有“变音魔术师”——这款耳机可以通过变音功能,让你在地铁上听到妹子的娇滴滴、在超市里听到大妈的吆喝,不仅让你的音乐体验更加丰富,还可以用来应对各种尴尬场合。
第三款推荐是“定位大师”——这款音箱有着强大的定位功能,无论你在哪个角落,都能让音乐声音环绕全身,仿佛置身于音乐盛宴之中。
此外,它还能帮你定位邻居家正在听的歌曲,方便你参加“邻居音乐分享会”。
紧随其后的是“时间旅行者”——这款CD播放器不仅能播放你喜爱的老歌,还能让你在音乐中穿梭时光,回到90年代的舞厅或者70年代的摇滚现场,让你感受各个年代的音乐魅力!
最后,我们推荐的是“云端管家”——这款音乐App可以帮你管理你的音乐收藏,发现新的音乐宝藏,还能根据你的心情推荐适合的歌曲,简直就像个了解你内心世界的好朋友!
以上五款音乐设备,让你在音乐的海洋里尽情徜徉,无论是追求震撼的音效还是怀旧的情怀,都能找到满足。
快来体验这些神奇的音乐设备,让音乐成为生活中最美妙的一部分!。
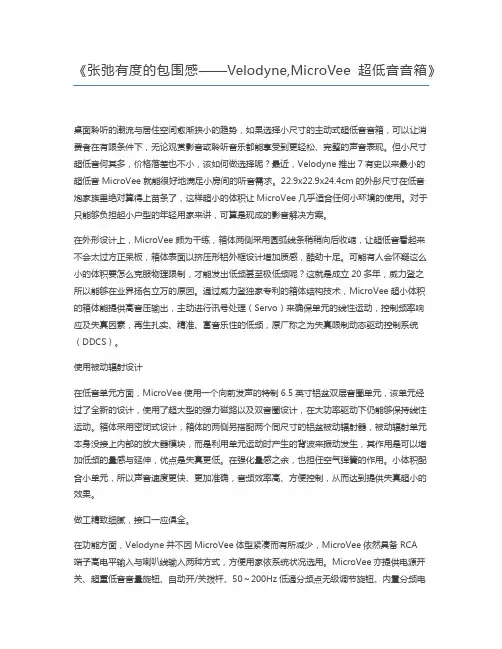
《张弛有度的包围感——Velodyne,MicroVee超低音音箱》桌面聆听的潮流与居住空间愈渐狭小的趋势,如果选择小尺寸的主动式超低音音箱,可以让消费者在有限条件下,无论观赏影音或聆听音乐都能享受到更轻松、完整的声音表现。
但小尺寸超低音何其多,价格落差也不小,该如何做选择呢?最近,Velodyne推出7有史以来最小的超低音MicroVee就能很好地满足小房间的听音需求。
22.9x22.9x24.4cm的外彤尺寸在低音炮家族里绝对算得上苗条了,这样超小的体积让MicroVee几乎适合任何小环境的使用。
对于只能够负担起小户型的年轻用家来讲,可算是现成的影音解决方案。
在外形设计上,MicroVee颇为干练,箱体两侧采用圆弧线条稍稍向后收缩,让超低音看起来不会太过方正呆板,箱体表面以挤压形铝外框设计增加质感,酷劲十足。
可能有人会怀疑这么小的体积要怎么克服物理限制,才能发出低频甚至极低频呢?这就是成立20多年,威力登之所以能够在业界扬名立万的原因。
通过威力登独家专利的箱体结构技术,MicroVee超小体积的箱体能提供高音压输出,主动进行讯号处理(Servo)来确保单元的线性运动,控制频率响应及失真因素,再生扎实、精准、富音乐性的低频,原厂称之为失真限制动态驱动控制系统(DDCS)。
使用被动辐射设计在低音单元方面,MicroVee使用一个向前发声的特制6.5英寸铝盆双层音圈单元,该单元经过了全新的设计,使用了超大型的强力磁路以及双音圈设计,在大功率驱动下仍能够保持线性运动。
箱体采用密闭式设计,箱体的两侧另搭配两个同尺寸的铝盆被动辐射器,被动辐射单元本身没接上内部的放大器模块,而是利用单元运动时产生的背波来振动发生,其作用是可以增加低频的量感与延伸,优点是失真更低。
在强化量感之余,也担任空气弹簧的作用。
小体积配合小单元,所以声音速度更快、更加准确,音频效率高、方便控制,从而达到提供失真超小的效果。
做工精致细腻,接口一应俱全。

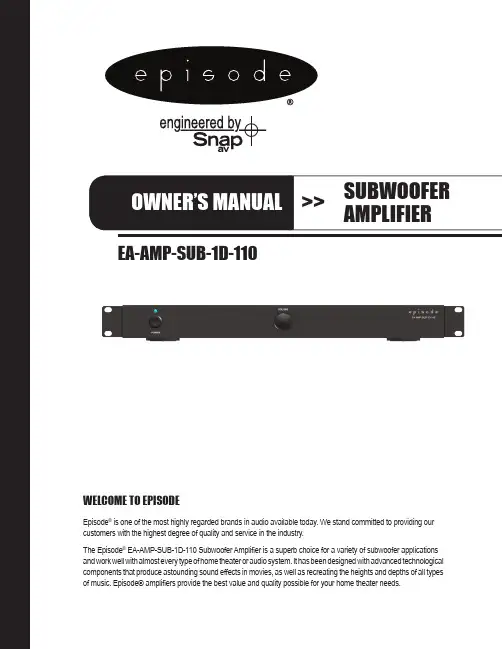
EA-AMP-SUB-1D-110WELCOME TO EPISODEEpisode® is one of the most highly regarded brands in audio available today. We stand committed to providing our customers with the highest degree of quality and service in the industry.The Episode® EA-AMP-SUB-1D-110 Subwoofer Amplifier is a superb choice for a variety of subwoofer applications and work well with almost every type of home theater or audio system. It has been designed with advanced technologicalcomponents that produce astounding sound effects in movies, as well as recreating the heights and depths of all typesof music. Episode® amplifiers provide the best value and quality possible for your home theater needs.pg.2EA-AMP-SUB-1D-110 Installation and Users ManualWARNING : To reduce the risk of fire or electric shock, do not expose this apparatus in or near rain or moisture.1. Read and keep these instructions for future reference.2. Do not use this apparatus near water.3. Clean only with a dry cloth.4. Do not block any ventilation openings. Install according to manufacturer’s instructions.5. Do not install near any heat sources such as radiators, heat registers, stoves or other apparatus(including amplifiers) that produce heat.6. Do not override the safety purpose of the polarized or grounding-type plug. A polarized plug has two blades -one wider than the other. A grounding type plug has two blades and a third grounding prong. The wide bladeor the third prong is provided for your safety. If the provided plug does not fit into your outlet, consult anelectrician for replacement of the obsolete outlet.7. Protect the power cord from being walked on or pinched particularly at plug, convenience receptacles, andthe point where it exits from the apparatus.8. Only use attachments/accessories specified by the manufacturer.9. Use only with a cart, stand, tripod, bracket or table specified by the manufacturer,or sold with the apparatus. When a cart is used, use caution when moving thecart/apparatus combination to avoid injury from tip-over.10. Unplug this apparatus during lightning storms or when unused for long periods of time.11. Refer all servicing to qualified service personnel. Servicing is required when the apparatus has been damagedin any way, such as when the power-supply cord or plug is damaged, liquid has been spilled or objects have fallen into the apparatus, the apparatus has been exposed to rain or moisture, does not operate normally, or hasbeen dropped.12. To completely disconnect this equipment from the AC mains, disconnect the power supply cord plug fromthe AC receptacle13. This is CLASS II apparatus with double insulation, and no protective earth provided.The lightning flash with arrowhead symbol, within an equilateral triangle, is intended to alert the user to the presence of uninsulated dangerous voltage within the product’s enclosure that may be of sufficient magnitude to constitute a risk of electric shock to persons. The exclamation point within an equilateral triangle is intended to alert the user to the presence of important operatingand maintenance (servicing) instructions in the literatureaccompanying the appliance.IMPORTANT SAFETY INSTRUCTIONS© 2011 Episode EA-AMP-SUB-1D-110 Installation and Users Manualpg.3FEATURES1. Power Switch a. RED – Off/Standby b. Blue – On/Operating2. Output Volume Control1. AUDIO INPUTS a. Connect the Right Female RCA input to an LFE output connection on a receiver or pre-amp processor.b. Connect the Left and Right Female RCA input to the Left and Right front output. connections on a receiver or pre-amp processor.NOTE: Both inputs have been calibrated to the same sensitivity level. When using stereo pre-amp outputs, both connections should beused to maintain proper input gain.2. 12V Trigger In a. Connect the 12V trigger output of the AV receiver to turn amp on when a 12V signal is received. When using a 12V trigger, the Power Mode settings do not apply. See System Connections for more information.3. POWER MODES a. ON – Always On b. Signal Sense – On, triggered via signal sense; when signal is off, amp will stay on for approximately 15 to 20 minutes.4. CROSS-OVER Crossover frequency setting of the Low Pass Filter can be adjusted from 40 to 140 Hz.NOTE: When using the LFE input, set to LFE so the preamplifier or receiver can control the crossover frequency.5. PHASE The phase of the subwoofer can be adjusted to fine tune the alignment of subwoofer signals and with those from the main speakers. Adjust the phase, listening for an increase in mid bass in the crossover region.6. SPEAKER OUTPUTS a. Connect the speaker wires to the Binding Posts. NOTE: Red is Positive and Black is Negative. Bridged output, do not ground. b. Use Bare Speaker Wire, Spade Lugs, or Banana Plugs to terminate the speaker wire.7. AC POWER a. Input voltage setting selects the appropriate 115V or 230V setting. b. IEC Power Cordpg.4EA-AMP-SUB-1D-110 Installation and Users ManualINSTALLATION – FIRST STEPSPOSITIONING YOUR EPISODE AMPLIFIER Episode amplifiers are designed to help deliver a great audio experience that makes your music come alive for years to come. However, where you place the amplifier can have a large effect on the performance that you receive and the life of the unit.• Be sure that the unit is in a well-ventilated area that provides adequate cooling.• Do not block the cooling vents located on both sides of the unit.• Do not place the unit on carpeting or any similar material.• Do not install the unit near a source of heat, or in an extremely humid or wet location.• If your installation lacks good air flow (such as solid cabinet doors or wall-mounted racks), it may be necessary tocreate ventilation to allow outside air into the space.• Allow a minimum of 5” of free air space above the unit.• Allow a minimum of 3” of free air space on either side of the unit. (Does not apply to rack mounting)VENTILATIONDo not block ventilation holes, or impede air flow by placing objects on oraround the amplifier. Do not place the amplifier on carpeting or any similarmaterial. Do not install the amplifier near a source of heat, or in anextremely humid or wet location.RACKMOUNT INSTALLATION1. Remove the amplifier’s four feet from the bottom of the chassis.2. Attach the included rack-mount ears to the front sides of the amplifier chassis.3. Securely mount the amplifier into the 19” equipment rack. The amplifier willoccupy 1U of rack space.4. Even though the amplifier produces very little heat, it is always wise to leaveventilation between components.When placing on a cabinet shelf, position the unit with all feet resting on a solid level surface.© 2011 EpisodeEA-AMP-SUB-1D-110 Installation and Users Manualpg.5SYSTEM CONNECTIONSCAUTION: All connections and switching must be done with the amplifier’s power switch positioned to ‘Off’ (LED will be RED). Connect the power cord last to be sure that the amplifier is off during all of your connections and set up.For line level connections, use high-quality RCA cables that feature low impedance, shielding and high-quality connectors.SPEAKER OUTPUTSUse 14-18 gauge stranded two-conductor loudspeaker wire for all high level connections. At each loudspeaker-level connection, ensure that at least 2 inches of each conductor are separated. Strip away 1/4 inch of insulation from each conductor. Connect the appropriate conductor to each screw terminal, observing correct polarity.pg.6EA-AMP-SUB-1D-110 Installation and Users Manual12V DC Trigger The EA-AMP-SUB-1D-110 is equipped with a 12V trigger input to turn the amplifier off, saving power consumption when not in use. When this input receives a 12V signal, the amplifier will turn ON and will turn OFF when the signal goes away.• Connect the 12V trigger output of the AV receiver to the 12V trigger input of the EA-AMP-SUB-1D-110using a high-quality 3.5mm (1/8”) mono cable.FINE TUNINGAfter making all the connections and calibrating the loudspeakers, set up your Episode subwoofer using the following steps:NOTE: When using an AV receiver and the LFE input, set the subwoofer calibration level to the factory setting1. Ensure that the subwoofer is plugged in.2. Set the following controls and switches to positions that will enable tuning for maximum performance.a. VOLUME knob set to 50%, or 12 o’clockb. CROSSOVER knob set to 120 Hz or 12 o’clockc. PHASE switch set to 0º3. During initial setup, it may be helpful to set the MODE switch to the ‘ON’ position. Once calibration is complete, switch it to ‘AUTO’ to enable the automatic power-saving mode.4. Play a movie scene or music track and set the system volume to an average level. Listen to the bass level from your favorite listening position. Adjust the VOLUME control as desired.5. If deeper bass is desired, adjust the CROSSOVER control toward the lower frequencies. Experiment with different frequency settings until you find one that sounds best.NOTE: When using the LFE input, set to LFE and make any crossover adjustments in the preamplifier or receiver crossover settings.6. Continue listening to your favorite music and movie sources using the settings chosen for volume and crossover.Now, try experimenting with the PHASE switch until you find the best setting for the installation. Depending on your subwoofer’s placement, the bass may sound louder or deeper when the phase has been optimized. In some cases, adjusting phase will make no discernible difference.• If the receiver does not have a 12V trigger output, using a 12V power supply plugged into a switched outlet on the receiver provides the same functionality.12V DC Pinout(Tip)© 2011 Episode EA-AMP-SUB-1D-110 Installation and Users Manual pg.7Continuous Power Output 68 watts RMS at 8 ohms110 watts RMS at 4 ohmsInput Sensitivity 195 mv for full output, 110 watts, with level control set to max.Frequency Response 35 - 200 HzDistortion .10% THD+N 1W/2W 100 HzAuto On Sensitivity 3.5 mvExternal Trigger Voltage 9.5 V - 20 VDimensions 16.9˝ W (18.9˝ including rack mounts)1.75˝ H (1.9˝ including feet)8.5˝ D (knob to rear chassis) 9.3” D (knob to rear speaker connector)Weight 19.7 lbs.Certification ETL Listed and tested under UL/EN60065 for US and CanadaNo audio output • Power cable to the amplifier is incorrectly connected or pluggedinto an outlet that does not have power. Check connections andverify power at the outlet.• Audio cable to the source component is not connected properly,connected to output or the cable is defective. Check connectionsor replace cable with one that has been verified as good.• Amplifier is in standby mode, and needs to be turned on “BLUE LED”.• Check the connections of the speaker wire at both the speaker and amplifier.• The level adjustment is turned down. Turn it to the right slowly toraise the volume.Hum or buzzing sound is heard • Check RCA input cables by removing them one at a time (poweringdown the amplifier before disconnecting) and verify connections.Amplifier will not turn on • The amplifier must be plugged into a live outlet.• The Power Switch on the front panel must be on.• The Power Mode switch may be set to the wrong mode for your system.SPECIFICATIONSTROUBLE SHOOTINGThis amplifier is designed to function trouble-free. Most problems that occur are due to simple issues.If you have trouble, check the list of simple fixes below. If the problem persists, contact your authorizedEpisode dealer or Episode technical support at 866-838-5052.WARRANTY 2-Year Limited WarrantyEpisode™ Amplifier Products have a 2-Year Limited Warranty. This warranty includes parts and labor repairs on all components found to be defective in material or workmanship under normal conditions of use. This warranty shall not apply to products which have been abused, modified or disassembled. Products to be repaired under this warrantymust be returned to the SnapAV or a designated service center with prior notification and an assigned return authorization number (RA).111004 © 2011 Episode。
KTV、酒吧的低频减振隔音方案聚茂声学现代社会人们的压力越来越大,相应的KTV、酒吧等释放压力的娱乐场所也随之而增多,那么对于这个行业什么最重要呢?当然是隔音,只有提供一个音质环境好的场所才能让客人玩得开心,周围的居民也有良好的休息环境。
为了降低噪音污染,大多数从事KTV的朋友在创业初期可能都会遇到资金不充裕的问题,所以就急切想了解如何让隔音装修经济实惠。
所谓低频噪声是指频率在500赫兹(倍频程)以下的声音。
住宅小区的低频噪声源主要有5大类:电梯、变压器、高楼中的水泵、中央空调(包括冷却塔)及交通噪声等。
浙江大学环境污染控制技术研究所在对杭州市典型的居住区对配套设备噪声源用声学仪器进行测试分析,选取供电系统、地下车库、电梯设备、供热系统、排水供水系统、空调设备、通风设备的噪声源,结果表明12种典型噪声源中9种最大声压级所在频段中是以低频段最多。
因而低频噪声成为居住区中影响最大的噪声源。
低频噪声与高频噪声不同,高频噪声随着距离越远或遭遇障碍物,能迅速衰减,如高频噪声的点声源,每10米距离就能下降6分贝。
而低频噪声却递减得很慢,声波又较长,能轻易穿越障碍物,长距离奔袭和穿墙透壁直入人耳。
振动、低频噪声和一般的噪声都有一个共同的性质,都是一种振动的波、是能量传播的一种方式。
低频噪声按传播途径主要分为结构传声、空气传声及驻波,其中驻波危害最重。
结构传声是指安装在大楼内的变压器、水泵、中央空调主机通过居住大楼的基础结构大梁、承重梁将低频振动的声波传导到各家各户。
空气传声是指低频噪声通过空气直接传播到小区住家户。
折射声波是指低频噪声在传播过程中经过多次反射形成折射声波,低频噪声在波腹中的振幅最强,对人的健康危害最重。
而KTV中的低频噪音特别大,危害严重。
设计隔音方案时首先需要了解KTV。
酒吧的声学要求,下面是声学要求的几个主要组成部分的概述:1、背景噪声:KTV包房不象录音棚,背景噪声充满整个房间。
噪声过高,使信号的听音音域提高,破坏了声音信号的音质,造成清晰度、可懂度下降。
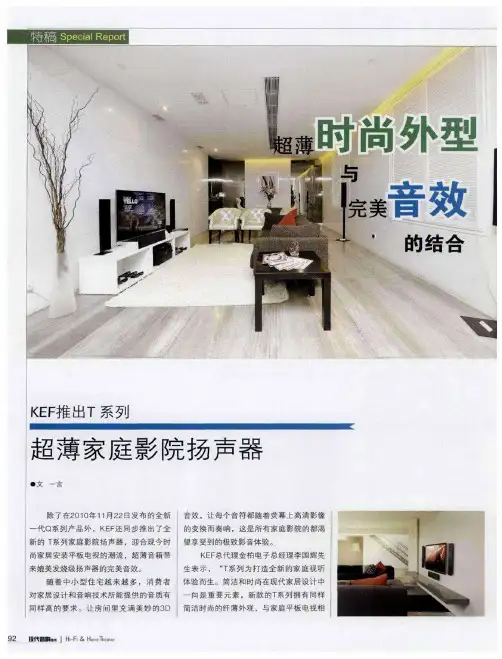
Personal Hi-End Theater丨品味私人影音[有质有量Hi-Fi影院都适用:KEF KF92超低音!文/家祺即将踏入60周年,KEF这个老牌音响厂家依然紧贴消费潮流,积极推出新品,永不落伍。
而KEF推出的各种类型新产品,传承着KEF的音乐哲学、设计理念、技术精华,却鲜有表露出岁月的痕迹,因为KEF总是将最尖端时尚的要素融入其产品之中,并将之转化为不会过时的设计。
比如KEF新近推出的影院音箱R系列,内部多项改良,外表新设计新漆面,焕然一新。
超低音KF92则采用抛光钢琴漆箱体,使用KEF标志性的混合材质低音单元和控制衍射的金属外边,两者仿佛融为一体,KEF也不使用网罩,让漂亮的单元外露。
背部有多层线条组成的散热片,正面则是胶质的哑光KEFIogo,不论从哪个方向看去都是独特而美观,令人眼前一亮。
►旗舰级配置KF92承袭了旗舰超低音Reference8B的谐振抵消结构配置,两个特制的9英寸混合铝合金/纸质低音单元以背对背方式安装,藉此抑制反射谐振,进而将箱体音染影响降到最低。
密封式箱体结构提高配置弹性,又能提升反应速度和声音清晰度,透过这样的配置,低音的凝聚力和能量得以提升,使KF92声压最高达到110dBo而具有两个反向配置的低音单元,意味着其有两个音圈能更快速散热;再加上KEF的通风驱动技术,确保电子组件在全力运作时仍维持在最佳温度状态,能进一步降低失真,提升功率处理。
9英寸单元在超低音中并不算大,让KF92的箱体能控制51Personal Hi-End Theater Isa味私人影音技术W"■尺寸:352.5X330X360.5mm■重量:20Kg■驱动单元:9"低音单元x2■可变■低通滤波器:40Hz-140Hz,LFE■最大输出:"OdB■频率响应(-3dB):11Hz-200Hz■输出功率:1000W RMS(2x500W RMS)在一个相对精巧的尺寸。
T200B音乐监听大师HiVi T200B 隆重推出-献给 HiVi X3 家庭影院荣获美国“ THX ” 认证(点击放大)HiVi T200B professional music monitor system建立HDV Studio电脑影音编辑新标准型号:HiVi T200B类型:双声道专业监听级有源系统惠威 T200B 是惠威历史上做得最好的有源 2.0 声道监听级音箱,也是当前国内外市场上所有品牌的多媒体近场两声道音箱商品中,音质音色最好的产品——特别是整体声场平衡和大动态具有压倒性的优势。
”惠威 T200B 厂家已经预公布参数,在听取了广大媒体,发烧友,专家及代理商意见后,对T200B 做了上市前的最后定型工作,包括对扬声器、分频器进行微调优化,进一步降低了系统失真度,改善了频响相位特性,完成了 T200B 上市前的终极版本。
秉承惠威一丝不苟的企业理念,惠威承诺所有的T200B音箱在出厂时由惠威专业人员在惠威亚洲最大的专业消声室内逐只实际测量打印,这些实测频响曲线将作为给用户的一个最高品质保证附在包装箱内和每一只HiVi T200B音箱一起出厂,这也开创了世界多媒体产品品质保证先河。
为了让两只箱子的曲线匹配更好,T200B使用的单元在上生产线以前就要进行曲线的配对工作,这样才能让最终出厂的T200B (A/B)两箱的曲线更趋于一致,声场定位更加准确。
虽然惠威的工程师将会为此付出更多的辛劳,但这样能让每一位用户享受到惠威T200B的顶级品质待遇,同时还能让用户对惠威全亚洲最大专业消声室也有更直接的感触,因为您手里的T200B曲线数据就是在这个消声室中实地测得的。
HiVi T200B 适用范围:全功能专业 Studio 录音棚近场监听,顶级私人影音声频工作站,家庭数字娱乐系统,狂热Hi-End 电脑音乐发烧友, iPod / Mp3 音乐欣赏,时尚 DVD 家庭影院, HiFi 发烧音乐欣赏,震撼 XBOX 360 游戏,Hi-End Windows XP Media Center 系统。
尊宝d4sub低音炮使用说明书一、产品概述尊宝D4sub低音炮是尊宝公司研发的一款高质量低音炮,适用于家庭影院系统、舞台演出以及其他音频场合。
该产品采用先进的技术和材料制造,能够提供卓越的音质和低音效果,为用户带来震撼人心的音乐和电影体验。
二、安全措施1.请确保低音炮和电源线与电源插座电压匹配,以免发生电器损坏和个人受伤。
2.在使用过程中请注意周围环境的安全,避免放置在易燃物品附近。
3.请勿在低音炮中加入任何金属物品,以免短路或损坏设备。
4.使用低音炮时请注意音量大小,避免对周围环境造成干扰或对听力造成损伤。
三、外观和连接1. 尊宝D4sub低音炮是一个矩形箱体,箱体上面标有品牌名称和产品型号。
2.低音炮左侧有一个电源开关,右侧有音频输入口和音频输出口。
3.使用标准音频线将音频源(如音响或电视)连接到低音炮的音频输入口,并使用另一根音频线将低音炮的音频输出口连接到主音响系统的音频输入口。
四、控制面板和操作1. 尊宝D4sub低音炮的控制面板位于箱体的前方,并带有以下主要控制按钮:-电源开关:用于打开和关闭低音炮。
-音量控制:用于调整低音炮的音量大小。
-频率调整:用于调整低音炮的低音频率。
-相位开关:用于调整低音炮的相位,以优化音频效果。
-自动开关:用于设置低音炮的自动开关功能,能够在无输入信号时自动关闭低音炮以节省能源。
2.操作低音炮时,请先打开电源开关,然后使用音量控制按钮调整音量大小。
为了达到最佳音质,建议将音量设置在适当的水平,避免过高或过低。
3.根据音频源的特性,可以使用频率调整按钮调整低音炮的低音频率。
通常情况下,低音炮的频率应与主音响系统的频率相匹配,以实现最佳音质。
4.相位开关用于优化低音炮的音频效果。
根据音频源和听音环境的不同,可以尝试不同的相位设置,以找到最佳效果。
5.自动开关功能可以节省能源。
当没有输入信号时,低音炮会自动关闭,当再次接收到输入信号时会自动开启低音炮。
6.完成操作后,请及时关闭电源开关,并将低音炮放置在安全的位置,以免发生意外。
体感振动音响全新上市
随着电声工业的发展,我们都在追求真实的声
音,特别是在欣赏电影时我们需要震撼而又真实的
声场、充沛的细节表现、明亮激越的高频和彭湃的
低频来烘托影片的气氛。
低频是渲染影片气氛最主
要的手段之一,也是一部电影重要的声音频段。
能
否获得出色的低频感受,是完整享受一部电影的关
键,因此如何完成真实的低频回放是一部影片声效
的重中之重。
根据仿生学原理,人体感受声音的部分并不局
限于耳朵,人的身体也是能“听”到声音的。
可以这么说,真实的声音,特别是真实的低频并不全是耳朵听到的,有很多其实是你的身体感受到的。
为了让系统有更强劲、更震撼的低音表现,除了对器材有很高的要求之外,环境是一个非常严格的环节。
目前超低频重放一直受到摆放环境的限制,小房间受制于听音空间,大房间环境受制于箱体体积的限制,都会难以重放高质量的超低频;而目前的用户对于在小空间环境重放超重低音的需求又相当广泛,例如在汽车和普通家居中。
随着电声工业的发展,我们都在追求真实的声音,特别是在欣赏电影时我们需要震撼而又真实的声场、充沛的细节表现、明亮激越的高频和彭湃的低频来烘托影片的气氛。
低频是渲染影片气氛最主要的手段之一,也是一部电影重要的声音频段。
能否获得出色的低频感受,是完整享受一部电影的关键,因此如何完成真实的低频回放是一部影片声效的重中之重。
根据仿生学原理,人体
感受声音的部分并不局限于
耳朵,人的身体也是能
“听”到声音的。
可以这么
说,真实的声音,特别是真
实的低频并不全是耳朵听到
的,有很多其实是你的身体
感受到的。
为了让系统有更
强劲、更震撼的低音表现,
除了对器材有很高的要求之
外,环境是一个非常严格的
环节。
目前超低频重放一直
受到摆放环境的限制,小房
间受制于听音空间,大房间环境受制于箱体体积的限制,都会难以重放高质量的超低频;而目前的用户对于在小空间环境重放超重低音的需求又相当广泛,例如在汽车和普通家居中。
体感音乐振动器
要想全方位的感受高质量的低频,仅使用传统的高质量低音器材是比较困难的,因为传统高质量超低音回放器材的设计存在着体积巨大、价格昂贵、低频下潜有限、音质受制于环境、倒相管气流摩擦声和大声压所带来的环境噪声等互相制约的问题,因此如何才能得到最原始真实的超低音是人们一直在探索的问题。
局部特写
我们知道,人的身体可以直接感觉到超低音那种地动山摇的震动的,在大型影院系统中那种让身体直接感受扑面而来的低音空气压力感就是一个最简单的例子。
如果能有一种特殊装备,将那些本该由空气传播的低频振动能量直接传达给人体,这样就能让人有极为真实的超低频感受,而又不受环境和其他器材的限制。
放在沙发底下
作为世界一流的电声设计和制造企业,为此设计了这款创新型的超低音单元,准确的来讲,我们称之为超低音激励器。
它的设计结构是非常独特的,振动部分采用了一体化成型的高强度压铸铝振膜,可以承受巨大的压力且具有最强的爆发力。
悬挂部分采用弹性优良、抗拉性优异的硅橡胶,为了提供最干净的低音,整个系统具有很大的振动质量,形成一个机械低通滤波器,足以滤除不必要的高频,为了尽可能提供更大的声压级,驱动部分采用高磁能钕铁硼磁体,以得到最强动力。
为了简单安全的使用,我们为它还设计了可靠的保护装置。
整体特写
体感音乐振动器的主要作用就是让您用最直接方法来感受原始的超低音震动。
低音激励器是直接安装在沙发座位脚下的,播放影片或者进行游戏时,如果音频信号中有大量的低频能量,那么用户除了能从普通扬声器中听到浓厚的低频冲击,惠威的专业低频激励器功放亦会从音频信号中把超低频部分的信号分离出来,重新放大后驱动CF1低频激励器,通过直接的机械振动来让沙发充分运动起来,就能让坐在沙发上的您亲身感受非常震撼真实的低音振动。
整体特写
搭配低频振动器使用的是心声音响专门开发的大功率低频振动器功放,连接到两只或四只低频振动器后将其放置在沙发、椅子下方;低频振动器和普通喇叭连接功放的方法一样,低频振动非常清晰深沉,产生梦幻般的超低音效果,让您感觉最真实的声音脉动!
整体搭配图
体感音乐振动器的适用面很广,不论是在顶极家庭影院中搭配AV器材来加强电影的低频氛围感,或是放置在电脑椅子下,让游戏发烧友体验什么是终极YY
的电脑外设,或放置在您爱车的座位下方,让您在飞速驰骋中,在充满节奏的音乐中让身体也跟着跃动。
可以说有了音乐振动器,能让您全面感受耳朵喜欢,身体喜欢的超低频振动效果。