KNX网络
- 格式:docx
- 大小:16.50 KB
- 文档页数:6

Application program descriptionElectromotoric actuatorSSA118.09HKNWith KNX communication for radiator valves, PICV and small valves●Support of KNX S-Mode (integration with ETS)●Direct mounting with coupling nut, no tools required●Position and actuator motion indication (LED)●Positioning force 100 N●Parallel operation of multiple actuators possible●Integral cable length 1.5 m●Usage: Application program usage●Product family: HVAC valve actuators●Manufacturer: Siemens●Name: SSA KNX Networked Actuator●ASN: SSA118.09HKNWorkflowIf no application has been downloaded (factory setting), the actuator enters the constructionmode right after the self-calibration procedure. In this mode, the actuator has limitedfunctionality and the valve position is set to 25 % to prevent freezing of the radiator. You canchange the valve position via the group address of 30/0/26 (0xF01A).Use ETS5 to download the application via KNX bus once the actuator is connected to thebus voltage. The following basic functions are available when the actuator is operated in S-Mode:●By using central heating boilers with a demand regulated flow temperature control, thedevice can send feedback regarding the current energy demand (current max. valveposition) via a group address to the central heating boiler.●Operating modes available in S-Mode: forced mode, summer mode, emergency mode,override control mode, night mode and office mode.HMI (Button and LED)The KNX programming button and KNX programming LED are designed according to thedesign concept of KNX device, which defines common usages of KNX programming mode,stimulation for a connection test and factory reset (multi-color mode). See the datasheet formore details.The stem position LED indicator is designed for motor behaviors. It indicates differentactuator movements. See the datasheet for more details.Factory resetYou can reset the device via the KNX programming button or the command from the KNXbus.2Self-calibrationSelf-calibration occurs at the first time after the bus voltage is applied and afterwards eachtime the application is downloaded. A new calibration run is performed at regular intervals(180 days).There are two different strategies for self-calibration in S-Mode, which are available asCalibration strategy parameters in ETS5.DiagnosticsDiagnostics data are directly accessible as properties on demand by a tool (e.g., KNX ACSService Tool) or optionally via a dedicated BA diagnostics object.The actuator measures and stores the following information:AlarmsAlarms are defined to indicate abnormal behaviors. There are two kinds of alarms in theactuator: calibration and mechanical failure/jam. The stem position LED indicator turns to redif either happens. If there is an alarm and the report function is enabled, the telegram of thealarm information is sent at an interval of 15 minutes.Mechanical failure/jamCalibration errorMode Description Define TelegramAttributes AlarmTextSupport +ErrorCodeSupport =12 = 0CAlarm Status InAlarm / Locked =05No Alarm (HB Repeat every 30 min)In case of no alarm indication, the following telegram is sent at an interval of 30 minutes:S-Mode PID=51: AlarmInfo: 00 03 00 00 00Release alarmsOnce an alarm happens, you can trigger calibration movement via KNX command or entermanual override mode via button to release the alarm. The alarm happens again if anotherfailure (e.g., mechanical jam) exists.ApplicationFields of applicationThe actuator should be connected to the valve and integrated in a KNX S-Mode systemwhich contains other KNX devices (integration with ETS and freely programmable). It can beused with controllers (with central functions) which can control water or chilled water supplyto groups and/or single rooms.Equipment combinationsKNX-certified HVAC controllers may be connected to all KNX devices with compatible KNXS-Mode data points.Device/tool TypeControllers and room unitsRDG.. RDG100KN, RDG160KN, RDG165KNTools for engineering and commissioning (partially suitable for device configuration)Tools for KNX S-Mode ETS5System networkHere is an example of topology of system network connection:KNX S-Mode network example4Communication objects6Calibration mode 0 = False1 = True This mode indicates that the actuator is under calibration process to find the end position of the valve.Window contact 0 = close1 = open This object sends the status of the binary input window contact “DI1”, if used. The status can be sent out periodically or upon status change. If this object is linked with the Forced position object in a group address, the actuator drives the valve to the specified forced position (by receiving the value “1” in the defined forced position). This object is only available if the window contact “DI1” has been activated under External interface at the Parameter page.Condensation contact 0 = close1 = open This object sends the status of the binary input condensation contact “DI2”, if used. The status can be sent out periodically or upon status change. If this object is linked with e.g. the Comfort mode object of the controller in a group address, the actuator acts as an extension of the Comfort operation mode. This object is only available if the condensation contact “DI2” has been activated under External interface at the Parameter page.Parameter descriptionStandard settings8Advanced settingsParameters DescriptionValve position The pre-defined but customizable valve position when the Forcedmode is activated.Automatic decalcification function Activates the function of valve protection.●Inactive: The function of valve protection is not executed.●Active: The valve is opened and closed completely once if thevalve position has not been changed within 7 days.Cyclical transmission Defines the time interval within which the own actual actuatingvalue is sent with the object “maximum position”.●If there is more than one device (valve actuator or heatingboiler) in a plan t, the option of “None; send only if ownactuating value is higher” must be selected.●If there is only one device (valve actuator or heating boiler) ina plant, the transmission cycle of maximum position can beparametrized into every x min to define the period of timewithin which this device initiates the comparison of actuatingvalues by sending the own actuating value.Cyclical transmission of overridden mode Defines the transmission period of the overridden mode:●0 min: No period transmission of the Overridden mode. Thestatus will be transmitted only if it is changed.●x min: Time interval for overridden mode status transmission.Calibration strategy Two calibration strategies are available:●If the first strategy is selected, the valve is measured during acalibration run (e.g. after reset) and the “valve open” and“valve closed” positions are stored. The calibration run isperformed twice after download and the resulting values arecompared for plausibility. The calibration runs three times atmost until two successive matching value pairs have beenmeasured. These values are then stored and the positions areused for future runs. The measured values are compared withthe stored values during the calibration run so that the processis only performed once for plausibility.●If the second strategy is selected, only the “Open” valveposition is calculated by working back from a set path from theclosing position. In order to close the valve, the actuatorpushes out the tappet until the set force is exerted on thevalve.If the second strategy is selected, as shown in the followingpicture, no mater wether the parameter “opening/closingdirection” is set to “Normal” or “Inverted”, the stroke iscalculated based on the position where the actuator pushesthe valve to the end. Be careful when combining strategy 210with inverted mode, and “Calibration Stroke” is set to a propervalue to ensure that normally-closed valves can be fullyclosed.Valve characteristicsParameters DescriptionOpening/closing direction Defines in which mode of operation the installed valve and valve actuator work.●Normal (closed with pushed tappet): If the actuator stemextends, the valve closes. Suitable for all common valves.●Inverted (open with pushed tappet): If the actuator stemretracts, the valve opens. Designed for inverted valves.Method for additional pressing of rubber seal Defines in which way the automatic adjustment will be executed. Depending on the installed valve, an optimized adaptation can be carried out as follows:End limit point by force: The end limit point is evaluated by closing the valve with a defined force of 100N during each positioning. End limit point by position: The end limit point is evaluated by closing the valve with not only a defined force of 100N, but also an additional stroke that can be set in the expanded “Position for additional pressing of rubber seal” field. Use this method if thevalve cannot be fully closed by applying the defined force. Maximum position Defines the maximum position that the valve can approach. Minimum position Defines the minimum valve position that the valve can approach.Behavior at minimum position underflow Defines which valve position is approached if theposition/actuating value is lower than the defined minimum position.●0 %: The valve actuator closes the valve completely if theactuating value is lower than the defined minimum position.●0 % = 0 %, otherwise min. valve position: The valve actuatorapproaches the defined minimum position if the actuatingvalue is lower than the defined minimum position.Valve type Defines the following valve types that have typically differentcharacteristic curves:●Linear characteristic curve: This option is used exclusively forvalves with linear characteristic curves. Valve positions arefixed and linearly mapped to volume flows.●Own characteristic curve: This option is for special valves withknown characteristic curves. With this option, the valveactuator can be adapted to a specific characteristic curve byadjusting valve positions at which volume flows in differentpercentages will be reached.●Equal characteristic curve: This option is for valves that haveequal-percentage characteristics.Window contactParameters DescriptionTransmission of window state Defines if and how often the status of the connected window contact will be sent.No cyclical transmission: Send only when the status is changed. Every x min: The status is sent at intervals of x min.Minimum repetition time Defines the minimum time interval of sending status changes. Incase the status changes frequently, this parameter helps to avoidbus congestion.Window open Defines whether a normally closed contact (NCC) or a normallyopened contact (NOC) is used as window contact.NOTICEWindow contact is displayed in ETS no matter what device is connected to DI1 of the actuator. For example, if a presence detector is connected to DI1, Window contact displayed in ETS actually means presence indication.Condensation contactParameters DescriptionTransmission of window state Defines if and how often the status of the connected condensation contact will be sent.No cyclical transmission: Send only when the status is changed. Every x min: The status is sent at intervals of x min.Minimum repetition time Defines the minimum time interval of sending status changes. Incase the status changes frequently, this parameter helps to avoidbus congestion.Window open Defines whether a normally closed contact (NCC) or a normallyopened contact (NOC) is used as condensation contact.NOTICECondensation contact is displayed in ETS no matter what device is connected to DI2 of theactuator. For example, if a presence detector is connected to DI2, Condensation contactdisplayed in ETS actually means presence indication.Mode prioritiesIf different modes are triggered at the same time, the priorities are as follows (if applicable):Priorities Communication1 Override control mode2 Calibration Mode3 Decalcification4 Forced mode5 Summer mode6 Setpoint7 Emergency modeFor example, if the actuator is in summer mode, then the forced mode is triggered, theactuator will be in the forced mode, similarly after the forced mode is released, it will entersummer mode again.Engineering and commissioningSystem environmentsNOTICEGood knowledge about KNX networks and ETS5 operation (depending on the systemenvironment) is required.Issued byBeijing Siemens Cerberus Electronics Ltd. Smart InfrastructureNo.1, Fengzhi East Road, Xibeiwang Haidian District, 100094 BEIJING, China Tel. +86 10 64768806/buildingtechnologies© Beijing Siemens Cerberus Electronics Ltd.,Technical specifications and availability subject to change without notice.To connect a PC with USB interface to a KNX network, an interface converter (e.g. OCI700,contained in OCI700.1) is required.Supported system/network environment and available engineering and commissioning tools are:Documentation of engineeringIt is highly recommended to document all planning data and settings in a way that is easily accessible after a long interval. Especially if special calculated parameters or plant-specific adaptations had to be made during engineering and commissioning, these should be clearly noted. For KNX LTE-mode systems, the engineering and commissioning protocol C3127 ([15]) is available. For KNX S-Mode systems, this functionality can be covered by ETS. KNX S-Mode engineeringFor engineering in KNX S-Mode, good command in operating the ETS5 is required. Basic knowledge about KNX standards is presupposed as well. The parameters and S-Mode objects are documented in “Parameters and Objects in S -Mode” in this documentation. The controllers are certified KNX devices, thus the usual ETS workflows in KNX projects apply. For KNX S-Mode engineering, the required product data (*.knxprod) have to be downloaded from the Siemens website and imported into the ETS device catalog. To obtain the product data, navigate to /hvac-td or /openair and locate the “Downloads” section.CommissioningFirst, the actuator is mounted onto the valve using the correct adapter ring. The bus voltage can then be applied. This automatically starts the self-calibration process.KNX S-Mode commissioningAt first the device needs to be connected to the KNX-bus via the included bus connection block.In case of integration with S-Mode devices the usual S-Mode commissioning procedures apply for ETS5 (Engineering Tool Software). The HMI (programing button and LED)conforms to the KNX standard. A short key press sets the device into programming mode. Download the ETS application file (.knxprod) from the GAMMA-TD page(/gamma-td ). After downloading the application to the actuator, it will be available for S-Mode communication.。

KNX与485区别KNX:他是一个合集的称呼,包括了KNX软件、KNX硬件、KNX协会、KNX协议、KNX线缆等等,包括还有KNX芯片。
无论你在世界的任何一台计算机上搜索,结果都是相似甚至相同的,仅此一家,绝无分店!楼宇控制系统中需要定义的内容它全部囊括。
从电气到介质(线缆)、从介质(线缆)到设备、从设备到软件、从软件到配置、从配置到系统。
RS485:准确的来说,它是一种通信技术,他仅仅是定义了物理层,也就是有电气规定,规定了它的信号电压、阻抗等。
当一个公司宣称他们的产品采用RS485协议的时候,实际上包含了两层含义:一、采用RS485的通信技术;二、使用RS485技术运行自己的协议。
所以如果你是个现场总线的门外汉,上网一搜“485协议”,结果可能是五花八门。
RS485总线技术,在国内流行的已经很久了,在RS485这个技术的基础上发展了很多通信协议,如DMX512、Modbus协议等等。
RS485技术广泛应用于现场总线的各个领域,小到智能家居控制系统,大到大型楼宇控制系统、以及抄表系统,可谓是无所不在。
由于他仅定义了物理层,所以一个应用485总线技术公司的产品的稳定性就要看公司自身的软件实力和硬件实力了,所以一些实力强悍的公司在这个技术的开发了稳定了楼控系统:如快思聪、霍尼韦尔、施耐德的C-BUS等等。
KNX引入中国应该是在2000年左右,毕竟KNX协会也才1999成立的。
中国第一批做KNX 的厂家也大都是2006年以后的事儿了。
所以KNX在中国的历史并不长,得益于其完善的KNX 技术体系和技术背景(前身是EIB-欧洲安装总线、BatiBus和EHSA),目前在中国的发展也是相当了得。
不只是已经有不少机场、地铁、公建、高端酒店广泛应用了KNX产品;同时已经有超过20家国内厂家加入了KNX阵营,开发KNX产品。
接下来我们从硬件、软件、标准、产品四个方面来讲KNX和RS485做下比较。
本比较尽量不带偏见,实际中的选择,还请各位自己斟酌。

《KNX系统介绍》教案教案:KNX系统介绍课程概述:本教案是一节关于KNX系统介绍的课程。
KNX系统是一种基于开放标准的智能建筑控制系统,可以实现对照明、供暖、通风、安防等多种设备的集中控制和管理。
通过本课程的学习,学生将了解KNX系统的基本原理、架构和应用场景,培养学生对智能建筑控制系统的理解和应用能力。
课程目标:1.了解KNX系统的基本原理和工作机制;2.了解KNX系统的硬件组成和网络结构;3.熟悉KNX系统的应用场景和优势;4.培养学生对智能建筑控制系统的理解和应用能力。
教学内容:一、KNX系统概述(200字)1.智能建筑的概念和意义;2.KNX系统的定义和特点。
二、KNX系统的基本原理(300字)1.KNX系统的工作机制;2.KNX系统的通信协议和数据传输方式。
三、KNX系统的硬件组成(300字)1.KNX总线;2.KNX设备:传感器、执行器、控制器;3.KNX接口和网关。
四、KNX系统的网络结构(300字)1.KNX系统的拓扑结构;2.KNX系统的网络规划和布线。
五、KNX系统的应用场景(300字)1.照明控制;2.供暖和空调控制;3.安防和监控;4.能源管理。
六、KNX系统的优势(200字)1.开放标准和互操作性;2.可扩展性和灵活性;3.节能和环保;4.智能化和便利性。
教学活动:1.小组讨论(20分钟):将学生分成小组,讨论智能建筑和KNX系统的概念和意义。
2.案例分析(30分钟):选取几个实际的智能建筑项目案例,分析其应用了哪些KNX系统的功能和优势。
3.实践操作(40分钟):学生分组进行KNX系统的硬件连接和配置,实现基本的照明控制和温度控制。
4.总结和讲解(10分钟):老师总结本课程的内容,并讲解KNX系统的发展趋势和未来应用前景。
教学评估:1.小组讨论的讨论质量和深度;2.案例分析的分析逻辑和应用能力;3.实践操作的操作准确性和成果展示;4.学生对KNX系统发展趋势和未来应用前景的理解。
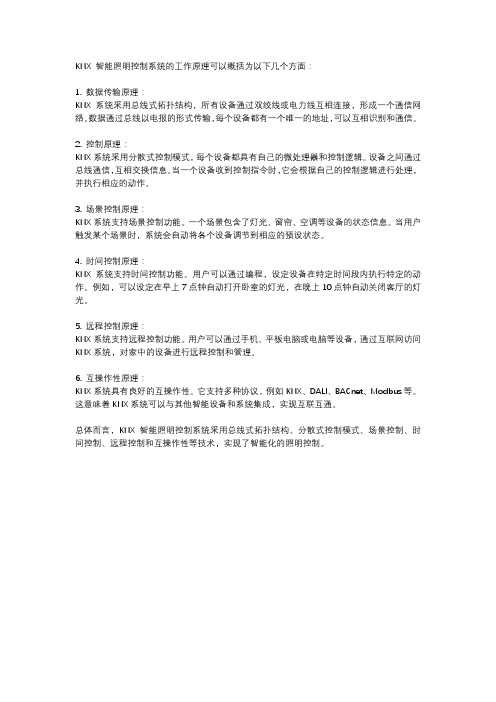
KNX 智能照明控制系统的工作原理可以概括为以下几个方面:
1. 数据传输原理:
KNX系统采用总线式拓扑结构,所有设备通过双绞线或电力线互相连接,形成一个通信网络。
数据通过总线以电报的形式传输,每个设备都有一个唯一的地址,可以互相识别和通信。
2. 控制原理:
KNX系统采用分散式控制模式,每个设备都具有自己的微处理器和控制逻辑。
设备之间通过总线通信,互相交换信息。
当一个设备收到控制指令时,它会根据自己的控制逻辑进行处理,并执行相应的动作。
3. 场景控制原理:
KNX系统支持场景控制功能。
一个场景包含了灯光、窗帘、空调等设备的状态信息。
当用户触发某个场景时,系统会自动将各个设备调节到相应的预设状态。
4. 时间控制原理:
KNX系统支持时间控制功能。
用户可以通过编程,设定设备在特定时间段内执行特定的动作。
例如,可以设定在早上7点钟自动打开卧室的灯光,在晚上10点钟自动关闭客厅的灯光。
5. 远程控制原理:
KNX系统支持远程控制功能。
用户可以通过手机、平板电脑或电脑等设备,通过互联网访问KNX系统,对家中的设备进行远程控制和管理。
6. 互操作性原理:
KNX系统具有良好的互操作性。
它支持多种协议,例如KNX、DALI、BACnet、Modbus等。
这意味着KNX系统可以与其他智能设备和系统集成,实现互联互通。
总体而言,KNX 智能照明控制系统采用总线式拓扑结构、分散式控制模式、场景控制、时间控制、远程控制和互操作性等技术,实现了智能化的照明控制。

234 167 5://..:@.:--1288U12B501http www kanontec comE support kanontec comT4008216843 8KNX IP 路由器KTEIPC● 可以通过IP连接ETS进行编程调试● 可作为IP路由器进行系统组网● 可提高KNX通讯速率● 具有过滤表功能:支持组地址首位过滤● 通过网页设置参数,无需ETS进行编程KTEIPC编程说明① RJ45网络接口② RUN指示灯:通电后,绿色常亮,收发数据时,为绿色快速闪烁③ PWR指示灯:通电后,橙色常亮④ BUS指示灯:接入KNX系统后,为红色常亮⑤ KNX总线端子:可接入KNX系统⑥ 重置按钮:长按此按钮6秒,待RUN指示灯快速闪烁,恢复亮后,设备即恢复出厂设置(主机IP网络参数、串口设置及启动模式)⑦ 辅助供电输入端子:使用9V-30V直流电源,V+为正极,G为负极正爵KTEIPC耦合器具有点对点隧道和路由功能,将KNX总线与网络连接。
KNX信号可以通过网络接收或发送,设备使用KNXnet/IP进行通讯,在域-域/域-线/线-线之间可以更快地传输信号。
1) 将KTEIPC连接至本地局域网后,使用Firefox/Chrome浏览器进入192.168.1.232;2) 默认用户名:admin,默认密码:123;3) 登陆成功后,点击“基本设置”→“启动参数”;4) 接口类型选择为“By KTS”,接口地址设置为X.Y.0;5) 启动模式更改为KNX Router Mode;6) 如果局域网环境改变,点击“基本设置”→“网络设置”,将KTEIPC相关参数修改至与局域网匹配;7) 修改完成后,点击“系统重启”,待RUN指示灯熄灭后再次亮起时,表示重启完成,设置参数生效。
组网示例。
一、KNX技术简介KNX通过一条总线将各个分散的设备连接并分组和赋予不同的功能;系统采用串行数据通讯进行控制、监测和状态报告。
KNX是基于事件控制的分布式总线系统,只有当总线上有事件发生时和需要传输信息时才将报文发送到总线上。
KNX 技术的通信模型采用五层结构:物理层、数据链路层、网络层、传输层和应用层。
KNX 物理层支持TP1( 双绞线)、PL110(电力线)、RF(射频) 和Ethernet(以太网),其中TP1 介质应用最多。
数据链路层实现总线设备之间的数据传输,并解决网络中的通信冲突问题。
对于小KNX系统中的总线设备,网络层的功能很少,只是完成了传输层和数据链路层的通信映射功能。
大型KNX 系统中有耦合器类产品,作用是在网络层完成路由功能和跳数(hop)控制功能。
传输层完成设备之间的传输,有四种传输模式:点到点无连接,点到点有连接,广播和多播。
KNX通信模型KNX传输介质主要是双绞线,比特率为9600bit/s。
总线由KNX电源(DC24V)供电,数据传输和总线设备电源共用一条电缆,数据报文调制在直流电源上。
KNX系统有两种配置模型:S-Mode (系统模式)和E-Mode (简单模式)。
S-Mode:该配置机制是为经过良好培训的KNX安装者实现复杂的楼宇控制功能。
一个由“S-Mode”组件组成的装置可以由通常的软件工具(ETS® 3专业版)在由S-Mode产品制造商提供的产品数据库的基础上进行设计:ETS 也可以用于连接和设置产品(即设置安装和下载要求的可用参数)。
“S-Mode”提供给实现楼宇控制功能的最高级别的灵活性。
E-Mode:该配置机制是针对经过基本KNX培训的安装人员。
和S-Mode相比,“E-Mode”兼容产品只提供有限的功能。
E-Mode组件是已经预先编程好的并且已经载入默认参数。
使用简单配置,可以部分的重新配置各个组件(主要是它的参数设置和通信连接)。
注:ETS软件是系统设计、编程和调试的工具软件;可能需要购买。
KNX的原理范文KNX(Konex)是一种开放的、标准化的、全球通用的建筑自动化和控制系统。
它是由欧洲著名的KNX协会开发和推广的,最早称为欧洲安装总线(EIB)。
KNX采用了一套统一的协议、物理传输介质和设备接口规范,可以实现不同设备之间的互联互通。
本文将详细介绍KNX的原理和工作流程。
1.KNX网络结构KNX网络由三个主要组成部分组成:KNX线路、KNX总线系统和KNX设备。
KNX线路是网络基础结构,使用两根双绞线。
KNX总线系统是连接所有KNX设备的基础设施,负责提供设备之间的通信功能。
KNX设备是网络中的节点,可以是传感器、执行器、控制器等。
2.KNX通信协议KNX使用一种开放的、标准化的通信协议,称为KNX数据链路层(KDL)协议。
KDL协议定义了设备之间的通信格式、数据传输方式和错误处理机制。
它支持点对点和多点通信模式,每个设备都有一个唯一的地址,可以通过地址来识别和定位设备。
3.KNX物理传输介质KNX支持多种物理传输介质,包括双绞线、无线电、红外线、以太网等。
其中最常用的是双绞线传输介质,它可以使用CAT-5或CAT-7标准的双绞线进行数据传输。
双绞线传输介质具有较高的抗干扰性能,适用于多种环境条件。
4.KNX设备接口规范KNX设备接口规范定义了设备之间的标准接口和功能。
它包括物理接口和应用接口两个方面。
物理接口定义了设备与总线之间的物理连接规范,例如插座、接口模块等。
应用接口定义了设备之间的信息交换方式和数据格式,例如传感器数据、控制命令等。
5.KNX工作流程KNX的工作流程可以分为四个主要步骤:初始化、连接、通信和断开。
(1)初始化:在系统启动时,所有的KNX设备都会进行初始化操作,包括分配唯一的地址、加载配置文件等。
(2)连接:设备之间通过KNX总线系统进行连接,形成一个网络。
设备可以根据自己的地址和配置信息找到其他设备,并建立通信连接。
(3)通信:设备之间可以通过KNX总线系统进行数据交换。
KNX与Zigbee的区别4月1日讯人们日渐生活和工作在“智能”建筑当中,并依靠自动化流程控制供暖、通风、空调、照明、安全以及其它运营系统。
这些系统能够抵御网络攻击威胁吗?来自腾讯安全平台的研究小组正在为4月即将召开的Hack in the Box 大会准备,会上他们将展示智能建筑的安全软肋。
该团队表示,目前智能建筑设备的安全性问题还没能得到足够的重视,他们希望借此机会让更多人关注智能建筑安全隐患。
入侵KNX与Zigbee网络腾讯刀锋团队的研究人员一直专注于探索KNX 技术,他们提出了一种新的攻击方法,能够控制KNX 网络组件并借此对其进行篡改。
KNX 全球唯一开放式的智能建筑控制标准,是欧洲总线技术,是一种用于大型公共场所(包括体育场、酒店、机场等)以及工业设施的楼宇自动化网络通信协议。
KNX 独立于制造商和应用领域的系统,通过总线设备(传感器/执行器)将楼宇管理装置连接到KNX 介质上即可进行信息交换,以实现一个统一的系统控制、监视和发送信号,不需要额外的控制中心。
Zigbee 是一种新兴的短距离、低速率的无线网络技术,主要用于近距离无线连接。
它有自己的协议标准,在数千个微小的传感器之间相互协调实现通信。
这些传感器只需很少的能量,以接力的方式通过无线电波将数据从一个传感器传到另一个传感器,因此通信效率非常高。
该通信协议则广泛应用于家庭自动化系统,是一种低功耗无线通信技术。
这几位研究人员在验证测试当中对某酒店发动攻击,并成功控制了目标酒店内的客户照明、空调、窗帘以及其它设备。
该团队在接受采访时表示,这类攻击方法需要以物理方式访问房间内的KNX 设备线缆,以便利用KNX 网关接入房间内的KNX 网络,他们利用KNX ETS 软件以及多种KNX 安全测试工具完成了此次攻击。
”通过分析KNX 协议,研究人员发现可以通过有线网络修改KNX/IP 路由器配置,而无需访问相关WiFi 网络或者外部网络。
K-BUS ®KNX IP 路由器KNX IP Router_V1.3BNIPR-00/00.1KNX/EIB 住宅和楼宇智能控制系统使用手册目录第一章概述------------------------------------------------------------------------------------------------------------------------------------------------1 1.1.功能概述------------------------------------------------------------------------------------------------------------------------------------------1 1.2.通道------------------------------------------------------------------------------------------------------------------------------------------------2 1.3.路由------------------------------------------------------------------------------------------------------------------------------------------------2 1.4.KNX IP路由器-----------------------------------------------------------------------------------------------------------------------------------3第二章技术参数&尺寸图和操作指示--------------------------------------------------------------------------------------------------------------3 2.1.技术参数------------------------------------------------------------------------------------------------------------------------------------------3 2.2.尺寸图(单位:mm)---------------------------------------------------------------------------------------------------------------------------4 2.3.指示和操作功能---------------------------------------------------------------------------------------------------------------------------------5第三章项目设计和应用--------------------------------------------------------------------------------------------------------------------------------6 3.1.操作模式------------------------------------------------------------------------------------------------------------------------------------------63.1.1.LED指示------------------------------------------------------------------------------------------------------------------------------------63.1.2.功能按钮------------------------------------------------------------------------------------------------------------------------------------63.1.3.编程按钮和LED--------------------------------------------------------------------------------------------------------------------------6 3.2.IP路由应用---------------------------------------------------------------------------------------------------------------------------------------73.2.1.IP网络中的KNX报文------------------------------------------------------------------------------------------------------------------73.2.2.IP路由器在网络安装中------------------------------------------------------------------------------------------------------------------73.2.3.IP路由器作为域耦合器使用-----------------------------------------------------------------------------------------------------------83.2.4.IP路由器使用在混合系统中-----------------------------------------------------------------------------------------------------------83.2.5.IP路由器作为线耦合器使用-----------------------------------------------------------------------------------------------------------9第四章ETS中系统参数设置说明-------------------------------------------------------------------------------------------------------------------104.1.物理地址配置----------------------------------------------------------------------------------------------------------------------------------10 4.2.参数界面“General”-----------------------------------------------------------------------------------------------------------------------11 4.3.参数界面“IP configuration”-------------------------------------------------------------------------------------------------------------12 4.4.参数界面“KNX Multicasting Address”----------------------------------------------------------------------------------------------13 4.5.参数界面“Main Line”---------------------------------------------------------------------------------------------------------------------14 4.6.参数界面“Sub Line”----------------------------------------------------------------------------------------------------------------------15第五章网页配置----------------------------------------------------------------------------------------------------------------------------------------17 5.1.访问网页端的方式----------------------------------------------------------------------------------------------------------------------------175.1.1.通过windows网络访问---------------------------------------------------------------------------------------------------------------175.1.2.通过IP地址访问------------------------------------------------------------------------------------------------------------------------185.1.3.通过MAC地址访问--------------------------------------------------------------------------------------------------------------------18 5.2.设备信息-----------------------------------------------------------------------------------------------------------------------------------------19 5.3.KNX-----------------------------------------------------------------------------------------------------------------------------------------------19 5.4.Update--------------------------------------------------------------------------------------------------------------------------------------------20 5.5.IP tunneling地址分配------------------------------------------------------------------------------------------------------------------------23第六章出厂状态----------------------------------------------------------------------------------------------------------------------------------------25第一章概述IP路由器可用作线耦合器或骨干耦合器。
KNX是Konnex的缩写。
1999年5月,欧洲三大总线协议EIB、BatiBus和EHSA合并成立了Konnex协会,提出了KNX协议。
该协议以EIB为基础,兼顾了BatiBus和EHSA的物理层规范,并吸收了BatiBus和EHSA中配置模式等优点,提供了家庭、楼宇自动化的完整解决方案。
KNX?总线是独立于制造商和应用领域的系统。
通过所有的总线设备连接到KNX 介质上( 这些介质包括双绞线、射频、电力线或IP/Ethernet), 它们可以进行信息交换。
总线设备可以是传感器也可以是执行器,用于控制楼宇管理装置如:照明, 、遮光/ 百叶窗、保安系统、能源管理、供暖、通风、空调系统、信号和监控系统、服务界面及楼宇控制系统、远程控制、计量、视频/ 音频控制、大型家电等。
所有这些功能通过一个统一的系统就可以进行控制、监视和发送信号,不需要额外的控制中心。
KNX是唯一全球性的住宅和楼宇控制标准。
在KNX系统中,总线接法是区域总线下接主干线,主干线下接总线,系统允许有15个区域,即有15条区域总线,每条区域总线或者主干线允许连接多达15条总线,而每条总线最多允许连接64台设备,这主要取决于电源供应和设备功耗。
每一条区域总线、主干线或总线,都需要一个变压器来供电,每一条总线之间通过隔离器来区分。
在整个系统中,所有的传感器都通过数据线与制动器连接,而制动器则通过控制电源电路来控制电器。
所有器件都通过同一条总线进行数据通信,传感器发送命令数据,相应地
址上的制动器就执行相应的功能。
此外,整个系统还可以通过预先设置控制参数来实现相应的系统功能,如组命令,逻辑顺序,控制的调节任务等。
同时所有的信号在总线上都是以串行异步传输(广播)的形式进行传播,也就是说在任何时候,所有的总线设备总是同时接收到总线上的信息,只要总线上不再传输信息时,总线设备即可独立决定将报文发送到总线上。
KNX电缆由一对双绞线组成,其中一条双绞线用于数据传输(红色为CE+ 黑色为CE-),另一条双绞线给电子器件提供电源。
KNX有三种结构:线形、树形、和星形。
NX是被正式批准的住宅和楼宇控制领域的开放式国际标准。
ISO/IEC
KNX技术于2006年被批准为国际标准ISO/IEC 14543-3。
CENELEC
KNX技术于2003年被批准为欧洲标准(CENELEC EN50090 和CEN EN 13321-1 和13321-2) 。
CEN
KNX技术于2006年被批准为EN 13321-1 (作为EN 50090部份参考)和EN1332-2 (KNXnet/IP)。
SAC
KNX技术于2007年被批准为中国标准GB/Z 20965。
ANSI/ASHRAE
KNX技术于2005年被批准为美国标准ANSI/ASHRAE 135。
交互是KNX 技术的主要部分,定义如下:“产品发送和接收信息的情形,可以完全地理解信号和不用附加设备对它们起作用。
”
为了便于最大程度的应用住宅和楼宇控制系统,不可缺少的是不同制造商(“多提供商交互”)的产品和不同应用领域(“交叉学科交互”)的产品。
KNX标准允许每个制造商选择最理想的配置模式,并根据市场允许每个制造商选择目标市场部分和应用的适当组合。
The?KNX?KNX标准包括2个不同的配置模式:
配置模式
S-Mode (系统模式)
该配置机制是为经过良好培训的KNX安装者实现复杂的楼宇控制功能。
一个由“S-Mode”组件组成的装置可以由通常的软件工具(ETS(R) 3专业版)在由S-Mode产品制造商提供的产品数据库的基础上进行设计:ETS也可以用于连接和设置产品(即设置安装和下载要求的可用参数)。
“S-Mode”提供给实现楼宇控制功能的最高级别的灵活性。
E-Mode (简单模式)
该配置机制是针对经过基本KNX培训的安装人员。
和S-Mode相比,“E-Mode”兼容产品只提供有限的功能。
E-Mode组件是已经预先编程好的并且已经载入默认参数。
使用简单配置,可以部分的重新配置各个组件(主要是它的参数设置和通信连接)。
传输介质
KNX?包括几种传输介质。
每种传输介质可以用来和一个或多个配置模型组合使用,它允许各个制造商针对目标市场部分和应用选择合适的组合。
TP ( 双绞线)
TP-0:双绞线,比特率为4800 bits/s ,继承于BatiBus。
使用的比较少,最常用的还是TP-1
TP-1:双绞线,比特率为9600 bits/s ,延续EIB 中的应用。
EIB 和KNX TP1 认证TP1 产品可与同类总线操作和通信。
PL ( 电缆)
PL110:电缆,比特率为1200 bits/s ,也是延续EIB 中的应用。
EIB 和KNX PL110 认证产品可与同类分布电网操作和通信。
PL132:电缆,比特率为2400bits/s,与PL110差不多,但是通信频率不一样而已。
RF ( 射频)
KNX 设备支持该传输介质使用无线电信号来传输KNX 信号。
信号传输频宽为868 MHz (短波设备),最大发射能量为25mW ,比特率为16.384 kBit/sec 。
KNX RF 介质可以离开机架组件进行开发,它允许单向和双向工作,特点是低耗能和小型及中型装置仅需要在特殊情况重传。
IP ( 以太网)
KNX 信号也可以打包成IP 信号传输。
通过这种方式,LAN 网络和英特网可以用来发送KNX 信号。
IP?路由器是USB 数据接口可选项,分别为TP 线路或主干网耦合器。
在后者中,常规TP?主干网被快速以太网基线取代。
KNX总线协议遵循OSI模型协议规范,并进行了合理的简化。
由物理层、数据链接层、网络层、传输层和应用层组成,会话层和表示层的功能则并入应用层
fieldbus
??HART Protocol??Honeywell SDS??HostLink??INTERBUS
??MECHATROLINK??MelsecNet??Modbus??Optomux
??PieP??Profibus??PROFINET IO
??SERCOS
interface ??SERCOS III??Sinec H1??SynqNet??TTEthernet
??RAPIEnet
工业控制系统??OPC DA??OPC HDA??OPC UA??MTConnect
智能建筑??1-Wire??BACnet??C-Bus??DALI ??DSI??KNX??LonTalk??Modbus ??oBIX??VSCP??X10??xAP ??ZigBee
输配电通讯协
定??IEC 60870-5??DNP3??IEC 60870-6??IEC 61850 ??IEC 62351??Modbus??Profibus
智能电表
??ANSI C12.18??IEC 61107??DLMS/IEC 62056??M-Bus
??Modbus
??ZigBee Smart
Energy 2.0
车用通讯??CAN??FMS??FlexRay??IEBus
??J1587??J1708??J1939
??Keyword
Protocol 2000 ??LIN??MOST??NMEA 2000??VAN。