摩托车报警器使用说明
- 格式:doc
- 大小:60.00 KB
- 文档页数:2
铁将军火星人3886说明书铁将军火星人说明书说明:可配置任何款型汽车,产品质保一年!1、电脑识别受袭程度,分级环保报警2、遥控开启行李箱(尾门)3、行李箱(尾门)实时检测4、中控门锁自动化5、环保/声光警戒,可依环境而设6、防误操控,自动回复7、防抢、求救。
铁将军/火星人2118/摩托车单向防盗报警器点用,帮我装那个人没有给我说明书-这个东西很简单,你要是想要直接在网上搜索一下就有了。
铁将军防盗器双向使用说明书?-.有一个是电启动的,双击就可以把摩托打开,但摩托要在空挡.有一个是寻车的,就是你如果把车存起来取的时候望了具体位置,可以按那个按扭,车就会响拌有双闪.大概一共就4个吧防盗的有一二级设定,二级灵敏读高.你是不是按对那。
铁将军火星人2118型摩托车单向防盗器怎么调解灵敏度?-在解除防盗时,长按(解锁键)5秒,方向灯长亮,表示已进入振动灵敏度程式设定状态,然后每按(点火启动键)一次,便在一.二.三.四.五级振动灵敏度选择切换,一级灵敏度最低,五级灵敏度最高,切换灵敏度设定时嗽叭叫一次,方。
铁将军防盗器接线图说明书-防盗器一般都是有9根可以有的线,分别是红1\黑2\黄2\绿1\灰1\白1\黑白红:的是正极一般接电池上的正级或接线路上的一根正级都可黑:接打铁或是负级黄:转向灯上的分别是左右各一绿:为启动有的,接启动继电器上的主动线上灰:是熄。
铁将军防盗器功能?-1)有中控锁功能!2)有声响!3)有锁电路功能!还有其他附加功能!加个铁将军只能防君子!防不了贼!多个响声而已!铁将军摩托车防盗器怎么使用-因为大多数摩托车遥控器,在你把下钥匙后7秒左右都会自动上锁的,你在碰当然会响了.你可以按开锁键就不响了,当然也不防盗了,铁将军是摩托车遥控器里.比较好的品牌!使用很好用的功能有寻车/在一定范围内你按下寻车键车子回响.防抢/在车子启动或驾驶过程中,按此键会自动熄火,在就是自动启动,防盗了.很简单一共就那几个键还都话的图很好用的!汽车铁将军防盗器安装说明书,这个怎么接,求教-先要确认你的车子,中控是什么触发,再根据说明书按到车子触发。
摩托车报警器使用说明一、摩托车报警器的安装1.首先,确定好报警器的安装位置。
一般来说,最佳位置是在座位下方或者隐藏在摩托车的一些内部部件中。
2.确保报警器的接线正确连接到摩托车的12V电源。
在连接之前,准确地确定好摩托车的电池正负极。
3.接下来,需要将报警器的传感器正确安装到摩托车的关键位置上。
这些位置包括车轮、方向盘、刹车等。
二、摩托车报警器的功能1.防盗功能:当摩托车遭受盗窃时,报警器会产生高音频警报声,并且会通过手机短信或者APP通知用户,以便及时采取措施。
2.防移功能:如果有人试图非法移动或抬走摩托车,报警器会自动触发警报系统。
3.防破坏功能:当有人试图损坏或剪断摩托车线路或其他部件时,报警器会立即响起警报。
4.防骚扰功能:当有人触碰摩托车时,报警器的震动传感器会检测到并发出具有骚扰效果的声音警告。
5.防启动功能:如果有人试图试图非法启动摩托车,摩托车报警器会立即发出警报以防止盗窃。
三、摩托车报警器的操作1.打开和关闭报警功能:报警器一般都配有外部开关,用于打开和关闭报警功能。
在停放摩托车时可以关闭报警功能以免误触发报警器。
2.手机APP操作:通过手机APP可以对报警器进行设置,包括调整报警音量、报警灵敏度、报警持续时间等。
3. App消息通知:当报警器触发时,手机APP会收到消息通知,用户可以及时采取相应措施。
4.远程关锁启动:一些高级报警器可以通过手机APP远程操作摩托车的关锁和启动功能,以提高安全性。
四、摩托车报警器的日常维护1.定期检查电池电量,并及时更换电池以保证报警器的正常工作。
2.注意保持报警器干燥,避免受潮或者受到其他液体的侵入。
3.定期检查报警器的连接线路,确保其牢固连接以防失效。
4.在长时间停放摩托车时,建议关闭报警器以节省电量。
总之,摩托车报警器是保护摩托车安全的重要装置,使用和维护良好能有效提升摩托车的安全性。
在安装和使用时应严格按照说明书和技术要求进行操作,以免误触发或者导致其他问题。
Control RemotoSistema de Alarma Para Motocicletas Manual de OperaciónPor Favor Leer el Manual Antes de Usar Modelo: A010-A011INTRODUCCIÓNFelicitaciones por escoger la Alarma de Motocicleta Lion.Un sistema de alarmas para motocicletas de alta calidad es una decisión sabia para prevenir la pérdida de un vehículo por robo. Este sistema fue diseñado por la imaginación de los expertos ingenieros electrónicos que integran nuestro equipo y trayectoria exitosa.Se utiliza un proceso de ensamblaje automático computarizado y tecnologías de información y comunicación en la producción para garantizar una alta calidad y confianza en el desempeño del sistema. Una revisión exhaustiva al recibir el producto verifica un desempeño completo de sus funciones para asegurar su excelencia. Por favor leer el diagrama de circuito cuidadosamente e instale el sistema con la asistencia de un mecánico eficiente para garantizar una correcta instalación.Muchas Gracias!BREVE INTRODUCCIÓN DE FUNCIONESBotón de ActivaciónModo de Activación: presionar para activar el sistema de alarma.Modo de Silencio: presionar dos veces en tres segundos paraactivar esta modalidad en estado normal.Antisecuestro: al estar manejando, presionar para bloquear el motor. Botón de DesactivaciónEn Modo de Activación: presionar por cinco segundos paradesactivar el sistema, la sirena hará dos pitidos y las luces destellarán dos veces. Si el Sistema está Sonando: presionar para detener la sirena temporalmente.Al Conducir: presionar para apagar la motocicletamomentáneamente.Botón de Encendido de MotorPresionar dos veces continuas para iniciar el motor remotamente. Botón de Localizador (únicamente en transmisores de cuatro botones) Presionar en estado normal o estado de activación para localizar la motocicleta, la sirena dará 5 pitidos y las luces destellarán.FUNCIONES1. ActivaciónPresionar , la sirena dará un pitido y las luces destellarán una vez. El sistema entra en modo de alerta luego de tres segundos.2. Modo de SilencioPresionar dos veces, la sirena dará un pitido y las luces destellarán una vez al entrar en modo de silencio.3. DesactivaciónPresionar en modo de activación. La sirena darán dos pitidos y las luces destellarán dos veces al desactivar el sistema. En el caso deestar en modo silencioso, la sirena no dará pitidos.4. Inicio de Motor RemotamentePresionar dos veces antes de un segundo y el motor iniciaráremotamente.5. Localizador (únicamente en transmisores de cuatro botones)Presionar en modo normal o de activación. La sirena dará 5 pitidos y las luces destellarán 5 veces simultáneamente.6. Detener Alarma T emporalmenteAl estar sonando la sirena, presionar para detenerla temporalmente.7. Alarma de Vibracióna) Con el primer golpe la sirena dará cinco pitidos y as lucesdestellarán cinco veces simultáneamente. Una segunda vibraciónmás fuerte dentro de diez segundos de la inicial activará la sirena por25 segundos.b) En modo de silencio, con el primer golpe las luces destellaráncinco veces. Un segundo golpe dentro de diez segundos del inicial activará las luces que destellarán por diez segundos.c) Si se enciende el vehículo con la llave en modo de activación osilencio, la sirena continuará dando pitidos y las luces destellaránsimultáneamente. Presionar para detenerlos o volverá el sistema a modo de activación luego de 25 segundos.8. Función de Adelantado (únicamente en transmisores de cuatro botones)Presionar al estar conduciendo. La sirena dará pitidos y las luces destellarán simultáneamente por 15 segundos. Esto se puededetener apretando cualquier botón.9. AntisecuestroPresionar por cinco segundos al estar conduciendo. La sirena comenzará a sonar y la luces destellarán. Luego de 10 segundos el motor se apagará, la sirena sonará por cinco segundos y el vehículo permanecerá en modo de activación. Este proceso se puede detener presionando .10. Auto-ReactivaciónPresionar en modo de activación. La sirena dará dos pitidos y las luces destellarán dos veces al desactivar la alarma. Si no se golpea o enciende la motocicleta dentro de 30 segundos, volverá a modode activación. Para desactivar el sistema completamente se debe presionar dos veces. La primera vez la sirena dará dos pitidosy las luces destellarán dos veces. Al presionar la segunda vez las luces destellarán dos veces y el sistema quedará completamente desactivado. 11. Recordatorio de ActivaciónSi el usuario no activa el sistema luego de diez segundos de haber apagado el vehículo la sirena dará tres pitidos y las luces destellarán tres veces para recordarle al usuario de activar el sistema.12. Memoria de EstadoCuando es removida la alimentación del sistema de alarma, al encenderse nuevamente el sistema regresa al modo en que se encontraba anteriormente.13. Programación de ControlesRemueva los cobertores plásticos del módulo y localice un botón que esta junto al ajuste del sensor de golpes sin colocar la llavede ignición. Presiónelo por cinco segundos. Las luces darán tres destellos y permanecerán encendidas. En este momento presione cualquier botón en cada control a programar (máximo cuatro controles). Al realizar este procedimiento, todos los controles antiguos serán borrados.INSTALACIÓN STANDARDAPAGADO EN NEGATVO*colores de la motocicleta sugeridos, estos pueden variarINSTALACIÓN STANDARD APAGADO CON CORTE DE IGNICIÓN。
报警器操作的简易说明
一、定义
报警器是一种机械或电子设备,通常由一个简单的传感器装置连接到控制系统中,用于监测重要参数的变化,当检测到特殊变化时,可向用户发出警报。
报警器的基本功能是发出警报,当特定的变化发生时,设备可以发出警报,以提醒用户或使之做出相应的行动。
二、分类
报警器可分为机械报警器和电子报警器两种。
1、机械报警器:这种报警器主要是用来检测物理变化,例如温度变化,压力变化等。
当检测到参数超出设定的上下限时,就会发出警报。
2、电子报警器:这种报警器主要是用来检测电子信号变化,例如电流变化,电压变化等,当检测到特定的电子信号变化时,就会发出警报。
三、报警器的使用
1、安装:报警器的安装是非常重要的,安装的位置要足够安全,安装时要先设置好警报的上下限参数和阈值,以确保报警器能够正常工作。
2、测试:安装完毕后,要对报警器进行测试,可以手动调整参数,模拟不同的环境条件,看看报警器是否可以正常工作。
3、维护:定期对报警器进行维护,确保其能够正常工作,以便在发生意外时能够及时发出警报。
四、应用
报警器的应用非常广泛。
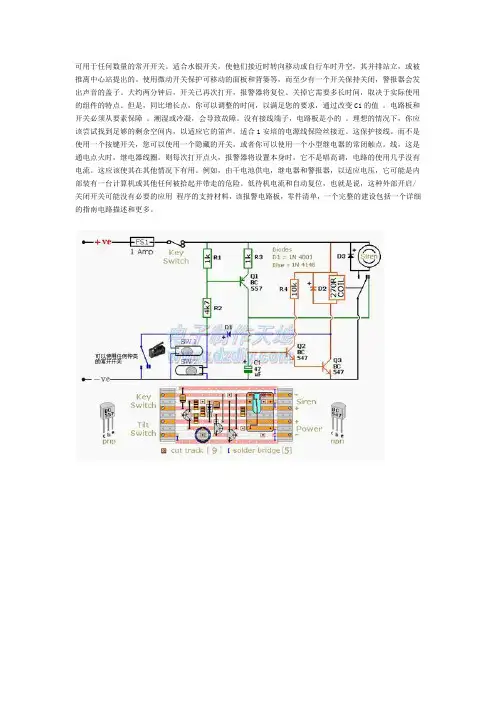
可用于任何数量的常开开关。
适合水银开关,使他们接近时转向移动或自行车时升空,其并排站立,或被推离中心站提出的。
使用微动开关保护可移动的面板和背篓等,而至少有一个开关保持关闭,警报器会发出声音的盖子。
大约两分钟后,开关已再次打开,报警器将复位。
关掉它需要多长时间,取决于实际使用的组件的特点。
但是,同比增长点,你可以调整的时间,以满足您的要求,通过改变C1的值。
电路板和开关必须从要素保障。
潮湿或冷凝,会导致故障。
没有接线端子,电路板是小的。
理想的情况下,你应该尝试找到足够的剩余空间内,以适应它的笛声。
适合1安培的电源线保险丝接近。
这保护接线。
而不是使用一个按键开关,您可以使用一个隐藏的开关,或者你可以使用一个小型继电器的常闭触点。
线,这是通电点火时,继电器线圈。
则每次打开点火,报警器将设置本身时,它不是唱高调,电路的使用几乎没有电流。
这应该使其在其他情况下有用。
例如,由干电池供电,继电器和警报器,以适应电压,它可能是内部装有一台计算机或其他任何被拾起并带走的危险。
低待机电流和自动复位,也就是说,这种外部开启/关闭开关可能没有必要的应用程序的支持材料,该报警电路板,零件清单,一个完整的建设包括一个详细的指南电路描述和更多。
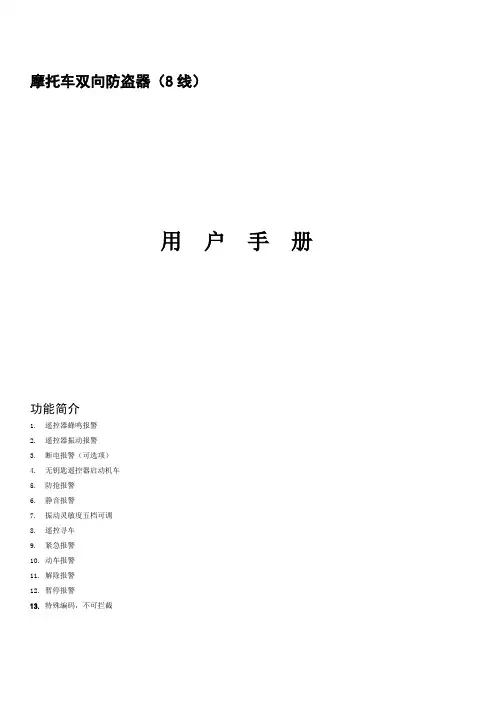
摩托车双向防盗器(8线)用户手册功能简介1.遥控器蜂鸣报警2.遥控器振动报警3.断电报警(可选项)4.无钥匙遥控器启动机车5.防抢报警6.静音报警7. 振动灵敏度五档可调8.遥控寻车9.紧急报警10.动车报警11.解除报警12.暂停报警13.特殊编码,不可拦截使用说明设定防盗熄火后关掉钥匙,按键1次,喇叭响1声,方向灯闪一次,机车进入防盗状态振动报警预警:当车受到振动时,发出3声“嘀,嘀,嘀”警报声,但此时双向遥控器不报警;正式报警:预警10秒内若车辆再次受到振动,则发出连续报警,此时双向遥控器也报警暂停报警在报警状态下,按键,暂停报警,维持防盗状态。
紧急报警在防盗状态下,打开电门锁,防盗喇叭会大声鸣响,此时双向遥控器也报警防抢报警行使中,按按键,车熄火,防盗喇叭报警,同时双向遥控器也报警解除防盗状态按键,喇叭响2声,方向灯闪2次,机车进入撤防状态。
遥控寻车按键,喇叭响5声,方向灯闪5次,提示机车位置振动灵敏度调整同时按住遥控器和不放,听到主机发出声音后放。
报警主机鸣叫一长声加一至五短声;其中一短声为一档,灵敏度最高;两短声,为二档,灵敏度次之;依此类推,鸣叫短五声,为五档,灵敏度最低。
(出厂设在二档)无钥匙遥控器启动机车2秒内按键2次,发动机点火,此时可行车。
用钥匙启动按键,插入钥匙并旋转,此时可行车。
断电报警(可选项)剪断电源线,双向遥控器会发出长时间报警静音报警设置按键1次,喇叭响1声,方向灯闪一次,连续操作5次,第五次时喇叭响3声,进入静音报警状态。
此时连续振动机车,报警喇叭不响,只有双向遥控器报警。
静音报警解除按键1次,喇叭响1声,方向灯闪一次,静音报警解除,进入有声防盗报警状态。
双向遥控器关机同时长按和键,听到遥控器“嘀”一声,指示灯闪一下,关机。
在不用时尽量关机,会大大延长电池寿命。
C型双向遥控器开机长按任意键,听到遥控器“嘀”一声,指示灯闪一下,开机。
此时短按任意键,指示灯会闪一下。

摩托车报警器使用说明1.介绍2.安装首先,确保您购买的摩托车报警器适用于您的摩托车。
阅读产品说明书,了解所需的安装步骤和材料。
通常,安装过程如下:(1)找到合适的位置:选择一个安全,不易受到物理损害的位置,通常在摩托车的底部或座位下方。
确保选择合适的位置,以便安装报警器和接线的需要。
(2)拆除部件:根据说明书,仔细拆除摩托车的特定部件,以便安装报警器。
(3)连接电源线:将报警器的电源线与摩托车的电源线连接。
确保正确连接正负极。
(4)安装报警器:根据说明书,将报警器安装在选定的位置上,并确保其固定牢固。
(5)连接喇叭和闪光灯:将报警器的喇叭和闪光灯部件相应地连接到摩托车。
(6)测试:安装完成后,测试报警器是否正常工作。
使用遥控器触发报警器,确保喇叭发出声音并闪光灯正常工作。
3.使用(1)启用/禁用:使用遥控器,您可以启用和禁用摩托车报警器。
在不使用摩托车时,建议禁用报警器以避免误触发。
(2)防盗模式:在您离开摩托车时,启用防盗模式。
当摩托车受到震动或移动时,报警器将触发警示声音和闪光灯。
这会吸引周围人的注意,并起到防止盗窃的作用。
(3)远程启动:一些摩托车报警器还具备远程启动功能,可以通过遥控器开启摩托车的电机。
这对于防止盗窃和方便操作非常有用。
(4)报警延时:您可以设置报警延时时间,以便在启用报警之前快速关闭报警器。
这可以避免在停车等情况下的误触发。
4.维护维护摩托车报警器可以延长其使用寿命和性能。
以下是一些常见的维护方法:(1)定期测试:定期测试报警器的声音和闪光灯功能。
确保遥控器距离和接收器正常工作。
(2)清洁:定期清洁报警器和遥控器。
使用柔软的布和清水擦拭,避免使用化学清洁剂。
(3)电池更换:定期更换遥控器的电池,以确保信号传输的稳定性。
(4)修理/更换:如果报警器出现故障或损坏,请务必及时修理或更换。
不要自行拆修报警器,以免引起更多损坏。
总结。
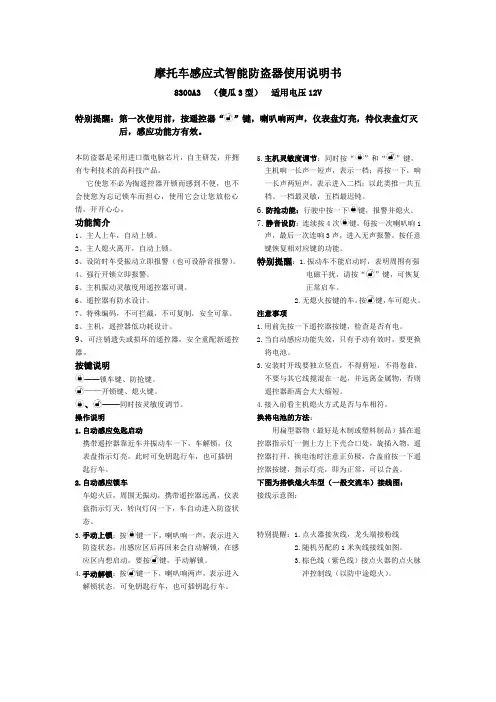
摩托车感应式智能防盗器使用说明书8300A3 (傻瓜3型) 适用电压12V特别提醒:第一次使用前,按遥控器“”键,喇叭响两声,仪表盘灯亮,待仪表盘灯灭后,感应功能方有效。
本防盗器是采用进口微电脑芯片,自主研发,并拥有专利技术的高科技产品。
它使您不必为掏遥控器开锁而感到不便,也不会使您为忘记锁车而担心,使用它会让您放松心情,开开心心。
功能简介1、主人上车,自动上锁。
2、主人熄火离开,自动上锁。
3、设防时车受振动立即报警(也可设静音报警)。
4、强行开锁立即报警。
5、主机振动灵敏度用遥控器可调。
6、遥控器有防水设计。
7、特殊编码,不可拦截,不可复制,安全可靠。
8、主机,遥控器低功耗设计。
9、可注销遗失或损坏的遥控器,安全重配新遥控器。
按键说明——锁车键、防抢键。
——开锁键、熄火键。
、——同时按灵敏度调节。
操作说明1.自动感应免匙启动携带遥控器靠近车并振动车一下,车解锁,仪 表盘指示灯亮,此时可免钥匙行车,也可插钥 匙行车。
2.自动感应锁车车熄火后,周围无振动,携带遥控器远离,仪表 盘指示灯灭,转向灯闪一下,车自动进入防盗状 态。
3.手动上锁:按键一下,喇叭响一声,表示进入防盗状态,出感应区后再回来会自动解锁,在感 应区内想启动,要按键,手动解锁。
4.手动解锁:按键一下,喇叭响两声,表示进入解锁状态。
可免钥匙行车,也可插钥匙行车。
5.主机灵敏度调节:同时按“”和“”键,主机响一长声一短声,表示一档;再按一下,响 一长声两短声,表示进入二档;以此类推一共五 档。
一档最灵敏,五档最迟钝。
6.防抢功能:行驶中按一下键,报警并熄火。
7.静音设防:连续按4次键,每按一次喇叭响1声,最后一次连响3声,进入无声报警。
按任意 键恢复相对应键的功能。
特别提醒:1.振动车不能启动时,表明周围有强电磁干扰,请按“”键,可恢复正常启车。
2.无熄火按键的车,按键,车可熄火。
注意事项1.用前先按一下遥控器按键,检查是否有电。
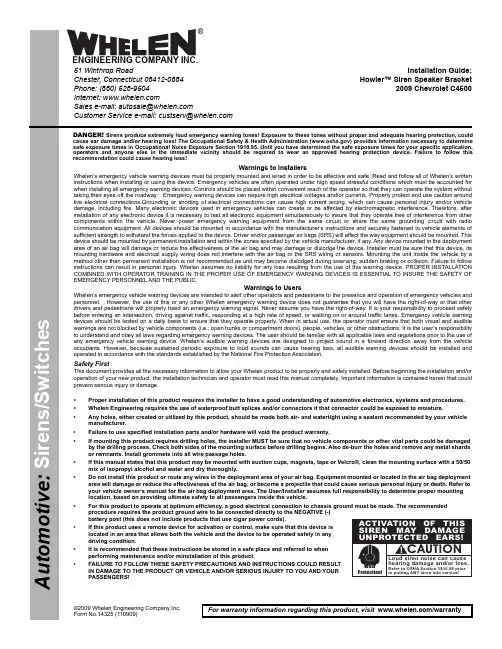
Page 1©2009 Whelen Engineering Company Inc.Form No.14325 (110909)A u t o m o t i v e : S i r e n s /S w i t c h e sFor warranty information regarding this product, visit /warrantyDANGER! Sirens produce extremely loud emergency warning tones! Exposure to these tones without proper and adequate hearing protection, could cause ear damage and/or hearing loss! The Occupational Safety & Health Administration () provides information necessary to determine safe exposure times in Occupational Noise Exposure Section 1910.95. Until you have determined the safe exposure times for your specific application,operators and anyone else in the immediate vicinity should be required to wear an approved hearing protection device. Failure to follow this recommendation could cause hearing loss!•Proper installation of this product requires the installer to have a good understanding of automotive electronics, systems and procedures.•Whelen Engineering requires the use of waterproof butt splices and/or connectors if that connector could be exposed to moisture.•Any holes, either created or utilized by this product, should be made both air- and watertight using a sealant recommended by your vehicle manufacturer.•Failure to use specified installation parts and/or hardware will void the product warranty.•If mounting this product requires drilling holes, the installer MUST be sure that no vehicle components or other vital parts could be damaged by the drilling process. Check both sides of the mounting surface before drilling begins. Also de-burr the holes and remove any metal shards or remnants. Install grommets into all wire passage holes.•If this manual states that this product may be mounted with suction cups, magnets, tape or Velcro®, clean the mounting surface with a 50/50 mix of isopropyl alcohol and water and dry thoroughly.•Do not install this product or route any wires in the deployment area of your air bag. Equipment mounted or located in the air bag deployment area will damage or reduce the effectiveness of the air bag, or become a projectile that could cause serious personal injury or death. Refer to your vehicle owner’s manual for the air bag deployment area. The User/Installer assumes full responsibility to determine proper mounting location, based on providing ultimate safety to all passengers inside the vehicle.•For this product to operate at optimum efficiency, a good electrical connection to chassis ground must be made. The recommended procedure requires the product ground wire to be connected directly to the NEGATIVE (-) battery post (this does not include products that use cigar power cords).•If this product uses a remote device for activation or control, make sure that this device is located in an area that allows both the vehicle and the device to be operated safely in any driving condition.•It is recommended that these instructions be stored in a safe place and referred to when performing maintenance and/or reinstallation of this product.•FAILURE TO FOLLOW THESE SAFETY PRECAUTIONS AND INSTRUCTIONS COULD RESULT IN DAMAGE TO THE PRODUCT OR VEHICLE AND/OR SERIOUS INJURY TO YOU AND YOUR PASSENGERS!CAUTIONLoud siren noise can cause hearing damage and/or loss.Refer to OSHA Section 1910.95prior to putting ANY siren into service!Wear Protection!ACTIVATION OF THIS SIREN MAY DAMAGE UNPROTECTED EARS!Warnings to InstallersWhelen’s emergency vehicle warning devices must be properly mounted and wired in order to be effective and safe. Read and follow all of Whelen’s written instructions when installing or using this device. Emergency vehicles are often operated under high speed stressful conditions which must be accounted for when installing all emergency warning devices. Controls should be placed within convenient reach of the operator so that they can operate the system without taking their eyes off the roadway. Emergency warning devices can require high electrical voltages and/or currents. Properly protect and use caution around live electrical connections.Grounding or shorting of electrical connections can cause high current arcing, which can cause personal injury and/or vehicle damage, including fire. Many electronic devices used in emergency vehicles can create or be affected by electromagnetic interference. Therefore, after installation of any electronic device it is necessary to test all electronic equipment simultaneously to insure that they operate free of interference from other components within the vehicle. Never power emergency warning equipment from the same circuit or share the same grounding circuit with radio communication equipment. All devices should be mounted in accordance with the manufacturer’s instructions and securely fastened to vehicle elements of sufficient strength to withstand the forces applied to the device. Driver and/or passenger air bags (SRS) will affect the way equipment should be mounted. This device should be mounted by permanent installation and within the zones specified by the vehicle manufacturer, if any. Any device mounted in the deployment area of an air bag will damage or reduce the effectiveness of the air bag and may damage or dislodge the device. Installer must be sure that this device, its mounting hardware and electrical supply wiring does not interfere with the air bag or the SRS wiring or sensors. Mounting the unit inside the vehicle by a method other than permanent installation is not recommended as unit may become dislodged during swerving; sudden braking or collision. Failure to follow instructions can result in personal injury. Whelen assumes no liability for any loss resulting from the use of this warning device. PROPER INSTALLATION COMBINED WITH OPERATOR TRAINING IN THE PROPER USE OF EMERGENCY WARNING DEVICES IS ESSENTIAL TO INSURE THE SAFETY OF EMERGENCY PERSONNEL AND THE PUBLIC.Warnings to UsersWhelen’s emergency vehicle warning devices are intended to alert other operators and pedestrians to the presence and operation of emergency vehicles and personnel. However, the use of this or any other Whelen emergency warning device does not guarantee that you will have the right-of-way or that other drivers and pedestrians will properly heed an emergency warning signal. Never assume you have the right-of-way. It is your responsibility to proceed safely before entering an intersection, driving against traffic, responding at a high rate of speed, or walking on or around traffic lanes. Emergency vehicle warning devices should be tested on a daily basis to ensure that they operate properly. When in actual use, the operator must ensure that both visual and audible warnings are not blocked by vehicle components (i.e.: open trunks or compartment doors), people, vehicles, or other obstructions. It is the user’s responsibility to understand and obey all laws regarding emergency warning devices. The user should be familiar with all applicable laws and regulations prior to the use of any emergency vehicle warning device. Whelen’s audible warning devices are designed to project sound in a forward direction away from the vehicle occupants. However, because sustained periodic exposure to loud sounds can cause hearing loss, all audible warning devices should be installed and operated in accordance with the standards established by the National Fire Protection Association.Safety FirstThis document provides all the necessary information to allow your Whelen product to be properly and safely installed. Before beginning the installation and/or operation of your new product, the installation technician and operator must read this manual completely. Important information is contained herein that could prevent serious injury or damage.Installation Guide:Howler™ Siren Speaker Bracket2009 Chevrolet C450051 Winthrop RoadChester, Connecticut 06412-0684Phone: (860) 526-9504Internet: Sales e-mail: autosale@Customer Service e-mail: custserv@®ENGINEERING COMPANY INC.Page 2BUMPER NUTSSPACERB R AC K E TBUMPER BOLTSB U MP E RBR A C K E T Fig.15/16-18X 1-1/4HEX HEAD BOLT5/16-18ELASTICSTOP NUT5/16-18ELASTICSTOP NUT5/16FLAT WASHER5/16FLAT WASHERInstallation:This bracket will mount to the front bumper, using the bolts that hold the bumper on.WARNING: When you install 2 sirenspeakers, install 1at a time so that you are not removingboth bumper supports at the same time.1.On the side of the vehicle that you will be installing the bracket,remove the 2 bolts that hold the bumper and it's support to the vehicle. Secure the mounting bracket to the bumper using these 2bolts as you re-install the bumper.2.Next install the bracket support. Loosen the 2 rear bolts that secure the hood latch to the vehicle (Fig. 1) just enough to slide the support underneath. The slots in the support fit around 2 of the bolts you loosened. Tighten the 2 bolts to secure the support.IMPORTANT supports vehicle overtighten and strip the nuts.3.Loosely attach the straps to the bracket as shown.Slide the secure the speaker to the bracket (adding spacer)while also securing it to the support you installed in step 2.4.Repeat procedure for the other side of the vehicle.5.Extend (Positive) speaker wires to your siren amplifier and connect as described in the amplifier manual.IMPORTANT: It is the responsibility of the installation technician to make sure that the installation and operation of this product will not interfere with or compromise the operation or efficiency of any vehicle equipment!IMPORTANT! Before returning the vehicle to active service, confirm the proper operation of this product, as well as all vehicle components/equipment.IMPORTANT! READ THESE WARNINGS BEFORE CONTINUING!The Howler™ Supplemental Siren was designed for use in high-risk areas such as an intersection. It is not intended to be, nor should be operated as, a replacement or alternative to the vehicle’s primary siren.The low-frequency tones of the Howler™ demonstrate significantly different audio characteristics as compared to those of a traditional higher-frequency siren. While the low-frequency tones are better able to penetrate other vehicles, thus alerting drivers to the presence of the responding emergency vehicle, these tones may also penetrate into the responding vehicle itself. This could potentially expose the operator to increased noise levels.To help eliminate overexposure, the Howler™ siren has been designed with a built-in timing circuit. The Occupational Safety & Health Administration (OSHA) () provides information necessary to determine safe exposure times in Noise and Hearing Conservation,Section 1910.95 (Occupational Noise Exposure). Until you have determined the safe exposure times for your specific application, this siren should be configured for the minimum operating time and operators should be required to use an approved hearing protection device.FAILURE TO FOLLOW THIS RECOMMENDATION COULD CAUSE HEARING LOSS!。
摩托车防盗报警器安装方法摩托车是一种非常常见的交通工具,也是许多人使用的代步工具。
然而,由于摩托车相对较小并且易于被盗,为了保护摩托车的安全,安装一款防盗报警器是非常必要的。
下面将介绍摩托车防盗报警器的安装方法。
首先,选择一款合适的摩托车防盗报警器。
市场上有许多不同类型的报警器可供选择,包括声光报警器、振动报警器、远程报警器等。
根据自己的需要和预算,选择一款适合自己的报警器。
其次,准备所需安装工具。
通常情况下,安装摩托车防盗报警器所需的工具包括扳手、螺丝刀、电钳、电笔、绝缘胶带、电烙铁等。
确保将这些工具准备完整,以便顺利进行安装。
第三步,确定报警器的安装位置。
报警器应安装在摩托车的隐蔽位置,以免被盗贼发现并拆除。
一般来说,摩托车座下或车身底部都是比较合适的安装位置。
注意选择一个固定平稳的安装位置,以确保报警器的稳定性。
第四步,连接报警器的电源线。
首先,将摩托车的电瓶负极断开,以确保安装过程中不会发生电流短路。
然后,使用螺丝刀和电钳等工具,将报警器的电源线与摩托车的电源线连接起来。
连接时需要将电源线的正负极与摩托车电源线正确连接,以免发生电路故障。
第五步,安装报警器的传感器。
传感器是用于监测摩托车的振动或移动的装置。
根据报警器的类型,传感器可以是电磁传感器、光感传感器等。
根据报警器的说明书,安装传感器并与报警器的控制模块进行连通。
第六步,安装报警器的控制模块。
控制模块是报警器的核心部件,用于接收传感器的信号并触发报警。
根据报警器的说明书,将控制模块牢固地固定在摩托车上,并使用绝缘胶带和螺丝固定。
第七步,调试报警器。
在完成安装后,将摩托车的电瓶负极重新连接,然后测试报警器是否正常工作。
可以通过晃动摩托车或使用遥控器来测试报警器的敏感度和响应时间。
最后,仔细检查安装效果。
确认摩托车报警器安装牢固且正常工作后,检查报警器的线路是否都被正确接通并隐藏在摩托车的构造部分中。
此外,还要确保所有螺丝紧固,以防因震动而松动。
摩托车报警器使用说明一、遥控器按键功能介绍声光防盗\防抢解除防盗\遥控熄火启动寻车\防抢二、遥控器功能操作1、防盗设置:摩托车停止取下钥匙后,按下键,喇叭响一声,方向灯闪一下,3秒后进入警戒状态。
2、防盗解除:在任何状态下,按键,喇叭响二声,方向灯闪二下,摩托车取消报警相关操作,恢复正常使用状态。
3、紧急报警:在警戒状态下,按键,启动报警,喇叭响6秒,方向灯闪6次,报警结束后继续处与警戒状态。
报警过程中再次按键,则立即停止报警,继续处于警戒状态。
4、震动报警:在警戒状态下,摩托车受到震动,喇叭响1声,方向灯闪1下,若5—10秒内再次受到震动立即启动报警,喇叭响6秒,方向灯闪6次,同时发动机锁死不能启动。
报警停止后10秒钟内再次受到震动,则再次启动报警。
10秒钟后自动恢复警戒状态。
5、偷盗报警:在警戒状态下,有人企图用锁匙偷开摩托车时,喇叭立即连续长响,方向灯闪动,发动机锁死不能启动。
6、遥控寻车:按键,喇叭响6秒,方向灯闪6次,可方便在停车场寻车。
7、遥控启动:连续按2次键,摩托车自动点火启动。
一次未启动成功,可多次启动。
刹车灯损坏时,无法遥控启动。
(强烈建议遥控启动前将摩托车置于空挡。
)8、遥控熄火:遥控启动状态下,按一下键,摩托车立即熄火。
喇叭、方向灯不动作。
9、防抢防骑劫:行使中遇悍匪强抢摩托车,危急中按键,喇叭连续响起,方向灯闪动,摩托车自动熄火,无法再启动,直到取下车钥匙或按键解除,才能停止报警;行使过程中按键,喇叭响起,方向灯闪动,提醒超车。
(强烈建议车主将遥控器随身携带,并与车钥匙分开存放。
)10、固定调节感应灵敏度:若震动灵敏度过高,可将主机内影响灵敏度的跳线块去掉,以降低灵敏度。
11、遥控调节感应灵敏度:同时按住和键,车灯快速闪动三次(新机充电时,在第三级),表示己进入灵敏度调节状态。
每按键一次,灵敏度改变一级。
车次快速闪动的次数代表灵敏度之级数,次数越多,代表级数越高,共四级循环调节。
2574型摩托车防盗器功能说明书一、 声光防盗:3秒内进入防盗警戒状态,受振动喇叭响五声警告,方向灯同步闪烁五次,若5秒内再次受振动,喇叭长鸣15秒,方向灯闪15秒,同时发动机锁定,机车不能启动。
15秒后回复到警戒状态,警戒灯闪烁频率为停一秒,闪一秒(在这一秒内闪二次)。
若再有振动,则二、 环保静音:按静音键,喇叭响一声,方向灯闪两下,3秒内进入静音防盗状态。
三、 自动锁定:防盗警戒状态,用锁匙强行拧锁,则喇叭长鸣15秒,方向灯闪烁15秒,发动Array机锁定机车不能启动,15四、 求救:2秒,喇叭长鸣15秒,方向灯同步闪光15解除。
五、 环保静音寻车:按静音键,喇叭“Bi”一声,方向灯同时闪5下,告知车主机车位置。
六、 解除防盗和自动回复:30秒内未受振动或机车未启动,防盗系统视作误操作,“Bi”一声,方向灯闪一下,自动回Bi”两声,彻底解七、 防抢报警:急闪,51八、 遥控熄火:车立即启动运转,若由于冷车或怠速偏低启动不成功,可重复上述操作。
九、 提示设定防盗:停车熄火,10秒后未设定防盗,防盗系统会发出“嘀——嘀——嘀”三声轻缓提示音,方向灯同步三下,提示设定防盗。
九、LED警戒灯:防盗警戒状态,LED警示灯以停1秒再闪1秒(在这1秒内闪烁两次)如此循环动作,在学习状态,LED警戒灯与方向灯同步动作。
十、声光超车:行驶途中按一下静音键,方向灯闪灯,喇叭同步发出5秒安全超车行驶信号。
十一、断电记忆状态:若防盗器断电记忆防盗状态,上电后“Bi”一声,重新进入防盗状态;若振动灵敏度过高,可剪断主机出线口上的回路线,使之降低。
十二、学码操作:在解除防盗状态,再短按任意键,学习指示灯方向灯长亮,按遥控器上任意按键,则学习指示灯、方向灯闪烁四下,表示学码成功,同样操作另一遥控器学码,每次至多学习两个遥控码,学习完退出学习状态。
若无操作30秒后退出学习状态,恢复解除状态,长按5秒,消除遥控器。
遥控器TX4001-2260。
产品功能和技术参数产品名称:摩托车双向防盗器日期:1.功能1.1【声光警戒设定】停车拔下Acc锁匙,短按一次“”键,主机LED灯闪烁,方向灯闪亮一次,喇叭响一Bi-声,进入声光警戒状态,遥控器响回传Bi-Bi音一声,同时遥控器显示屏中“”图标与“ ”点亮.1.2【静音警戒设定】停车拔下Acc锁匙,连续按二次“”键,主机LED灯闪烁,方向灯闪亮一次,喇叭不响,进入静音警戒状态遥控器响回传Bi-Bi音一声,同时遥控器显示屏中“”与“ ”图标点亮.按一次“”键,进入声光警戒状态, 按二次“”键,进入静音警戒状态, 按三次“”键,进入声光警戒状态,1.3【振动报警】在声光警戒状态中,首次受到振动触发,主机报警喇叭短BI叫5次,方向灯同步闪烁,车辆无法启动,遥控器响BI声5次, 报警开始后后振动一次提示车主,同时遥控器显示屏中振动图标与车灯图标闪亮,遥控器按此方式重复报警一次,10秒钟内若再次受到振动触发,主机报警喇叭大叫30秒,方向灯同步闪烁,车辆无法启动,遥控器响BI-BI-BI声约30秒,报警开始后振动8次,同时显示屏中振动图标与车灯图标闪亮,报警后防盗系统回到报警前状态.静音防盗警戒中,主机喇叭不响,其它与声光防盗警戒报警方式相同。
1.4微波报警(选配功能)在警戒状态下,微波探测器连续5秒探测到有物体或人连续移动,主机熄火保护,车灯不亮,主机报警喇叭短BI叫5次,进入一级警戒状态,遥控器发出Bi声5次提示,振动一次,同时显示屏中的车灯及“[ ] ”点亮,背光点亮绿灯,遥控器按此循环报警一次;微波探测器连续15秒探测到有物体或人连续移动,主机熄火保护,车灯闪亮,主机报警喇叭大叫30秒,进入二级警戒状态,遥控器响Bi Bi Bi声约30秒,同时显示屏中的车灯点亮,背光点亮黄灯。
报警开始后振动8次。
在静音警戒状态下,报警喇叭不响,其它与有声警戒相同。
同按“”或“”键时,进入设定(微波),遥控器显示屏上“[ ] ”闪动表示微波打开,遥控器显示屏上“[ ] ”不闪动表示微波关闭。
ma08es使用报警说明(一)MA08ES使用报警说明概述MA08ES是一种先进的报警系统,广泛应用于各个领域。
本文旨在帮助用户更好地理解和使用MA08ES报警系统,并提供相关的操作指南和注意事项。
使用前的准备工作在开始使用MA08ES报警系统之前,需要确保以下准备工作已经完成:•安装MA08ES报警系统设备•连接电源和网络•安装并配对相关的传感器或探测器•完成系统初始化和设置MA08ES报警系统操作指南在进行MA08ES报警系统的日常操作过程中,您可以参考以下指南:1.开启/关闭报警–按下系统控制面板或遥控器上的报警开关按钮,即可开启或关闭报警功能。
2.调节音量–根据需要,您可以在系统控制面板或遥控器上找到音量调节按钮,并通过增加或减小音量来调整报警声音的大小。
3.设置报警模式–MA08ES报警系统支持多种报警模式,例如声音报警、光线报警、震动报警等。
您可以根据不同场景和需求,选择相应的报警模式。
4.处理报警信号–当MA08ES报警系统检测到异常信号时,它会发出报警声音并触发相应的警报动作。
此时,用户需要根据不同情况采取适当的应对措施,例如迅速联系安全人员、查看监控画面等。
使用注意事项为了确保MA08ES报警系统的正常运行和您的安全性,以下是需要注意的事项:•定期检查系统设备的电源和网络连接情况,确保系统处于正常工作状态。
•在系统安装过程中,请遵循厂商提供的详细安装指南,确保设备正确安装并连接。
•请妥善保管系统的遥控器和密码信息,避免未经授权的操作。
•如果系统发出误报警信号,请及时调查和处理,以免影响正常生活和工作。
以上是关于MA08ES使用报警说明的相关介绍和指南。
通过按照本文提供的操作指南和注意事项,您可以更好地使用和管理MA08ES报警系统,确保您的个人和财产安全。
台湾VEISON摩托车锁报警使用说明书
摩托车遥控器三个按钮的比较常见,也有4个。
①有一个锁上状态的锁的小图标,是给摩托车上锁的。
②有个开锁图标的按钮,在警报器上锁的状态,按一下是解锁。
在警报器已经在警报了的时候,按一下是解除警报,但警报状态仍然在。
再按一下解锁。
在摩托车电子起火以后,按一下解锁键,摩托车熄火。
③还有个闪电标志的按钮。
按一下摩托车处于供电状态,再按,摩托车开始电子启动。
④唤车。
也就是方便你寻找你的车。
PS:①②③是比较常见的。
摩托车钥匙门和警报器完全是2个供电系统,互相没有牵制。
也就是说你用遥控启动车辆,钥匙门是没有办法将车熄火的,反之亦成立。
希望可以帮到你,望采纳。
磁性防盗锁盖,必须要原车钥匙上的磁头才能打开,不过它也不是非常精密,有时多用几把胡似的钥匙试试,或许碰巧也就打开。
打开锁盖露出锁孔,然后才能插入钥匙开领起动,如果没带钥匙,打开了锁盖也没用。
摩托车只有在空档,并且点火开关(钥匙)处于关闭状态才用遥控电启动,遥控电启动只起暖车作用,在25分钟内摩托车自动熄火,使用遥
控电启动后,打开点火开关之前不得使用前、后制动,否则启动电动机会再次运转,取消免匙驾驶,确保防盗防抢、防骑劫功能可靠。
摩托车报警器使用说明
一、遥控器按键功能介绍
声光防盗\防抢
解除防盗\遥控熄火
启动
寻车\防抢
二、遥控器功能操作
1、防盗设置:摩托车停止取下钥匙后,按下键,喇叭响一声,方向
灯闪一下,3秒后进入警戒状态。
2、防盗解除:在任何状态下,按键,喇叭响二声,方向灯闪二下,
摩托车取消报警相关操作,恢复正常使用状态。
3、紧急报警:在警戒状态下,按键,启动报警,喇叭响6秒,方向
灯闪6次,报警结束后继续处与警戒状态。
报警过程中再次按键,则立即停止报警,继续处于警戒状态。
4、震动报警:在警戒状态下,摩托车受到震动,喇叭响1声,方向灯闪1
下,若5—10秒内再次受到震动立即启动报警,喇叭响6秒,方向灯闪6次,同时发动机锁死不能启动。
报警停止后10秒钟内再次受到震动,则再次启动报警。
10秒钟后自动恢复警戒状态。
5、偷盗报警:在警戒状态下,有人企图用锁匙偷开摩托车时,喇叭立即
连续长响,方向灯闪动,发动机锁死不能启动。
6、遥控寻车:按键,喇叭响6秒,方向灯闪6次,可方便在停车场
寻车。
7、遥控启动:连续按2次键,摩托车自动点火启动。
一次未启动成
功,可多次启动。
刹车灯损坏时,无法遥控启动。
(强烈建议遥控启动前将摩托车置于空挡。
)
8、遥控熄火:遥控启动状态下,按一下键,摩托车立即熄火。
喇叭、
方向灯不动作。
9、防抢防骑劫:行使中遇悍匪强抢摩托车,危急中按键,喇叭连续
响起,方向灯闪动,摩托车自动熄火,无法再启动,直到取下车钥匙或按键解除,才能停止报警;行使过程中按键,喇叭响起,方向灯闪动,提醒超车。
(强烈建议车主将遥控器随身携带,并与车钥匙分开存放。
)
10、固定调节感应灵敏度:若震动灵敏度过高,可将主机内影响灵敏度的
跳线块去掉,以降低灵敏度。
11、遥控调节感应灵敏度:同时按住和键,车灯快速闪动三次
(新机充电时,在第三级),表示己进入灵敏度调节状态。
每按键一次,灵敏度改变一级。
车次快速闪动的次数代表灵敏度之级数,次数越多,代表级数越高,共四级循环调节。
当调节至适合级数后,按键退出灵敏度调节状态,主机将确认并记忆目前灵敏度级数。
三、使用条件
1、电源电压范围为12V±3V。
2、电源电压正常状态下使用。
当电池失效,保险丝烧断,调压器失效时,
会影响其功能使用。
3、电瓶电压不足会影响遥控启动功能。