release2更新说明
- 格式:docx
- 大小:15.87 KB
- 文档页数:2
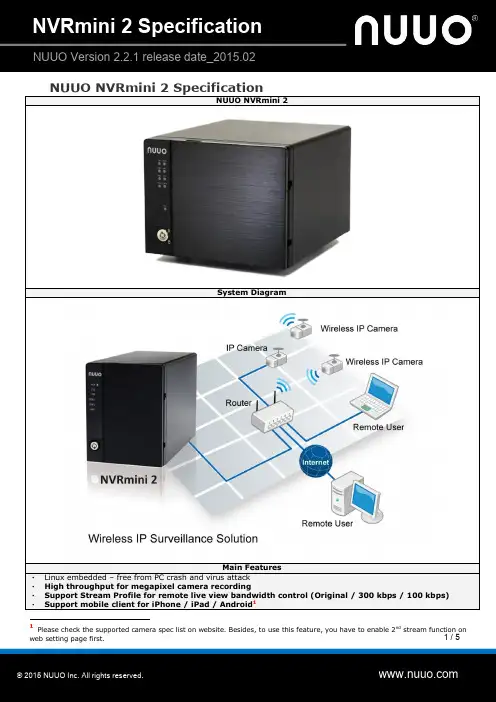
1 / 5 NUUO NVRmini2 Specification NUUO NVRmini 2System DiagramMain Features ‧Linux embedded – free from PC crash and virus attack ‧High throughput for megapixel camera recording ‧Support Stream Profile for remote live view bandwidth control (Original / 300 kbps / 100 kbps) ‧Support mobile client for iPhone / iPad / Android 1 1 Please check the supported camera spec list on website. Besides, to use this feature, you have to enable 2nd stream function on web setting page first.2 / 5 ‧ Panorama 360° PTZ (ImmerVision and VIVOTEK fisheye) ‧Generic dewarp (fisheye) 15 ‧Support camera multi-stream setting 2 ‧Support camera two-way audio 3 ‧ Web-based configuration, live viewer , playback (Recommend on IE 8, 9, 10, 11, Mac Safari v6.1,v7.0 and WindowsChrome) ‧ RAID 0,1,5,10 for maximum capacity or data protection 16‧ Support HDD SMART self-test‧ Onlin e GUI recording schedule‧ Support megapixel cameras and H.264 compression format‧ Digital PTZ and multi-view‧ Real-time digital output, Email alert and push notification on mobile‧ Remote I/O solution and camera I/O integration‧ Up to 128 CH remote live view with multiple monitors‧ Support joystick for easier camera control‧ Playback with 5 types of intelligent event search‧ Point of Sale (POS)‧ E-map with indicator‧ Digital watermark‧ Auto port-forwarding‧ NTP server synchronization ‧ Support over 85 brands of IP cameras and 2151 models 4 (with free monthly update)‧ Alarm source of NUUO Central Management SystemSpecificationsModel NE-2020/NE-2040 NE-4080/NE-4160 Recording Cameras 1~2(4)5 / 1~4 1~8(16)6 / 1~16Playback Channels 2(4) / 4 8 / 16Number of Drives 2xSATA II 4xSATA IIMax Storage Per Drive 4TB 4TBRAID Level RAID 0,1 RAID 0,1,5,1016CPU Marvell 88F6283 1.0GHz Marvell 88F6282 1.6GHzRAM 256MB 512MBI/O Interface 2xUSB 2.0 (for UPS) 2xUSB 2.0 (for UPS);2xeSATA (for DAS)LAN Transmission Speed10/100/1000 Mbps (RJ45 x1) 10/100/1000 Mbps (RJ45 x2)Voltage DC 19V 2.1A DC 19V 4.74A Power Consumption 40W 7 90W 8Device Dimension (HxWxD)140.0 x 109.8 x 219.0 mm 140.0 x 183.4 x 219.0 mmDevice Weight (Without Drive)2.12 kg (4.67lbs) 2.97 kg (6.55lbs)Temperature Operating: 0°C-40°CHumidity Operating: 5%-95%Supported IP Camera Brand(s): 85 brands in v1.7.29ACTi ADT Airlive Alphatech American Dynamics Arecont AMTK ARM Asoni AXIS BASLER Bolide BOSCH Brickcom Bullwark2DP 3.0 or above 3DP 3.1 or above 4The data is updated for DP 2.16. 5NE-2020 can support up to 4 cameras capacity with license activation (license type: 2ch) 6 NE-4080 can possess up to 16ch capacity with license activation (license type: 2/4/8ch) 7 40 W is the maximum power consumption 8 90 W is the maximum power consumption 9 The data is updated for DP 2.16.3 / 5 CentrixCISCO CNB COP CORUM DahuaDigital Watchdog D-Link D-LinkCN DYNACOLOR EneoErnitec Etrovision Everfocus Fine ForenixGE Grandstream Grundig Guardeon GuardlinerHIKVision Histream Honeywell i-Mege IQinVisionJetstor JVC LevelOne LG LilinLinksys Lumenera MegaIP Messoa MilesightMobotix NetworkCamera NTIC On Electronics OnvifPanasonic Pelco PiXORD Planet ProbeRover Saerim Samsung SANTEC SANYOShany Sony StarDot Sunell TelviewTechson Tiandy TOSHIBA TRUEN UDPVideosec Vitek Vision Hi-Tech Vista VIVOTEKYudor Zavio 3M 3Svision CompressionFormatMPEG-4, M-JPEG, H.264, MxPEG (depends on IP camera) RecordingPerformanceAround 60/120fps at 1.3M Total bitrate: 40Mbps Around 240fps at 1.3M Total bitate: 80Mbps Recording TypeContinuous record, record by schedule, event trigger record, digital input trigger record Remote Live ViewControlLive view, preset/go, PTZ, remote I/O, snapshot, multi-view, digital PTZ, advanced E-Map, bandwidth monitoring Audio & VideoRecordingSynchronized audio and video recording POSLive view, record, playback, and search for every transaction Auto BackupAutomatically backup the recorded video of the date before to FTP server Intelligent SearchGeneral motion, missing object, foreign object, lose focus, camera occlusion Remote Live ViewConnectionLive view maximum 64 connections per server at the same time SupportedLanguage English, Croatian, Czech, Deutsch, Dutch, Finnish, French, Hebrew, Hungarian, Italian, Japanese, Korean, Polish, Portuguese (Brazil) , Russian, Simplified Chinese, TraditionalChinese, Serbian, Spanish, Swedish, Thai, and TurkishRemote Client System Minimum RequirementModel NE-2020/NE-2040 NE-4080/NE-4160OS Windows XP (32-bit), Windows 7 (32/64-bit), Windows 8/8.1 (32/64-bit)CPU Intel Core 2 Duo, 2.6GHzRAM 1GBLAN Transmission Speed 10/100/1000 Mbps (RJ45)UI1. Web browser: Internet Explorer 8, 9, 10, 112. NUUO client application program3. NUUO iPhone, iPad, Android mobile live viewer 10Technical Details ‧ System, Setting, Management and Integration⏹ Server-Client Architecture: Centralizes all video data transaction only via NVRmini 2 to remote clients. Withthis centralized structure, total camera loading remains at a stable level, thus ensuring good recording quality even when reaching maximum number of remote client access.⏹ Open Platform: Support over 2151 IP camera models and video servers (encoders) from over 85 brands of major network camera manufacturers.11⏹ Automatic Camera Model Detection: NVRmini 2 can automatically search for IP cameras in the network (camera should support UPnP protocol or should be implemented its brand’s search tool 12). For those 10Please check the supported camera spec list on website. Besides, to use this feature, you have to enable multi-stream function on web setting page first. 11 The data is updated for DP 2.16. 12 Support camera search tools of ACTi, Arecont, D-link, and Sony.4 /5 unsearchable cameras, user can manually insert it. The auto detection function will help the user to find the brand and model of the camera after specifying its IP address.⏹ Storage Optimization: NVRmini 2 supports H.264 compression format which helps increasing the storage efficiency to nearly 600% higher than MJPEG and 150% higher than MPEG-4.⏹ Friendly GUI Recording Scheduler: Graphical user interface to setup recording schedule featuring unique day mode and week mode.⏹ Event & Action: 4 camera events including motion detection (if supported by camera), connection lost and camera input; 1 input event from remote I/O box; 3 system events and daily system report by E-mail; 5 instant alarm responses supporting output, Email, E-map popup, push notification on mobile and NUUO CMS alarm system.⏹ Online RAID Capacity Expansion and Level Migration: Support RAID 0, 1, 5, and 10 for maximum capacity or data protection at the HDD level. 16⏹Point of Sale (POS): POS transactions received through NUUO POS box or Ethernet (TPC/IP client). POS text overlay on live view video and recordings. All recorded POS transactions are searchable in the NVRmini 2 database.⏹ I/O Event Control : With the integration of camera I/O and NUUO I/O Box, system can start recording wheninput triggered, or trigger output as an event happened.⏹ Various Authorities of Different Kinds of Users: Web Viewer logins to NVRmini 2 via 4 different usergroups: administrator, power user, user, and guest. Each user group has its own distinctive privilege in system configuration, live view camera and playback records.⏹ Synchronization with NTP Server: Synchronize time daily/weekly/monthly to keep the accuracy of recordingtime.⏹ Log System: Hardware Log keeps track of system operation; NVR Log for camera status and user access; NVRevent Log for special events; Export and Backup Log for exporting video or video backup action.⏹ User Friendly: Provide users HELP page on the webpage for quick start tips and troubleshooting.⏹ Auto Power-on: The system shall be able to power-on automatically and keep recording after incident poweroutage.‧ Remote Client Operation⏹ Multiple Live View Channel: Up to 64 channels of remote connections per unit. Remote Live Viewer clientsupports 64 channels from multiple servers, and could display up to 128 channels with multiple monitors. In addition, Remote Live Viewer client can access and display live video from any NUUO Mainconsole family servers simultaneously.⏹ Multiple Playback Channel: Up to 16 channels in web playback client/NUUO Playback System.⏹ Monitor Resolution: 800x600, 1024x768, 1200x900, 1280x1024, 1366x768, 1440x900, 1600x1200,1680x1050, 1920x1080, 1920x1200.⏹ Multi-View: NVRmini 2 can duplicate the same live view video onto multiple channels and digitally zoom in tosee the details of different spots on cloned channels without losing the original live view video or using extra camera licenses.⏹ Stream Profile: Live display multiple camera streams with lower bit rate, while still recording at highestpossible quality.⏹ E-Map: Show device indicator on map for easy finding and tracking device location. Furthermore, pop up map5 / 5 to point out the device when an event occurred.⏹ Multiple Mobile Clients: Support mobile live viewer for iPhone, iPad, and Android.13‧ Playback, Search, Export and Secure Data⏹ Post-Recording Processing: Intelligent search, digital PTZ and video enhancement tool.⏹Intelligent Search: Search recorded video for 5 events including general motion, foreign object, missing object, loss focus and camera occlusion. ⏹Video Enhancement: Fine tune the image’s visibi lity, sharpen, brightness, contrast or even grey scale. ⏹Evidence Export: Snapshot and print video image in BMP/ JPEG; backup video in DAT; save video in ASF/AVI. The action exporting video or video backup will be recorded in NVRmini 2’s log system. ⏹Alarm Notification: Notify users on camera and system event through sound, digital output, push notification, E-mail and NUUO CMS alert. ⏹Auto Backup: Automatically backup the recorded video of previous dates to a designated FTP server. ⏹Manual Backup: Manually backup or delete the recordings from any NVRmini 2. ⏹ Watermark: Protect original recordings from alternation with NUUO watermark verification tool.‧ Extended Service⏹ NUUO Central Management System (CMS): Ultimate central monitoring solution for grand scale projectsand projects with multiple sites. Fully compatible with all NUUO Mainconsole family servers.‧ External Device⏹ POS Box (from serial port to Ethernet): NUUO Point of Sales system works on NVRmini 2 by overlaying thetransaction text from cash register or ATM machines onto live video channels. All POS recordings aresearchable.⏹ Remote I/O Box: I/O signals of NUUO I/O Box are converted to Ethernet through converter, which enablesNVRmini 2 to do more sophisticated application, such as starting recording when input triggered, triggering output as an event happened, and much more.⏹ Panorama 360° PTZ: Several modes are supported on live view and playback. Generic dewarp: Original mode, Rectilinear mode, Quad mode and Dual-view panorama mode. ImmerVision 14: Original mode, PTZmode, Quad mode and Perimeter mode. Vivotek: Original mode, Rectilinear mode, Full-view panorama mode, and Dual-view panorama mode.⏹ APC UPS: Continues to feed the NVRmini 2 power in an event of power outage.⏹ Joystick: Joystick support on PTZ cameras and software enabled digital PTZ function are both available inNVRmini 2. Preset points and patrol functions are also available on many camera models.13 Please check the supported camera spec list on website. Besides, to use this feature, you have to enable 2nd stream function on web setting page first. 14 Please refer to ImmerVision’s website for qualified cameras. 15 Fisheye dewarp supported on Internet Explorer only 16 RAID5 is only supported using 1TB Enterprise level HDDs.。
LabVIEW Real-Time Module™Release and Upgrade NotesVersion 8.5This document provides system requirements, installation instructions,descriptions of new features, and information about upgrade andcompatibility issues for version 8.5 of the LabVIEW Real-Time Module.Refer to the Getting Started with the LabVIEW Real-Time Module manualfor an introduction to the LabVIEW Real-Time Module. ContentsSystem Requirements (2)Installing the Real-Time Module 8.5 (3)RT Target Configuration (3)Real-Time Execution Trace Toolkit 2.0 (4)Activating the Real-Time Execution Trace Toolkit (4)New Real-Time Module 8.5 Features (5)Multiple CPU Support (5)Timed Loop CPU Assignment (5)Enhancements to the Multiple Variable Editor (5)Real-Time Performance Improvements (6)Linear Algebra Performance Improvements (6)Jitter Reduction in Math and Signal Processing VIs (6)Serial ATA Hard Drive Support (6)Improved Support for RT Desktop PCs (7)On-Screen CPU Monitor (7)Running Real-Time Applications (7)Upgrade and Compatibility Issues (7)RTX Support Discontinued (7)IrDA Support Discontinued (7)Timed Loop Priority Restriction (7)Compatibility with VxWorks 6.1 (8)Front Panel:Open Method Error (8)Real-Time Module Examples (8)Known Issues with the Real-Time Module 8.5 (8)System RequirementsTable1 describes the system requirements to run version 8.5 of theReal-Time Module. The Real-Time Module system requirements are inaddition to the LabVIEW system requirements listed in the LabVIEWRelease Notes.Table 1. System Requirements for the Real-Time Module 8.5Platform Media and SystemRequirements Important NotesWindows 2000/XP/Vista National Instrumentsrecommends that you haveat least 300 MB of diskspace for the minimumReal-Time Moduleinstallation or 750 MB ofdisk space for the completeReal-Time Moduleinstallation, which includesthe Real-Time andEmbedded drivers from theNational InstrumentsDevice Drivers CD.You might need more memory than the LabVIEW-recommended 512 MB of RAM depending on the size of the application you design in LabVIEW on the host computer. To view and control the front panel of a VI running on an RT target remotely using a Web browser, National Instruments recommends Internet Explorer 5.5 with Service Pack 2 or later.Real-Time Module Release and Upgrade © National Instruments Corporation 3Real-Time Module Release and Upgrade NotesInstalling the Real-Time Module 8.5This section includes information about installing the Real-Time Moduleon a development, or host, computer.Note You must install LabVIEW 8.5 before attempting to install the Real-Time Module 8.5. Refer to the LabVIEW Release Notes for the LabVIEW installation instructions.Complete the following steps to install the LabVIEW Real-Time Moduleon the host computer.1.Disable any automatic virus detection programs before you install. Some virus detection programs interfere with the installation program.2.Log on as an administrator or as a user with administrator privileges.3.Insert the LabVIEW Real-Time Module installation CD into theCD-ROM drive. The LabVIEW Real-Time Module installationprogram runs automatically.4.Follow the instructions that appear on the screen.5.Install the Real-Time and Embedded drivers and any other drivers that you require from the National Instruments Device Driver CD.RT Target ConfigurationUse Measurement & Automation Explorer (MAX) to configure RT targetsand to install software and drivers on targets.•Networked RT Targets —Refer to the Max Remote Systems Helpbook in the Measurement & Automation Explorer Help , available byselecting Help»MAX Help from MAX, for information aboutconfiguring networked RT targets.•Desktop PC Targets —Refer to the Using Desktop PCs as RT Targetswith the LabVIEW Real-Time Module document for information aboutconfiguring a desktop PC as a networked RT target. You can access thedocument from Windows by selecting to install the Real-Time Moduledocumentation when you install the Real-Time Module. Select Start»All Programs»National Instruments»LabVIEW 8.5»Manualsto open the labview\manuals directory and then double-clickRT_Using_PC_as_RT_Target.pdfto open the document.Real-Time Execution Trace Toolkit 2.0The LabVIEW 8.5 Real-Time Module includes a 30-day full-featuredevaluation of the Real-Time Execution Trace Toolkit 2.0. The Real-TimeExecution Trace Toolkit includes the Real-Time Execution Trace Tool andthe Execution Trace Tool VIs. You can use the Execution Trace Tool VIsto capture the timing and execution data of VI and thread events forapplications running on an RT target. The Real-Time Execution Trace Tooldisplays the timing and event data, or trace session, on the host computer.In LabVIEW, select Tools»Real-Time Execution Trace Toolkit todisplay the Real-Time Execution Trace Tool.Refer to the Real-Time Execution Trace Toolkit book in the LabVIEWHelp for information about using the Real-Time Execution Trace Toolkit todebug real-time applications. Select Help»Search the LabVIEW Helpto display the LabVIEW Help. In the LabVIEW Help, browse to Toolkits»Real-Time Execution Trace Toolkit to view the Real-Time ExecutionTrace Toolkit book.Activating the Real-Time Execution Trace ToolkitThe Real-Time Execution Trace Toolkit relies on licensing activation. Youhave a temporary license for a 30-day full-featured evaluation period. Ifyou do not activate the Real-Time Execution Trace Toolkit license, thetoolkit functions in evaluation mode for a 30-day evaluation period. Theevaluation period begins the first time you launch the Trace Tool byclicking the Evaluate button in the NI Real-Time Execution TraceToolkit dialog box. When the evaluation period expires, you must activatea valid Real-Time Execution Trace Toolkit license to continue using theReal-Time Execution Trace Toolkit.After you launch the Real-Time Execution Trace Toolkit in evaluationmode, you can click the Purchase button in the NI Real-Time ExecutionTrace Toolkit dialog box to purchase the toolkit.To activate the Real-Time Execution Trace Toolkit, use the serial numberyou receive as part of your installation package. You can activate theLabVIEW license in either of the following ways:•During installation, enter the serial number and select to run theNI Activation Wizard at the end of the installation.•When you launch the Trace Tool, click the Activate button in the NIReal-Time Execution Trace Toolkit dialog box.If you do not activate the Real-Time Execution Trace Toolkit duringinstallation, the Trace Tool prompts you for activation on launch. After youactivate the Real-Time Execution Trace Toolkit license, you no longer seethis prompt. If activation fails, the Real-Time Execution Trace Toolkitremains in evaluation mode until the 30-day evaluation period expires. Real-Time Module Release and Upgrade © National Instruments Corporation 5Real-Time Module Release and Upgrade NotesNew Real-Time Module 8.5 FeaturesThe Real-Time Module includes the following new features. Refer to theLabVIEW Help, available by selecting Help»Search the LabVIEW Help ,for more information about the following new features.Multiple CPU SupportThe Real-Time Module 8.5 supports parallel processing for increasedperformance on ETS targets with multiple CPUs. When multiple-CPUsupport is enabled, the real-time operating system automatically allocatesthreads across CPUs. As a result, many existing applications can realize animmediate performance improvement on multiple-CPU systems.You might be able to achieve further performance improvements byimplementing a pipelined architecture or by manually assigning TimedLoops to particular CPUs. To take advantage of parallel processing on amultiple-CPU system, use the LabVIEW Real-Time Software Wizard inMAX to install the NI RT Extensions for SMP. Refer to the MAX Help forinformation about using the LabVIEW Real-Time Software Wizard. Referto the LabVIEW Help for information about optimizing RT applications forsystems with multiple CPUs.Note Single-CPU systems perform best without the NI RT Extensions for SMP. Also, some applications, such as those that consist mainly of single-point I/O, can achieve lower latency using a single CPU without the NI RT Extensions for SMP. Refer to the National Instruments Web site at /info and enter the info code rtsmp for further details about optimizing RT applications for systems with multiple CPUs.Timed Loop CPU AssignmentThe Real-Time Module 8.5 supports manual CPU assignment for TimedLoops. The Timed Loop now includes an Assigned CPU input that you canuse to optimize an application for execution on systems with multipleCPUs. Refer to the LabVIEW Help for information about manuallyassigning Timed Loops to particular CPUs.Enhancements to the Multiple Variable EditorUse the Multiple Variable Editor window to configure a large number ofshared variables at one time. Right-click a project library or shared variableand select Edit Variables from the shortcut menu to display the MultipleVariable Editor window.The Multiple Variable Editor window includes the followingimprovements:•Edit multiple shared variables at once using the new table format.•Search across several shared variables at once using the new advancedsearch options. Click the Find button to display the search options.•Copy and paste property values across shared variables by clicking theCopy and Paste buttons.•Sort shared variable properties by right-clicking a property column andselecting Sort Ascending or Sort Descending from the shortcutmenu.You no longer need to use the Multiple Variable Editor window toimport or export shared variable configuration information to or from aspreadsheet file. To import the information, right-click a project libraryand select Import Variables from the shortcut menu. To export theinformation, right-click a project library and select Export Variablesfrom the shortcut menu.Real-Time Performance ImprovementsThe Real-Time Module 8.5 includes the following performanceimprovements.Linear Algebra Performance ImprovementsIn addition to the performance improvements documented in the LabVIEWUpgrade Notes, the Real-Time Module 8.5 features significantperformance improvements for the VIs on the Linear Algebra palette.Jitter Reduction in Math and Signal Processing VIsThe Real-Time Module 8.5 includes a new Real-Time Analysis Utilitiespalette that installs as a subpalette of both the Mathematics palette and theSignal Processing palette. You can use the Real-Time Analysis UtilitiesVIs to handle the resource requirements of certain Mathematics and SignalProcessing VIs in a dedicated analysis workspace. To prevent raceconditions, priority inversions, and other undefined behavior, you must usethe Real-Time Analysis Utilities VIs according to a strict set of guidelines.Refer to the Creating Deterministic Applications with the Real-TimeModule topic in the LabVIEW Help for guidelines and information aboutusing the analysis workspace to reduce execution jitter.Serial ATA Hard Drive SupportIn the Real-Time Module 8.2.1 and earlier, you can use Serial ATA(SATA) hard drives only in legacy mode. The LabVIEW Real-TimeModule 8.5 includes native support for SATA drives.Real-Time Module Release and Upgrade Improved Support for RT Desktop PCsThe Real-Time Module 8.5 includes improved BIOS compatibility fordesktop PCs used as RT targets. Also, the Real-Time Module 8.5 supportsnew multiple-CPU systems, ethernet chipsets, and SATA hard drives.Refer to the National Instruments Web site at /info and enter theinfo code etspc for up-to-date information about supported hardware andthe specific specifications that National Instruments recommends.On-Screen CPU MonitorRT targets with the Real-Time Module 8.5 software installed include anon-screen CPU monitor that displays CPU utilization information whenyou connect the target to a monitor. You can use the CPU monitor todiagnose performance issues in RT applications and to help determine theload balance on multiple-CPU systems.Running Real-Time ApplicationsTo run a stand-alone real-time application in the Real-Time Module 8.2.1and earlier, you must right-click the build specification in the ProjectExplorer window, select Set as startup and then Deploy from the shortcutmenu, and reboot the target. In the Real-Time Module 8.5, you can set theapplication to run in one step by right-clicking the application and selectingRun as startup from the shortcut menu. The Run as startup shortcutmenu item sets the application as the startup application, deploys theapplication to the target, and prompts you to reboot the RT target. Upgrade and Compatibility IssuesYou might encounter the following compatibility issues when upgrading tothe LabVIEW 8.5 Real-Time Module.RTX Support DiscontinuedAs of version 8.5, the Real-Time Module no longer supports RTX desktoptargets and no longer contains the Shared Memory VIs. Refer to the UsingDesktop PCs as RT Targets with the LabVIEW Real-Time Moduledocument for information about configuring a PC as an ETS RT target. IrDA Support DiscontinuedAs of version 8.5, the LabVIEW Real-Time Module no longer supports theIrDA protocol and no longer contains the associated IrDAVIs.Timed Loop Priority RestrictionIn the Real-Time Module 8.5, the Timed Loop only supports Priorityvalues less than 65,535.© National Instruments Corporation7Real-Time Module Release and Upgrade NotesCompatibility with VxWorks 6.1When you install the Real-Time Module 8.5 on the host computer, you alsomust install version 8.5 of the Real-Time Module software on cRIO-901xtargets. The Real-Time Module 8.5 updates the operating system oncRIO-901x targets from VxWorks 6.1 to VxWorks 6.3. Some functions inVxWorks 6.3 are not compatible with VxWorks 6.1. If you use custom Ccode in a LabVIEW application running on a cRIO-901x target, you mustrecompile the .OUT files for VxWorks 6.3. Refer to the NI Web site at/info and enter the info code rtvx for more information. Front Panel:Open Method ErrorIn the Real-Time Module 8.2.1 and earlier, the Front Panel:Open methodfailed without returning an error. In the Real-Time Module 8.5, theFP.Open method returns error 53.Real-Time Module ExamplesUse the NI Example Finder, available by selecting Help»Find Examplesfrom LabVIEW, to browse or search for RT example VIs. You also canaccess example VIs from the labview\examples\Real-Time directory. Known Issues with the Real-Time Module 8.5Refer to the readme_RT.html file on the LabVIEW 8.5 Real-TimeModule installation CD for information about known issues with theReal-Time Module 8.5.You also can launch the readme_RT.html file from Windows after youinstall the Real-Time Module. Complete the following steps to access thereadme_RT.html file from Windows.1.Select Start»All Programs»National Instruments»LabVIEW 8.5»Readme to open the labview\readme directory.The labview\readme directory contains the HTML readme files forLabVIEW and any installed LabVIEW modules and add-ons.2.Double-click readme_RT.html to open the LabVIEW Real-TimeModule Readme.National Instruments, NI, , and LabVIEW are trademarks of National Instruments Corporation.Refer to the Terms of Use section on /legal for more information about NationalInstruments trademarks. Other product and company names mentioned herein are trademarks or tradenames of their respective companies. For patents covering National Instruments products, refer to theappropriate location: Help»Patents in your software, the patents.txt file on your CD, or/patents.© 2000–2007 National Instruments Corporation. All rights reserved.371374D-01Aug07。
This document provides firmware update instructions and describes what is new in this firmware version for the SUHD553-L, SUHD653-L, SUHD753-L, SUHD863-L.This is the initial release for the Secure Series II panels (SUHD553-L, SUHD653-L, SUHD753-L, SUHD863-L) for the Scaler firmware v1.0.1.8 and Ethernet firmware v14.Follow these steps to update the scaler firmware.Learn how to update the scaler firmware.Christie recommends updating the scaler firmware using the USB method as it is faster than the webserver update method.1.Upload the firmware for the A/D board.2.Plug in a USB memory to the service terminal.3.Enter the Factory-Menu.To enter the Factory-Menu by remote control:After version 1.0.2.1-114.5.Select USB Update.For compatible USB storage devices a Connected message appears. Proceed to step 5. If the USB storage device is not compatible, proceed to step 6.6.If Connected appears, select USB Update.The firmware is updated automatically and the panel goes into Standby mode after a successfulfirmware update (about 30 seconds).a.Reset the main power switch to turn the panel back on.b.When the firmware update is complete, From the Factory-Menu perform an Initial Setting.c.After Initial Setting, power off the panel using the rocker-switch.d.Wait at least 10 seconds and power the panel back on.7.If the USB storage device is not compatible, a Not Connected USB message appears.8.For the software version to upload correctly, ensure the filename is SUHD983P.bin.Follow these steps to update the Ethernet firmware.1.To use a static IP address, select Disable under DHCP.•The default static IP address is 192.168.10.10.•At initial power on, it may take up to 30 seconds for the IP address to be active.2.Select DHCP Enable to use a dynamic IP address.•If there is router, the IP address starts with 192.166.•If there is no router, the IP address starts with 169.254.1.Go to Local Network Setting > Internet protocol version 4 (TCP/IPv4).2.If DHCP is disabled, set the IP address and Subnet mask.The IP address must be a different address than the display.IP address : 192.168.10.50Subnet Mask : 255.255.255.03.If DHCP is enabled, select Obtain an IP address automatically.The ping test checks the Ethernet connection.1.Press Windows + R.2.Type cmd and click OK.3.Type ping –t 192.168.10.10.4.Replace the IP address with the address of the display panel.A response similar to below indicates the ping test was successful.A response similar to below indicates the ping test failed.Connect to the built-in web server open a Web browser (for example, Internet Explorer, Chrome) and follow the instructions below.1.In a web browser, go to the address of the display panel.The web page provides all menu controls on the on-screen display.2.To set a value, click Apply.3.To display the current value, click Read.4.To upgrade the Ethernet or Scaler firmware, go to the General settings page.•Ethernet firmware update time: approximately 5 minutes.File name : Ethernet_FW_Secure_Series_II_V*.bin•Scaler firmware update time: approximately 8 minutesSecure_Series_II.binIf you updated the scaler firmware using the USB method, it does not need to be updated again inthe web server.Before staring the updates, ensure the following settings are selected in the Setup menu of the WebUI or the on screen display:•Setup > Power Save > Off•Setup > Power Off Mode > StandbyScaler F/W update:The panel turns off approximately three minutes after the update starts. Once the update is complete (takes approximately five to eight minutes) an Update completed. Please reboot. messageappears on the WebUI and the panel powers on.Ethernet F/W update:The panel stays on throughout the update. Once the update is complete (takes approximately five to eight minutes) an Update completed. Please reboot. message appears on the WebUI and thepanel stays on.5.Power off the unit using the remote control.6.Power cycle the panel by turning the rocker switch to the OFF position and back to ON after 15 seconds.7.Power on the panel.8.To confirm version of the firmware, click the About page on the WebUI or the panel on-screen display. For installation, setup, and user information, see the product documentation available on the Christiewebsite. Read all instructions before using or servicing this product.1.Access the documentation from the Christie website:•Go to this URL: https://bit.ly/2VccFTr orhttps:///products/lcd-panels/secure-series-II/•Scan the QR code using a QR code reader app on a smartphone or tablet.2.On the product page, select the model and switch to the Downloads tab.Additional information on the LCD panels is available in the following documents.•Secure Series II LCD Panels Product Safety Guide (P/N: 020-001778-XX)•Secure Series II LCD Display Panels External Commands (P/N: 020-001915-XX)•SUHD553-L LCD Panels Service Guide (P/N: 020-001850-XX)•SUHD653-L LCD Panels Service Guide (P/N: 020-001851-XX)•SUHD753-L LCD Panels Service Guide (P/N: 020-001876-XX)•SUHD863-L LCD Panels Service Guide (P/N:020-001877-XX)Technical support for Christie products is available at:•North and South America: +1-800-221-8025 or ************************************•Europe, Middle East, and Africa: +44 (0) 1189 778111 or ********************************•Asia Pacific•Australia: +61 (0)7 3624 4888•China: +86 10 6561 0240•India: +91 (80) 6708 9999•Japan: 81-3-3599-7481•Singapore: +65 6877-8737•South Korea: +82 2 702 1601•Christie Professional Services: +1-800-550-3061 or ***********************。

基于开源项目二次开发更新方案基于开源项目二次开发更新方案一、引言开源项目是指其源代码已经公开并且可自由使用、修改和分发的软件项目。
随着开源软件的兴起,越来越多的人开始从开源社区中获取软件解决方案,以满足其特定需求。
然而,随着时间的推移,这些开源项目可能会面临更新和维护问题。
为了保持软件的高质量和功能完备性,进行二次开发更新是一种常见的选择。
本文将探讨基于开源项目的二次开发更新方案。
二、评估开源项目在进行二次开发之前,对开源项目进行全面评估是必要的。
以下是对开源项目进行评估的一些建议:1. 功能分析:深入了解开源项目的功能和特点。
了解其是否满足了你的需求,以及项目所需的基本功能是否已经实现。
2. 代码质量评估:对开源项目的代码进行评估,包括代码结构、代码规范、注释质量等。
确保代码质量达到你的要求,并且易于维护和扩展。
3. 社区支持和活跃度:查看开源社区的活跃程度和支持情况。
一个活跃的社区将为你提供及时的技术支持和解决方案。
4. 开源许可证:了解开源项目所使用的许可证,确保你使用的开源项目符合你的需求和法律要求。
三、更新方案基于评估的结果,制定适合的二次开发更新方案是关键。
以下是一些通用的二次开发更新方案:1. 需求确定:根据现有的功能和未来的需求,明确你的二次开发目标。
定义清晰的功能需求和优先级,以使开发过程更有针对性。
2. 模块化设计:根据开源项目的结构和需求,在进行二次开发时采取模块化设计。
这样可以将更新的功能和原有功能分开,减少代码冲突和维护成本。
3. 核心功能优化:针对你的需求,对开源项目的核心功能进行优化和改进。
确保核心功能在更新后仍然稳定和高效。
4. 移植和集成:根据你的系统环境和其他软件资源,对开源项目进行移植和集成。
确保二次开发后的项目与其他系统和软件的兼容性。
5. 测试和验证:在二次开发完成后,进行详细的测试和验证。
确保更新后的功能正常运行,没有引入新的问题或错误。
四、个人观点和理解基于开源项目进行二次开发是一个灵活和高效的方式,可以满足各种特定需求。
BIOS MCSDK 2.0.2Release NotesApplies to Product Release: 02.00.02.14Publication Date: September 08, 2011Document LicenseThis work is licensed under the Creative Commons Attribution-NoDerivs 3.0 Unported License. To view a copy of this license, visit /licenses/by-nd/3.0/ or send a letter to Creative Commons, 171 Second Street, Suite 300, San Francisco, California, 94105, USA.Copyright (C) 2011 Texas Instruments Incorporated - © Copyright 2011 Texas Instruments, Inc.All Rights ReservedContents1 Overview (1)2 Licensing (1)3 Documentation (2)4 Device Support (3)5 Technical Support and Product Updates (3)6 IS NOT (3)7 Installation (3)8 Known Issues (4)9 Releases (4)9.1 Build 2.0.2.14 (4)9.2 Previous Releases (6)9.2.1 Build 2.0.1.12 (6)9.2.2 Build 2.0.0.11 (8)9.2.3 Build 2.0.0.9 (10)9.2.4 Build 2.0.0.8 (13)9.2.5 Build 2.0.0.6 (14)BIOS MCSDK 2.00.02.141OverviewThis document is the Release Notes for Release 2.0.2 of the Multicore Software Development Kit (MCSDK) for the BIOS operating system. This BIOS MCSDK software release gives developers the ability to evaluate the hardware and software capabilities of the evaluation platform and provide core software to rapidly develop a multi-core application.2LicensingThe tables below describe the primary license for the packages that make up the BIOS MCSDK. As shown in the Releases section below, some of these packages are delivered with the Code Composer Studio installer and some are delivered with the BIOS MCSDK installer.IMPORTANT: There may be portions of these packages under other licenses and you should refer to the individual package Software Manifest (after installation) for complete and specific licensing.Target ContentThis is software that runs on the device. For the location, replace <ver> with the version that is part of the component name (e.g., 2.0.0.11, etc.).BIOS MCSDK Release NotesHost ToolsThese are development tools that run primarily on the development host. For the location, replace <ver> with the version that is part of the component name (e.g.,2.0.0.11, etc.).3Documentation•EVM Quick Start Guide: Provides information on hardware setup and running the demonstration application that is loaded on flash. This document is provided as part of the EVM kit.•BIOS MCSDK Getting Started Guide: Provides information on installing the software from the two software packages (MCSDK, CCS), connect to the target EVM using JTAG, load pre-compiled libraries to the EVM, and run theapplication.•BIOS MCSDK Users Guide: Provides detailed information regarding software elements and infrastructure to allow developers to start creating applications.•Image Processing Demonstration Guide: Provides information on the image processing demo including software design, performance results, development concerns.Revision A:4Device SupportThe device and platform supported with this release include:•C6678: This release supports the Texas Instruments TMS320C6678 high performance DSP. The EVM supported by the software is TMDXEVM6678L.•C6670: This release supports the Texas Instruments TMS320C6670 high performance DSP. The EVM supported by the software is TMDXEVM6670L.•C6618: This release supports the Texas Instruments TMS320TCI6618 high performance DSP. The EVM supported by the software is TMDXEVM6618LXE.5Technical Support and Product UpdatesFor technical discussions and issues, please visit•C66x Multicore forum: /support/dsp/c6000_multi-core_dsps/f/639.aspx•BIOS Embedded Software forum:/support/embedded/f/355.aspx•Embedded Processors wiki: /index.php/Main_Page For product updates, please visit•Multicore Software Development Kits:/docs/toolsw/folders/print/bioslinuxmcsdk.htmlThe EVM comes with disks containing the MCSDK software and CCS. You can start with these or go to the MCSDK software download site listed above to check for the latest updates and version. The BIOS-MCSDK release download will also have pointers to applicable CCS and compiler release versions as well. Please review the release notes and software manifest before downloading and/or installing the software.6IS NOT•Support for BIOS5 or older releases•Support for CCS 4.x or older releases•DSP image format other than ELF (e.g., COFF)•Security Accelerator LLD is not included in this package, but has been tested against SA LLD 1.0.1.47InstallationSee the online BIOS MCSDK Getting Started Guide (link) for installation information.BIOS MCSDK Release Notes8Known IssuesThe list of issues can be found online using this link.9Releases9.1Build 2.0.2.14This is the post production release.Revision A:New features:•Linux Installer and Build Support•Added PCIe example for C6670•Updated the CSL, SRIO LLD for C6670 and C6678•Updated Hyperlink LLD for C6678Externally Tracked Issues Fixed:BIOS MCSDK Release Notes Other Issues Fixed:•IPC SRIO examples use wrong datarate: clock is 250MHz, not 312.5MHz for C6670•Simulator target for NDK is broken•Added ability to do NDK loopback under HUA•Reset Isolation needs to be disabled for SRIO sample initialization for C6678•Update of the CSL-RL for EMIF-16 for C6678•Writer utility should strip the carriage return character when parsing the input text file•Platform Lib: C6678 needs to be aligned with the CSL EMIF16 updates for C66789.2Previous Releases9.2.1Build 2.0.1.12This is the post production release of BIOS MCSDK 2.0.1Revision A:New features:•Added Multicore Application Deployment Utilities (MAD-Utils) Externally Tracked Issues Fixed:•MAD tools integration with Image Processing Demo•DSP Code generation tools update to 7.2.4 version•PDK c6670 SRIO and QMSS IPC examples require a clean then rebuild in order to operate correctly9.2.2Build 2.0.0.11This is the production release of BIOS MCSDK 2.0.0New features:•PCIe Boot example added•PCIe LLD added for C6670•Image Processing Demo support for C6670•IPC over SRIO & QMSS transports•SRIO boot exampleExternally Tracked Issues Fixed:Other Issues Fixed:•CSL PDK (C6670): PCIE project fails to compile due to undefined symbol CSL_BootCfgGetPCIEPLLLock•PDK (C6618 simulator): BCP example project for Big Endian and simulator hangs at second test•PDK (C6670): BCP test and example projects for Big Endian fail all tests.•C6670 EVM BE: TCP3E_dblMgzTestProject Big Endian fails on EVM•C6670 EVM BE: TCP3E_exampleProject Big Endian fails on EVM•There is no Readme for shmIpcBenchmark_c6678 – PDK•Platform Library simulator target does not work for NDK•getLibs() added for Platform Library and NIMU should be adopted by all MCSDK components•Fixed issue preventing building EDMA3 LLD examples•HUA: Occasionally Flash Page has nothing after the How It Works text•makefile support for MCSDK components•HUA Demo: Running the Transmit UDP benchmark multiple times crashes the system•IBL need to support I2C boot from multiple device/images based on the dip swich setting•NAND ecc bytes computation needs to be changed for BIOS MCSDK to align with Linux•Provide makefiles for EEPROM/NAND/NOR writers•ibl\src\make\ibl_c661x\i2crom.map.pre defines clocks/plls incorrectly•IBL PLL workaround is too slow for PCIe•TCP3d/TCP3e LLD source files does not build using the external to PDK ED-MA3LLD driver provided by TI-India•NIMU Rx pDataBuffers are not cached aligned•Image processing demo: The edge slices are not cache aligned•PDK (C66x): hyplnk_read_ECCErrors_reg() doesn't work. It accesses the wrong HW register.9.2.3Build 2.0.0.9This is a Beta-2 release.New features•PCIe LLD added for C6678•BCP, TCP3d,TCP3e and FFTC LLDs added for C6670•Multicore System Analyzer (MCSA) supportOther bug fixes:•Going back to the Main Flash Page after a NOR Read or Write Shows the NAND selection•HUA project name should be changed from "hpdspua" to "hua" to align w/ collateral•Import of LLD example projects gives warning and build fails unless a macros.ini is imported manually•Installer sometimes has an error at the end of the installation stage•Browsing the MCSDK help conent (UG and GSG) always crashes my Eclipse..•On the information page the User switch 1/2 display "OFF" even though 1 is ON in static mode.•Can not write HUA to NAND flash•Text in browser after test is run appears chopped.•RBL EMAC boot example and any necessary tools•Eclipse plugin did not work after the new installer update•DOC: Host boot utilities documentation in UG•IBL build instruction/documentation confusion•POST: Can not build Release build configuration for POST•Platform Library: Need C6670-sim target support•HUA : eeprom read causes application to crash on NY•Boot example projects for 6670 are missing•When written to NOR as bootable image on HUA failed to boot.•HUA does not print debug messages on UART•DOC: Need C6670 HW setup guide wiki page•POST: Add ability to indicate SA-enabled device•Nand writer on C6678 not working reliably...•Many MCSDK examples don't work out of box•Image processing demo should print messages in UART console•HUA : Internal RAM test checks for valid core between 1<= core_id < 6 instead of 1<= core_id < 8.9.2.4Build 2.0.0.8This is an update to Beta-1.New features•C6670 EVM support addedIssues fixed in this ReleaseOther bug fixes:•In Eclipse help the release note link for MCSDK is broken•POST does not display FPGA version•PLATFORM LIB: platform_lib_lite needs some documentation on intent/purpose •PDK LLD UserGuide: Documnet the LLD user guide information in wiki Userguide9.2.5Build 2.0.0.6This is the Beta-1 release of BIOS MCSDK 2.0.New features•Initial Multicore SDK for KeyStone devices •C6678 EVM support•C6678/C6670 simulator supportIssues fixed in this Release•None (this is the first release)。

O r a c l e_11g_R e l e a s e2安装手册教程(总15页)1、Oracle 11g R2安装手册(图文教程)For Windows1.下载Oracle 11g R2 for Windows版本,下载地址如下官方网站:解压两个压缩包到同一目录,即"database",然后单击解压目录下的""文件,如下图所示:3.执行安装程序后会出现如下的命令提示行。
4.等待片刻之后就会出现启动画。
5.稍微等待一会,就会出现如下图所示的安装画面,取消下图所示的选中,然后单击"下一步"继续,同时在出现的信息提示框单击"是"继续。
6.之后就会出现安装选项对话框,默认点击"下一步"继续7.之后会出现安装类型对话框,点击"下一步"继续,如果奔出你是安装在Windows Server上的话就选择服务器类。
8.然后就是安装配置,在这要注意的是:管理口令的格式要至少包含一个大写字母,一个小写字母和一个数字,否则会提示警告,正确输入后点击"下一步"继续。
9. 之后会出现"先决条件检查"对话框,选中"全部忽略"并单击"下一步"以继续。
10.之后点击"完成"就开始安装了11.安装画面如下图所示:12.当上述进度到达100%时会出现线面的对话框,请耐心等待它完成。
13.然后再弹出的确认对话框点击"确定"这时会回到主界面然后再单击"关闭"完成安装。
14.至此,Oracle11g R2已经安装完成,你可以在开始菜单->Oracle - OraDb11g_home1->Database Control - orcl中打开访问网址。
15.登陆:在连接身份里选择"SYSDBA",再用户名处输入"sys",密码为你最初设定的密码,点击"登陆"你就可以访问数据库了2、Oracle 11g R2安装手册(图文教程)For Aix一、确认系统硬件环境Oracle10g最低安装要求:512M物理内存、MIN(RAM*2,2G) SWAP空间、400M /TMP空间、4G Oracle目录空间、64位体系结构下面是确认过程:1、确认内存大小(1G)localhost> /usr/sbin/lsattr -E -l sys0 -a realmemrealmem 1048576 Amount of usable physical memory in Kbytes False这里oracle10g安装文档写错了,将“sys0(数字0)”写成了“sysO(字母O)”。
Third-party add-ons for ThinLinux 2.2 and later versionsDeployment GuideNotes, cautions, and warningsA NOTE indicates important information that helps you make better use of your product.A CAUTION indicates either potential damage to hardware or loss of data and tells you how to avoid theA WARNING indicates a potential for property damage, personal injury, or death.© 2020 Dell Inc. or its subsidiaries. All rights reserved. Dell, EMC, and other trademarks are trademarks of Dell Inc. or its subsidiaries. Other trademarks may be trademarks of their respective owners.Chapter 1: Introduction (4)Other documents you may need (4)Chapter 2: Citrix add-on installation (5)Download the Citrix packages (5)Install the Citrix package using add-on manager (5)Install the Citrix package using INI parameters (10)Install the Citrix package using Wyse Management Suite (11)Chapter 3: VMware add-on installation (12)Download the VMware packages (12)Convert the Bundle package to Debian package (12)Install the VMware Horizon Client package using add-on manager (13)Install the VMware package using INI parameters (17)Install the VMware package using Wyse Management Suite (18)Chapter 4: Contacting Dell (19)Contents3Introduction DISCLAIMER: The information contained in this document is general purpose information only. Dell assumes no responsibility for errors or omissions in the contents. In no event shall Dell be liable for any special, direct, indirect consequential, or incidental damage or any damage whatsoever. Dell reserves the right to make additions, deletions, or modification to the content at any time without prior notice.This document contains links to external websites that are not provided or maintained by or in any way affiliated with Dell. We do not guarantee the accuracy, relevance, timeliness, or completeness of the information about these external websites. This document helps users get early access to latest third-party applications. The packages (add-ons) created by users by following the instructions are not supported by Dell. Dell is not responsible or liable in any manner for any damage occurring due to the software. Dell will assist customers in installing third-party add-ons, and provide operating system support. Any other support or functionality inquiries may need to be shared with the third-party software vendor. Dell may not assist customers in updating or modifying the third-party add-ons.Dell Wyse ThinLinux simplifies the user management model with application icons to enhance the user experience. The Graphical User Interface (GUI) framework integrates the VDI clients such as Citrix Workspace app and VMware Horizon Client.The third-party add-on releases for Citrix Workspace app and VMware Horizon Client on ThinLinux 2.x will no longer be available on /support. You must download the packages directly from the third-party software vendor website and install the packages on your thin client.This guide provides information about deploying a Citrix add-on for Citrix Workspace app and VMware add-on for VMware Horizon Client using any of the following methods:•If you have knowledge about how to use ThinLinux UI, use the add-on manager method.•If you have knowledge about how to use ThinLinux INI parameter, use the INI parameter method.•If you want to deploy the add-on to multiple thin clients simultaneously, use the Wyse Management Suite version 1.2 or later.The target audience for this guide is customers with administrator privileges. You must have knowledge about the ThinLinux operating system, Wyse Management Suite, usage of INI parameters, and Linux commands.Table 1. Supported platformsPlatform Memory configuration (Flash/RAM)BIOS versionWyse 5070 Celeron Thin Client16 GB or 4 GB 1.3.1 and laterWyse 5070 Pentium Thin Client16 GB or 4 GB 1.3.1 and laterWyse 5070 Extended Thin Client16 GB or 4 GB 1.3.1 and laterWyse 3040 Thin Client16 GB or 2 GB 1.2.5 and laterWyse 5470 Thin Client16 GB or 4 GB 1.1.1 and laterOther documents you may needIn addition to this guide, you can access the following guides available at /support/manuals.•The Dell Wyse ThinLinux 2.2 Administrator's Guide provides information about how to configure the ThinLinux settings using the ThinLinux UI.•The Dell Wyse ThinLinux 2.2 INI Reference Guide provides information about how to configure the ThinLinux settings using INI parameters.•The Dell Wyse Management Suite Administrator's Guide provides information about configuration, and maintenance of the ThinLinux2.2-based thin clients by using the Wyse Management Suite console.4IntroductionCitrix add-on installationThe overall Citrix add-on installation includes the following tasks:1.Download the Citrix UI package, Citrix RTME package, and Citrix Workspace app for Linux Debian package. See, Download the Citrixpackages.2.Install the packages in the order Citrix UI package > Citrix Workspace app for Linux package > Citrix RTME package using anyof the following methods:•Install using Add-on Manager. See, Install and upgrade the Citrix package using add-on manager•Install using INI parameter. See, Install and upgrade the Citrix package using INI parameters•Install using Wyse Management Suite. See, Install and upgrade the Citrix package using Wyse Management SuiteDownload the Citrix packages•Download the Debian version of Citrix Workspace app for Linux package (x86_64) from .•Download the Citrix UI and the RTME packages as follows:1.Go to /support.2.In the Enter a Service Tag, Serial Number, Service Request, Model, or Keyword field, type the Service Tag or the modelnumber of your device, and press Enter or click Search.3.On the product support page, click Drivers & downloads.4.Select the operating system as ThinLinux from the drop-down menu.5.From the list, locate VDI Clients Add-on Package for ThinLinux 2.x.6.Click the download icon and extract the file.The following are the Citrix packages available from the extracted file:Table 2. Citrix packagesFilename Summaryica-ui_2.2.1.0-16_amd64.deb (Citrix UI package)Use this file as the Dell custom UI interface for Citrix ICAclient on ThinLinux 2.x.citrix-rtme_2.8.0-2235-02_amd64.deb (Citrix RTME package)Use this file as the Dell custom Citrix RealTime Media Engine (RTME) plug-in on ThinLinux 2.x.Install the Citrix package using add-on managerSteps1.Go to System settings > INI and select Server and Local as the Configuration Source.Citrix add-on installation5Figure 1. System Settings2.Copy package to the ftp server in wyse/addons/ directory and update the directory file with the add-on available in the add-onmanager list.3.To remove the earlier version of Citrix add-on, do the following:a.Go to System settings > Add-ons and click Manage Add-ons.b.From the add-ons list, select the earlier versions of the Citrix ICA package and the Citrix RTME package.c.Click the Remove button and restart the thin client.6Citrix add-on installationFigure 2. System Settings4.To install the Citrix add-on, do the following:a.Go to System settings > Add-ons and click Install Add-ons.b.From the add-ons list, select the Citrix UI Debian package that you have downloaded.c.Click Install and restart the thin client.Citrix add-on installation7Figure 3. System Settings5.To install the Citrix Workspace app package, open the terminal and run the following command:sudo dpkg -i icaclient_x.x.x.x_amd64.deb6.Restart the thin client after the installation is successful.7.To install the Citrix RTME add-on, do the following:a.Go to System settings > Add-ons and click Install Add-ons.b.From the add-ons list, select the Citrix RTME package that you have downloaded.c.Click Install and restart the thin client.unch the Citrix UI from System Settings > Connections.8Citrix add-on installationFigure 4. System Settings9.Click Create a new Citrix connection, enter the required details, and click Save.Citrix add-on installation9Figure 5. System Settingsunch the Citrix session.Install the Citrix package using INI parametersPrerequisitesIf there is an earlier version of the add-on installed on your thin client, uninstall the add-on by deploying the following INI parameter,in wlx.ini. For example, RemoveAddons=ica_19.12.0.19-01_amd64.deb1.Copy the add-on and the directory file to the <root path>\add-ons folder.2.To install the newer version of the add-on, deploy InstallAddons=<deb file> in wlx.ini INI parameter.To manually configure the INI server details, follow steps 4 to 11. If the DHCP method to add INI server details is configured, then skip steps 4 to 11.3.Log in to the thin client.4.To enter into the Admin mode, click the Switch to Admin button.5.Enter the default password.The default password is admin.6.Click the Settings icon on the desktop.The System Settings page is displayed.10Citrix add-on installation7.Click the Management icon.8.Click INI.The Manage INI Configuration page is displayed.9.From the drop-down list, select the configuration source and provide the server details.10.Click Save.11.Restart the thin client.The installation begins and the add-on is installed.Install the Citrix package using Wyse Management SuitePrerequisites•Ensure that you have added the Debian packages—ica-ui_2.2.1.0-16_amd64.deb, citrix-rtme_2.8.0-2235-02_amd64.deb, and Citrix Workspace app for Linux package—to C:\WMS\LocalReporepository on the Wyse Management Suite server.You must create a separate application policy for each Debian package and deploy the packages in the order•1.Go to ThinLinux policy settings and click Advanced.2.Enter the INI parameter RemoveAddons= <add-on name>.3.Click Save and Publish.Steps1.Log in to Wyse Management Suite 1.2 or later.2.Click Portal Administration, and then click File Repository under Console Settings.3.Select the Local Repository check box.4.Click Apps and Data.The Apps and Data page is displayed and verify the copied package is in the applications list.5.Create a group in the Wyse Management Suite server.6.Click Groups and Configurations.7.Click Plus sign (+) and register your client to the same group.8.Click Apps and Data.9.Click Thin Client under the App Policy.10.To add the policy to the required group, click Add Policy.11.Update the required fields, and then click Save.12.To schedule the policy, click Schedule App Policy and update the required fields.13.Jobs page.The lock screen is displayed during the package installation process on all the thin clients.14.Follow the steps again and install the Citrix Workspace app for Linux package followed by the Citrix RTME package.To verify whether the add-on is installed successfully, go to System Information > Packages and verify the add-on version.For more information on how to deploy the package using the newer versions of Wyse Management Suite, see the latest Dell Wyse Management Suite Administrator's Guide at /support.Citrix add-on installation11VMware add-on installationThe overall VMware add-on installation includes the following tasks:1.Download the VMware UI package and VMware Horizon Client for 64-bit Linux installer bundle. See, Download the VMware packages.2.Convert the VMware Horizon Client installer bundle to the VMware bundle update Debian package. See, Convert the Bundle packageto Debian package.3.Install the packages in the order VMware bundle update package > VMware UI package using any of the following methods:•Install using Add-on Manager. See, Install the VMware Horizon Client package using add-on manager•Install using INI parameter. See, Install the VMware Horizon Client package using INI parameters•Install using Wyse Management Suite. See, Install the VMware Horizon Client package using Wyse Management SuiteDownload the VMware packages•Download the VMware Horizon Client for 64-bit Linux installer bundle file from .•Download the VMware UI package as follows:1.Go to /support.2.In the Enter a Service Tag, Serial Number, Service Request, Model, or Keyword, type the Service Tag or the model numberof your device, and press Enter or click Search.3.On the product support page, click Drivers & downloads.4.Select the operating system as ThinLinux from the drop-down menu.5.From the list, locate VDI Clients Add-on Package for ThinLinux 2.x.6.Click the download icon and extract the file.The following are the VMware packages available from the extracted file:Table 3. VMware packagesPackage name Summaryvmware-viewclient-ui_5.0.0-00.02_amd64.deb (VMware UI package)Use this file as the Dell custom UI interface for VMware View Client on ThinLinux 2.x.vmware-bundle-update_1.0.0-00.03_amd64.deb Use this file as the wrapper package for updating the VMwareView Horizon Client bundle on ThinLinux 2.x. Convert the Bundle package to Debian packagePrerequisitesIf you are installing the package for the first time, use the vmware-bundle-update_1.0.0-00.03_amd64.deb package from /support.Steps1.Log in to a Linux system or a Linux Virtual Machine (VM). For example, Ubuntu.2.Open the terminal window. For example, press Alt+Ctrl+X if you are running Ubuntu.3.Create a directory /tmp/vmware using the following command:mkdir /tmp/vmware4.Copy the Debian package that you have downloaded from Dell support site to the directory using the following command:cp vmware-bundle-update_1.0.0-00.03_amd64.deb /tmp/vmware3 12VMware add-on installation5.Create a directory packagedata inside the /tmp/vmware directory using the following commands:cd /tmp/vmwaremkdir packagedata6.Extract the file system from the Debian package archive into the directory using the following command:dpkg-deb -R vmware-bundle-update_1.0.0-00.03_amd64.deb packagedata7.Remove the previous bundle file using the following command:rm -f packagedata/var/cache/update/vmware/VMware-Horizon-Client-5.4.1-15988340.x64.bundle8.Copy the latest bundle package that you have downloaded from VMware website to—packagedata/var/cache/update/vmware/ using the following command:cp <latest bundle> packagedata/var/cache/update/vmware/9.Edit the filename as follows:a.Run the following vi editor command:vi packagedata/DEBIAN/postinstb.Replace the name VMware-Horizon-Client-5.4.1-15988340.x64.bundle to <new-filename>.bundle and savethe file.10.Edit the version as follows:a.Run the following vi editor command:vi packagedata/DEBIAN/controlb.Change the PKG_RELEASE version to the next version. For example, PKG_RELEASE= 00.03 to PKG_RELEASE=00.04.11.Change the directory to packagedata directory using the following command:cd packagedata12.Build the new Debian package using the following command:dpkg-deb -b ../vmware-bundle-update_1.0.0-00.04_amd64.debNext stepsUse the newly created vmware-bundle-update_1.0.0-00.04_amd64.deb to upgrade the VMware View Horizon client on your thin client. For subsequent VMware Horizon Client installer updates, you can use the vmware-bundle-update_1.0.0-00.04_amd64.deb and follow the steps to convert the VMware Horizon bundle package to Debian package using the steps mentioned in this section.Install the VMware Horizon Client package using add-on managerSteps1.Go to System Settings > INI and select Server and Local as the Configuration Source.VMware add-on installation13Figure 6. System Settings2.To remove the earlier version of VMware add-on, do the following:a.Go to System settings > Add-ons and click Manage Add-ons.b.From the add-on list, select the VMware Debian package.c.Click Remove to uninstall the VMware add-on and restart the thin client.14VMware add-on installationFigure 7. System Settings3.To install the new VMware Debian package, do the following:a.Go to System settings > Add-ons and click Install Add-ons.b.Select the VMware Debian package from the list.c.Click Install button to install the VMware Debian package and restart the thin client.d.Once the thin client restarts, go to System settings > Add-ons and click Manage Add-ons.e.From the add-on list, select the VMware UI Debian package.f.Click Install button to install the VMware UI Debian package and restart the thin client.VMware add-on installation15Figure 8. System Settingsunch the VMware UI from System Settings > Connections.16VMware add-on installationFigure 9. System Settings5.Click Create a new VMware connection, enter the required details, and click Save.unch the VMware session.Install the VMware package using INI parametersPrerequisitesIf there is an earlier version of the add-on installed on your thin client, uninstall the add-on by deploying the following INI parameter,RemoveAddons=<addon-name> in wlx.ini1.Copy the add-on and the directory file to the <root path>\add-ons folder.2.To install the newer version of the add-on, deploy InstallAddons=<deb file> in wlx.ini INI parameter.To manually configure the INI server details, follow steps 4 to 11. If the DHCP method to add INI server details is configured, then skip steps 4 to 11.3.Log in to the thin client.4.To enter into the Admin mode, click the Switch to Admin button.5.Enter the default password.The default password is admin.VMware add-on installation176.Click the Settings icon on the desktop.The System Settings page is displayed.7.Click the Management icon.8.Click INI.The Manage INI Configuration page is displayed.9.From the drop-down list, select the configuration source and provide the server details.10.Click Save.11.Restart the thin client.The installation begins and the add-on is installed.Install the VMware package using Wyse Management SuitePrerequisites•Ensure that you have added the Debian packages—vmware-bundle-update_1.0.0-00.04_amd64.deb and vmware-viewclient-ui_5.0.0-00.02_amd64.deb—to C:\WMS\LocalRepo\repository\thinClientApps repository on the Wyse Management Suite server.You must create a separate application policy for each Debian package and deploy the packages in the order•1.Go to ThinLinux policy settings and click Advanced.2.Enter the INI parameter RemoveAddons= <add-on name>.3.Click Save and Publish.Steps1.Log in to Wyse Management Suite 1.2 or later.2.Click Portal Administration, and then click File Repository under Console Settings.3.Select the Local Repository check box.4.Click Apps and Data.The Apps and Data page is displayed and verify the copied package is in the applications list.5.Create a group in the Wyse Management Suite server.6.Click Groups and Configurations.7.Click Plus sign (+) and register your client to the same group.8.Click Apps and Data.9.Click Thin Client under the App Policy.10.To add the policy to the required group, click Add Policy.11.Update the required fields, and then click Save.12.To schedule the policy, click Schedule App Policy and update the required fields.13.Jobs page.The lock screen is displayed during the package installation process on all the thin clients.14.Follow the steps again and install the VMware UI package.To verify whether the add-on is installed successfully, go to System Information > Packages and verify the add-on version.For more information on how to deploy the package using the newer versions of Wyse Management Suite, see the latest Dell Wyse Management Suite Administrator's Guide at /support.18VMware add-on installation4Contacting Dell Dell provides several online and telephone-based support and service options. Availability varies by country and product, and some services may not be available in your area. To contact Dell for technical support or customer service issues, see /contactdell.If you do not have an active Internet connection, you can find contact information on your purchase invoice, packing slip, bill, or the product catalog.Contacting Dell19。

DIGI INTERNATIONAL9350 Excelsior Blvd, Suite 700Hopkins, MN 55343, USA+1 (952) 912-3444 | +1 (877) 912-3444AnywhereUSB Windows Driver Release NotesAnywhereUSB Gen 2Version 3.99 (December 04, 2019)INTRODUCTIONThis is a production release of the AnywhereUSB Generation 2 Windows Driver.SUPPORTED Products∙AnywhereUSB Gen 2 Windows Driver for 32-bit operating systems∙AnywhereUSB Gen 2 Windows Driver for 64-bit operating systemsSUPPORTED Operating Systems∙Windows 7∙Windows 8∙Windows 8.1∙Windows 10∙Server 2008-R2∙Server 2012∙Server 2012-R2∙Server 2016∙Server 2019KNOWN ISSUES∙The Belkin USB 2.0 4-port mobile-powered hub model F5U404BLK sometimes fails to enumerate when connected to AnywhereUSB.UPDATE BEST PRACTICESDigi recommends the following best practices:1.Uninstall the existing driver package via Add and Remove Hardware2.Install the new Windows driver package.TECHNICAL SUPPORTGet the help you need via our Technical Support team and online resources. Digi offers multiple support levels and professional services to meet your needs. All Digi customers have access to product documentation, firmware, drivers, and knowledge base and peer-to-peer support forums. Visit us at https:///support to find out more.CHANGE LOGVERSION 3.99 December 4, 2019NEW FEATURESNoneENHANCEMENTS1.AwUsbApi.dll is now multi-thread safe. This means that library functions can be calledconcurrently from different Windows threads.SECURITY FIXESNoneBUG FIXES1.With Windows 10 builds 1903 and 1908, the host computer would lose connectivity on reboot.This issue was determined to be due to the system network driver not being available at the time the AnywhereUSB system driver started. The “Digi AnywhereUSB Network Service” has been changed so that it works around this problem by disabling and re-enabling the “Network Attached USB Enumerator”. Note that this requires that the Startup Type of this service be configured for “Automatic” (which is the default).NOTE: The Microsoft-certified AnywhereUSB device drivers have not changed since v3.95 and will still show up with a version number of 3.95.2.AwUsbApi.dll AwUsbGetConnectionStatus function incorrectly reportedAWUSB_STATUS_IN_USE instead of AWUSB_STATUS_CONNECTED when the host itself was connected to an AnywhereUSB hub.VERSION 3.96 February 20191.The Windows Installer and the AnywhereUSB Configuration Utility are signed by DigiInternational to eliminate UAC (User Account Control) warning messages about unknown publisher.2.For customers using encrypted AnywhereUSB connections, the encryption service will nowuse certificates from either the Windows Local Machine Trusted Root CA store or theWindows Local Machine Intermediate CA store for authentication server certificates. In the previous 3.95 release, the encryption service only used the Trusted Root CA store.VERSION 3.95 April 20181.Several USB devices (e.g. Dediprog SF100 and Silicon Labs UART) fail to enumerate over ahigh latency WAN link. Fixed by setting ionhub service registry DWORD variableFastStartHub to 1. This variable is off (0) by default.[HKEY_LOCAL_MACHINE\SYSTEM\CurrentControlSet\services\ionhub]"FastStartHub"=dword:00000001(JIRA AWUSB-537)2.AnywhereUSB client driver awvusbd.sys blue-screens when connecting to an AnywhereUSBhub. Happens only with XenServer and XenCenter VM's. Fixed. (JIRA AWUSB-550)3.AnywhereUSB driver installer does not support upgrades. Installer now blocks attempts toupgrade over a previous installation. Previous installation must uninstalled first. You maybe prompted to reboot the computer. (JIRA AWUSB-438)ers can now import CA certificates to the Windows Certificate Store to authenticateserver certificates. The CA certificate must be installed on the "Local Computer" in theTrusted Root Certification Authorities store. (JIRA AWUSB-539)1.AwUsbGetConnectionStatus did not handle groups correctly. It also incorrectly reportedAWUSB_STATUS_IN_USE instead of AWUSB_STATUS_CONNECTED for host currentlyconnected to local machine. Fixed. JIRA AWUSB-492.2.On rare occasions the encryption service has stopped and forced users to restart it. It willnow automatically restart. (JIRA AWUSB-513)3.The encryption service now logs critical events which can be viewed from the WindowsEvent Viewer System log. (JIRA AWUSB-514)VERSION 3.91 September 20171.Client to hub connections with lengthy establishment times could lead to a blue screen ifprematurely disconnected by a user. Fixed. (JIRA AWUSB-421)2.Fixed memory leak in encryption service. (JIRA AWUSB-451)3.Disconnecting an AnywhereUSB hub connected to an Axis T8311 joystick caused a bluescreen. Fixed. (JIRA AWUSB-392)VERSION 3.90.223 June 20171.TLS v1.2 and SHA-2 (SHA-256) support. This only affects “Encrypted AnywhereUSB”.SHA-2 (SHA-256) certificates can now be used for authentication. Note that the certificatemust be signed using 2048-bit RSA encryption. Also, SHA-1 based certificates can still beused.Note:TLS v1.2 and SHA-2 support require AnywhereUSB firmware to be updated to at least rev N1(1.93). It still works with older firmware (starting with rev L v1.80) by "falling back" to TLS1.0.ers can specify a certificate "folder" instead of a certificate file when setting up"Encrypted AnywhereUSB" connections. You can specify it from the AnywhereUSBConfiguration Utility (AwUsbCfg.exe) or the console application (AwConsole.exe) just as you specify a file.Please note - to use a folder, each certificate must be renamed after the subject hash.Suppose you had a folder named c:\my-certs with two certificates - CertA.crt and CertB.crt.For example, to rename CertA.crt:a.Download an OpenSSL installer for Windows (version >= 1.0 since pre-1.0 versionsuse an older hash which will not work with AnywhereUSB).b.Open a command prompt from your certificate folder (c:\my-certs)c.Create a subject hash:c:\my-certs> openssl x509 -hash -in CertA.crt –nooutIt outputs an 8-digit hash (e.g. bc35a2e5)d.Rename (or copy) your certificate file with the hash as its base and the zerocharacter as its extension:c:\my-certs> copy CertA.crt bc35a2e5.0VERSION 3.90 January 20171.Support encryption in AnywhereUSB Programming API, AwUsbApi.dll.2.Workaround for Error Code 38. When all of the AnywhereUSB hubs are disconnected, thedevice manager unloads the ionhub.sys and awvusbd.sys drivers, and several outstanding references to the driver objects persist and block it from being removed from memory. Asubsequent attempt to connect to an AnywhereUSB hub will fail with an Error Code 38 and require a reboot in order to recover.To work-around this failure (most likely caused by intrusive third-party software) you must set these two variables to 1:[HKLM\System\CurrentControlSet\Services\AwVusbd]"DoNotUnload" = dword:1[HKLM\System\CurrentControlSet\Services\IonHub]"DoNotUnload" = dword:1Note: This work-around is disabled by default.VERSION 3.82 May 20161.Fix IOCTL Vulnerability - "Secunia advisory SA68000". (JIRA AWUSB-295)2.An unusually long network delay could lead to a BSOD. Fixed. (JIRA AWUSB-259)3.Fix Handle leak in Encryption Service. (JIRA AWUSB-310)VERSION 3.80 July 20151.Installer did not remove pre-InstallShield drivers (such as 3.60) and led to customercomplaints. Fixed.2.Configuration Utility was not remembering group assignment after disconnecting as it haddone in 3.60. Fixed.3.Added support in AwConsole for encrypted connections.VERSION 3.71 Jan 20151.OpenSSL encrypted USB traffic support (AES-128 encryption only). Firmware version 1.81and later is required.2.Optional "tunneling" of TCP connections over a single TCP connection between the hostand the AnywhereUSB remote hub to eliminate network disconnects due to inactivity. Note that tunneling is enabled automatically when data encryption is turned on. Firmwareversion 1.80 and later is required.3.New installer. Uninstalls will be done conventionally from Programs and Features insteadof from the Configuration Utility. However the configuration utility must be used touninstall an older version if you are upgrading. Note that the new installer copies the driver files to C:\Program Files\Digi\AnywhereUSB by default instead of c:\AnywhereUSB.4.The hub driver would sometimes unload with pending network I/O resulting in a bluescreen. Fixed.5.This release no longer supports signed drivers for Windows XP, Server 2003, and Server2008.VERSION 3.60 May 20141.Low and Full Speed devices which are attached to AnywhereUSB via an external USB2.0hub did not enumerate. Fixed. (JIRA AWUSB-77)2.AwUsbView did not show device speeds correctly. Fixed. (JIRA AWUSB-54)3.Add Multi-Host support to AwUsbApi DLL. (JIRA AWUSB-65)4.If a USB string contained zero as a character, AnywhereUSB would incorrectly treat it as aninvalid string. Fixed.5.Removed Reboot and Configure commands from AwConsole (the console configurationapp). (JIRA AWUSB-80)6.Added work-around for Microsoft Windows 8 / Server 2012 bug which kept USB MassStorages devices from working. (JIRA AWUSB-77)7.Fix bug with MultiTT (Multi Transaction Translator) external hub. (JIRA AWUSB-87)8.UnInstaller failed on Windows 8 because of a deprecated registry key. Fixed. (JIRA AWUSB-88)9.UnInstaller failed to bring up log in Windows 8 and Server 2012. Fixed. (JIRA AWUSB-88)10.When certain devices are removed, awvusbd.sys was causing a BSOD. Fixed. (JIRA AWUSB-86)11.Removed firmware and configuration app for legacy AnywhereUSB/5 devices. They will nolonger be supported going forward.VERSION 3.51 January 20131.Fix critical memory leak in awusbsys driver.2.If you put awusbsys and awvusbd under Driver Verifier, it would cause a blue-screenbecause of the DV filter. Fixed.3.The “X” icon at the top-right now closes the AWUSB Configuration Utility. It used tominimize it to the System Tray.4.The Connection List now has Group Number field. This was added to support connectivityto MHC (Multi-Host Connections) capable AnywhereUSB hubs that couldn’t be discovered.5.Event Logging section has been removed from File / Preferences window. Digi tech supportwill provide specific logging methods for troubleshooting if needed.6.Event Log button, which was only for the legacy AnywhereUSB/5, has been removed. Digitech support will provide specific logging methods for troubleshooting if needed.7.The AnywhereUSB Configuration Utility executable and the three AnywhereUSB drivers (.sysfiles) all share the same version numbers now.8.The Configure button is now only used to configure Group Numbers for 2nd generationmodels which are running v1.38 (or newer) firmware. Network configuration and FriendlyName changes are no longer supported with the Configure button. Use the DeviceDiscovery Utility or the AnywhereUSB Web UI to make network configuration changes. Use the AnywhereUSB Web UI to make Friendly Name changes.VERSION 3.50 October 20121.In rare circumstances, the endpoint receiver handler locks up when it receives a partialmessage from TDI. Rebooting the host was the only way to recover from this in a MultiHost environment. Fixed.2.Added a MultiString registry variable, "SkipMsOsDescrDevList", which can be used to defineproblematic USB devices which fail enumeration if they receive a Get String Descriptorrequest for the Microsoft OS Device Descriptor.3.AwUsbCfg.exe - Add Group Number field to Connection List Dialog. This only affects userswho have to connect to a hub on a different subnet.VERSION 3.30 February 20121.Updated driver to use Microsoft's new value of USBD_STATUS_CANCELED. Using the oldvalue caused some devices to hang.2.Initialize the wValue field of the setup packet. This fixed support for Aladin EToken.3. A device with a very long USB serial number string could cause a blue screen. Fixed.4.IonHub ignored IOCTL_INTERNAL_USB_CYCLE_PORT. Fixed. Some USB functional driversdepend on this IOCTL.5.If a functional driver used the WdfDeviceAssignS0IdleSettings/IdleUsbSelectiveSuspendmethod for its device, it failed because IonHub reported that the device could wake fromPowerDeviceD3. It (ionhub.sys) has been fixed by reporting PowerDeviceD2 in DeviceWake.This fixes a problem seen with Texas Instruments umpusbvista.sys functional driver for its 3410 USB to serial converter.6. A column in Configuration Utility that was used to display the address of the host in theHost to group assignments was too narrow for an IP address of 12 digits. This caused aline wrap in the Host Column and all subsequent group assignments were displayed off by one.。

Matt Monaghan: Chairman, President and CEO Kathy Leneghan: SVP and CFOLois Lee: Director, Treasury and Investor RelationsForward-Looking StatementsThis presentation contains forward-looking statements within the meaning of the“Safe Harbor”provisions of the Private Securities Litigation Reform Act of1995.Forward-looking statements arethose that describe future outcomes or expectations that are usually identified by words such as“will,”“should,”“could,”“plan,”“intend,”“expect,”“continue,”“forecast,”“believe,”and“anticipate”andinclude,for example,any statement made regarding the company's future results.Actual results maydiffer materially as a result of various risks and uncertainties,including those expressed in thecautionary statement in the company’s earnings press release for the second quarter2018posted on/investorrelations,as well as in the company's annual reports on Form10-K,quarterly reports on Form10-Q and other filings with the Securities and Exchange Commission.Thecompany may not be able to predict and may have little or no control over many factors or events thatmay influence its future results and,except as required by law,shall have no obligation to update anyforward-looking statements.Financial results presented are as of June30,2018,unless otherwise noted.Agenda2Q18 FINANCIAL RESULTSSTRATEGY UPDATE2Q18 Highlights versus Last Year❑Reported net sales increased 5.4% to $246.2 million❑Operating loss improved by $8.9 million❑EBITDA of $(3.2) million, an improvement of $8.8 million❑GAAP loss per share was $(0.50) versus $(0.72); adjusted net loss per share was $(0.41) versus $(0.63)❑Free cash flow usage of $24.6 million compared to usage of $22.4 million(in millions USD)2Q182Q17$ Change% ChangeReported Net Sales$246.2$233.5$12.6 5.4%Constant Currency Net Sales$232.3$233.5$(1.2)(0.5)%Gross Margin % of Net Sales27.4%27.8%---40 bpsGross Profit$67.3$65.0$2.3 3.5%Constant Currency SG&A$70.7$75.7$(5.1)(6.7%)Operating Loss$(6.8)$(15.7)$8.956.7%Free Cash Flow$(24.6)$(22.4)$(2.2)(9.6)%EBITDA$(3.2)$(12.0)$8.873.5%Segment Performance –Europe($M)2Q182Q171Q18% /$∆YOY%/$ ∆SeqReported Sales138.9128.5131.38.1% 5.8% Mobility & Seating58.453.551.89.1%12.8% Lifestyles69.664.168.08.6% 2.4% Respiratory 6.5 6.6 6.8(2.3)%(4.2)% Other 4.4 4.2 4.8 4.5%(8.4)% Operating Income 5.27.1 6.6$(1.9)$(1.4)❑Constant currency net sales down 2.3% compared to last year as a result of thegradual transformation in Europe, which is expected to continue through theremainder of 2018❑Gross profit improved as a result of favorable foreign exchange partially offset by unfavorable manufacturing variancesand expedited freight costs, to addressbacklog during initial phase of EU facilityconsolidation, and increased R&D expense❑Operating Income decreased $1.9 million due to lower gross profit and increasedSG&A expenseSegment Performance –NA/HME($M)2Q182Q171Q18% /$∆YOY%/$ ∆SeqReported Sales79.977.779.8 2.8%0.1% Mobility & Seating31.127.229.214.3% 6.5% Lifestyles31.631.030.6 1.7% 3.1% Respiratory17.018.819.7(9.9)%(14.1)% Other0.30.60.3(58.0)%8.4% Operating Loss(8.4)(12.4)(8.1)$4.0$(0.3)❑Reported sales increased 2.8% compared to last year❑Constant currency net sales increased 2.3% with greater than 10% increase in Mobility and Seating compared to last year andincreased 0.3% sequentially❑Decline in stationary concentrators and HomeFill® product partially offset by anincrease in portable oxygen concentrators❑Gross profit declined due to increased freight costs partially offset by reducedwarranty and R&D expense and net salesgrowth❑Operating Loss improved $4.0 million compared to last year, a 32% increase,primarily due to reduced SG&A expenseand net sales increasesSegment Performance –IPG($M)2Q182Q171Q18% /$∆YOY%/$ ∆SeqReported Sales13.715.314.9(10.6)%(7.9)% Operating Income 1.2 1.5 1.6$(0.3)$(0.4)❑Reported sales and constant current net sales both declined compared to last year principally due to lower bed product sales as a result of a now-resolved supplydisruption❑Operating income declined compared to last year principally due to a decline in net sales partially offset by reduced SG&A and warranty expense❑This segment is transitioning regarding its channel strategySegment Performance –Asia Pacific($M)2Q182Q171Q18% /$∆YOY%/$ ∆SeqReported Sales13.712.011.113.8%23.5% Mobility & Seating8.47.1 6.918.9%22.6% Lifestyles 2.7 2.6 2.3 3.8%20.8% Respiratory0.50.30.170.6%321.0% Continuing Care0.40.70.3(33.4)%55.7% Other 1.5 1.3 1.517.8% 1.5% Operating Income (Loss) 1.6(0.1) 1.0$1.7$0.6❑Reported sales increased compared to last year and sequentially in all product linesprimarily driven by Mobility and Seating❑Constant currency net sales increased13.1% compared to last year and 27.7%sequentially❑Gross profit and gross margin as a % of sales improved compared to last yeardriven by net sales growth, favorablemanufacturing variances and reduced R&D expense❑Operating Income improved as a result of gross profit improvementSelected Balance Sheet MetricsFree Cash Flow❑Free cash flow usage greater than last year primarily related to increasedworking capital related to inventory and higher interest payment❑Total cash flow usage and seasonality for 2018 expected to be similar to2017 including higher Capex❑In 2018, additional cash flow will be invested in capital expenditures andincreased working capital as revenues grow, which we expect will be offset by anticipated improvements in operating income Cash:❑Cash balances decreased due to negative free cash flow driven by operatinglosses and increased working capital; expect seasonal 2H18 improvement Total Debt:❑Total Debt: $270.0 million in convertible debt and $30.3 million of otherdebt, primarily leases❑Zero drawn on revolving credit facilities with availability of $38.7 million, asof 6/30/18Capital Structure:❑Based on current expectations, the company believes its cash balances andthe available borrowing capacity under its credit facilities should be sufficient to fund its transformation$300.3$301.4$122.4$176.5$0$50$100$150$200$250$300$3502Q184Q17(i n m i l l i o n s )Debt and CashTotal Debt Cash & Equivalents($M)2Q182Q17Free Cash Flow (24.6)(22.4)Cash Conversion Days69.180.6Agenda2Q18 FINANCIAL RESULTSSTRATEGY UPDATEOn Track to $100M EBITDA Run Rate in 3Q 2020Region Components & Interim Update ContributingBenefit *Additional Sales *Europe Sales Growth❑2018 minor pruning with growth expected in 2019Cost Reduction❑Completed transfer of manual wheelchair manufacturing from Sweden and to an existing facility in France with expected annualized savings of $1.6 million❑Announced transfer of manual wheelchair manufacturing from Switzerland toFrance by 3Q18 with expected annualized savings of $1.7 million $12.5M$12.5M$25-$40MN/ANorth America Mobility and Seating Sales Growth❑Unrestricted sales from US facilities and new wheelchair with Informatics❑Good alignment and favorable formulary position with top customers❑Power products on Federal Supply Schedule for Veterans Administration$25M$50-$80MNorth America Post-Acute Care and Respiratory Sales Growth❑Introduced the world’s first portable oxygen concentrator with Connectivity❑Strong clinical value of product and service offering for sales in care settings❑Working with channel partners to drive growth$25M$50-$80MNorth America Cost Reductions❑Optimizing operations, aligning employee roles, streamlining customerinteractions; annualized savings of $24.2 million from actions since October 2016$25M N/A* For illustrative purposes only; not projected resultsSummaryVisionLeverage the company’s strong technical capabilities for solving clinically complex needs and making life’s experiences possible for the people who use our productsGoalExecuting well with clinically meaningful products, sound and efficient operations to enable solid financial performance Progress as of 2Q18:❑Year-over-year and sequential sales growth in mobility and seating products on consolidated basis and NA/HME –an indicator of theprogress of our transformation. While it takes time to win back market share, we are pleased with the growth realized in this product category❑Significant improvements in operating income and EBITDA compared to 2Q17 and first six months of 2018❑European segment focused on margin expansion, execution of restructuring programs and reduction in sales for the remainder of 2018 as we apply the company’s transformation to this segment.❑Work-in-process for improved channel performance in IPG segment and Respiratory offering❑Free cash flow for FY 2018 expected to be consistent with 2017 –anticipated improvement in operating performance of the segments as compared to 2017 offset by increased investment in capex and working capital with growthAppendixTransformation to Invacare 2.0❑Leverage commercial improvements❑Optimize the business for cost andefficiency ❑Continue to improve quality systems ❑Launch new clinically product platforms ❑Expand talent management and culture ❑Lead in quality culture andoperations excellence ❑Grow above marketPhase 1 –Assess and ReorientPhase 3 –GrowPhase 2 –Build and Align20152019+❑Increase commercial effectiveness ❑Shift and narrow the productportfolio ❑Focus innovation on clinicallycomplex solutions ❑Accelerate quality efforts on qualityand excellence ❑Develop and expand talentResults: Reduced non-core sales, gross margin % improvements, SG&A investments and cash flow usageExpected Outcome: Growth in sales and gross profit dollars; operating income and free cash flow turningExpected Outcome: Margins,operating income reflect leverage on business infrastructureMid-way through Phase Two commercial transformationGoal is to leverage the company’s strong technical capabilities for solving clinically complex needs to generate better returns for re-investment and growthPhase 1 and 2 Indicators1Q162Q163Q164Q161Q172Q173Q174Q171Q182Q18Constant Currency Net Sales (a)(b)(c)(4.8)%(1.6)%(4.5)%(8.1)%(4.4)%(9.3)%(4.5)%(2.3)%(4.4)%(0.5)%Gross Margin Percentage of Net Sales (a)(b)+90 bps+120 bps+/-0 bps-60 bps+180 bps+100 bps+80 bps-60 bps+/-0 bps-40 bpsGross Profit (a)(b)$(3.7)M $2.1M $(4.2)M$(12.1)M $(2.7)M $(8.6)M $(2.7)M $(0.4)M $1.4M $2.3M Constant Currency SG&A (a)(b)(c) 1.3% 2.7%0.8%(2.3)% 2.7%(0.4)%(1.9)%(5.0)%(6.6)%(6.7)%Free Cash Flow (d)$(40.2)M $(17.4)M$1.5M $(10.6)M $(33.4)M $(22.4)M $(4.8)M $20.6M $(26.7)M $(24.6)M Operating (Loss) Income (d)$(5.1)M $(5.8)M $2.6M $(6.9)M $(10.7)M $(15.7)M $(5.9)M $(7.9)M $(5.1)M $(6.8)M EBITDA (d)$(1.4)M$(2.2)M$(1.1)M$(3.2)M$(7.1)M$(12.0)M$(2.2)M$(3.9)M$(1.0)M$(3.2)M%$Recent Performance –Key Expectations(a)Compared to same period prior year.(b)The comparative periods for Q116 and Q216 exclude the divested rentals businesses.(c)The comparative periods for Q416, Q117, Q217 and Q317 exclude divested Garden City Medical.(d)Amounts shown represent actual results achieved, not comparison to same period prior year.“Say -Do” Ratio: Results are tracking with key indicatorsReconciliation of Non-GAAP Performance Metrics to GAAP Financial Measures(Dollars in millions)2Q171Q182Q18Net Loss($23.5)($14.1)($16.5) Income Taxes 2.2 2.3 3.0 Loss Before Taxes(21.3)(11.8)(13.6) Interest Expense 4.67.07.0 Interest Income(0.0)(0.2)(0.1) Net Gain (Loss) on Convertible Debt Derivatives 1.1(0.1)(0.0) Operating Loss(15.7)(5.1)(6.8)Operating Loss(15.7)(5.1)(6.8) Depreciation and Amortization 3.7 4.1 3.6 EBITDA(12.0)(1.0)(3.2)Net Cash Provided by Operating Activities(20.1)(24.7)(22.4) Plus: Sales of Property and Equipment(0.2)(0.0)(0.0) Less: Purchases of Property and Equipment(2.5)(2.1)(2.2) Free Cash Flow($22.4)($26.7)($24.6)Reported Net Sales % Change-15.1% 2.3% 5.4% Less: Foreign Exchange Impact-2.9% 6.7% 5.9% Less: Impact of Divested Entities-2.9%0.0%0.0% Constant Currency Sales % Change-9.3%-4.4%-0.5%Reported SG&A % Change-3.8%-1.7%-2.6% Less: Foreign Exchange Impact-2.0% 4.9% 4.1% Less: Impact of Divested Entities-1.4%0.0%0.0% Constant Currency SG&A % Change-0.4%-6.6%-6.7%Non-GAAP Financial MeasuresSome of the information in this presentation is derived from the company’s consolidated financial data but not presented in its financial statements prepared in accordance with U.S.generally accepted accounting principles(GAAP).Certain of these data are considered “non-GAAP financial measures”under Securities and Exchange Commission rules.These non-GAAP financial measures supplement the company’s GAAP disclosures and should not be considered an alternative to the GAAP measure.The reconciliations to their most directly comparable GAAP financial measures are included in Appendix A.The company uses non-GAAP financial measures including the following:❑“Constant currency net sales”,which is net sales excluding the impact of foreign currency translation.❑"Constant currency sequential net sales“,which is a given period's net sales as compared to the most recent prior period's net sales with each period's net sales translated at the foreign exchange rates for the quarter ended March31,2018.❑“Constant currency SG&A”,which is SG&A excluding the impact of foreign currency translation.❑“Free cash flow”,which is net cash provided(used)by operating activities less purchases of property and equipment plus proceeds from sales of property and equipment.❑“EBITDA”,which is net earnings(loss)from continuing operations plus:income taxes,interest expense-net,net gain or loss on convertible debt derivatives,gain on sale of business,asset write-down to an intangible asset,and depreciation and amortization.❑“Adjusted net earnings(loss)”,which is defined as net loss before income taxes net of adjusted income taxes.。
The Self-Managing Database: Automatic Shared Memory Management with Oracle Database 10g Release 2An Oracle White PaperMay 2005Release 2 Introduction (3)Current Challenges (3)Introducing Automatic Shared Memory Management (4)The SGA_TARGET Parameter (4)Automatically Managed SGA Components (4)Manually Sized SGA Components (6)Benefits (7)More Flexible and Adaptive Memory Utilization (7)Enhanced Performance (7)Ease of Use (7)Enabling Automatic Shared Memory Management (8)Dynamic Modification of SGA Parameters (10)Dynamic Modification of SGA_TARGET (10)SGA Size Advisor (11)Dynamic Modification of Parameters for Automatically Managed Components (12)Modification of Parameters for Manually Sized Components (13)Persistence of Auto Tuned Values (14)Conclusion (14)Release 2INTRODUCTIONOne of the key self-management enhancements in the Oracle Database 10g is Automatic Shared (SGA) Memory Management. This functionality automates the management of shared memory used by an Oracle Database 10g instance and frees administrators from having to manually configure the sizes of shared memory components. Besides making more effective use of available memory and thereby reducing the cost incurred of acquiring additional hardware memory resources, the Automatic Shared Memory Management feature significantly simplifies Oracle database administration by introducing a more dynamic, flexible and adaptive memory management scheme.This paper describes this functionality and illustrates its advantages.CURRENT CHALLENGESThe Shared Global Area (SGA) in Oracle comprises multiple memory components -- a component being a pool of memory used to satisfy a particular class of memory allocation requests. Examples of memory components include the shared pool (used for allocating memory for SQL and PL/SQL execution), java pool (used for java objects and other java execution memory), buffer cache (used for caching disk blocks), etc.In past releases, the Oracle administrator was required to manually set a number of parameters for specifying different SGA component sizes, such as SHARED_POOL_SIZE, DB_CACHE_SIZE, LARGE_POOL_SIZE, and JAVA_POOL_SIZE.The task of manually adjusting the sizes of individual SGA components could pose a few challenges. It may not be easy to determine the optimal sizes of these components suitable for a given workload. Oracle9i Database alleviated this problem to a great extent by introducing advisory mechanisms that allow DBAs to determine the optimal sizes of the buffer cache and shared pool. However, these recommendations still had to be implemented by the administrator. This challenge is further compounded in situations in which the workload tends to vary with the time of the day e.g., online users during the day and batch jobs atnight. Sizing for peak load could mean memory wastage while under-sizing may cause out-of-memory errors (ORA-4031). For example if a system is configured with a big large pool to accommodate a nightly RMAN backup job, most of this memory – which could have been better utilized in the buffer cache or shared pool for OLTP activity – remains unused for the most part of the day. At the same time, the cost of failures could be prohibitive from a business point of view leaving administrators with few other options.INTRODUCING AUTOMATIC SHARED MEMORY MANAGEMENTTo resolve these challenges, Oracle Database 10g introduces Automatic Shared Memory Management. In Oracle Database 10g, DBAs can just specify the total amount of SGA memory available to an instance using the new parameterSGA_TARGET. The database server then automatically distributes the available memory among various components as required. The Automatic Shared Memory Management feature is based on a sophisticated algorithm internal to the database that continuously monitors the distribution of memory and changes it periodically as needed, according to the demands of the workload.The SGA_TARGET ParameterThe SGA_TARGET parameter reflects the total size of the SGA and includes memory for:• Fixed SGA and other internal allocations needed by the Oracle instance • Log buffer• Shared Pool• Java Pool• Buffer Cache• Keep/Recycle buffer caches (if specified)• Non standard block size buffer caches (if specified)• Streams Pool (new in Oracle Database 10g)An important point to note is that SGA_TARGET includes the entire memory for the SGA. Thus, SGA_TARGET allows the user to precisely control the size of the shared memory area allocated by Oracle.Automatically Managed SGA ComponentsWhen SGA_TARGET is set, the most commonly configured components are sized automatically. These include:1. Shared pool (for SQL and PL/SQL execution)2. Java pool for (java execution state)3. Large pool (for large allocations such as RMAN backup buffers)4. Buffer cache5. Streams poolThere is no need to set the of size any of the above components explicitly and by default the parameters for these components will appear to have values of zero. Whenever a component needs memory, it can request that it be transferred from another component via the internal auto-tuning mechanism. This will happen transparently without user-intervention.The performance of each of these components is also monitored by the Oracle instance. The instance uses internal views and statistics to determine how to optimally distribute memory among the automatically sized components. As the workload changes, memory is redistributed to ensure optimal performance with the new workload. This algorithm is never complacent and always tries to find the optimal distribution by taking into consideration long term as well as short terms trends.The administrator can still exercise some control over the sizes of the auto-tuned components by specifying minimum values for each of these components. This can be useful in cases in which the administrator knows that an application needs a minimum amount of memory in certain components to function properly. The minimum value of a component is specified by setting the corresponding parameter for the component.Here is an example configuration:SGA_TARGET = 132MSHARED_POOL_SIZE = 32MDB_CACHE_SIZE = 20MIn the above example, the shared pool and the default buffer pool will not be sized below the specified values (32M and 20M, respectively). This implies that the remaining 80M can be distributed across all the components. The actual distribution of values between the SGA components may be as follows:Actual Shared Pool Size = 92MActual buffer cache size = 20MActual java pool size = 16MActual Large Pool Size = 0MOther = 4MThe fixed view V$SGA_DYNAMIC_COMPONENTS displays the current size of each SGA component while the parameter values (e.g. DB_CACHE_SIZE, SHARED_POOL_SIZE) specify the minimum values. The current sizes of the SGA components can also be obtained by looking at the Enterprise Manager memory configuration page.Fig 1: EM displays the current sizes of automatically tuned SGA componentsManually Sized SGA ComponentsThere are a few SGA components whose sizes are not automatically adjusted. The administrator needs to specify the sizes of these components explicitly, if needed by the application. Such components are:• Keep/Recycle buffer caches (controlled by DB_KEEP_CACHE_SIZE and DB_RECYCLE_CACHE_SIZE)• Additional buffer caches for non-standard block sizes (controlled by DB_<N>K_CACHE_SIZE, N={2,4,8,16,32})The sizes of these components is determined by the administrator-defined value of their corresponding parameters. These values can, of course, be changed any time either using Enterprise Manager or from the command-line via the ALTER SYSTEM command.The memory consumed by manually sized components reduces the amount of memory available for automatic adjustment. So for example, in the following configuration:• SGA_TARGET = 256M• DB_8K_CACHE_SIZE = 32MThe instance has only 224M (256 – 32) remaining to be distributed among the automatically sized componentsBENEFITSMore Flexible and Adaptive Memory UtilizationThe most significant benefit of using automatic SGA memory management is that the sizes of the different SGA components are flexible and will adapt to the needs of a workload without requiring user intervention.Let us illustrate this with an example. Consider a manual configuration in where 1G of memory is available for SGA and distributed as follows (for the purpose of simplicity we ignore other SGA components for now):SHARED_POOL_SIZE=128MDB_CACHE_SIZE=896MIn this case, if the application ever tries to allocate more than 128M of memory from the shared pool, it will receive an ORA-4031 indicating that available shared pool has been exhausted. Note that when this condition happens, there may be free memory in the buffer cache - but it is not accessible to the shared pool. The user will then manually have to shrink the buffer cache and grow the shared pool to work around this problem.Instead with automatic management, the DBA can simply set:SGA_TARGET = 1GIn this case, if the application needs more shared pool memory for avoiding an ORA-4031 error condition, it will simply obtain that memory by acquiring it from the buffer cache.Enhanced PerformanceBesides maximizing the use of available memory, the Automatic Shared Memory Management feature can enhance workload performance as well. With manual configuration, it is possible that compiled SQL statements will frequently age out of the shared pool because of its inadequate size. This will manifest in terms of frequent hard parses and, hence, reduced performance. However when automatic management is enabled, the internal tuning algorithm will monitor the performance of the workload and grow the shared pool if it determines that doing so will reduce the number of parses required. This is one of the most wonderful aspects of Automatic Shared Memory Management feature since it provides enhanced out-of-box performance, without requiring any additional resources or manual tuning effort.Ease of UseHaving just a single parameter to deal with greatly simplifies the job of administrators. DBAs can now just specify the amount of SGA memory an instance has its disposal and forget about the rest. They do not need to figure outthe sizes of individual components any more. In addition, they can be assured of the fact that no out of memory errors will be generated unless the system has truly run out of memory.ENABLING AUTOMATIC SHARED MEMORY MANAGEMENTThe Automatic Shared Memory Management feature can be enabled either using EM or by setting the SGA_TARGET parameter.When migrating from a manual scheme, it is best to tally the existing values of the SGA parameters and add a small amount (e.g. 16MB) to account for fixed SGA and internal overhead. At the same time the values of the automatically sized components can be removed from the parameter file.For instance, when migrating from the following configuration:SHARED_POOL_SIZE=256MDB_CACHE_SIZE=512MLARGE_POOL_SIZE=256MLOG_BUFFER=16MThe above parameters can be replaced withSGA_TARGET = 256 M + 512M + 256 M + 16M + 16 M (fixed SGA overhead) = 1056 MAutomatic Shared Memory Management may also be enabled dynamically. If you are using Enterprise Manager, you can enable SGA tuning by clicking the enable button on the SGA screen in the Memory Parameters section.Fig 2: Enabling Automatic Shared Memory Management using Enterprise Manager When enabling the Automatic Shared Memory Management feature using EM, the appropriate value for SGA_TARGET is automatically calculated according to the formula described above. In addition, EM also unsets all the parameters specifying the size of individual components in order to maximize the benefit of automatic management.If using command line interface, the steps involved in enabling Automatic Shared Memory Management are as follows:• Dynamically set SGA_TARGET to the current SGA size. The current size of the SGA can be determined from the fixed-view V$SGA via thefollowing query:select sum(value) from v$sga;• Next dynamically set each of the auto-tuned component sizes to zero so that the automatic shared memory tuning algorithm can modify the sizes as needed.If the above query for example returns the result of 536870912 (or 512M) then the steps for enabling auto SGA are as follows:alter system set sga_target=512M;alter system set db_cache_size = 0;alter system set shared_pool_size = 0;alter system set large_pool_size = 0;alter system set java_pool_size = 0;DYNAMIC MODIFICATION OF SGA PARAMETERSDynamic Modification of SGA_TARGETThe SGA_TARGET parameter is dynamic and can be increased up to the value specified by the parameter SGA_MAX_SIZE. The value of this parameter can also be reduced. In that case, one or more automatically tuned components are identified to release memory. The value of the SGA_TARGET parameter can be reduced until one or more auto-tuned components reach their minimum size. The change in the amount of physical memory consumed when SGA_TARGET is modified depends on the OS platform. On some Unix platforms that do not support dynamic shared memory, the physical memory in use by the SGA is equal to the value of SGA_MAX_SIZE. On such platforms, there is no real benefit in running with a value of SGA_TARGET less than SGA_MAX_SIZE and setting SGA_MAX_SIZE on those platforms is, therefore, not recommended. On other platforms, such as Solaris and Windows, the physical memory consumed by the SGA is equal to the value of SGA_TARGET parameter.Note that when SGA_TARGET is resized, the only components to be affected are the auto-tuned components. Any manually configured components remain unaffected.For example, if we have an environment with the following configuration:SGA_MAX_SIZE=1024MSGA_TARGET = 512MDB_8K_CACHE_SIZE = 128MIn this example, the value of SGA_TARGET can be resized up to 1024M and can also be lowered until one or more of the buffer cache, shared pool, large pool, or java pool reaches its minimum size (the exact value depends on environmental factors such as the number of CPUs on the system). But the value of DB_8K_CACHE_SIZE will remain fixed at all times at 128M.Also, when SGA_TARGET is reduced, if the values for any auto-tuned component sizes have been specified to limit their minimum sizes, then those components will not shrink below their respective minimums. Therefore, if we have the following combination of parameters:SGA_MAX_SIZE=1024MSGA_TARGET = 512MDB_CACHE_SIZE = 96MDB_8K_CACHE_SIZE = 128MThe Self-Managing Database: Automatic SGA Memory Management with Oracle Database 10g Release 2 PageIn this example, in addition to the DB_8K_CACHE_SIZE being permanently fixed at 128M, the primary buffer cache will not shrink below 96M. This imposes an additional restriction on how far the value of SGA_TARGET can be reduced.SGA Size AdvisorTo determine the appropriate value for SGA_TARGET, Oracle provides the SGA Size Advisor. The SGA size advisor can be accessed from the Memory Parameters page of the EM interface.Fig 3: Accessing the SGA advisorThe advisor performs a what-if analysis to quantify the expected impact on the overall system performance for various sizes of the SGA. In the example below, the best improvement will be obtained by setting the SGA_TARGET value to 164M.Fig 4: SGA advisorAn alternative to using the EM interface is to query the$SGA_TARGET_ADVICE view.Dynamic Modification of Parameters for Automatically Managed ComponentsWhen the parameter SGA_TARGET is not set, the rules governing resize for all SGA_TARGET component parameters are the same as in earlier releases. This is because in the absence of SGA_TARGET, the Automatic Shared Memory Management feature is disabled.However, as mentioned earlier, when Automatic Shared Memory Management is enabled, the manually specified size of an automatically sized component (e.g. SHARED_POOL_SIZE), serves as a lower bound for the size of that component. It is possible to modify this limit dynamically by altering the value of the corresponding parameter.If the specified lower limit for the size of a given SGA component is less than its current size, there is no immediate change in the size of that component. The value simply limits the auto-tuning algorithm to that reduced minimum size in the future.For example, if:SGA_TARGET = 512M,SHARED_POOL_SIZE = 256M(Current) Shared Pool size = 284MIn this example, dynamically resizing the SHARED_POOL_SIZE parameter down to 128M or lower has no effect on the current size of the shared pool. Also note that setting the size of an automatically sized component to zero disables the enforcement of any user minimum on the size of the component. As stated earlier, this is the default behavior of automatically sized components when SGA_TARGET is set.However, if the value of the parameter is raised to be greater than the current size of the component, the component will grow in response to the resize to accommodate the increased minimum. In the above example, if the value of SHARED_POOL_SIZE is resized up to 300M, then the shared pool will grow till it reaches 300M. This resize will happen at the expense of one or more auto-tuned components.It is important to note that manually limiting the minimum size of one or more automatically sized components reduces the total amount of memory available for dynamic adjustment, thereby limiting the system’s ability to adapt to workload changes. Consequently, the use of this option is not recommended barring exceptional cases. The default automatic management behavior has been designed to maximize both system performance and the use of available resources.Modification of Parameters for Manually Sized Components Parameters for manually sized components can be dynamically altered as well, the difference being that the value of the parameter always specifies the precise size of its corresponding component.Therefore, if the size of a manual component is increased, extra memory is taken away from one or more automatically sized components. If the size of a manual component is decreased, the memory that is released is given to the automatically sized components.For example:SGA_TARGET = 512MDB_8K_CACHE_SIZE=128MIn this case, increasing DB_8K_CACHE_SIZE to 144M (or by 16M) will mean that the 16M will be taken away from the automatically sized components.Likewise, shrinking DB_8K_CACHE_SIZE to 112 M (or by 16M) will mean that the 16M will be given to the automatically sized components. PERSISTENCE OF AUTO TUNED VALUESThe sizes of the automatically tuned components are remembered across shutdowns if a server parameter file (SPFILE) is used. This means that the system will not need to learn the characteristics workload from scratch each time and will pick up where it left off from the last shutdown.For this reason it is highly recommended that an SPFILE be used in conjunction with the Automatic Shared Memory Management feature.CONCLUSIONMemory is a precious system resource and administrators currently spend a significant amount of their time optimizing its use. With Automatic Shared Memory Management, they are relieved of this time consuming and often tedious exercise. The flexibility and adaptiveness of this solution will ensure the best possible utilization of existing resources and thereby help organizations reduce capital expenditure. Just another example of how the Oracle Database10g is going to let administrators play more strategic roles and allow businesses to become more profitable!The Self-Managing Database: Automatic SGA Memory Management with Oracle Database 10g Release 2 May 2005Author:Tirthankar Lahiri, Arvind NithrkashyapContributing Authors:Sushil Kumar, Brian Hirano, Kant Patel, Poojan Kumar, Herve LejeuneOracle CorporationWorld Headquarters500 Oracle ParkwayRedwood Shores, CA 94065U.S.A.Worldwide Inquiries:Phone: +1.650.506.7000Fax: +1.650.506.7200Oracle Corporation provides the softwarethat powers the internet.Oracle is a registered trademark of Oracle Corporation. Variousproduct and service names referenced herein may be trademarksof Oracle Corporation. All other product and service namesmentioned may be trademarks of their respective owners.Copyright © 2002 Oracle CorporationAll rights reserved.。
BarTender ® 2021 Preview 2BarTender® 2021 Preview 2 provides early access to BarTender 2021 before it’s released later this year. Preview 2 is for customers wanting advanced label document management, including: design and approval workflows; fast, secure, web-based printing; high-availability license redundancy options; and enhanced automation, integration and database improvements. This is your chance to help shape the future of BarTender. Try it out and send us your feedback. We’d love to hear from you.Key enhancements by editionPreview 2 includes these capabilities for each edition.Key benefitsIn addition to significant overall speed and performance improvements in BarTender 2021, you’ll experience:•Increased label QA and accountability with visual Workflow Designer for easy design, approval, tracking and deployment• Faster approval process using integrated web-based Print Portal and configurable email notifications providing label approval anywhere, any time•Improved business continuity and disaster recovery — licensing backup server and redundancy to ensure continuous printing operations•Tighter integration with your business systems, and expanded API support for the new workflow and Print Portal enhancements•Upgraded Designer and other feature enhancements providing improved productivity and expanded dynamic data support for images and table objects • Fast, secure internet printing — access, select and print labels from anywhere, any time• Printing directly from any browser, on any device, to any connected printer• Easier label system control with enhanced Integration Builder and Admin Console• Flexible database options with support for Google Sheets, Excel Online, QuickBooks Online and JSON •Comprehensive security with role-based accessNew Visual Workflow Designer• Drag and drop user interface — easily create label design, approval and deployment workflows • Track the status of label files from start to finish for end-to-end project tracking• Define State, Approval and Transition objects to build workflows•Secure document access with user-basedpermissionsAccess workflow approval process anywhere, any time• Integrated web-based print portal• Review and approve documents from any browser or smartphone • Email notification support•Configurable emails for each document state,approval and transitionSupport, feedback and release notes• Provide your feedback and get technical support through our support portal — per your current support plan — and in our community forum•What’s New and Workflow tutorial guides and release notes are available to help guide you through what’s new in Preview 2Download BarTender 2021 Preview 2 at/support/preview-2Expanded API Support• Integrate your business systems • New Print Portal REST API • Expanded Librarian API•Access via OpenAPI SpecificationEnhanced reliability for mission-critical environments• Enhanced failover license support • Resilient licensing for fault tolerance•Advanced, always on, high availability optionsNew Print Portal• New faster responsive design UI, with streamlined functionality • Online approvals enabled for full and immediate printing control • Comprehensive security with SSL/encryption and role-based access • Driverless printing with no printer drivers required on server•Print to PDF supported directly from PortalNew database support connectors• Google Sheets• Excel Online• JSON• Quickbooks OnlineJSONFaster, more integratedLibrarian• Optimized for speed over the internet• Revision history and workflow statesavailable in Print Portal• Changes in Print Portal reflect inLibrarian and vice versa。
Reducing the Frequency of Server UpdatesDue to customer feedback to reduce the frequency of server updates, specifically for older server generations, HPE releases two types of SPPs.1. A “Production SPP” with support for the “production server generations”.2.Multiple generati on specific “Post-Production SPPs” with support for one specific “post-productionserver generation” (e.g. Gen8 only Post-Production SPP that contains the firmware and drivers forGen8 only).Production SPPThe production server generations are the server generations where HPE is adding support for new technology, features, options and new major OS/hypervisor versions. All of which involve adding new functionality to or modifying existing functionality in the firmware, drivers, and system software and releasing updated versions.Firmware, drivers, and system software updates for the “production server generations” may include bug fixes, security updates, plus new features, functionality, and new OS/hypervisor version support and require more frequent updates and testing.Because the updates contain new functionality, bug fixes, and security updates, HPE recommends updating production server generations on a yearly cadence.Post-Production SPPThe post-production server generations are the server generations where HPE is no longer adding support for new technology, features, options and new major OS/hypervisor versions. When a server generation is in post-production, modifications to the firmware, drivers, and system software for that server generation is limited to bug fixes and security updates.Smart Component updates during the post-production phase of a server generation as less frequent and are only released to resolve an issue.Because updates are only released to resolve specific issues, HPE recommends updating to post-production SPP and then applying only the “hot fixes” that apply to your server models, OS/hypervisor versions, and environment.Post-productions SPPs are supported as long as HPE supports that server generation and you do not need to perform yearly updates on post-production server generations.Gen10 Gen9 Gen8 G7SPP Classification Production Post-Production Post-Production Post-Production Entitlement required No Yes Yes YesLogin required Yes Yes Yes YesSPP Release Frequency 2-4X per year(March, September +select new productreleases)Once(All updates released ashot fixes and/orsupplements)Once(All updates releasedas hot fixes and/orsupplements)Once(All updates releasedas hot fixes and/orsupplements)New OS support ✓X X X New Device support ✓X X X New functionality ✓X X X Bug fixes ✓✓✓✓Security Updates ✓✓✓✓RecommendedUpdate Frequency Yearly Only to resolve anissueOnly to resolve anissueOnly to resolve anissueComponent Update Path Testing 1 yearThrough the end of serversupportThrough the end ofserver supportThrough the end ofserver supportSPP to use Latest Production SPP Gen9 Post-Production Gen8 Post-Production G7 Post-Production Downloading an SPPThe Gen10 production SPPs can be downloaded using HPE passport account, without the need for active warranty or support agreementThe Gen9/Gen10 production SPP and Gen9 post-production SPP downloads require an active warranty or support agreement (see More Information on Access to HPE Support Materials for more details).HPE provides several methods to download the SPP.•SPP Custom Download (/servers/spp/custom) –HPE’s preferred method for downloading a production or post-production SPP.•SPP Download Page (/servers/spp/download) – which also provides access to the SPP release documentation, hot fixes and advisories, and FAQs.•HPE Support Center (/support)•Software Deliver Repository (SDR) (/SDR/) – YUM repository containing the Smart Components.How do I know if updates have been released for a Post-Production SPP?The “Hot Fixes and Advisory” section of the SPP Download page provides a list of the hot fixes and advisories for the selected SPP (production and post-production).Is there release documentation for each Post-Production SPP?Yes, the “Documentation” sec tion of the SPP Download page contains the SPP documentation (release notes, server support guide, contents report, and component notes) for the Production and Post-Production SPPs.。
资料编码产品名称OSTA2.0 Release2 使用对象华为工程师、合作方工程师产品版本V200R020/21/22/23 编写部门服务器产品部资料版本V1.1OSTA2.0 Release2开局指导书拟制:王旭波日期:2007-4-25审核:日期:审核:日期:批准:日期:华为技术有限公司版权所有侵权必究OSTA2.0 Release2开局指导书文档密级:内部公开修订记录日期修订版本描述作者2007-4-25 V1.0 初稿完成王旭波2007-6-8 V1.1 增加接口板、扣板介绍部分章节王旭波OSTA2.0 Release2开局指导书文档密级:内部公开目录第1章设备简述 (1)1.1 OSTA2.0 Release 2产品简述 (1)1.2 交流环境中OSTA2.0 R2服务器系统组成 (3)1.3 认识T8223机箱 (4)1.3.1 前视图 (4)1.3.2 后视图 (5)1.3.3 机箱特性介绍 (6)1.3.4 单板配置 (7)1.3.5 机箱供电 (9)1.3.6 通风散热系统 (9)1.3.7 线缆管理 (10)1.3.8 技术指标 (11)1.4 认识各种单板 (12)1.4.1 BH22服务器板 (12)1.4.2 BH23服务器板 (13)1.4.3 BA22服务器板 (14)1.4.4 NX20交换网板 (14)1.4.5 SMMD机箱管理板 (15)1.5 认识各种接口板 (16)1.5.1 BR25服务器接口板 (16)1.5.2 BR26服务器接口板 (17)1.5.3 BR28服务器接口板 (18)1.6 服务器板和接口板之间的对应关系 (19)1.7 认识各种扣板 (19)1.7.1 外出GE扣板(电) (19)1.7.2 外出GE扣板(光) (20)1.7.3 外出TOE扣板(电) (20)1.7.4 Fabric GE扣板 (20)1.7.5 外出FC扣板 (21)1.7.6 Fabric FC扣板 (21)1.7.7 SCSI扣板 (22)1.7.8 固态硬盘扩展扣板 (22)1.8 接口板与扣板之间的对应关系 (22)1.9 认识散热托盘 (24)OSTA2.0 Release2开局指导书文档密级:内部公开1.10 认识OSTA2.0 R2电源配套件 (25)1.6.1 GEPS4890-30AR AC/DC电源系统 (26)1.10.2 Flatpack2 2000W AC/DC电源系统 (28)1.11 总装机柜 (30)1.11.1 外观 (31)1.11.2 物理尺寸 (31)1.11.3 机柜部件结构 (32)1.11.4 机柜内部设备 (32)1.12 配套设备 (33)第2章开局前准备 (1)2.1知识技能准备 (1)2.1.1 硬件结构与安装 (1)2.1.2 软件安装与调试 (2)2.1.3 软件加载与升级 (2)2.2资料准备 (2)2.3物料、工具准备 (3)2.4现场勘测准备 (3)第3章硬件安装 (5)3.1 概述 (5)3.2 安装AC/DC电源系统 (7)3.2.1 安装Flatpack2 2000W AC/DC套件 (7)3.2.2 安装GEPS4890-30AR AC/DC套件 (8)3.3 安装散热托盘 (8)3.4 安装OSTA2.0 R2设备 (10)3.4.1 安装T8223机箱 (10)3.4.2 安装单板 (11)3.4.3 安装后的OSTA2.0 R2 (12)3.4.4 数据线连接 (15)3.4.5 SMM单板网口连线及IP设置说明 (15)3.5 电源线连接 (18)3.5.1 Flatpack2 AC/DC电源交流端电源线连接 (19)3.5.2 Flatpack2 AC/DC电源直流端电源线连接 (20)3.5.3 GEPS4890-30AR AC/DC电源交流端电源线连接 (22)3.5.4 GEPS4890-30AR AC/DC电源直流端电源线连接 (23)3.5.5 地线的连接 (25)3.6 其他设备安装 (26)3.7 外部线缆走线 (26)3.8 安装后检查 (26)OSTA2.0 Release2开局指导书文档密级:内部公开3.8.1 设备安装检查 (27)3.8.2 线缆连接检查 (27)第4章设备上下电步骤及操作说明 (28)4.1 启动前准备 (28)4.1.1 设备安装检查 (28)4.1.2 线缆连接检查 (29)4.2 上电操作过程 (29)4.2.1 设备上电 (29)4.2.2 硬件状态检测 (29)4.3 下电操作过程 (30)4.3.1 服务器板下电 (30)4.3.2 交换网板和负载均衡板下电 (30)4.3.3 SMM管理板下电 (31)4.3.4 OSTA2.0 R2机箱及配套设备下电 (31)第5章设备软件安装及配置 (33)5.1 服务器板操作系统的安装 (33)5.1.1 Windows Server 2003的安装 (33)5.1.2 SuSE Linux Enterprise Server 9的安装 (33)5.1.3 Red Hat Enterprise Linux 3/4的安装 (33)5.2 OSTA2.0 R2与磁盘阵列柜的连接 (33)5.2.1 存储设备的配置过程 (33)5.2.2 在Windows系统下访问存储 (33)5.2.3 在Linux系统下访问存储 (34)5.3 USM管理软件的安装使用 (35)第6章日常维护及常用工具 (36)6.1 告警指示灯说明 (36)6.1.1 服务器板、交换板告警指示灯 (36)6.1.2 SMM 板告警指示灯 (37)6.2 服务器板BIOS设置 (37)6.3 用SMM命令进行管理和设置 (38)6.3.2 命令行接口 (39)6.3.3 命令行视图介绍 (39)6.3.4 命令行特性 (41)6.4 基本操作 (42)6.4.1 常用查询操作 (42)6.4.2 常用设置操作 (47)6.5 USM的使用说明 (49)OSTA2.0 Release2开局指导书文档密级:内部公开关键词:OSTA ATCA KVM磁盘阵列USM SMM服务器板交换网板RAID摘要:本文简要介绍了OSTA2.0 Release设备的相关部件与组成、开局前的准备、硬件安装步骤、上下电过程、软件安装与配置、日常维护及常用工具以及相关的参考资料等,可供开局或维护工程师参考。
SoftMax® Pro Software Version 5.4.2Software Release NotesIntroductionThe SoftMax® Pro Software version 5.4.2 update is a minor release. Thefollowing is a summary of the changes incorporated in this update ascompared to version 5.4.1, the last general release of the SoftMax ProSoftware.•New in SoftMax Pro v5.4.2 on page1•Modifications Made to SoftMax Pro Software v5.4.2 on page1•General Software Issues Addressed in SoftMax Pro Software v5.4.2 onpage3•How to Update to SoftMax Pro Software v5.4.2 on page5New in SoftMax Pro v5.4.2Updated Support for Operating SystemsSoftMax Pro Software v5.4.2 is now supported for MAC OS v10.6, as well asWindows 7, 32-bit and 64-bit operating systems supported in the SoftMax ProSoftware v5.4.1 release.Additional Windows 7 installation considerations for the SpectraMax® LMicroplate Reader, StakMax® Microplate Handling System, and the MDCFileServer are addressed in an insert to the SoftMax Pro Software User Guideincluded with the software.Modifications Made to SoftMax Pro Software v5.4.2Protocol ModificationsThe following protocol files were added, removed, or updated:•Assay Development♦Fluorescence OptimizationUpdated the introduction and instruction sections to enhance clarityand usability.♦Z Factor Assay DevelopmentChanged from FlexStation® 3 Reader type to FI mode, and updatedreader suitability to enhance the protocol’s usability.•Cell Signaling and Transport♦QBT Fatty Acid Uptake-EndpointRemoved and replaced with QBT Fatty Acid Uptake protocol♦QBT Fatty Acid Uptake-KineticRemoved and replaced with QBT Fatty Acid Uptake protocol♦QBT Fatty Acid Uptake (added)Added to combine QBT Fatty Acid Uptake-Endpoint and QBT FattyAcid Uptake-Kinetic protocols into a single protocol.•Early ADME-Permeability & Solubility♦MScreen PAMPAUpdated the introduction section to enhance clarity and usability.v5.4.2 1SoftMax ® Pro Software Version 5.4.2 Software Release Notes2 v5.4.2•ELISA-Kinetic ♦HRP and ABTS-Kinetic Corrected group table reference in standard curve to ensure users get accurate results.•Molecular Devices ♦Calcium Changed PMT to medium to accommodate firmware change and prevent PMT saturation with typical assays to improve user experience and avoid bad or lost data.♦QBT Fatty Acid Uptake-Endpoint Removed and replaced with QBT Fatty Acid Uptake protocol ♦QBT Fatty Acid Uptake-Kinetic Removed and replaced with QBT Fatty Acid Uptake protocol ♦QBT Fatty Acid Uptake (added)Added to combine QBT Fatty Acid Uptake-Endpoint and QBT Fatty Acid Uptake-Kinetic protocols into a single protocol.•Nucleic Acids ♦PicoGreen Fluorescence Updated the introduction section to enhance clarity and usability.•Reporter Assays ♦GeneBLAzer Improved readers suitability.♦Ready-To-Glow Secreted Luciferase Improved readers suitability.•Statistics ♦Z-Factor Determination Changed from FlexStation ® 3 Reader type to FI mode, and updated reader suitability to enhance the protocol’s usability. •TR-FRET♦HTRF_Competitive Added a note to indicate that this protocol is for use with Europium reagents only.♦HTRF_Immunoassay Added a note to indicate that this protocol is for use with Europium reagents only.♦HTRF_Protease Added a note to indicate that this protocol is for use with Europium reagents only.♦HTRF_Terbium Cryptate Added a new protocol for Terbium reagents from Cisbio.Note:In version 5.4.1, the protocol folder titled MDS Analytical Technologies was renamed to Molecular Devices .SoftMax Pro Software Version 5.4.2 Software Release Notesv5.4.2 3General Software Issues Addressed in SoftMax Pro Software v5.4.2The “M3 M4 M5 M5e ABS1” and “M3 M4 M5 M5e FL1” validation protocols are not included in v5.4.1Defect ID: FB 2570These two validation protocols are not included in the v5.4.1 release preventing the protocols from being used for validation.Resolution:The validation protocols are included in the v5.4.2 release.Impact of fix:This fix has no impact on current workflow or data.The LM1 protocol on a SpectraMax L reader produces out-of-range resultsDefect ID: FB 2355Running the LM1 protocol on a SpectraMax L reader produces out-of-range results due to incorrect calculations in the protocol.Resolution:The corrected calculations in the LM1 protocol now display values within the acceptable range.Impact of fix:If validation was performed using the uncorrected protocol, validation should be performed again using the corrected protocol. This fix has no other impact on current workflow or data.Performing a multi-well read on the SpectraMax L reader returns all the same values for each wellDefect ID: FB 2356When performing a multi-well read on the SpectraMax L reader , the software returns all the same values for each well if the system calibration is incorrect.Resolution:When system calibration is incorrect, the software has been enhanced to prompt the user that the calibration values are not acceptable.Impact of fix:This fix impacts workflow to require system calibration if the system has incorrect calibration values. If reads were performed using a system with incorrect calibration, some of the data might be invalid.SoftMax ® Pro Software Version 5.4.2 Software Release Notes4 v5.4.2Incorrect column formula for Vmax850 in Kinetic Baseline Noise groupThe Kinetic Baseline Noise evaluation done in the Helma validation protocols Plus Helma and M Series Helma have incorrect Vmax reduction formulas that can lead to failures of the result to meet the specified limits for the instruments.Defect ID: FB 2442Resolution:The Vmax reduction formulas in these protocols have been corrected for the 850nm and 405nm wavelengths.Impact of fix:If validation was performed using the uncorrected protocols, validation should be performed again using the corrected protocols. This fix has no other impact on current workflow or data.After multiple plate reads using a SpectraMax L reader, some of the data is not being displayedDefect ID: FB 2289After multiple plate reads using a SpectraMax L reader , some of the data is not being displayed when the software retains data from previous reads.Resolution:The software is now forcing a recalculation in the background which enhances the capability to display all the calculated data.Impact of fix:This fix has no impact on current workflow. If multiple plate reads were performed using v5.4.1, some of the data might be invalid.Exported data in .xml format when Plate kinetic data contains fewer than 96 wells does not contain all the dataDefect ID: FB 2304When exporting data in .xml format from Plate kinetic data that contains fewer than 96 wells, some of the data is not included in the exported .xml file.Resolution:The exported .xml file contains plate kinetic data for all the selected wells.Impact of fix:If incomplete data was exported using v5.4.1, the data can be exported correctly from the saved data file using v5.4.2. The fix has no other impact on current workflow or data.After a reading in GxP, the saved data file does not retain the “read by” informationDefect ID: FB 2082After performing a read using SoftMax Pro GxP Software, the saved data file does not retain the “read by” information.Resolution:The saved data includes the “read by” information.Impact of fix:This fix has no impact on current workflow or data.SoftMax Pro Software Version 5.4.2 Software Release Notesv5.4.2 5Fluorescence Polarization mode becomes disabled after a well scan read on a FlexStation 3 readerDefect ID: FB 1801After performing a well scan read on a FlexStation 3 reader , the Fluorescence Polarization (FP) mode becomes disabled.Resolution:After a well scan read, the Fluorescence Polarization mode is enabled.Impact of fix:This fix has no impact on current workflow or data.How to Update to SoftMax Pro Software v5.4.2Within-version updates (such as from v5.4) are provided online at no charge to customers who have registered their previous software version with Molecular Devices. Please visit the SoftMax Pro Software home page for more information about registering your products. You will need your software serial number to complete the process./softmax Note:To upgrade from version 4.x or older , please contact your local Molecular Devices representative.This document is provided to customers who have purchased Molecular Devices, Inc. (“Molecular Devices”) equipment, software, reagents, and consumables to use in the operation of such Molecular Devices equipment, software, reagents, and consumables. This document is copyright protected and any reproduction of this document, in whole or any part, is strictly prohibited, except as Molecular Devices may authorize in writing.Software that may be described in this document is furnished under a license agreement. It is against the law to copy, modify, or distribute the software on any medium, except as specifically allowed in the license agreement. Furthermore, the license agreement may prohibit the software from being disassembled, reverse engineered, or decompiled for any purpose.Portions of this document may make reference to other manufacturers and/or their products, which may contain parts whose names are registered as trademarks and/or function as trademarks of their respective owners. Any such usage is intended only to designate those manufacturers' products as supplied by Molecular Devices for incorporation into its equipment and does not imply any right and/or license to use or permit others to use such manufacturers' and/or their product names as trademarks.Molecular Devices makes no warranties or representations as to the fitness of this equipment for any particular purpose and assumes no responsibility or contingent liability, including indirect or consequential damages, for any use to which the purchaser may put the equipment described herein, or for any adverse circumstances arising therefrom.For research use only. Not for use in diagnostic procedures.Product manufactured by Molecular Devices, Inc.1311 Orleans Drive, Sunnyvale, California, United States of America 94089.Molecular Devices, Inc. is ISO 9001 registered.© 2011 Molecular Devices, Inc.All rights reserved.Printed in the USA.The trademarks mentioned herein are the property of Molecular Devices, Inc. or their respective owners. These trademarks may not be used in any type of promotion or advertising without the prior written permission of Molecular Devices, Inc.。
In this guide, you will be able to learn the most important things about this release wave. These will help you plan to onboard the release updates with confidence.T op things to knowNew capability highlightsThe 2019 release wave 2, brings to market significant new services and capabilities to enable digital transformation for businesses. For Microsoft Flow, these new capabilities include: •Microsoft Flow with AI Builder brings the power ofMicrosoft AI through a point-and-click experience. You can now build AI without knowing programming or datascience expertise to easily automate processes and predict outcomes to improve business performance.•Business process flow immersive experiences means you can create an experience fully dedicated to a single business process and that’s is fully customizable.•Flows that use other solution components will enable you to take full advantage of the new types of components that are added to a solution.•Running flows from a geofence to trigger a flow when a mobile device enters or leaves a location range.Key milestonesGet prepared to onboard the new 2019 release wave 2 updates with confidence. Early access of the release wave, October update will start on August 2nd , 2019 and will be generally available on October 1st , 2019.For Microsoft Flow administratorsEnd-user impacting features should be reviewed by Microsoft Flow administrators. This facilitates release changemanagement and enables successful onboarding of new capabilities released to market. Look for all features tagged “End users, automatically” in the release plan.2019 release wave 2October 2019-March 2020Watch the release overview videoGet an overview of the new capabilities and enhancements to Microsoft Flow.Visit: aka.ms/ROGMF19RW2ROVRead the release planExplore the entire set of new capabilities planned for 2019 release wave 2.Visit: aka.ms/ROGMF19RW2RPOnboard new capabilities with confidencePrepare to onboard the new capabilities in your production deployment by watching the deep-dive video series for Microsoft Flow.Coming soon!Join the Microsoft Flow communityVisit: aka.ms/ROGMF19RW2UCUnlock Next.New capability highlightsThese upcoming capabilities outline our commitment to deliver on our roadmap priorities. To learn more about the entire set of capabilities being delivered during this release wave, view the release plan: aka.ms/ROGMF19RW2RPBusiness process flow immersive experiencesOrganizations are increasingly using business process flows to model their key processes. There is now much more flexibility in how business processes are built and used. For example, business process flows can now be built in a completelystandalone fashion, so they don't need to rely on other records in the Common Data Service. Moreover, you can now use the new Form designer to fully customize the appearance of business process flows, including using custom controls with the PowerApps Control Framework.Microsoft Flow with AI BuilderAI Builder (preview) is a new Microsoft Power Platform capability for teams with the business expertise to easily automate processes and predict outcomes to improve business performance. AI Builder is a turnkey solution that brings the power of Microsoft AI through a point-and-click experience. You can now build AI without knowing programming or data science. Using AI is made even easier with integration directly into PowerApps and Microsoft Flow.2019 release wave 2October 2019-March 2020Watch the overview video: aka.ms/ROGMF19RW2ROV1Watch the overview video: aka.ms/ROGMF19RW2ROV2Flows that use other solution componentsThe Microsoft Power Platform is continuing to adopt a single packaging mechanism. We're continuing to close gaps, so that any solution component has consistent behavior and pre-existing user workflows aren't negatively affected. Combined with enhancements to our developer tooling, you can manage all customizations in source control, enabling continuous integration and continuous delivery with fully automated build and release pipelines.You will be able to take full advantage of the new types of components that are added to a solution. The latest features, like canvas apps, flows, connections, custom connectors, and environment variables, will now follow the full end-to-end lifecycle, including:•Canvas apps with flows are supported within solutions.•Add custom connectors that were not originally created from a solution.•Connections for flows are created automatically when importing solutions.•Dependencies are tracked and enforced for new solution components.•Flows natively consume environment variables.In addition, flows in solutions are easier to discover and edit. They are located under Team Flows and no longer need to be turned off before editing.Watch the overview video: aka.ms/ROGMF19RW2ROV3New capability highlights2019 release wave 2October 2019-March 2020Key milestonesPrepare to onboard the new release update with confidence.Early access for the 2019 release wave 2,October update will start on August 2nd , 2019. General availability is October 1st , 2019.June 10, 2019August 2, 2019October 1, 2019Release plan availableLearn about the new capabilities coming in the 2019 release wave 2 (October 2019 –March 2020) across Dynamics 365 and the Power Platform.General availabilityProduction deployment for 2019 release wave 2, October update begins.Early access availableTry the new capabilities before they get enabled automatically for end-users as part of the 2019 release wave 2, October update.Running flows from a geofenceIn May, we previewed the ability to trigger a flow from the Microsoft Flow app for iOS and Android. The feature allows users to create a location range that triggers a flow when a mobile device enters or leaves the location range. This enables certain flows to automatically run, without manual activation from the user, further adding to the mobile application's efficiency.With general availability, we are adding more configuration options, including the ability to trigger a flow on either an entry or an exit, but not both.Watch the overview video: aka.ms/ROGMF19RW2ROV4Update process and global rolloutEarly accessApplication administrators can try out new capabilities in a non-production deployment prior to receiving release updates in their production deployment starting on August 2nd , 2019. Learn how to enable access to these enhancements with confidence. Visit: aka.ms/EarlyAccessFeaturesGeneral availabilityThe 2019 release wave 2, October update will be deployed in production environment for all customer starting October 1st, 2019. For more information on specific timelines, please visit: aka.ms/ROGMF19RW2GAT2019 release wave 2October 2019-March 2020For Microsoft Flow administratorsEnd-user impacting features to the user experience enabled automaticallyEnd-user impacting features should be reviewed by application administrators. This facilitates release change management and enables successful onboarding of new capabilities released to market. For the complete list, look for all features tagged “End users, automatically” in the release plan.Features that must be enabled by application administratorsThis release wave contains features that must be enabled or configured by administrators, makers, or business analysts to be available for their end users. For the complete list, look for all features tagged “End users by admins, makers, or analysts” i n the release plan.Get the most out of Microsoft FlowRelease planaka.ms/ROGMF19RW2RPView all capabilities included in this release.Release calendaraka.ms/ROGMF19RW2RCKnow important release milestones.Product releasesaka.ms/ROGMF19RW2PRStay up to date on product updates.Pricingaka.ms/ROGMF19RW2LGImprove your understanding of how to license Microsoft Flow.aka.ms/ROG19RW2FeedbackIs this guide helpful?©2019Microsoft Corporation.All rights reserved.This document is for informational purposes only.MICROSOFT MAKES NO WARRANTIES,EXPRESS,IMPLIED,OR STATUTORY,AS TO THE INFORMATION IN THIS DOCUMENT.Some examples are for illustration only and are fictitious.No real association is intended or inferred.User community aka.ms/ROGMF19RW2UCEngage with Microsoft Flow experts and peers in the community.Microsoft Flow tutorialsaka.ms/FlowTutorialsLearn much more about Microsoft Flow.Release deep-dive videos aka.ms/ROGMF19RW2DDVSGet an in-depth look of the new capabilities.Product documentationaka.ms/ROGMF19RW2PDFind documentation for Microsoft Flow.。
Mellanox Switch-IB™ 2 Firmware Release NotesRev 15.1460.0162NOTE:THIS HARDWARE, SOFTWARE OR TEST SUITE PRODUCT (PRODUCT(S)) AND ITS RELATED DOCUMENTATION ARE PROVIDED BY MELLANOX TECHNOLOGIES AS-ISﺴWITH ALL FAULTS OF ANY KIND AND SOLELY FOR THE PURPOSE OF AIDING THE CUSTOMER IN TESTING APPLICATIONS THAT USE THE PRODUCTS IN DESIGNATED SOLUTIONS. THE CUSTOMER'S MANUFACTURING TEST ENVIRONMENT HAS NOT MET THE STANDARDS SET BY MELLANOX TECHNOLOGIES TO FULLY QUALIFY THE PRODUCT(S) AND/OR THE SYSTEM USING IT. THEREFORE, MELLANOX TECHNOLOGIES CANNOT AND DOES NOT GUARANTEE OR WARRANT THAT THE PRODUCTS WILL OPERATE WITH THE HIGHEST QUALITY. ANY EXPRESS OR IMPLIED WARRANTIES, INCLUDING, BUT NOT LIMITED TO, THE IMPLIED WARRANTIES OF MERCHANTABILITY, FITNESS FOR A PARTICULAR PURPOSE AND NONINFRINGEMENT ARE DISCLAIMED. IN NO EVENT SHALL MELLANOX BE LIABLE TO CUSTOMER OR ANY THIRD PARTIES FOR ANY DIRECT, INDIRECT, SPECIAL, EXEMPLARY, OR CONSEQUENTIAL DAMAGES OF ANY KIND (INCLUDING, BUT NOT LIMITED TO, PAYMENT FOR PROCUREMENT OF SUBSTITUTE GOODS OR SERVICES; LOSS OF USE, DATA, OR PROFITS; OR BUSINESS INTERRUPTION) HOWEVER CAUSED AND ON ANY THEORY OF LIABILITY, WHETHER IN CONTRACT, STRICT LIABILITY, OR TORT (INCLUDING NEGLIGENCE OR OTHERWISE) ARISING IN ANY WAY FROM THE USE OF THE PRODUCT(S) AND RELATED DOCUMENTATION EVEN IF ADVISED OF THE POSSIBILITY OF SUCH DAMAGE.Mellanox Technologies350 Oakmead Parkway Suite 100Sunnyvale, CA 94085U.S.A.Tel: (408) 970-3400Fax: (408) 970-3403© Copyright 2017. Mellanox Technologies Ltd. All Rights Reserved.Mellanox®, Mellanox logo, Accelio®, BridgeX®, CloudX logo, CompustorX®, Connect-IB®, ConnectX®, CoolBox®, CORE-Direct®, EZchip®, EZchip logo, EZappliance®, EZdesign®, EZdriver®, EZsystem®, GPUDirect®, InfiniHost®, InfiniBridge®, InfiniScale®, Kotura®, Kotura logo, Mellanox CloudRack®, Mellanox CloudXMellanox®, Mellanox Federal Systems®, Mellanox HostDirect®, Mellanox Multi-Host®, Mellanox Open Ethernet®, Mellanox OpenCloud®, Mellanox OpenCloud Logo®, Mellanox PeerDirect®, Mellanox ScalableHPC®, Mellanox StorageX®, Mellanox TuneX®, Mellanox Connect Accelerate Outperform logo, Mellanox Virtual Modular Switch®, MetroDX®, MetroX®, MLNX-OS®, NP-1c®, NP-2®, NP-3®, NPS®, Open Ethernet logo, PhyX®, PlatformX®, PSIPHY®, SiPhy®, StoreX®, SwitchX®, Tilera®, Tilera logo, TestX®, TuneX®, The Generation of Open Ethernet logo, UFM®, Unbreakable Link®, Virtual Protocol Interconnect®, Voltaire® and Voltaire logo are registered trademarks of Mellanox Technologies, Ltd.All other trademarks are property of their respective owners.For the most updated list of Mellanox trademarks, visit /page/trademarksTable of ContentsTable of Contents . . . . . . . . . . . . . . . . . . . . . . . . . . . . . . . . . . . . . . . . . . . . . . . . 3 List of Tables . . . . . . . . . . . . . . . . . . . . . . . . . . . . . . . . . . . . . . . . . . . . . . . . . . . . 4 Chapter 1 Overview . . . . . . . . . . . . . . . . . . . . . . . . . . . . . . . . . . . . . . . . . . . . . . 61.1 Supported Systems. . . . . . . . . . . . . . . . . . . . . . . . . . . . . . . . . . . . . . . . . . . . . 61.2 Firmware Interoperability . . . . . . . . . . . . . . . . . . . . . . . . . . . . . . . . . . . . . . . 61.3 Supported EDR Cables and Modules. . . . . . . . . . . . . . . . . . . . . . . . . . . . . . . 61.4 Firmware Upgrade . . . . . . . . . . . . . . . . . . . . . . . . . . . . . . . . . . . . . . . . . . . . . 71.5 PRM Revision Compatibility. . . . . . . . . . . . . . . . . . . . . . . . . . . . . . . . . . . . . . 7 Chapter 2 Changes and New Features in Rev 15.1460.0162 . . . . . . . . . . . . . . 8 Chapter 3 Known Issues . . . . . . . . . . . . . . . . . . . . . . . . . . . . . . . . . . . . . . . . . . . 9 Chapter 4 Bug Fixes History . . . . . . . . . . . . . . . . . . . . . . . . . . . . . . . . . . . . . . . 11 Chapter 5 Firmware Changes and New Feature History. . . . . . . . . . . . . . . . . 12List of TablesTable 1:Release Update History. . . . . . . . . . . . . . . . . . . . . . . . . . . . . . . . . . . . . . . . . . . . . . . .5 Table 2:Supported Systems . . . . . . . . . . . . . . . . . . . . . . . . . . . . . . . . . . . . . . . . . . . . . . . . . . .6 Table 3:Firmware Interoperability. . . . . . . . . . . . . . . . . . . . . . . . . . . . . . . . . . . . . . . . . . . . . .6 Table 4:Qualified EDR Cables . . . . . . . . . . . . . . . . . . . . . . . . . . . . . . . . . . . . . . . . . . . . . . . . . .6 Table 5:Firmware Rev 15.1460.0162 Changes and New Features . . . . . . . . . . . . . . . . . . . .8 Table 6:Known Issues . . . . . . . . . . . . . . . . . . . . . . . . . . . . . . . . . . . . . . . . . . . . . . . . . . . . . . . .9 Table 7:Bug fixes History. . . . . . . . . . . . . . . . . . . . . . . . . . . . . . . . . . . . . . . . . . . . . . . . . . . . .11 Table 8:History of Major Changes and New Features . . . . . . . . . . . . . . . . . . . . . . . . . . . . .12Release Update HistoryTable 1 - Release Update HistoryRelease Date Description Rev 15.1460.0162August 8, 2017Added SHARP bug fix.Rev 15.1430.0160July 31, 2017Added SHARP known issue.June 08, 2017Initial release.1OverviewThese are the release notes for the Switch-IB™ 2 firmware, Rev 15.1460.0162. This firmware complements the Switch-IB™ 2 silicon architecture with a set of advanced features, allowing easy and remote management of the switch.1.1Supported SystemsThis firmware supports the devices and protocols listed in Table 2. For the most updated list of switches supported, visit the Firmware Download pages on . 1.2Firmware InteroperabilityTo raise links with platforms based on the following ICs, these minimum requirements must be met:1.3Supported EDR Cables and ModulesTable 4presents the qualified EDR cables for externally managed EDR switch systems.Firmware Rev 15.1460.0162 is compatible with MFT tools v4.5.0-31. Using older versions of MFT tools causes failure during image creation.Table 2 - Supported SystemsDevice Part NumberDescriptionMSB7890Switch-IB™ 2 based EDR InfiniBand switch; 36 QSFP28 ports; externally managedTable 3 - Firmware InteroperabilityHCA/SwitchFirmware VersionSwitch-IB™ v11.1200.0102SwitchX®-2v9.2.8000ConnectX-5 / ConnectX-5 Ex v16.18.1000 “Beta”ConnectX-4v12.18.2000ConnectX-4 Lx v14.18.1000ConnectX®-3 (Pro)v2.40.7000ConnectX®-2v2.9.1200Connect-IB®v10.16.1020Table 4 - Qualified EDR CablesMellanox P/NDescriptionCable LengthMCP1600-E00A a Mellanox® passive copper cable, up to 100Gb/s, QSFP28, LSZH 0.5m MCP1600-E001aMellanox® passive copper cable, up to 100Gb/s, QSFP28, LSZH1mTable 4 - Qualified EDR CablesMellanox P/N Description Cable Length MCP1600-E01A a Mellanox® passive copper cable, up to 100Gb/s, QSFP28, LSZH 1.5mMCP1600-E002a Mellanox® passive copper cable, up to 100Gb/s, QSFP28, LSZH2mMCP1600-E02A Mellanox® passive copper cable, up to 100Gb/s, QSFP28, LSZH 2.5mMCP1600-E003Mellanox® passive copper cable, up to 100Gb/s, QSFP28, LSZH3mMCP1600-E004Mellanox® passive copper cable, up to 100Gb/s, QSFP28, LSZH4mMFA1A00-E005a Mellanox® active fiber cable, up to 100Gb/s, QSFP285mMFA1A00-E010a Mellanox® active fiber cable, up to 100Gb/s, QSFP2810mMFA1A00-E015a Mellanox® active fiber cable, up to 100Gb/s, QSFP2815mMFA1A00-E050Mellanox® active fiber cable, up to 100Gb/s, QSFP2850mMFA1A00-E100Mellanox® active fiber cable, up to 100Gb/s, QSFP28100ma.Forward Error Correction (FEC) is deactivated on this cable.Please refer to the LinkX™ Cables and Transceivers webpage (/prod-ucts/interconnect/cables-configurator.php) for the full list of supported cables and transceivers.1.4Firmware UpgradeFirmware upgrade may be performed directly from any previous version to this version. Toupgrade firmware, please refer to the Mellanox Firmware Tools (MFT) package at:/page/management_tools1.5PRM Revision CompatibilityFirmware Rev 15.1460.0162 complies with the Mellanox Switches Programmer’s ReferenceManual (PRM), Rev 1.45 or later.Changes and New Features in Rev 15.1460.01622Changes and New Features in Rev 15.1460.0162Table 5 - Firmware Rev 15.1460.0162 Changes and New FeaturesCategory DescriptionSHARP Bug affecting SHARP functionality was fixed, see “Bug Fixes History” on page 11.3Known IssuesTable 6 describes known issues in this firmware release and possible workarounds.Table 6 - Known IssuesInternal Ref.Issue955641Description: In VL arbitration, VL_HIGH_LIMIT isn't affecting VL Arbiter as expected. Workaround: VL Arbitration Table should be set using only the low priority VL Arbitra-tion Table.Keywords: General982005Description: When connecting 6 & 7 meters, link may raise DDR instead of QDR against GD4000/IS5000 switches.Workaround: N/AKeywords: Link-Description: Congestion control is not supported. Workaround: N/AKeywords: General-Description: VL2VL mode is not supported from an aggregation port to an egress port. Workaround: N/AKeywords: General-Description: FDR link may rise with symbol errors on optic EDR cable longer than 30M. Workaround: N/AKeywords: Link-Description: Port LEDs do not flash on system boot. Workaround: N/AKeywords: LEDs-Description: Link width reduction is not supported in this release. Workaround: N/AKeywords: Power Management-Description: If QDR is not enabled for the switch's InfiniBand Port Speed while connected to ConnectX-3/Pro or Connect-IB® FDR adapters or to SwitchX® /SwitchX®-2 FDR switches, links will rise at SDR or DDR (even if FDR is enabled).Workaround: Enable QDR (in addition to FDR) when connecting to peer ports running at FDRKeywords: Interoperability-Description: Force FDR10 is not supported on EDR products.Workaround: To raise link with an FDR10 device, make sure all speeds, including EDR, are configured on Switch-IB.Keywords: Interoperability-Description: Adaptive routing and adaptive routing notification do not support 3D Torus topologies.Workaround: N/AKeywords: NetworkTable 6 - Known IssuesInternal Ref.IssueBug Fixes History4Bug Fixes HistoryTable 7 - Bug fixes HistoryInternal Ref.Issue1089528Description: SHARP not functional in case of groups larger than 14 members Keywords: SHARPDiscovered in Release: 15.1430.0160Fixed in Release: 15.1460.0162964972Description: In info block 29 (Thermal algorithm values): DELTA TEMP REPORTING > '4' will be considered '1'. DELTA TEMP REPORTING = 1,2,3 returns no issues. Keywords: Thermal ManagementDiscovered in Release: 15.1310.0138Fixed in Release: 15.1310.0150-Description: VL arbitration does not distribute traffic as expected in case of multiple VLs Keywords: GeneralDiscovered in Release: 15.1200.0102Fixed in Release: 15.1300.0100-Description: In rare cases, FDR links may rise with errors. (Improved BER performance.) Keywords: LinkDiscovered in Release: 15.1.1002Fixed in Release: 15.1300.00925Firmware Changes and New Feature HistoryTable 8 - History of Major Changes and New FeaturesCategory Description15.1430.0160General Added support for Adaptive Routine (AR) optimizations with ConnectX-5 (RC Mode)Link Added support for Force EDR on Switch IB systems as described in MellanoxSwitches Programmer's Reference Manual (PRM) under PTYS Register15.1400.0102General Added support for IB telemetry, Congestion Monitoring-Thresholds (See MellanoxSwitches PRM (Programmer's Reference Manual) - section 9.7 - Congestion Teleme-try).General Added support for Additional Port Counters Extended (See IB Specification V ol 1-Release-1.3, MgtWG 1.3 Errata).General Added support for IB Router Port (Port 37) Counters (See IB Specification V ol 1-Release-1.3).15.1300.0126General Added support for burst/traffic histograms (described in Vendor Specific MAD PRMRev 1.3, Section 3.33 – Mellanox Performance Histograms)Link Added support for Port PHY Link Mode (PLLM) register (For register description, SeeSwitch PRM - PPLM - Port Phy Link Mode)Link Added support for QSFP copper cables which do not publish attenuation in the mem-ory map15.1200.0102General Added support for SHArP performance improvements (UD, Group trimming)General Added support for fast flash burn with new register MFMC and updates to current flashburn register MFPA (according to Section 3.9 of the Switches PRM)Link Added support for PRBS generation tool (according to registers PPTT and PPRT regis-ters in Section 7.14 of the Switches PRM)Link Added support for new PHY statistical counters group to register PPCNT (according toSection 7.14 of the Switches PRM)15.1100.0072General Added support for SHArPSystem Manage-Added system MKey supportmentAdded support of IB NodeDescription SetChassis Manage-mentModules Added support for reading from pages with password through cable info MADFor more information, please refer to register MCIA in the Switch PRM and theCableinfo VS-MAD15.0400.0064General First beta-level releaseGeneral Added support for port mirroringGeneral Added support for SHArPGeneral Improved support for adaptive routing, adaptive routing notification, fault routing, fault routing notificationLink Removed out-of-the-box Forward Error Correction (FEC), reaching 90ns latency, on Mellanox GA level AOCs equal to or shorter than 30m.•MFA1A00-EXXX: 3, 5, 10, 15, 20, 30Link Added support for FDR10 speedChassis Manage-ment Added support for power supply monitoring (for more information please refer to the MSPS register in the SwitchX Family Programmer’s Reference Manual)Table 8 - History of Major Changes and New Features Category Description。
天工开物众包平台release2版本更新说明
一平台用户端
新增功能
1.首页增加联系方式的电话号码、二维码展示
2.用户注册成功后增加修改昵称的引导功能
3.我得团队加“加入已有团队”按钮
4.团队管理增加解散团队、发布队内公告、成员查看队内公告功能
5.团队综合能力展示图增加得分说明
6.项目发布增加公开、邀请发布功能
7.项目各环节节点增加短信提醒(报名、报名截止、项目变更、项目完成)
8.设计师资质logo、业主主页展示logo、设计师主页展示logo、项目logo、团队logo
增加备选库
9.增加投诉与建议功能
10.增加给运营端留言功能
调整功能
1.首页站内信图标未读条数增加自动刷新功能
2.首页设计团队,申请加入团队时增加填写“备注”
3.设计师资质信息增加元素身份证正反面、毕业证书、学位证书、工作经历
4.设计师资质信息-专业增加“水保”,“节能”,“财务分析”,“概(预)算”专业,去
掉“地址”,“土建”,“技经”
5.设计师资质认证中项目经历-类型增加“其他”选项
6.设计师可同时申请加入多个团队
7.团队管理页面增加申请加入的数量提示
8.项目类型增加“专项设计”、“其他”类型
9.项目发布时项目类型修改为可多选
10.招募中的项目,报名按钮位置向上调整
11.业主选定团队时商务报价显示=原值*0.4和团队能力得分显示=原值*0.6
12.设计师的团队不能报名自己发布的项目
13.站内信打开方式调整
二运营管理端
新增功能
1.增加欢迎页面及快捷方式
2.增加主页显示设置-轮播图展示设置、热门项目设置、团队展示设置、设计师及大咖
设置功能
3.增加修改项目状态、修改项目每个类型对象的执行阶段功能
4.平台用户管理功能增加重置密码功能、维护用户设计师及业主资质信息功能
5.资质审核增加查看上一版本功能
6.增加管理端人员管理、角色管理、权限维护及可配置显示菜单功能
7.增加项目变更功能
8.项目增加挂起功能
9.增加项目评价管理功能
10.增加投诉与建议处理功能
11.增加给平台用户发送站内信功能
调整功能
1.发布项目-企业名称选择时可输入文字联想查询业主名称
2.项目编号生成规则调整,无法区分光或风的项目使用SJ作为标识
3.当前菜单点击可刷新页面
4.待审核列表菜单增加待处理数据条数提示
5.项目完成时系统给用户发短信提醒评价。