IC-F7000快速说明书
- 格式:doc
- 大小:257.02 KB
- 文档页数:17
F7000系列安装手册一、安装注意事项:1、走线要强、弱电分离并保持一定距离,同时加屏蔽线。
如起弧线和弧压检测线归为强电,信号线如485和CAN、电机脉冲线、分压板的ARC正负输出到调高器的线归为弱电。
强电加屏蔽线可以抑制自身干扰外放,弱电加屏蔽线可以防止外部干扰进入。
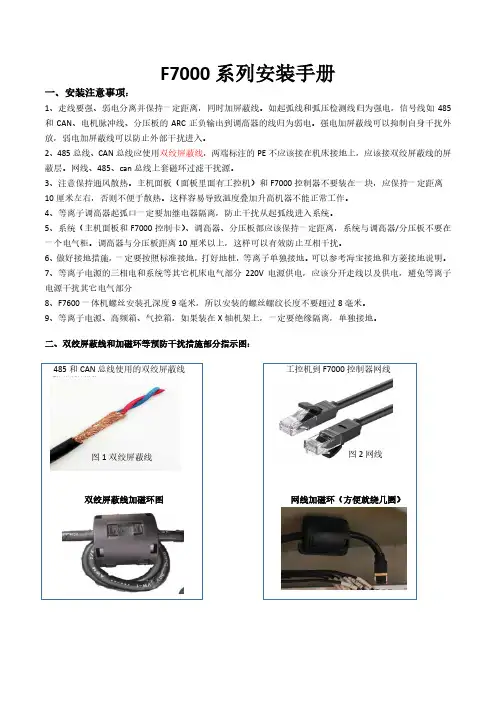
2、485总线、CAN总线应使用双绞屏蔽线,两端标注的PE不应该接在机床接地上,应该接双绞屏蔽线的屏蔽层。
网线、485、can总线上套磁环过滤干扰源。
3、注意保持通风散热。
主机面板(面板里面有工控机)和F7000控制器不要装在一块,应保持一定距离10厘米左右,否则不便于散热。
这样容易导致温度叠加升高机器不能正常工作。
4、等离子调高器起弧口一定要加继电器隔离,防止干扰从起弧线进入系统。
5、系统(主机面板和F7000控制卡)、调高器、分压板都应该保持一定距离,系统与调高器/分压板不要在一个电气柜。
调高器与分压板距离10厘米以上,这样可以有效防止互相干扰。
6、做好接地措施,一定要按照标准接地,打好地桩,等离子单独接地。
可以参考海宝接地和方菱接地说明。
7、等离子电源的三相电和系统等其它机床电气部分220V电源供电,应该分开走线以及供电,避免等离子电源干扰其它电气部分8、F7600一体机螺丝安装孔深度9毫米,所以安装的螺丝螺纹长度不要超过8毫米。
9、等离子电源、高频箱、气控箱,如果装在X轴机架上,一定要绝缘隔离,单独接地。
二、双绞屏蔽线和加磁环等预防干扰措施部分指示图:485和CAN总线使用的双绞屏蔽线图1双绞屏蔽线图2网线双绞屏蔽线加磁环图网线加磁环(方便就绕几圈)注:以下接线全部使用(双绞屏蔽线用X标注和加磁环用标注),网线加磁环。
三、PCB各种模式与配置接线图:F7000 与FCB1200PC、F1627D/S 、F1610电容调高接线说明。
1、双割炬主板(FCB1200PC):板子编号说明,根据F7000接线只说明相关部分编号。
2号接F7000 输出IO 口,3号接为输出口主要接F1627D/S 、F1610调高器等配件,7号是CAN总线,8号为模式选择拨码开关,9是电源输入口。
ICOMIC-7000功能细说(一)来源:《无线电》杂志 2009.01 作者:杨法(BD4AAF)自从ICOM公司的IC-7000多功能电台上市以来一直备受业余无线电爱好者的关注。
IC-7000较传统通信电台有太多的创新,这对无论是刚入门的新手还是年过花甲的资深HAM都产生了巨大的吸引力。
IC-7000有两个最大的卖点就是TFT彩屏显示和IF DSP技术的应用,其他数字录音、内置RTTY解码、全遥控手持话筒、频谱显示、HF/VHF/UHF 多频段多模式操作、机头分离、视频输出、SWR图形显示、电视接收(有版本限制)等更是举不胜举。
这也注定了IC-7000是一部多功能、很耐玩的电台。
IC-7000经过在HAM界数年的实战,有很高的购入比例,也有较高的换手率。
对于该机所提供的功能大家基本比较满意,对其100W发射性能也没有多大异议,对其音质问题各人看法不同,这也与话筒特性和设置有关,目前争议比较大的是IC-7000的接收性能。
很多业余无线电爱好者在购买IC-7000前通过产品宣传和有限知识的了解,都默认为这部花费近万元的小电台是一部融合了目前最新数字化科技的高档、高性能产品,其性能在传统电台上有质的飞跃。
随着爱好者对该机器使用的深入和与其他电台对比的机会增多,我们可以客观地来重新认识一下这部电台的特性。
◆外观与特点从外观体积上来看,IC-7000是一部定位于车载,并可以作为便携电台使用的“小而全”的电台(尽管没有内置天调),体积较传统标准体积的基地式电台小得多,加上机头分离功能(需要另外购买专用的机头分离线,由于其接口是专用的,所以不能像FT-857D、IC-2720H那样轻易用水晶头自制),非常适合安装在各种中小型车辆上。
说到天调,绝大部分中小体积电台所装备的内置自动天调调节范围都不大,大部分匹配范围在16.5~150Ω,也就是说可以改善SWR<3的天线系统,与一些室外长线自动天调和手动天调的调节范围相差甚远,所以也被称谓“锦上添花”型的天调,主要是用来扩展谐振型天线的工作带宽。
ICOM IC-R7000简易操作指南2010-01-06 04:10:55| 分类:接收机| 标签:|字号大中小订阅一、主要旋钮、按键及开关说明1、速度钮SPEED,用于扫描速度的调整,右旋到底扫描速度最大。
2、延时方式钮DELAY,用于扫描过程中检测到信号时停留延时方式。
OFF-信号出现多久就暂停多久;5-停留5秒钟;15-停留15秒钟;∞-只要检测到信号就停止扫描。
3、扫描键盘SCAN START/STOP,可设置六种扫描方式:重点扫描、频段扫描、选择信道扫描、同种制式扫描、所有信道扫描和自动扫描存贮。
①、重点扫描键PRIO,可在当前信道频率和重点设置的频率这两个频率间进行扫描。
②、频段扫描键PROG,设置了低频和高频后,则以TS旋钮设置的步进反复进行扫描。
③、选择信道扫描键SEL-M,在选择了的各个信道中进行扫描。
④、同种制式信道扫描键MODE,扫描与当前制式相同的各个信道。
⑤、所有信道扫描键MEMORY,扫描所有的存贮了的信道。
⑥、自动扫描存贮键AUTO-M,根据频段扫描中设置的高低频率,扫描并自动存贮到CH80~99信道中,因此CH80~99信道不作为常规存贮信道用。
4、衰减键ATT,天线衰减器,按下为衰减。
实际工作中一般不需衰减,不用按下此键。
5、频段键1GHz,按下此键则转换到1GHz以上的频段,最高监测频率可达1999.999MHz。
6、锁键LOCK,锁定键。
7、信道钮MEMORY CH,选择信道旋钮。
8、存写键WRITE,将频率存写入信道。
9、清除键CLEAR,清除当前信道内的频率数据。
10、确定键ENT,输入频率及其调制方式时的确定键。
11、步进钮TS(kHz),频率步进钮,频段扫描时用,一般设为25 kHz。
12、音量钮AF GAIN,旋至合适位置即可。
13、静噪钮SQUELCH,扫描时要旋至合适位置。
14、FM频段开关(在背面板),因为是拆机下来的机子,有些内部线路可能有改动,对FM和FMn调制方式有影响,因此要根据实际情况将此开关拨至FM(1)或FM(2)档位,才能正常监听FM或FMn的信号。
ICOMIC-7000功能细说(一)来源:《无线电》杂志 2009.01 作者:杨法(BD4AAF)自从ICOM公司的IC-7000多功能电台上市以来一直备受业余无线电爱好者的关注。
IC-7000较传统通信电台有太多的创新,这对无论是刚入门的新手还是年过花甲的资深HAM都产生了巨大的吸引力。
IC-7000有两个最大的卖点就是TFT彩屏显示和IF DSP技术的应用,其他数字录音、内置RTTY解码、全遥控手持话筒、频谱显示、HF/VHF/UHF 多频段多模式操作、机头分离、视频输出、SWR图形显示、电视接收(有版本限制)等更是举不胜举。
这也注定了IC-7000是一部多功能、很耐玩的电台。
IC-7000经过在HAM界数年的实战,有很高的购入比例,也有较高的换手率。
对于该机所提供的功能大家基本比较满意,对其100W发射性能也没有多大异议,对其音质问题各人看法不同,这也与话筒特性和设置有关,目前争议比较大的是IC-7000的接收性能。
很多业余无线电爱好者在购买IC-7000前通过产品宣传和有限知识的了解,都默认为这部花费近万元的小电台是一部融合了目前最新数字化科技的高档、高性能产品,其性能在传统电台上有质的飞跃。
随着爱好者对该机器使用的深入和与其他电台对比的机会增多,我们可以客观地来重新认识一下这部电台的特性。
◆外观与特点从外观体积上来看,IC-7000是一部定位于车载,并可以作为便携电台使用的“小而全”的电台(尽管没有内置天调),体积较传统标准体积的基地式电台小得多,加上机头分离功能(需要另外购买专用的机头分离线,由于其接口是专用的,所以不能像FT-857D、IC-2720H那样轻易用水晶头自制),非常适合安装在各种中小型车辆上。
说到天调,绝大部分中小体积电台所装备的内置自动天调调节范围都不大,大部分匹配范围在16.5~150Ω,也就是说可以改善SWR<3的天线系统,与一些室外长线自动天调和手动天调的调节范围相差甚远,所以也被称谓“锦上添花”型的天调,主要是用来扩展谐振型天线的工作带宽。

iCAP6000系列ICP培训教程iCAP6000系列ICP初级操作在初级操作中, 我们主要是了解和掌握最基本的分析全过程,其中包括如何开机预热, 编辑基本分析方法, 点燃等离子体,以及如何分析样品,处理结果,打印报告等, 从而完成一些简单的日常分析任务。
一、日常操作1. 开机预热2. 制定分析方案3. 编辑分析方法4. 点火操作5. 谱线校准6. 建立标准曲线并分析样品7. 熄火并返回待机状态8. 完全关机二.常见故障与排除三.日常维护一. 日常操作1、开机预热1)确认有足够的氩气用于连续工作。
(储量≥1瓶)2)确认废液收集桶有足够的空间用于收集废液。
3)打开稳压电源开关,检查电源是否稳定,观察约1分钟。
4)打开氩气并调节分压在0.60—0.70Mpa之间5)打开主机电源。
(左侧下方黑色刀闸)注意仪器自检动作。
此时光室开始预热。
6)打开电脑,待仪器自检完成后,双击“iTEVA”图标,进入操作软件主界面,仪器开始初始化。
2、制定分析方案1)确定样品是否适用于ICP分析。
ICP主要以常量和微量分析为主,在没有基体干扰的情况下,样品溶液中元素的含量一般不应小于5*DL(检出限),在有基体干扰的情况下,样品溶液中元素的含量一般不应小于5*5*DL。
2)确定样品分解方法(溶样方法)确保所测的元素能够完全分解,并溶解在溶液中。
尽可能用HNO3或HCL分解样品。
尽量不用H2SO4和H3PO4,会降低雾化效率。
如果用HF酸的话,一定要赶尽,以避免损坏雾化器和影响B、Na、Si、Al等元素的测定。
3)配制工作曲线(混标)浓度之间相差2—5倍一般用2—3点两个常见错误: a).所有分析元素的浓度都一致, 这样省事, 但不科学, 应该根据不同元素的浓度范围, 制定其相应的标准溶液浓度。
b).标准曲线点与点之间相隔太近, 如2, 4, 6, 8…,完全没有必要。
4)样品准备:样品必须消解彻底,不能有混浊, 否则必须先用滤纸过滤, 但不要抽滤对于标准雾化器,样品溶液中固溶物含量要求≤1.0%3、编辑分析方法1)操作软件(iTEV A)主窗口包括两个应用程序:1>分析2>报告生成2) 编辑分析方法:1>单击分析进入分析模块,单击方法→新建… ,选择所需的元素及其谱线。

日立F-7000荧光分光光度计简易操作步骤<一>开机顺序:(1) 接通电脑及打印机电源,进入Windows操作系统。
(2) 接通光度计左侧电源开关(POWER)约5秒钟后主机右上方绿色氙灯指示灯点亮,表示氙灯已经启辉工作。
(3) 双击电脑屏幕上FL Solutions 荧光分析快捷框,进入仪器操作界面。
<二>关机顺序:(4) 使用仪器操作软件退出操作系统并关闭氙灯。
(5) 保持主机通电10分钟以上最后关闭主机电源开关。
(目的是让灯室充分散热)<三> 波长扫描的简易操作:(Wavelength Scan)点击快捷栏“Method” 后,立即显示了分析方法(Analysis Method)的五个模块界面,分别为“常规”(General),“仪器条件”(Instrument),“监视界面”(Monitor),“处理”(Processing),“报告”(Report)。
下面详细介绍每个界面:(1)General (常规)*Measurement(测量方式)--------选择Wavelength (波长扫描)*Operator (操作者名)---------键入操作者性名*Insturment (仪器型号) ----------自动给出*Sampling (进样器类型) -------选用自动进样器后该项自动指定*Comments (注释表)-----------可输入简单注释说明* Use sample table(使用样品表)----(2) Instrument (仪器条件)*Scan mode (扫描方式) ---------- Excitation (激发波长扫描)Emission(发射波长扫描)Synchronous(同步扫描)*Data mode (数据方式)---------Fluorescence (荧光采集)Luminescence (发光采集)Phosphorescence(磷光采集)*EM WL (发射波长)------------输入范围 0nm, 200nm~900nm*EX Start WL (激发起始波长)---- 输入范围 200nm~890nm*EX End WL (激发终止波长)-----输入范围 210nm~900nm* EX WL (激发波长)-------------输入范围 0nm, 200nm~900nm*EM Start WL (发射起始波长)-----输入范围 200nm~890nm*EM End WL (发射终止波长)-----输入范围 210nm~900nm*Scan speed (扫描速度)-----------30,60,240,1200,2400,12000,30000,60000nm/min八挡可选(磷光扫描仅有三挡:30,60,240nm/min)*Delay (延迟时间)----------输入范围0~9999秒(重复测量时仅对第一次测量有效)*EX Slit (激发单元狭缝)-----------1, 2.5 ,5, 10, 20,五挡可选。
ICOM IC-R7000使用说明书一、主要旋钮、按键及开关说明1、速度钮SPEED,用于扫描速度的调整,右旋到底扫描速度最大。
2、延时方式钮DELAY,用于扫描过程中检测到信号时停留延时方式。
OFF‐信号出现多久就暂停多久;5‐停留5秒钟;15‐停留15秒钟;∞‐只要检测到信号就停止扫描。
3、扫描键盘SCAN START/STOP,可设置六种扫描方式:重点扫描、频段扫描、选择信道扫描、同种制式扫描、所有信道扫描和自动扫描存贮。
①、重点扫描键PRIO,可在当前信道频率和重点设置的频率这两个频率间进行扫描。
②、频段扫描键PROG,设置了低频和高频后,则以TS旋钮设置的步进反复进行扫描。
③、选择信道扫描键SEL ‐M,在选择了的各个信道中进行扫描。
④、同种制式信道扫描键MODE,扫描与当前制式相同的各个信道。
⑤、所有信道扫描键MEMORY,扫描所有的存贮了的信道。
⑥、自动扫描存贮键AUTO‐M,根据频段扫描中设置的高低频率,扫描并自动存贮到CH80~99信道中,因此CH80~99信道不作为常规存贮信道用。
4、衰减键ATT,天线衰减器,按下为衰减。
实际工作中一般不需衰减,不用按下此键。
5、频段键1GHz,按下此键则转换到1GHz以上的频段,最高监测频率可达1999.999MHz。
6、锁键LOCK,锁定键。
7、信道钮MEMORY CH,选择信道旋钮。
8、存写键WRITE,将频率存写入信道。
9、清除键CLEAR,清除当前信道内的频率数据。
10、确定键ENT,输入频率及其调制方式时的确定键。
11、步进钮TS(kHz),频率步进钮,频段扫描时用,一般设为25kHz。
12、音量钮AF GAIN,旋至合适位置即可。
13、静噪钮SQUELCH,扫描时要旋至合适位置。
14、FM频段开关(在背面),对FM和FMn调制方式有影响,因此要根据实际情况将此开关拨至FM(1)或FM(2)档位,才能正常监听FM或FMn的信号。
二、存写信道。
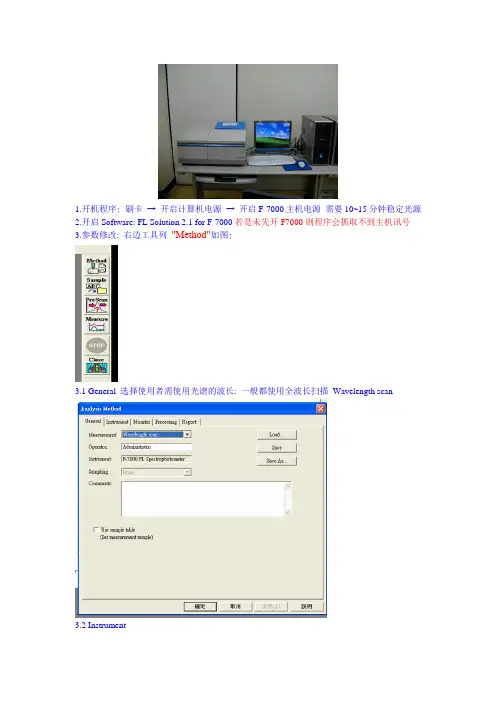
1.开机程序: 刷卡→ 开启计算机电源→ 开启F-7000主机电源需要10~15分钟稳定光源2.开启Software: FL Solution 2.1 for F-7000若是未先开F7000则程序会抓取不到主机讯号3.参数修改: 右边工具列"Method"如图:3.1 General 选择使用者需使用光谱的波长: 一般都使用全波长扫描Wavelength scan3.2 InstrumentEM WL : 入射激发光波长EX Start WL : 入射激发光波长侦测起始波长EX End WL : 入射激发光波长侦测终止波长End wavelength : 200~900 nmScan speed : 一般建议选Auto 若自订尽量小于扫描波段Lamp change :source 在哪一个波长做灯源切换Slit : 光路讯号的半高宽数值大则讯号强度大PMT voltage :Sampling interval : 取点间距一般选用AutoReplicates : 重复量测次数Path length : Calculate sample thickness , 可不用设定,所量测出来的值为绝对能量3.3 Monitor 设定图表的参数: 如Y轴的最大最小值此参数可扫描之后再做调整3.5 ReportData report parameter选[Report] 是用程序内建输出报告选[Microsoft Excel] 是用excel 输出报告4 样本放置样本载台有分为液体与固体,直接用一字螺丝起子做交换,液相的liquid cell 需要自备,有分石英、玻璃、塑料材质的Cell,适合不同波段的侦测。
6 "Measurement"开始量测:取出[Sample]上的背景试片,放上待测试片,按下[Measure],开始量测7 Date parameter 修正8 数据输出:按下[Report]可将DATA做报告输出,可在[Property]中设定输出格式,有内建报告与excel 两种格式9 关机直接关闭程序,并关闭灯泡与主机电源。
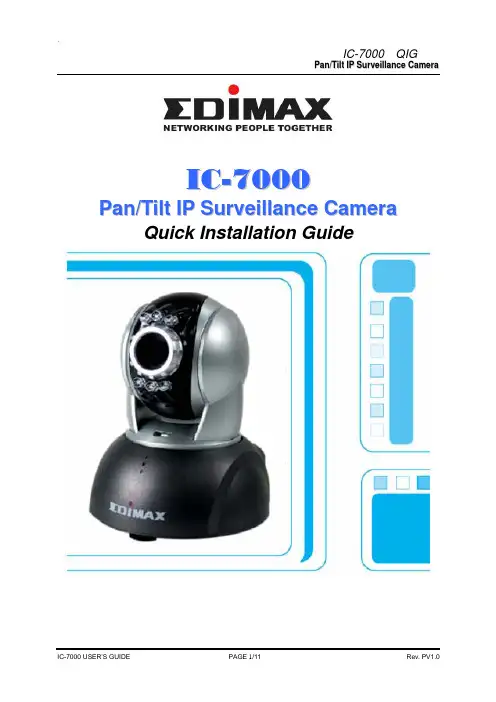
I C-7000P a n/T i l t I P S u r v e i l l a n c e C a m e r a Quick Installation Guideby Edimax Technology Co, LTD. all rights reserved. No part of thisAnchorFrameScrew (P head M3.5X25)When the installation is completed, you will get ” CAM_EZ Search “ as follows CAM_EZ Search is a camera search utility comes with this product. It can search all IP CAMs connected to LAN by sending broadcasting packets. After IP CAM responds the inquery packet, the utility will display a list of all IP CAM found on LAN. And it allows you to modify the settings of specified IP CAM, such as IP address or the name of IP CAM.figure 1B. Make sure the IP addresses of PC and IP CAM are on the same networkOpen and execute CAM_EZ Search (as shown in Figure 2). The system will scan the IP-CAM that you just installed automatically. Then, you will find255IC-7000 in the column of Camera Lists. Click 255IC-7000 with left mouse button. You can see the default settings of IP-CAM.Figure 2 2.3 N ETWORK S ETUPOpen and execute CAM_EZ Search (as shown in Figure 3). The system will scan the IP-CAM that you just installed automatically. Then, you will find255IC-7000 in the column of Camera Lists. Click 255IC-7000 with leftFigure 3z Fill static IP Address as shown below. (If you do not know your IP address, please contact your ISPshown below)`IC-7000 QIGP a n/T i l t I P S u r v e i l l a n c e C a m e r aPV1.0IC-7000 USER’S GUIDE PAGE 11/11 Rev.。

Icom IC-7000 Frequently Asked Questions (FAQ)This guide was created to answer the most commonly asked questions about the Icom IC-7000. The goal is two-fold:1) Condense the discussions found in the Yahoo group to the raw information providing a definitivesource for the FAQ reader2) Remove these recurring questions from the group to improve the “signal to noise ratio” Instructions for updating, correcting and adding information are located at the end of this FAQ.IC-7000 Unique Features• The IC-7000 was the smallest multimode radio available at its introduction (and the time of this writing)• It was the first truly mobile radio to feature IF-DSP (customizable filters – nothing to buy)• Filter width adjustable by mode with “sharp” and “soft” shape factors• Dual ADI Blackfin DSP Processors - feature set similar to the IC-7800, IC-756 Pro III• ACG loop performance controlled by DSP• Auto notch plus dual manual notch filters for up to 70 dB of attenuation• Noise blanker features adjustable pulse width and depth of cut• Internal RTTY decode and dual peak RTTY filter• High stability crystal oscillator is standard• Voice synthesizer standard• VFO knob includes a working “spinner”• The VFO knob tension is adjustable from free to tight and detented – great for mobile operation!• Microphone and external speaker jacks on both the head and body• Color composite video output available at all times to support a larger monitor• Multifunction display shows complete receiver status, S-meter/power output, ALC, compression, SWR and final temperature on a single screen• Semi-real-time spectral display 25-500kHz wide with peak hold and SWR sweep meter• VHF NTSC TV reception with internal modification• Many functions, including band stack registers, direct frequency entry, mode, filters and speech synthesizer available directly via the microphone (no menu navigation required) • Two programmable function keys on microphone for most used functions• CW/Voice memory keyer with 4 memories each and internal recorder feature• CW/voice keyer directly accessible with simple box described in manual• Thermostatically controlled fan• Less receive standby current draw than the IC-706MKIIG• Remotely mountable head• 6-pin data jack and 13-pin accessory jack• Customizable opening messageUser Measured SpecificationsPower outputThe IC-7000 maximum output power drops as voltage drops. This behavior is consistent with other radios as shown by the Yaesu FT-450 results below.The band tested below was not specified.13.84 2.0 17 9313.49 2.0 17 9213.01 2.0 17.5 9212.50 2.0 17.5 9012.02 2.0 16.0 8011.50 2.0 14.5 7011.01 2.0 14.0 6010.50 2.0 12.5 5010.00 2.0 11.5 409.50 2.0 XMIT FAILEDVoltage measured at power supply. Cables supplied by Icom. Power out as indicated in CW mode on attached tuner into a dummy load. At full voltage I had a full 100w PEP on SSB.<Marc W0KYZ>By comparison, these are the measurements that I obtained from a new Yaesu FT-450AT late last year: 13.8V - 100W12.5V - 100W12.0V - 75W11.5V - 68W<VR2AX> I looked up the % charge chart for my Trojan Deep Cycle battery:100% 12.70V80% 12.46V75% 12.40V50% 12.20V45% 12.16V25% 12.00V10% 11.94V5% 11.92V Discharged @ 11.90V<Jack_son>Receive standby currentIcom specs say 1.3A on receive squelched and 1.6A full volume.I checked mine. I got 1.36A two minutes after power up with default settings on 2m FM. Full volume (painful) was1.52A. I found I could save about 40mA by reducing "LCD Bright" to minimum (and still read the display) and another 40mA by turning off the switch backlighting. The readings were a little tough to validate because the fan is variable speed and can affect the readings by more than 100mA.These numbers seem consistent with the published Icom specs. It's not exactly milliamps but it's still 500mA less than the IC-706MKIIG specs. <Scott N7SS>How do I…?How do I hook a monitor to my IC-7000?The IC-7000 uses a 1/8” mono mini jack to provide composite video out. Any monitor, TV or VCR that supports composite video input (yellow RCA jack) can be used as a display. Although the 1/8” mini jack is small, it’s not a standard video connector. Radio Shack offers a 6 foot cable (Catalog #: 42-2444) for only a few dollars that has a 1/8” mini plug to RCA plug and will connect the IC-7000 directly to a standard composite monitor/TV.It is also possible to use an adapter to convert the 1/8” mini jack to an RCA to allow the use of a standard RCA cable. Rigid adapters should be used with caution because the jack can be pulled off the main board if too much torque is applied.“To use with a standard computer monitor, it is necessary to convert the composite video to RGB video with a device like the KWorld TV Box 1680ex.I use this one and it works ok but the above is better: /mpd/tvbox9.html<Steve Ellington, N4LQ>How do I use a Bluetooth headset with my IC-7000?“Works great. See link below from K7SFN. /projects/bluetooth.html”<Dave, KI4KQ>How do I connect more than one CI-V device to my IC-7000?The Icom CI-V interface is a serial bus design. This allows more than one device to be connected to the radio CI-V interface (amplifier, antenna switch, SteppIR antenna, additional radios, etc.). “To connect these devices get a flexible adapter like the Radio Shack 42-2437 or even a three-way adapter like the Radio Shack 42-2458”. <Doug Faunt, N6TQS>How do I get better transmitted audio?The IC-7000 was designed as a mobile radio and the microphone was intended to be used in high noise environments. Although the Heil microphones and W2IMY equalizers provide excellent audio, many people want to maintain the functionality of the stock microphone and get better audio without the expense of these options. AB5N has created a modification for the stock microphone at/ that creates a “hotter” microphone and higher quality audio. There is also a microphone modification posted at http://www.mods.dk/.The IC-7000 has two microphone jacks but the Icom manual specifically states that only one microphone should be used at a time. This is likely because both microphones would be hot at the same time. Some have suggested a mute switch (disabling the mike element) in the stock microphone. This would allow the stock microphone to be used as a “remote control” in one mike jack with a headset in the second mike jack.How do I use my IC-7000 on 60m?Page 40 of the IC-7000 manual provides information on 60m operation and is quoted below.To assist you in operating the 5 MHz band correctly within the rules specified by the FCC, transmission is impossible on any 5 MHz band frequency other than the 5 frequencies indicated in the table below.IC-7000 Display Frequency* FCC Channel Center Frequency*5.33050 MHz 5.33200 MHz5.34650 MHz 5.34800 MHz5.36650 MHz 5.36800 MHz5.37150 MHz 5.37300 MHz5.40350 MHz 5.40500 MHzNOTE: We recommend that you store these frequencies, mode and filter settings into the memory channel for easy recall.*The channel center frequencies that are specified by the FCC, show the center frequency of their passband. However, the IC-7000 displays carrier point frequency, so set 1.5 kHz below from FCC channel center frequency.How do I get full power output when transmitting?The IC-7000 was designed to deliver full power output at 13.8 volts. This is the voltage provided by most power supplies and the alternator output of a vehicle. The voltage table at the beginning of this FAQ shows output as voltage drops. When using the radio from a battery it is necessary to use the largest possible power cabling and a battery voltage booster to maintain the 13.8 volts required for maximum output.I use my IC7000 on CW almost exclusively, and I operate ONLY mobile. I use the N8XJK booster / with no problems at all. For a while I used it with the RF sensing, but no longer do so... not because of any performance problems, but because when the engine is running I don't need the booster, and when in receive I don't hear any noise problems from the booster, so I decided to so away with the additional wiring needed to use the RF Sensing. <Dave- K9FN>“I will ad that the MFJ-4416 voltage booster has helped greatly when the vehicle isn't running. This radio and many other mobiles do not Tx full output power on less than 13+ volts. So either get a battery voltage booster or keep the vehicle running.” <AE5MH>How do I use my radio in VOX mode?“Two things two check. You are in a voice mode and you have turned VOX on. I just tried it and it works with the stock 151 microphone. Be sure the word VOX shows up on your display.” <Steve EllingtonN4LQ>“Turn the VOX Gain up reasonably high, and turn the Anti-VOX as low as you can with out the speaker triggering the VOX. My 7000 works great with stock microphone in VOX mode.” <Dave - KI4KQ>How do I access the CW/Voice memory keyer?The CW and voice keyer options are accessible through the menu. When using the keyers via menu, it is not possible to access other features or the popular multimeter screen. There is a simple resistor network with switches shown in the manual to allow immediate access to the CW/voice memory keyer.“I made the device in the photo for solve this problem using the circuit at the 135 Page. I use my 7k for contesting and expeditions so the voice message function is a powerful help but use it via the menus is complex. /ea1nt/7kbox.htm <Luis EA1NT>How do I use a Turbo Tuner and screwdriver antenna with an IC-7000On the Turbo Tuner Web site, N2VZ is shipping Turbo Tuners setup for the 7000 AND the software update for Turbo Tuners that were programmed for 706, to make it a 7000 tuner. He will email you the update to flash your 706 Turbo Tuner thru the RS232 port on the Turbo Tuner./<Kent KQ4KK>How do I enter DTMF tones for Echolink/IRLP or repeater control?The stock IC-7000 microphone has many functions but like the IC-706 family, it can’t generate DTMF tones. There are two solutions offered by Icom. The first option is the same DTMF microphone used by the IC-706, the HM-154T.There are also 4 DTMF memories of up to 24 digits described on page 67-68 of the IC-7000 manual. This allows recording command/control sequences in these memories. Set Menu Option 38 specifies which DTMF option appears when F-2 is pressed in the menu.Can I use my IC-706 accessories with my IC-7000?Most accessories from Icom and third parties will work directly with the IC-7000. There are a few exceptions. The Icom remote kit is different for the IC-7000. The body and head bracket are the same but the remote cable has 10 pins, rather than only 8 pins. The microphones are largely compatible but the IC-7000 does not have an audio output line in the microphone cable. This could effect some TNC cables and older Heil headsets. The later Heil headsets have a separate speaker plug. There have also been some compatibility issues with third-party tuners (LDG and Turbo Tuner) although ROM upgrades are generally available to address these issues.Where do I find…?DC Power connector“New HF radios from Japan, introduced in the past 5 years operating on 12V DC, like the ICOM IC-7000, Kenwood TS-480, Yaesu FT-450, Yaesu FT-2000, and the new ICOM entry level radio all use the same connector, wired the same way.” <John Bee N1GNV – Quicksilver Radio>Quicksilver Radio - /DCpower.htmTower Electronics - /Powerwerx - /Wimo - http://wimo.de/cgi-bin/verteiler.pl?url=netzgeraete-zubehoer_d.htmlMonitorThere are too many monitor options available from too many sources to list here. The IC-7000 provides composite video out. This can be run into most TV sets and VCRs with the appropriate cable (1/8” monaural mini plug to RCA plug).Small monitors can often be found on eBay and any place that sells car audio/video. In-dash DVD players and many navigation systems include a composite video input. There has even been some discussion that a Toyota Prius instrument panel has an input that could be used for an IC-7000.Icom uses a 7” Xenarc 700YV monitor in the display they use at hamfairs. This monitor is more than what is necessary for most users. The rated LCD brightness of 500 cd/m² and contrast ratio of 400:1 crates a nice image. These are the two most important numbers when determining the quality of an LCD display. Often these numbers are not available and the price is the only indication of the relative monitor quality.CI-V computer interfaces for serial and USBIcom sells the CT-17 interface, which offers 4 CI-V ports and a single DB-9 serial port. There are a number of less expensive options available on the market in both serial and USB. These are commonly found on eBay. Radio Shack also has some scanner programming cables that will work.“I purchased the Radio Shack 20-047 USB Programming Cable & Driver Software today.(the number and description is right off their label)I followed their directions and connected the USB plug after installing the driver. It connects at 19,200 bps and has not given one sign of improper connection...This is faster and easier than the CT-17.I used a 20 foot stereo extension to get to the ICOM and used the stereo to mono adapter supplied with the interface to plug in at the radio end of the connection.18 hours later, I am sure this is the best way to go.” <im2old2run>Interfaces are also available from:West Mountain Radio - /RIGtalk.htmMFJ /Product.php?productid=MFJ-5383IControl softwareThe IC-7000 is similar to the other Icom HF radios and can use much of the same software written for the IC-706 family (although the radio address may need to be changed). More software is offering native IC-7000 support. One of the first and best is Ham Radio Deluxe (HRD) and is available for download at no cost from /.Memory programming softwareThere are a number of packages specifically designed to program the memory channels in the IC-7000. Rumtrol7k http://www.dl2rum.de/rumsoft/RUMtrol7K.htmlIC7000BKT /ic7000bkt_en.htmCI-V Cat.program/Memory Manager http://www.tellina.nl/software/Radio IssuesThe IC-7000 runs hot even on receiveThere are reports of the IC-7000 running hot despite most of the radio body being cooler than the IC-706. There are three points in particular that can run warm; the display because of the backlight, the area behind the speaker where the DSP ICs are heat sinked and the actual heat sink on the back of the radio. Here is a chart showing relative temperatures of various devices with color displays. The temperatures below were taken with an infrared thermometer after a 24 hour warm-up period at 71 degrees F with no transmit.Icom IC-7000 91°F 33°CIcom IC-2800 107°F 41°CSharp 15” TV/Monitor 85°F 29°CG2G 5” TFT Portable Monitor 106°F 41°CInitial 7” Portable DVD Player 85°F 29°CThe display runs about 91°F. The heatsink on the rear runs 99-103°F (in receive). The cooler areas on the back are 92-96°F. The temperature on the top ranges from 95-109°F. The area directly behind the speaker is the hottest at 109°F. This is directly over the silver box containing the DSP chips.The thermometer on the multimeter display shows the rear heatsink temperature. The final output transistors use this heatsink.Many users have installed fans over or behind the radio to increase the airflow over the chassis. Care must be taken with fans in dusty environments. There is also a fan modification published onhttp://www.mods.dk.Strange behavior on transmit (shutting down, resetting, changing frequency, etc.) This is most commonly a grounding/RFI issue. Make sure the radio and antenna are properly grounded. If the separation cable is being used, attempt to route it away from RF sources and be sure to use the screw to attach it to the radio.Audio feedback during transmitCheck to make sure you don't have the "monitor" turned on. Usually, you just use the monitor when transmitting digital modes.• Push SET button (AF gain control knob) upper left hand corner of radio.• Go to "Set Mode" > OTH > Monitor. Set to OFF<Brian, KC4UKR>High frequency (8kHz) tone in audioVery early models of the radio had a noticeable tone at 8kHz. This was not audible through the internal speaker because the internal speaker is “communications grade”, meaning it has a frequency response limited to voice frequencies. It was also not audible when using Heil, David Clark and othercommunications headphones or speakers. It was most obvious when using inexpensive “Walkman” style hifi headphones which are excellent at reproducing non-voice frequencies.Icom addressed this within a few months after production began with some capacitor and grounding changes. This modification should be available at no charge for units in warranty.Low level hiss in audioMany radios have a small amount of hiss (white noise) when the volume is set to the minimum value. This hiss remains at a constant level as the volume is increased and is quickly overwhelmed by signal audio. The hiss is apparently internally generated. There is no known solution but some users insert attenuators in the audio line. Since the hiss is a fixed level, it will reduce the hiss level while allowing the signal level to be increased with additional AF gain.This audio hiss is very low through the internal speaker because it is “communications grade”, meaning it has a frequency response limited to voice frequencies. Any external speaker or headphones should also be designed for communications work, rather than hi-fi, so as to minimize this issue.S-meter reads lowThe IC-7000 S-meter is very accurate but as a mobile unit is calibrated to read accurately with the preamp enabled.Changing the transmit audio bandwidth results in poor transmit audioThe Icom IC-7000 supports changing the transmit audio bandwidth. There are three predefined settings which can be modified. Because it appears the transmit equalization feature was cut, there is no way to rebalance the audio as the bandwidth is narrowed. This makes the audio quality very poor at narrow bandwidths. If DX-quality narrow audio is desired, the best solution is a good DX microphone or an external equalizer like those from W2IHY.。
IC-F7000中文说明书(快速中文说明)杭州柯顿通信科技有限公司/目录1.面板 (1)1.1 控制器面板 (1)1.2 主机面板 (2)1.3 麦克风 (2)1.4 LCD显示屏 (2)2.信道编程 (3)2.1 增加信道 (4)2.2 编辑已有信道 (4)2.3 删除信道 (5)3.ID编程 (5)3.1 进入初始设置 (5)3.2 Selcall选呼ID输入 (5)3.3 删除Selcall ID (6)3.4 ALE ID 码输入 (6)3.5 删除ALE ID 码 (6)4.话音接受或发送操作 (7)5.选呼操作 (7)5.1 选择信标呼叫 (7)5.2 选择呼叫 (7)5.3 ALE呼叫 (8)5.4 结束ALE呼叫 (9)5.5 ALE探测 (10)6.VFO〈频率〉方式 (11)6.1 CHANNEL /VFO 方式选择 (11)6.2 调整频率 (11)6.3 分频操作 (12)7.简易方式操作 (13)8.快速设置方式 (13)8.1 进入快速设置方式 (13)8.2 工作方式选择 (13)8.3 电台发射功率选择 (13)8.4 予放操作 (13)9.扫描 (13)9.1 进入扫描编辑 (14)9.2 打开、关闭扫描 (14)9.3 扫描组选择 (14)1.面板1.1 控制器面板电源按键:[I/O]按下,打开电源。
当电源已打开,快速按下[I/O],进入“快速设置方式”。
再次按下[I/O],退出“快速设置方式”。
按下约1秒钟,关电源。
静噪键:[MUTE]按下可选择静噪方式:话音静噪,信号电平静噪,选呼静噪。
调谐键:[TUNE]按下约一秒钟,启动手动调谐。
上/下键:[UP]/[DN]选择信道或设置方式的项。
扫描键:[SCAN]按下启动或停止扫描。
呼叫键:[CALL]按下进入呼叫菜单,再按退出。
按下约一秒钟发送呼叫。
1.2 主机面板1.3 麦克风[PTT]:按下讲话,释放接收。
[DN]/[UP]:下/上按键。
HF/VHF/UHFALL MODE TRANSCEIVERHF/VHF/UHF ALL MODE TRANSCEIVER35W output in 70cm bandHigh power MOS-FET amps supply 35W output power on 430/440MHz band as well as 100W on HF/50MHz bands and 50W on 144MHz. It pro-vides stable, high quality output with low IMD and low spurious emissions even during high duty cycle and extended operation.High stability crystal unitThe IC-7000 inco rpo rates a high-stability master o scillato r, pro viding 0.5ppm (–0°C to +50°C). A must for data mode operation.DDS (Direct digital synthesizer) circuitIcom’s original DDS (Direct digital synthesizer) circuit improves the C/N ratio, providing a clear, clean transmit signal in all bands.Compact, all in one packageThe IC-7000 sheds 20mm (0.79 in) of depth compared with the IC-706MKIIG. It’s compact body is easy for carrying outdoors or mobile operation.IF DSP — First in its classDigital IF fi lter, manual no tch fi lter, digital twin PBT and more. The lat-est digital features are incorporated in this compact radio from two DSP chips that deliver superior process-ing perfo rmance. Of co urse, tho se features work on all ham bands, from HF to the 70cm band.AGC loop performance controlled by DSPY ou will never experience AGC pumping from a signal filtered out by the DSP system. The digi-tal IF fi lter and manual notch fi lter are inside the AGC loop, so you will not encounter AGC block-ing. The AGC time constants are fl exibly adjust-able from slow, middle, fast (or AGC-off) for each operating mode.Digital IF fi ltersAll the fi lters you want at your fi ngertips! Y ou will never have to purchase “Optional” filters as the IC-7000 has adjustable digital filters. Y ou just dial in the width you wantand select whether you want a sharp or soft fi lter shape for SSB and CW modes. Then to pull-in the the weak ones, with a quickturn of the concentric twin PBT knobs, you can either narrow the IF passband, or shift the entire passband to eliminate the QRM.2-point MNF (Manual notch fi lter)Pull out the weak signals in crowded band condi-tions with Icom’s NEW two-point MNF (manualnotch fi lter). Apply 70 dB of rejection to two sig-nals at once! Notch width is adjustable – wide, medium, and narrow – and an auto-tuning notch fi lter is available, too.Digital noise reductionNoise reduction reduces background noise and improves signal-to-noise ratio. The noise reduction level is adjustable in 16 steps. It improves the readability of voice and data signals.Digital noise blankerThe noise blanker reduces pulse-type noise such as engine ignition and sparking. The NB level and width (blanking duration) are adjustable in 100 steps.AGC time constant setting Manual notch fi lterIF fi lter settingMOS FET P A unitsIcom original DDS circuitThe technical properties and advantages of IF DSP found in our leading base station models now offers its superior advantages on mobile HF, 50MHz 144MHz and 430/440 MHz bands.2.5 inch color TFT displayThe 2.5 inch color TFT display presents numbers and indicators in bright, concentrated colors for easy recognition. Y ou can choose from 3 back-ground colors and 2 font styles to suit your preference, in addition to a large operating frequency readout. And more, the Video output jack on the rear panel allows you to view a magnifi ed display on an external monitor*.* 3.5(d) mm monaural cable is required for connection.SSB transmit bandwidth adjustableThe SSB transmit bandwidth is selectable from 100, 200, 300, 500Hz atthe high-pass edge, and 2500, 2700, 2800, 2900Hz at the low-pass edgerespectively. 3 types of high and low combinations can be set in the quickset mode.2-mode band scopeThe band scope function lets you watch condi-tions aro und the band and visually assists infi nding other stations. In center mode the bandsco pe range is centered o n the receiving fre-quency (±10kHz to ±250kHz). In Fixed mode theband scope sweeps a fi xed range.Multi function meter and SWR graphic displayThe IC-7000 displays power level, SWR*, ALCand compression level of the speech compres-sor. The SWR graphic display* is useful for tuningantennas. The measuring step is selectable from10/50/100/500kHz steps and the number of mea-suring steps is adjustable from 3 to 13 steps. (* HF/50MHz band only)Other outstanding features• Front panel separation with optional 3.5m/5m separation cable • Selectablemain dial tension from heavy, light and click • RF speech compressor controlledby the DSP • CW full break-in • CW receive reverse • CW pitch adjustable •Tone squelch in FM mode • 503 memory channels • Built-in voice synthesizerannounces operating frequency, mode and signal strength • Duplex mode and au-tomatic repeater function • Transmit monitor • DTMF monitor • 1Hz tuning • VOX• CI-V interface • RIT/∂TX • RF/SQL knob • Large speaker • Auto TS function• Thermo control silent cooling fan • Noise squelch and S-meter squelch• Preamplifi er • Dial lock • 20dB attenuatorEight of the most-used radio func-tions such as NB, NR, MNF, andANF are co ntro lled by dedicatedfunction keys grouped around thedisplay for easy visibility. One quicktouch turns the function on and off.A lo nger to uch activates adjust-ment of the function’s setting.Digital voice recorder (DVR)Record your callsign, CQ, or other information in4 transmit playback memories with alphanumericlabels. A total of 90 seconds is available for thefour memories. A front panel REC control allowsyou to record incoming signals for up to 25 min-utes (99 channels)*. The DVR makes portablecontesting or mini-expeditions a breeze!* Up to 120 seconds per channelBuilt-in RTTY demodulatorThe RTTY demodulator and decoder are built-in.External units and PC are no longer required fordecoding. The twin peak audio fi lter reduces inter-fering signals overlapping the tones and the tuningindicator helps you zero-in with accurate tuning.Remote control microphone, HM-151The HM-151 has a 10-keypad for quick channel selection.The triple band stacking register memorizes the last threefrequencies and modes used on each band. Push the bandbutton once to three times to recall the channel setting. TheF-1 and F-2 buttons are programmable as shortcut menusof your often used functions.Key illuminationVoice RX memoryNegative type Color type Positive typeFixed mode band scopeRTTY decode screenMultimeter screen1-1-32, Kami-minami, Hirano-ku, Osaka 547-0003, Japan Phone: +81 (06) 6793 5302Fax: +81 (06) 6793 0013Count on us!www.icom.co.jp/worldPrinted in Japan2380 116th Avenue NE,Bellevue, WA 98004, U.S.A.Phone : +1 (425) 454-8155Fax : +1 (425) 454-1509E-mail :*********************URL : Unit 1 / 103 Garden Road,Clayton, VIC 3168 Australia Phone : +61 (03) 9549 7500Fax : +61 (03) 9549 7505 E-mail :**************.au URL : .auBlacksole House, Altira Park, Herne Bay, Kent, CT6 6GZ, U.K.Phone : +44 (01227) 741741Fax : +44 (01227) 741742E-mail :**************.ukURL : Zac de la Plaine,1 Rue Brindejonc des Moulinais, BP 45804, 31505 Toulouse Cedex 5, France Phone : +33 (5) 61 36 03 03Fax : +33 (5) 61 36 03 00E-mail :********************URL : Ctra. Rubi, No. 88 "Edificio Can Castanyer" Bajos A 08174, Sant Cugat del Valles, Barcelona, SpainPhone : +34 (93) 590 26 70Fax : +34 (93) 589 04 46E-mail :******************URL : 146A Harris Road, East Tamaki,Auckland, New Zealand Phone : +64 (09) 274 4062Fax : +64 (09) 274 4708E-mail :*****************.nz URL : Glenwood Centre #150-6165 Highway 17,Delta, B.C., V4K 5B8, Canada Phone: +1 (604) 952-4266Fax : +1 (604) 952-0090E-mail :*******************URL: Y our local distributor/dealer:6F No. 68, Sec. 1 Cheng-Teh Road, T aipei, Taiwan, R.O.C.Phone: +886 (02) 2559 1899Fax : +886 (02) 2559 1874E-mail :*******************URL : 81-850 Sopot, ul. 3 Maja 54, Poland Phone : +48 (58) 550 7135Fax : +48 (58) 551 0484E-mail :*************************.pl URL : .plCommunication Equipment Auf der Krautweide 2465812 Bad Soden am Taunus, Germany Phone : +49 (6196) 76685-0Fax : +49 (6196) 76685-50E-mail :*******************URL : HF/VHF/UHF ALL MODE TRANSCEIVER• C T-17 C I-V LEVEL CONVERTERFo r remo te transceiver co ntro l using a PC with an RS-232C.• R S-BA1 I P REMOTE CONTROL SOFTWAREFor IP remote transceiver control from a PC. (Not guaranteed)• Frequency coverage (unit: MHz)*1 :Receive 0.030– 199.999*2 400.000–470.000*2 Transmit 1.800– 1.999 3.500– 3.9995.255– 5.405*2 7.000–7.300 10.100– 10.150 14.000– 14.350 18.068– 18.168 21.000– 21.450 24.890– 24.990 28.000– 29.700 50.000– 54.000 144.000– 148.000430.000– 450.000*1 Showing USA version, frequency coverage depends on version.*2 Some frequency ranges are not guaranteed.• Mode: U SB, LSB, CW, RTTY , AM, FM,WFM (Rx only)• Number of memory Ch. : 503 (495 regular, 6 scan edges and 2 call)• Antenna connector : S O-239×2 (fo r HF/50MHz and 144/430/440MHz bands; 50Ω)• T emperature range : –10˚C to +60˚C; +14˚F to +140˚F • Frequency stability : L ess than ±0.5ppm(0°C to +50°C; +32°F to +122°F)• Power supply requirement : 13.8V DC ±15% • P ower consumption : Tx Max. power 22.0A (approx.) Rx S tandby 1.3AMax. audio 1.6A• D imensions (W×H×D): 167×58×180 mm;(Projections not included) 6.57×2.28×7.09 in• Weight (approx.): 2.3kg; 5.1lb • Modulation system :S SB Digital P .S.N. modulation AM Digital low power modulation FM Digital phase modulation • Spurious emissions : L ess than –50dB (HF bands)Less than –60dB (50MHz band*)Less than –60dB (144/440MHz bands)(* Less than –63dB for EUR versions)• Carrier suppression : More than 50dB • Unwanted sideband suppression: More than 50dB• Microphone connector : 8-pin modular jack (600Ω)• Intermediate frequencies :S SB, CW, RTTY , AM, FM 124.487MHz, 455kHz, 16.15kHz WFM 134.732MHz, 10.70MHz SSB/CW, AM : 10dB S/N, FM, WFM : 12dB SINAD• Squelch sensitivity (Pre-amp: ON, threshold):SSB Less than 5.6μV FM Less than 0.3μV • Selectivity (representative value): S SB More than 2.4kHz/–6dB(BW: 2.4kHz, sharp) Less than 3.6kHz/–60dB C W More than 500Hz/–6dB(BW: 500Hz, sharp) Less than 900Hz/–60dBRTTY(BW: 350Hz) M ore than 360Hz/–6dB Less than 650Hz/–60dBAM(BW: 6kHz) M ore than 6.0kHz/–6dB Less than 15.0kHz/–60dBFM(BW: 15kHz) M ore than 12.0kHz/–6dB Less than 20.0kHz/–60dB• S purious and image : More than 70dB (HF/50MHz bands)rejection ratio More than 65dB (144/440MHz bands)(except 1/2 IF through on 50MHz, IF through on 144MHz)• AF output power : M ore than 2.0W at 10% distortion (at 13.8V DC)with an 8Ω load• EXT SP connector : 2-conductor 3.5 (d) mm (1⁄8ʺ)/8ΩApplicable U.S. Military Specifi cationsSPECIFICATIONSRECEIVERSupplied accessories:• Hand microphone, HM-151 • Microphone hanger • Electronic keyer plug • RTTY key plug • DC power cable • ACC cable (13-pin) • Spare fuses• O PC-599 CABLE ADAPTERCo nverts 13-pin ACC co nnecto r to 7-pin + 8-pin ACC connector forconnection with IC-PW1/EURO.• O PC-742 ACC 13 PIN CABLE ADAPTERRequired when using both AT -180 and a 2 m or 70 cm linear amplifi er.• S EP ARA TION CABLES OPC-1443: 3.5m (11ft)OPC-1444: 5m (16ft)• O PC-589 MODULAR 8-PINCABLE ADAPTER• O PC-598 ACC 13 PIN LONG CABLE FOR A T -180 (7m; 23ft)• M B-106 CARRYING HANDLEOPTIONS• M B-105A MOBILE MOUNT -ING BRACKETFo r mo unting the detached fro nt panel.• M BF-1 MOUNTING BASESuctio n cup mo unting base fo r mo unting the detached fro nt panel. The MB-105A is required.• A H-2b ANTENNA ELEMENTFor mobile operation with the AH-4. All bands between 7–54MHz can be matched.• A H-4 HF+50MHz AUTO-MA TIC ANTENNA TUNERCo vers 3.5–54MHz with a 7m • A T -180 HF+50MHz AUTO-MA TIC ANTENNA TUNERStyle and size are matched to the IC-PW1/IC-PW1EUROHF+50MHz 1kWHF LINEAR AMPLIFIER• H M-151 REMOTE-CONTROL MICROPHONESame as supplied. For exclusive use with IC-7000 only.• S P-10 EXTERNAL SPEAKERHeavy duty speaker fo r mo bile use.• PS-126 DC POWER SUPPL Y13.8V DC, 25A max. with 4-pin type connector.READ ALL INSTRUCTIONS carefully and completely before using the transceiver.All stated specifi cations are subject to change without notice or obligation.Some options may not be available in some countries. Please ask your dealer for details.• S M-30 DESKTOP MICROPHONEElectret microphone.(An optional OPC-589 is required.)SM-20 also can be used with OPC-589.• S M-50 DESKTOP MICROPHONEDynamic microphone.(An optional OPC-589 is required.)• M B-120 MOUNTING BASEFo r mo unting the detached fro nt panel in a vehicle. The MB-105A is required.05ES011K* © 2005–2012 Icom Inc.• M B-62 MOBILE MOUNTING BRACKETFo r mo unting the IC-7000 main unit or the A T -180.Covers all HF and 50MHz bands, provides clean, stable 1kW output.Automatic antenna tuner and compact detachable controller are standard. 2 exciter inputs are available. (An optional OPC-599 is required.)。
ICOM IC-R7000使用说明书一、主要旋钮、按键及开关说明1、速度钮SPEED,用于扫描速度的调整,右旋到底扫描速度最大。
2、延时方式钮DELAY,用于扫描过程中检测到信号时停留延时方式。
OFF‐信号出现多久就暂停多久;5‐停留5秒钟;15‐停留15秒钟;∞‐只要检测到信号就停止扫描。
3、扫描键盘SCAN START/STOP,可设置六种扫描方式:重点扫描、频段扫描、选择信道扫描、同种制式扫描、所有信道扫描和自动扫描存贮。
①、重点扫描键PRIO,可在当前信道频率和重点设置的频率这两个频率间进行扫描。
②、频段扫描键PROG,设置了低频和高频后,则以TS旋钮设置的步进反复进行扫描。
③、选择信道扫描键SEL‐M,在选择了的各个信道中进行扫描。
④、同种制式信道扫描键MODE,扫描与当前制式相同的各个信道。
⑤、所有信道扫描键MEMORY,扫描所有的存贮了的信道。
⑥、自动扫描存贮键AUTO‐M,根据频段扫描中设置的高低频率,扫描并自动存贮到CH80~99信道中,因此CH80~99信道不作为常规存贮信道用。
4、衰减键ATT,天线衰减器,按下为衰减。
实际工作中一般不需衰减,不用按下此键。
5、频段键1GHz,按下此键则转换到1GHz以上的频段,最高监测频率可达1999.999MHz。
6、锁键LOCK,锁定键。
7、信道钮MEMORY CH,选择信道旋钮。
8、存写键WRITE,将频率存写入信道。
9、清除键CLEAR,清除当前信道内的频率数据。
10、确定键ENT,输入频率及其调制方式时的确定键。
11、步进钮TS(kHz),频率步进钮,频段扫描时用,一般设为25 kHz。
12、音量钮AF GAIN,旋至合适位置即可。
13、静噪钮SQUELCH,扫描时要旋至合适位置。
14、FM频段开关(在背面),对FM和FMn调制方式有影响,因此要根据实际情况将此开关拨至FM(1)或FM(2)档位,才能正常监听FM或FMn的信号。
二、存写信道。
主要功能设计和使用说明:l 频段选择和频率设定、频率步进和操作技巧1. 长按键盘右下角的BAND键,萤幕将会显示出BAND字样,例如此时要到14MHz段,就按下数位5的哪个按键,不同的频率段,用灰白色写在不同的按键上数位的正下方。
2. 短按键盘右下角的BAND键,萤幕显示输入介面,此时就可以直接用数位按键输入所需频率,注意需要输入小数点,技巧,输入完小数点后,短按Band键即可结束并确认输入的频率。
- A, A- e+ r/ [* L0 d& [$ G3. 短按位於频率搜索旋钮左边的TS键,萤幕会在KHz位元显示小三角与否,表示频率搜索旋钮是否以KHz為单位进行调整。
8 D; y' d2 W& ]2 [9 y! _1 X" \4. 长按位於频率搜索旋钮左边的TS键,萤幕会切换到频率步进的设定状态,用频率搜索旋钮设定,再次短按下TS键即可确认。
l 天调使用和功率调整、仪表功能的切换1. 天调的使用非常简单,长按下位於频率搜索旋钮左边的TUNER键,就会全自动地调整天调到当前频率的匹配状态,调整期间,萤幕上左下角TUNE标誌闪烁,调整完成后,显示出TUNE标誌,调整失败时,不显示TUNE标誌。
断开天调至直通状态,短按TUNER键,萤幕上通过TUNE标誌消失确认操作。
; h+ w+ f4 h3 {- E+ g0 Q# Y, `2. 功率调整很简单,按下位於频率搜索旋钮右下角的SET键,用主机右下角的双层旋钮中心的哪个旋钮,转动直到萤幕显示出RF POWER,即可用频率搜索旋钮来做设定输出的功率,注意此时显示的数值,不代表绝对的输出功率数值,完成后再次短按下SET键退出。
, }% p1 V4 t# d. w3. 萤幕上刻度仪表的功率切换,长按下键盘右上角的ANF (METER)键,即可在功率、驻波、ALC驱动指数,三个功能间切换显示。
, q: }3 \, {- \" P5 {8 Z0 il 工作模式切换和滤波器设定0 M; G# B3 u$ c* b) a. Z) o% ~ 1. 工作的模式切换,短按下位於频率搜索旋钮左边的MODE 键即可,单边带、CW、RTTY模式下,长按BAND键,可以在不同模式下变换子模式,例如单边带通信,可以切换為使用上边带还是下边带的通信模式。
IC-F7000中文说明书(快速中文说明)北京华诚广通科技有限公司/目录1.面板 (1)1.1 控制器面板 (1)1.2 主机面板 (2)1.3 麦克风 (2)1.4 LCD显示屏 (2)2.信道编程 (3)2.1 增加信道 (4)2.2 编辑已有信道 (4)2.3 删除信道 (5)3.ID编程 (5)3.1 进入初始设置 (5)3.2 Selcall选呼ID输入 (5)3.3 删除Selcall ID (6)3.4 ALE ID 码输入 (6)3.5 删除ALE ID 码 (6)4.话音接受或发送操作 (7)5.选呼操作 (7)5.1 选择信标呼叫 (7)5.2 选择呼叫 (7)5.3 ALE呼叫 (8)5.4 结束ALE呼叫 (9)5.5 ALE探测 (10)6.VFO〈频率〉方式 (11)6.1 CHANNEL /VFO 方式选择 (11)6.2 调整频率 (11)6.3 分频操作 (12)7.简易方式操作 (13)8.快速设置方式 (13)8.1 进入快速设置方式 (13)8.2 工作方式选择 (13)8.3 电台发射功率选择 (13)8.4 予放操作 (13)9.扫描 (13)9.1 进入扫描编辑 (14)9.2 打开、关闭扫描 (14)9.3 扫描组选择 (14)1.面板1.1 控制器面板电源按键:[I/O]按下,打开电源。
当电源已打开,快速按下[I/O],进入“快速设置方式”。
再次按下[I/O],退出“快速设置方式”。
按下约1秒钟,关电源。
静噪键:[MUTE]按下可选择静噪方式:话音静噪,信号电平静噪,选呼静噪。
调谐键:[TUNE]按下约一秒钟,启动手动调谐。
上/下键:[UP]/[DN]选择信道或设置方式的项。
扫描键:[SCAN]按下启动或停止扫描。
呼叫键:[CALL]按下进入呼叫菜单,再按退出。
按下约一秒钟发送呼叫。
1.2 主机面板1.3 麦克风[PTT]:按下讲话,释放接收。
[DN]/[UP]:下/上按键。
[LOCK]:滑动时,开启或者是关断“上/下按键功能”1.4 LCD 屏幕本机有两种显示屏:信道显示,频率显示。
信道显示方式可显示已编程信道号及信道注释:信道显示:LQA指示:当工作方式为ALE显示信道LQA级别(0-30)。
发射功率:显示发射功率为HI(高),MID(中),LOW(低)。
静噪方式:“V”话音静噪;“L”信号电平静噪;“S”选呼静噪。
信道注释:显示信道注释,GPS位置数据。
扫描时显示“Scanning”,调谐时显示“Tuning”,调谐完成“Tuned”。
频率显示:①收/发指示收到信号显示RX;分频功能关,发射时显示TX;②分频功能开,发射时显示TX。
③收/发频率指示,接受时显示接受频率;等分频功能关,发射显示发送频率。
2.信道编程IC–F7000最多可编程500个信道(其中400常规信道,100ALE信道),信道注释最多15个字符。
①按住键,按[I/O]键打开电源;进入“initial set mode”初始设置工作模式,按[▼]/[▲]键,可选需要类别:SET MODE②选中“CH LIST”,按键进入信道编辑(可增加,编辑信道,删除信道)。
2.1 增加信道:﹤add﹥用[▼]/[▲]键,选﹤add﹥,然后按键;用键盘键入“信道号”,然后按进入信道编程;按[▼]键跳到“RX”,按键,用键盘写入接收频率(当频率小于10M时,第一位,输入0),按;按[▲] 键选择“TX”,用键盘写入频率,按;按[▲]键进入信道注释编程,最多可写入15字符;按[▼]键选择下列项目,然后按键或键设置需设定内容:·mode selection 工作方式选择·Call Type 呼叫方法·Filter Selection 滤波器选择·Scan group 扫描组·按[▲],多次,到信道号处,按键2.2 编辑已有信道按[▼]/[▲]键选择预定信道,然后按;按[▼]键选“TX”,按键,用键盘写入频率,按键;按[▼]键选“RX”,按键,用键盘写入频率,按键;按[▼]/[▲]键,选择项目:Comment,RX,TX,Call Type,Scan group,filter;按/,设定“Comment,Call Type”Scan group,filter,值或条件;编辑完成后,按[▲]多次到信道号处,按键。
2.3 删除信道按[▼]/[▲]键,选定予删除信道,按键;按[▼]键多次选“DELETE CH”;按住键,信道被删除。
3.ID编程IC–F7000有三种ID码,“选呼ID,TEL号码,ALE ID”。
3.1 进入初始设置①按住,按[I/O]键,打开电源进入“initial set mode”;②按[▼]键选“ID LIST”,然后按键,显示呼叫方式菜单;③按[▼]/[▲]键,选择所需呼叫方式,然后按键。
3.2 Selcall 选呼ID输入IC–F7000可存储10个自己ID码90个呼叫地址ID码,10个自己的ID码包含5个选呼ID 码(S1-S5)及5个TEL呼叫ID码(T1-T5)按[▼]/[▲]键选定S组别按键,显示ID编程屏幕(ID码可4位或6位,可在初始设定Selcall menu中设定缺省值为4位)按键,用键盘写入4位数,后进入ID名编程ID名最多15个字符,写入后按[▼]键,选择“CH”,按键,进入信道范围设定。
信道范围输入例子:信道连续:信道范围从ch12到ch320(小数先输)按0 0 1 2 然后0 3 2 0 按键信道不连续:信道ch12与ch320(小数先输)按0 0 1 2 与0 0 1 2 然后换0 3 2 0 与0 3 2 0 按键完成后,按[▲]多次,到“ID码”处,按键3.3 删除SelCall ID选择欲删除ID码,按键按[▼]键多次,选择“DELETE NO”,然后按,且按住键,ID 码被删除。
3.4 ALE“ID”码输入IC–F7000可存储:20个自己的ID 码(S1-S20)100呼叫ID码,用于ALE操作按[▼]/[▲]键选定S组别按键,显示ID编程屏幕按[▼]键,选择“ID”,然后按键,编辑ID·ID码最多15字符·输入完成后按2次键,完成设定按[▼]键,选择“NET”,按键编辑网络识别码·网络识别码最多15字符·输入完成后按2次键,完成设定按[▼]键,选择“CH”,按键设定信道范围输入例:信道连续:信道范围从ch6000到ch6999按 6 0 0 0 然后 6 9 9 9 按键信道不连续:信道ch6000与ch6999按 6 0 0 0 与 6 0 0 0 然后换6 9 9 9 与 6 9 9 9 按键按[▼]键,选择“SLOT”(组呼应答顺序码)按键,输入数字(不大于100)3.5 删除ALE ID码选择欲删除ID码,按键按[▼]键多次,选择“DELETE NO”,然后按,且按住 键,ID 码被删除。
4. 话音接收/发送操作① 按[I/O]键,打开电台电源② 利用[▼]/[▲]键,或键盘选择予定信道 ③ 调节“VOL ”按钮,调节音频频率若无音频信号,检查一下,快速设置“Quick set mode ”中“SP OUT ”,内容应为“ON ”④ 如配接天调,按“TUNE ”键,调谐天线“Tuning ”字符显示,调谐成功显示“Tuned ”⑤ 按下“PTT ”键,转入发状态(出现“TX ”提示),对准手柄上麦克风讲话,LCD 屏幕显示射频输出功率 ⑥ 释放“PTT ”,电台返回接收状态,(出现RX 提示)5. 选呼操作选择ID 码可以是4位或6位,可进行单独或成组呼叫5.1 选择信标呼叫选择信标呼叫便于用户确定电台与指定电台之间传输信道信号质量 ① 按[▼]/[▲]键,选择选呼用信道 ② 按[CALL]键,进入呼叫菜单,如:③ 按或,选择“SEL BCON ”其中 SELCALL,GPSBCON,GPS POSN,EMER SELCALL,PAGECALL ,STATUS CALL,SEL BCON ,也可以选择④ 按[▼]键选择“ID ”写入指定台 四位ID 码(或6位,取决于初始设置) 或按键,进入ID 码选择,利用[▼]/[▲]键选择予先编程,ID 码。
然后按键,确定该ID 码。
⑤ 按[CALL]键1秒钟,发选择信标呼叫 当呼叫中可按[CALL]键,可终止呼叫5.2 选择呼叫① 按[▼]/[▲]键,选择选呼用信道2020:SELCALL TX:3.200.0 Self ID :1004 〣 SELCALL 〣 ID:1024② 按[CALL]键,进入呼叫菜单③按或键,选择“SELCALL ”④ 按 [▼]键,选择“ID ”,然后写入或选择ID 码 用键盘写入4位(或6位,取决于初始设置) 或者按进入“ID ”码选择,按[▼]/[▲]键,选择予编程ID ,然后按,确定该ID 码⑤ 按[CALL]键,约1秒钟,发选择呼叫 当呼叫中,按[CALL],终止呼叫5.3 ALE 呼叫利用ALE 表自动建立通信链路 ① 按[▼]/[▲]键,选择ALE 信道② 按[CALL]键,进入呼叫菜单③ 按或键,选择所需呼叫可选:INDI-CALL,NET-CALL,SOUNDING ,DATA (AMD)呼叫方式SELCALL USB HI 2020 RX 3.200.0 12:34 2020:SELCALL TX:3.200.0 Self ID :1004〣 SELCALL 〣 ID :1024ALE-U HI 6020RX 4.426.0 12:34ALE:INDI —CALL SLF:SF 1 TO:S02CH:0020 LQA:20 TX:4.246.0 10:11④按[▼]键,选择“SLF ”,然后选择你自己ID 码按键,进入ID 码选择,按[▼]/[▲]键,选择予编程ID ,然后按键,确定该ID 码。
⑤按[▼]键,选择“TO ”,然后选择—预期ID 码按键,进入“ID ”选择,按[▼]/[▲]键,选择予编程ID 码,然后按,确定该ID 码⑥按[▼]键,选“CH ”,然后选择—发送信道 若欲改变信道: 按键,进入“LQA ”表,按[▼]/[▲]键,选择其他信道然后按键,确定该信道⑦按[CALL]键,约1秒,发送ALE 呼叫。
5.4 结束ALE 呼叫① 在ALE 呼叫完成后,按[CALL]键,进入呼叫菜单 ② 按键或键,选择“TERMINATION ”ALE:INDI-CALL SLF:SF1 TO:S02CH:6020 LQA:20 TX:4.246.0 10:11SF1 〣 SF2 SF36030CH 12:03 30 6050CH 10:22 20 6010CH 11:43 10 6020CH ---:--- --- 6040CH ---:--- ---〣 ALE:TERMINATION 〣SLF:S11 TO:S06CH:0020 LQA:--- TX:4.245.0 ---:---③ 按[CALL]键约1秒,发送拆线呼叫5.5 ALE 探测以一定间隔(0.5~16小时),自动发送一探测信号,以检查信道质量,并将数据存于LQA 表中,也可以手动探测。