python入门教程5
- 格式:pdf
- 大小:296.45 KB
- 文档页数:22
Python 入门教程1 ---- Python Syntax1 Python是一个高效的语言,读和写的操作都是很简单的,就像普通的英语一样2 Python是一个解释执行的语言,我们不需要去编译,我们只要写出代码即可运行3 Python是一个面向对象的语言,在Python里面一切皆对象4 Python是一门很有趣的语言5 变量:一个变量就是一个单词,只有一个单一的值练习:设置一个变量my_variable,值设置为10[cpp]#Write your code below!my_variable = 103 第三节1 Python里面有三种数据类型 interage , floats , booleans2 Python是一个区分大小写的语言3 练习1 把变量my_int 值设置为72 把变量my_float值设置为1.233 把变量my_bool值设置为true[python]#Set the variables to the values listed in the instructions!my_int = 7my_float = 1.23my_bool = True6 Python的变量可以随时进行覆盖2 练习:my_int的值从7改为3,并打印出my_int[python]#my_int is set to 7 below. What do you think#will happen if we reset it to 3 and print the result? my_int = 7#Change the value of my_int to 3 on line 8!my_int = 3#Here's some code that will print my_int to the console: #The print keyword will be covered in detail soon!print my_int7 Pyhton的声明和英语很像8 Python里面声明利用空格在分开3 练习:查看以下代码的错误[python]def spam():eggs = 12return eggsprint spam()9 Python中的空格是指正确的缩进2 练习:改正上一节中的错误[python]def spam():eggs = 12return eggsprint spam()10 Python是一种解释执行的语言,只要你写完即可立即运行2 练习:设置变量spam的只为True,eggs的值为False [python]spam = Trueeggs = False11 Python的注释是通过“#”来实现的,并不影响代码的实现2 练习:给下面的代码加上一行注释[python]#this is a comments for Pythonmysterious_variable = 4212 Python的多行注释是通过“""" """ ”来实现的2 练习:把下面的代码加上多行[python]"""this is a Python course"""a = 513 Python有6种算术运算符+,-,*,/,**(幂),%2 练习:把变量count_to设置为1+2[python]#Set count_to equal to 1 plus 2 on line 3!count_to = 1+2print count_to14 Python里面求x^m,写成x**m2 练习:利用幂运算,把eggs的值设置为100 [python]#Set eggs equal to 100 using exponentiation on line 3! eggs = 10**2print eggs1 练习:1 写一行注释2 把变量monty设置为True3 把变量python值设置为1.2344 把monty_python的值设置为python的平方[python]#this is a Pythonmonty = Truepython = 1.234monty_python = python**2Python 入门教程2 ---- Tip Calculator1 把变量meal的值设置为44.50[python]#Assign the variable meal the value 44.50 on line 3!meal = 44.501 把变量tax的值设置为6.75%[python]meal = 44.50tax = 6.75/1001 设置tip的值为15%[python]#You're almost there! Assign the tip variable on line 5.meal = 44.50tax = 0.0675tip = 0.151 把变量meal的值设置为meal+meal*tax[python]#Reassign meal on line 7!meal = 44.50tax = 0.0675tip = 0.15meal = meal+meal*tax设置变量total的值为meal+meal*tax[python]#Assign the variable total on line 8!meal = 44.50tax = 0.0675tip = 0.15meal = meal + meal * taxtotal = meal + meal * tipprint("%.2f" % total)Python 入门教程3 ----Strings and Console Output15Python里面还有一种好的数据类型是String16一个String是通过'' 或者""包成的串3 设置变量brian值为"Always look on the bright side of life!" [python]#Set the variable brian on line 3!brian = "Always look on the bright side of life!"1 练习1 把变量caesar变量设置为Graham2 把变量praline变量设置为john3 把变量viking变量设置为Teresa[python]#Assign your variables below, each on its own line!caesar = "Graham"praline = "John"viking = "Teresa"#Put your variables above this lineprint caesarprint pralineprint viking17 Python是通过\来实现转义字符的2 练习把'Help! Help! I'm being repressed!' 中的I'm中的'进行转义[python]#The string below is broken. Fix it using the escape backslash!'Help! Help! \'\m being repressed!'18 我们可以使用""来避免转义字符的出现2 练习:把变量fifth_letter设置为MONTY的第五个字符[python]"""The string "PYTHON" has six characters,numbered 0 to 5, as shown below:+---+---+---+---+---+---+| P | Y | T | H | O | N |+---+---+---+---+---+---+0 1 2 3 4 5So if you wanted "Y", you could just type"PYTHON"[1] (always start counting from 0!)"""fifth_letter = "MONTY"[4]print fifth_letter19 介绍String的第一种方法,len()求字符串的长度2 练习:把变量parrot的值设置为"Norweigian Blue",然后打印parrot的长度[python]parrot = "Norwegian Blue"print len(parrot)20 介绍String的第二种方法,lower()把所有的大写字母转化为小写字母2 练习:把parrot中的大写字母转换为小写字母并打印[python]parrot = "Norwegian Blue"print parrot.lower()21 介绍String的第三种方法,upper()把所有的大写字母转化为小写字母2 练习:把parrot中的小写字母转换为大写字母并打印[python]parrot = "norwegian blue"print parrot.upper()第八节1 介绍String的第四种方法,str()把非字符串转化为字符串,比如str(2)是把2转化为字符串"2"2 练习: 设置一个变量pi值为3.14 , 把pi转化为字符串[python]"""Declare and assign your variable on line 4,then call your method on line 5!"""pi = 3.14print str(pi)22 主要介绍“.”的用处,比如上面的四个String的四个方法都是用到了点2 练习: 利用“.”来使用String的变量ministry的函数len()和upper(),并打印出[python]ministry = "The Ministry of Silly Walks"print len(ministry)print ministry.upper()23 介绍print的作用2 练习:利用print输出字符串"Monty Python"[python]"""Tell Python to print "Monty Python"to the console on line 4!"""print "Monty Python"1 介绍print来打印出一个变量2 练习:把变量the_machine_goes值赋值"Ping!",然后打印出[python]"""Assign the string "Ping!" tothe variable the_machine_goes online 5, then print it out on line 6!"""the_machine_goes = "Ping!"print the_machine_goes24 介绍我们可以使用+来连接两个String2 练习:利用+把三个字符串"Spam "和"and "和"eggs"连接起来输出[python]# Print the concatenation of "Spam and eggs" on line 3!print "Spam " + "and " + "eggs"25 介绍了str()的作用是把一个数字转化为字符串2 练习:利用str()函数把3.14转化为字符串并输出[python]# Turn 3.14 into a string on line 3!print "The value of pi is around " + str(3.14)第十四节1 介绍了字符串的格式化,使用%来格式化,字符串是%s2 举例:有两个字符串,利用格式化%s来输出[python]string_1 = "Camelot"string_2 = "place"print "Let's not go to %s. 'Tis a silly %s." % (string_1, string_2)1 回顾之前的内容2 练习1 设置变量my_string的值2 打印出变量的长度3 利用upper()函数并且打印变量值[python]# Write your code below, starting on line 3!my_string = "chenguolin"print len(my_string)print my_string.upper()Python 入门教程4 ---- Date and Time 26 介绍得到当前的时间datetime.now()2 练习1 设置变量now的值为datetime.now()2 打印now的值[python]<span style="font-size:18px">from datetime import datetimenow = datetime.now()print now</span>27 介绍从datetime.now得到的信息中提取出year,month等2 练习: 从datetime.now中得到的信息中提取出year,month,day [python]<span style="font-size:18px">from datetime import datetimenow = datetime.now()print now.monthprint now.dayprint now.year</span>28 介绍把输出日期的格式转化为mm//dd//yyyy,我们利用的是+来转化2 练习:打印当前的日期的格式为mm//dd//yyyy[python]<span style="font-size:18px">from datetime import datetimenow = datetime.now()print str(now.month)+"/"+str(now.day)+"/"+str(now.year)</span>29 介绍把输出的时间格式化为hh:mm:ss2 练习:打印当前的时间的格式为hh:mm:ss[python]<span style="font-size:18px">from datetime import datetimenow = datetime.now()print str(now.hour)+":"+str(now.minute)+":"+str(now.second)</span>第五节1 练习:把日期和时间两个连接起来输出[python]<span style="font-size:18px">from datetime import datetimenow = datetime.now()print str(now.month) + "/" + str(now.day) + "/" + str(now.year) + " "\+str(now.hour) + ":" + str(now.minute) + ":" + str(now.second)</span>Python 入门教程 5 ----Conditionals & Control Flow30 介绍Python利用有6种比较的方式== , != , > , >= , < , <=2 比较后的结果是True或者是False3 练习1 把bool_one的值设置为 17 < 118%1002 把bool_two的值设置为 100 == 33*3 + 13 把bool_two的值设置为 19 <= 2**44 把bool_four的值设置为 -22 >= -185 把bool_five的值设置为 99 != 98+1[python]#Assign True or False as appropriate on the lines below! bool_one = 17 < 118%100bool_two = 100 == 33*3+1bool_three = 19 <= 2**4bool_four = -22 >= -18bool_five = 99 != 98+131 介绍了比较的两边不只是数值,也可以是两个表达式2 练习1 把bool_one的值设置为 20 + -10*2 > 10%3%22 把bool_two的值设置为 (10+17)**2 == 3**63 把bool_two的值设置为 1**2**3 <= -(-(-1))4 把bool_four的值设置为 40/20*4 >= -4**25 把bool_five的值设置为 100**0.5 != 6+4 [python]# Assign True or False as appropriate on the lines below! bool_one = 20+-10*2 > 10%3%2bool_two = (10+17)**2 == 3**6bool_three = 1**2**3 <= -(-(-1))bool_four = 40/20*4 >= -4**2bool_five = 100**0.5 != 6+432 介绍了Python里面还有一种数据类型是booleans,值为True或者是False2 练习:根据题目的意思来设置右边的表达式[python]# Create comparative statements as appropriate on the lines below!# Make me true!bool_one = 1 <= 2# Make me false!bool_two = 1 > 2# Make me true!bool_three = 1 != 2# Make me false!bool_four = 2 > 2# Make me true!bool_five = 4 < 533 介绍了第一种连接符and的使用,只有and的两边都是True那么结果才能为True2 练习1 设置变量bool_one的值为False and False2 设置变量bool_two的值为-(-(-(-2))) == -2 and 4 >= 16**0.53 设置变量bool_three的值为19%4 != 300/10/10 and False4 设置变量bool_four的值为-(1**2) < 2**0 and 10%10 <= 20-10*25 设置变量bool_five的值为True and True[python]bool_one = False and Falsebool_two = -(-(-(-2))) == -2 and 4 >= 16**0.5bool_three = 19%4 != 300/10/10 and Falsebool_four = -(1**2) < 2**0 and 10%10 <= 20-10*2bool_five = True and True34 介绍了第二种连接符or的使用,只要or的两边有一个True那么结果才能为True2 练习1 设置变量bool_one的值为2**3 == 108%100 or 'Cleese' == 'King Arthur'2 设置变量bool_two的值为True or False3 设置变量bool_three的值为100**0.5 >= 50 or False4 设置变量bool_four的值为True or True5 设置变量bool_five的值为1**100 == 100**1 or 3*2*1 != 3+2+1 [python]bool_one = 2**3 == 108%100 or 'Cleese' == 'King Arthur'bool_two = True or Falsebool_three = 100**0.5 >= 50 or Falsebool_four = True or Truebool_five = 1**100 == 100**1 or 3*2*1 != 3+2+135 介绍第三种连接符not , 如果是not True那么结果为False,not False结果为True2 练习1 设置变量bool_one的值为not True2 设置变量bool_two的值为not 3**4 < 4**33 设置变量bool_three的值为not 10%3 <= 10%24 设置变量bool_four的值为not 3**2+4**2 != 5**25 设置变量bool_five的值为not not False[python]bool_one = not Truebool_two = not 3**4 < 4**3bool_three = not 10%3 <= 10%2bool_four = not 3**2+4**2 != 5**2bool_five = not not False36 介绍了由于表达式很多所以我们经常使用()来把一些表达式括起来,这样比较具有可读性2 练习1 设置变量bool_one的值为False or (not True) and True2 设置变量bool_two的值为False and (not True) or True3 设置变量bool_three的值为True and not (False or False)4 设置变量bool_four的值为not (not True) or False and (not True)5 设置变量bool_five的值为False or not (True and True)[python]bool_one = False or (not True) and Truebool_two = False and (not True) or Truebool_three = True and not (False or False)bool_four = not (not True) or False and (not True)bool_five = False or not (True and True)第八节1 练习:请至少使用and,or,not来完成以下的练习[python]# Use boolean expressions as appropriate on the lines below!# Make me false!bool_one = not ((1 and 2) or 3)# Make me true!bool_two = not (not((1 and 2) or 3))# Make me false!bool_three = not ((1 and 2) or 3)# Make me true!bool_four = not (not((1 and 2) or 3))# Make me true!bool_five = not (not((1 and 2) or 3)37 介绍了条件语句if38 if的格式如下, 比如[python]if 8 < 9:print "Eight is less than nine!"3 另外还有这elif 以及else,格式如下[python]if 8 < 9:print "I get printed!"elif 8 > 9:print "I don't get printed."else:print "I also don't get printed!"4 练习:设置变量response的值为'Y'[python]response = 'Y'answer = "Left"if answer == "Left":print "This is the Verbal Abuse Room, you heap of parrot droppings!"# Will the above print statement print to the console?# Set response to 'Y' if you think so, and 'N' if you think not.第十节1 介绍了if的格式[python]if EXPRESSION:# block line one# block line two# et cetera2 练习:在两个函数里面加入两个加入条件语句,能够成功输出[python]def using_control_once():if 1 > 0:return "Success #1"def using_control_again():if 1 > 0:return "Success #2"print using_control_once()print using_control_again()39 介绍了else这个条件语句2 练习:完成函数里面else条件语句[python]answer = "'Tis but a scratch!"def black_knight():if answer == "'Tis but a scratch!":return Trueelse:return False # Make sure this returns Falsedef french_soldier():if answer == "Go away, or I shall taunt you a second time!":return Trueelse:return False # Make sure this returns False40 介绍了另外一种条件语句elif的使用2 练习:在函数里面第二行补上answer > 5,第四行补上answer < 5 , 从而完成这个函数[python]def greater_less_equal_5(answer):if answer > 5:return 1elif answer < 5:return -1else:return 0print greater_less_equal_5(4)print greater_less_equal_5(5)print greater_less_equal_5(6)第十三节1 练习:利用之前学的比较以及连接符以及条件语句补全函数。

Python基础教程第一章Python的介绍1、python介绍一种面向对象,面向函数的解释型计算机程序设计语言,由荷兰人Guido van Rossum于1989年发明,第一个公开发行版发行于1991年。
Python是纯粹的自由软件,源代码和解释器CPython遵循GPL(GNU General Public License)协议[2]. Python语法简洁清晰,特色之一是强制用空白符(white space)作为语句缩进。
Python具有丰富和强大的库。
它常被昵称为胶水语言,能够把用其他语言制作的各种模块(尤其是C/C++)很轻松地联结在一起。
常见的一种应用情形是,使用Python快速生成程序的原型(有时甚至是程序的最终界面),然后对其中[3] 有特别要求的部分,用更合适的语言改写,比如3D游戏中的图形渲染模块,性能要求特别高,就可以用C/C++重写,而后封装为Python可以调用的扩展类库。
需要注意的是在您使用扩展类库时可能需要考虑平台问题,某些可能不提供跨平台的实现。
2、Python的历史自从20世纪90年代初Python语言诞生至今,它已被逐渐广泛应用于系统管理任务的处理和Web编程。
Python的创始人为Guido van Rossum。
1989年圣诞节期间,在阿姆斯特丹,Guido为了打发圣诞节的无趣,决心开发一个新的脚本解释程序,做为ABC 语言的一种继承。
之所以选中Python(大蟒蛇的意思)作为该编程语言的名字,是因为他是一个叫Monty Python的喜剧团体的爱好者。
ABC是由Guido参加设计的一种教学语言。
就Guido本人看来,ABC 这种语言非常优美和强大,是专门为非专业程序员设计的。
但是ABC语言并没有成功,究其原因,Guido 认为是其非开放造成的。
Guido 决心在Python 中避免这一错误。
同时,他还想实现在ABC 中闪现过但未曾实现的东西。
就这样,Python在Guido手中诞生了。
Python入门教程网络安全网络安全工具Python入门教程-网络安全工具Python是一种简单易学的编程语言,它具有广泛的应用领域,包括网络安全。
网络安全是当今互联网时代一个重要的议题,人们越来越重视保护自己的隐私和个人信息。
Python提供了丰富的库和工具,可以帮助我们开发和实现各种网络安全功能。
本文将介绍几个常用的Python网络安全工具,帮助读者入门这个领域。
一、ScapyScapy是一个强大的Python库,用于创建和发送网络数据包。
它可以用于网络嗅探、网络扫描、数据包分析等网络安全任务。
Scapy具有灵活的API,可以自定义和控制数据包的各个字段,从而轻松定制自己的网络工具。
例如,我们可以使用Scapy来实现简单的端口扫描程序,帮助我们发现网络中开放的端口,以便进行进一步的安全检查。
二、hashlibhashlib是Python的内置库,提供了常见的散列算法,如MD5、SHA-1、SHA-256等。
散列算法是密码学中常用的工具,用于验证文件的完整性和一致性。
我们可以使用hashlib来计算文件的哈希值,并与预期的哈希值进行比较,以确保文件的完整性。
这对于下载文件、检查文件的安全性非常有用。
三、requestsrequests是Python中最流行的HTTP库之一,它简化了与网络服务交互的过程。
requests提供了各种方法,例如发送HTTP请求、处理响应、处理Cookies等。
它可以用于编写网络爬虫、构建Web应用程序以及进行各种网络安全测试。
requests库简洁而强大,适合初学者入门。
四、paramikoparamiko是一个Python库,用于SSH(Secure Shell)协议的实现。
SSH是一种安全的网络协议,用于在不安全的网络上进行安全的远程登录和数据交换。
paramiko可以用于编写SSH客户端和服务器,实现安全的远程命令执行、文件传输等功能。
它是开源的,具有良好的可扩展性和灵活性。
编程语⾔python⼊门-Python基础教程,Python⼊门教程(⾮常详细)Python 英⽂本意为"蟒蛇”,直到 1989 年荷兰⼈ Guido van Rossum (简称 Guido)发明了⼀种⾯向对象的解释型编程语⾔(后续会介绍),并将其命名为 Python,才赋予了它表⽰⼀门编程语⾔的含义。
图 1 Python 图标说道 Python,它的诞⽣是极具戏曲性的,据 Guido 的⾃述记载,Python 语⾔是他在圣诞节期间为了打发时间开发出来的,之所以会选择Python 作为该编程语⾔的名字,是因为 Guido 是⼀个叫 Monty Python 戏剧团体的忠实粉丝。
看似 Python 是"不经意间”开发出来的,但丝毫不⽐其它编程语⾔差。
⾃ 1991 年 Python 第⼀个公开发⾏版问世后,2004 年 Python 的使⽤率呈线性增长,不断受到编程者的欢迎和喜爱;2010 年,Python 荣膺 TIOBE 2010 年度语⾔桂冠;2017 年,IEEE Spectrum 发布的 2017 年度编程语⾔排⾏榜中,Python 位居第 1 位。
直⾄现在(2019 年 6 ⽉份),根据 TIOBE 排⾏榜的显⽰,Python 也居于第 3 位,且有继续提升的态势(如表 2 所⽰)。
表 2 TIOBE 2019 年 6 ⽉份编程语⾔排⾏榜(前 10 名)Jun 2019Jun 2018ChangeProgramming LanguageRatings11Java15.004%22C13.300%34Python8.530%43C++7.384%56Visual Basic .NET4.624%654.483%872.567%99SQL2.224%1016Assembly language1.479%Python语⾔的特点相⽐其它编程语⾔,Python 具有以下特点。
Python基础教程Change Listversion date author content0.12009-08-01枫无眠简介0.22009-08-02..基础编程0.32009-08-03..基础编程(文件操作)0.42009-08-04..数据库编程,dbapi2规范,cx_oralce0.52009-08-05..cx_oralce例子目录1简介31.1安装python41.2安装ide环境__SPE4 2基础编程52.1基本概念82.1.1python特色82.1.2变量、运算符与表达式112.2流程控制142.2.1顺序执行142.2.2条件执行if...else....:152.2.3循环执行for...in...:152.3函数162.3.1自定义函数162.3.2常用内置函数172.4容器192.4.1列表192.4.2元组202.4.3字典212.4.4序列222.5模块232.5.1概念232.5.2常用的标准模块242.6文件操作27 3数据库编程293.1DB-API 2.0规范293.1.1模块接口connect()方法.293.1.2Connection对象293.1.3Cursor对象303.2oracle(cx_Oracle)313.2.1安装313.2.2连接数据库323.2.3直接sql323.2.4预编译343.2.5数组绑定353.2.6blob353.2.7查询363.2.8例子373.3Mssql Server编程413.4Mysql编程41 1简介Python是一种脚本语言,已经有20多年的历史,比现在流行的Java和C#要早很多年。
不要一听说是脚本语言就认为他只能做一些简单的事情。
其实凡是你能想到的Java和C#能做的编程,Pyton都能胜任。
比如网络编程,游戏编程,web 编程等等,甚至在smbian的手机上都能使用Python来进行编程。


实用标准Python 入门教程超详细1小时学会Python为什么使用Python假设我们有这么一项任务: 简单测试局域网中的电脑是否连通. 这些电脑的ip 范围从192.168.0.101 到 192.168.0.200.思路 : 用 shell编程.(Linux通常是bash而Windows是批处理脚本). 例如 , 在 Windo ws 上用 ping ip的命令依次测试各个机器并得到控制台输出. 由于 ping 通的时候控制台文本通常是 "Reply from ... "而不通的时候文本是"time out ... " ,所以,在结果中进行字符串查找 , 即可知道该机器是否连通.实现 :Java 代码如下 :String cmd="cmd.exe ping";String ipprefix="192.168.10.";int begin=101;int end=200;Process p=null ;for ( int i=begin;i<end;i++){p= Runtime.getRuntime().exec(cmd+i);String line= null ;BufferedReader reader= new BufferedReader( new InputStreamReader(p.getInputStream()));while ((line= reader.readLine())!= null ){//Handling line, may logs it.}reader.close();p.destroy();}这段代码运行得很好, 问题是为了运行这段代码, 你还需要做一些额外的工作. 这些额外的工作包括:1.编写一个类文件2.编写一个 main 方法3.将之编译成字节代码4. 由于字节代码不能直接运行, 你需要再写个小小的bat 或者 bash 脚本来运行 .当然 , 用 C/C++同样能完成这项工作. 但 C/C++不是跨平台语言. 在这个足够简单的例子中也许看不出C/C++和 Java 实现的区别 , 但在一些更为复杂的场景, 比如要将连通与否的信息记录到网络数据库. 由于 Linux 和 Windows的网络接口实现方式不同, 你不得不写两个函数的版本 . 用 Java 就没有这样的顾虑.同样的工作用Python 实现如下 :import subprocesscmd="cmd.exe"begin=101end=200while begin<end:p=subprocess.Popen(cmd,shell=True,stdout=subprocess.PIPE,stdin=subprocess.PIPE,stderr=subprocess.PIPE)p.stdin.write("ping192.168.1."+str(begin)+"\n")p.stdin.close()p.wait()print"execution result:%s"%p.stdout.read()对比 Java,Python的实现更为简洁, 你编写的时间更快. 你不需要写main 函数 , 并且这个程序保存之后可以直接运行. 另外 , 和 Java 一样 ,Python也是跨平台的.有经验的C/Java 程序员可能会争论说用C/Java 写会比 Python 写得快 . 这个观点见仁见智 . 我的想法是当你同时掌握Java 和 Python 之后 , 你会发现用Python 写这类程序的速度会比 Java 快上许多 . 例如操作本地文件时你仅需要一行代码而不需要Java 的许多流包装类.各种语言有其天然的适合的应用范围 . 用 Python 处理一些简短程序类似与操作系统的交互编程工作最省时省力 .Python 应用场合足够简单的任务, 例如一些 shell编程.如果你喜欢用Python 设计大型商业网站或者设计复杂的游戏, 悉听尊便 .2快速入门2.1 Hello world安装完 Python 之后 ( 我本机的版本是 2.5.4),打开IDLE(Python GUI) ,该程序是Python 语言解释器 , 你写的语句能够立即运行. 我们写下一句著名的程序语句:print"Hello,world!"并按回车 . 你就能看到这句被K&R引入到程序世界的名言.在解释器中选择"File"--"New Window"或快捷键Ctrl+N ,打开一个新的编辑器.写下如下语句 :print"Hello,world!"raw_input("Press enter key to close this window");保存为 a.py 文件 . 按 F5, 你就可以看到程序的运行结果了. 这是 Python 的第二种运行方式 .找到你保存的 a.py 文件 , 双击 . 也可以看到程序结果.Python的程序能够直接运行,对比 Java, 这是一个优势.2.2国际化支持我们换一种方式来问候世界. 新建一个编辑器并写如下代码:print" 欢迎来到奥运中国!"raw_input("Press enter key to close this window");在你保存代码的时候,Python会提示你是否改变文件的字符集, 结果如下 :# -*- coding: cp936 -*-print" 欢迎来到奥运中国!"raw_input("Press enter key to close this window");将该字符集改为我们更熟悉的形式:# -*- coding: GBK -*-print" 欢迎来到奥运中国!" #使用中文的例子raw_input("Press enter key to close this window");程序一样运行良好.2.3方便易用的计算器用微软附带的计算器来计数实在太麻烦了. 打开 Python 解释器 , 直接进行计算 :a=100.0b=201.1c=2343print(a+b+c)/c2.4字符串,ASCII和UNICODE可以如下打印出预定义输出格式的字符串:print"""Usage: thingy[OPTIONS]-h Display this usage m essage -H hostname Hostname to connect to"""字符串是怎么访问的?请看这个例子:word="abcdefg"a=word[2]print"a is:"+ab=word[1:3]print"b is:"+b # index 1 and 2 elements of word.c=word[:2]print"c is:"+c # index0 and 1 elements of word.d=word[0:]print"d is:"+d # All elements of word.e=word[:2]+word[2:]print"e is:"+e # All elements of word.f=word[-1]print"f is:"+f# The last elements of word.g=word[-4:-2]print"g is:"+g # index 3 and 4 elements of word.h=word[-2:]print"h is:"+h # The last two elements.i=word[:-2]print"i is:"+i# Everything except the last two characters l=len(word)print"Length of word is:"+ str(l)请注意 ASCII 和 UNICODE字符串的区别 :print"Input your Chinese name:"s=raw_input("Press enter to be continued");print"Your name is:"+s;l=len(s)print"Length of your Chinese name in asc codes is:"+str(l);a=unicode(s,"GBK")l=len(a)print"I'm sorry we should use unicode char!Characters number of your Chinese \ name in unicode is :"+str(l);2.5使用List类似 Java 里的 List,这是一种方便易用的数据类型:word=['a','b','c','d','e','f','g']a=word[2]print"a is:"+ab=word[1:3]print"b is:"print b # index 1 and 2 elements of word.c=word[:2]print"c is:"print c # index0 and 1 elements of word.d=word[0:]print"d is:"print d # All elements of word.e=word[:2]+word[2:]print"e is:"print e# All elements of word.f=word[-1]print"f is:"print f#The last elements of word.g=word[-4:-2]print"g is:"print g#index3and4elements of word.h=word[-2:]print"h is:"print h#The last two elements.i=word[:-2]print"i is:"print i#Everything except the last two characters l=len(word)print"Length of word is:"+ str(l)print"Adds new element"word.append('h')print word2.6条件和循环语句# Multi-way decisionx=int (raw_input("Please enter an integer:"))if x<0:x=0print"Negative changed to zero"elif x==0:else :print"More"#Loops Lista = ['cat','window','defenestrate']for x in a:print x, len(x)2.7如何定义函数#Define and invoke function.def sum(a,b):return a+bfunc= sumr=func(5,6)print r#Defines function with default argument def add(a,b=2):return a+br=add(1)print rr=add(1,5)print r并且 , 介绍一个方便好用的函数:# The range()functiona =range(5,10)print aa = range(-2,-7)print aa = range(-7,-2)print aa = range(-2,-11,-3)# The 3rd parameter stands for stepprint a2.8文件I/Ospath="D:/download/baa.txt"f=open(spath,"w")#Opens file for writing.Creates this file doesn't exist.f.write("First line 1.\n")f.writelines("First line 2.")f.close()f=open(spath,"r")#Opens file for readingfor line in f:print linef.close()2.9异常处理s=raw_input("Input your age:")if s=="":raise Exception("Input must no be empty.")try :i= int (s)except ValueError:print"Could not convert data to an integer."except:print"Unknown exception!"else : # It is useful for code that must be executed if the try clause does n ot raise an exceptionprint"You are %d" % i,"years old"finally : # Clean up actionprint"Goodbye!"2.10类和继承class Base:def __init__(self):self.data=[]def add(self,x):self.data.append(x)def addtwice(self,x):self.add(x)self.add(x)# Child extends Baseclass Child(Base):def plus(self,a,b):return a+boChild=Child()oChild.add("str1")print oChild.dataprint oChild.plus(2,3)2.11包机制每一个 .py 文件称为一个module,module之间可以互相导入. 请参看以下例子:# a.pydef add_func(a,b):return a+b# b.pyfrom a import add_func# Also can be : import aprint"Import add_func from module a"print"Result of 1plus2is:"print add_func(1,2)#If using"import a" ,then here should be "a.add_fun c"module 可以定义在包里面.Python定义包的方式稍微有点古怪, 假设我们有一个 par ent文件夹 , 该文件夹有一个child子文件夹 .child中有一个 module a.py .如何让 Pytho n 知道这个文件层次结构?很简单 , 每个目录都放一个名为_init_.py的文件 . 该文件内容可以为空 . 这个层次结构如下所示:parent--__init_.py--child--__init_.py--a.pyb.py那么 Python 如何找到我们定义的module?在标准包 sys 中,path属性记录了Python 的包路径 . 你可以将之打印出来:import sysprint sys.path通常我们可以将module 的包路径放到环境变量PYTHONPATH中, 该环境变量会自动添加到 sys.path属性.另一种方便的方法是编程中直接指定我们的module 路径到 sys.path 中:import syssys.path.append('D:\\download')from parent.child.a import add_funcprint sys.pathprint"Import add_func from module a"print"Result of 1 plus 2is:"print add_func(1,2)总结你会发现这个教程相当的简单. 许多Python特性在代码中以隐含方式提出, 这些特性包括 :Python不需要显式声明数据类型, 关键字说明 , 字符串函数的解释等等. 我认为一个熟练的程序员应该对这些概念相当了解, 这样在你挤出宝贵的一小时阅读这篇短短的教程之后, 你能够通过已有知识的迁移类比尽快熟悉Python, 然后尽快能用它开始编程.当然 ,1 小时学会 Python 颇有哗众取宠之嫌. 确切的说 , 编程语言包括语法和标准库.语法相当于武术招式, 而标准库应用实践经验则类似于内功, 需要长期锻炼.Python学习了原因 ), 在开篇我们看到了 Python 如何调用 Windows cmd的例子 , 以后我会尽量写上各标准库的用法和一些应用技巧 , 让大家真正掌握 Python.但不管怎样 , 至少你现在会用Python代替繁琐的批处理写程序了. 希望那些真的能在一小时内读完本文并开始使用Python 的程序员会喜欢这篇小文章, 谢谢 !。
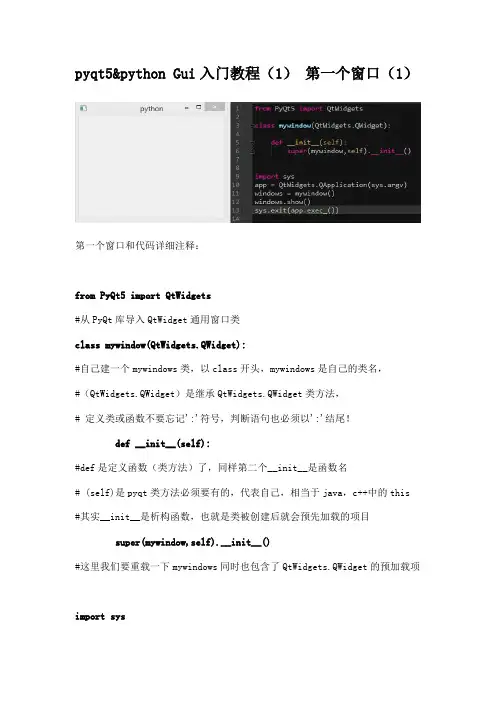
pyqt5&python Gui入门教程(1)第一个窗口(1)第一个窗口和代码详细注释:from PyQt5 import QtWidgets#从PyQt库导入QtWidget通用窗口类class mywindow(QtWidgets.QWidget):#自己建一个mywindows类,以class开头,mywindows是自己的类名,#(QtWidgets.QWidget)是继承QtWidgets.QWidget类方法,# 定义类或函数不要忘记':'符号,判断语句也必须以':'结尾!def __init__(self):#def是定义函数(类方法)了,同样第二个__init__是函数名# (self)是pyqt类方法必须要有的,代表自己,相当于java,c++中的this #其实__init__是析构函数,也就是类被创建后就会预先加载的项目super(mywindow,self).__init__()#这里我们要重载一下mywindows同时也包含了QtWidgets.QWidget的预加载项import sysapp = QtWidgets.QApplication(sys.argv)#pyqt窗口必须在QApplication方法中使用,#要不然会报错 QWidget: Must construct a QApplication before a QWidget windows = mywindow()# 生成过一个实例(对象), windows是实例(对象)的名字,可以随便起!# mywindows()是我们上面自定义的类windows.show()#有了实例,就得让他显示这里的show()是QWidget的方法,用来显示窗口的!sys.exit(app.exec_())#启动事件循环pyqt5&python Gui入门教程(2)第一个窗口(2)上图是第一篇教程,下面的显示效果都一样,我们来看看有什么不同1、类的名字、实例的名字都换了,2、多了一个if __name__ == "__main__": 以及下面的代码缩进了,层次改变了1、我们把结尾的5句代码,单独建立了一个函数2、然后直接调用函数3、注意两个def的缩进,第一个def缩进了代表是在class里面,第二个和class平齐,则是在外面。
Python编程⼊门教程(以在线评测平台为载体)⼀、PythonPython由荷兰数学和计算机科学研究学会的Guido van Rossum 于1990 年代初设计,也就是龟叔,顺便⼀提,Van 这个姓⽒代表是贵族后裔。
Python提供了⾼效的⾼级数据结构,还能简单有效地⾯向对象编程。
别⼈帮你造好了⼤楼,你拿来装修后做什么是你的事情。
Python是⾯向对象的语⾔,是⼀种抽象的软件开发的思想⽅法,在Python⾥⼀切皆对象。
Python是解释型语⾔,他会将将源代码逐条转换成⽬标代码同时逐条运⾏。
⽽C/C++等编译型语⾔会⼀次性将代码转换为⽬标代码,所以运⾏速度更快。
最⼴泛使⽤的Python解释器是CPython,其是⽤C语⾔实现的Python解释器。
Python语法很多来⾃C,但是其⼜增添了⼀些语法规则,如强制缩进。
Python可以花更多的时间⽤于思考程序的逻辑,⽽不是具体的实现细节,所以受科研⼯作者深度热爱。
Python简单易学,所以作为⾮计算机专业学⽣的⼊门语⾔也是⾮常友好的,不⽤担⼼学不会。
Python具有⾮常丰富的模块,它可以帮助你处理各种⼯作。
⽐如OCR识别,⼀⾏代码,如pytesseract.image_to_string("sample.jpg"),即可完成对"sample.jpg"这个图像⽂件的⽂字识别。
使⽤⼏⾏代码能完成对表格的复杂处理。
当然他的功能远不如此,图形界⾯开发、系统⽹络运维、科学与数字计算均可⽤Python轻松完成。
Python取各语⾔之长,前⾯我们已经提到过其语法很多来⾃于C,其标准库的正则表达式参考了Perl,⽽lambda, map, filter, reduce等函数参考了Lisp。
如果你是计算机专业,我建议你从C学起,⽼⽼实实将数据结构与算法学踏实,这对你学习Python将会⾮常有帮助。
⽆论学习什么语⾔,算法都是编程的核⼼。
pythonpygame⼊门教程⽬录⼀、安装⼆、第⼀个代码实例三、绘制⼀个矩形框四、绘制矩形框的进阶版本五、绘制⼀条直线六、绘制⼀条弧线⼀、安装在 cmd 命令中输⼊:pip install pygame即可安装成功了⼆、第⼀个代码实例代码快⾥⾯有注释,想必⼤家都可以看懂的。
import pygameimport sysimport pygame.localspygame.init()# 初始化screen = pygame.display.set_mode((500, 600))# 设置屏幕的⼤⼩pygame.display.set_caption("First Demo")# 设置屏幕的名称Seashell = 255, 245, 238# 设置 RGB 颜⾊NavyBlue = 0, 0, 128# 设置 RGB 颜⾊while True:for event in pygame.event.get():if event.type == pygame.locals.QUIT or event.type == pygame.locals.KEYDOWN:# 如果点击关闭按钮,或者按下任意键,那么退出程序sys.exit()else:passscreen.fill(Seashell)position = (250, 300)pygame.draw.circle(screen, color=NavyBlue, center=position, radius=100, width=50)pygame.display.update()运⾏结果这个实例只需要强调⼀下的是:1、QUIT表⽰按下关闭的按钮,KEYDOWN是按下任意⼀个按键,这两个都是pygame内部⾃⼰定义好的常量。
2、颜⾊可以⽤RGB进⾏表⽰三、绘制⼀个矩形框import pygameimport pygame.localsimport syspygame.init()screen = pygame.display.set_mode((600, 500))pygame.display.set_caption("Drawing Rectangles")# 设置名称Blue = 0, 0, 255Purple = 160, 32, 240while True:for event in pygame.event.get():if event.type == pygame.locals.QUIT or event.type == pygame.locals.KEYDOWN: # 还是如果说点击了关闭的按键,或者是按下了任意键,那么就可以关闭程序了 sys.exit()pos = (300, 250, 100, 100)# 这⾥的 pos 不仅设置了位置,⽽且设置了长度以及宽度screen.fill(Purple)pygame.draw.rect(screen, Blue, pos, width=10)# width 是线条的宽度,screen 表⽰指定使⽤哪⼀个屏幕进⾏显⽰pygame.display.update()代码运⾏的结果;四、绘制矩形框的进阶版本import pygameimport pygame.localsimport sysimport timepygame.init()screen = pygame.display.set_mode((600, 500))pygame.display.set_caption("Drawing Moving Rectangle")color1 = 139, 0, 139color2 = 104, 131, 139px = 200py = 300# 初始化的位置应该放在外⾯,否则会⼀直在⼀个地⽅绘制图形了vx = 10vy = 20# 初始化速度也应该放在外⾯,否则会⼀直以恒定的速度运动while True:for event in pygame.event.get():if event.type in (pygame.locals.QUIT, pygame.locals.KEYDOWN):# 如果是按下了任意键或者是点击了关闭按钮,那么退出程序sys.exit()# vx = 10# vy = 20# px = 200# py = 300px += vxpy += vyif px <= 0 or px + 100 >= 600:vx = - vx# else:# px += vxif py <= 0 or py + 100 >= 500:vy = - vy# else:# py += vyscreen.fill(color1)pygame.draw.rect(screen, color2, (px, py, 100, 100))time.sleep(0.2)pygame.display.update()五、绘制⼀条直线# 绘制线条import pygameimport pygame.localsimport sysimport timecolor1 = 0, 80, 0color2 = 100, 255, 200pygame.init()# 初始化screen = pygame.display.set_mode((600, 500))# 设置显⽰屏幕pygame.display.set_caption("Drawing Lines")# 设置显⽰框的标题的名称while True:for event in pygame.event.get():if event.type == pygame.locals.QUIT or event.type == pygame.locals.KEYDOWN: sys.exit()# 与前⾯⼀样,如果说按下任意键或者是按下关闭的按钮,那么我们就退出程序 screen.fill(color1)pygame.draw.line(screen, color2, (150, 150), (450, 450), width=10)pygame.display.update()运⾏代码的结果展⽰;在这⾥,我们再⼀次详细地介绍⼀下line⾥⾯的各个参数的意义:pygame.draw.line(screen, color2, (150, 150), (450, 450), width=10)1、第⼀个参数:设置⽤于显⽰的屏幕是谁2、第⼆个参数:设置直线段的颜⾊3、第三个阐述:设置起点,也就是开始的位置4、第四个参数:设置终点,也就是停⽌的位置5、第五个参数:设置线条的宽度或者说是粗细的程度最后再说⼀句,别忘记了加上⼀个pygame.display.update()⽤来更新画⾯六、绘制⼀条弧线⾸先,我们绘制⼀个圆的⼀部分,也就是真正的圆弧形:import mathimport pygameimport pygame.localsimport sysimport timecolor1 = 144, 238, 144color2 = 0, 0, 139pygame.init()pygame.display.set_caption("Drawing Arcs")screen = pygame.display.set_mode((600, 500))while True:for event in pygame.event.get():if event.type in (pygame.locals.QUIT, pygame.locals.KEYDOWN):sys.exit()screen.fill(color1)ang1 = math.radians(45)# 设置起始⾓位置ang2 = math.radians(315)# 设置结束的⾓位置# 设置矩形框"""元组中;第⼀个参数,矩形框的左上⾓的横坐标第⼆个参数,矩形框的右上⾓的纵坐标第三个参数,矩形框的长度即就是:相对于 x 轴平⾏的⽅向的长度第四个参数,矩形框的宽度即就是:相对于 y 轴平⾏的⽅向的长度另外,如果矩形框的长度和宽度不相等的话,绘制出来的弧线不是圆的⼀部分,⽽是椭圆的⼀部分"""rect1 = 100, 50, 400, 400# 第⼀个矩形框----画园的⼀部分rect2 = 200, 200, 200, 100# 第⼆个矩形框----画椭园的⼀部分pygame.draw.arc(screen, color2, rect1, ang1, ang2, width=10)# 参数的含义解释"""第⼀个参数:屏幕第⼆个参数:颜⾊第三个参数:开始的⾓度第四个参数:结束的⾓度第五个参数:线条的宽度"""pygame.display.update()接下来,我们绘制⼀个椭圆形的⼀部分:正如前⼀个实例中的注释所说,如果说:这个矩形框的长度和宽度不是相等的,那么,使⽤这个⽅法就是会绘制⼀个放缩以后的椭圆形。
pyQt5QtDesigner简易⼊门教程python3.6 & pyQt5 & QtDesigner 简易⼊门教程1. python 官⽹下载安装python3.6并配置好环境;2.cmd下运⾏:pip install PyQt5 安装PyQt库;3.cmd下运⾏:pip3.6 install PyQt5-tools 安装QtDesignerQtDesigner⼀般默认被安装到Python36\Lib\site-packages\pyqt5-tools路径下。
安装成功后在此路径下打开designer.exe即可进⾏QT界⾯的设计。
设计完成后保存为.ui格式⽂件。
其实.ui⽂件就是⼀个xml⽂件,⾥⾯有界⾯元素的各种信息。
然后在python代码中使⽤loadUi()函数加载ui⽂件。
这个过程其实是解析xml⽂件并转译为python程序对象的过程。
import sysfrom PyQt5.QtWidgets import QApplication, QMainWindowfrom PyQt5.uic import loadUiclass MainWindow(QMainWindow):def __init__(self, parent=None):super(MainWindow, self).__init__(parent)loadUi('qtdesigner.ui', self)self.pushButton.clicked.connect(self.say)def say(self):bel.setText("哈哈哈")print("哈哈哈")app = QApplication(sys.argv)w = MainWindow()w.show()sys.exit(app.exec())加载后界⾯内的各种对象都可以被python程序代码调⽤,属性也可以动态改变。
I n p u ta n do u t p u t输入和输出61输入和输出概述Input and output overview 2命令行参数Command line parameter4文件和文件对象F i l e a n d f i l e o b j e c tCONTENT3标准输入和输出函数S t a n d a r d i n p u t a n do u t p u t f u n c t i o n s6重定向和管道Redirection and pipeline 5标准输入、输出和错误流Standard input,output,a n d e r r o r s t r e a m s3输入和输出概述Python程序通常可以使用下列方式之一实现交互功能:•命令行参数•标准输入和输出函数•文件输入和输出•图形化用户界面4命令行参数——sys.argv•命令行参数是Python语言的标准组成。
用户在命令行中Python程序之后输入的参数,程序中可以通过列表sys.argv访问命令行参数。
•argv[0]为Python脚本名,argv[1]为第一个参数,以此类推。
import sys, randomn = int(sys.argv[1])for i in range(n):print(random.randrange(0,100))C:\Users\wy>python C:\Users\wy\Desktop\2017Python课程\ch06\randomseq.py 1086【例6.1】命令行参数示例33338419545672669C:\Users\wy>5命令行参数——argparse 模块•argparse 模块是用于解析命名的命令行参数,生成帮助信息的Python 标准模块。
【例6.2】命令行参数解析数示例import argparseparser = argparse.ArgumentParser()parser.add_argument('--length', default=10, type=int, help='长度')parser.add_argument('--width', default=5, type=int, help='长度')args = parser.parse_args()area = args.length * args.width print('面积=', area)面积= 50>>>Python内置的输入函数input和输出函数print,格式为:input([prompt])print(value,…,sep= ‘’,end = ‘\n’,file = sys.stdout,flush = False)•print函数用于打印一行内容,即将多个以分隔符(sep,默认为空格)分隔的值(value,...,以逗号分隔的值),写入到指定文件流(file,默认为控制台sys.stdout)。
参数end指定换行符;flush指定是否强制写入到流。
【例6.3】输入函数和输出函数示例1【例6.4】输入函数和输出函数示例2print(1,2,3)print(1,2,3,sep=',')print(1,2,3,sep=',',end='.\n')for i in range(5):print(i, end=' ‘)========= RESTART:C:\Users\wy\Desktop\2017Python课程\ch06\io_test1.py =========1 2 31,2,31,2,3.0 1 2 3 4>>> import datetimesName = input("请输入您的姓名:")birthyear = int(input("请输入您的出生年份:"))#把输入值通过int转换为整型age = datetime.date.today().year -birthyearprint("您好!{0}。
您{1}岁。
".format(sName, age)) ==== RESTART: C:\Users\wy\Desktop\2017Python 课程\Pythonpa\ch06\io_test2.py ====请输入您的姓名:张三请输入您的出生年份:1996您好!张三。
您21岁。
>>>8标准输入和输出函数——交互式用户输入【例6.5】交互式用户输入示例a=[] #初始化列表x=float(input("请输入一个实数,输入-1终止:"))while x != -1:a.append(x) #将所输入的实数添加到列表中x=float(input("请输入一个实数,输入-1终止:"))print("计数:", len(a)) #列表长度即为实数个数print("求和:", sum(a)) #列表中各元素求和print("平均值:", sum(a)/len(a)) #列表中各元素求平均值=========== RESTART: C:\Users\wy\Desktop\2017Python课程\ch06\stat.py ===========请输入一个实数,输入-1终止:1.5请输入一个实数,输入-1终止:2.8请输入一个实数,输入-1终止:4.6请输入一个实数,输入-1终止:3.9请输入一个实数,输入-1终止:34.334请输入一个实数,输入-1终止:-1计数:5求和:47.134平均值:9.4268>>>9标准输入和输出函数——运行时提示输入密码【例6.6】交互式用户输入示例•可以使用getpass 模块,在程序运行时提示用户输入密码,保证用户输入的密码在控制台中不回显。
•getpass.getpass (prompt=‘Password:’,stream=None)•getpass.getuser()import getpassusername = input("用户名:") #提示输入用户名passwd = getpass.getpass("密码:") #提示输入密码if username == 'jianghong' and passwd == 'password':#实际运用中,需要与数据库中的账户信息比较print('登录成功')else:print('登录失败’)========= RESTART: C:\Users\wy\Desktop\2017Python 课程\ch06\getpass1.py =========用户名:123456Warning (from warnings module):File "C:\Users\wy\AppData\Local\Programs\Python\Python37\lib\getpass.py", line 100return fallback_getpass(prompt, stream)GetPassWarning: Can not control echo on the terminal.Warning: Password input may be echoed.密码:登录失败>>>10文件和文件对象——open函数内置函数open()用于打开或创建文件对象,其语法格式如:f = open(file,mode = ‘r’,buffering = -1,encoding = None)•使用open()函数时,可以指定打开文件的模式mode为:'r'(只读)、'w'(写入,写入前删除旧内容)、'x'(创建新文件,如果文件存在,则导致FileExistsError)、'a'(追加)、'b'(二进制文件)、't'(文本文件,默认值)、'+'(更新,读写)•通过内置函数open()可创建或打开或创建文件对象;通过文件对象的实例方法write/writelines可以写入字符串到文本文件;通过文件对象的实例方法read/readline,可以读取文本文件的内容;文件读写完成后,应该使用close方法关闭文件【例6.7】读取并输出文本文件示例import sysfilename = sys.argv[0] #所读取并输出的就是本程序文件type_file.py f=open(filename, 'r', encoding='utf-8') #打开文件line_no=0 #统计行号while True:line_no += 1 #行号计数line = f.readline() #读取行信息if line:print(line_no, ":", line) #输出行号和该行内容else:breakf.close() #关闭打开的文件【例6.7】读取并输出文本文件示例======== RESTART: C:\Users\wy\Desktop\2017Python课程\ch06\type_file.py ========1 : import sys2 : filename = sys.argv[0] #所读取并输出的就是本程序文件type_file.py3 : f=open(filename, 'r', encoding='utf-8') #打开文件4 : line_no=0 #统计行号5 : while True:6 : line_no += 1 #行号计数7 : line = f.readline() #读取行信息8 : if line:9 : print(line_no, ":", line) #输出行号和该行内容10 : else:11 : break12 : f.close() #关闭打开的文件13 :>>>•实现上下文管理协议的对象with context [as var]•文件对象支持使用with语句,确保打开的文件自动关闭with open(file,mode) as f:【例6.8】利用with语句读取并输出文本示例import sysfilename = sys.argv[0] #所读取并输出的就是本程序文件type_file_with.pyline_no=0 #统计行号with open(filename, 'r', encoding='utf8') as f: #使用with语句实现上下文管理协议for line in f:line_no+= 1 #行号计数print(line_no, ":", line) #输出行号和该行内容f.close()====== RESTART: C:\Users\wy\Desktop\2017Python 课程\ch06\type_file_with.py ======1 : import sys 2 : filename = sys.argv[0] #所读取并输出的就是本程序文件type_file_with.py 3 : line_no=0 #统计行号4 : with open(filename, 'r', encoding='utf8') as f: #使用with 语句实现上下文管理协议5 : for line in f:6 : line_no += 1 #行号计数7 : print(line_no, ":", line) #输出行号和该行内容8 : f.close()9 :>>>【例6.8】利用with 语句读取并输出文本示例•在程序启动时,Python自动创建并打开三个文件流对象:标准输入流文件对象、标准输出流文件对象和错误输出流文件对象。