onetouch
- 格式:pdf
- 大小:35.00 KB
- 文档页数:4

卡片随身存储希捷颜系列(One Touch)移动固态硬盘随着移动互联网的发展,我们每天都会产生大量的数据,包括照片、视频、文档等等。
为了方便携带和存储这些数据,移动硬盘成为了很多人的选择。
而在众多移动硬盘中,希捷颜系列(One Touch)移动固态硬盘凭借其卓越的性能和便携的特点,备受消费者们的青睐。
希捷颜系列(One Touch)移动固态硬盘是一款小巧轻便的存储设备,它外观时尚,性能优越,适合需要频繁携带和使用数据的用户。
下面我们来看看它的特点和优势。
希捷颜系列(One Touch)移动固态硬盘采用了固态硬盘技术,相比传统机械硬盘,它具有更高的读写速度和更好的耐用性。
用户可以更快地传输数据,提高工作效率,而且不用担心因为摔跌而损坏数据。
这对于经常需要携带硬盘外出工作的用户来说,是非常重要的一点。
希捷颜系列(One Touch)移动固态硬盘还具有防震防摔的设计,内部采用了颗粒减震结构,外壳采用了抗震材料,即便是在使用过程中不小心摔落,也能有效保护硬盘内部的数据安全。
这让用户可以更加放心地携带和使用硬盘,而不用担心数据丢失的问题。
希捷颜系列(One Touch)移动固态硬盘还支持多种操作系统,包括Windows、MacOS和Linux等,用户可以在不同的设备上使用硬盘,而不用担心兼容性的问题。
这让用户可以更加方便地携带和使用硬盘,而不用担心设备的限制。
希捷颜系列(One Touch)移动固态硬盘是一款性能卓越、便携方便的存储设备,它采用了固态硬盘技术,具有高速读写、防摔防震和数据加密等功能,适合需要频繁携带和使用数据的用户。
如果你正在寻找一款移动硬盘,不妨考虑一下希捷颜系列(One Touch)移动固态硬盘,相信它会为你的工作和生活带来很大的便利。

Use this guide to get to know your meter, and follow the steps inside to get started.IMPORTANT: Please read the Owner's Booklet that came with your system.Intended useThe OneTouch Verio Flex™ Blood Glucose Monitoring System is intended to be used for the quantitative measurement of glucose (sugar) in fresh capillary whole blood samples drawn from the fingertip.The OneTouch Verio Flex™ Blood Glucose Monitoring System is intended for self-testing outside the body (in vitro diagnostic use) by people with diabetes at home as an aid to monitor effectiveness of diabetes control.LimitationsThe OneTouch Verio Flex™ Blood Glucose Monitoring System is intended to be used by a single patient and should not be shared. The system is not to be used for the diagnosis of or screening of diabetes or for neonatal use. The system is not for use on critically ill patients, patients in shock, severely dehydrated patients or hyperosmolar patients.2Take a testInsert a test strip (gold side and 2 silver prongs facing you) to turn the meter on.Flashing blood drop appears.Apply blood sample to the channel on either side of the test strip. Wait for the channel to fill.The channel turns red and the meter counts down from 5 to 1.Turn it onPress and hold until the start-up screen appears.1Set the time and date on your meterSet the time on the first SET screen >Hour flashes. Press if correct or edit and confirm.>Minutes flash. Press if correct or edit and confirm.>AM/PM flashes. Press if correct or edit and confirm.Set the date on the next SET screen >Year flashes. Press if correct or edit and confirm.>Month flashes. Press if correct or edit and confirm. >Day flashes. Press if correct or edit and confirm.Ready to testYour meter setup is complete when the screen with 3 dashes appears.Use buttons to edit each setting and press to confirm.AW 06933101A © 2015 LifeScan, Inc.Rev. Date: 03/2015Manufactured by:LifeScan Europe Division of Cilag GmbH International Gubelstrasse 346300 Zug SwitzerlandAW 06933101A3View your readingExample of an In Range readingYour reading appears on the display. The Range Indicator arrow points to the blue, green, or red Range Indicator color bar, to let you know your reading is below, within, or above your range limit.Example of a Below Range reading Example of an AboveRange reading4Optional: Connect to a mobile deviceYour meter comes with Bluetooth® Smart technology. This allowsyou to wirelessly send your readings to a mobile device such as aphone or a tablet, where you can view and graph them.To learn more about using your meter's wireless feature andview a complete listing of compatible devices and softwareapplications, visit us at .Connecting your meterPress and at the same time to turn the Bluetooth®feature on and off. When prompted by your mobile device, enterthe PIN shown on your meter into your device.The symbol meansBluetooth® is on.Example of a PIN number.About the Range IndicatorYour meter comes with a Range Indicator that automatically letsyou know if your reading is below, above or within your rangelimits. The high and low range limits used by the Range Indicatorare pre-set as follows:Pre-set low range limit Pre-set high range limitFor details about changing the pre-set range limits to suit yourneeds, refer to your Owner's Booklet.The Bluetooth® word mark and logos are registered trademarks owned byBluetooth SIG, Inc., and any use of such marks by LifeScan Scotland Ltd. is underlicense. Other trademarks and trade names are those of their respective owners.IMPORTANT SAFETY INSTRUCTIONS:• This meter and lancing device are for single patient useonly. Do Not share them with anyone else, including familymembers! Do Not use on multiple patients!• After use and exposure to blood, all parts of this kit areconsidered biohazardous. A used kit may potentially transmitinfectious diseases even after you have performed cleaningand disinfection.For more information see: FDA Public Health Notification: "Useof Fingerstick Devices on More than One Person Poses Risk forTransmitting Bloodborne Pathogens: Initial Communication"(2010) /MedicalDevices/Safety/AlertsandNotices/ucm224025.htm.CDC Clinical Reminder: "Use of Fingerstick Devices on More thanOne Person Poses Risk for Transmitting Bloodborne Pathogens"(2010) /injectionsafety/Fingerstick-DevicesBGM.html.As your partner in diabetes care, we welcome you to contact us(7 days a week, 8 a.m. - 10 p.m. Eastern Time) at 1 888 567-3003(English), 1 888 567-3010 (Español), or .Meter Made in ChinaConsult instructions for use.。
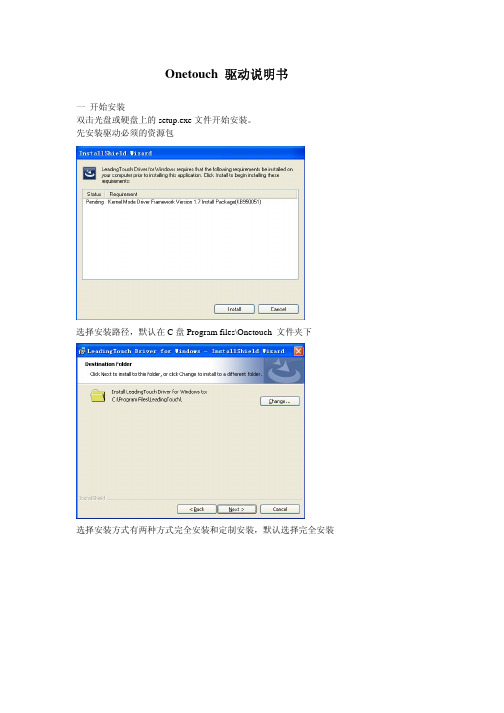
Onetouch 驱动说明书一开始安装双击光盘或硬盘上的setup.exe文件开始安装。
先安装驱动必须的资源包选择安装路径,默认在C盘Program files\Onetouch 文件夹下选择安装方式有两种方式完全安装和定制安装,默认选择完全安装安装完成后双击桌面上的LeadingTouchSetup进入校正程序二驱动设置及功能介绍2.1 触摸屏管理界面语言栏:可以切换语言,目前有中文和英文两种界面触摸屏:所有识别到的触摸屏都将显示在这个框体内,选择需要校正的触摸屏后点击设置进行进一步的设置工作串口管理:如果是COM口触摸屏那么需要选择串口管理,选择触摸屏连接的Com口后再进行下一步设置(注意:COM口触摸屏无法被自动识别,用户必须手动选择COM口后点击”添加设备”如下图)版本驱动程序版本信息2.2 触摸屏设置识别:显示当前触摸屏对应的显示器自定义:可以自定义校正范围,拖动左边的边角以及右边的边角来确定校准范围。
4点校准:进行4点校准,声波及红外屏适用9点校准:进行9点校准,四线、五线、电容屏适用25点校准:进行25点线性校准,四线、五线、电容屏适用选择自定义、4点校准、9点校准、25点校准后点击校准按钮开始校准触摸屏请用手指点击屏幕上出现的红点中心部位,按住不放大约2-3秒,直到靶心跳转到下一个位置或者听见beep声再松开手指,点击下一位置的靶心直到完成校准即可。
校准完成后,可以选择重新校准(快捷键”空格键”),校正后鼠标位置和手指点击位置对应不上请选择这个选项再次校准划线测试(快捷键””回车键),进行划线测试。
详细介绍请参阅下一部分退出(快捷键”Esc”),退出校准程序。
2.3 触摸屏设置-调整边界调整:由于安装或屏体线性原因可能有时边角区域触摸异常可以调整边角的缩放距离大小来适应当前屏体。
触摸模式:Normal:普通模式,可以进行划线、双击、单击、拖拽图标的动作Click On Touch:点击时触摸,当手指接触触摸屏时触发触摸动作Click On Release: 释放时触摸,当手指离开触摸屏时触发触摸动作Click On Touch No Move:点击时触摸不能移动,当手指接触触摸屏时触发触摸动作,不能划线拖拽图标Click On Release No Move:释放时触摸不能移动,当手指离开触摸屏时触摸触摸动作,不能划线以及拖拽图标2.4 触摸屏设置-按键按键切换启用自动右键切换功能:自动范围:点击桌面10毫米以内范围自动时间:当点击桌面不动1000毫秒后就会自动触发鼠标右键功能,可以通过拖拽标尺条来改变这一时间长度以上两个条件同时成立才能触发自动鼠标右键功能。

Getting the most from yourMaxtor OneTouch TM USB hard driveand Linksys Network Storage LinkShare your OneTouch drive with everyone on your network.With the Linksys Network Storage Link, you can now use your MaxtorOneTouch USB hard drive as a network hard drive.This document shows you how to install everything and get up andrunning as quickly as possible.What are the benefits of a network drive?Share informationKeep your files, photos or MP3s in one central location. Every PC or selected users on your network can access the information.Save moneyNo need to keep a PC or server turned on all the time for files to be available–your network hard drive is always accessible.Protect your valuable dataWith the included Retrospect®Express® backup software, you can schedule automated backups to your network hard drive.Before you install – please read!Not Hot-Swappable – Make sure that the Network Storage Link is turned OFF before you connect or disconnect your Maxtor OneTouch Drive!Drive Format – When using the OneTouch drive as a network drive, it must be connected to the Network Storage Link ONLY, as it is formatted using a non-Windows file system.The OneTouch drive may NOT be connected directly to a Windows system withoutreformatting. Warning: Reformatting will erase all of your data.OneTouch Button – The OneTouch button currently does not work with the NetworkStorage Link. You may use the included Retrospect Express backup software, however, for automated backup of your files on one computer. (See page 6 for more information.)USB Only – The Network Storage Link is not compatible with FireWire. You may ONLYuse a USB-compatible OneTouch drive.Windows Only – The Network Storage Link currently supports Windows 98SE, ME, 2000, and XP only.Installing the Network Storage Link and OneTouch Drive Connecting the Network Storage Link to Your Network1. Connect one end of an Ethernet cable tothe Ethernet port on the back of theNetwork Storage Link.2. Connect the other end of the Ethernetcable to your router.Figure 1. Connecting the Ethernet cable Connecting the OneTouch Drive to the Network Storage Link Important – Make sure that the Network Storage Link is turned OFF before you connector disconnect your Maxtor OneTouch drive!3. Connect one end of the included USBcable to your OneTouch drive.4. Connect the other end of the USBcable to the Disk 1 port on the NetworkStorage Link.Note: You can only connect up to twoFigure 2. Connecting the USB cable drives. Do NOT connect additional drivesusing a USB hub.Powering Up the OneTouch Drive5. Connect the round female connector fromthe power adaptor to the drive’s powerconnector6. Connect the two-pin female connector onthe power cord to the power adaptor.Figure 3. Connecting the power7. Connect the standard 3-pin electrical plug to an AC power outlet (preferably asurge-protected outlet).8. Turn on the OneTouch drive using the switch on its back panel.Powering Up the Network Storage Link9. Connect one end of the power adaptor to the back of the Network Storage Link.10. Connect the other end of the power adaptor to an AC power outlet (preferably asurge-protected outlet).11. Turn on the Network Storage Link by pressing its front panel button.The Network Storage Link may take up to three minutes to completely power up.During this time, the Ready/Status light will flash. When the Ready/Status light stops flashing and remains solid green, the Network Storage Link is ready for use.Note: For more information about the lights on the Network Storage Link, see Chapter 3:“Connecting the Storage Link,” in the Linksys User Guide.Installing the Linksys Software12. Insert the Setup Wizard CD into your computer.The Linksys Main Menu screen should appear after a few seconds.Note: If the main menu does not appear, see Chapter 4: “Setting Up the Storage Link,” in the Linksys User Guide.13. Click Setup.The Linksys software will search for the Network Storage Link connected to your network.When your Network Storage Link is found, the message: “Network Storage Link(s) Have Been Found!” will appear at the top of the screen and an icon and the name of your Storage Link will appear in the Selection Column.On the right side of the screen, you will see the IP Address of your Network Storage Link.14. Write down this IP Address. You will need it later to use your networked OneTouch drive. Note: If your Network Storage Link is not found, try clicking Search Again. If it is still not found, see Appendix A: “Troubleshooting” in the Linksys User Guide.Once your Storage Link is found, the next step is to format your OneTouch drive.Keep the Linksys setup screen open and proceed to the next section.Formatting the OneTouch Drive15. On the left side of the Linksys setupscreen, double-click the icon for your NetworkStorage Link.Figure 4. Network Storage Link IconA web browser will open and the Home page for your Network Storage Link will appear.Note: If your web browser does not automatically open, follow the steps in Chapter 6:”Configuring the Storage Link,” in the Linksys User Guide.Note: If you receive a “page cannot be displayed” message, you may need to change the IP address (URL) of your Network Storage Link. See Chapter 4: “Setting Up the Storage Link,” in the Linksys User Guide, for information about changing the Network Storage Link’s settings. If you change the IP address of your Network Storage Link, be sure to write down the new number,as you will need it to use your networked OneTouch drive after formatting.16. Click Administration.A window will open, asking you to enter your user name and password.17. Enter admin for both user name and password and click OK.The LAN page will appear.18. Click Advanced.The Groups page will appear.19. Click Disk.The Disk page will appear.20. Click Format Disk 1.Note: If your drive is connected to the Disk 2 port on the Network Storage Link, click Format Disk 2.The formatting process may take 15 to 30 minutes, depending on the size of your OneTouch Drive.Once it is finished, the message: “Formatted” will appear.21. Close your web browser and click No at the bottom of the Linksys Setup Screen. Note: For more information about the Linksys Web Utility, see Chapter 6: “Configuring the Storage Link,” in the Linksys User Guide.Using Your Networked OneTouch DriveTo use your networked OneTouch Drive, follow these steps:1. On the desktop, right-click the icon for yourcomputer and choose Map Network Drive.Figure 5. Mapping a Network DriveThe Map Network Drive windowwill appear.2. In the Folder (or Path) box enter theIP address of your Network StorageLink,followed by Disk 1 using thisformat:\\IP address\Disk 1.For example: \\192.168.1.77\Disk 1Note: Make sure there is a spacebetween “Disk” and “1” in the IP address.Note: If you changed the IP address inFigure 6. Entering IP Address of Network Storage Linkthe “Formatting the OneTouch Drive”section on page 3, be sure to enter thataddress here.Note: Reconnect at logon is automatically selected. This means that every time you logon in the future, you will automatically be connected to your OneTouch drive. You will find it alongside your computer’s main disks (C and D, for example) in the My Computer window.3. Click Finish.Windows will search the available networks for your Network Storage Link and a window will open displaying the contents of the Disk 1 directory on your OneTouch drive.Note: Two directories are automatically created for you on your OneTouch Drive. The Admin 1 directory is set up for only the administrator to use and will require a User ID and Password to be entered by any user accessing it from a computer other than the administrator’s. The Disk 1 directory, however, does not require a User ID or Password. You may create password-protected directories for additional users. See Chapter 6: “Configuring the Storage Link” in the Linksys User Guide for more information.Your OneTouch drive is now ready for use as a networked drive. You may drag and drop files to it, just like a normal hard drive.Network Backup SoftwareYour OneTouch drive includes Retrospect Express backup software, for easy, automated backup of your important files. If you would like to backup files from a computer on your network, follow the steps outlined in the next section.Note: You may only install the Retrospect Express software on one computer. However, you may purchase additional copies of Retrospect by going to: .Retrospect Software Installation:1. Go to Chapter 2: ‘Installing Your Drive’ in the Maxtor OneTouch User’s Guide.2. Find the Installing the Software section for your operating system.Your options are: Windows 2000 and XP or Windows 98SE and ME3. Follow the installation steps, choosing the Full Installation option.Note: When you have completed the software installation, do not proceed to the “Connecting the Drive” or “Setting up the Maxtor OneTouch Feature” sections.For step-by-step directions on how to back up your entire computer system using Retrospect, see the following section.Automated Network Backup Using Retrospect1. Open Retrospect.2. On the left side of the screen, click the + signnext to Automate and then click EasyScript.The EasyScript welcome windowwill appear.3. Click Next.The next window will ask you to choose yourbackup media.4. Select Disks and click Next.Figure 7. EasyScriptThe next window will ask you how many backup sets you want.5. Select I want one Backup Set for everything and click Next.The next window will ask you how often you would like to back up.6. Choose either Once a week or Every weekday and click Next.If you chose Once a week, you will choose the day and the start time.If you chose Every weekday, you will choose only the start time.7. Make your choice(s) and click Next.The Backup Summary window will appear showing the backup options you have chosen. The Start the first backup now checkbox is checked, which means your first backup will start when you click Finish.Note: It is recommended that you start your first backup now, because you will choose the source and destination of your backup, the first time you do it. If you choose not to start your first backup now, you will need to be at your computer for the first scheduled backup to choose the source and destination of your backup.8. Click Finish.If you chose the “Start the first backup now” option, Retrospect will scan your drive and the Backup Set window will appear. You will now choose the disk where your backup files willbe stored.9. Double-click My Network Places.The Adding Network Volume window will appear.10. Click Advanced.A window will open, asking you to enter the UNC path for the volume.11. Enter the IP address of your Network Storage Link,followed by Disk 1 usingthis format:\\IP address\Disk 1. For example: \\192.168.1.77\Disk 1Note: If you changed the IP address in the “Formatting Your Drive” section on page 3, be sure to enter that address here.12. Click OK.Disk 1 will now appear under My Network Places in the Backup Set window.13. Select Disk 1 and click Proceed.The Add New Member window will appear to confirm your backup destination.14. Click OK.The backup will now start.Note: Your entire computer system (including all of its drives) will automatically be backed up. Depending on the size of your system and the speed of your network, this process may take as much as several hours. For example, on a home wireless network of less than 10 megabits per second, a 10 gigabyte backup would take over three hours.If you wish to change the specific items that are backed up or learn how to restore files from a backup, see the Retrospect online help in the Retrospect Express software.When the backup is finished, you will see the message: “Execution completed successfully.”Congratulations. You have completed your first backup. Future backups will take place automatically on the days and times that you selected, as long as the computer, OneTouch drive and Network Storage Link are turned on.。
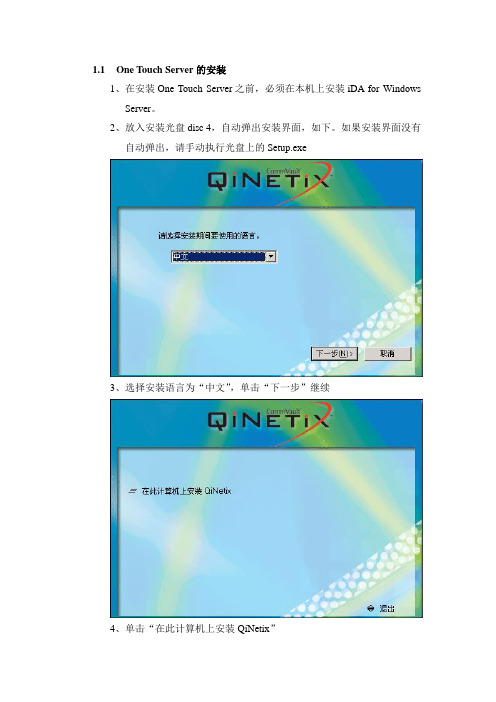
1.1One Touch Server的安装1、在安装One Touch Server之前,必须在本机上安装iDA for WindowsServer。
2、放入安装光盘disc 4,自动弹出安装界面,如下。
如果安装界面没有自动弹出,请手动执行光盘上的Setup.exe3、选择安装语言为“中文”,单击“下一步”继续4、单击“在此计算机上安装QiNetix”5、单击“下一步”继续6、在安装CommVault软件之前,请立即关闭所有的防病毒软件,否则将可能安装失败,单击“确定”继续7、选择“我接受许可协议中的条款”,单击“下一步”继续8、如果本机是MSCS双机的一部分,将出来以上界面,选择“在物理节点上安装”,单击“下一步”继续9、选择Client Modules中的“1-Touch Server”,单击“下一步”继续10、选择一键式服务器程序文件的安装路径,单击“下一步”继续11、确认安装选择,单击“下一步”开始安装程序文件12、程序文件安装完成后,可选择“立即启动一键式选项”配置OneTouch Server,以后进行配置选择“现在不启动一键式选项。
我将在以后准备一键式服务器”,单击“下一步”继续13、单击“完成”完成One Touch Server的安装。
1.2One Touch Server的配置1、开始->程序->CommVault QiNetix->Galaxy->1-Touch2、选择“Windows部署管理器”,单击“下一步”开始添加Windows部署3、单击“添加”4、在“Windows部署共享名称”中输入部署共享的名称,在“说明”中输入部署的说明,在“产品版本”中选择Windows的版本,在“源位置”中输入Windows安装光盘的路径,在“许可密钥”中输入Windows安装光盘的CD-KEY,单击“添加”添加Windows到部署共享中。
如果需要做One Touch灾难恢复的服务器有不同的操作系统版本,需要将每个不同的Windows版本添加到Windows部署共享中。

软件版本v6.5.1发布于01/2018©2018 NETSCOUT SYSTEMS, Inc. 保留所有权利。
所有产品名称都是其各自公司的商标。
OneTouch ™ AT 10G 网络助手用户手册法律声明本产品必须按照《最终用户许可协议》使用,该协议通过以下网址http:///legal/terms-and-conditions/ 提供,或在发货时随产品一同提供。
在适用情况下,使用本产品时还必须遵守 NETSCOUT SYSTEMS, INC. 与产品购买方签订并执行的合法协议(统称为“协议”)。
政府使用和权利限制说明:适用于美国地区政府(以下称“政府”)合同或政府转包合同,客户将提供按照本协议售出或交付的产品和文件,包括任何技术资料(统称为“资料”)以供政府使用。
根据《联邦采购条例》(“FAR”)2.101 及其附录或其他文件的定义,这些资料为商业资料,均适用“权利限制”条款。
所有资料完全为自费编制。
资料的使用、复制、发布、修改、转让或披露(统称为“使用”)均受本协议条款约束;如果提供给政府民事机构使用,还受 FAR 52.227-14 规定的约束;如果提供给政府军事机构使用,还受《国防联邦采购条例附录》(“DFARS”)252.227-7015 规定的约束;或在适用情况下,资料的使用还受其他相关政府组织的类似采购条例及修订版本的约束。
资料的使用受本协议条款的约束,而且根据 DFARS 第 227.7202 部分和 FAR 第 12.212 部分规定,资料的使用还受NETSCOUT 商业性质的《最终用户许可协议》规定约束。
除本文件中规定的情况外,禁止将资料用于其他用途。
本产品可能包含第三方技术。
NETSCOUT 可能仅许可将这类第三方技术和文件(以下称“第三方资料”)用于本产品。
如果本产品包含第三方资料,或者如果您有机会将本产品与第三方资料(NETSCOUT 在相关文件中所指明的资料)结合使用,那么 NETSCOUT 将根据本产品应用程序光盘中“Read Me(自述)”或“About(关于)”文件内所包含的第三方适用条款和条件提供或允许使用此类第三方资料。
1-touch for Solaris 备份恢复操作手册目录一、准备工作 (3)二、1-Touch备份过程 (3)三、1-Touch恢复过程 (13)四、总结 (22)一、准备工作1、准备2台Solaris 10服务器。
其中,一台作为1-Touch Server,一台作为1-TouchClient。
2、确认2台服务器的IP地址在同一子网段中。
在本次测试中,使用128.0.0.21作为1-Touch Server端IP地址;使用128.0.0.22作为1-Touch Client端IP地址。
3、分别在2台服务器上修改Host表,确保2台服务器能够相互解析,并且Ping通。
本次测试使用的hosts对应如下:128.0.0.21 pdmsvr1 1-Touch Server128.0.0.22 pdmsvr2 1-Touch Client4、分别在2台服务器上安装CommVault 7.0 相关软件模块。
5、在CommVault GUI管理界面为pdmsvr2(即1-Touch Client)创建文件备份策略,做好备份准备。
6、准备好Solaris 10的安装光盘。
二、1-Touch备份过程1、通过阅读online book,我们知道可以看到,在执行1-Touch备份之前,需要在1-Touch Server端服务器上创建Solaris 10的JumpStart Server。
所以,我们需要使用Solaris 10安装光盘的disk1。
2、将Solaris 10安装光盘的disk1插入pdmsvr1(128.0.0.21)的光驱,执行安装JumpStart Server的步骤(此步骤可以询问SUN工程师获得)。
进入到相应的目录后,执行命令:./setup_install_server /export/home/install/solaris10这个过程主要是将光盘镜像拷贝到相应的1-Touch Server目录下,并且安装JumpStart Server。
Windows 2000 and Windows XP InstallationStep 1. Install the OneTouch SoftwareYou must have Administrative Privileges.Refer to chapter 3 of the User’s Guide formore information.1.Insert the Install CD.2.Wait for the Maxtor screen to appear.3.Follow the on-screen instructions to installthe software. Refer to chapter 2 of theUser’s Guide for more information.4.After completing installation, eject the CD.Do not remove the CD until all steps of theinstallation are complete.Step 2. Connect the OneTouch III1.Plug in the power adapter.2.Turn the power switch on.3.Connect a USB 2.0 cable from the OneTouch IIIto the corresponding port on your computer.Refer to chapter 2 of the User’s Guide formore information.Allow up to 2 minutes for your computer torecognize the Maxtor OneTouch III.Step 3. Set up the OneTouch Feature1.Push the button on the front of your drive.The Maxtor OneTouch Manager will open tothe Backup Settings menu. Follow the on-screeninstructions to configure your backup.Your installation is complete!You may now back up your computer:– Perform a backup at any time by pressing theOneTouch button, or– Right-click on the Maxtor icon in the SystemTray and select Back up now, or– Allow Maxtor Backup to automatically run atthe next scheduled backup time.Refer to chapter 3 of the User’s Guide for moreinformation on:–Restoring Your Files–System Rollback–SyncOneTouch ButtonLimited Warranty StatementM a x t o r's w a r r a n t y o b l i g a t i o n s a r e l i m i t e d t o t h e t e r m s s e t f o r t h b e l o w.Please note that Maxtor reserves the right to update from time to time the warranty terms provided for new purchases of Maxtor products, and to establish the effective date of those updated warranty terms. Please refer to for the then current form of Limited Warranty Statement for Maxtor brand products.Please note that Maxtor products are distributed outside the United States and Canada through local authorized distributors and resellers (“Resellers”). These Resellers generally offer a consumer warranty, and associated warranty services, to consumer purchasers. Maxtor recommends that consumers in these jurisdictions first contact the Reseller from whom they purchased the Maxtor product for all issues with regard to product defects and the applicable product warranty.Maxtor warrants to the original consumer purchaser (“you”) that new Maxtor disk drive products (“New Products”) will be free from defects in material and workmanship for the Standard Warranty Period for the relevant New Product. The Standard Warranty Period for the various New Products marketed by Maxtor and for the geographies in which they are sold is detailed on .The warranty period on replacements for New Products is the remainder of the warranty on the original New Product or 90 days from the date of shipment of the replacement product, whichever is longer.In addition to the New Products, Maxtor may from time to time sell refurbished disk drive products which are not new and which have been reconditioned to Maxtor’s standards for refurbished products (“Refurbished Products”). Unless a warranty period (“Refurbished Warranty Period”) is designated by Maxtor for the specific Refurbished Product either on or on the product packaging (as applied by Maxtor), Refurbished Products are provided strictly on an “AS IS” basis and Maxtor disclaims any and all warranties or conditions whatsoever for Refurbished Products.To the extent that Maxtor so designates a warranty period for the Refurbished Product, Maxtor warrants to the original consumer purchaser that the Refurbished Product will be free from defects in material and workmanship for the associated Refurbished Warranty Period.New Products and Refurbished Products are together referred to as “Products.” The start of the Standard Warranty Period or Refurbished Warranty Period (together referred to as the “Warranty Period”), as the case may be, is the documented date of your purchase of the Product from Maxtor or Maxtor’s authorized reseller. In the absence of a documented purchase date, the start of the Warranty Period will be deemed the date of original shipment by Maxtor from its point of new or refurbish manufacture, as the case may be, to Maxtor’s customer.The Products are manufactured from parts and components that are new or equivalent to new in accordance with industry standards.If you discover a defect in material or workmanship during the Warranty Period, and Maxtor agrees that the defect exists, Maxtor will, at its option, repair or replace the Product at no charge to you, provided it is returned during the applicable Warranty Period, with transportation charges prepaid, to the facility designated by Maxtor. The Product must be properly packaged in Maxtor or Maxtor-approved packaging, with the Return Material Authorization clearly displayed on the outside of the packaging, to obtain warranty service. Products that fail within the first 30 days after purchase will be replaced with a new Product. Maxtor may require proper proof of purchase documentation prior to issuing the replacement Product.If Maxtor elects to repair a Product, Maxtor owns all parts removed from the repaired Product. Maxtor uses new and reconditioned parts made by various manufacturers in conjunction with warranty repairs and replacement Products. Repair parts or replacement Products may, at Maxtor's option, include an equal or better model or features.Maxtor has no responsibility whatsoever with regard to any content or data on returned Products.To request warranty service and before returning a Product to Maxtor, please contact the Maxtor Service Center. Refer to the Maxtor Installation Guide or for your online guide to find the appropriate telephone number for obtaining customer assistance within your jurisdiction and the proper address for shipping authorized returns. Once the Maxtor Service Center determines that a repair is required, Maxtor will issue an RMA number. A copy of your receipt or bill of sale bearing the name and location of Maxtor’s authorized reseller and the Maxtor serial number and model number of the Product in which the defect has been reported may be required as a proof of your purchase for warranty service. Note that, as an alternative, Maxtor offers an online warranty return option for certain Products through .You are responsible for saving or backing up data contained in any Product returned to Maxtor in conjunction with warranty or any other services. Maxtor shall have no responsibility for such data whatsoever and shall have no liability arising out of any damage to, or loss or disclosure of, such data.This limited warranty applies only to the Maxtor products that can be identified by the original, unaltered Maxtor trademark, trade name or logo affixed to them. Maxtor does not warrant any product that is not manufactured by, for, or with permission from Maxtor, or which is not otherwise distributed by Maxtor under the Maxtor brand.This warranty does not cover any of the following conditions:–Abuse, unreasonable use, mistreatment, or neglect–Unusual physical or electrical stress or power fluctuations–Damage caused during installation of the Product–Damage or capacity/performance/operational resetting caused by the equipment or system with which the Product is used–Damage caused by modification or repair not made or authorized by Maxtor–Products whose Maxtor Serial Number and/or Material Number label have been removed, torn or defaced–Damage caused by use of non-Maxtor packaging–Damage caused by improper or improperly used packaging–Damage caused by lack of ESD protection–Products that are determined to be stolen.Further, this limited warranty is void if the Product cover, or any label or seal on the Product, is removed or damaged.Maxtor owns all parts removed from the repaired Products. Maxtor uses new and reconditioned parts in performing warranty repairs and building replacement products.FAILURE TO COMPLETE AND RETURN ANY MAXTOR PRODUCT REGISTRATION FORM WILL NOT DIMINISH YOUR WARRANTY RIGHTS. Certain Products include software or firmware as a component (“Software”). Maxtor or its suppliers retain all rights of ownership in such Software and any use of the Software is subject to the license agreement provided by Maxtor accompanying such Software. If no license is provided by Maxtor, you are granted the limited right to use the Software as required for the operation of the Product and no other rights are granted whatsoever. Certain Software is licensed under the GNU General Public License Agreement (“GPL Software”). EXCEPT AS OTHERWISE PROVIDED BY MAXTOR IN A WRITTEN LICENSE AGREEMENT, SOFTWARE IS OFFERED “AS IS”AND MAXTOR GRANTS NO WARRANTIES OF ANY KIND, EXPRESS OR IMPLIED, BY STATUTE, COMMUNICATIONS OR OTHERWISE WITH REGARD TO THE SOFTWARE. MAXTOR SPECIFICALLY DISCLAIMS ANY IMPLIED WARRANTIES OF MERCHANTABILITY, FITNESS FOR A PARTICULAR PURPOSE OR NONINFRINGEMENT WITH RESPECT TO THE SOFTWARE. Please note that Maxtor makes the source code for the GPL software available through .TO THE MAXIMUM EXTENT PERMITTED BY LAW, THIS WARRANTY AND THE REMEDIES SET FORTH ABOVE ARE EXCLUSIVE AND IN LIEU OF ALL OTHERS, WHETHER ORAL OR WRITTEN, EXPRESSED, IMPLIED OR STATUTORY. OTHER THAN AS EXPRESSLY SET FORTH HEREIN, MAXTOR SPECIFICALLY DISCLAIMS TO THE MAXIMUM EXTENT PERMITTED BY LAW ANY AND ALL REPRESENTATIONS, WARRANTIES AND CONDITIONS AS TO THE PRODUCTS, SERVICES, OR ANY OTHER MATTER WHATSOEVER. IN PARTICULAR, BUT WITHOUT LIMITING THE GENERALITY OF THE FOREGOING, MAXTOR SPECIFICALLY DISCLAIMS ANY AND ALL IMPLIED OR DEEMED WARRANTIES AND CONDITIONS OF SATISFACTORY QUALITY, MERCHANTABILITY, FITNESS FOR A PARTICULAR PURPOSE, PERFORMANCE IN A SKILLFUL AND WORKMANLIKE MANNER, AND NON-INFRINGEMENT OF THIRD PARTY RIGHTS OR ANY OTHER WARRANTY ARISING FROM A COURSE OF DEALING OR USAGE OF TRADE. THIS LIMITED WARRANTY DOES NOT APPLY TO, AND MAXTOR MAKES NO WARRANTY TO YOU WITH REGARD TO, PRODUCTS ORIGINALLY SOLD AS AN INTEGRATED COMPONENT OF A SYSTEM NOT SUPPLIED BY MAXTOR, OR PRODUCTS PROVIDED UNDER A THIRD PARTY LEASING OR SERVICE ARRANGEMENT. No Maxtor distributor, reseller, dealer, agent or employee is authorized to make any modification, extension or addition to this warranty.MAXTOR IS NOT RESPONSIBLE OR LIABLE FOR ANY INDIRECT, UNFORESEEABLE, SPECIAL, INCIDENTAL OR CONSEQUENTIAL DAMAGES HOWEVER CAUSED AND WHETHER OR NOT MAXTOR WAS ADVISED OF THE POSSIBILITY OF SUCH DAMAGES, INCLUDING BUT NOT LIMITED TO, COSTS OF PROCUREMENT OF SUBSTITUTE GOODS, LOSS OF DATA OR PROGRAMS, LOST PROFITS, DOWNTIME, GOODWILL, DAMAGE OR REPLACEMENT OF EQUIPMENT AND PROPERTY, AND ANY COSTS OF RECOVERING, PROGRAMMING OR REPRODUCING ANY PROGRAM OR DATA STORED IN OR USED WITH MAXTOR PRODUCTS OR ANY OTHER DAMAGES ARISING OUT OF THE PURCHASE, USE OR PERFORMANCE OF THE PRODUCT. Maxtor is not, and cannot be, responsible for any losses or damages arising out of any loss of, or any inability to access, data as a result from the failure of a Product, and accordingly you bear this risk. The allocation of risk under this limitation of liability is reflected in the purchase price of the Product. This limitation of liability, however, will not apply to claims for death or personal injury caused by the negligence of Maxtor or its associated companies, officers, representatives or agents.Some jurisdictions do not allow the exclusion or limitation of incidental or consequential damages or exclusions of implied or deemed conditions or warranties, so the above limitations or exclusions may not apply to you. This warranty gives you specific legal rights, and you may also have other rights that vary from jurisdiction to jurisdiction. By way of example, if a Product is purchased from Maxtor or Maxtor's authorized reseller by you in Europe, Africa or the Middle East, you may have additional warranty rights which are explained at .Please note that you are expressly not permitted to use the Products in conjunction with the operation of nuclear facilities, aircraft navigation, aircraft communication, aircraft flight control, aircraft air traffic control systems, weapons devices or systems, or in any devices or systems in which a malfunction (including, without limitation, software related delay or failure) would result in foreseeable risk of injury or death to the operator of the device or system, or to others.This Statement of Limited Warranty shall be exclusively interpreted in accordance with the English language with the meaning of its terms. Should any provisions of this Limited Warranty be declared invalid by any court of competent jurisdiction, the balance of this Limited Warranty will remain in full force and effect. In addition, should a translation of this Limited Warranty deviate from the English language version, only the English language version shall apply and be binding.。
1981One button validation of network and datacenter performanceat 10 Gigabit rates1 of 122 of 12Figure 2. Detailed breakdown of wired to peerFigure 1. Detailed breakdown of XG customperformanceFigure 3. The AutoTest provides a comprehensivemeasurement of network performance from the enduser point-of-view, from cable to services andapplications3 of 12Client view of network performanceMost network trouble tickets start where a client device is connected to the network—where the device could be a PC, tablet, IP phone, printer, POS terminal, industrial equipment controller or a medical imager. Troubleshoot common issues—or prove that the network is not the cause—by emulating the client device and measuringnetwork performance.Infrastructure to application testingThe cause of a network problem can be elusive. Identify the root cause of a problem by measuring and analyzing the performance of the critical network elements: the network cabling, the connection to the nearest switch, and the performance of key network services and server-based applications.Network services testingTest DHCP server responsiveness. Identify the DHCP servers and view the offer and acceptance timing and lease information. Test DNS server responsiveness. Identifythe DNS servers and view the DNS lookup time.Network application testingDetermine if a server-based application is the root cause of a reported problem by measuring availability and responsiveness metrics. Add to the AutoTest profile the performance test appropriate for the application: ping (ICMP), connect (TCP), web (HTTP), file (FTP), multicast (IGMP), video (RTSP) or email (SMTP). Each test is graphically represented on the OneTouch AT home page as an icon. After running the AutoTest, touch a test icon on the home page to get a detailed breakdown of application performance including DNS lookup time, server response time and data rate.The test results are presented side-by-side for easy IPv4/IPv6 performance comparisons. A few examples: connect to port 2000 on your VoIP call manager, download apage of an application with a web interface, upload or download a file from a server, subscribe to a multicast group, access video content from an on-demand streaming video server or email a text message to your mobile phone.Local, intranet and internet performanceUnderstand the performance of network services and server-based applications wherever they are hosted: locally in the datacenter, on a corporate intranet server or on a server reached via the public internet. Create location centric AutoTest profiles by grouping together co-located services and applications. Measure service levels to the different groups to quickly spot problems.4 of 12Figure 4. Cloud Service enables analysis of results over time to troubleshoot intermittent problems5 of 12Remote control and file accessUse the built-in RJ-45 management port or optional USB Wi-Fi adapter to remotely control the tester and access saved files. Any action that can be performed directly onthe instrument using the touch screen can be performed remotely using a PC, laptop, tablet or smart phone. Manage the tester remotely when and where convenient. Minimize the time, expense and inconvenience of traveling to the client location where the problem was reported. Webcam support enables live, remote viewing of the physical environment near the tester.Remotely control the OneTouch AT 10G tester and access saved files from the Cloud Service web application. Increase productivity by remotely managing the tester and viewing trended AutoTest results all from a single location. Remote management via the Cloud Service web application also allows traversal of NAT devices, which is very advantageous when troubleshooting outside the office.Problem avoidance and performance optimizationCloud trending and analytics let you use the OneTouch AT 10G tester for proactive problem avoidance and performance optimization. Set a long trending duration – up to one week – and use Cloud Service analytics to identify potential vulnerabilities and performance bottlenecks. In this use model, the tester serves as a 24/7 portablenetwork probe and the Cloud Service as the analytics engine. Identify and correct potential network, service or application vulnerabilities before they become problemsthat adversely impact users. Identify performance bottlenecks and reconfigure the network to optimize end user response time.The OneTouch AT 10G tester excels at both "firefighting" - reactive troubleshooting of both persistent and intermittent problems – and daily network management for proactively avoiding problems and optimizing performance.Wired network discovery and analysisAutomatically discover copper and fiber-connected devices and key device properties. Select from among fourteen different sorts to obtain different views into the wired network. For example, sort by IPv4 or IPv6 address to identify used and available addresses. Or sort by switch name/slot/port to understand where on the networkdevices are connected. Sort by discovered problems to quickly identify potential issues. Additional discovery-assisted analysis tools aid with troubleshooting and profile creation. For example, the Multiport Statistics tool provides visibility into switch, router and AP port statistics including speed, duplex, slot, port, VLANs, host count, utilization, discards and errors. The Devices on Port tool provides visibility into the devices connected to an individual switch port. The Path Analysis tool provides a layer2 and3 trace route from the OneTouch AT to a target device including time to each hop and SNMP switch and router port statistics.Packet captureCapture network traffic when a packet-level view is required to solve a complex network or application issue. Filter the traffic to capture what is most important. Export the capture file to a PC for decoding and analysis using protocol analysis software. Capture traffic on either the copper or fiber optic port at rates up to 100 Mbps. Optionally capture traffic while the AutoTest runs.6 of 12Additional OneTouch AT 10G Network Assistant FeaturesCopper and Fiber Optic Cable TestingCopper and Fiber Optic Cable Testing Troubleshoot twisted pair cable by measuring cable length. Measure the optical power received through fiber optic links. Verify the cleanliness of fiber optic connections by viewing connector end faces with the optional FiberInspector™ USB video probe.Troubleshoot your IPv6 NetworkEasily compare and contrast IPv4 and IPv6 network performance by viewing test results side-by-side.Save Test ResultsSave the test results in a report to share with colleagues or outside parties. A report serves as trouble ticket documentation, as a record of historical performance for benchmarking or as a certification report after new infrastructure deployment and turn up. Define which test results to include in the report (AutoTest, Wired Analysis,Tools Settings) and the report format (PDF, XML). Open the results in a spreadsheet for flexibility in results analysis.Setup WizardSimply AutoTest profile creation while learning about the tester's capabilities by running the Setup Wizard. The wizard simplifies profile creation with step-by-step guided instructions, yes/no prompts, on-screen help and graphical progress indicators. Experienced users can bypass the wizard if desired.Purpose-built for Field TestingThe OneTouch AT 10G Network Assistant is engineered specifically for network support professionals on the go. Useful test and management tools include a web browser, Telnet/SSH client, webcam support and optional fiber optic connector inspection camera. The durable platform provides years of reliable operation in tough environments.Gold SupportProtect your investment with Gold Support. Gold Support benefits include Gold Cloud Service, software upgrades, unlimited priority repair service with loaner units, annual factory performance verification, free accessory replacement and 24x7 technical support with priority members-only access numbers.7 of 128 of 129 of 1210 of 12。
The market price of one-touch options in foreignexchange marketsWhat is a one-touch option?Internationally active market participants are always subject to changing foreign exchange rates and hedge their exposure by trading an immense variety of options worldwide. EUR/USD is considered the most liquid traded currency pair in the foreign exchange market.Besides vanilla (European style put and call) options, the so-called first generation exotics have become standard derivative instruments. We distinguish between(a) vanilla options that knock in or out if the underlying hits a barrier (or one of two barriers) and(b) all kind of touch options which include one-touch/no-touch options and pay a fixed amount ofeither USD or EUR if the spot ever/never trades at or beyond the touch-level and zero if it doesn’t. Double-touch options work the same way with two barriers.In this article we would like to take a detailed look at the pricing of one-touch options, which are often also called binary or digital options, hit options or rebate options. They trade as listed1 and are over-the-counter products.Touch-time is the first time the underlying trades at or beyond the touch-level. The barrier determination agent, which is specified in the contract, determines the touch-event. The Foreign Exchange Committee2, which includes representatives of major financial institutions engaged in foreign currency trading worldwide, has recommended a set of best practices for the barrier options market to the foreign exchange community and is planning to publish a revision of the International Currency Options Master Agreement (ICOM) reflecting some new recommendations. Following, some of its key regulations- The barrier needs to have been traded within the foreign exchange markets- All transactions have to be completed between 5:00 A.M. Sydney time on Monday and 5:00 P.M. New York time on Friday- All transactions need to have a commercial size (generally at least $3 million in liquid markets)The barrier or touch-level is usually monitored continuously over time.Applications of one-touch optionsSpeculative market participants like to use one-touch options as bets on a rising or falling exchange rate. Clients, who prefer to hedge, trade one-touch options as a rebate in order to secure themselves a compensation in case their strategy doesn’t work out. One-touch options are also often integrated into structured products to increase returns on forward and interest rates. Quotation conventions and bid-ask spreadsIf the payoff is at maturity, the undiscounted value of the one-touch is the touch probability under the risk-neutral measure. The market standard is to quote the price of a one-touch in per cent of 1Often named Hit Warrants, e.g. on Reuters page COBAWAR6002 For details see /fxc/fxann000217.htmlthe payoff, which is a number between 0% and 100%. The price of a one-touch depends on the overhedge (explained below) and the bid-ask spread. The spread in turn depends on the currency pair and the client. Interbank trading spreads are usually between 2% and 4% for liquid currency pairs.Cost of trading and its implication on the market price of one-touch options The theoretical value (TV) of a one-touch is based on the standard Black-Scholes model for the underlying exchange rate of EUR/USD, a geometric Brownian motion with constant parameters EUR interest rate, USD interest rate and volatility. The TV is defined as the expectation under the risk neutral measure of the discounted payoff of the one-touch.3 The tradable price is the sum of the TV and the overhedge. Two typical examples, one for an upper touch level in EUR/USD, one for a lower touch level, are shown in the charts below.Clearly, there is no overhedge for one-touch options with a TV of 0% or 100%, but it is worth noting that low-TV one-touch options can be twice as expensive, and sometimes even more expensive, than their TV. has become a standard reference for pricing exotic FX options up to the market. The overhedge arises from the cost of risk managing the one-touch. In the Black-Scholes model the only source of risk is the underlying exchange rate,whereas the volatility and interest rates are assumed constant. However, volatility and rates themselves vary in dependence of e.g. spot movements as the options trader’s positions are exposed to unstable vega and rho (change of the value with respect to volatility and rates). For short dated options, the interest rate risk is negligible compared to the volatility risk. Hence the overhedge of a one-touch is a reflection of a trader’s cost of managing his vega exposure. 3 for details see Foreign Exchange Risk , ed. by J. Hakala and U. Wystup, Risk Books 2002.ExampleLet’s reflect over a one-year one-touch in USD/JPY with payoff in USD. Our assumed market parameters are a spot of 117.00 JPY per USD, JPY interest rate 0.10%, USD interest rate 2.10%, volatility 8.80%, 25delta risk reversal –0.45%4, 25delta butterfly 0.37%5. The notion of risk reversals and butterflies are illustrated in the graph shown below.The touch level is 125.00, and the TV is at 38.2%. If we only hedge the vega exposure we need to consider two main risk factors:(1) the change of vega as the spot changes, often called vanna and(2) the change of vega as the volatility changes, often called volga (or volgamma or vomma).To hedge this exposure we need to deal with both effects separately.The vanna of the one-touch is –9.0, the vanna of the risk reversal is 4.5.We therefore need to sell 2 (=-9/4.5) risk reversals, and for each of them we need to pay 0.15% of the USD amount, which causes an overhedge of 0.3%. The volga of the one-touch is –1.0, the volga of the butterfly is 0.035. So we need to sell 28 (=-1/0.035) butterflies, each of which pays us 0.27% of the USD amount, which causes an overhedge of -7.7%. Therefore, the overhedge is –7.4%.However, we will get to the touch level with a risk-neutral probability of 36%, in which case we would have to unwind the hedge. Therefore the total overhedge is -64%*7.7%=-4.7%. This leads to a mid market price of 33.5%.There are different beliefs among market participants about the unwinding cost. Other prices for one-touch options can be caused by different vega profiles in the trader’s portfolio, a marketing campaign or a hidden additional sales margin.Comment on the cost of risk reversals and butterfliesThe cost of the risk reversal mentioned above is computed as follows: Difference of the call with correct implied volatility and the call with at-the-money volatility minus the difference of the put with correct implied volatility and the put with at-the-money volatility. It is easy to see that this can be well approximated by the vega of the at-the-money vanilla times the risk reversal in terms of volatility. Similarly, the cost of the butterfly can be approximated by the vega of the at-the-money volatility times the butterfly in terms of volatility.4 This means that a 25delta USD call is 0.45% cheaper than a 25delta USD put in terms of implied volatility.5This means that a 25delta USD call and 25delta USD put is on average 0.37% more expensive than an at-the-money option in terms of volatilityFurther applicationsThe method illustrated above shows how important the current smile of the vanilla options-market is for the pricing of simple exotics. Similar types of approaches are commonly used to price other exotic options. For long-dated options the interest rate risk will take over the lead in comparison to short dated options where the volatility risk is dominant. As a matter of consistency the method can also reproduce the smile for the vanilla market.Dr Uwe Wystup – FX Product Development Commerzbank Securities。