icharger 308duo 充电器中文说明书
- 格式:pdf
- 大小:1.69 MB
- 文档页数:38
ⅠSⅠDOCHARGER说明书
1、充电宝的接口和指示灯:从左到右分别是检查电量键、电量指示灯、USB接口(输入)、USB接口(输出)。
2、给充电宝充电:将USB数据线的大头接到手机的充电头上,将小头接到充电宝的输入USB接口上,插上电源,即可给充电宝充电。
3、充电宝给手机充电:将USB数据线的大头接至充电宝的USB 输出接口,另一小头接至手机的输入接口(即充电接口)。
4、电量检查键的使用:按此键后,充电宝即会显示剩余电量,根据不同的电量,不同的电量会闪烁不同的灯,闪烁几下后自动关闭。
5、利用电量检查键,可以给蓝牙耳机、手环等小电流设备进行持续弃电,方法:连续按2次电量检查键,此时四个指示灯循环点亮;若想停止小电流功能,则按1次电量检查键即可。
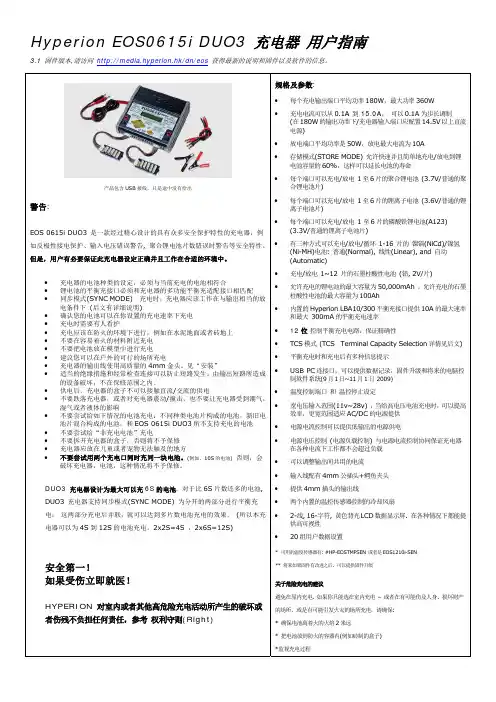
Hyperion EOS0615i DUO3 充电器用户指南3.1 固件版本,请访问http://media.hyperion.hk/dn/eos获得最新的说明和固件以及软件的信息。
产品包含USB接线,只是途中没有给出警告:EOS 0615i DUO3 是一款经过精心设计的具有众多安全保护特性的充电器,例如反极性接电保护、输入电压错误警告, 聚合锂电池片数错误时警告等安全特性。
但是,用户有必要保证此充电器设定正确并且工作在合适的环境中。
•充电器的电池种类的设定,必须与当前充电的电池相符合•锂电池的平衡充接口必须和充电器的多功能平衡充适配接口相匹配•同步模式(SYNC MODE) 充电时,充电器应该工作在与输出相当的放电条件下(后文有详细说明)•确认您的电池可以在你设置的充电速率下充电•充电时需要有人看护•充电应该在防火的环境下进行,例如在水泥地面或者砖地上•不要在容易着火的材料附近充电•不要把电池放在模型中进行充电•建议您可以在户外的可行的场所充电•充电器的输出线使用高质量的4mm金头。
见“安装”•适当的绝缘措施和经常检查连接可以防止短路发生。
由输出短路所造成的设备破坏,不在保修范围之内。
•供电后,充电器的盒子不可以接触直流/交流的供电•不要跌落充电器,或者对充电器震动/撞击,也不要让充电器受到潮气,湿气或者液体的影响•不要尝试给如下情况的电池充电:不同种类电池片构成的电池,新旧电池片混合构成的电池,和EOS 0615i DUO3所不支持充电的电池•不要尝试给“非充电电池”充电•不要拆开充电器的盒子,否则将不予保修•充电器应放在儿童或者宠物无法触及的地方•不要尝试用两个充电口同时充同一块电池。
(例如,10S的电池)否则,会破坏充电器,电池,这种情况将不予保修。
DUO3 充电器设计为最大可以充6S的电池. 对于比6S片数还多的电池, DUO3 充电器支持同步模式(SYNC MODE) 为分开的两部分进行平衡充电,这两部分充电后并联,就可以达到多片数电池充电的效果。
电动车充电器使用方法说明书使用方法说明书 - 电动车充电器一、产品概要电动车充电器是一种电动车配件,用于给电动车电池充电。
本说明书将详细介绍如何正确地使用和操作电动车充电器。
二、安全提示在使用电动车充电器之前,请务必阅读以下安全提示,并遵循相关操作规程以确保您的安全和充电器的正常使用。
1. 请在安全环境下使用充电器。
确保充电区域通风良好,远离易燃物品和水源。
2. 请勿将充电器接触湿手、湿地或放置在潮湿环境中。
3. 请勿在充电器损坏或线缆受损时使用,以免发生电击或其他安全事故。
4. 请勿自行拆解或修理充电器。
如有故障,请联系专业人士进行检修。
5. 当充电器闲置时,请拔掉电源插头,以避免不必要的事故发生。
三、充电器使用方法在开始正式使用电动车充电器之前,请确保您已具备以下条件并准备好相关设备:1. 检查电动车电池和车辆充电接口是否符合本充电器的兼容性要求。
2. 确保充电器已经正确连接到电源,并稳固地插入相应的插座上。
以下是使用电动车充电器的详细步骤:步骤一:检查连接将充电器的连接线插入电动车的充电接口上,确保插头与接口完全贴合且稳固。
步骤二:连接电源将充电器的电源插头插入交流电源插座中,确保接地线已正确连接。
步骤三:设置充电模式根据电动车电池的类型和具体需求,选择充电模式。
充电器通常提供不同的充电模式以适配各种电池。
步骤四:开始充电在检查完所有连接后,按下充电器上的启动按钮,充电器将开始工作并为电动车电池充电。
四、使用注意事项为了延长充电器的使用寿命并确保充电过程的高效性,以下是您在使用过程中应该注意的事项:1. 在充电过程中,请勿拔掉充电器或断开电源,以确保充电过程的连续性。
2. 充电器在工作过程中会产生一定的余热,请确保不要将充电器放置在易燃物体旁边,也不要覆盖充电器散热口。
3. 建议在安全环境下进行充电,以避免在充电过程中发生意外。
4. 在充电过程中,如发现任何异常情况(如烟雾或其他不正常噪音),请立即中断充电并联系售后服务。

廉价智能充电器60V20AH使用说明书概述:本廉价智能充电器,采用先进的MCU控制的全数字式开关电源加智能电池充电管理,不管电池电压多高,风机均为12V供电,控制均为5V供电,系统稳定可靠。
加上严格的ERP质量管理生产系统,使产品性能更加稳定可靠。
本廉价智能充电器,对蓄电池进行智能化充电管理,产品能自动识别最大电池电压60V等级向下兼容的6V、12V、16V、24V、36V、48V和60V电池组,也能自动识别20AH最大电池容量向下兼容10AH、12AH、14AH等电池系统管理充电,输出最高电压与环境温度有关(因为因部有温度补偿,按最低按-35℃设计,+25度时最大电压输出59V左右)独特的主电路设计,交流电压适用范围广,可以160V也能正常工作(注意电压越低可能输出电流偏小,充电的时间可能会加长,但会充电正常)。
不要担心电网波动而导致充电器无法使用。
同时独特的主电路设计,使充电器AC交流插头插入电网插座时不会出现打火现象。
可大大提高电池插座的使用寿命。
主要性能指标:输入交流电压交流220V(+10% ~ -50%)50/60HZ(交流电压适用范围广,宽电压设计)充电器型号--电池电压等级(V)36(3节) 48(4节) 60(5节) 64 72 …环境25度时最高电压(V)44 59 74 78.6 88.5 …最高充电电压(V)48 64 80 85.3 96 …额定充电电流—14AH等级DC1.8A(-5%~+15%)(最大脉冲2.3A)额定充电电流—20AH等级DC2.5A(-5%~+15%)(最大脉冲3.5A)额定充电电流—24AH等级DC3.5A(-5%~+15%)(最大脉冲4.1A)适用环境温度-35℃~ +40℃(超出40度按40度充电)浮充电压0V(长时间不去除电源插头,可能会自动补充充电)使用方法:1、先将充电器的充电插头插入电池箱的充电插座上,此时如果电池反接,黄灯会亮,请与厂家联系更换产品,无法充电(或输出线接到反接转换线上)。
东成电池充电器使用说明书东成电池充电器使用说明书尊敬的用户:感谢您购买东成电池充电器。
为了确保您能正确、安全地使用我们的产品,我们特别为您提供以下使用说明。
请在使用前仔细阅读本手册,并按照指示操作。
1. 产品概述:\n东成电池充电器是一款高效、安全的充电设备,适用于各种类型的可充电电池,如锂离子电池、镍氢电池等。
它具有智能识别功能,能自动识别并适配不同类型的电池。
2. 使用步骤:\n(1)将东成电池充电器插头插入交流插座。
\n(2)将需要充电的电池正确放入充电槽中。
请注意正负极的对应关系,确保正确连接。
\n(3)按下开关按钮启动充电器。
\n(4)在液晶屏上可以看到当前的充电状态和剩余时间。
\n(5)当充满时,液晶屏上会显示“满”字样,并且指示灯会变绿色。
\n(6)拔出插头,完成充电过程。
3. 注意事项:\n(1)请勿将东成电池充电器暴露在高温、潮湿或有腐蚀性气体的环境中。
\n(2)请勿将充电器接触到水或其他液体,以免发生短路或电击。
\n(3)请勿将充电器与金属物体接触,以免发生火灾或其他危险。
\n(4)请勿将充电器用于非指定用途,以免损坏设备或引发安全隐患。
\n(5)请勿长时间使用过度放电的电池进行充电,以免损坏设备或导致安全问题。
\n(6)请勿在无人看管的情况下使用充电器,以防止意外事故发生。
4. 故障排除:\n如果您在使用过程中遇到任何问题,请先检查以下几点:\n(1)确认插头是否插紧,并且交流插座是否正常供电。
\n(2)检查电池是否正确放置,并且正负极是否正确连接。
\n(3)检查液晶屏上的显示信息是否正常,如有异常,请联系售后服务。
5. 售后服务:\n如果您对产品有任何疑问或需要售后服务,请随时联系我们的客服中心。
我们将竭诚为您提供帮助和支持。
再次感谢您选择东成电池充电器。
我们将持续努力提供更好的产品和服务,以满足您的需求。
祝您使用愉快!东成电池充电器团队。
感谢您购买本公司的iCharger系列充电器,使用前请仔细阅读本说明书,以便您能更好地使用本产品。
参数指标1010B 106B输入电压范围:10.0~18.0VDC 10.0~18.0VDC0.05~10.0A充电电流调节范围: 0.05~10.0A放电电流调节范围: 0.05~7.0A 0.05~7.0A<180W充电功率限制: <200W放电功率限制:<30W <20W<300mA平衡电流: <300mA平衡精度:<10mV <10mV串(支持LiPo/Lilo/LiFe)1~6 串(支持LiPo/Lilo/LiFe)支持锂电池数: 1~10支持NiCd/NiMH电池数: 1~25 串1~17 串支持铅酸蓄电池: 2~36V(1~18串) 2~24V(1~12串)重量: 400g 350g尺寸: 143X97X26mm 134X83X25mm能性特点z大功率,大电流,高转换效率。
充电功率最大为200W(106B为180W),充电电流最大为10A;放电功率最大为30W(106B为20W),放电电流最大为7A。
采用先进的高效同步升降压(Synchronous buck-boost DC/DC converter)技术,使输出转换效率 >90%。
z提供两种电源输入端口:DC座(带自恢复保险,最大输入电流7A(106B为6A))和焊线鳄鱼夹(最大输入电流25A)。
可设置输出功率随输入功率自适应调整功能,有效地杜绝了输入电源过载现象。
z支持LiPo、Lilo、LiFe锂电池,内置锂电池平衡功能。
z智能风扇控制。
通过内部温度传感器,感知机器内部温度,从而控制风扇的开启或关闭。
z内部温度保护。
内部温度 >60℃(140℉),自动降低1/4输出功率;>65℃(149℉),自动停机。
z支持10组参数设置存储和导入。
用户可保存多种电池的参数设定,使用时无需重复设置,导入即可。
USB多功能移动充电器使用说明书USB多功能移动充电器是专为手机、MP3、MP4、DV数码相机、掌上电脑、iPOD数码产品等设计的电池充电专用设备。
为了保护您的利益和延长充电器的使用寿命,在使用多功能充电器前请阅读以下说明:一、主要功能1.集AC输入、USB输入输出、储能、USB升压、DC输出供电充电于一体。
2.红黄绿蓝LED灯,充放电状态显示,工作状态一目了然。
3.方便的伸缩线、USB输入输出,可以边充边用,是真正的移动电源。
4.完善的保护,具备电流、电压、充电、放电、负载、短路、温度等多重保护功能。
二、使用说明1.用AC 100~240V 电源向内置电池充电:插入AC电源,正在充电时,红色灯亮,直至绿色、蓝色灯亮时,充满结束。
2.用USB接口对内置电池充电:在USB口插入外部USB电源,开关-IN位置,正在充电时,红色灯亮,直至绿色灯亮时,充满结束。
3.直接用AC 100~240V电源向用电设备充电:插入AC电源,在DC输出口或USB口(开关-OUT)插上用电设备,蓝色灯亮时,用电设备充电结束,AC电源会继续对内部电池充电,绿色灯亮时,内置电池充满结束。
4.用USB电源升压后向用电设备充电:在USB口插入外部USB电源(开关-IN),在DC输出口,插上用电设备,蓝色灯亮时,用电设备充电结束,USB电源会继续对内部电池充电,绿色灯亮时,内置电池充满结束。
5.二路输出移动充电:将伸缩线插头插入DC插孔,或开关-OUT位置DC口和USB口可以同时输出,蓝色和黄色灯亮(微闪属正常),接上用电设备或在USB口插上USB用电设备,蓝色灯熄灭(或闪烁-视用电设备不同闪烁频率也不同),直至蓝色灯常亮时,充电结束。
三、注意事项1.一般内部充电时间6-10小时,外部充电时间1-4小时。
2.外部设备充电结束后,请及时拔下输出插头和开关-IN位置。
3.请勿于高温或潮湿环境中使用或存放。
四、技术参数USB Multi-function Portable Charger User GuideThis product is a multi-function portable charger designed for Mobile 、MP3、MP4、DV、Portable PC 、a series of iPod digital products. For pretect yourself benefit and extend the charger life, Please read carefull the guide before use.一、Features1.Built in AC input, USB input and output, storage, USB power Step up,output DC power supply.2.Red-yellow-green-blue LED Lights, charge and discharge status, working status display.B telescopic line input and output , it is a truly portable power supply.4.Seven categories protection with over current, over voltage, over charge and over discharge, over load, short-circuit,high temperature.二,Operation1.AC100~240V power for charging the internal battery :as the Charge connected to AC power supply , the internal battery of charge is charging, the red lights. So green , blue LED lights, with the end..B interface for charging the internal battery : USB interface connectedto USB external power port(Switch -IN), is charging that the red LED lights, until the green LED lights, with the end.3.AC100~240V power for charging external device :the charge connectedto AC power,DC JACK or the USB port (Switch -OUT) connected to electrical equipment, when the blue LED lights, Charging end. AC100~240V power will charge for the internal battery, and the green LED lights, batteries charging end.4.Step up USB power voltage for charging the electronic equipment :USB interface connected to USB external power port(Switch -IN),digital product DC port connected to DC jack , when the blue LED lights, electrical equipment charging end.The external USB power will continue to chargefor internal batteries, when the green LED lights, batteries charging end.5、Two port output charging:USB telescopic line plugs connected to DC JACK (or Switch -OUT ), Charger USB port and DC port can export voltage,The blue and yellow LED lights (scintillation:normal). Digital product connected to the USB port or DC JACK ,the Blue LED lights out (or scintillation - As digital devices is different, scintillation frequency is different)。
充电器说明书模板before operation,users should read this specification carefully 操作前,用户应仔细阅读本说明书1.note:注turn off the power before taking off the changing collet of the battery 更换夹头前关闭电源when charging up,it may generrate inflammable gas,so fire and spark are strictly prohibited,and avoid erosion of rainwater ,snow and dampness;充电时,它可能产生可燃性气体,所以严禁烟火,避免雨水的侵蚀,雪和湿;the red collet goes to the positive terminal,whilethe black one goes to the negative tenminal.dont reverse the collets when charging;红色夹子夹到正极,而黑色夹子夹道负终。
不反夹头充电;dont use demaged wires and/or collets.the battery charger should avoid shake and crash when charging .and don’t refresh frozen storage batteries;不要使用损坏的电线或夹头。
电池充电器应避免震动和碰撞时充电。
不要给冻结的蓄电池充电;must use standard fuse必须使用标准保险丝before charging,clear the storge battery carefully and check it initial voltage 充电前,清除蓄电池仔细检查它的初始电压principle 原则when charging current lies on the type of storage battery,generally is about 10% of the max. current of the battery.当充电电流取决于蓄电池的类型,一般是电池的最大电流10%。
爱德森充电器使用说明
使用爱德森充电器非常简单,请按照以下步骤操作:
1. 确保充电器插头已正确插入电源插座。
2. 将需要充电的设备连接到充电器的USB端口上。
3. 检查设备的充电线是否已正确连接到设备的充电接口上。
4. 确保设备和充电器之间的连接牢固,没有松动或断开的情况。
5. 检查充电器上的指示灯,确认电源已打开或设备正在充电。
6. 如果有多个USB端口,可以同时连接多个设备进行充电,
但请注意确保总功率不超过充电器的额定功率。
7. 一旦设备开始充电,保持连接,并等待充电完成。
8. 充电完成后,将设备从充电器上断开,以防止过度充电或损坏设备。
请注意,不同型号的爱德森充电器可能具有不同的功能和指示灯,所以在使用充电器之前请先阅读充电器的使用说明书。
确保按照说明书上的要求操作,以免造成意外情况或损坏设备。
网口移动电源使用说明移动电源被充电(input):1.使用MiNi5pin接口2.DC(直流)5V1A输入(要求外配充电器电压4.8-5.5V 电流大于1A)3.双色灯L1控制充电。
充电状态红灯充满红灯转为绿灯4.移动电源使用专业的锂电池充电管理IC有效保护锂电池充电。
移动电源给充电(output):1.使用8PIN网线口输出2.DC(直流)5V1A输出3.自动负载检测(接上设备自动启动移动电源给设备充电,设备拔掉移动电源自动待机)4.双色灯L2控制电芯电量状态,电芯电量100%-25%灯为绿色,低于25%灯由绿色转成红色。
0%灯熄灭。
电源自动关机。
5.输出过流保护,超出设定值移动电源休眠移动电源关断输出。
6.输出短路保护,输出接口不小心与金属导体接触移动电源会自动关机,使用充电器给电源充电激活移动电源。
(不建议与钥匙金属及导体与移动电源堆放一起)安全:1.使用专业性高通用性广应用最多的锂电池保护线路。
具有过充电过放电短路过流保护等专业性功能。
2.使用3芯18650电芯。
电芯间使用牛皮纸做绝缘。
用高温低内阻导线做电芯与保护板连接。
3.电芯上下面使用高质量粘性强的3M双面海绵胶固定电芯。
防止移动电源跌落震动后内部电芯松动。
4.双镍片牢固组合电芯。
元件说明:1. 充电管理IC U7(专业锂电池充电管理IC)2. 升压管理IC U4 电芯电压3.8V测试转换效率85%3. C3 使用钽电容。
4. PCB使用FR-4玻纤板5.无需认证工艺默认为有铅锡作业6.所以元器件使用带有POHS 认证商标的7.锂电池使用安全认证寿命长的注意事项:1.移动电源不使用长时间未使用应单独放置。
2.移动电源给充电转红灯时应及时充电,防止外出移动电源电量不足3.每个月最少要都移动电源进行一次循环(充满电,放到自动关机再充满)4.移动电源在被充电与给充电情况下有热量是正常的。
电池电量越低效率越低损耗越大发热越高。
属于正常。
5.使用用电设备根据用电设备的电池容量来判断移动电源转换率误差太大。
瑞轩自动智能双向无极充电机使用说明书
使用方法:
1、接上电池,打开电源开关,充电机开始给电池充电,设备会根据所接电池12V、24V自动识别进行充电。
2、开始充电时,电源指示灯点亮,充电指示灯点亮,数码管显示内容是由电池当前电压跟当前充电电流自动切换显示的。
刚开始时,充电电流是逐渐增长的;
充电指示灯是闪烁的;
大电流充电结束后,充电指示灯变为常亮,当充电结束时充满指示灯点亮;
充电指示灯熄灭。
3、在使用过程中不要堵塞风扇孔,以免损坏设备。
4、自行购买无线充电底座或无线充电后壳方可使用。
5、将充电器与无线充电底座连接,然后将手机或带有无线充电后壳的手机放置无线充电底座上即可。
6、若手机皮套太厚或非原装充电皮套,可能会影响充电效果,拿掉皮套后充电尝试。
7、在充电的时候,无线充电器周围的LED灯会亮起,显示使用状态。
另外,手机屏幕顶部的电池图标也会显示充电状态。
8.当给12伏电瓶充电的时候,我们用红色的充电夹子夹住电瓶的正极,用黑色夹子夹住电瓶的负极,转换开关调到12伏,然后插上电源,至于电流调节多少,要根据电瓶的大小和具体充电的时间来决定。
对于轿车电瓶,一般都是免维护电瓶,不建议充太长时间,一般3到4个小时就可以。
当给24伏电瓶充电的时候,我们把红色夹子夹住一块电瓶的正极(上面有电瓶线通往起动机),用黑色夹子夹住另一块电瓶的负极(有通往车身的搭铁线)。
USER GUIDEP30DUAL CHANNEL SMART CHARGERNever use the charger without supervision, please stop using the charger and refer to the manual for reasons if any functional abnormity.Keep the charger away from dust, humidity, rain and high temperature, as well as avoid direct exposure to the sunlight and intense vibration.Place the charger on a heat-resisting, non-flammable and insulating surface. Do not use it on the car’s seats, carpet or other similar places.Keep inflammable and explosive objects away from operation areas of the charger.Read the instruction manual carefully to be familiar with the features of the charger,and set proper charging parameters before operating. Setting the parameters incorrectly will result in damage to the product, personal property and cause serious injury as well.Warnings and Safety Tips••• •For your safety and a better user experience,please read this manual and follow the instruction before using the new charger.Please visit: www.isdt.co for more details on the functions of this smart charger,as well as purchase various accessories. Functions of products will be kept on upgrading,the manual in your hand may be different from the actual operation, please refer to the actual functions.Thanks for purchasing the ISDT P30 Smart Charger.Model No: P30Input voltage: DC 10~34V Output voltage: DC 1~34V Max. input current: 60ACharging current: 0.2~30A ×2Discharging current: 0.2~3.0A ×2Balance current: 1.5A/Cell MaxMax. discharging power: 30W ×2Max. charging power: Single channel Max. 1000W ; Whole model Max. 1500WSupported battery types and cell count: LiFe,LiIon,LiPo 1-8S ; LiHv 1-7S ; Pb 1-12S ; NiMH/Cd 1-16SSpecificationsWorking temperature: 0~40℃Storage temperature: -20~60℃Abnormal voltage alarm: SupportIncorrect cell count setting alarm: Support Dimension: 110×110×65mm Weight: 730gPort / KeyPower InputScreen Touch Key Touch Key Type-C Upgrading PortCH1Power OutputCH2Power OutputCH1Balance Port CH2Balance PortFan VentUSB ConnectionKey operation instructions (under standby interface)CH1 Middle Key:Short press to enter CH1 detail page, Long press to enter CH1 task setting menu.CH2 Middle Key:Short press to enter CH2 detail page, Long press to enter CH2 task setting menu.Press and Hold the CH1 ad CH2 Middle Key to enter advanced settings menu.Make sure to know the maximum charging current of the battery before charging, never use excessive current to charge to damage your battery, which will result in over heat even explosion during the charging process.The charging and discharging capacity of battery is usually marked with C value. Multiplying the charging C value and battery capacity equals to the maximum charging current supported by the battery.For example, for a 1000 mAh battery with a charging capacity of 5C, the maximum charging current would be 1000*5=5000mA; therefore, the maximum charging current is 5A.For a lithium battery, if it is impossible to confirm the supported charging C value, please set the charging current below 1C, for the sake of its (lithium battery) safety.The reference relation between C value and charging time: charging time ≥60 minutes/ charging C value(e.g. it needs around 60-70 minutes to complete charging with 1C).Due to differences in battery conversion efficiency, the time to complete the charging might be extended.How to Confirm Charging CurrentPreset Battery Type of Charger and Task ParametersPower on smart charger, connect the battery,and short touch the middle key of the touch board to enter the task setting menu as follows:Operating the ChargerTaskBattery Battery and cell countCurrent Charge, Discharge, Destroy, DC power supply, StorageLiHv、LiPo、LiIon、LiFe、Pb、NiMh/CdLiFe,LiIon,LiPo (1~8S) ; LiHv (1~7S) ; Pb (1~12S) ; NiMH/Cd (1~16S) 0.2~30AChargeBalancing port is strongly recommended when charging lipo battery, which can make sure to monitor voltageon each cell battery and balance it when charging.Warning beeper will yell before start charging lipo if in non-balance mode(no connecting with balance port). Current setting range: 0.2~30AThe battery type, cell count and charging current are auto set accordingly when connecting with BattGo battery. DischargeCurrent setting range: 0.2~3.0AThe battery type, cell count and discharging current are auto set accordingly when connecting with BattGo battery. StorageCurrent setting range: 0.2~30AThe battery type, cell count and storage current are auto set accordingly when connecting with BattGo battery. DestroyConnect the battery to be scrapped,and select the scrap function in task options, which capable to discharge the battery to 0V.Current setting range: 0.2~3.0AThe battery type and cell count are are auto set accordingly when connecting with BattGo battery.Charging ScreenTouch the touch board to shift the charging information, as cell voltage, cell internal resistance,BattGo information, working parameter. The cell voltage and internal resistance are only on display in balancing charging mode.The BattGo information will be displayed only when connected to the BattGo battery, and the cell voltage is able to be displayed without connected to the balance port.Advanced SettingsUnder the standby interface, long press the middle button of the left and right touch board to enter the advanced setting menu.Dual taskSelect this setting,the charger will charge/discharge/store to the two channel batteries with the same parameters at the same time. Connect the charger with the power supply and power on,select this setting on the advanced setting menu to set the task parameters.Under the advanced setting menu, select the system setting into the system setting menu as follows:System Setting MenuMin. input voltage protection: 10~31VAll tasks in operation will be stopped at once and hint warning of low voltage, when the input voltage is lower than the input voltage as set up.It will protect the battery from being discharged when using battery pack as power supply.Max. input power setting: 100~1700WIf the input power is smaller than the max working power(1500W), please set up the parameter as the actual output power as max input, to protect the input power and enable the charger to work stable.BattGoWhen the corresponding channel (CH1 output,CH2 output,Power input) connect to a BattGo battery, you could read this and modify the related parameters of Battgo battery.VolumeThere are 4 options of High Mid Low and Off for volume setting.When the setting is OFF, it will turn off the operation sound,but not the warning error beep.Parallel chargingParalled taskSelect this setting, it could output Max Power to one battery.Find a power splitter or 1/2 power cord, one end connect with the battery, and the other two ends connect with the battery output port. The battery balance port could connect with any of the charger's balance port. Connect the charger with the power supply and power on, and connect your battery as required, select this setting on the advanced setting menu to set the task parameters.DC power (CH1)The charger CH1 is equivalent to a DC power supply when selecting this function, with output voltage adjustable from 2 to 30V, and current adjustable from 1.0 to 5.0A.System settingEnter into system setting menu.Wireless connectionSelect this to put the charger into Bluetooth pairing mode. While selecting this, open the isdGO App on your phone and click on the "+" in the upper right corner to search, Select the corresponding device in the list for Bluetooth connection. After establishing a Bluetooth connection with a mobile phone, you can view detailed parameters or set tasks through the mobile phone. In the charger pairing mode, a 30-second countdown will be performed,and the pairing mode will automatically exit after the countdown ends.Touch sliderWhen the setting is ON, you could slide on the touch board for quick operation.Split screenThere are 3 options of 60 seconds,30 seconds and OFF for automatic split screen setting.You can choose to switch the display of the main interface from the single-channel parameter interface toDual channel (split screen) parameter interface.You can also select "Off" to turn off the automatic split screen function.Self-testWhen all batteries on CH1 and CH2 port are not connected, please select this option to self-test task manually. Calibration:The input voltage, output voltage and balance voltage of the charger can be calibrated with this task.App downloadGoogle Play From ISDT iOS*All product photos, statements and literature are for reference only. For up-to-date information, please visit our official web www.isdt.coSHENZHEN ISD TECHNOLOGY CO. LTDISDT reserves the right of final explanation and revision for the terms.406P3000000。
Hyperion EOS0615i DUO3 充电器用户指南3.1 固件版本,请访问http://media.hyperion.hk/dn/eos获得最新的说明和固件以及软件的信息。
产品包含USB接线,只是途中没有给出警告:EOS 0615i DUO3 是一款经过精心设计的具有众多安全保护特性的充电器,例如反极性接电保护、输入电压错误警告, 聚合锂电池片数错误时警告等安全特性。
但是,用户有必要保证此充电器设定正确并且工作在合适的环境中。
•充电器的电池种类的设定,必须与当前充电的电池相符合•锂电池的平衡充接口必须和充电器的多功能平衡充适配接口相匹配•同步模式(SYNC MODE) 充电时,充电器应该工作在与输出相当的放电条件下(后文有详细说明)•确认您的电池可以在你设置的充电速率下充电•充电时需要有人看护•充电应该在防火的环境下进行,例如在水泥地面或者砖地上•不要在容易着火的材料附近充电•不要把电池放在模型中进行充电•建议您可以在户外的可行的场所充电•充电器的输出线使用高质量的4mm金头。
见“安装”•适当的绝缘措施和经常检查连接可以防止短路发生。
由输出短路所造成的设备破坏,不在保修范围之内。
•供电后,充电器的盒子不可以接触直流/交流的供电•不要跌落充电器,或者对充电器震动/撞击,也不要让充电器受到潮气,湿气或者液体的影响•不要尝试给如下情况的电池充电:不同种类电池片构成的电池,新旧电池片混合构成的电池,和EOS 0615i DUO3所不支持充电的电池•不要尝试给“非充电电池”充电•不要拆开充电器的盒子,否则将不予保修•充电器应放在儿童或者宠物无法触及的地方•不要尝试用两个充电口同时充同一块电池。
(例如,10S的电池)否则,会破坏充电器,电池,这种情况将不予保修。
DUO3 充电器设计为最大可以充6S的电池. 对于比6S片数还多的电池, DUO3 充电器支持同步模式(SYNC MODE) 为分开的两部分进行平衡充电,这两部分充电后并联,就可以达到多片数电池充电的效果。
大艺电动扳手充电器说明书
1、大艺电动扳手充电器使用规定电压:线路电压不超过电钻铭牌上所规定电压的±5%方可使用。
2、大艺电动扳手充电器避开电线及水、油:在装设电线的场所,钻孔时切勿有损电线,并避免水、油进入电机、开关等电器部分。
3、大艺电动扳手充电器小心使用的场所:在狭窄场所如锅炉、金属容器、管道内等,应使用Ⅲ类工具,如使用Ⅱ类工具,必须装设漏电保护电器。
4、正确使用插头:不得任意调换插头,也不能不用插头而将裸导线直接插入插座内。
5、及时拔下插头:电钻不用或调换钻头及零件时,应及时拔下插头,但不能接着电源线拔下插头。
也不要在插头仍插入电源时,把手按在开关上搬动电钻。
6、使用前的检查:使用前空转一分钟,检查传动部分是否灵活,有无异常杂音,螺钉等是否松动脱落,换向火花是否正常。
7、防止过载:使用的钻头必须锋利,钻孔时不宜用力过猛,凡遇转速异常降低时,应即减少压力,电钻因故突然刹停或卡钻时,必须立即切断电源。
8、及时调换电刷:电刷磨损到不能使用时,须及时调换(二只电刷同时调换)否则会使电刷与换向器接触不良,引起环火,损坏换向器,严重时会烧坏电枢。
一,充电机的构成。
要想学会使用充电机,首先应对其结构进行学习了解。
下面简单介绍下新科华充电机的结构构成。
图一外部结构图二CPU控制器(显示器)图二CPU控制器按键介绍A键上翻B键下翻0--9 数字键D键程序储存及程序调用F键清楚所有程序(初始化)确认键确认取消键取消运行停止跳转暂停快捷键图三设备接线部分(1P开关)图四设备接线部分(刀型断路器)下面再介绍下充电机指令.1.待机指令。
在待机下,不断按动A键或B键,在设备显示器(图二示)显示处,将循环出现VIEW START EDIT PROG JUMP DA TA 控制指令,下面逐一介绍上述控制指令。
VIEW:查看指令。
按该键后再按确认键即可进入程序查看功能,就是说此时可以查看我们运行的工艺程序情况,比如可以查看到阶段,电流,设置运行时间等。
在查看后,可按C 键退出该功能。
START:启动(运行)指令。
在待机情况下按A或B键选中该指令(或按快捷键运行键)后按确认键即可启动充电机当前设置的充放电工艺程序。
※EDIT PROG: 手动设置工艺。
具体方法为用A或B 键上下翻选中该指令,按确认键进入充放电工艺编制。
下面以图五为例简单说明。
图五下面以CA为例进入编程。
图六A.步骤数:显示当前编辑步数,不用设置,程序最多可设30步。
B .ID号。
可以简单理解为充电机号,但有些是和充电机号不同的。
C.工艺指令:控制指令不同界面也不同,控制指令主要包括:END,CA,LV,HOLD(常用的)。
按A向后,B键向前选择,选择后按确认键。
这些指令的作用分别为:END:程序结束指令。
手设工艺时,确认该指令后退出编辑状态,充电机正常运行时,按该指令后,充电机立即退出运行程序,进入待机状态。
CA:恒流充放电指令。
也就是在我们设置工艺时间同一阶段的这段时间内,电流是保持不变的。
其中恒流充电指令为CHA,恒流放电指令为DIS.LV:恒压充电指令。
这一指令在胶体工艺中基本都能用到。
308DUO 使用说明书( V1.5.0 )目录使用须知 ................................................................................................................................................................. - 4 - ● 安全须知........................................................................................................................................................... - 4 - ● 版权声明........................................................................................................................................................... - 4 - ● 308DUO性能特点......................................................................................................................................... - 5 - ● 外观参数........................................................................................................................................................... - 5 - ● 电性能参数....................................................................................................................................................... - 5 - 设备简介 ................................................................................................................................................................. - 6 - ● 308DUO部件、接口名称............................................................................................................................. - 6 - ● 308DUO按键功能、界面图标 ..................................................................................................................... - 6 - ● 308DUO标准配件......................................................................................................................................... - 8 - ● 308DUO选购配件......................................................................................................................................... - 8 - 充电器的连线 ......................................................................................................................................................... - 9 - ● 电源输入地线不能与输出地线连通............................................................................................................... - 9 - ● 接线顺序........................................................................................................................................................... - 9 - ● 双通道的连线方式........................................................................................................................................... - 9 - ◆ 通道异步模式连线方式 ............................................................................................................................... - 9 - ◆ 通道同步模式连线方式 ............................................................................................................................... - 9 - 充电器充放电程序设置及使用 ........................................................................................................................... - 10 - ● 电源设置......................................................................................................................................................... - 10 - ● 程序添加与管理............................................................................................................................................. - 11 - ● 运行充电器程序............................................................................................................................................. - 11 - ● 程序运行状态................................................................................................................................................. - 12 - ● 错误提示......................................................................................................................................................... - 13 - ● 程序编辑......................................................................................................................................................... - 13 - ◆ LiPo/LiIo/LiFe电池的充放电设置.......................................................................................................... - 14 -❑ LiPo/LiIo/LiFe电池充电设置 ............................................................................................................ - 14 - LiPo/LiIo/LiFe电池的非平衡充电 .............................................................................................. - 15 - LiPo/LiIo/LiFe电池的平衡充电 .................................................................................................. - 15 - LiPo/LiIo/LiFe电池充电Advanced设置 .................................................................................... - 16 - LiPo/LiIo/LiFe电池充电SAFETY设置 ..................................................................................... - 16 - ❑ LiPo/LiIo/LiFe电池储存模式设置 .................................................................................................... - 17 - ❑ LiPo/LiIo/LiFe电池放电设置 ............................................................................................................ - 17 - To channel模式设置 ..................................................................................................................... - 17 - LiPo/LiIo/LiFe电池放电Advanced设置 .................................................................................... - 18 - LiPo/LiIo/LiFe电池放电Safety设置 .......................................................................................... - 18 - ❑ LiPo/LiIo/LiFe电池循环充放电设置 ................................................................................................ - 18 - ❑ LiPo/LiIo/LiFe电池执行平衡功能 .................................................................................................... - 18 - ◆ NiMH/NiCd电池的充放电设置 .............................................................................................................. - 19 -❑ NiMH/NiCd电池充电设置................................................................................................................. - 19 - NiMH/NiCd电池充电Advanced设置 ........................................................................................ - 19 - NiMH/NiCd电池充电Safety设置 .............................................................................................. - 19 -❑ NiMH/NiCd电池放电设置................................................................................................................. - 20 - NiMH/NiCd电池放电Safety设置 .............................................................................................. - 20 - ❑ NiMH/NiCd电池循环充放电设置..................................................................................................... - 20 - ◆ Pb电池的充放电设置 .............................................................................................................................. - 20 -❑ Pb电池充电设置 ................................................................................................................................ - 20 - Pb电池充电Advanced设置 ........................................................................................................ - 21 - Pb电池充电Safety设置 .............................................................................................................. - 21 - ❑ Pb电池电池放电设置......................................................................................................................... - 21 - ❑ Pb电池循环充放电设置..................................................................................................................... - 21 - ◆ NiZn电池的充放电设置.......................................................................................................................... - 21 -❑ NiZn电池充电设置 ............................................................................................................................ - 21 - NiZn电池的非平衡充电 .............................................................................................................. - 22 - NiZn电池的平衡充电 .................................................................................................................. - 22 - NiZn电池充电Advanced设置 .................................................................................................... - 22 - NiZn充电SAFETY设置 ............................................................................................................. - 22 - ❑ NiZn电池放电设置 ............................................................................................................................ - 22 - To channel模式设置 ..................................................................................................................... - 22 - NiZn电池放电Advanced设置 .................................................................................................... - 22 - NiZn电池放电Safety设置 .......................................................................................................... - 22 - ❑ NiZn电池循环充放电设置 ................................................................................................................ - 22 - 308DUO参数设置 ............................................................................................................................................... - 23 - ● 308DUO参数设置....................................................................................................................................... - 23 - ◆ Charger Setup ............................................................................................................................................ - 23 -❑ 温度&风扇设置..................................................................................................................................... - 23 - ❑ 提示音设置............................................................................................................................................ - 24 - ❑ LCD设置............................................................................................................................................. - 24 - ❑ 输出功率设置........................................................................................................................................ - 24 - ❑ 电源设置................................................................................................................................................ - 25 - ❑ 保存&加载配置文件设置..................................................................................................................... - 26 - ❑ 通信方式................................................................................................................................................ - 26 - ❑ 语言设置................................................................................................................................................ - 26 - ❑ 设备校准................................................................................................................................................ - 27 - ◆ Extra Function ........................................................................................................................................... - 28 -❑ 日志文件管理........................................................................................................................................ - 28 - ❑ 伺服器测试............................................................................................................................................ - 28 - ❑ 脉冲测试................................................................................................................................................ - 29 - ● USB & SD卡的使用.................................................................................................................................... - 30 - ● 保修及服务..................................................................................................................................................... - 30 - 308DUO固件升级 ............................................................................................................................................... - 31 - ● 通过USB接口更新固件 ............................................................................................................................... - 31 - ● 通过SD卡更新固件...................................................................................................................................... - 32 - 308DUO接入LogView ....................................................................................................................................... - 33 - ● LogView的使用步骤................................................................................................................................... - 33 - 重要提示 ............................................................................................................................................................... - 35 - ● 反射充电模式的充电原理............................................................................................................................. - 35 -● 电源回充模式................................................................................................................................................. - 35 - ● 通道再生模式................................................................................................................................................. - 35 - ◆ Resistance or bulbs .................................................................................................................................... - 35 - ◆ Charging battery ........................................................................................................................................ - 36 - ● 锂电池外部扩展放电模式............................................................................................................................. - 36 - 附录....................................................................................................................................................................... - 37 - ● 通道运行状态指示......................................................................................................................................... - 37 - ● 通道控制状态指示......................................................................................................................................... - 37 - ● 错误指示......................................................................................................................................................... - 37 -使用须知●安全须知使用充电器前,请认真阅读本章节内容;以便于您更放心、更安全的使用充电器。