网络视频解码器使用手册
- 格式:doc
- 大小:1.26 MB
- 文档页数:24
松佳2户解码器说明书一、产品简介松佳2户解码器是一款高性能、高稳定性的解码器,广泛应用于智能家居、办公场所等场景。
本产品具备强大的解码能力,可以满足用户在音视频、图像、数据等方面的需求。
松佳2户解码器采用先进的解码技术,具有体积小、性能稳定、兼容性强等特点。
接下来,我们将详细介绍如何使用这款解码器。
二、使用方法1.安装步骤在使用松佳2户解码器之前,请确保已正确安装相关软件和驱动。
以下是安装步骤:(1)打开包装盒,取出解码器。
(2)将解码器插入计算机或其他设备的USB接口。
(3)计算机或其他设备自动识别解码器并安装驱动。
(4)安装完成后,运行解码器软件。
2.操作指南松佳2户解码器操作简单,只需按照以下步骤进行:(1)启动解码器软件。
(2)将需要解码的文件拖入软件界面。
(3)点击“开始解码”按钮,等待解码完成。
(4)解码完成后,可将解码后的文件保存到指定位置。
3.注意事项在使用过程中,请注意以下事项:(1)请确保使用正规渠道购买的解码器,避免购买假冒产品。
(2)使用前请仔细阅读产品说明书,了解产品性能和功能。
(3)避免在潮湿、高温、强磁场环境下使用解码器。
(4)勿将解码器暴露在阳光下长时间照射。
三、故障处理如果在使用过程中遇到故障,请按照以下步骤进行处理:(1)检查解码器连接是否正常,确保USB接口无松动。
(2)重启计算机或其他设备,尝试重新安装驱动。
(3)更新解码器软件,确保为最新版本。
(4)如仍无法解决问题,请联系售后服务人员。
四、售后服务松佳2户解码器提供以下售后服务:(1)自购买之日起,享受一年内免费保修服务。
(2)保修期内,如产品出现非人为损坏的故障,免费维修或更换。
(3)保修期外,提供有偿维修服务。
五、产品优势松佳2户解码器具有以下优势:(1)高性能解码能力,满足用户多样化需求。
(2)兼容性强,支持多种操作系统和文件格式。
(3)体积小,便于携带和安装。
(4)稳定的性能,确保长时间运行不卡顿。

VEX-1-MP4 视 频 编 解 码 器 技术手册 北京蛙视通信技术有限责任公司目 录 1. 概述 (3)2.工作原理介绍 (3)3.设备构成 (4)4. 系统组网方式介绍 (9)5.安装使用指南 (10)6.主要技术参数指标 (10)7.一般故障处理 (11)8.厂家联系方式 (12)*最新产品敬请查看我公司网页1. 概述VEX-1视频编解码器集视频编码压缩和数据传输为一体,主要是为远程视频监控设计,它适合于监视远端实时图象,监听远端现场声音和异步数据上下传送的场合,可以广泛应用于交通、电力、邮电、石油、水利等系统的无人值守机房及其它环境监控。
VEX-1系统主要完成实时视频信号的压缩、语音信号和数据的编码,通过复接发送到E1接口传输;以及从E1接口解压缩视频信号、分解数据和语音信号的功能。
VEX-1系统基于单个E1信道传输。
VEX-1系统采用MPEG-4的编解码技术进行视频编解码,为用户提供高质量的实时图像。
产品主要特点l 通过1路E1通道传送双向高质量的实时图像,同时可提供双向立体声音频通道以及2路透明数据(RS232/RS485/RS422可选)通道。
l 视频处理上采用MPEG-4硬件编解码技术对模拟图像进行编解码,图像质量清晰稳定,实时性高,分辨率可达到720*576,传输延时小于300ms。
l 通过一对设备、1路E1即可完成双向音视频的同时传输。
l 本系统适用范围广,组网灵活方便,可应用在多种场合。
l 本系统设备安装简单,使用方便。
2.工作原理介绍VEX-1主要包括VEX-R(远端设备)和VEX-C(局端设备)。
在传输单向视频时VEX-R为远端监控现场使用的视频压缩传输设备,VEX-C为监控中心使用的视频解压缩设备。
VEX-1也可以同时传输双向视频音频信号。
VEX视频传输原理示意图 VEX由视频板、E1接口板和机箱三部分构成。
在视频板的编码侧,外部输入的模拟视频信号接入视频板视频输入接口,以MPEG4方式进行编码压缩,同时对音频信号进行编码。
高清解码器用户手册2安全使用注意事项此内容的目的是确保用户正确使用本产品,以避免危险或财产损失。
在使用此产品之前,请认真阅读此说明手册并妥善保存以备日后参考。
如下所示,预防措施分为“警告”和“注意”两部分: 警告:无视警告事项,可能会导致死亡或严重伤害。
注意:无视注意事项,可能会导致伤害或财产损失。
警告1.在本产品安装使用中,必须严格遵守国家和使用地区的各项电气安全规程。
2.请使用正规厂家提供的电源适配器。
3.请不要将多个编码器连接至同一电源(超过适配器负载量,可能会产生过多热量或导致火灾)。
4.在接线、拆装等操作时请一定要将编码器电源断开,切勿带电操作。
5.如录编码器中出现冒烟现象,或产生恶臭,或发出杂音,请立即关掉电源并且将电源线拔掉,并同经销商或服务中心联系。
6.如果编码器工作不正常,请联系购买设备的商店或最近的服务中心,不要以任何方式拆卸或修改设备。
(对未经认可的修改或维修所导致的问题,本公司不承担责任)。
注意1.请不要使物体摔落到设备上或大力震动编码器,并使设备远离存在磁场干扰的地点。
避免将设备安装到表面震动或容易受到冲击的地方(忽视此项可能会损坏设备)。
2.不能暴露安装于可能淋到雨或非常潮湿的地方。
3.避免将设备放在阳光直射地点、或通风不良的地点,或如加热器或暖气等热源附近(忽视此项可能会导致火灾危险)。
4.为了避免编码器损坏,切勿把编码器设置在有油烟或水蒸气、温度过高或有很多灰尘的场所5.清洁时,用软布擦拭掉机壳上的污垢。
清理污垢时,应以干布清理,污垢不易清除时,可用中性清洗剂轻拭干净,切勿使用碱性清洁剂洗涤。
声明:非常感谢您购买我公司的产品,如果您有什么疑问或需要请随时联系我们。
本手册为编码器产品安装使用手册,支持功能由于型号不同而有所区别,请以实物和随机快速使用说明为准。
本手册旨在供您作为操作和编程系统时的参考工具。
您可以在本手册中找到有关功能和命令的信息,以及详细的菜单树和快速操作指南。

TS110R解码器使用文档(V 1.0.0)Topsee Technologies Co., Ltd.All rights reserved修订记录Date Version Editor Description 2009-07-06 V 1.0.0 胡建华初稿简介天视通网络视频解码器V1.00(以下简称解码器)是一款专为安防行业度身定做的云台解码器,设备采用了高性能的数字处理器,由视频解码模块、以太网接口以及模拟视频输出接口构成。
解码器支持通过浏览器(Internet Explore)访问,完成各项查询配置,以及在线升级功能。
解码器通过以太网接口,获得用户指定的MPEG4格式的流媒体并将数据解码,解码获得的模拟视频数据将在电视机上显示。
此外,解码器能够处理云台协议 (PELCO-D、PELCO-P、SAMSUNG等) 控制命令。
采用了运算速度更快的数字处理器,能够快速压缩尺寸更大更加清晰的画面,采用了嵌入的服务器,完全脱离PC平台,系统调度效率高,代码固化在FLASH 中,系统运行稳定可靠。
支持通过浏览器(Internet Explore)进行远程图像访问。
产品特点:* MPEG4视频压缩标准;* 支持D1和CIF两种尺寸;* 内嵌Web Server,全面支持Internet Explore监视、配置、升级* 10/100M以太网接口支持* 支持IO接口连接其他外设* RS485接口,网络透明通道连接,客户端可通过解码器的透明通道控制* 支持多个用户同时访问建议机器配置:CPU 3.0GHz, 1G内存, 128M独立显存,2.1声卡,Audio输出,Mic输入,Windows2000/XP/2003,Microsoft IE 6.0。
本手册是根据当前发布软件编写,由于软件更新,修改和升级,以及设备的升级,可能造成手册描述的技术问题存在不准确或不完善的地方,敬请谅解。
手册会定期更新,恕不另行通知。
罗德雨解码器说明书摘要:1.罗德雨解码器的概述2.罗德雨解码器的主要功能3.罗德雨解码器的操作步骤4.罗德雨解码器的使用注意事项5.罗德雨解码器的售后服务与支持正文:罗德雨解码器是一款专业的解码设备,主要用于将数字信号转换为模拟信号,使得信号能够在不同的设备之间进行传输和播放。
该解码器具有强大的解码能力,能够支持多种音视频格式,满足用户在各种场合下的使用需求。
罗德雨解码器的主要功能包括:1.将数字信号转换为模拟信号,实现信号的传输和播放;2.支持多种音视频格式,如MP3、MP4、AVI 等;3.提供多种输出接口,可连接不同类型的设备;4.具备良好的稳定性和兼容性,确保解码过程中的信号损失降到最低。
操作罗德雨解码器非常简单,只需按照以下步骤进行:1.将需要解码的数字信号源(如U 盘、硬盘等)连接到解码器上;2.根据信号源的格式选择合适的解码模式;3.调整解码器的输出接口,使其与需要播放的设备相连接;4.启动解码器,开始进行信号转换和播放。
在使用罗德雨解码器时,需要注意以下几点:1.确保解码器与信号源以及播放设备之间的连接正确无误;2.在解码过程中,避免对解码器进行移动或断开连接,以免影响解码效果;3.对于不支持的信号格式,请勿强行进行解码,以免损坏解码器。
罗德雨解码器为您提供全面的售后服务与支持,包括:1.提供详尽的产品说明书,帮助您快速了解和使用解码器;2.提供一年内的免费保修服务,解决您在使用过程中遇到的问题;3.设有专业的客户服务团队,随时为您解答各类疑问。
总之,罗德雨解码器凭借其强大的解码能力、简便的操作和完善的售后服务,成为了音视频解码领域的优选产品。
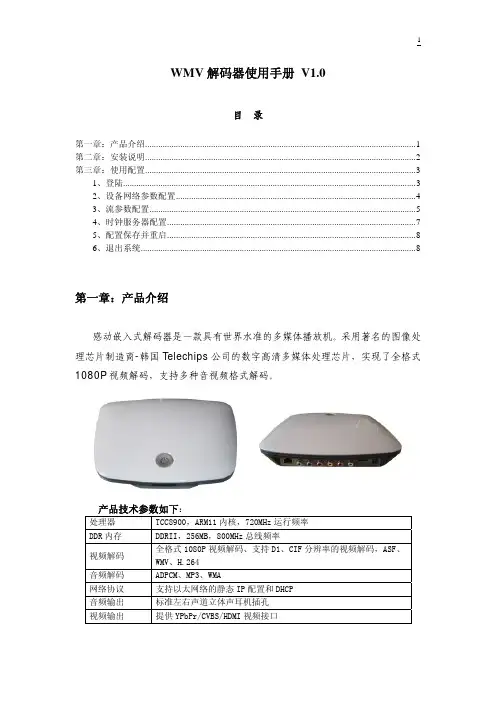
WMV解码器使用手册 V1.0目 录第一章:产品介绍 (1)第二章:安装说明 (2)第三章:使用配置 (3)1、登陆 (3)2、设备网络参数配置 (4)3、流参数配置 (5)4、时钟服务器配置 (7)5、配置保存并重启 (8)6、退出系统 (8)第一章:产品介绍感动嵌入式解码器是一款具有世界水准的多媒体播放机。
采用著名的图像处理芯片制造商-韩国Telechips公司的数字高清多媒体处理芯片,实现了全格式1080P视频解码,支持多种音视频格式解码。
产品技术参数如下:处理器 TCC8900,ARM11内核,720MHz运行频率DDR内存 DDRII,256MB,800MHz总线频率视频解码 全格式1080P视频解码、支持D1、CIF分辨率的视频解码,ASF、WMV、H.264音频解码 ADPCM、MP3、WMA网络协议 支持以太网络的静态IP配置和DHCP 音频输出 标准左右声道立体声耳机插孔视频输出 提供YPbPr/CVBS/HDMI视频接口网络 1个标准10/100Mbps以太网网口,网口自带LNK和ACK灯USB 2个标准USB 2.0 Host接口SD卡 标准SD卡插座,最大支持16GB存储按键 一个硬件reset键,一个开机键实时时钟 内建电池时钟保持电路自动开关机 支持系统定时开关机,可通过配置文件或者应用软件设置电源 12V 2A直流电源功耗 典型情况下,12W尺寸 209mm(L)*162mm(W)*72mm(H)重量 毛重:190g工作环境 工作温度:0℃~70℃,相对湿度 10%~85% (无凝结)第二章:安装说明设备各接口如图:打开设备箱后,依据不同型号的各类配件,进行安装连接。
设备上电后,“开/关”键是红色的,当按一下后,灯光变成蓝色的,设备才启动,如再按一下,变成红色后,设备系统就又关闭。
第三章:使用配置将编解码器接入网络中,使用光盘中配置工具找到编解码器的ip,然后对设备进行配置,设备出厂默认ip设置为192.168.0.20。

解码器拨码配置手册目录一、操作流程(配置流程) (1)二、操作步骤(配置步骤) (1)三、适用型号 (2)四、变更记录 (2)五、关于海康威视 (1)一、操作流程(配置流程)1)明确现场需求2)根据app查询拨码3)根据拨码实现需求二、操作步骤(配置步骤)1、明确现场需求,需要几层几户,起始楼层;2、下载半数字拨码app;路径:/产品资料/01.股份公司/10.报警门禁对讲产品/01-技术支持资料(指导文档,CAD样例,常用调试工具,培训视频等)/3.可视对讲/6.调试工具/自研半数字对讲软件/解码器计算工具/Divider/3、根据拨码提示完成相应拨码。
注意:如系统中存在DS-KH3000-L室内机需配合1.3.0及以后的版本的解码器,并将RW1第八位往上拨,并重启解码器三、适用型号五、关于海康威视海康威视是以视频为核心的物联网解决方案提供商,面向全球提供综合安防、智慧业务与大数据服务。
海康威视全球员工超26000人(截止2017年底),其中研发人员和技术服务人员超13000人,研发投入占企业销售额的7-8%,绝对数额占据业内前茅。
海康威视是博士后科研工作站单位,以杭州为中心,建立辐射北京、上海、重庆、武汉以及加拿大蒙特利尔、英国利物浦的研发中心体系,并计划在西安、武汉、成都、重庆和石家庄建立新的研发基地。
海康威视拥有视音频编解码、视频图像处理、视音频数据存储等核心技术,及云计算、大数据、深度学习等前瞻技术,针对公安、交通、司法、文教卫、金融、能源和智能楼宇等众多行业提供专业的细分产品、IVM智能可视化管理解决方案和大数据服务。
在视频监控行业之外,海康威视基于视频技术,将业务延伸到智能家居、工业自动化和汽车电子等行业,为持续发展打开新的空间。
海康威视在中国大陆拥有32家省级业务中心/一级分公司,在境外有38 个分支机构(截止2018年9月30日)。
海康威视产品和解决方案应用在150 多个国家和地区,在G20杭州峰会、北京奥运会、上海世博会、APEC会议、德国纽伦堡高铁站、韩国首尔平安城市等重大项目中发挥了极其重要的作用。
Video DecoderUser Manual Manual Version:V1.00Thank you for purchasing our product. If there are any questions, or requests, please do not hesitate to contact the dealer.CopyrightCopyright 2016 Zhejiang Uniview Technologies Co., Ltd. All rights reserved. No part of this manual may be copied, reproduced, translated, or distributed in any form or by any means without prior consent in writing from our company.Trademark Acknowledgementand other Uniview's trademarks and logos are the property ofZhejiang Uniview Technologies Co., Ltd. Other trademarks, company names and product names contained in this manual are the property of their respective owners.DisclaimerCAUTION!The default password is used for your first login. To ensure account security, please change the password after your first login. You are recommended to set a strong password (no less than eight characters).●To the maximum extent permitted by applicable law, the productdescribed, with its hardware, software, firmware and documents, isprovided on an "as is" basis.●Best effort has been made to verify the integrity and correctness ofthe contents in this manual, but no statement, information, orrecommendation in this manual shall constitute formal guaranteeof any kind, expressed or implied. We shall not be held responsiblecontents of this manual are subject to change without prior notice.Update will be added to the new version of this manual.●Use of this manual and the product and the subsequent result shallbe entirely on the user's own responsibility. In no event shall we beliable for any special, consequential, incidental, or indirectdamages, including, among others, damages for loss of businessprofits, business interruption, or loss of data or documentation, orproduct malfunction or information leakage caused by cyber attack,hacking or virus in connection with the use of this product.●Video and audio surveillance can be regulated by laws that varyfrom country to country. Check the law in your local region beforeusing this product for surveillance purposes. We shall not be heldresponsible for any consequences resulting from illegal operationsof the device.●The illustrations in this manual are for reference only and may varydepending on the version or model. The screenshots in this manualmay have been customized to meet specific requirements and userpreferences. As a result, some of the examples and functionsfeatured may differ from those displayed on your monitor.●This manual is a guide for multiple product models and so it is notintended for any specific product.●Due to uncertainties such as physical environment, discrepancymay exist between the actual values and reference values providedin this manual. The ultimate right to interpretation resides in ourcompany.Environmental ProtectionThis product has been designed to comply with the requirements onenvironmental protection. For the proper storage, use and disposal ofthis product, national laws and regulations must be observed.Safety and Compliance InformationSafety SymbolsThe symbols in the following table may be found on installation-related equipment. Be aware of the situations indicated and take necessary safety precautions during equipment installation and maintenance.The symbols in the following table may be found in this manual.Carefully follow the instructions indicated by the symbols to avoid hazardous situations and use the product properly.Symbol DescriptionWARNING!Indicates a hazardous situation which, if not avoided, could result in bodily injury or death.CAUTION!Indicates a situation which, if not avoided, could result in damage, data loss or malfunction to product.NOTE!Indicates useful or supplemental information about the use of product.Safety InformationRead through the instructions carefully before starting installation and operation.Installation and maintenance must be performed by qualified●This device is a class A product and may cause radio interference.Take measures if necessary.●While shipping, the device should be packed in its original packing.●Disconnect power before installation and cable connection. Powerdown the device before connecting and disconnecting cables, accessories and peripherals.●Verify installation and cable connection are correct before use.Incorrect installation and connection may cause personal injury and device damage.●Protect the power cable from being stepped on or pressed,particularly at the plug, receptacle, and the part leading out of the device.●Follow the procedure to shut down the device properly. Use anUninterrupted Power Supply (UPS) if possible. Sudden power failures can cause disk damage or device malfunction.●Improper use or replacement of the battery may cause risk ofexplosion. Use the manufacturer recommended battery. Dispose of the used battery according to local regulations or the battery manufacturer's instructions. Never dispose of the battery in fire.●Ensure a proper operating environment, including temperature,humidity, ventilation, power supply, and lightning protection. Make sure the device is always properly grounded. Keep the device from dust, excessive vibration and strong electromagnetic radiation.●Do not use the device near water or expose to rain or moisture.Never spill liquid of any kind on the device. Never let liquid of any kind enter the device.●Never stare at the optical module or optical fiber connector duringoperation.●Take necessary measures to ensure data security and protect thedevice from network attack and hacking (when connected toInternet). Possible risks and consequences are at user's solediscretion.● Contact your dealer if the device does not work properly. Neverattempt to disassemble the device yourself. User shall assume allresponsibility for damage, loss, or injury caused by unauthorizedrepair or maintenance.WARNING!● Never look at the transmit laser while the power is on. Never look directly at the fiber ports and the fiber cable ends when they are powered on.●Use of controls or adjustments to the performance or procedures other than those specified herein may result in hazardous laser emissions.Regulatory ComplianceFCC Part 15This equipment has been tested and found to comply with the limits for digital device, pursuant to part 15 of the FCC Rules. These limits are designed to provide reasonable protection against harmful interference when the equipment is operated in a commercial environment. This equipment generates, uses, and can radiate radio frequency energy and, if not installed and used in accordance with the instruction manual, may cause harmful interference to radio communications. Operation of this equipment in a residential area is likely to cause harmful interference in which case the user will be required to correct the interference at his own expense.This product complies with Part 15 of the FCC Rules. Operation is subject1.This device may not cause harmful interference.2.This device must accept any interference received, includinginterference that may cause undesired operation.LVD/EMC DirectiveThis product complies with the European Low Voltage Directive 2006/95/EC and EMC Directive 2004/108/EC.WEEE Directive–2002/96/ECThe product this manual refers to is covered by the Waste Electrical & Electronic Equipment (WEEE) Directive and must be disposed of in a responsible manner.Contents1 Introduction (1)2 Login (1)3 Common Functions (2)4 Network (3)TCP/IP (3)Telnet (4)SNMP (5)5 Audio and Video (7)Audio (7)Video (8)Media Stream (8)6 Service (9)Image (9)Transparent Channel (11)7 System (12)User (12)Time (12)Management Platform (13)Serial Port (14)8 Maintenance (16)Maintenance (17)Device Status (17)Decoding Status (18)1 IntroductionThis manual describes how to manage the device on a Web browser.The figures in this manual are only for illustration purpose. Theparameters, options and values actually displayed on the Web pages ofyour device may be different from those in this manual.2 LoginBefore you start, check that:The device is operating properly.The computer is connected to the device.The computer is installed with Microsoft Internet Explorer (IE) 7.0 or higher, and no proxy server is being used.NOTE!●The default IP address of your device is 192.168.0.14; the defaultsubnet mask is 255.255.255.0; the default gateway is 192.168.0.1.●Use admin as the username and password for first-time login. Pleasechange the default password under System to ensure accountsecurity.Follow the steps to log in to the device:1.Enter the device's IP address in the address bar and then pressEnter.2.Log in with the correct username and password. The Commonpage is displayed to list the frequently used functions. For details,see Common Functions.3 Common FunctionsThe Common page lists functions that are frequently used to manage the device. The table below describes the meaning of the icons on this page.firmware version, network settings, and management mode.For more details, seethe screen, image resolution and refresh rate, and remainingdecoding capacity of the device. For more details, seeDecoding StatusSet network parameters such as IP address for the device.For more details, seeSet parameters required if the device is to be managed by amanagement platform (central server). For more details, seeManagement PlatformSet vidoe output parameters, including the number ofwindows that appear on the screen, image resolution andrefresh rate. For details, seeSet maintenance parameters. For details, see4 NetworkSet network settings include TCP/IP and Telnet so that the device can communicate with other devices on the network.TCP/IPAssign a static IP address manually, or obtain one using the DHCP server.1.Click Network > TCP/IP.2.Set the parameters. Some are described in the table below.3.Click Save.TelnetEnable Telnet if you want to access the device from a computer with Telnet. The username and password for Telnet are the one you use to access the device on a Web browser. If the password for Web access is changed, the Telnet password changes too. By default the admin username cannot be changed.1.Click Network > Telnet.2.Select the check box to enable Telnet, and then click Save. SNMPEnable Simple Network Management Protocol (SNMPv3) if the device operates in server mode (managed via a central server). Through SNMP the central server synchronizes audio/video channel configurations and some of the scheduled tasks to the device, and the device reports device alarms to the central server.1.Click Network > SNMP.2.Set the parameters. Some are described in the table below.5 Audio and VideoSet video, audio and media stream parameters. The major functionsprovided on the Video&Audio menu are listed in the table below.NOTE!●In standalone mode, all parameters under Video & Audio can beconfigured on the client computer.●In server mode, only Display Mode can be configured on the clientcomputer; other parameters can only be configured on the centralserver.AudioSelect the output channel and adjust the sound volume as needed.1.Click Audio & Video > Audio.2.Set the parameters and then click Save.VideoSelect the output channel and then set the number of windows on the screen, image resolution and refresh rate.1.Click Audio & Video > Video.2.Set the parameters and then click Save.Media StreamSet media stream parameters, including the stream source address and address format, so that the device can receive media streams from the connected cameras.1.Click Audio & Video > Media Stream.2.Set the parameters. Some are described in the table below.6 ServiceSet image parameters and a transparent channel as needed. The major functions provided on the Service menu are listed in the table below.ImageSet the image display ratio, width and color of the divider line on the screen, and crop images as needed.1.Click Service > Image.2.Set the parameters. Some are described in the table below.Transparent ChannelSet the transparent channel to transfer video and audio signals through a serial port.1.Click Service > Transparent Channel.2.Set the parameters. Some are described in the table below.7 SystemSet system parameters, including the user password, system time, system language, management platform, and serial port.UserChange the default password to a strong one (at least 8 digits) after your first login. It is also recommended that you change the password periodically to ensure account security.1.Click System > User.2.Enter the old and new passwords.3.Click Save.TimeSet system time for your device and how the time is updated.1.Click System > Time.2.Set the parameters. Some are described in the table below.NOTE!The device synchronizes time with the central server when operating in server mode.Management PlatformConfigure the management platform only when the device operates inserver mode (managed by a central server).1.Click System > Platform.2.Select Connect to Platform.3.Set the parameters. Some are described in the table below.4.Click Save.Serial PortSet the serial port on the device, including the port type, baud rate, parity check, and flow control method.1.Click System > Serial Port.2.Select the desired port and then set parameters accordingly. Theparameters displayed vary with the serial port selected. Thefigure below shows the parameters displayed when COM 1isselected.The figure below shows the parameters displayed when COM 2is selected.3.Some parameters are described in the table below.NOTE!In server mode, only Duplex can be configured on the Web browser, and all the other parameters can be configured only on the central server. 8 MaintenanceThe major functions provided on the Maintenance menu are listed inthe table below.MaintenanceClick Maintenance> Maintenance and then perform maintenance operations as needed. You can restart the device, restore some factory default settings, import and export configuration files, export logs, and upgrade the device.Device StatusClick Maintenance> Device Status to view basic information of the device, its network settings and operation status. The following shows an example.Decoding StatusClick Maintenance> Decoding Status to view decoding status, including the output channel, number of windows on the screen, image resolution and refresh rate, remaining decoding capacity, and stream source address. The following shows an example.。
大华0905解码器说明书
1、下载大华0905解码器完成之后,双击此解码器开始安装,将出现软件安装的界面,过程不再赘述,就是一路下一步。
2、最后,安装完成,完成之后,你无须打开此软件,因为视频解码器软件是当某一视频需要用到此解码器时,它会自动开始工作,所以,安装完成,直接点击完成后退出。
3、这时,我们现在再打开刚才无法播放的视频,就会发现,现在视频已经可以正常播放了。
这就是视频解码器的作用。
4、这时,我们切换到系统托盘区域,会发现多出一个任务图标,这个图标便是视频解码器的图标。
D系列Dante AV解码器使用说明书DANTE AV解码器D10H©Bolin Technology目录操作说明 (2)重要信息 (2)清单 (4)概述 (5)特性 (5)产品示图 (6)解码器安装 (7)DIN导轨安装 (7)壁挂式安装 (10)单机架安装 (11)双机架安装 (11)背挂式安装 (12)系统配置 (16)连接 (16)D ANTE AV系统基本连接 (16)获取视频信号 (17)支持的视频分辨率 (17)通过解码器控制摄像机 (17)通过解码器使用红外遥控器 (17)使用键盘控制器控制解码器 (20)LED指标 (22)绿色LED灯 (22)多色LED灯 (22)接口和连接器 (23)USB接口 (23)红外线接口 (24)尺寸图 (25)操作说明感谢购买我们的产品。
如果有任何问题,请联系授权经销商。
在操作设备之前,请仔细阅读本手册并妥善保管以备将来参考。
版权保凌影像保留所有版权。
不得复制本手册的任何部分,如需发布在任何应用中或通过任何方式修改,必须得到我司事先书面同意。
商标●和其他Bolin的商标和标志都是Bolin Technology的财产。
●Microsoft、Windows、ActiveX和Internet Explorer是Microsoft公司在美国或其他国家注册商标。
●HDMI、HDMI LOGO和高清多媒体接口是HDMI许可证、LLC在美国和其他国家的商标或注册商标。
●该软件可能包含H.264/AVC视频技术,其使用需要来自MPEG-LA,L.C的以下通知。
本软件根据AVC专利组合许可证获得许可,用于消费者的个人和非商业用途:(I)按照AVC标准(“AVC视频”)对视频进行编码,或((II)对从事个人和非商业活动的消费者编码的AVC视频进行解码,或从获得许可的视频提供商处获取的AVC视频进行解码。
提供AVC视频。
未授予或暗示任何其他用途的许可。
更多信息可从MPEG LA,L.L.C.获得。
一层三户解码器拨码实例手册目录一、操作流程(配置流程) (1)二、操作步骤(配置步骤) (1)三、适用型号 (3)四、变更记录 (3)五、关于海康威视 (1)一、操作流程(配置流程)1)层号拓展配置2)房号拓展配置3)层号配置二、操作步骤(配置步骤)解码器拨码分为RW1(层号拓展、房号拓展),RW2(层号配置)两部分,其中RW1 分为层号拓展与房号拓展两部分,1-3位为层号拓展,4-6位为房号拓展。
图1:拨码示意图一层三户建议使用DS-KAD312,一个解码器供4层使用,不浪费网口。
1、层号拓展配置图2:KAD312层号拓展示意图一层三户,一个解码器给四层用,则选择标出的层号配置,RW1的1-3位为ON\ON\OFF。
2、房号拓展配置图3:KAD312房号拓展示意图房间号从1开始,并且是4层3户的模式,则选择标出的房号配置,RW1的4-6位为OFF\OFF\OFF3、层号配置(二进制拨码,层号需要换算成十进制)图4:KAD312层号配置示意图如图房号为(1+2+8=11)若解码器给1-4层使用,则层号拨为1,若解码器给5-8层用,则层号拨为5。
以此类推。
注意:如系统中存在DS-KH3000-L室内机需配合1.3.0及以后的版本的解码器,并将RW1第八位往上拨,并重启解码器三、适用型号五、关于海康威视海康威视是以视频为核心的物联网解决方案提供商,面向全球提供综合安防、智慧业务与大数据服务。
海康威视全球员工超26000人(截止2017年底),其中研发人员和技术服务人员超13000人,研发投入占企业销售额的7-8%,绝对数额占据业内前茅。
海康威视是博士后科研工作站单位,以杭州为中心,建立辐射北京、上海、重庆、武汉以及加拿大蒙特利尔、英国利物浦的研发中心体系,并计划在西安、武汉、成都、重庆和石家庄建立新的研发基地。
海康威视拥有视音频编解码、视频图像处理、视音频数据存储等核心技术,及云计算、大数据、深度学习等前瞻技术,针对公安、交通、司法、文教卫、金融、能源和智能楼宇等众多行业提供专业的细分产品、IVM智能可视化管理解决方案和大数据服务。
高清解码器用户手册V2 2021.6声明Kedacom™、TrueSens™、、为苏州科达科技股份有限公司的商标,不得擅自使用。
苏州科达科技股份有限公司版权所有,保留所有权利。
HDMI、HDMI高清晰度多媒体接口以及HDMI标志是HDMI Licensing Administrator,Inc.在美国和其他国家的商标或注册商标。
本手册可能包含技术上不准确的地方、或与产品功能及操作不相符的地方、或印刷错误。
我司将根据产品功能的增强而更新本手册的内容,并将定期改进或更新本手册中描述的产品或程序。
更新的内容将会在本手册的新版本中加入,恕不另行通知。
注意为了提高产品网络使用的安全性,建议您设置高强度密码,密码必须包含8-16个字符,且至少由数字、字母或特殊字符中的两种或两种以上类型组合而成。
请您定期更改用户名的密码,建议每3个月更新一次。
如果设备在较高风险的环境中使用,建议每月或每周更新一次。
请妥善保管好您的用户名与密码。
环保声明请遵守有关设备包装材料、耗尽电池和废旧设备处理的本地法规,并支持回收行动。
适用型号KDM201-D02E、KDM2510-D02E、KDM201-D01E-4K、KDM2510-D01E-4K关于本手册本手册用于指导用户操作,手册中的界面截图、图表等仅用于解释和说明的目的,与具体产品可能存在差异,请以实际为准。
本书约定图标或格式斜体苏州科达科技股份有限公司地址:江苏省苏州市高新区金山路131号邮编:215011 网址:电话:*************传真:*************客户咨询热线:400-828-2866目录1产品简介 (1)1.1产品概述 (1)1.2产品接口 (1)2设备安装 (2)2.1安装环境 (2)2.2安装 (2)2.2.1解码卡安装 (2)2.2.2解码器安装 (3)3初始配置 (5)3.1设备激活 (5)3.2网络参数修改 (5)3.3登录Web客户端 (6)3.3.1登录 (6)3.3.2界面说明 (6)4显示控制 (8)5通道控制 (10)5.1媒体源配置 (10)5.1.1媒体源管理 (10)5.1.2搜索添加 (12)5.2高级 (13)6配置 (14)6.1网络管理 (14)6.1.1IP及端口 (14)6.1.1.1以太网 (14)6.1.1.2服务端口 (15)6.1.1.3静态路由 (15)6.1.2上联协议 (17)6.1.2.1SIP协议 (17)6.1.2.2ONVIF (19)6.1.2.4PDNS (20)6.1.3下联协议 (21)6.1.4其他协议 (21)6.1.4.1PPPoE (21)6.1.4.2SMTP (21)6.1.4.3端口映射 (22)6.1.4.4DDNS (24)6.1.4.5HTTPS (25)6.2系统配置 (26)6.2.1基本设置 (26)6.2.2时间设置 (26)6.2.3用户安全 (28)6.2.3.1用户信息 (28)6.2.3.2RTSP认证 (30)6.2.3.3安全服务 (30)6.2.3.4地址过滤 (31)6.2.4接口设置 (32)6.2.4.1显示接口 (32)6.2.4.2串口 (33)6.3系统维护 (33)6.3.1系统状态 (33)6.3.1.1设备信息 (33)6.3.1.2通道状态 (33)6.3.1.3健康状态 (34)6.3.2日志信息 (34)6.3.3网络维护 (35)6.3.3.1以太网状态 (35)6.3.3.2网络探测 (36)6.3.3.3网络抓包 (36)6.3.4设备维护 (37)7.1场景应用一:直连电视墙 (40)7.2场景应用二:入网国标平台 (40)7.3场景应用三:入网显控平台 (44)附录A IPCSearch (49)1 产品简介1.1 产品概述KDM201-D01E-4K/D02E和KDM2510-D01E-4K/D02E均由苏州科达科技股份有限公司自主开发的高清解码器,支持两路HDMI接口输出、音频采集与输出,实时呈现远端图像和声音。
网络视频解码器使
用手册
1
2020年4月19日
网络视频解码器
使用手册
尊敬的用户,非常感谢您一直对我公司的产品的关注,假如您在使用过程中按照使用手册无法解决问题时,请致电我公司技术部垂询相关操作方法。
本手册的内容将做不定期的更新,恕不另行通知。
目录
1 引言.......................................................................... 错误!未定义书签。
1.1 编写目的 .......................................................... 错误!未定义书签。
1.2 使用范围 .......................................................... 错误!未定义书签。
2 产品介绍 .................................................................. 错误!未定义书签。
2.1 产品简介 .......................................................... 错误!未定义书签。
2.2 产品技术规格 .................................................. 错误!未定义书签。
3 设备说明 .................................................................. 错误!未定义书签。
3.1 运行环境 .......................................................... 错误!未定义书签。
3.2 支持解码设备 .................................................. 错误!未定义书签。
4 产品使用 .................................................................. 错误!未定义书签。
4.1 装箱清单 .......................................................... 错误!未定义书签。
4.2 产品安装注意事项........................................... 错误!未定义书签。
4.3 连接示意图 ...................................................... 错误!未定义书签。
4.4 设置解码器 ...................................................... 错误!未定义书签。
4.4.1搜索解码器............................................... 错误!未定义书签。
4.4.2添加解码器............................................... 错误!未定义书签。
4.4.3解码器参数设置 ....................................... 错误!未定义书签。
4.4.4设备列表设置........................................... 错误!未定义书签。
4.4.5系统参数配置........................................... 错误!未定义书签。
4.4.6轮巡设置 .................................................. 错误!未定义书签。
4.4.7云台控制 .................................................. 错误!未定义书签。
4.4.8播放任务列表........................................... 错误!未定义书签。
4.4.9系统日志查询........................................... 错误!未定义书签。
4.4.10版本查询 ................................................ 错误!未定义书签。
4.5 使用软件DecManage升级.............................. 错误!未定义书签。
1引言
1.1编写目的
本手册为商务人员及最终用户了解产品性能、设计方案、合理使用产品而编制。
1.2使用范围
本手册使用人员:最终用户、商务人员、技术支持人员。
本手册涉及内容:网络视频解码器的产品介绍、性能参数和使用功能说明。
2产品介绍
2.1产品简介
网络视频解码器是数字网络产品中的一员。
它无需PC平台,直接将数字视频数据从网络接收解码后直接输出到电视墙,操作方便、简单。
2.2产品技术规格
3设备说明
3.1运行环境
工作及环境条件。