永诺闪光灯YN565EXII-for C说明书
- 格式:pdf
- 大小:15.17 MB
- 文档页数:36
INSTRUCTION MANUAL 说 明 手 册中英文双语 / Chinese English Bilingual在使用本产品之前:请先仔细阅读本手册,以确保您能安全使用。
请保存好本手册以备将来查询参考。
Before using this product:Please read this user manual carefully in order to ensure your safety and the proper operation of this product. Keep for future reference.锂电机顶闪光灯Pioneering Li-ion Camera FlashForewordThank you for purchasing a GODOX product.V850II Li-ion camera flash adopts Godox wireless X system and 2.4G ratio transmission, which is compatible with AD360II-C, AD360II-N, TT685C, TT685N, X1T-C, X1T-N, etc. Fit all DSLR camera brands e.g. Canon, Nikon, Sony, etc.This V850II camera flash features:• GN60 (m ISO 100, @200mm). Adjust from 1/1 to 1/128 in1/3rd stops• Built-in 2.4G wireless transmission to support transmitting andreceiving• High speed sync, wireless remote control, multi flash andmanual focus assist• Stable consistency and color temperature with good evenlighting• User-friendly LCD display & control panel- 19 -For Your Safety• Always keep this product dry. Do not use in rain or in dampconditions.• This product contains high-voltage electronic parts. Touching the high-voltage circuit inside it may result in electric shock. Do not disassemble. Should repairs become necessary, thisproduct must be sent to an authorized maintenance center.• Stop using this product if it breaks open due to extrusion,falling or strong hit. Otherwise, electric shock may occur if you touch the electronic parts inside it.• Do not fire the flash directly into the eyes (especially those of babies) within short distances. Otherwise visual impairmentmay occur. When taking pictures for babies, keep the flash unit at least 1 meter (3.3 feet) away from them. Using bounce flash to reduce light intensity is also recommended.• Do not use the flash unit in the presence of flammable gases, chemicals and other similar materials. In certain circumstances, these materials may be sensitive to the strong light emittingfrom this flash unit and fire or electromagnetic interference may result.• Do not leave or store the flash unit in places where the ambient temperature reads over 50°C (e.g. in automobile). Otherwisethe electronic parts may be damaged.- 20 -Pioneering Li-ion Camera FlashConventions used in this Manual● This manual is based on the assumption that both the camera and camera flash’s power switches are powered on.● Reference page numbers are indicated by “p.**”.The Caution symbol gives supplemental information.- 21 -- 22 -Foreword For Your Safety Name of Parts Body Control Panel LCD PanelWhat’s in the Box of V850II Kit?What’s in the Box of V850II (only flash unit)?Separately Sold AccessoriesBatteryAttaching to a Camera Using the Flash Power Management Flash OutputZOOM: Setting the Flash Coverage M Mode: Manual Mode Multi Mode: Stroboscopic Flash S1 Mode S2 ModeHi-Speed Sync TriggeringCustom Function----Focus Assist Beam Buzz FunctionWireless Flash Shooting: Radio (2.4G) Transmission Wireless Control Function Sync TriggeringCustom Function----Sleep Function C.Fn Setting Custom FunctionsProtection Function Advanced Application Technical Data Maintenance19202325262734353737Contents- 23 -● Body01. Catchlight Panel 02. Built-In Wide Panel (Retracted)03. Flash Head04. Optic Control Sensor 05. Focus Assist BeamWireless Mode Selection (Long Keypress)Button (Long Keypress)(Long Keypress)06. Wireless Control Port 07. Sync Cord Jack 08. Hotshoe 09. Lock Ring10. Battery Compartment 11. USB Port121319141516171817. ON/OFF Power Switch18. <>Test Button / FlashReady IndicatorHigh Speed Sync Button (Long Keypress)- 24 -● LCD Panel20. <M >Manual Flash Mode 21. <S1>S1 Slave Flash Triggering 22. <S2>S2 Slave Flash Triggering23. <Multi >Multi/Stroboscopic● What's in the Box of V850II Kit?1. Flash Unit2. Li-ion Battery Pack3. Battery Charger4. Battery Charger Cable5. Mini Stand6. Protection Case7. Instruction Manual● What's in the Box of V850II (only flash unit)?1. Flash Unit 5. Mini Stand 6. Protection Case 7. Instruction Manual233233- 25 -● Separately Sold AccessoriesThe product can be used in combination with the followingaccessories sold separately, so as to achieve best photography effects: X1 TTL wireless flash trigger, Cells II high speed trigger, FT-16S power & trigger control, Car charger, Mini softbox, White & Silver Reflector, Honeycomb, Color gels, Snoot, etc.● Features1. This flash unit uses Li-ion polymer battery which has long runtime. The available charge-and-discharge times are 500.2. It is reliably safe. The inner circuit is against overcharge, overdischarge, overcurrent, and short circuit.3. Take only 2.5 hours to fully charge the battery by using the standard battery charger.● Cautions1. Do not short circuit.2. Do not expose to rain or immerse into water. This battery is not water proof.3. Keep out of reach of children.4. No over 24 hours’ continuous charging.5. Store in dry, cool, ventilated places.6. Do not put aside or into fire.7. Dead batteries should be disposed according to local regulations.8. If the battery had ceased using for over 3 months, please makea full recharge.125634BatteryTo load the battery, push the battery compartment cover downward and open it.According to the triangle sign on the battery pack, insert it into the compartment until a white knob locks the battery with a click sound.To unload the battery, tap the white knob and the battery pack will pop out. Then close the compartment.the battery level indication on the LCD panel to see the remaining 1 23- 27 -Using the Flash1.Power ManagementUse ON/OFF Power Switch to power the flash unit on or off. Turn off if it will not be used for an extended period of time. This flash unit has Sleep Function and will enter into sleep status when there is no operation for a long time. For Sleep Function setting, see the following instruction.2.Flash Output● Flash output can be varied from 1/128th power to 1/1 full power in 1/3 stop increments. To obtain a correct flash exposure, use a hand-held flash meter to determine the required flash output.● Adjust the power output by rotating Select Dial . The following table makes it easier to see how the stop changes in terms off/ stop when you increase or decrease the flash output:3. ZOOM: Setting the Flash Coverage4. M Mode: Manual Modeyour trigger hot shoe for firing. Before shooting, adjust the flash power output. When the camera’s shutter is pressed, the flash will fire synchronously. Slave triggering mode is not available in M mode.5. Multi Mode: Stroboscopic Flashflashes is fired. It can be used to capture multiple images of aPress the Mode Selection Button 1item to be set. The item blinks.desired number.Calculating the Shutter SpeedDuring stroboscopic flash, the shutter remains open until the firing stops. Use the provided formula to calculate the shutter speed required to capture the full sequence of flashes:Number of flashes / Firing frequency = Shutter speed For example, if the number of flashes is 10 and the firing frequency is 5 Hz, the shutter speed should be at least 2 sec.Note:● Stroboscopic flash is most effective with a highly reflective subject against a dark background.● Using a tripod and a remote switch is recommended.● A flash output of 1/1 or 1/2 cannot be set for stroboscopic flash.● Stroboscopic flash can be used with “buLb”.creating multiple lighting effects. Itis respectively applicable tomanual flash environment.● In S1 mode, the flash unit will firesynchronously when the mastercreating multiple lighting effects.It is applicable when using a TTLmaster flash.● In S2 mode, the flash unit willignore a single “preflash” from● To enter <> mode, long press● To exit <> mode, press Mode● In <> hi-speed sync triggeringmode, you can use a hi-speedsync trigger to have your flash unitsynchronized with all shutterspeeds of cameras (max. 1/8000second, up to your camera). Thisis convenient when you want touse aperture priority for fill-flashportraits.Note:*Hi-speed sync triggering mode is effective only when the flash unit is used together with the following flash triggers.1. Hi-speed sync trigger, e.g., Godox Cells II transceiver.2. TTL wireless flash trigger X1C3. TTL wireless flash trigger X1N*Hi-speed sync triggering mode is not available when V850II is mounted onto the camera.pop is fired. The time between thelast fire and the auto shutdown offocus assist beam is calledNo-Flash Time. The time is useradjustable and set to 10 secondsThen press “SET” button to enter“FC” mode. The LCD paneldisplays “FC” (Auto shutdown ofturned off.Godox Cells II transceiver(Optional )TTL wireless flash trigger X1C /X1N (Optional )11. Wireless Flash Shooting: Radio (2.4G) TransmissionSlave mode, groups can be selected from A/B/C/D/E.● As V850II adopts Godox wireless X system, it is compatible with AD360II-C, AD360II-N, TT685C, TT685N, X1T-C, X1T-N wireless control, etc.● See the picture below:12. Wireless Control Function● The flash unit is built in with a Wireless Control Port (6) so that you can wirelessly adjust the power level of the flash and control the on-or-off of your flash, focus assist beam and buzzer, as well as trigger the flash.(6) on the flash and insert the transmit endinto the camera hot shoe. Settings madeon the hotshoe-mounted transmit andreceive ends will bewirelessly communicated tothe flash. Then you canpress the camera shutter-release button to triggerthe flash. You can also holdthe transmit end at hand tocontrol your off-cameraflash.13.Sync TriggeringThe Sync Cord Jack (7) is a Φ2.5mm plug. Insert a trigger plug here and the flash will be fired synchronously with the camerashutter.“Sleeping Time”. Idle time beforeentering Sleep Mode is 10 minutes● When the flash enters sleep mode, the LCD panel displays a“Z z” icon.● To wake up the flash unit, press any button on the flash unit, orpress the camera release button, or press the trigger TESTbutton.Note:The idle time before entering Sleep Mode is recommended to set short. This can ensure a longer battery life.Protection Function1. Over-Temperature Protection● To avoid overheating and deteriorating the flash head, do not fire more than 30 continuous flashes in fast succession at 1/1 fullpower. After 30 continuous flashes, allow a rest time of at least 10 minutes.● If you fire more than 30 continuous flashes and then fire moreflashes in short intervals, the inner over-temperature protection function may be activated and make the recycling time about 10 to 15 seconds. If this occurs, allow a rest time of about 10minutes, and the flash unit will then return to normal.the LCD display.Number of flashes that will activate over-temperatureNumber of flashes that will activate over-temperature2. Other ProtectionsThe system provides real-time protection to secure the device andAdvanced Application● Bounce FlashBy pointing the flash head toward a wall or ceiling, the flash will bounce off the surface before illuminating the subject. This can soften shadows behind the subject for a more natural-looking shot. This is called bounce flash. To set the bounce direction, hold the flash head and turn it to a satisfying angle.● Creating a CatchlightWith the catchlight panel, you can create a catchlight in thesubject’s eyes to add life to the facial expression.● Using the Wide PanelPull out the built-in wide panel to enlarge the flash lighting range, so as to get more softened and natural lighting effect.Pull out the wide panel and placeit over the flash head as shown.The flash coverage will then beextended to 14 mm.● The catchlight panel will comeout at the same time. Pushthe catchlight panel back in.Technical DataMaintenance- Shut down the device immediately should abnormal operation be detected.- Avoid sudden impacts and the lamp should be dedusted regularly. - It is normal for the flash tube to be warm when in use. Avoidcontinuous flashes if unnecessary.- Maintenance of the flash must be performed by our authorized maintenance department which can provide original accessories. - This product, except consumables e.g. flash tube, is supported with a one-year warranty.- Unauthorized service will void the warranty.- If the product had failures or was wetted, do not use it until it is repaired by professionals.- Changes made to the specifications or designs may not bereflected in this manual.FCC WarningAny Changes or modifications not expressly approved by the party responsible for compliance could void the user's authority to operate the equipment.This device complies with part 15 of the FCC Rules. Operation is subject to the following two conditions: (1) This device may not cause harmful interference, and (2) this device must accept any interference received, including interference that may cause undesired operation.FCC Radiation Exposure Statement:This equipment complies with FCC radiation exposure limits set forth for an uncontrolled environment. This transmitter must not be co-located or operating in conjunction with any other antenna or transmitter.深圳市神牛摄影器材有限公司GODOX Photo Equipment Co., Ltd.地址/Add: 深圳市宝安区福永镇福洲大道西新和村华发工业园A4栋Building A4, Xinhe Huafa Industrial Zone, Fuzhou RD West, Fuyong Town, Baoan District, Shenzhen 518103, China电话/Tel: +86-755-29609320(8062) 传真/Fax: +86-755-25723423邮箱/E-mail:*******************://705-V85020-00 Made In China。
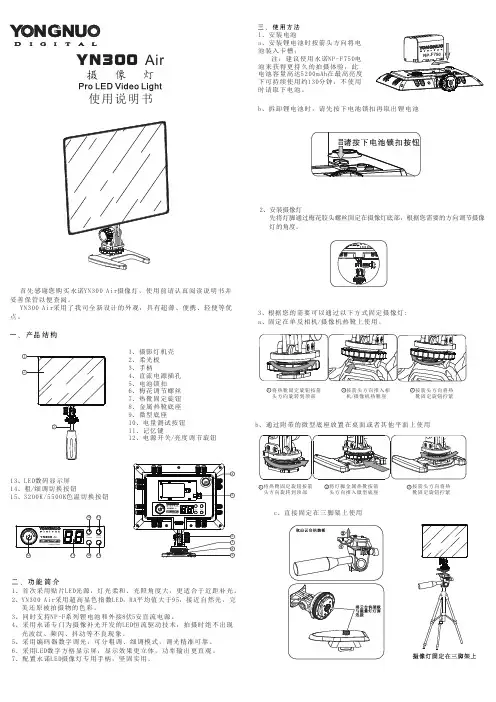
b 、拆卸锂电池时,请先按下电池锁扣再取出锂电池2、安装摄像灯先将灯脚通过梅花胶头螺丝固定在摄像灯底部,根据您需要的方向调节摄像灯的角度。
3、根据您的需要可以通过以下方式固定摄像灯:a 、固定在单反相机/摄像机热靴上使用。
将热靴固定旋钮按箭头方向旋转到顶部1按箭头方向推入相机/摄像机热靴座2按箭头方向将热靴固定旋钮拧紧3b 、通过附带的微型底座放置在桌面或者其他平面上使用将热靴固定旋钮按箭头方向旋转到顶部1将灯脚金属热靴按箭头方向推入微型底座2按箭头方向将热靴固定旋钮拧紧3c、直接固定在三脚架上使用三、使用方法1、安装电池a 、安装锂电池时按箭头方向将电池装入卡槽;注:建议使用永诺NP -F750电池来获得更持久的拍摄体验,此电池容量高达5200mAh 在最高亮度下可持续使用约130分钟,不使用时请取下电池。
使用说明书1、摄影灯机壳2、柔光板3、手柄4、直流电源插孔5、电池锁扣6、梅花调节螺丝7、热靴固定旋钮8、金属热靴底座9、微型底座10、电量测试按钮11、记忆键12、电源开关/亮度调节旋钮灯摄像一、产品结构13、LED 数码显示屏14、粗/细调切换按钮15、3200K /5500K 色温切换按钮123YN300 Air首先感谢您购买永诺YN300 Air 摄像灯,使用前请认真阅读说明书并 妥善保管以便查阅。
YN300 Air 采用了我司全新设计的外观,具有超薄、便携、轻便等优 点。
二、功能简介2、YN300 Air 采用超高显色指数LED ,RA 平均值大于95,接近自然光,完 美还原被拍摄物的色彩。
3、同时支持NP-F 系列锂电池和外接8伏5安直流电源。
4、采用永诺专门为摄像补光开发的LED 恒流驱动技术,拍摄时绝不出现 光波纹、频闪、抖动等不良现象。
5、采用编码器数字调光,可分粗调、细调模式,调光精准可靠。
6、采用LED 数字方格显示屏,显示效果更立体,功率输出更直观。
7、配置永诺LED 摄像灯专用手柄,坚固实用。


580EXII闪光灯,中国牛人详尽解释,秒杀说明书580EXII闪光灯中国牛人详尽解释秒杀说明书580EXII闪光灯中国牛人详尽解释秒杀说明书580EXII闪光灯中国牛人详尽解释秒杀说明书580EXII闪光灯中国牛人详尽解释秒杀说明书580EXII闪光灯中国牛人详尽解释秒杀说明书580EXII 闪光灯中国牛人详尽解释秒杀说明书580EXII闪光灯中国牛人详尽解释秒杀说明书580EXII闪光灯中国牛人详尽解释秒杀说明书580EXII闪光灯中国牛人详尽解释秒杀说明书580EXII闪光灯中国牛人详尽解释秒杀说明书本文111 BWANG7贡献pdf文档可能在WAP端浏览体验不佳。
建议您优先选择TXT或下载源文件到本机査看。
580EXII和430EXII有什么区别或者说580EXII值不值得买不考虑预算答我觉得回答这个月经问题要考虑两个方面1、两者的重量、体积区别。
580EXII 体积非常大比430EXII重和大见下图。
长时间手持和经常外出必须要考虑重量和体积的问题这是要首先考虑的。
2、要是你不怕重量那好我们再看看两者的功能区别主要见下表。
主要你要弄清楚需不需要更大的指数、频闪功能还有无线主控功能。
搞明白了也就可以做出判断了。
奎尔萨拉斯上传了这张照片:五、想玩离机闪以上提到的那么多闪光灯中哪些可以做主控单元下文统称主灯那些可以做从属单元下文统称副灯答可以做主控单元580EXII、580EX、550EX、ST-E2 引闪器。
可以做从属单元580EXII. 580EX、550EX、430EXII. 430EX、420EX 即将上市的320EX、270EXII第二部分佳能闪光灯实物说明及基本术语解释好了拿到闪光灯我们自然要弄明白各个按钮和部位是干什么的我拍了四张430、580EXII的实物图片作为说明。
这张是430EXII的正面奎尔萨拉斯上传了这张照片:这张是430EXII的背面奎尔萨拉斯上传了这张照片:这张是580EXII的正面奎尔萨拉斯上传了这张照片:这张是580EXII的背面奎尔萨拉斯上传了这张照片:一、什么是A-TTL、E-TTL、E-TTLII闪光测光模式答1、A-TTL闪光测光模式英文全称Advanced ThroughThe Lens意为“高级透过镜头”闪光测光。
永诺YN-622C⽆线TTL引闪器说明书⽤户⼿册⽬录注意事项注意事项 (1)产品功能简介 (2)⽀持的功能列表 (3)兼容性列表 (4)各部位名称 (5)使⽤前准备................6-7设置...................8-9闪光灯唤醒、测试引闪 (10)远程控制(遥控)模式 (11)⾃动闪光(E-TTL II) (12)快门同步 (13)闪光包围/曝光补偿 (14)灯头变焦(闪光覆盖范围) (15)⼿动/多次闪光(频闪) (16)⽆线闪光功能.............17-20混合控制模式. (21)B/C型相机闪光触发 (22)PC接⼝触发 (23)参考..................24-25故障排除................26-27规格. (28)使⽤前请先阅读您的相机与闪光灯的说明书,并通v读本使⽤⼿册,以确保能正确使⽤本产品的功能。
注意事项连接或安装本产品时,请关闭所有设备电源。
请保持⼲燥,勿⽤湿⼿接触产品,亦不可将产品浸⼊⽔中或暴露⾬中,否则可能引起⽆法正常使⽤,甚⾄损坏。
请勿在易燃易爆场合中使⽤,违反此警告可能引起爆炸或⽕灾。
本产品涉及电池,关于电池的使⽤请严格按照相关规定,否则会引起财产损失或⼈⾝伤害。
本说明书描述之功能均为假定所有收发设置在相同的频道,闪光灯、相机、引闪器电源为开启,相机设置闪光灯闪光为启动。
本产品为⽆线收发⼀体设计,为⽅便表述,本说明书中将安装于相机热靴时将称之为发射器接收器(主控单元),安装或连接闪光灯时将称之为(从属单元)。
产品功能简介⾸先感谢您选购永诺产品。
YN-622TTL⽆线引闪器是⾼性能的多灯摄影主控及受控设备,通过数字FSK 2.4GHz⽆线传输,可在360度布置你的闪光灯,实现不同的拍摄效果。
采⽤收发⼀体的设计,遥控距离可达100M,⽀持7个⽆线频道及A/B/C三个分组。
安装在⽀持外接闪光灯菜单的佳能EOS系列单反相机,可实现快速地更改远程闪光灯的模式及参数,如TTL分组光⽐或⼿动控制每组闪光灯的闪光输出。

TTL 永诺YN468闪光灯使用说明2011-02-07 13:30:58Canon 50D, 40D, 30DCanon 500D/T1i, 450D/Xsi, 400D/Xti, 350D不适用机型:Canon 1Ds, 1D, 5D, 5DII Series, and 7D)一、警告:请勿让本产品淋雨或受潮,以免发生火灾或触电。
处理电池时,请将电池的触点包裹好以避免短路,并请遵守好当地有关处理电池的规定。
请将电池或容易误吞的东西远离儿童存放,如果误吞了物体,请立即与医生联系。
不要近距离对人体的眼睛使用闪光元件,否则有可能对人体视网膜造成伤害。
不要对需要高度注意力的人使用闪光灯,否则有可能引发安全事故。
如果发生以下情况,请立即取出电池并停止使用。
本产品跌落或受到强烈冲击,使产品的内部裸露。
电池内部腐蚀性液体泄漏,此时应带手套取出电池。
产品发出奇怪的气味,发热或冒烟。
请勿自行拆卸或维修本产品,如果接触产品内部的高压电路,可能会触电。
长期不使用本产品时,请取出所有电池。
二、部件及显示屏说明1、反射板2、广角扩散板3、闪光灯头4、电池仓盖5、辅助对焦灯及无线触发感应器6、固定旋钮7、热靴座8、热靴触点9、显示屏10、+、—按钮11、测试按钮(PILOT)12、模式切换按钮(MODE)13、电源按钮(ON/OFF)14、充电指示灯15、模式指示16、功率/EV指示17、ISO指示(仅尼康版本可用)18、光圈指示19、输出功率微调指示20、频闪次数及频率指示21、后帘同步指示22、对焦灯开关指示23、灯头焦距指示24、灯头手动变焦指示三、产品安装1、安装电池。
按箭头所示方向滑动【电池仓盖】将其打开。
按电池仓中贴纸的指示安放电池,确保电池的正负极接点朝向正确。
按箭头所示方向滑动【电池仓盖】将其关闭。
2、将闪光灯安装到相机上。
按箭头所示方向转动【固定旋钮】到最高点。
将闪光灯【热靴座】完全推入相机热靴。
如箭头所示方向转动【固定旋钮】拧紧。
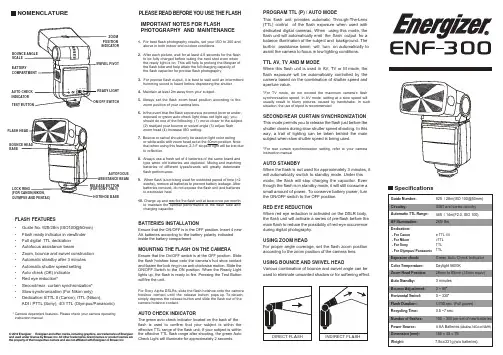
1. For best flash photography results, set your ISO to 200 and above in both indoor and outdoor conditions.2. After each picture, wait for at least 4-5 seconds for the flash to be fully charged before taking the next shot even when the ready light is on. This will help to prolong the lifespan of the flash tube and help attain the full charging capacity of the flash capacitor for precise flash photography.3. For precise flash output, it is best to wait until an intermittent humming sound is heard before depressing the shutter.4. Maintain at least 2m away from your subject.5. Always set the flash zoom head position according to the zoom position of your camera lens.6. In the event that the flash exposure is incorrect (over or under- exposed or green auto check light does not light up), you should do one of the following: (1) move closer to the subject (2) readjust your bounce or swivel angle (3) adjust flash zoom head (4) Increase ISO setting.7. Bounce or swivel should only be used on light color ceiling or white walls with zoom head set at the 50mm position. Note that when using this feature, 2-3 F stops of light will be lost due to reflection.8. Always use a fresh set of 4 batteries of the same brand and type when old batteries are depleted. Mixing and matching batteries of different types/brands will greatly deteriorate flash performance.9. When flash is not being used for extended period of time (>2 weeks), remove all batteries to prevent battery leakage. After batteries removal, do not expose the flash unit and batteries to excessive heat. 10. Charge up and test fire the flash unit at least once per monthto maintain the optimal performance of the flash tube and charging capacitor.SpecificationsNOMENCLATURE • Guide No: 92ft/28m (ISO100@50mm) • Flash ready indicator in viewfinder • Full digital TTL dedication • Autofocus assistance beam• Zoom, bounce and swivel construction • Automatic standby after 3 minutes • Automatic shutter speed setting • Auto check (OK) indicator • Red eye reduction*• Second/rear curtain synchronization* •Slow synchronization (For Nikon only)• Dedication: ETTL II (Canon), iTTL (Nikon),ADI / PTTL (Sony), 4/3 TTL (Olympus/Panasonic)* Camera dependent features. Please check your camera operating instruction manualZOOM SCALEBASEAUTOFOCUS PROGRAM TTL (P) / AUTO MODEThis flash unit provides automatic Through-The-Lens (TTL) control of the flash exposure when used with dedicated digital cameras. When using this mode, the flash unit will automatically emit the flash output for a balance illumination of the subject and background. The built-in assistance beam will turn on automatically to assist the camera to focus in low lighting conditions.TTL AV, TV AND M MODEWhen this flash unit is used in AV, TV or M mode, the flash exposure will be automatically controlled by the camera based on the combination of shutter speed and aperture value.*For TV mode, do not exceed the maximum camera’s flash synchronization speed. In AV mode, setting at a slow speed will usually result in blurry pictures caused by handshake. In such situation, the use of tripod is recommended.SECOND/REAR CURTAIN SYNCHRONIZATIONThis mode permits you to release the flash just before the shutter closes during slow shutter speed shooting. In this way, a trail of lighting can be taken behind the main subject when slow shutter speed is being used.*For rear curtain synchronization setting, referto your camera instruction manual.AUTO STANDBYWhen the flash is not used for approximately 3 minutes, it will automatically switch to standby mode. Under this mode, the flash will stop charging the capacitor. Even though the flash is in standby mode, it will still consume a small amount of power. To conserve battery power, turn the ON/OFF switch to the OFF position.RED EYE REDUCTIONWhen red eye reduction is activated on the DSLR body,the flash unit will activate a series of pre-flash before the main flash to reduce the possibility of red-eye occurrence during digital photography.USING ZOOM HEADFor proper angle coverage, set the flash zoom position according to the zoom position of the camera lens.USING BOUNCE AND SWIVEL HEADVarious combination of bounce and swivel angle can beused to eliminate unwanted shadow or for softening effect.BATTERIES INSTALLATIONEnsure that the ON/OFF is in the OFF position. Insert 4 new AA batteries according to the battery polarity indicated inside the battery compartment.MOUNTING THE FLASH ON THE CAMERAEnsure that the On/OFF switch is at the OFF position. Slide the flash hotshoe base onto the camera’s hot shoe contact and fasten the lock ring in an anti-clockwise motion. Slide the ON/OFF Switch to the ON position. When the Ready Light lights up, the flash is ready to fire. Pressing the Test Button will fire the unit.For Sony Alpha DSLRs, slide the flash hotshoe onto the camera hotshoe contact until the release button pops up. To detach,simply depress the release button and slide the flash out of the camera hotshoe contact.AUTO CHECK INDICATORThe green auto check indicator located on the back of the flash is used to confirm that your subject is within the effective TTL range of the flash unit. If your subject is within the effective TTL flash range after shooting, the green Auto Check Light will illuminate for approximately 2 seconds.IMPORTANT NOTES FOR FLASHPHOTOGRAPHY AND MAINTENANCEPLEASE READ BEFORE YOU USE THE FLASHFLASH FEATURES© 2012 Energizer Energizer and other marks, including graphics, are trademarks of Energizer and used under license by Bower , Inc. All other trademarks, brand names or product names are the property of their respective owners and are not affiliated with Energizer or Bower , Inc.。
迈进高速时代永诺YN568EX闪光灯作者:暂无来源:《摄影之友·影像视觉》 2012年第10期以往,国产闪光灯除了价格低廉以外,很难找到什么亮点。
但此次永诺用最新的568EX震撼了我们,它不仅支持TTL,还支持以往被国外闪光灯所垄断的高速同步功能。
568EX到底有多强大?让我们拭目以待。
撰文/摄影:黄媛媛编辑:李硕美编:王晓勇高速壁垒一般来说,闪光灯同步的快门速度是1/250秒,而高于这个时间的快门时间,比如说1/640秒,则无法捕捉一瞬间的闪光。
这是因为机械快门的本身限制造成的,在大部分相机上,快门能够全部打开的最快速度是1/250秒。
当我们使用更高的快门速度时,相机的快门帘幕会采用开启一个狭缝扫过感光元件的方式,让感光元件获得足够短的快门速度。
而闪光灯的高速同步则是利用了闪光灯连续发出多个闪光脉冲,保证快门帘幕狭缝在扫过感光元件的整个过程里,可以得到充分的闪光曝光。
实际上就是在高速快门启动的整个时间段不间断的频闪,照亮被摄物体。
这个功能一般用于在有强烈自然光源,需要进行大光圈拍摄,快门速度无法降低到常规同步速度的时候。
一直以来带有高速同步功能的闪光灯是国内摄影器材生产厂家一直希望突破的技术壁垒。
在等待了多年以后,永诺终于率先打破了这个壁垒。
摆在我们面前的具有高速同步功能的全新闪光灯YN568EX,其闪光同步速度可以达到1/8000秒,与原厂闪光灯相同。
并且,568EX和永诺早先推出的565EX一样支持机身TTL闪光测光,也能兼容佳能和尼康两家的无线闪光系统,作为从属单元使用。
做工与配置如果你将永诺565EX与568EX同时拿在手中就会发现,新款的568EX显得做工更加出色,液晶屏更大,线条也更加硬朗。
特别是灯头的造型,以往永诺560/565系列基本都采用了近似佳能580EX的造型,灯头上边缘有一个明显的圆弧状凸起。
而此次568EX则取消了这个凸起,整个灯头变成方形,线条更加简洁有力。
全能闪光灯永诺TTL闪光灯YN685
何云拯
【期刊名称】《影像视觉》
【年(卷),期】2015(0)11
【摘要】高速同步、极速回电、内置622、支持603,可远程控制各组离机闪光灯的多面手。
产品参数闪光指数:60(ISO100,200mm)闪光模式:ETTL,M,Multi触发方式:普通机顶,无线电离机变焦范
围:AUTO,20,24,28,35,50,70,80,105,135,200mm上下旋转角度:-7~90度左右旋转角度:0~360度电源:4节AA碱性电池或AA镍氢(NiMH)电池回电时间:约3秒(使用AA碱性电池)
【总页数】2页(P104-105)
【作者】何云拯
【作者单位】
【正文语种】中文
【相关文献】
1.进击的国产闪光灯永诺YN568EX Ⅱ玩主手册 [J],
2.实惠的外闪解决方案永诺YN560-Ⅱ外接闪光灯 [J], 盛秋
3.释放闪光魅力永诺无线TTL闪光灯触发器YN-622C [J], 黄媛媛
4.迈进高速时代永诺YN568EX闪光灯 [J], 黄媛媛;李硕
5.永诺YN565EX闪光灯 [J], 王晶
因版权原因,仅展示原文概要,查看原文内容请购买。
TTL 永诺YN468闪光灯使用说明TTL 永诺YN468闪光灯使用说明2011-02-07 13:30:58Canon 50D, 40D, 30DCanon 500D/T1i, 450D/Xsi, 400D/Xti, 350D不适用机型:Canon 1Ds, 1D, 5D, 5DII Series, and 7D)一、警告:请勿让本产品淋雨或受潮,以免发生火灾或触电。
处理电池时,请将电池的触点包裹好以避免短路,并请遵守好当地有关处理电池的规定。
请将电池或容易误吞的东西远离儿童存放,如果误吞了物体,请立即与医生联系。
不要近距离对人体的眼睛使用闪光元件,否则有可能对人体视网膜造成伤害。
不要对需要高度注意力的人使用闪光灯,否则有可能引发安全事故。
如果发生以下情况,请立即取出电池并停止使用。
本产品跌落或受到强烈冲击,使产品的内部裸露。
电池内部腐蚀性液体泄漏,此时应带手套取出电池。
产品发出奇怪的气味,发热或冒烟。
请勿自行拆卸或维修本产品,如果接触产品内部的高压电路,可能会触电。
长期不使用本产品时,请取出所有电池。
二、部件及显示屏说明1、反射板2、广角扩散板3、闪光灯头4、电池仓盖5、辅助对焦灯及无线触发感应器6、固定旋钮7、热靴座8、热靴触点9、显示屏10、,、—按钮11、测试按钮(PILOT)12、模式切换按钮(MODE)13、电源按钮(ON/OFF)14、充电指示灯15、模式指示输出功率将闪烁,在此状态下按【模式切换按钮】即MODE按钮,闪光次数将闪烁,此时按【,】与【,】可以调整闪光次数,再按【模式切换按钮】,闪光频率将开始闪烁,此时按【,】与【,】可以调整闪光次数。
注意:电池电量不足的情况,闪光灯充电速度较慢,可能会引起高频率闪光出现漏闪,在这种情况下,请降低闪光频率。
6、S1/S2模式通过按下【模式切换按钮】,可以使闪光灯进入S1、S2模式。
这两种模式适合作为副灯使用,以创建多种照明效果,它们分别适合于手动闪光环境和TTL闪光环境。
前言:如果玩摄影的人都应该知道这个牌子 -- 永诺,他们家出了不少好东西,也可说是国产领导品牌~特别是灯这一块的,经典手动灯560,经典568EX高速TTL灯,622引闪什么的,很多,我就不一一数出来了。
最近他们家出了50 1.8镜头,网上的评价扁多赞,我没用过我也不好评论。
这次我进手了永诺较为好的一款带高速带TTL的闪光灯568EX...我为什么买这灯呢?其实就是觉得价格便宜,然后在家拍拍东西可以用,工作出外做个备用灯挺好的。
其实吧,尼康SB910刚出没多久的时候我就买了,因为曾经用SB700的时候觉得不咋的,然后朋友买了和我说910有多牛逼有厉害回电有多快白平衡有多准,我就咬牙买下了。
这次也尝尝国产品牌的旗舰灯。
看看如何。
首先我们来看看官方的介绍~对于外包装我也就是一律而过,纸皮外包装,一堆图标,未免有点太过堆积的。
热靴底座,其实做工的确不怎么好,只有中间那个洞卡住一只触角,而且如果是插910上去这个底座,根本插不进,就算卡进了也很难卸出来~而且配件除了底座,没有其在旋转灯头操作时则不需要按下一侧的锁定,因为它根本没有,直接上下左右旋转,这一点有好有不好吧,个人而言用习惯锁定的,没有就觉得稍微怪一点,但相对来说就是操作方便一点。
灯头,拉出来则是扩散板和反光板,不知你们有没有发现,其实灯头的单当弹簧位置和佳能的一样,都在左边,而尼康的则在右边。
热靴底座~其实永诺旧款都是旋转锁定热靴,这一点是非常不方便的,但笔者留意到新款的YN600EX则是用了佳能那种拨的锁定方式,相对来说,也比旋转要好。
YN568EX的PC口提供的是2.5mm的接口,可用于连接相机或者引闪器来达到引闪离闪的作用。
电池仓。
液晶面板相对来说有点小,字体黄色也符合整体颜色,按钮按下去挺爽的,就是稍微有点硬吧。
正常操作画面,字体还挺大的,直观不错。
这是待机时状态,话说深入看过说明书,发现永诺的灯设置起来大概都是这样的。
总结:笔者在室内用568EX和SB910对比时发现568EX的缺点不多,甚至在性价比上来说完秒910,为什么这样说呢?TTL基本没太大差别,控制的都差不多,其次白平衡的话568ex稍微有点偏蓝,910则是偏黄,只是一点点,其次1/1连拍的话,910输出的光量比568ex大丁点,其回电速度910完胜,在相同环境相同参数下,568只能完美连拍2张,第三、四张则是全黑,而910则可以完美4张,然后则是黑三张,第四张又正常回电了。
6. S1/S2 ModePress the [MODE] button, then the flash will enter S1/S2 mode.These modes are applicable for slave flash in order to create manylight effects. They are respectively applicable for manual flashenvironment and TLT flash environment.When the flash is in S1 mode, it will work with the first work ofthe master flash synchronously, with the result consistent with theuse of radio slave. To use this mode correctly, the master flashshould be set at manual flash and the TTL flash system withpreflight function and the red-reduction function with multipleflashes should not be used.S2 mode is similar to S1 mode, but it can support the master flashin TTL mode. In particular, if S1 mode cannot have correct andsynchronous flash with the inbuilt flash, you can try to use S2mode.7. Menu Access of Camera (only compatible with CanonETTL camera system)On the Canon camerasupporting ETTL, you canswitch flash mode via thecamera menu. With thesetting function of theexternal flash function in theflash control menu, you canswitch between the TTLmode and the manual flash mode; in addition, on such menu, youmay also set front and rear curtain synchronization, and setmanual flash output with 1/3ev step length.8. Test FlashWhether in any mode, you can press PILOT button to test if theflash light flashes normally.In M/S1/S2 mode, press the PILOT button and the flash light willsend light with different luminance as per levels of output powerselected.9. Power-saving FunctionIn TTL/M/MULTI mode, if idle for about 30min, the flash willpower off automatically.In S1/S2mode,if idle for 60min, the flash will power offautomatically.VI. SpecificationsGuide number 33Circuit design Insulated Gate Bipolar Transistor (IGBT)Flash mode TTL, M, Multi, S1, S2Zoom range Auto, 24, 28, 35, 50, 70, 85 mmVertical rotation angle -7~90 degreesHorizontal rotation angle 0~270 degreesPower Supply 4×AAsize batteries (Alkaline or Ni-MHare usable)Lighting times 100~1500 times (AA alkaline cell used)Recycle time less than 3s (AA alkaline cell used)Color temperature 5600kFlash time 1/800s~1/20000sFlash control TTL auto flash or manual Level 8 lightquantity output control with 0.3 stopincrementAdditional featuresFEB, FEC, FEL, Automatic zooming,Rear-curtain Sync.Dimensions 60×72×172 mm(extended state)Net weight 300gAccessories Flash light (1), protecting bag (1), andmini stand(1) and manual (1)VII. Possible problems during use and solutions1. The AF LED is not on? Check if this camera needs flash lightassist AF or if it supports the function; some cameras requiresfocucal points to be in the center, focus method to adopt AF-S andrequires dark environment; check if some settings in the cameraare forbidden.2. Photos are under exposure or over exposure? Check if the setshutter, aperture and ISO are too near the flash limit or if somesettings including exposure compensation in relation to flash areproper.3. Vignetting appears in photos or only part of the subject isilluminated? This product has a designed light head zoom rangeof 24-85 mm, and is currently not compatible with full framecamera system. You may pull out the wide-angle diffuser to widenthe flash range.4. Because of differences among various models of cameras anddifferent personal preferences, the use of this product may causebrightness with the [Output control knob] within the range of ±3ev,Please Note that this compensationexposure compensation setting on thephotos by making flash light headaimed at wall or ceiling and using the light reflected back from theceiling or wall to light the desired object, so that the shade behindthe object can be decreased to getIf the wall or ceiling is too far, theweak towall orwhitein order to get efficient reflection;notwhite, color cast may appear in photo.9. Use Reflection Board to Take PhotosWith the reflection board flash, draw the reflection board and theout from the light head at the sametime and then push the wide-anglediffusion board back. In such case,if this product is being used to takeaeyes ofthe subject and thus make the eyesThiseffectwhen the flasher head is up 90°.diffusion board,board andfigure; in suchextent to 18mm and the flash effect will be softer andused in incompatible iTTL/ETTLcamera, Functions 2, 3, 4, 5, 6 and 7 are not available.物对焦后按下相机快门,闪光灯就会根据相机的指示闪出合适的光,就可以得到您所需要的相片。
永诺YN568EX⾼速同步热靴闪光灯评测近期上市发售的永诺YN568EX,是⼀款带有⾼速同步功能的国有品牌热靴闪光灯,这也标志着国产⾼速同步技术的突破,作为永诺新⼀代旗舰产品,YN568EX拥有新颖的外观,强劲的功能,及超⾼的性价⽐。
下⽂就为⼤家介绍这款闪光灯的各项功能。
外观篇:包装及附件:外包装⼀直延续了永诺的⼀贯风格,简洁环保的纸质包装。
包装内包括便携套,闪灯⽀架。
永诺YN568EX⽤了全新设计的模具。
虽然永诺的外包装⼀直没有改变,但闪灯的模具⼯艺⽇益完善。
灯体棱⾓分明,光滑细腻。
看得出永诺对⾃⼰品牌的⽣产态度及与国际⼤品牌争锋的决⼼。
YN568EX的体积为62X72X188mm,不装电池时候的重量为350g。
以下是永诺568ex对⽐永诺560和尼康sb900的外观图。
灯⾝布局液晶屏操控感受:永诺YN568EX左右两侧分别是电池仓和闪光灯同步接⼝。
右侧电池仓也重新设计,电池填装⽅式和以往永诺产品也不同(具体请看下图)。
左侧偏下是闪光灯同步接⼝,YN568EX采⽤了2.5mm⾳频⼝来代替之前的PC⼝作为闪光灯同步接⼝。
2.5mm⾳频⼝体积更⼩,⽤户也可以轻易地购买到廉价的2.5mm⾳频线甚⾄使⽤旧的⾳频线⾃⼰改装后作为闪光灯同步线使⽤。
由于YN568EX功能⾮常强⼤,除了传统的标准按键控制之外,必须⽤到组合键来控制。
在使⽤组合键的时候不是同时按下两个按键,⽽是有先后之分。
操作时需要先按下圆点所指⽰按键然后再按下箭头所指按键,开始有些不习惯,稍后很快就适应了。
各闪光模式在LCD上的显⽰:尼康I-TTL模式佳能E-TTL模式M档闪光模式频闪模式热靴接⼝:YN568EX采⽤了⾦属热靴接⼝,热靴锁仍旧采⽤⽐较⽼式旋转拨盘式,感觉有些⽼旧。
个⼈认为改成拨杆锁式也没那么难吧?灯头可旋转最⼤⾓度左右: 0 ~ 360度,各档位清晰,松紧适度。
上下:-7~90度,档位清晰,松紧适度。
使⽤篇:TTL、离机TTL,离机距离测试:永诺YN568EX除了⽀持机顶热靴插⼊时可以实现的TTL全部功能之外,在离机使⽤的时候可以同时兼容C/N两家的离机指令,意思就是在离机使⽤YN568EX的时候可以不⽤考虑尼康或是佳能的机⾝区别,在闪灯上设定后可以做到同时兼容佳能尼康⽤户的离机操控。
永诺YN685闪光灯作者:暂无来源:《摄影之友·影像视觉》 2015年第11期高速同步、极速回电、内置622、支持603,可远程控制各组离机闪光灯的多面手。
图/文:何云拯编辑:钟硕嘉美编:周蕾产品参数闪光指数: 60(ISO100,200mm)闪光模式: ETTL , M, Multi触发方式:普通机顶,无线电离机变焦范围: AUTO , 20,24,28,35,50,70,80,105,135,200mm上下旋转角度: -7~90度左右旋转角度: 0~360度电源: 4节AA 碱性电池或AA 镍氢(Ni-MH)电池回电时间:约3秒(使用AA 碱性电池)色温: 5600K闪光时间: 1/200~1/20000秒外部接口:外接电源接口,PC接口,热靴无线触发距离: 100米附加功能:高速同步、后帘同步、曝光补偿、曝光包围、曝光锁定、灯头电动变焦、声音提示、自动保存设置、节电模式、过热保护、自定义功能体积:约67 X 77 X 210mm净重: 426g永诺摄影器材有限公司致力于135专业数码与胶片单反市场,一直为佳能、尼康等主流相机厂家提供专业附件。
从我们熟知的相机快门线、红外遥控器到以闪光灯为主的各种诸如闪光灯控制器等闪光灯配套设备。
永诺是行业内的知名品牌,这里为你带来的是永诺全新的TTL 闪光灯YN685。
特点介绍从外观上来看,永诺YN685在按键上作了一些改变,用两个长条型的按键取代了之前一直沿用的标志性一排四个小圆键,按键的位置分布与之前的YN600EX相似。
YN685的灯头可上下旋转-7 ~ 90度,左右旋转0-360度,这能使我们在一些能够反光的环境下用闪光灯来进行跳闪来获得其他更好的效果,这为我们的创作带来了更好的灵活性。
灯头上方配备广角扩散片和反光板,广角扩散片能够在我们使用广角镜头时,也能给前景带来均匀的补光并且闪光效果更加柔和自然。
反光板的作用就是为了在人像拍摄时为被摄者的阴影部分和眼睛进行补光,在被摄者的眼睛中形成高光点,使眼神更加迷人有光彩,非常实用。
进击的国产闪光灯永诺YN568EX lI玩主手册作者:暂无来源:《摄影之友·影像视觉》 2013年第8期摄影就是光线的艺术,对于很多人来说,闪光灯已经成为必备的配件,永诺全新发布这款YN568EX II能为我们的摄影带来什么样的光影?图:乔纳斯编辑:王小龙美编:王晓勇在影像类产品中,国产厂商在配件领域的竞争力还是相当不错的,永诺当属其中的佼佼者,以廉价、高品质的闪光灯而闻名,深受玩灯人士的喜爱。
这次给大家带来就是7月份刚刚上市的永诺YN568EX II闪光灯的体验与试玩。
多卡口兼容,支持高速同步以及多种触发同步方式,全面支持TTL功能,3秒极速回电,具备灯头自动及手动变焦(24-105mm),哈哈,这样的配置想必你也眼馋了吧?高速同步很难得吗?虽说闪光灯释放出的光速度是非常快的,但是你决不能随便选择最快的快门速度。
当快门速度特别快的时候,后帘会在前帘开始开启之后就关闭——这会导致曝光不均匀,画面部局变暗的现象。
只有当快门完全按下时,使用闪光灯同步快门速度,就可以确保光线完全覆盖了整张照片。
所以对于一般闪光灯来说,跟快门的最大同步速度都在1/250秒以下,鲜少能有像永诺YN568EX II一样做到1/8000秒的——你可以在任何快门下运用闪光灯而不用担心同步问题。
在国内永诺还是首家攻克高速同步的厂商。
58的指数是什么水平?闪光指数(GN)是指闪光输出的最大功率——数字越大, 闪光灯输出的功率越大。
你要注意的是,输出功率越大,回电速度跟散热肯定要受影响,所以GN指数也不是一味的越高越好。
一般说来,主流顶级配置的闪光灯都是58的指数,次一级的闪光灯指数都是在三十多到四十多不等。
永诺YN568EXII具备GN58@ ISO100、105mm的指数,达到主流热靴闪光灯的最高水平。
YN568EX II玩多灯如何?玩多灯,除了掌握闪光灯基础的一些知识以外,第1个建议是不要让你的闪光灯停留在热靴上,要让光线“动”起来。
1.功能介绍●支持2013年1月后上市的所有永诺YN360闪光灯●M/Multi两种闪光模式●多达6个分组的闪光输出及焦距遥控设置●兼容RF602/RF603/RF603II●6个频道●清晰大屏幕显示,操作快捷,易用●传输距离100米●支持RF603/RF603Ⅱ无线快门令使用前请通过YN360-TX激活YN360III闪光灯的分组功能,即可通过控制器遥控各组闪光模式(闪光输出)及焦距设置,无需在闪光灯上进行操作,闪光灯显示屏将同步显示控制器对应分组设置的参数。
2.注意事项●连接或安装本产品时,请关闭所有设备电源,●请保持干燥,勿用湿手接触产品,亦不可将产品浸入水中或暴露雨中,否则可能引起无法正常使用,甚至损坏。
●请勿在易燃易爆场合中使用,违反此警告可能引起爆炸或火灾。
●本产品涉及电池,关于电池的使用请严格按照相关规定,否则会引起财产损失或人身伤害。
3.型号说明YN360-TXForCYN360-TXFOTN更适合佳能相机更适合尼康相机●用于非专用的相机时,不具备丛相机唤醒闪光小能咽功不受到保品4.各部位使用及说明①状态指示灯:唤醒(对焦)时亮绿色,引闪(快门)时亮红色②显示屏:清晰、直观地显示当前的功能状态OMODE:设置闪光模式(M/ Multi/--)④GR/1:选择分组(A/B/C/D/E/F)⑤快门线接口:连接快门线实现无线快门功能⑥测试按钮/电源指示灯:打开电源即点亮电源指示灯,按下该按钮测试闪光。
⑦Z00M/CH:短按设置变焦(24-105MM),长按设置频道(1-16)③Hz/FN:短按设置频闪次数或频闪频率,长按设置通信模式(RF602/RF60 3)@电源开关:ON为开,OF为关@选择/设置按钮组:设置各种参数,【左】为减小参数,【右】为增加参数,【上】【下】为微调,中间的[ok]键确认。