UVDiskTool工具使用说明
- 格式:docx
- 大小:471.69 KB
- 文档页数:29

1.软件功能及窗口介绍1.1. 软件功能本软件包含以下功能:●波长扫描功能●时间扫描功能●定波长测量波长扫描功能1.根据设定以指定波长间隔进行打印。
也可以指定波长进行打印(最高达12点)。
.2.扫描的方式有:透过率(%T);吸光度(Abs);样品光束能量(E(S));参比光束能量(E(R))(仅当连接U-2800和U-2810)3.提供扫描开始和结束的快捷键。
扫描开始:F4;扫描结束:F64.可以设置重复测量的间隔时间。
并可进行长达99次的重复测量。
时间扫描功能1.比率计算功能。
(动力学测定)2.根据设定以指定时间间隔进行打印。
也可以指定时间进行打印(最高达12点)。
定波长测量功能1.包含如下测量及计算功能:定波长分析;面积分析;峰高及峰面积分析;最多达20点的标准样品,一、二、三阶及折线方式回归;2.标准曲线重新测量功能;光标读取标准曲线功能。
3.标准曲线打印功能及保存功能。
4.标准曲线及样品测量数据同时显示,随时观察每个样品的测量结果。
5.显示标准曲线的相关系数值,可以很方便地判定所回归的标准曲线的质量。
并且提供双波长及三波长的回归功能。
6.统计计算功能。
可以进行样品的多次平均测定,可以进行标准样品偏离值(SD)的测定。
7.可以设定极限值,并自动标定出大于极限值的点。
8.定波长测量中可以显示光谱值。
用定波长测量的计算功能可以显示波长扫描中的峰高,峰面积及差值。
数据处理功能测量后经保存的数据可以进行各种数据处理。
1.图谱数据光标检索功能。
2.峰谷值自动判定功能。
3.图谱缩放功能。
4.数据平滑(数据滤波)功能。
5.数据微分处理功能。
6.图谱与图谱,图谱与常数的运算功能。
7.面积计算功能。
8.文件导出功能。
数据可转换成TXT(文本文件),图型可转换成Windows的位图文件。
9.显示字体及打印字体的设置功能。
10.数据列表功能。
11.设定参数打印功能。
12.数据分类打印功能。
如:峰值列表等。
13.坐标栅格打印功能。

万能启动u盘制作工具fbinsttool1.501使用教程(菜鸟教程)高手莫进,献给不懂命令行照葫芦画瓢的菜鸟。
根据时空论坛,无忧论坛高手指点,特别感谢fbinst作者bean,fbinsttool作者jianliulin以及大力推广者gzk101。
本人是一个菜鸟,见到命令行就头疼,但非常关注usb启动领域知识,照葫芦画瓢,用fbinsttool1.501工具将diskgen、老九WinPE 老毛桃修改1111 版、ms-dos7.1软件集成进去,测试成功启动运行。
具体步骤:1、插入u盘,打开fbinsttool1.501,按照说明格式化u盘。
(格式化后,fbinst将重写u盘MBR)。
在这里注意隐藏区大小填为:主分区一般填为8m,根据文件导入大小填写扩展分区,文件大小=主分区+扩展分区。
如下图1:2、在grldr内置菜单编辑:(注意空格)pxe detectconfigfiledefault 0timeout 10title [01] Microsoft WinPEmap (ud)/winpe.ISO(oxFF)map --hookchainloader (oxFF)titie [02]Diskgenmap --mem (ud)DISKGEN229.IMA (fd0)map --hookchainloader (fd0)+1rootnoverify (fd0)titie [03] MS-DOS7.10map (ud)/msdos7.1.ISO(oxFF)map --hookchainloader (oxFF)titie [04] commandlinecommandlinetitie [05] rebootreboottitie [06] halthalt点击“保存”,然后点击“打开文件”选中“grldr”,点击“打开”。
(解释:点击“打开”,此时已将修改的内置菜单加入grld内)如下图2:3、在“文件管理”里点击右键导入“grldr”到u盘分区。

u盘量产工具怎么用?实例讲解u盘量产工具使用方法u盘量产工具怎么用?u盘是我们接触到最多的一种存储设备,由于其自身的设计特点,u盘的安全性相对较低,经常会出现u盘无法格式化,系统无法识别U盘,或者磁盘显示0字节等问题。
遇到这类硬故障最终极的解决方法就是实用u盘量产工具,下面小编就来为大家介绍一下u盘量产工具的使用方法u盘量产是什么意思在此之前我们先简单介绍一下u盘量产是什么意思,U盘量产字面意思就是,批量生产优盘。
是指批量对U盘主控芯片改写数据。
而用来对U盘完成该操作的软件程序,就是U盘量产工具。
在U盘出厂时候最后一道工序是量产。
而现实中,水货U盘,或者需要制作带CD-ROM盘的U盘,方便U盘装系统,也会用到量产。
在这里大可以把u盘量产简单理解为给u盘进行初始化。
u盘量产工具使用方法介绍:做u盘量产所需要的软件:芯片精灵、量产工具、Windows PE(可选)u盘量产第一步:使用芯片精灵读取出u盘的详细型号芯片精灵是一款USB设备芯片型号检测工具,可以自动查询U盘、MP3/MP4、读卡器、移动硬盘等一切USB设备的主控芯片型号、制造商、品牌,并提供相关资料下载地址。
将需要量产的U盘插入电脑,打开芯片精灵,此时芯片精灵就会读取出u盘的型号数据,这里需要你记住主控型号和VID、PID(见上图红色方框)。
u盘量产第二步:使用u盘量产工具开始量产u盘1、下载MPParamEdit 量产工具,下载完成后双击运行“MPParamEdit_F1.exe”,选择Advance Setting、New Setting,点击OK。
2、打开界面如下界面3、主控选择刚刚在芯片精灵上检测出的主控型号,笔者这款U盘主控型号为PS2251-50,第二项选择01即可。
4、选择Partition Setting选项①、分区数量选2。
②、点击CD-ROM。
③、CD镜像中选择下载好的PE ISO文件④、在模式中选择215、选择Drive Info选项,把刚才在芯片精灵中记录下的VID、PID信息输入进去。

UV光解设备操作说明书一、原理1、本产品利用特制的高能高臭氧UV紫外线光束照射恶臭气体,裂解恶臭气体如:氨、三甲胺、硫化氢、甲硫氢、甲硫醇、甲硫醚、二甲二硫、二硫化碳和苯乙烯,硫化物H2S、VOC 类,苯、甲苯、二甲苯的分子键,使呈游离状态的污染物分子与臭氧氧化结合成小分子无害或低害的化合物,如CO2、H2O等。
2、利用高能高臭氧UV紫外线光束分解空气中的氧分子产生游离氧,即活性氧,因游离氧所携正负电子不平衡所以需与氧分子结合,进而产生臭氧。
UV+O2→O-+O*(活性氧)O+O2→O3(臭氧),众所周知臭氧对有机物具有极强的氧化作用,对恶臭气体及其它刺激性异味有极强的清除效果。
3、恶臭气体利用排风设备输入到本净化设备后,净化设备运用高能UV紫外线光束及臭氧对恶臭气体进行协同分解氧化反应,使恶臭气体物质其降解转化成低分子化合物、水和二氧化碳,再通过排风管道排出室外。
4、利用高能UV光束裂解恶臭气体中细菌的分子键,破坏细菌的核酸(DNA),再通过臭氧进行氧化反应,彻底达到脱臭及杀灭细菌的目的。
二、产品性能特点有机废气气体利用排风设备输入到本净化设备后,净化设备运用高能UV紫外线光束及臭氧对有机废气进行协同分解氧化反应,使恶臭气体物质其降解转化成低分子化合物、水和二氧化碳,再通过排风管道排出室外。
UV高效光解废气净化设备的性能优势1、能高效去除挥发性有机物(VOC)、无机物、硫化氢、氨气、硫醇类、芳香类(含苯环)等主要污染物。
2、无需添加任何物质:只需要设置相应的排风管道和排风动力,使工业废气通过本设备进行分解净化,无需添加任何物质参与化学反应。
3、适应性强:UV高效光解废气净化设备可适应高浓度,大气量,不同工业废气物质的净化处理,可每天24小时连续工作,运行稳定可靠。
4、运行成本低:UV高效光解废气净化设备无任何机械动作,无噪音,无需专人管理和日常维护,只需作定期检查,本设备能耗低,设备风阻极低<50pa,可节约大量排风动力能耗。

教你怎么用ultraiso制作另类的深度隐藏万能U+V2启动U盘2013-01-19 19:04 来源: 未知作者: 浏览量:29112次当前,PE制作已经从光盘基本转型到U盘,U盘启动PE已经成为装机主流。
大容量U盘价格变成白菜价,多引导U盘启动技术也日益成熟。
目前U盘主要的启动方式有USB-HDD,USB-ZIP和usb-cdrom等三种。
而U盘启动PE,从部署原理来,又可以分为量产、UD、U+和B+等方式。
详见后附资料。
现在流行于市面上的五花八流的万能启动U盘,基本都是采用UD启动方式,即fbinst+grub。
GRUB是一种功能强大灵活性强兼容性好的多引导启动方式。
fbinst启动,把PE文件放于U 盘隐藏区(UD区)中,可以防病毒,可以防误删除及识格式化,智能识别各种类型主板的U盘启动,兼容性特别强;用UD格式化U盘,以后再更新数据,不会破坏非UD区数据,这点上也比量产强。
fbinst+grub强强联合,创造了PE史上的一个神话,UD启动良好的兼容性经过无数些实践证明,真不愧为万能启动U盘。
而本文介绍的,不是大家熟悉的UD启动盘,而是用UltraISO来制作另一种类型的隐藏万能启动U盘。
另类,是指它不采用网上流行的UD启动盘技术,而是采有最新版ultraiso把ISO版PE写入U盘,即大家常说的U+V2。
下面大家一起来体验U+V2制作的隐藏万能启动U盘技术吧。
一、什么是U+和U+技术的发展(一)什么是U+大家可能感到奇怪,UltraISO不是一款光盘工具吗?它也能制作启动U盘?其实,自UltraISO V9.12起,UltraISO已经包含制作启动U盘的功能。
此后版本功能不断增强。
它可以简单易行的把ISO格式PE写入U盘启动。
记得当年U+第一代出来,我按照网上的方法,把老毛桃扬州版U+到自己U盘上,第一次成功实现了U盘启动,让我对第一代U+印象深刻。
在此之前,用毛桃大师的U盘制作工具,及其它制作工具,从没有让U盘在自己电脑上成功启动。

中控考勤软件U盘操作软件截图
进入U盘数据管理界面
说明:
登陆软件
点击“数据(F)”
选择USB闪盘管理
说明:
选择“彩屏或OP1000自助式指纹机…”
点击确认
从U盘导入数据至电脑
说明:
若员工姓名/工号都在考勤机上登记,且员工信息有更新时,则先将考勤机的中的人员信息导入至U盘然后再执行该操作
选择“导入用户数据至电脑”
点击“从U盘导入用户数据”
确认
说明:
导入记录数据至电脑即是将员工的打卡记录导入至电脑
点击“导入记录数据至电脑”
点击“从U盘导入数据”
选择时间段
点击查询,查询结果为选定员工范围在指定时间段内容的所有员工打卡记录。
如:财务部所有员工2012-12-01–2012-12-31的所有员工打卡记录
只要U盘已将最新记录数据导入至电脑,则该操作可以查询出所有的员工打卡记录
点击“导出”可将查询出的员工打卡记录导出成Excel表格
报表统计
说明:
点击“统计报表”
选择部门选择员工
选择统计时间段
点击“查询计算”
软件默认显示的是“班次明细情况表”,若想查看其它报表,参考其它界面截图 若想将统计出的报表导出成Excel表格,点击“导出数据”。

U盘镜像写入制作工具说明
此工具的作用: 把我公司开发的linux嵌入式监控系统写入系统高清卡V200或者写入U盘引导安装数字高清硬盘录像机系统
一、软件的安装:
1、解压软件包
2、双击ifw_en_trial.exe 如图所示:
3、安装步骤如下所示:
软件安装成功!!!
二、软件使用
1、首先找到软件包里面的serial.txt文件双击打开。
(里面有个KEY,用来注册该软件。
)如图所示:
2、找到桌面上软件图标:image for windows如图所示:
3、双击打开后会有如下图所示的注册画面点击Enter Key。
4、将serial.txt 内容填入如下图所示的文本框,填入后点击OK。
5、显示注册成功点击OK 。
6、进入软件配置界面如图所示:
第一步、选择Resrore(Normal) 。
第二步、点击Settings 出现如下图所示的对话框:
点击去掉Show Entire Network 单选框里面的选择钩。
然后点击OK 。
7、找到镜像的所在磁盘的位置。
8、选中所要的镜像。
9、选择写入镜像的盘符(V200 闪存卡、U盘)
10镜像开始写入了,稍等几分钟。
这样就把镜像写入U盘或者系统高清卡V200里面了。
把U盘插在硬盘录像机上或者在安有V200系统高清卡的电脑上,按F12
选择启动方式选择从U盘启动进入镜像的进行安装界面。

使用u启动PE系统下victoria工具进行磁盘扫描
使用u启动PE系统下victoria工具进行磁盘扫描
硬盘是电脑主要的文件数据存储媒介之一,我们不能对硬盘的关注有丝毫的马虎,时常检测硬盘可以让我们更好的了解它处于什么样的工作状态下。
那么如何检测硬盘呢?下面我们就教大家如何使用u 启动u盘启动victoria磁盘扫描工具进行硬盘扫描检测。
1、把u启动u盘启动盘插在电脑usb接口上,然后重启电脑,在出现开计画面时用一键u盘启动快捷键的方法进入到u启动主菜单界面,选择【03】运行u启动win03pe增强版,按回车键确认选择,如下图所示:
2、进入到win03pe系统后,依次点击开始——程序——硬件检测——victoria磁盘扫描,如下图所示:
3、在打开的victoria磁盘扫描工具主窗口中:①、点击“测试”
应用,②、可以选择一个校验模式,③、点击“开始”按钮,执行磁盘检测,如下图所示:
4、然后耐心等待硬盘扫面完成,扫面所需时间较长,请大家耐心等待,扫描结果参数可以看下图中红色框处所在的位置,如下图所示:
u启动u盘启动victoria磁盘扫描工具进行硬盘扫面的操作就介绍到这里,由于victoria 磁盘扫描工具的修复功能需要收费,在这里我们就不进一步的对其详细说明,大家可以参考上面我们为大家推荐的u 启动硬盘修复工具的使用教程来解决。
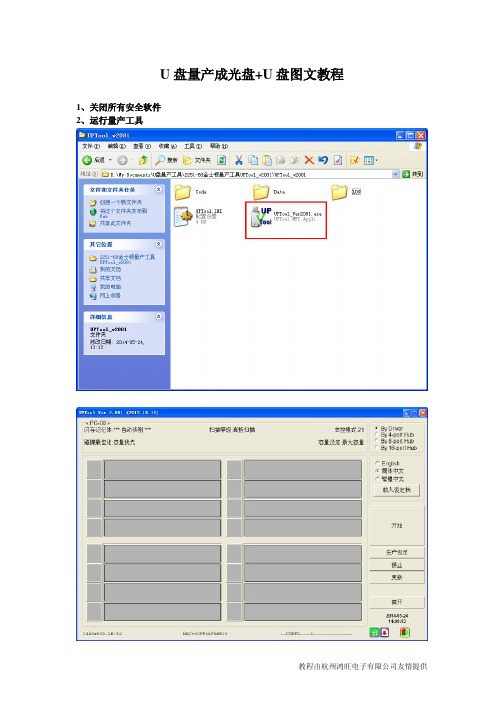
U盘量产成光盘+U盘图文教程
1、关闭所有安全软件
2、运行量产工具
3、点击“生产设定”按钮
4、密码为空,直接点击“确认”按钮
5、点击选项卡中的“分区”
6、勾选“启用模拟光碟”
7、选择“CDROM+USB Disk”模式
8、点击“选取”按钮,加载ISO镜像文件(需先用其它工具制作好ISO镜像文件)
9、找到ISO镜像文件存放的位置
10、选取ISO镜像文件,点击“打开”按钮
11、点击“确认”按钮保存设置
12、将待量产的U盘插入电脑USB,软件将自动检测到U盘(先插入U盘,再启动量产工具也是可以的,只不过启动软件后就开始检测了)
13、点击“开始”按钮,进行量产
14、量产开始,进度条开始前进,请耐心等待,此时不要乱动电脑和U盘,千万不要断电,否则造成量产失败甚至U盘报废。
15、量产完成,进度条变成绿色
16、点击“离开”按钮,关闭量产工具
17、等U盘灯不再闪烁后,拔出U盘,再重新插入电脑,此时,电脑会识别出一张光盘和一个U盘。

使用u深度UltraDefrag工具整理磁盘碎片
电脑在使用过程中磁盘会产生碎片,如果不清理,时间久了会影响系统的使用,因此我们需要定期进行碎片整理以保证磁盘处于最佳状态。
今天为大家带来使用u深度U盘启动盘中UltraDefrag磁盘管理工具进行碎片整理的教程。
1、我们将制作好的u深度U盘启动盘连接电脑,重启电脑,在出现开机logo时按下启动快捷键,选择从U盘启动,进入u深度主菜单后选择【03】运行u深度win2003PE增强版(老机器),如图所示:
2、随后进入u深度03pe系统,在桌面上依次点击“开始——程序——磁盘管理——UltraDefrag碎片整理”,如图所示:
3、进入UltraDefrag碎片整理工具主界面,上方会显示电脑上各个盘的列表,很直观,此时我们点击选择需要进行碎片整理的磁盘,然后点击“整理”,如图所示:
4、工具开始工作,左下方会显示进度百分比,我们等待完成即可,如图所示:
5、完成后看到有碎片,点击“优化”进行处理,如图所示:
碎片整理的操作就到此为止了,需要整理碎片的用户可以按照本文的方法进行操作,我们在使用电脑过程中要经常注意维护电脑,让电脑一直出于健康状态。
希望这个方法可以帮助到有需要的人。

uv tool 用法-回复关于uv tool的使用方法,下面我将为大家一步一步详细介绍。
第一步:了解uv tool是什么首先,我们需要了解uv tool是什么。
uv tool是一种用于生成3D模型纹理坐标的软件工具。
它的功能包括将2D纹理贴图映射到3D模型上,创建纹理坐标,调整和编辑纹理贴图等。
它是3D建模和游戏开发过程中非常重要的一环。
第二步:安装uv tool在开始使用uv tool之前,我们需要先将它安装到我们的电脑上。
通常,官方网站会提供下载链接。
请确保你下载的是最新版本的uv tool,并且适用于你所使用的操作系统。
第三步:启动uv tool安装完成后,点击uv tool的图标来启动它。
通常,它会在你的“应用程序”或“开始”菜单中找到。
一旦启动,你将看到uv tool的用户界面。
第四步:导入模型在uv tool的用户界面中,你将会看到导入按钮。
点击该按钮,并选择你的3D模型文件。
一旦你选择了文件,uv tool将开始加载该模型,并在用户界面中呈现出来。
第五步:创建纹理映射一旦你的模型被导入,你可以开始创建纹理映射。
通过选择模型的表面,你可以为该表面创建一个纹理坐标。
这些纹理坐标表示2D纹理贴图在3D 表面上的映射关系。
第六步:调整纹理坐标一旦你创建了纹理映射,你可以使用uv tool的编辑工具来调整纹理坐标。
你可以移动、旋转、缩放纹理坐标,以确保它们正确地映射到3D模型上。
第七步:编辑纹理贴图除了调整纹理坐标外,你还可以使用uv tool来编辑纹理贴图本身。
它提供一些绘图工具,如画笔、橡皮擦、填充工具等,让你能够在纹理贴图上绘制和修改。
第八步:导出纹理坐标和纹理贴图完成了纹理映射和编辑后,你可以将纹理坐标和纹理贴图导出到你所需的格式。
通常,uv tool支持多种文件格式,如PNG、JPG等。
选择适合你需要的格式,并指定导出的路径和文件名。
第九步:应用纹理到模型中最后,将导出的纹理贴图应用到你的3D模型上。

User’s ManualFormat Utility User’s ManualContents1.Introduction (2)1.1System Requirements (2)1.2Multilingual Support (2)1.3Disk Partitioning (2)1.4Secret & Compress: (2)1.5Note (3)2.Icon Descriptions of the UFD Utility (4)2.1Partition Manager (5)2.2Boot Manager (5)2.3Security Manager (5)2.4Autorun Manager (5)2.5Flash Mail Manager (5)2.6PC Lock Manager (5)2.7Bookmark Manager (5)2.8Security Folder (5)2.9Remark (5)3.UFD Utility Operation manual (6)3.1Introduction of Partition Manager (6)3.2Instructions of Boot Manager (8)3.2.1Configure Boot Disk (8)3.2.2Making a Boot Disk (for Windows 98) (9)3.2.3Making a Boot Disk (for Windows ME / 2000 / XP / Vista) (11)3.3Instructions of Security Manager: (13)3.3.1Login to Security Area (13)3.3.2Logout from Security Area (14)3.4Instructions of Autorun Manager (15)3.4.1Start from Source File Preparation (15)3.4.2Start from Existing Source File (19)3.4.3Restore To Default Setting (22)3.5Instructions of Flash Mail Manager (26)3.5.1First Time Set Up (26)3.5.2Flash Mail Manager Operation Flow (28)3.6Instructions of PC Lock Manager (30)3.7Instructions of Bookmark Manager (32)3.7.1Import My Favorites (32)3.7.2Select PC Bookmark or UFD Bookmark (32)3.7.3How to use PC Bookmark or UFD Bookmark (33)3.8Introduction of Security Folder (34)3.8.1Secret area data access (35)3.8.2Change Secret area password (36)1. Introduction1.1 System Requirements−Windows 98 / ME / 2000 / XP / Vista−USB 2.0 Host、USB HUB (Optional)1.2 Multilingual Support− Simplified Chinese、Traditional Chinese、Portuguese、Japanese and English1.3 Disk PartitioningUFD Utility can be used to partition UFD into 2 kinds of partitioning types. Please read instructions below before partitioning.− Public AreaDefault setting is no security restrictions. User can use entire memory area as public area.− Security AreaAll data in Security Area is protected by password.−Public Area + Security AreaUFD can be partitioned into 2 areas, Public area and Security area. All data stored in Security area is protected by password. However, the Public area has no restrictions in access.1.4 Secret & Compress:UFD Utility Secret Zip tool is save secret Zip file with special extension.21.5 Note−UFD, used in the article, stands for USB FLASH DISK−Please be aware that some utility functions will format the UFD after executing the UFDUtility.exe. Please backup all data in the UFD before executing the program.342. Icon Descriptions of the UFD UtilityThe descriptions for each icon after plug in UFD and execute was list below.2.1 Partition ManagerThe icon is able to use to partition UFD into “public area” only or “public area + security area”. It supports to modify disk label and password for security area.2.2 Boot ManagerThe icon is able to make UFD as a boot disk as USB-ZIP or USB-HDD.2.3 Security ManagerThe icon is able to Login security area after correct password key in and logout after data access for protection.2.4 Autorun ManagerCreate virtual CDROM partition with auto-run feature embedded on top of “Partition Manager” made 1 or 2 partition areas. This tool also supports ISO image file making and one single “Removable Disk” default setting call back function.2.5 Flash Mail ManagerThe icon is able to copy mail, address book and accounts in the Outlook Express to the UFD. It can use to read mail at any Windows Outlook Express platform.2.6 PC Lock ManagerLock PC to prevent un-wanted operation during setting time after un-plug UFD. User can define PC lock time and text/picture display they prefer during PC lock time.2.7 Bookmark ManagerCopy my favorites in the Internet Explorer to the UFD. It can be used to visit favorite website on any Windows Internet Explorer platform.2.8 Security FolderPut the file you want to secret or compress to the vfzip folder under public area. The tool will create a special vfbest.vfo Zip file.2.9 RemarkWhenever “Partition Manager”, “Boot Manager” and “Autorun Manager” executed, the “UFD Utility.exe” will be duplicated to the Public area for user convenience.563. UFD Utility Operation manual3.1 Introduction of Partition Manager−Click “Partition Manager” on the UFD Utility bar.− “Partition manager” window will pop up right after click as below.− Use keyboard (↑,↓,←,→) or mouse to adjust public or security area capacity. The minimumcapacity for public area is 5MB.− Enter new password (maximum is 8 characters)− Enter the password hint to remind the user in case forgetting password− User may enter or modify the disk label for each area (maximum is 15 characters) − Execution by pressing “Start”7−A warning message prompts user to backup all the data before partition. − Press “OK”.− Showing format complete message when finished. Re-plug device is necessary after finish.83.2Instructions of Boot Manager3.2.1 Configure Boot Disk− Click “Boot Manager” on the UFD Utility bar− “Boot-Up” window will pop up right after click as below.− The disk label can be modified through “Boot-Up” setting window.− May enter or modify the disk label (maximum is 11 characters) −Select booting mode, USB Zip or USB HDD. Please select the same mode in the BIOS first boot device.− Notice: USB HDD booting support on Windows 98 ONLY . − User can modify the disk label only if press “Start”.93.2.2 Making a Boot Disk (for Windows 98)−Click “Boot Manager” on the UFD Utility bar− “Boot-Up” window will pop up right after click as below.− Users can select either “using internal MS-DOS system files” or “using MS-DOS system fileslocated at:” in Windows 98.− If users select “using internal MS-DOS system files”, then UFD Utility will copy “”and “io.sys” under Windows 98 “Command” folder to UFD public area.−If users select ”using MS-DOS system files located at:”, UFD Utility will copy “”and “io.sys” from user specify folder to UFD public area. − Press “Start”.− A warning message reminds user to backup all the data before partition then press “OK”.−Showing format complete message when finished. Re-plug device is necessary after finish.1011−3.2.3 Making a Boot Disk (for Windows ME / 2000 / XP / Vista)−Click “Boot Manager” on the UFD Utility bar− “Boot-Up” window will pop up right after click as below.− Users only can select “using MS-DOS system files located at:” when using Windows ME, 2000,XP or Vista platform.−UFD Utility will copy “” and “io.sys” from user specify folder to UFD public area. −Press “Start”.− A warning message prompts user to backup all the data before partition.− Press “OK”.−Showing format complete message when finished. Re-plug device is necessary after finish.12Format Utility User’s Manual 3.3 Instructions of Security Manager:3.3.1 Login to Security Area−Click “Security Manager” on the UFD Utility bar.−“Login/out” window will pop up right after click as below. Current status, Logout” will show on window.−Click “Hint” to recall the password, if the password was set but forget.−Input the correct password to log into security area.Format Utility User’s Manual14− Figure 3.31, Figure 3.32 and removable disk window will pops up right after successful login.3.3.2Logout from Security Area − Double click on the icon bar; a “Login/out” window pops up. Current status, Login, willshow up on window.− Click “Logout”− Removable disk Window will change from security area to public area after logout success.− Only public area is accessible after logout the security area.Format Utility User’s Manual 3.4 Instructions of Autorun Manager3.4.1 Start from Source File PreparationPrepare “Source File” in advance, including “Autorun.exe”, “Autorun.inf” and “Autorun.ico (optional)” −Example of “Source File”−Example of “Autorun.exe”−Example of “Autorun.inf”Format Utility User’s Manual16− Click “Autorun Manager” on the UFD Utility bar.−“Autorun Manager” window will pop up right after click as below. Click on the button shownbelow and select the file-stored path.−Select the “Source File” store path and click “OK”−Select the path to store “ISO File” and click “Save”. Notes: DO NOT PLACE BOTH ISO FILE AND SOURCE FILE IN THE SAME FOLDER OR VISTA ROOTS FOLDER.−Input the volume label of the CDROM and click “Build”−“Build ISO complete” indication pops up, click “OK”.− A warning message prompts to user to backup all the data before partition.− Click “OK”−Burn ISO file completed. Re-plug device is necessary after finish.−After re-plug the UFD, 2 disks will appear in “My Computer”, ”Compact Disk” and “Removable Disk”.−The virtual CDROM was partitioned successfully.Format Utility User’s Manual3.4.2 Start from Existing Source FileTo use the existing ISO file to create a virtual CDROM for Autorun.−Click “Autorun Manager” on the UFD Utility bar.−“Autorun Manager”” window will pop up right after click as below.19−Click ISO file browse button “…” to locate ISO file.20−Select the ISO file.− Click “Burn”.− A warning message prompts to user to backup all the data before partition.− Click ”OK”21−When burn is complete, click “OK”−After re-plug the UFD, 2 disks will appear in “My Computer”, ”Compact Disk” and “Removable Disk”. Partitioning is successful.3.4.3 Restore To Default SettingRestore to initial setting, single partition.−Click “Autorun Manager” on the UFD Utility bar.−“”Autorun Manager” window will pop up right after click as below.22−Check “Single Partition” option, only one partition will be shown in left side. Click “Restore Default Setting” to restore original partitions.2324− Click “Burn”. A warning message prompts to user to backup all the data before partition. − Click“OK”− Click “OK” after burn is complete.−After re-plug the UFD, only one “Removable Disk” will appear in “My Computer”.25Format Utility User’s Manual3.5 Instructions of Flash Mail Manager3.5.1 First Time Set Up− Click “Flash Mail Manager” on the UFD Utility bar.−Click “Yes” to continue flash mail setting if it is first time use.− “Mail Manager” window will pop up right after click as below.Format Utility User’s Manual27− Select the items you want to copy to UFD mail folder− Click “Copy Data”−Copy Email data to mail folder−Click “OK” when Email data was copied complete− In order to keep data consistence, please close Outlook Express before remove device− Click “OK”− Re-plug UFD and one new mail folder is set up in UFD. This means email data was importedsuccessfully.Format Utility User’s Manual3.5.2 Flash Mail Manager Operation Flow−Click “Flash Mail manager” in UFD utility bar−In order to keep data consistence, please close Outlook Express before remove device− Click “OK”−Please enter your username and password when logon dialog appearsFormat Utility User’s Manual−Then user can send and receive emails on Windows platform. Note: If use “Flash Mail Manager”to send or receive mails the new mail will be store in UFD “Mail” folder only. No mail will update in your PC Outlook Express.−This function not supports Vista Windows Mail.29Format Utility User’s Manual3.6Instructions of PC Lock Manager − Click “PC Lock Manager” on the UFD Utility bar.− “PC Lock” window will pop up right after click as below.− Select time from “Lock Interval” reel: PC Lock Manager will start screen saver according tousers setting time.− User can click “Execute and shut down” after selecting lock interval time. Then the computer willshut down and lock PC. (Computer will lock PC when re-starting)−User can select the wallpaper of screen saver from text or pictures display. − Must indicate the location of folder that picture storage. The picture must be JPG, GIF or BMPfile. − User can select location of wallpaper at center or stretch to the screen size.Format Utility User’s Manual −User can set the speed of wallpaper change.−After setting and pressing <Start>, PC will be locked immediately when you un-plug UFD.−Please well keep UFD after executing PC Lock Manager.−Re-plug same UFD to computer in any time to un-locking PC, than user can start using computer again.−This function not supports Fixed Disk Type.31Format Utility User’s Manual 3.7 Instructions of Bookmark Manager3.7.1 Import My Favorites−Click “Bookmark Manager” on the UFD Utility bar.−“UBookmark” window will pop up right after click as below.−Click “Import my favorites”, will copy My Favorites directory to UFD Device.−After completion, remove the UFD device.−If success, there will be created one Favorites folder in the UFD directory.3.7.2 Select PC Bookmark or UFD Bookmark−Click “Bookmark Manager” on the UFD Utility bar.−“UBookmark” window will pop up right after click as below.33−Selected PC or UFD Bookmark in the Bookmark manager window. − IE will load user selected Bookmark after close the Bookmark manager window.3.7.3 How to use PC Bookmark or UFD Bookmark− Select “Run Internet Explorer after the button is selected”− Browse website after user select PC bookmark or UFD bookmark button.− Before remove UFD must back to Bookmark manager and click “PC Bookmark”.343.8Introduction of Security FolderClick “Security Folder” on the UFD Utility barAfter “Disk Login” window pop up please input password.3.8.1 Secret area data accessAfter login to secret area user can create folder or copy file.Cut file and delete file.Close “Security Folder” window will logout secret area. Login secret area again user should click “Compress Manager” and input password again.3.8.2 Change Secret area passwordAt “management” user can logout or change password.After logout to the public area user will found vfbest.vfo file under vfzip folder. This file is the Zip file for secret area and only can be use by login to secret area. (Delete vfbest.vfo will cause all data under secret area missing.)中文使用手冊Contents1.產品簡介 (2)1.1系統需求 : (2)1.2支援多國語言: (2)1.3磁碟分割區型式: (2)1.4加密&壓縮: (3)1.5注意事項: (3)2.UFD Utility視窗功能說明 (4)2.1分割管理員 (4)2.2開機管理員 (4)2.3保密區管理員 (5)2.4自動執行管理員 (5)2.5電子郵件管理員 (5)2.6電腦鎖管理員 (5)2.7書籤管理員 (5)2.8資料保密管理員 (5)2.9備註欄 (5)3.UFD Utility操作說明 (6)3.1分割管理員使用說明: (6)3.2開機管理員使用說明: (8)3.2.1開機管理組態設定 (8)3.2.2製作成可以開機磁碟(Windows 98系統) (9)3.2.3製作成可以開機磁碟(Windows ME、2000、XP、Vista系統) (11)3.3保密區管理員使用說明: (13)3.3.1登入保密區切換視窗 (13)3.3.2登出保密區切換視窗 (14)3.4自動執行管理員使用說明: (15)3.4.1製作虛擬光碟機 (15)3.4.2使用現有的ISO File (19)3.4.3單一分割格式化 (22)3.5電子郵件管理員使用說明: (25)3.5.1選擇設定 (25)3.5.2注意事項說明 (28)3.6電腦鎖管理員使用說明: (29)3.7書籤管理員使用說明: (31)3.7.1匯入我的最愛 (31)3.7.2選取PC書籤或UFD書籤 (31)3.7.3使用PC書籤或使用UFD書籤 (32)3.8保密資料管理員使用說明: (33)3.8.1登入保密區資料存取 (34)3.8.2修改變更保密區密碼 (35)Format Utility User’s Manual 1. 產品簡介1.1 系統需求 :−作業系統: Windows 98 / ME / 2000 / XP / Vista。

北京中广上洋科技股份有限公司U-TOOL系列工具数据库工具安装使用手册上洋产品部2011/8/29软件版本V1.0目录目录 (2)一、概述 (3)二、安装 (4)三、认识软件 (4)四、数据库 (5)●添加数据库 (5)●删除数据库 (7)●修改数据库 (8)五、备份设置 (9)●定时备份 (9)●立即备份 (10)六、还原设置 (12)七、附录1:预置参数 (14)●U-Edit: (14)●iStore (14)●iChannel (14)八、附录2:iChannel还原数据库注意事项 (15)一、概述U-Tool是上洋为广大视音频工作者提供的系列工具包,用于数据管理、业务管理等。
此次发布的是U-Tool-DBTool数据库工具,能够轻松实现数据库的备份和还原,支持上洋全线产品(如U-Edit非线性编辑系统、iStore媒资管理系统、iChannel 数字化播出系统),从而确保系统安全稳定运行,方便用户管理。
传统的数据库管理方式操作复杂、维护不便、自动化管理成本高,对技术人员维护水平要求较高。
而U-Tool-DBTool数据库工具采用定时自动和人工干预相结合的方式,结合广电行业的应用特点,简单安装、简单设置后即可轻松完成数据库备份还原。
它具有以下特点:●开机自动启动、后台运行●按月、周、天、整点定时自动备份数据库●手动立即备份数据库●支持备份到本地或网络路径●同时备份多个数据库,一次还原●出厂提供上洋各产品数据库备份还原预设,便于使用。
如U-Edit产品有5个库,备份或还原时,使用者无需关心有多少个库,以及它们的对应关系,只需设为自动或一键操作即可●备份拷贝数目可设,用户可根据实际需求和硬盘容量情况自动设置●占用系统资源少,避免增加服务器压力●兼容多操作系统:⏹Windows XP⏹Windows 2003 /2008 Server⏹Windows 7 32 /64 Bit●适用于多数据库:⏹SQL Server 2005 Express⏹SQL Server 2008 Express⏹SQL Server 2008 Enterprise⏹SQL Server 2008 R2 Express三、适用场景U-Tool-DBTool数据库工具可用于以下场景的数据库备份和还原。

A quick guide on how to use the sharing capabilities of MyDesktop and U:Storage Drive for ITP studentsWorking on MyDesktop and the U: network drive offer many conveniences over a thumb drive.∙ Did you know you can save a file and not worry about losing it?∙ Did you know you can work on your file between two operating systems at the sametime?∙ Did you know you can access these files from wherever you are?Your laptop/computer or computers in the SAL or ITPClassroomsThe MyDesktop servers and the U: Storage DriveHere is a diagram of how MyDesktop and your computing device work in tandem. Whenworking on an assignment, the files are accessed by the Viterbi School’s servers in real time. The servers supporting MyDesktop are connected directly to the U: Storage Drive. This directconnection reduces latency between MyDesktop and the Storage Drives. This method would be faster than connecting a USB flash drive on your computer and sharing that with MyDesktop.See diagram below:Steps to placing your file onto MyDesktop and the U: Network Storage Drive.There are several ways to do this. If you are already logged on a computer with your USC Net ID in any of the ITP or Engineering Computing Center (SAL125) classrooms:1.Create a file for your assignment or if you saved it on a thumb drive, insert it onto thecomputer you are using.2.Save the created file on the desktop. Or if you have the file saved to your thumb drive,copy the file onto the desktop.3.Select the file that you are going to work your assignment on. (In this case I Created afolder named “Adobe”)unch the VMWare Horizon Client.5.Enter the server address: 6.Log in with your USC Net ID credentials.7.Once logged in, click on the “Enhanced Desktop.” This is where the Adobe CC Suite isinstalled.8.As soon as you login you will see your file on MyDesktop.If you are using your own computer:unch VMWare Horizon Client.2.Enter the server address: 3.Log in with your USC Net ID credentials.4.Once logged in, click on the “Enhanced Desktop.” This is where Adobe CC Suite isinstalled.5.If you have the file saved on your computer, copy the file to the “Enhanced Desktop’s”desktop or U: drive. If you have the file saved on a thumb drive, insert it into yourco mputer and copy it over to the “Enhanced Desktop’s” desktop or U: drive.The blue circle is my computer. The red circle is my thumb drive. The orange circle is my U: Storage Drive. All three devices are available when using MyDesktop.Please note, MyDesktop only saves files in your U:Drive, Desktop and My Documents folder.6.Click on your thumb drive and right-click on your mouse and click “Copy” to copy the file7.From there you can paste it on your U:Drive or the desktop or “Documents” folder onMyDesktop.FAQ:1.Do I have to work on only the iMacs in OHE540/542 for my assignments?In regards to the Adobe CC Suite, you do not have to use the iMacs in those classrooms.MyDesktop is accessible wherever you have a wifi or network connection. The fasterand more stable your connection, the better your experience will be.2.After saving my files to the U: drive on MyDesktop, if I log off, would my files disappear?No, your files will be there as long as you saved it to your U: drive. It will stay in your U: drive until you delete them. Please refer to the MyDesktop background wall paper for a schedule of when your data files will be purged at the end of the semester. If you would like to have a copy of the data files, please copy them to your thumb drive before theend of the semester.3.Any place else I could save my files on MyDesktop besides the U: drive and would it stillbe there the next time I log in?Yes. You could save your files directly to the desktop or the documents folder. Theseare part of your profile and is accessible to you as long as you log in with your USC NetID onto MyDesktop, computers in ITP classrooms or the computers in the EngineeringComputing Center (ECC). If you save files to any other areas, such as the C:\ drive, those files will not be there the next time you log in.4.Can I work on a file on Photoshop on MyDesktop and transfer it to the iMac I am usingfor Final Cut Pro?Yes, you can! As long as you save it on the desktop on both the Mac side andMyDesktop, your data file will be accessible to both.5.If I save my data files to my network storage space, would anyone else be able to see it?No. Your classmates and the professor will not be able to access your data files. Updated 9/27/18。

U盘量产详细图⽂教程(附⼯具下载)⽂章导读:“U盘量产”我想⼤家都有可能听说过,最近有很多⽹友在寻修问吧提出这个问题,笔者最近也做了个量产的尝试,结果⾮常顺利地做好了量产,接下来我就把我做量产的经验分享给⼤家。
“U盘量产”我想⼤家都有可能听说过,最近有很多⽹友在寻修问吧提出这个问题,笔者最近也做了个量产的尝试,结果⾮常顺利地做好了量产,接下来我就把我做量产的经验分享给⼤家。
⾸先来了解⼀下量产软件的定义,量产软件英⽂USB DISK PRODUCTION TOOL,简称是PDT,意思是U盘⽣产⼯具。
U盘⽣产⼚家不像我们玩家,⼀次就搞⼀两个U盘,他们⽣产都是按批计算的,是⽤电脑连上USB HUB,同时连上8-16个(甚⾄更多)U盘,然后⽤PDT向众多U盘写⼊相同数据,完成U盘⽣产的最后⼯序。
所以PDT因此得名量产软件—即⼯⼚⼤批量⽣产U盘的专⽤软件。
实战:需要⽤到的软件:ChipGenius,⽤于检测U盘芯⽚型号。
U盘量产软件:基本上每⼀种芯⽚都有专门的量产⼯具软件,⼤家先⽤ChipGenius检测芯⽚型号后作出选择。
USB芯⽚型号检测⼯具ChipGenius v4.0B24⾸先启动ChipGenius,然后把U盘插上,ChipGenius就开始检测U盘芯⽚组。
可以得知芯⽚型号是联盛的UT165。
ChipGenius检测U盘芯⽚组我们选⽤这⾥我们选⽤UT165的量产⼯具进⾏量产。
⼯具截图如下:⼯具截图这个量产⼯具⾮常强⼤,还有加密、分割、书签等⼀系列的功能,⼤家可以⾃⼰摸索。
我们选择⾃动执⾏管理员进⾏量产,启动之后截图如下:⾃动执⾏管理员进⾏量产这⾥的映像档选择你要烧录的光盘⽂件,笔者烧录的是UBUNTU的光盘⽂件选定之后直接点烧录就可以了。
我来给⼤家看⼀下量产完成后的图⽚:量产完成后的图⽚这⾥H盘是物理光驱,G盘跟J盘是量产之后产⽣的光盘和U盘,是不是很奇妙呢?这个U盘还有启动功能,那些卖上⽹本的商家经常会⽤到。

实验16 U盘使用和维护实验目的:掌握U盘的查看、格式化、杀毒软件的使用实验内容:利用U盘的查看、格式化、杀毒软件进行U盘的使用和维护实验时间:2学时实训注意事项:有一个空的U盘,或确保U盘中重要数据已经进行备份。
实验步骤和内容:一、U盘识别软件Chip Genius是一款USB设备芯片型号检测工具,可以自动查询U盘、MP3/MP4、读卡器、移动硬盘等一切USB设备的主控芯片型号、制造商、品牌、并提供相关资料下载地址.当然也可以查询USB设备的VID/PID信息、设备名称、接口速度、序列号、设备版本等。
二、U盘格式化软件要进行U盘格式化,首先经过U盘识别软件,了解U盘的芯片型号。
例如HP U盘格式化工具,是HP 公司专门针对市面上不同种类的U盘制作了本款软件,目前国内最优秀的U盘数据管理软件.三、U盘启动盘制作软件在制作U盘启动盘前,请先将U盘里的重要资料复制到电脑上进行备份操作。
因为制作U盘启动盘会将U盘里的原数据删除,但是制作成功之后,我们一样可以将制作成为启动盘的U盘像平常一样的使用.U盘启动盘制作软件很多,我们以大白菜超级U盘启动盘制作工具V1。
5(最新版)为例,U盘的启动文件,是大白菜小组精心优化的系统,启动PE系统,是经过反复研究最终形成了真正万能安装系统PE!系统能否识别出来硬盘或者U 盘,大白菜的PE系统,整合了最全面的硬盘驱动,真正的硬盘识别全能王!软件功能:1、真正的快速一键制作万能启动U盘,所有操作只需要点一下鼠标,操作极其方便简单。
2、启动系统集成大白菜精心制作和改良的PE系统,真正可以识别众多不同硬盘驱动的PE系统,集成一键装机,硬盘数据恢复,密码破解等实用的程序。
3、自定义启动系统加载,用户只需要在大白菜官网或者在其他网上找到的各种功能的PE或者其他启动系统,只需要制作时添加一下,自动集成到启动系统中。
4、U盘启动区自动隐藏,防病毒感染破坏,剩下的空间可以正常当U盘使用,无任何干挠影响!更新说明:5、操作步骤如下:(1)下载大白菜系统(其他也可以,不保证质量)和大白菜超级u盘启动盘(2)打开大白菜超级u盘启动盘,选择归还空间,点击制作,成功就ok,复制下载的大白菜系统iso 中的sys.gho文件(解压才能看到)(3) 重启,设置usb启动,进入大白菜启动画面,进pe系统(第一个),选择桌面的备份还原工具(选择u盘的sys。

量产工具U盘量产工具U盘量产工具(英文USB DISK PRODUCTION TOOL,简称是PDT)的功能是向U盘写入相应数据,使电脑能正确识别U盘,并使U盘具有某些特殊功能。
U盘是由主控板+FLASH+外壳组成的,当主控板焊接上空白FLASH后插入电脑,因为没有相应的数据,电脑只能识别到主控板,而无法识别到FLASH,所以这时候电脑上显示出U盘盘符,但是双击盘符却显示没有插入U盘,就像是插入一个空白的读卡器。
事实上这时候的U盘几乎就是读卡器。
所以要让电脑识别出空白FLASH 这张“卡”就要向FLASH内写人对应的数据,这些数据包括U盘的容量大小,采用的芯片(芯片不同,数据保留的方式也不同),坏块地址(和硬盘一样,FLASH也有坏块,必须屏蔽)等等,有了这些数据,电脑就能正确识别出U盘了。
而当这些数据损坏的时候,电脑是无法正确识别U盘的。
当然有时候是人为的写入错误数据,像J S量产U盘的时候,把1G的U盘的FLASH容量修改为8G,插上电脑,电脑就错误的认为这个U盘是8G,这就是JS制造扩容盘的原理。
U盘量产工具获得:第一、到U盘厂家网站。
一般主控开发商都给厂家主控的,如果官网没提供下载,可打电话或发EMail要;第二、到主控开发商网站。
主控芯片厂商提供的能批量将U盘进行格式化工具软件,其功能是根据不同的需要各有特点;第三、到网络里搜寻。
可以到相关工具网站找。
(推荐“数码之家”更新很快,很齐全)。
注意:厂家推出的量产工具也是在不断提高版本的,新版本添加有新主控型号驱动。
但量产工具不是版本越高越好,还要看是不是支持你的U盘的型号。
主控芯片对应的量产工具和通用量产工具的区别,不光是在功能的专业化,比如可以设置U盘上的指示灯闪烁频率等;更重要的是,选错量产软件或者无法量产或者量产错误。
所以,大家最好查清U盘的主控制芯片,然后下载相对应的量产工具和相应的教程,看懂了再动手。

disktoolbox怎么使⽤?硬盘修复清零⼯具箱disktoolbox
使⽤图⽂教程
磁盘⼯具箱(DiskToolBox)可以对硬盘扇区级进⾏复制,以及对硬盘进⾏清零(擦除数据),很多朋友不知道disktoolbox怎么使⽤,今天⼩编就为⼤家带来了硬盘修复清零⼯具箱disktoolbox使⽤图⽂教程,需要的朋友⼀起看看。
硬盘清零即把硬盘所有扇区全部⽤0或全部⽤1写⼊,之后硬盘上所有数据全部丢失,连分区也都没有了,和新买来时⼀样。
硬盘的使⽤时间记录是记录在硬盘的SAMRT表内的。
SMART技术是硬盘本⾝的⼀种⾃我检测保护技术。
普通的⼿段和软件是⽆法修改的。
各种检测⼯具倒是可以读取。
但是⽆法修改的。
硬盘修复清零⼯具箱(disktoolbox)就是这样⼀个可以帮您将硬盘恢复到出⼚的样⼦。
可以对硬盘扇区级进⾏复制,以及对硬盘进⾏清零(擦除数据)。
disktoolbox 磁盘⼯具箱 v1.6 中⽂绿⾊免费版
类型:磁盘光盘
⼤⼩:717KB
语⾔:简体中⽂
时间:2016-05-04
查看详情
硬盘修复清零⼯具箱disktoolbox使⽤教程
1、选择源硬盘和⽬标硬盘
2、点击【⽬标硬盘清零】即可
3、选中⾼级选项,可以对扇区进⾏复制。
关于UVDiskTool 操作说明目录一、程序须知 ------------------------------------------------------------------------------------------ 21.1 程序用途 ------------------------------------------------------------------------------------- 2二、程序操作 ------------------------------------------------------------------------------------------ 32.1 工程测试盘---------------------------------------------------------------------------------- 32.2.1 制作工程测试盘须知------------------------------------------------------------- 32.2.2制作工程测试盘步骤-------------------------------------------------------------- 42.2 刷机盘 ---------------------------------------------------------------------------------------- 62.2.1 制作刷机盘须知 ------------------------------------------------------------------- 62.2.2 制作刷机盘步骤 ------------------------------------------------------------------- 62.3 抽取工具盘---------------------------------------------------------------------------------- 82.3.1 制作抽取工具盘须知------------------------------------------------------------- 82.3.2 制作抽取工具盘步骤------------------------------------------------------------- 92.4 普通盘 -------------------------------------------------------------------------------------- 152.4.1 制作普通盘须知 ----------------------------------------------------------------- 152.4.2 制作普通盘步骤 ----------------------------------------------------------------- 152.5 系统配置 ----------------------------------------------------------------------------------- 172.6 产生校验码-------------------------------------------------------------------------------- 192.7 导出用户刷机包 ------------------------------------------------------------------------- 212.8 导出经销商刷机包 ---------------------------------------------------------------------- 232.9 导出烧写器刷机包 ---------------------------------------------------------------------- 252.10烧写器刷机包使用 --------------------------------------------------------------------- 282.11 关于UVDiskTool ------------------------------------------------------------------------ 28一、程序须知1.1 程序用途该程序主要是用于制作刷机盘、测试盘、抽取盘及导出一些定制刷机包:1.制作工程测试盘:主要是要测试设备各个器件是否能正常工作。
2.制作刷机盘:主要是给设备装系统。
3.制作抽取盘:主要是对已经刷了系统,在系统上做了配置及装了软件,想把当前修改的系统状态刷到另一个设备,即可制作抽取盘。
4.可以通过系统配置对项目进行修改,详见后续介绍5.可以导出用户、经销商、烧写器刷机包,具体详见后续介绍程序位于刷机包目录UVDiskTool下的UVDiskTool.exe,双击运行,如图1:图1插上制作刷机的U盘,在该程序中选择U盘盘符即可。
如图2:图2二、程序操作2.1 工程测试盘主要是测试设备各个器件是否能正常工作。
2.2.1 制作工程测试盘须知制作工程测试盘时防毒软件可能会弹出提示,需要点允放操作。
2.2.2制作工程测试盘步骤1. 运行刷机包中的UVDiskTool.exe,并插上制作工程测试盘的U盘,如图3:图32. 选择下拉项“工程测试盘”,单击“开始”按钮,并在弹出的提示框中选择“是”。
如图4:图43. 程序制作完测试盘后,会弹出一个对话框,直接单击“OK”如图5:到这一步工程测试盘就完整制作完了。
注:直接把制作好的工程测试盘插到板子上,上电启动即可。
2.2 刷机盘主要是给设备装系统。
2.2.1 制作刷机盘须知制作刷机盘时防毒软件可能会弹出提示,需要点允放操作。
2.2.2 制作刷机盘步骤1. 运行刷机包中的UVDiskTool.exe,并插上制作刷机盘的U盘,如图5:图52. 选择下拉项“刷机盘”,单击“开始”按钮,并在弹出的提示框中选择“是”。
如图6:图63. 程序制作完刷机盘后,会弹出一个对话框,直接单击“OK”如图7:图7到这一步刷机盘就完整制作完了。
注:直接把制作好的刷机盘插到板子上,上电启动即可。
2.3 抽取工具盘主要是对已经刷了系统,在系统上做了配置及装了软件,想把当前修改的系统状态刷到另一个设备,即可制作抽取盘。
2.3.1 制作抽取工具盘须知制作抽取盘时防毒软件可能会弹出提示,需要点允放操作。
2.3.2 制作抽取工具盘步骤1. 运行刷机包中的UVDiskTool.exe,并插上制作抽取工具盘的U盘,如图8:图82. 选择下拉项“抽取工具盘”,单击“开始”按钮,并在弹出的提示框中选择“是”。
如图9:图93. 在弹出的提示对话框中,单击“OK”,拔出U盘,同时不能退出程序;把拔出的U盘插到板子上,上电启动板子即可。
如图10、图11(单击“OK”后的状态):图10图114. 根据屏幕提示,进度条满100,则把U盘从板子上拔出来,插回制作抽取工具盘的电脑上,回到程序上重新选择U盘盘符(见图11的状态)。
如图12:图125. 重新选择完U盘盘符后,单击“抽取”按钮,如图13:图136.程序制作完抽取工具盘后,会弹出一个对话框,直接单击“OK”如图14:图14到这一步抽取工具盘就完整制作完了。
注:直接把制作好的抽取工具盘插到板子上,上电启动即可。
2.4 普通盘普通盘是针对那些已经被制作过工程测试盘、刷机盘、抽取工具盘的U盘。
2.4.1 制作普通盘须知制作普通盘时防毒软件可能会弹出提示,需要点允放操作。
2.4.2 制作普通盘步骤1. 运行刷机包中的UVDiskTool.exe,并插上要恢复为普通盘的U盘,如图15:图152. 选择下拉项“普通盘”,单击“开始”按钮,在弹出的对话框中单击“OK”。
如图16:图16到这一步普通盘就完整制作完了。
2.5 系统配置运行刷机包中的UVDiskTool.exe,单击“选项—>系统配置”,最终会弹出“UVSystemConfig 界面”,具体的操作详见UVSystemConfig工具使用说明。
如图17:图172.6 产生校验码运行刷机包中的UVDiskTool.exe,产生校验码主要是针对目录原始文件已被修改。
1.在“定制U盘”项,选择下拉类型,如刷机盘(图18):图182.单击“选项—>产生校验码”,在弹出的对话框中单击“OK”,如图19:图192.7 导出用户刷机包1.运行刷机包中的UVDiskTool.exe,单击“选项—>导出用户刷机包”,如图20:图202.在弹出的对话框中输入导出包的名字与保存的路径,单击“保存”。
如图21:图213.单击“保存”按钮后,等待片刻,在弹出的对话框中单击“OK”,如图22:图22到这一步用户刷机包就导出完了。
2.8 导出经销商刷机包1.运行刷机包中的UVDiskTool.exe,单击“选项—>导出经销商刷机包”,如图23:图232.在弹出的对话框中输入导出包的名字与保存的路径,单击“保存”。
如图24:图243.单击“保存”按钮后,等待片刻,在弹出的对话框中单击“OK”,如图25:图25到这一步经销商刷机包就导出完了。
2.9 导出烧写器刷机包1.运行刷机包中的UVDiskTool.exe,单击“选项—>导出烧写器刷机包”,如图26:图262.在弹出的对话框中输入导出包的名字与保存的路径,单击“保存”。
如图27:图273.单击“保存”按钮后,等待片刻,在弹出的对话框中单击“OK”,如图28:图28到这一步烧写器刷机包就导出完了。
2.10烧写器刷机包使用1.解压烧写器刷机包:进入PGM003目录,在该目录下有两个目录,分别是PGM_MDT(该目录同刷机包的MDT目录的作用是一样的,用于烧录)与PGM_UVDiskTool(该目录同刷机包的UVDiskTool目录一样的,用于刷机)。
2.进入目录PGM_UVDiskTool,制作烧写器刷机盘。
操作同制作刷机盘是一样的。
3. 进入PGM_MDT,运行MDT_BAL.exe工具(选择正确nandflash的类型)。
4. 接上烧写器烧录口,插上刚刚制作的烧写器刷机盘,上电(烧录过程:蓝灯常亮;烧录完后自动进入刷机,在刷机过程:蓝灯闪烁;刷机结束:绿灯闪烁。