Android 自定义Spinner
- 格式:doc
- 大小:38.50 KB
- 文档页数:5

Android之Spinner⽤法详解⽬录⼀、Spinner的两种展⽰样式⼆、Spinner相关⽅法三、Spinner⽤法举例XML布局⽂件activity_main.xml选中⽂字样式item_select.xml列表其他⽂字样式item_dropdown.xmlJava代码MainActivity.java四、dropdown模式下的列表分割线⼀、Spinner的两种展⽰样式下拉列表的展⽰⽅式有两种,⼀种是在当前下拉框的正下⽅展⽰列表,此时把spinnerMode属性设置为dropdown;另⼀种是在页⾯中部以对话框形式展⽰列表,此时把SpinnerMode属性设置为dialog。
⼆、Spinner相关⽅法setPrompt:设置标题⽂字。
setAdapter:设置下拉列表的适配器。
setSelection:设置当前选中哪项。
注意该⽅法要在setAdapter⽅法之后调⽤。
setOnItemSelectedListener:设置下拉列表的选择监听器,该监听器要实现接⼝OnItemSelectedListener。
三、Spinner⽤法举例XML布局⽂件activity_main.xml<?xml version="1.0" encoding="utf-8"?><LinearLayout xmlns:android="/apk/res/android"android:layout_width="match_parent"android:layout_height="match_parent"android:orientation="vertical"><Spinnerandroid:layout_width="200dp"android:id="@+id/spinner"android:layout_height="wrap_content"android:layout_gravity="center_horizontal"android:spinnerMode="dropdown"android:dropDownVerticalOffset="45dp"android:background="@null"/></LinearLayout>选中⽂字样式item_select.xml<?xml version="1.0" encoding="utf-8"?><TextView xmlns:android="/apk/res/android"android:layout_width="match_parent"android:layout_height="45dp"android:background="@android:color/holo_blue_dark"android:textSize="14sp"android:textColor="@android:color/holo_red_light"android:gravity="center"/>列表其他⽂字样式item_dropdown.xml<?xml version="1.0" encoding="utf-8"?><TextView xmlns:android="/apk/res/android"android:layout_width="match_parent"android:layout_height="45dp"android:textColor="@android:color/black"android:textSize="14sp"android:gravity="center"/>Java代码MainActivity.javapublic class MainActivity extends AppCompatActivity{private String[] starArray = {"⽔星","⾦星","地球","⽕星","⽊星","⼟星"};@Overrideprotected void onCreate(Bundle savedInstanceState) {super.onCreate(savedInstanceState);setContentView(yout.activity_main);initSpinner();}private void initSpinner(){//声明⼀个下拉列表的数组适配器ArrayAdapter<String> starAdapter = new ArrayAdapter<String>(this,yout.item_select,starArray);//设置数组适配器的布局样式starAdapter.setDropDownViewResource(yout.item_dropdown);//从布局⽂件中获取名叫sp_dialog的下拉框Spinner sp = findViewById(R.id.spinner);//设置下拉框的标题,不设置就没有难看的标题了sp.setPrompt("请选择⾏星");//设置下拉框的数组适配器sp.setAdapter(starAdapter);//设置下拉框默认的显⽰第⼀项sp.setSelection(0);//给下拉框设置选择监听器,⼀旦⽤户选中某⼀项,就触发监听器的onItemSelected⽅法sp.setOnItemSelectedListener(new MySelectedListener());}class MySelectedListener implements AdapterView.OnItemSelectedListener{@Overridepublic void onItemSelected(AdapterView<?> adapterView, View view, int i, long l) {Toast.makeText(MainActivity.this,"您选择的是:"+starArray[i],Toast.LENGTH_SHORT).show();}@Overridepublic void onNothingSelected(AdapterView<?> adapterView) {}}}四、dropdown模式下的列表分割线只需要在style中添加如下代码即可添加样式<style name="XSpinnerStyle" parent="android:Widget.ListView.DropDown"><!-- 分隔线颜⾊ --><item name="android:divider">#000000</item><item name="android:dividerHeight">1dp</item></style>然后在AppTheme中调⽤<item name="android:dropDownListViewStyle">@style/XSpinnerStyle</item>但注意,该分割线只有是dropdown样式时才会显⽰到此这篇关于Android之Spinner⽤法详解的⽂章就介绍到这了,更多相关Android之Spinner⽤法内容请搜索以前的⽂章或继续浏览下⾯的相关⽂章希望⼤家以后多多⽀持!。
大家好,我们这一节讲一下Android下的下拉菜单Spinner,就像是Swing的Combobox,html 的<select>,由于手机画面有限,要在有限的范围选择项目,下拉菜单是比较好的选择. Android提供的Spinner Widget的下拉菜单已经非常好用了,样式也还适用.但我们本节的Demo的重点在于自定义下拉菜单里的样式,其关键在于调用setDropDownViewResource方法,以XML的方式定义下拉菜单要显示的模样.Step 1: 创建一个新的Android 工程, 我们命名为SpinnerDemo .Step 2 :打开layout 文件夹,找到main.xml 将其内容改为:<?xml version="1.0" encoding="utf-8"?><LinearLayout xmlns:android="/apk/res/android"android:orientation="vertical"android:padding="10dip"android:layout_width="fill_parent"android:layout_height="wrap_content"><TextViewandroid:layout_width="fill_parent"android:layout_height="wrap_content"android:layout_marginTop="10dip"android:text="Please select a planet:"/><Spinnerandroid:id="@+id/spinner"android:layout_width="fill_parent"android:layout_height="wrap_content"android:drawSelectorOnTop="true"android:prompt="@string/planet_prompt"/></LinearLayout>注意:the Spinner's android:promptis a string resource. In this case, Android does not allow it to be a string, it must be a reference to a resource. So...Step 3:找到在res/values/string.xml,在里面加入如下(黑体)一行:<?xml version="1.0" encoding="utf-8"?><resources><string name="hello">Hello World, SpinnerDemo!</string> <string name="app_name">SpinnerDemo</string><string name="planet_prompt">Choose a planet</string> </resources>Step 4:在res/values/文件夹下创建一个xml文件,命名为arrays.xml:<resources><string-array name="planets"><item>Mercury</item><item>Venus</item><item>Earth</item><item>Mars</item><item>Jupiter</item><item>Saturn</item><item>Uranus</item><item>Neptune</item></string-array></resources>这是用户可以从Spinner Widget选择list 的选择项.Step5:打开SpinnerDemo.java,编辑内容如下:package com.android.test;import android.app.Activity;import android.os.Bundle;import android.widget.ArrayAdapter;import android.widget.Spinner;public class SpinnerDemoextends Activity{public void onCreate(Bundle savedInstanceState) {super.onCreate(savedInstanceState);setContentView(yout.main);Spinner s = (Spinner) findViewById(R.id.spinner);ArrayAdapter adapter = ArrayAdapter.createFromResource(this, R.array.planets, yout.simple_spinner_item)adapter.setDropDownViewResource(yout.simple_spinner_dropdown_it em);s.setAdapter(adapter);}}step 6:最后run it(运行之)效果如下:搞定,让大家久等了,终于把日语搞定了..Android,英语,我来了!!!!。
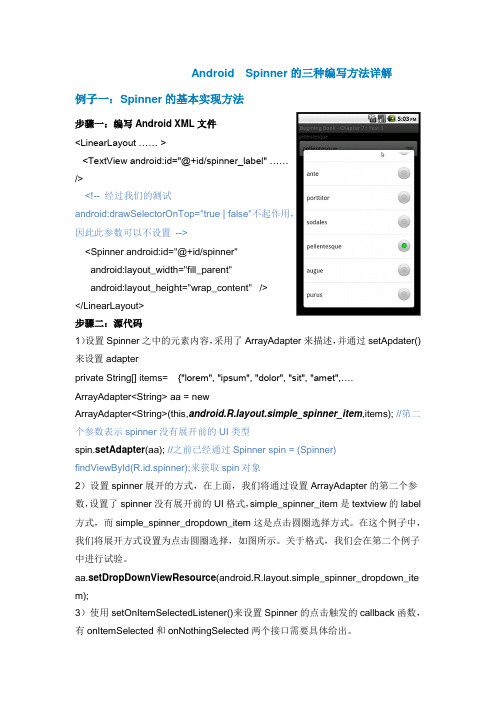
Android Spinner的三种编写方法详解例子一:Spinner的基本实现方法步骤一:编写Android XML文件<LinearLayout …… ><TextView android:id="@+id/spinner_label" ……/><!-- 经过我们的测试android:drawSelectorOnTop="true | false"不起作用,因此此参数可以不设置--><Spinner android:id="@+id/spinner"android:layout_width="fill_parent"android:layout_height="wrap_content" /></LinearLayout>步骤二:源代码1)设置Spinner之中的元素内容,采用了ArrayAdapter来描述,并通过setApdater()来设置adapterprivate String[] items= {"lorem", "ipsum", "dolor", "sit", "amet",….ArrayAdapter<String> aa = newArrayAdapter<String>(this,yout.simple_spinner_item,items); //第二个参数表示spinner没有展开前的UI类型spin.setAdapter(aa); //之前已经通过Spinner spin = (Spinner)findViewById(R.id.spinner);来获取spin对象2)设置spinner展开的方式,在上面,我们将通过设置ArrayAdapter的第二个参数,设置了spinner没有展开前的UI格式,simple_spinner_item是textview的label 方式,而simple_spinner_dropdown_item这是点击圆圈选择方式。

AndroidSpinner的简单⽤法。
今天学到的是spinner,就是下拉列表,这可不是ExpandListView哈。
闲话不解释。
这是控件,所以先上布局:就不上线性布局了,基本上可以总结出,控件都得在布局⾥写,写之前嵌个布局就⾏。
<Spinner android:layout_height="wrap_content" android:layout_width="match_parent" android:entries="@array/spinner_arr" 这边介绍下,这是下拉列表的各个列表的数据,这是给第⼆个简单的列表写法⽤的,我们现在讲的是⾃⼰写⾃⼰的列表数据 android:prompt="@string/spinner_prompt" 这个是下拉列表的标题,不能在这直接写字符串,得到Values⾥的string⾥写好,再调⽤ android:spinnerMode="dialog" 有两种⽅式,dialog和dropdown,⼀个是对话框,⼀个是下拉框。
android:id="@+id/sp1"/>这个是在Values⾥头创建的⼀个array:<?xml version="1.0" encoding="UTF-8"?>-<resources>-<string-array name="spinner_arr"><item>星期⼀</item><item>星期⼆</item><item>星期三</item><item>星期四</item><item>星期五</item><item>星期六</item><item>星期⽇</item></string-array></resources>然后这边就先在drawable⾥创建⼏张图⽚再搞个布局来给下拉列表⾥的列表这边和ExpandListView差不多,我们得写个适配器,会不会奇怪,为啥List有个Person。
android shape ring用法Android Shape Ring 是Android 平台上的一个可用于创建自定义环形形状的图形资源。
它可以用于各种控件或背景中,为用户提供更加个性化和独特的界面设计。
本文将详细介绍Android Shape Ring 的用法,包括创建、配置和应用环形形状资源的各个步骤,帮助开发者更好地使用这个功能来打造精美的用户界面。
第一步:了解Shape Drawable在开始之前,让我们先了解一下Shape Drawable。
Shape Drawable 是指由XML 文件定义的矢量图形资源,可以用于绘制各种形状,例如矩形、圆形、椭圆等。
通过在XML 中使用Shape Drawable,开发者可以轻松地创建独特的背景或前景形状,并将其应用于Android 应用的各个界面元素中。
第二步:创建shape_ring.xml 文件首先,我们需要创建一个名为shape_ring.xml 的XML 文件,用于定义环形的形状资源。
在res/drawable 文件夹中创建一个新的XML 文件,并将其命名为shape_ring.xml。
第三步:定义环形形状在shape_ring.xml 文件中,我们需要使用<shape> 元素来定义环形的形状。
下面是一个示例的shape_ring.xml 文件的代码:xml<shape xmlns:android="android:shape="ring"android:useLevel="false"><solid android:color="#FF0000" /><size android:width="50dp"android:height="50dp" /><gradient android:type="linear"android:startColor="#FFFF00"android:endColor="#00FF00" /><stroke android:color="#000000"android:width="1dp" /></shape>在上面的代码中,我们使用了`<shape>` 元素,并设置了`android:shape` 属性为"ring",以创建一个环形的形状资源。
Android中Spinner(下拉框)控件的使⽤详解android给我们提供了⼀个spinner控件,这个控件主要就是⼀个列表,那么我们就来说说这个控件吧,这个控件在以前的也看见过,但今天还是从新介绍⼀遍吧。
Spinner位于 android.widget包下,每次只显⽰⽤户选中的元素,当⽤户再次点击时,会弹出选择列表供⽤户选择,⽽选择列表中的元素同样来⾃适配器。
Spinner是View类得⼀个⼦类。
1.效果图2.创建页⾯⽂件(main.xml)<Spinnerandroid:id="@+id/spinner1"android:layout_width="match_parent"android:layout_height="wrap_content" /><TextViewandroid:id="@+id/tvResult"android:layout_width="match_parent"android:layout_height="wrap_content"android:text="选择的⽔果" />3.创建下拉框的数据源List<String> list = new ArrayList<String>();list.add("苹果");list.add("⾹蕉");list.add("橘⼦");list.add("⾹蕉");4.创建适配器(下拉框的数据源是来⾃适配器)ArrayAdapter<String> adapter=new ArrayAdapter<String>(this, yout.simple_spinner_item,list);5.为适配器添加样式adapter.setDropDownViewResource(yout.simple_spinner_dropdown_item);系统提供的样式如下simple_spinner_dropdown_item(列表-间距较⾼⽐较好看)simple_spinner_item(列表-间距紧凑不好看)simple_list_item_checked(复选框-选中的有绿沟)simple_list_item_single_choice (单选按钮)6.向控件Spinner添加适配器Spinner sp=(Spinner) findViewById(R.id.spinner1);sp.setAdapter(adapter);释义1. setAdapter(SpinnerAdapter adapter) ,从类的继承关系上看,ArrayAdapter是SpinnerAdapter接⼝的间接实现类7.实现选择项事件(使⽤匿名类实现接⼝)sp.setOnItemSelectedListener(new OnItemSelectedListener() {// parent:为控件Spinner view:显⽰⽂字的TextView position:下拉选项的位置从0开始public void onItemSelected(AdapterView<?> parent, View view, int position, long id) {TextView tvResult = (TextView) findViewById(Result);//获取Spinner控件的适配器ArrayAdapter<String> adapter = (ArrayAdapter<String>) parent.getAdapter();tvResult.setText(adapter.getItem(position));}//没有选中时的处理public void onNothingSelected(AdapterView<?> parent) {}});8.后台整体代码如下public void onCreate(Bundle savedInstanceState) {super.onCreate(savedInstanceState);setContentView(yout.main);List<String> list = new ArrayList<String>();list.add("苹果");list.add("⾹蕉");list.add("橘⼦");list.add("⾹蕉");ArrayAdapter<String> adapter = new ArrayAdapter<String>(this, yout.simple_spinner_item, list);adapter.setDropDownViewResource(yout.simple_list_item_single_choice);Spinner sp = (Spinner) findViewById(R.id.spinner1);sp.setAdapter(adapter);sp.setOnItemSelectedListener(new OnItemSelectedListener() {// parent:为控件Spinner view:显⽰⽂字的TextView position:下拉选项的位置从0开始public void onItemSelected(AdapterView<?> parent, View view, int position, long id) {TextView tvResult = (TextView) findViewById(Result);//获取Spinner控件的适配器ArrayAdapter<String> adapter = (ArrayAdapter<String>) parent.getAdapter();tvResult.setText(adapter.getItem(position));}//没有选中时的处理public void onNothingSelected(AdapterView<?> parent) {}});}以上所述是⼩编给⼤家介绍的Android中Spinner(下拉框)控件的使⽤详解,希望对⼤家有所帮助,如果⼤家有任何疑问请给我留⾔,⼩编会及时回复⼤家的。
/**** 自定义软键盘** @author Neil**/public class KeydemoActivity extends Activity {private Context ctx;private Activity act;private EditText edit;private EditText edit1;InputMethodManager inputMe;@Overridepublic void onCreate(Bundle savedInstanceState) { super.onCreate(savedInstanceState);setContentView(yout.main);ctx = this;act = this;edit = (EditText) this.findViewById(R.id.edit);if (android.os.Build.VERSION.SDK_INT <= 10) {//4.0以下danielinbitiedit.setInputType(InputType.TYPE_NULL);} else {this.act.getWindow().setSoftInputMode(youtParams.SOFT_INPUT_STATE_ALWAYS_HIDDEN);try {Class<EditText> cls = EditText.class;Method setShowSoftInputOnFocus;setShowSoftInputOnFocus =cls.getMethod("setShowSoftInputOnFocus",boolean.class);setShowSoftInputOnFocus.setAccessible(true); setShowSoftInputOnFocus.invoke(edit, false); } catch (Exception e) {e.printStackTrace();}}// inputMe=(InputMethodManager)getSystemService(Context.INPUT_METHOD_SERVICE);edit1 = (EditText) this.findViewById(R.id.edit1);if (android.os.Build.VERSION.SDK_INT <= 10) {//4.0以下danielinbitiedit1.setInputType(InputType.TYPE_NULL); } else {this.act.getWindow().setSoftInputMode(youtParams.SOFT_INPUT_STATE_ALWAYS_HIDDEN);try {Class<EditText> cls = EditText.class;Method setShowSoftInputOnFocus;setShowSoftInputOnFocus =cls.getMethod("setShowSoftInputOnFocus",boolean.class);setShowSoftInputOnFocus.setAccessible(true);setShowSoftInputOnFocus.invoke(edit1,false); } catch (Exception e) {e.printStackTrace();}}edit.setOnTouchListener(new OnTouchListener() {@Overridepublic boolean onTouch(View v, MotionEvent event) {int inputback = edit.getInputType();edit.setInputType(InputType.TYPE_NULL);new KeyboardUtil(act, ctx, edit).showKeyboard();edit.setInputType(inputback);return false;}});edit1.setOnTouchListener(new OnTouchListener() {@Overridepublic boolean onTouch(View v, MotionEvent event) {int inputback = edit1.getInputType();edit1.setInputType(InputType.TYPE_NULL);new KeyboardUtil(act, ctx, edit1).showKeyboard();edit1.setInputType(inputback);return false;}});}}/**** 工具类** @author xutangning**/public class KeyboardUtil {private Context ctx;private Activity act;private KeyboardView keyboardView;private Keyboard k1;// 字母键盘private Keyboard k2;// 数字键盘public boolean isnun = false;// 是否数据键盘public boolean isupper = false;// 是否大写private EditText ed;public KeyboardUtil(Activity act, Context ctx, EditText edit) { this.act = act;this.ctx = ctx;this.ed = edit;k1 = new Keyboard(ctx, R.xml.qwerty);k2 = new Keyboard(ctx, R.xml.symbols);keyboardView = (KeyboardView)act.findViewById(R.id.keyboard_view);keyboardView.setKeyboard(k1);keyboardView.setEnabled(true);keyboardView.setPreviewEnabled(true);keyboardView.setOnKeyboardActionListener(listener);}private OnKeyboardActionListener listener = new OnKeyboardActionListener() {@Overridepublic void swipeUp() {}@Overridepublic void swipeRight() {}@Overridepublic void swipeLeft() {}@Overridepublic void swipeDown() {}@Overridepublic void onText(CharSequence text) {}@Overridepublic void onRelease(int primaryCode) {}@Overridepublic void onPress(int primaryCode) {}@Overridepublic void onKey(int primaryCode, int[] keyCodes) {Editable editable = ed.getText();int start = ed.getSelectionStart();if (primaryCode == Keyboard.KEYCODE_CANCEL) {// 完成hideKeyboard();} else if (primaryCode == Keyboard.KEYCODE_DELETE) {// 回退if (editable != null && editable.length() > 0) {if (start > 0) {editable.delete(start - 1, start);}}} else if (primaryCode == Keyboard.KEYCODE_SHIFT) {// 大小写切换changeKey();keyboardView.setKeyboard(k1);} else if (primaryCode == Keyboard.KEYCODE_MODE_CHANGE) {// 数字键盘切换if (isnun) {isnun = false;keyboardView.setKeyboard(k1);} else {isnun = true;keyboardView.setKeyboard(k2);}} else if (primaryCode == 57419) { // go leftif (start > 0) {ed.setSelection(start - 1);}} else if (primaryCode == 57421) { // go rightif (start < ed.length()) {ed.setSelection(start + 1);}} else {editable.insert(start, Character.toString((char) primaryCode));}}};/*** 键盘大小写切换*/private void changeKey() {List<Key> keylist = k1.getKeys();if (isupper) {//大写切换小写isupper = false;for(Key key:keylist){if (bel!=null && isword(bel.toString())) {bel = bel.toString().toLowerCase();key.codes[0] = key.codes[0]+32;}}} else {//小写切换大写isupper = true;for(Key key:keylist){if (bel!=null && isword(bel.toString())) {bel = bel.toString().toUpperCase();key.codes[0] = key.codes[0]-32;}}}}public void showKeyboard() {int visibility = keyboardView.getVisibility();if (visibility == View.GONE || visibility == View.INVISIBLE) { keyboardView.setVisibility(View.VISIBLE);}}public void hideKeyboard() {int visibility = keyboardView.getVisibility();if (visibility == View.VISIBLE) {keyboardView.setVisibility(View.INVISIBLE);}}private boolean isword(String str){S tring wordstr = "abcdefghijklmnopqrstuvwxyz";i f (wordstr.indexOf(str.toLowerCase())>-1) {return true;}r eturn false;}}在xml文件夹下,建的两个xml文件qwerty.xml文件<?xml version="1.0"encoding="UTF-8"?><Keyboard android:keyWidth="10.000002%p"android:keyHeight="@dimen/key_height"android:horizontalGap="0.0px"android:verticalGap="0.0px"xmlns:android="/apk/res/android"> <Row><Key android:codes="113"android:keyEdgeFlags="left"android:keyLabel="q"/><Key android:codes="119"android:keyLabel="w"/><Key android:codes="101"android:keyLabel="e"/><Key android:codes="114"android:keyLabel="r"/><Key android:codes="116"android:keyLabel="t"/><Key android:codes="121"android:keyLabel="y"/><Key android:codes="117"android:keyLabel="u"/><Key android:codes="105"android:keyLabel="i"/><Key android:codes="111"android:keyLabel="o"/><Key android:codes="112"android:keyEdgeFlags="right"android:keyLabel="p"/></Row><Row><Key android:horizontalGap="4.999995%p"android:codes="97"android:keyEdgeFlags="left"android:keyLabel="a"/> <Key android:codes="115"android:keyLabel="s"/><Key android:codes="100"android:keyLabel="d"/><Key android:codes="102"android:keyLabel="f"/><Key android:codes="103"android:keyLabel="g"/><Key android:codes="106"android:keyLabel="j"/><Key android:codes="107"android:keyLabel="k"/><Key android:codes="108"android:keyEdgeFlags="right"android:keyLabel="l"/></Row><Row><Key android:keyWidth="14.999998%p"android:codes="-1"android:keyEdgeFlags="left"android:isModifier="true"android:isSticky="true"android:keyIcon="@drawable/sym_keyboard_shift"/><Key android:codes="122"android:keyLabel="z"/><Key android:codes="120"android:keyLabel="x"/><Key android:codes="99"android:keyLabel="c"/><Key android:codes="118"android:keyLabel="v"/><Key android:codes="98"android:keyLabel="b"/><Key android:codes="110"android:keyLabel="n"/><Key android:codes="109"android:keyLabel="m"/><Key android:keyWidth="14.999998%p"android:codes="-5"android:keyEdgeFlags="right"android:isRepeatable="true"android:keyIcon="@drawable/sym_keyboard_delete"/> </Row><Row android:rowEdgeFlags="bottom"><Key android:keyWidth="20.000004%p"android:codes="-2"android:keyLabel="12#"/><Key android:keyWidth="14.999998%p"android:codes="44"android:keyLabel=","/><Key android:keyWidth="29.999996%p"android:codes="32"android:isRepeatable="true"android:keyIcon="@drawable/sym_keyboard_space"/><Key android:keyWidth="14.999998%p"android:codes="46"android:keyLabel="."/><Key android:keyWidth="20.000004%p"android:codes="-3"android:keyEdgeFlags="right"android:keyLabel="完成"/> </Row></Keyboard>symbols.xml文件<?xml version="1.0"encoding="utf-8"?><Keyboard xmlns:android="/apk/res/android"android:keyWidth="25%p"android:horizontalGap="0px"android:verticalGap="0px"android:keyHeight="@dimen/key_height"> <Row><Key android:codes="49"android:keyLabel="1"/><Key android:codes="50"android:keyLabel="2"/><Key android:codes="57419"android:keyEdgeFlags="right"android:keyIcon="@drawable/sym_keyboard_left"/> </Row><Row><Key android:codes="52"android:keyLabel="4"/><Key android:codes="53"android:keyLabel="5"/><Key android:codes="54"android:keyLabel="6"/><Key android:codes="57421"android:keyEdgeFlags="right"android:keyIcon="@drawable/sym_keyboard_right"/> </Row><Row><Key android:codes="55"android:keyLabel="7"/><Key android:codes="56"android:keyLabel="8"/><Key android:codes="57"android:keyLabel="9"/><Key android:codes="-3"android:keyHeight="100dip"android:keyEdgeFlags="right"android:isRepeatable="true"android:keyLabel="完成"/></Row><Row><Key android:codes="-2"android:keyLabel="ABC"/><Key android:codes="48"android:keyLabel="0"/><Key android:codes="-5"android:keyIcon="@drawable/sym_keyboard_delete"/></Row></Keyboard>Main.xml文件<?xml version="1.0"encoding="utf-8"?><LinearLayoutxmlns:android="/apk/res/android"android:layout_width="fill_parent"android:layout_height="fill_parent"android:orientation="vertical"><EditTextandroid:id="@+id/edit"android:layout_width="fill_parent"android:layout_height="wrap_content"/><EditTextandroid:id="@+id/edit1"android:layout_width="fill_parent"android:layout_height="wrap_content"android:password="true"/><RelativeLayoutandroid:layout_width="fill_parent"android:layout_height="wrap_content"><android.inputmethodservice.KeyboardViewandroid:id="@+id/keyboard_view"android:layout_width="fill_parent"android:layout_height="wrap_content"android:layout_alignParentBottom="true"android:focusable="true"android:focusableInTouchMode="true"android:background="@color/lightblack"android:keyBackground="@drawable/btn_keyboard_key"android:keyTextColor="@color/white"android:visibility="gone"/></RelativeLayout></LinearLayout>根据main.xml可以修改键盘放置的位置,可以直接显示在界面中,根据要求修改键盘。
接下来我们来看看如何在对话框中嵌套一个ListView。
首先,需要一个布局文件,布局文件里只创建一个ListView,如下代码<?xml version="1.0" encoding="utf-8"?><LinearLayout xmlns:android="/apk/res/android" android:orientation="vertical" android:layout_width="fill_parent"android:layout_height="fill_parent" android:scrollbars="vertical"> <ListViewandroid:id="@+id/listCity"android:layout_width="fill_parent"android:layout_height="fill_parent"android:scrollbars="vertical"/></LinearLayout>Java代码如下private void ShowLoginDialog(){Builder builder = new AlertDialog.Builder(Tab1Activity.this);builder.setTitle("选择城市");LayoutInflater factory = LayoutInflater.from(Tab1Activity.this); View dialogView = factory.inflate(yout.dialogcity, null); listCity =(ListView)dialogView.findViewById(R.id.listCity);GetCity();builder.setView(dialogView);builder.show();}private void GetCity(){System.out.println("asd");ArrayList<HashMap<String, String>> listData = new ArrayList<HashMap<String,String>>();HashMap<String, String> hmItem = new HashMap<String, String>();hmItem.put("city", "北京");listData.add(hmItem);hmItem = new HashMap<String, String>();hmItem.put("city", "上海");listData.add(hmItem);hmItem = new HashMap<String, String>();hmItem.put("city", "深圳");listData.add(hmItem);hmItem = new HashMap<String, String>();hmItem.put("city", "天津");listData.add(hmItem);hmItem = new HashMap<String, String>();hmItem.put("city", "南京");listData.add(hmItem);hmItem = new HashMap<String, String>();hmItem.put("city", "武汉");listData.add(hmItem);hmItem = new HashMap<String, String>();hmItem.put("city", "江苏");listData.add(hmItem);hmItem = new HashMap<String, String>();listData.add(hmItem);SimpleAdapter sim = new SimpleAdapter(this, listData, yout.simple_list_item_1, new String[]{"city"}, new int[]{android.R.id.text1});listCity.setAdapter(sim);}直接调用ShowLoginDialog方法即可。
Android 自定义Spinner
在Android的UI开发中,Spinner(下拉列表)总是可以用到的,一个简单的自定义Spinner制作我们只需要记住这重要的五步,一个Spinner就可以应用而生了。
(1)新建一个Android工程,名字为SpinnerTest1。
修改layout下的main.xml,添加一个Textview和一个Spinner,文件内容如下:
Java代码
1<?xmlversion="1.0"encoding="utf-8"?>
2
3<LinearLayout
4
5
6
7android:layout_width="fill_parent"
8
9android:layout_height="fill_parent"
10
11android:orientation="vertical"
12
13xmlns:andro>
14
15<TextView
16
17android:layout_width="fill_parent"
18
19android:layout_height="wrap_content"
20
21android:text="你选择的是"
22
23android:textSize="25sp">
24
25</TextView>
26
27<Spinner
28
29android:layout_width="fill_parent"
30
31android:layout_height="wrap_content">
32
33</Spinner>
34
35<!--定义一个下拉菜单-->
36
37</LinearLayout>
(2)修改你的SpinnerTest1类,在这里我们就要记住五步来自定义一个Spinner了,完整代码
及五步注释如下:
Java代码
38packageeoe.spinner;
39
40
41
42importjava.util.ArrayList;
43
44importjava.util.List;
45
46importandroid.app.Activity;
47
48importandroid.os.Bundle;
49
50importandroid.view.MotionEvent;
51
52importandroid.view.View;
53
54importandroid.view.View.OnTouchListener;
55
56importandroid.view.animation.Animation;
57
58importandroid.view.animation.AnimationUtils;
59
60importandroid.widget.AdapterView;
61
62importandroid.widget.ArrayAdapter;
63
64importandroid.widget.Spinner;
65
66importandroid.widget.TextView;
67
68
69
70publicclassSpinnerTest1extendsActivity{
71
72/**Calledwhentheactivityisfirstcreated.*/
73
74
75
76
77
78privateList<String>list=newArrayList<String>();
80privateTextViewmyTextView;
81
82privateSpinnermySpinner;
83
84privateArrayAdapter<String>adapter;
85
86privateAnimationmyAnimation;
87
88
89
90@Override
91
92publicvoidonCreate(BundlesavedInstanceState){
93
94super.onCreate(savedInstanceState);
95
96setContentView(yout.main);
97
98//第一步:添加一个下拉列表项的list,这里添加的项就是下拉列表的菜单项
99
100list.add("北京");
101
102list.add("上海");
103
104list.add("深圳");
105
106list.add("南京");
107
108list.add("重庆");
109
110
111
112myTextView=(TextView)findView ById(R.id.TextView_Show);
113
114mySpinner=(Spinner)findView ById(R.id.spinner_City);
115
116//第二步:为下拉列表定义一个适配器,这里就用到里前面定义的list。
117
118adapter=newArrayAdapter<String>(this,yout.simple_spinner_item,list); 119
120//第三步:为适配器设置下拉列表下拉时的菜单样式。
121
122adapter.setDropDownV iewResource(yout.simple_spinner_dropdown_item);
124//第四步:将适配器添加到下拉列表上
125
126mySpinner.setAdapter(adapter);
127
128//第五步:为下拉列表设置各种事件的响应,这个事响应菜单被选中
129
130mySpinner.setOnItemSelectedListener(newSpinner.OnItemSelectedListener(){ 131
132publicvoidonItemSelected(AdapterView<?>arg0,Viewarg1,intarg2,longarg3){ 133
134//TODOAuto-generatedmethodstub
135
136/*将所选mySpinner的值带入myTextView中*/
137
138myTextView.setText("您选择的是:"+adapter.getItem(arg2));
139
140/*将mySpinner显示*/
141
142arg0.setV isibility(View.VISIBLE);
143
144}
145
146publicvoidonNothingSelected(AdapterView<?>arg0){
147
148//TODOAuto-generatedmethodstub
149
150myTextView.setText("NONE");
151
152arg0.setV isibility(View.VISIBLE);
153
154}
155
156});
157
158/*下拉菜单弹出的内容选项触屏事件处理*/
159
160
161
162mySpinner.setOnTouchListener(newSpinner.OnTouchListener(){
163
164publicbooleanonTouch(Viewv,MotionEventevent){
165
166//TODOAuto-generatedmethodstub
168/*将mySpinner隐藏,不隐藏也可以,看自己爱好*/
169
170v.setV isibility(View.INVISIBLE);
171
172returnfalse;
173
174}
175
176});
177
178/*下拉菜单弹出的内容选项焦点改变事件处理*/
179
180mySpinner.setOnFocusChangeListener(newSpinner.OnFocusChangeListener(){ 181
182publicvoidonFocusChange(Viewv,booleanhasFocus){
183
184//TODOAuto-generatedmethodstub
185
186v.setV isibility(View.VISIBLE);
187
188}
189
190});
191
192}
193
194}。