GridView使用大全
- 格式:doc
- 大小:494.00 KB
- 文档页数:73
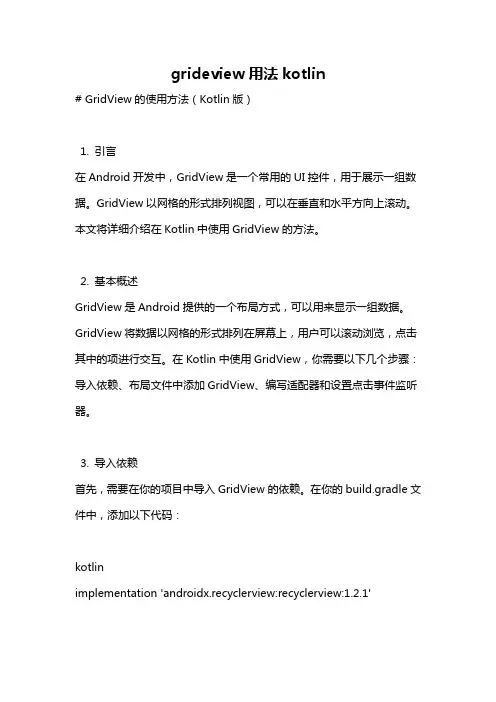
grideview用法kotlin# GridView的使用方法(Kotlin版)1. 引言在Android开发中,GridView是一个常用的UI控件,用于展示一组数据。
GridView以网格的形式排列视图,可以在垂直和水平方向上滚动。
本文将详细介绍在Kotlin中使用GridView的方法。
2. 基本概述GridView是Android提供的一个布局方式,可以用来显示一组数据。
GridView将数据以网格的形式排列在屏幕上,用户可以滚动浏览,点击其中的项进行交互。
在Kotlin中使用GridView,你需要以下几个步骤:导入依赖、布局文件中添加GridView、编写适配器和设置点击事件监听器。
3. 导入依赖首先,需要在你的项目中导入GridView的依赖。
在你的build.gradle文件中,添加以下代码:kotlinimplementation 'androidx.recyclerview:recyclerview:1.2.1'4. 添加GridView到布局文件中在你的布局文件中,添加GridView作为父容器,并设置一些基本属性,例如列数、填充方式等。
示例代码如下:kotlin<GridViewandroid:id="@+id/gridView"android:layout_width="match_parent"android:layout_height="match_parent"android:numColumns="3"android:verticalSpacing="8dp"android:horizontalSpacing="8dp"android:stretchMode="columnWidth"android:gravity="center"android:padding="8dp" />在上述代码中,我们指定了GridView的id为"gridView",宽度和高度为match_parent,列数为3,垂直和水平间距为8dp,填充方式为columnWidth,内容居中,边距为8dp。
androidGridView的使用-电脑资料一些属性设置:1.android:numColumns=”auto_fit”//GridView的列数设置为自动2.android:columnWidth=”90dp "//每列的宽度,也就是Item的宽度3.android:stretchMode=”columnWidth"//缩放与列宽大小同步4.android:verticalSpacing=”10dp”//两行之间的边距5.android:horizontalSpacing=”10dp”//两列之间的边距6.android:cacheColorHint="#00000000"//去除拖动时默认的黑色背景7.android:listSelector="#00000000"//去除选中时的黄色底色(若要自定义按下效果,可将之设置为透明色,在设置自己的选择器)8.android:scrollbars="none"//隐藏GridView的滚动条9.android:fadeScrollbars="true"//设置为true就可以实现滚动条的自动隐藏和显示10.android:fastScrollEnabled="true"//GridView出现快速滚动的按钮(至少滚动4页才会显示)11.android:fadingEdge="none"//GridView衰落(褪去)边缘颜色为空,缺省值是vertical,,电脑资料《android GridView的使用》(https://www.)。
(可以理解为上下边缘的提示色)12.android:fadingEdgeLength="10dip"//定义的衰落(褪去)边缘的长度13.android:stackFromBottom="true"//设置为true时,你做好的列表就会显示你列表的最下面14.android:transcriptMode="alwaysScroll"//当你动态添加数据时,列表将自动往下滚动最新的条目可以自动滚动到可视范围内(发现设置后有时候,可以一直往下拉,上面已经没有数据了,还可以拉,奇怪的现象!)15.android:drawSelectorOnTop="false"//点击某条记录不放,颜色会在记录的后面成为背景色,内容的文字可见(缺省为false) ListView 和GridView这一类控件都只能用选择器设置按下的效果,但手一松开,效果不会保持,要想保持可以在做一个按下位置position的标记,设置onItemClick事件中记下position的值,通知数据刷新,在getView中判断是否是你设置的标记,是则设置选中效果,不是都去除选中效果。
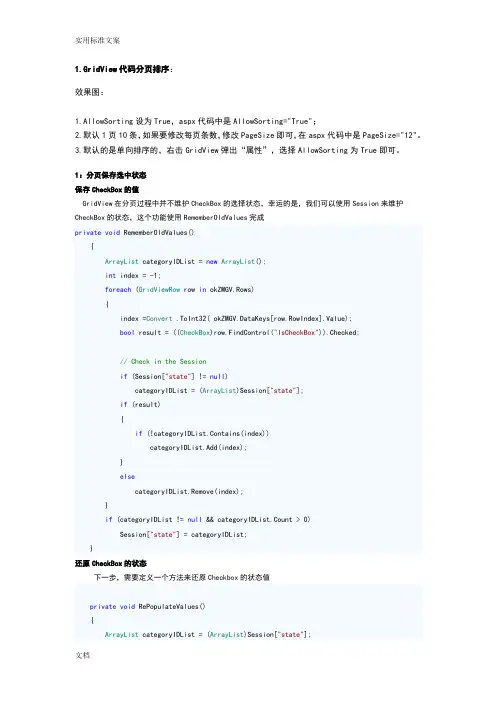
1.GridView代码分页排序:效果图:1.AllowSorting设为True,aspx代码中是AllowSorting="True";2.默认1页10条,如果要修改每页条数,修改PageSize即可,在aspx代码中是PageSize="12"。
3.默认的是单向排序的,右击GridView弹出“属性”,选择AllowSorting为True即可。
1:分页保存选中状态保存CheckBox的值GridView在分页过程中并不维护CheckBox的选择状态,幸运的是,我们可以使用Session来维护CheckBox的状态,这个功能使用RememberOldValues完成private void RememberOldValues(){ArrayList categoryIDList = new ArrayList();int index = -1;foreach (GridViewRow row in okZMGV.Rows){index =Convert .ToInt32( okZMGV.DataKeys[row.RowIndex].Value);bool result = ((CheckBox)row.FindControl("IsCheckBox")).Checked;// Check in the Sessionif (Session["state"] != null)categoryIDList = (ArrayList)Session["state"];if (result){if (!categoryIDList.Contains(index))categoryIDList.Add(index);}elsecategoryIDList.Remove(index);}if (categoryIDList != null && categoryIDList.Count > 0)Session["state"] = categoryIDList;}还原CheckBox的状态下一步,需要定义一个方法来还原Checkbox的状态值private void RePopulateValues(){ArrayList categoryIDList = (ArrayList)Session["state"];if (categoryIDList != null && categoryIDList.Count > 0){foreach (GridViewRow row in okZMGV .Rows){int index = (int)okZMGV.DataKeys[row.RowIndex].Value;if (categoryIDList.Contains(index)){CheckBox myCheckBox = (CheckBox)row.FindControl("IsCheckBox"); myCheckBox.Checked = true;}}}}最后,在分页事件里调用上面两个方法protected void page_Click(object sender, ImageClickEventArgs e){RememberOldValues();string count = ((ImageButton)sender).CommandArgument.ToString().ToLower ();switch(count){case"prev":if (okZMGV.PageIndex > 0){okZMGV.PageIndex -= 1;}break;case"next":if (okZMGV.PageIndex < okZMGV.PageCount - 1){okZMGV.PageIndex += 1;}break;case "0":okZMGV.PageIndex=0;break;case "last":okZMGV.PageIndex= okZMGV.pagecount-1;break;}BrndOKBind();RePopulateValues();}2.GridView选中,编辑,取消,删除:效果图:后台代码:你可以使用sqlhelper,本文没用。
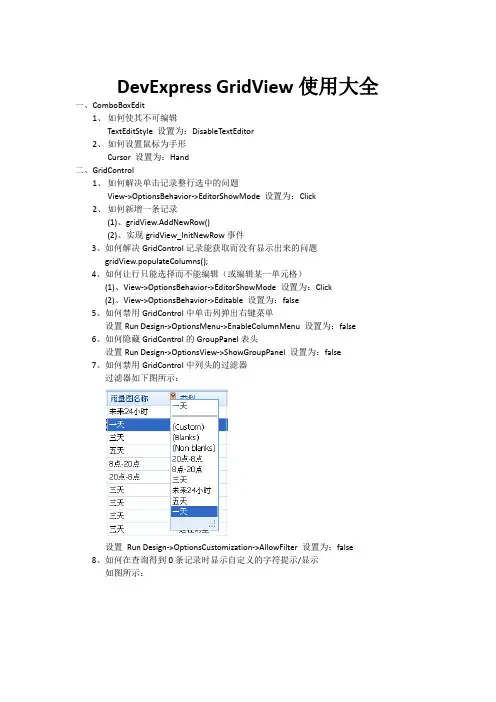
DevExpress GridView使用大全一、ComboBoxEdit1、如何使其不可编辑TextEditStyle 设置为:DisableTextEditor2、如何设置鼠标为手形Cursor 设置为:Hand二、GridControl1、如何解决单击记录整行选中的问题View->OptionsBehavior->EditorShowMode 设置为:Click2、如何新增一条记录(1)、gridView.AddNewRow()(2)、实现gridView_InitNewRow事件3、如何解决GridControl记录能获取而没有显示出来的问题gridView.populateColumns();4、如何让行只能选择而不能编辑(或编辑某一单元格)(1)、View->OptionsBehavior->EditorShowMode 设置为:Click(2)、View->OptionsBehavior->Editable 设置为:false5、如何禁用GridControl中单击列弹出右键菜单设置Run Design->OptionsMenu->EnableColumnMenu 设置为:false6、如何隐藏GridControl的GroupPanel表头设置Run Design->OptionsView->ShowGroupPanel 设置为:false7、如何禁用GridControl中列头的过滤器过滤器如下图所示:设置Run Design->OptionsCustomization->AllowFilter 设置为:false8、如何在查询得到0条记录时显示自定义的字符提示/显示如图所示:方法如下://When no Records Are Being Displayedprivate void gridView1_CustomDrawEmptyForeground(object sender, CustomDrawEventArgs e){//方法一(此方法为GridView设置了数据源绑定时,可用)ColumnView columnView = sender as ColumnView;BindingSource bindingSource = this.gridView1.DataSource as BindingSource;if(bindingSource.Count == 0){string str = "没有查询到你所想要的数据!";Font f = new Font("宋体", 10, FontStyle.Bold);Rectangle r = new Rectangle(e.Bounds.Top + 5, e.Bounds.Left + 5,e.Bounds.Right - 5, e.Bounds.Height - 5);e.Graphics.DrawString(str, f, Brushes.Black, r);}//方法二(此方法为GridView没有设置数据源绑定时,使用,一般使用此种方法)if (this._flag){if (this.gridView1.RowCount == 0){string str = "没有查询到你所想要的数据!";Font f = new Font("宋体", 10, FontStyle.Bold);Rectangle r = new Rectangle(e.Bounds.Left + 5, e.Bounds.Top +5, e.Bounds.Width - 5, e.Bounds.Height - 5);e.Graphics.DrawString(str, f, Brushes.Black, r);}}}9、如何显示水平滚动条?设置this.gridView.OptionsView.ColumnAutoWidth = false;10、如何定位到第一条数据/记录?设置this.gridView.MoveFirst()11、如何定位到下一条数据/记录?设置this.gridView.MoveNext()12、如何定位到最后一条数据/记录?设置this.gridView.MoveLast()13、设置成一次选择一行,并且不能被编辑this.gridView1.FocusRectStyle =DevExpress.XtraGrid.Views.Grid.DrawFocusRectStyle.RowFocus; this.gridView1.OptionsBehavior.Editable = false;this.gridView1.OptionsSelection.EnableAppearanceFocusedCell = false;14、如何显示行号?this.gridView1.IndicatorWidth = 40;//显示行的序号private void gridView1_CustomDrawRowIndicator(object sender,RowIndicatorCustomDrawEventArgs e){if (.IsRowIndicator && e.RowHandle>=0){.DisplayText = (e.RowHandle + 1).ToString();}}15、如何让各列头禁止移动?设置gridView1.OptionsCustomization.AllowColumnMoving = false;16、如何让各列头禁止排序?设置gridView1.OptionsCustomization.AllowSort = false;17、如何禁止各列头改变列宽?设置gridView1.OptionsCustomization.AllowColumnResizing = false;18、19、20、21、22、23、24、25、26、三、navBarControl1、如何在每一个navBarGroup里添加自己想要的控件设置GroupStyle: ControlContainer2、如何设置navBarGroup有滚动条设置SkinExplorerBarViewScrollStyle:ScrollBar3、如休把navBarGroup设置成如下样式如图所示:设置navBarGroup的PaintStyleName属性为: SkinNavigationPane四、toolTipController效果图如下:1、如何设置显示的时间长短设置this.toolTipController1.AutoPopDelay = 2000;2、如何在屏幕上显示如上图所示的效果ToolTipControllerShowEventArgs args =this.toolTipController1.CreateShowArgs();this.toolTipController1.SetToolTip(this.sbtnYes, "请选择一条记录!");this.toolTipController1.SetTitle(this.sbtnYes, "提示");this.toolTipController1.SetToolTipIconType(this.sbtnYes,DevExpress.Utils.ToolTipIconType.Exclamation);this.toolTipController1.ShowBeak = true;this.toolTipController1.ShowShadow = true;this.toolTipController1.Rounded = true;this.toolTipController1.ShowHint("请选择一条记录!", "提示"); args.ToolTip = "请选择一条记录!";args.Title = "提示";3、如何设置边框的颜色this.toolTipController1.Appearance.BorderColor = Color.Red;五、TextEdit1、如何设置TextEdit为多行,可拉伸设置TextEdit的Propertity->AutoHeight为:False六、LayoutControl1、如何设置LayoutItem为隐藏设置LayoutItem.Visibility = Never七、TreeList1、如何隐藏TreeList的列头设置TreeListr的OptionsView的ShowColumns属性为:False2、如何八、PictureEdit1、如何禁止PictureEdit的右键菜单?设置PictureEdit的Properties->ShowMenu为:false九、TreeList1、如何让TreeList的每个结点高亮显示?效果如下:代码如下:private void treeList1_CustomDrawNodeCell(object sender,DevExpress.XtraTreeList.CustomDrawNodeCellEventArgs e){TreeList node = sender as TreeList;if (e.Node == node.FocusedNode){e.Graphics.FillRectangle(SystemBrushes.Window, e.Bounds);Rectangle r = new Rectangle(e.EditViewInfo.ContentRect.Left,e.EditViewInfo.ContentRect.Top,Convert.ToInt32(e.Graphics.MeasureString(e.CellText, treeList1.Font).Width + 1),Convert.ToInt32(e.Graphics.MeasureString(e.CellText,treeList1.Font).Height));e.Graphics.FillRectangle(SystemBrushes.Highlight, r);e.Graphics.DrawString(e.CellText, treeList1.Font, SystemBrushes.HighlightText, r);e.Handled = true;}}//============================================================================ //===============================以下内容为收集=============================== //============================================================================一、改变grid的样式。
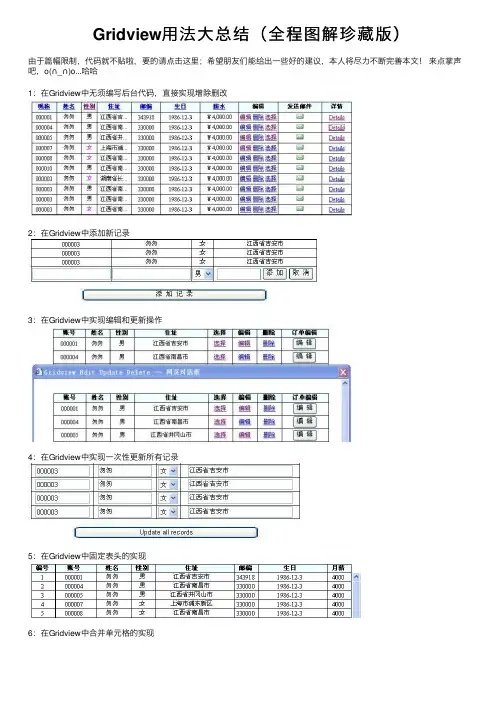
Gridview⽤法⼤总结(全程图解珍藏版)
由于篇幅限制,代码就不贴啦,要的请点击这⾥;希望朋友们能给出⼀些好的建议,本⼈将尽⼒不断完善本⽂!来点掌声吧,o(∩_∩)o...哈哈
1:在Gridview中⽆须编写后台代码,直接实现增除删改
2:在Gridview中添加新记录
3:在Gridview中实现编辑和更新操作
4:在Gridview中实现⼀次性更新所有记录
5:在Gridview中固定表头的实现
6:在Gridview中合并单元格的实现
7:在Gridview中将数据操作结果显⽰在Footer中
8:在Gridview中添加表头
9:在Gridview中将数据导出
10:在Gridview中实现数据导⼊
11:在Gridview中实现嵌套功能
12:在Gridview中实现多层嵌套
13:在Gridview中实现排序
14:在Gridview中实现分页
15:Gridivew结合CheckBox控件的使⽤
16:Gridview结合DropDownList控件的使⽤
17:Gridview结合RadioButtom的使⽤
18:Gridview内嵌DropDownList控件
19:Gridview结合JS,在客户端结合CheckBox的使⽤
20:在Gridview中设置数据⾏的背景颜⾊
21:在Gridview中设置数据⾏的事件
22:在Gridview中设置数据⾏的其他属性
23:在Gridview中索引主键的使⽤。
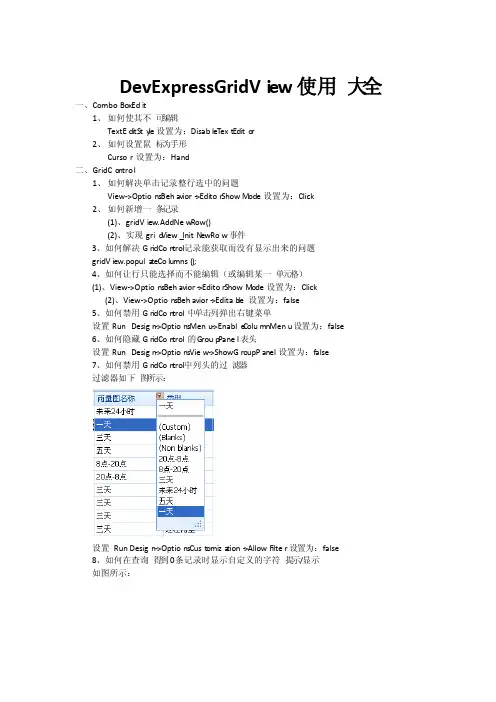
DevExp ressG ridVi ew使用大全一、ComboBoxEdit1、如何使其不可编辑TextEditSty le设置为:DisableT ext Edito r2、如何设置鼠标为手形Cursor设置为:Hand二、GridCo ntrol1、如何解决单击记录整行选中的问题View->OptionsBeha vior->Editor ShowM ode设置为:Click2、如何新增一条记录(1)、gridView.AddNew Row()(2)、实现grid View_InitN ewRow事件3、如何解决GridCon trol记录能获取而没有显示出来的问题gridView.popula teColumns();4、如何让行只能选择而不能编辑(或编辑某一单元格)(1)、View->OptionsBehavior->EditorShowM ode设置为:Click(2)、View->OptionsBehavior->Editab le 设置为:false5、如何禁用GridCon trol中单击列弹出右键菜单设置RunDesign->OptionsMenu->Enable ColumnMenu设置为:false6、如何隐藏GridCon trol的G roup Panel表头设置RunDesign->OptionsView->ShowGroupPanel设置为:false7、如何禁用GridCon trol中列头的过滤器过滤器如下图所示:设置Run Design->OptionsCust omiza tion->AllowF ilter设置为:false8、如何在查询得到0条记录时显示自定义的字符提示/显示如图所示:方法如下://When no Record s Are BeingDispla yedprivat evoid gridVi ew1_C ustom DrawE mptyF oregr ound(object sender,Custom DrawE ventA rgs e){//方法一(此方法为Gr idVie w设置了数据源绑定时,可用)Column Viewcolumn View= sender as Column View;Bindin gSour ce bindin gSour ce = this.gridVi ew1.DataSo urceasBindin gSour ce;if(bindin gSour ce.Count== 0){string str = "没有查询到你所想要的数据!";Font f = new Font("宋体", 10, FontSt yle.Bold);Rectan gle r = new Rectan gle(e.Bounds.Top + 5, e.Bounds.Left + 5,e.Bounds.Right- 5, e.Bounds.Height - 5);e.Graphi cs.DrawSt ring(str, f, Brushe s.Black, r);}//方法二(此方法为Gr idVie w没有设置数据源绑定时,使用,一般使用此种方法)if (this._flag){if (this.gridVi ew1.RowCou nt == 0){string str = "没有查询到你所想要的数据!";Font f = new Font("宋体", 10, FontSt yle.Bold);Rectan gle r = new Rectan gle(e.Bounds.Left + 5, e.Bounds.Top + 5, e.Bounds.Width-5, e.Bounds.Height - 5);e.Graphi cs.DrawSt ring(str, f, Brushe s.Black, r);}}}9、如何显示水平滚动条?设置this.gridView.Option sView.Column AutoW idth= false;10、如何定位到第一条数据/记录?设置this.gridView.MoveFirst()11、如何定位到下一条数据/记录?设置this.gridView.MoveNe xt()12、如何定位到最后一条数据/记录?设置this.gridView.MoveLa st()13、设置成一次选择一行,并且不能被编辑this.gridVi ew1.FocusR ectSt yle =DevExp ress.XtraGr id.Views.Grid.DrawFo cusRe ctSty le.RowFoc us; this.gridVi ew1.Option sBeha vior.Editab le = false;this.gridVi ew1.Option sSele ction.Enable Appea rance Focus edCel l = false;14、如何显示行号?this.gridVi ew1.Indica torWi dth = 40;//显示行的序号privat evoid gridVi ew1_C ustom DrawR owInd icato r(object sender, RowInd icato rCust omDra wEven tArgs e) {if (.IsRowI ndica tor && e.RowHan dle>=0){.Displa yText = (e.RowHan dle + 1).ToStri ng();}}15、如何让各列头禁止移动?设置gridView1.Option sCust omiza tion.AllowC olumn Movin g = false;16、如何让各列头禁止排序?设置gridView1.Option sCust omiza tion.AllowS ort = false;17、如何禁止各列头改变列宽?设置gridView1.Option sCust omiza tion.AllowC olumn Resiz ing = false;18、19、20、21、22、23、24、25、26、三、navBar Contr ol1、如何在每一个n avBarGrou p里添加自己想要的控件设置Grou pStyle:Contro lCont ainer2、如何设置na vBarG roup有滚动条设置Skin Explo rerBa rView ScrollStyl e:Scroll Bar3、如休把nav BarGr oup设置成如下样式如图所示:设置navBarGro up的Pa intSt yleNa me属性为:S kinNa vigat ionPa ne四、toolTipCont rolle r效果图如下:1、如何设置显示的时间长短设置this.toolTi pCont rolle r1.AutoPo pDela y = 2000;2、如何在屏幕上显示如上图所示的效果ToolTi pCont rolle rShow Event Argsargs = this.toolTi pCont rolle r1.Create ShowA rgs(); this.toolTi pCont rolle r1.SetToo lTip(this.sbtnYe s, "请选择一条记录!");this.toolTi pCont rolle r1.SetTit le(this.sbtnYe s, "提示");this.toolTi pCont rolle r1.SetToo lTipI conTy pe(this.sbtnYe s,DevExp ress.Utils.ToolTi pIcon Type.Exclam ation);this.toolTi pCont rolle r1.ShowBe ak = true;this.toolTi pCont rolle r1.ShowSh adow= true;this.toolTi pCont rolle r1.Rounde d = true;this.toolTi pCont rolle r1.ShowHi nt("请选择一条记录!", "提示"); args.ToolTi p = "请选择一条记录!";args.Title= "提示";3、如何设置边框的颜色this.toolTi pCont rolle r1.Appear ance.Border Color = Color.Red;五、TextEd it1、如何设置Te xtEdi t为多行,可拉伸设置Text Edit的Prope rtity->AutoHe ight为:False六、Layout Contr ol1、如何设置La youtItem为隐藏设置Layo utIte m.Visibility= Never七、TreeList1、如何隐藏Tr eeLis t的列头设置Tree Listr的OptionsView的Sh owColumns属性为:False2、如何八、Pictur eEdit1、如何禁止Picture Edit的右键菜单?设置Pict ureEd it的Pr opert ies->ShowMenu为:false九、TreeList1、如何让Tre eList的每个结点高亮显示?效果如下:代码如下:privat evoid treeLi st1_C ustom DrawN odeCe ll(object sender,DevExp ress.XtraTr eeLis t.Custom DrawN odeCe llEve ntArg s e){TreeLi st node = sender as TreeLi st;if (e.Node == node.Focuse dNode){e.Graphi cs.FillRe ctang le(System Brush es.Window, e.Bounds);Rectan gle r = new Rectan gle(e.EditVi ewInf o.Conten tRect.Left,e.EditVi ewInf o.Conten tRect.Top,Conver t.ToInt32(e.Graphi cs.Measur eStri ng(e.CellTe xt,treeLi st1.Font).Width+ 1),Conver t.ToInt32(e.Graphi cs.Measur eStri ng(e.CellTe xt,treeLi st1.Font).Height));e.Graphi cs.FillRe ctang le(System Brush es.Highli ght, r);e.Graphi cs.DrawSt ring(e.CellTe xt, treeLi st1.Font, System Brush es.Highli ghtTe xt, r);e.Handle d = true;}}//============================================================================ //===============================以下内容为收集=============================== //============================================================================一、改变grid的样式。
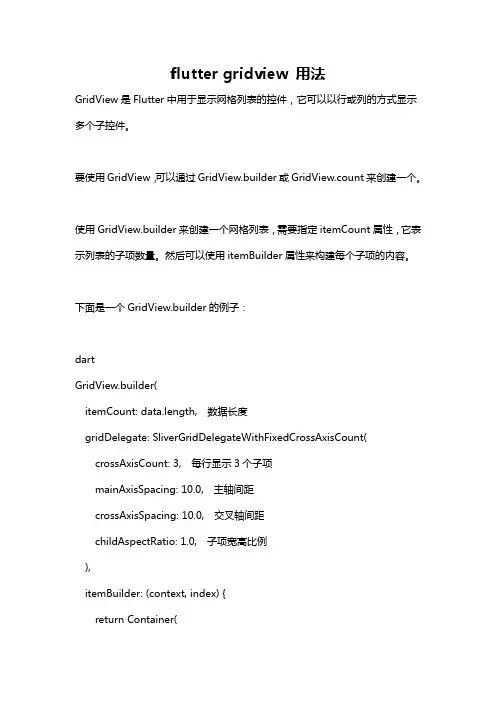
flutter gridview 用法GridView是Flutter中用于显示网格列表的控件,它可以以行或列的方式显示多个子控件。
要使用GridView,可以通过GridView.builder或GridView.count来创建一个。
使用GridView.builder来创建一个网格列表,需要指定itemCount属性,它表示列表的子项数量。
然后可以使用itemBuilder属性来构建每个子项的内容。
下面是一个GridView.builder的例子:dartGridView.builder(itemCount: data.length, 数据长度gridDelegate: SliverGridDelegateWithFixedCrossAxisCount(crossAxisCount: 3, 每行显示3个子项mainAxisSpacing: 10.0, 主轴间距crossAxisSpacing: 10.0, 交叉轴间距childAspectRatio: 1.0, 子项宽高比例),itemBuilder: (context, index) {return Container(color: Colors.blue,child: Center(child: Text('Item index',style: TextStyle(fontSize: 20.0, color: Colors.white),),),);},)使用GridView.count来创建一个网格列表,需要指定crossAxisCount属性,它表示每行或每列显示的子项数量。
下面是一个GridView.count的例子:dartGridView.count(crossAxisCount: 3, 每行显示3个子项mainAxisSpacing: 10.0, 主轴间距crossAxisSpacing: 10.0, 交叉轴间距childAspectRatio: 1.0, 子项宽高比例children: List.generate(20, (index) {return Container(color: Colors.blue,child: Center(child: Text('Item index',style: TextStyle(fontSize: 20.0, color: Colors.white),),),);}),)以上就是使用GridView创建网格列表的基本用法。

Gridview用法(个人总结)202X803Gridview用法(个人总结)202*0803Gridview的一些操作:1、添加删除列:直接使用Gridview的删除事件:1)选择Gridview的右上角任务栏,打开之后选择编辑列,然后选择CommandFiled,打开CommandFiled选择删除,然后选择添加,设置HeadText为删除。
2)打开Gridview控件的属性对话框,在事件中双击RowDeleting,然后添加删除事件代码:protectedvoidGridView1_RowDeleting(objectsender,GridViewDelete EventArgse){StringBuildersb=newStringBuilder();sb.AppendFormat(@"DELETEFRO MSUPPLIERSWHEREID="+Convert.ToInt32(GridView1.DataKeys[e.RowIndex] .Value));SQLHelperhelper=newSQLHelper();helper.ExecuteSql(sb.ToStr ing());Bindon();}不使用Gridview的删除事件:使用添加LinkButton的方法实现删除选定行1)选择Gridview的右上角任务栏,打开之后选择编辑列,然后选择TemplateField,设置HeadText为删除,然后在脚本中添加下面代码:2)打开Gridview控件的属性对话框,在事件中双击RowDataBound,添加如下代码://获取删除行的IDif(e.Row.RowType==DataControlRowType.DataRow){stringid=GridVie w1.DataKeys[e.Row.RowIndex].Value.ToString();//得到idLinkButtonibtnDel=(LinkButton)e.Row.FindControl("delet");//实例化LinButton按钮控件mandArgument=id;//指定删除按钮的关联参数ibtnDel.Attributes.Add("onclick","returnconfirm("确定要删除吗?");");}3)打开Gridview控件的属性对话框,在事件中双击RowCommand,添加如下代码:if(mandName=="del"){stringid=mandArgument.ToString();//获得IDStringBuildersb=newStringBuilder();sb.AppendFormat(@"DELETEFROMSUPPLIERSWHEREID="+id);SQLHelperhe lper=newSQLHelper();helper.ExecuteSql(sb.ToString());Bindon();}即可。
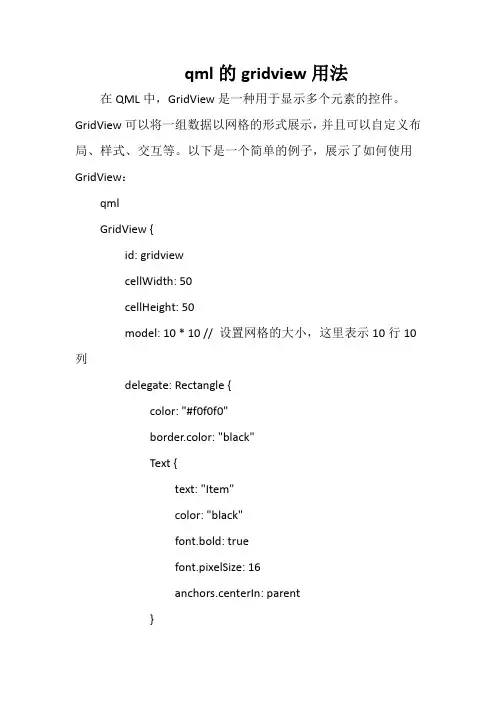
qml的gridview用法在QML中,GridView是一种用于显示多个元素的控件。
GridView可以将一组数据以网格的形式展示,并且可以自定义布局、样式、交互等。
以下是一个简单的例子,展示了如何使用GridView:qmlGridView {id: gridviewcellWidth: 50cellHeight: 50model: 10 * 10 // 设置网格的大小,这里表示10行10列delegate: Rectangle {color: "#f0f0f0"border.color: "black"Text {text: "Item"color: "black"font.bold: truefont.pixelSize: 16anchors.centerIn: parent}}}在上面的例子中,我们创建了一个GridView,设置了每个单元格的宽度和高度,并通过model属性设置了网格的大小,这里表示10行10列。
然后,我们定义了一个Rectangle作为delegate,用于自定义每个单元格的外观和内容。
在Rectangle中,我们设置了背景颜色和边框颜色,并在中心位置放置了一个文本标签。
除此之外,GridView还提供了其他一些属性和方法,可以用于自定义布局、样式、交互等。
例如,可以通过布局方向属性layoutDirection来设置网格的布局方向,通过突出显示属性highlight来设置突出显示样式,通过移动函数来实现网格的移动操作,通过鼠标事件来响应鼠标事件等。
可以根据具体需求进行定制和扩展。
GridView用法一、概述GridView是Android中非常常用的一个控件,它可以以网格的形式展示大量数据,并且支持滚动和分页加载。
在开发过程中,我们经常需要使用GridView来展示图片、商品列表等具有规律性的数据。
本文将深入探讨GridView的用法,包括如何创建、布局、填充数据以及处理点击事件等方面的内容。
二、创建GridView要创建一个GridView,首先需要在XML布局文件中添加GridView控件。
如下所示:<GridViewandroid:id="@+id/grid_view"android:layout_width="match_parent"android:layout_height="match_parent"android:numColumns="3"android:stretchMode="columnWidth"android:horizontalSpacing="10dp"android:verticalSpacing="10dp"/>上述代码中,我们使用了GridView控件,并且为其指定了id、宽度、高度、列数和间距等属性。
其中,android:numColumns属性用于指定每一行显示的列数,这里我们设置为3列;android:stretchMode属性用于指定当内容不足一行时,是否拉伸填充满整个GridView;android:horizontalSpacing和android:verticalSpacing属性用于指定每个网格之间的水平和垂直间距。
三、填充GridView数据在使用GridView之前,我们需要为其填充数据。
通常情况下,我们可以通过适配器(Adapter)来为GridView提供数据。
在Gridview中添加超链接列进入Gridview的【编辑列…】窗口进行编辑,如图:在【可用字段】里选择HyperLinkField,单击【添加】按钮。
然后选择在【选定的字段】中,选择刚添加的这个HyperLinkField。
在右边按照图示进行设置:外观-Text:设置链接的文字。
外观-HeaderText:设置链接列的标题。
数据-DataNavigateUrlFields:设置超链接要传递的参数,这里写的“id,name”表示要传递id和name这两个字段的值,注意用逗号分隔,可以设置多个字段。
数据-DataNavigateUrlFormatString:设置要链接到的页面和传递的参数。
Default2.aspx?id={0}&name={1}表示要链接到Default2.aspx页面。
这里的{0}表示在形成链接时{0}将会被DataNavigateUrlFields中设置的第一个参数实际的值替代,在我们这里是id,{1}将会被name的实际值替代。
最终形成的页面代码如下:<asp:GridView ID="cityList"runat="server"AutoGenerateColumns="False"><Columns><asp:BoundField DataField="id"HeaderText="编码"/><asp:BoundField DataField="name"HeaderText="名称"/><asp:HyperLinkField DataNavigateUrlFields="id,name" DataNavigateUrlFormatString="Default2.aspx?id={0}&name={1}" HeaderText="操作"Text="修改"/></Columns></asp:GridView>后置代码如下:using System;using System.Data;using System.Configuration;using System.Collections;using System.Web;using System.Web.Security;using System.Web.UI;using System.Web.UI.WebControls;using System.Web.UI.WebControls.WebParts;using System.Web.UI.HtmlControls;using System.Data.SqlClient;public partial class _Default : System.Web.UI.Page{protected void Page_Load(object sender, EventArgs e){SqlConnection conn =new SqlConnection("Data Source=.;Initial Catalog=demo;User ID=sa;Password=sa1");DataSet citySet = null;try{SqlDataAdapter adapter =new SqlDataAdapter("select * from city", conn);citySet =new DataSet();adapter.Fill(citySet, "city");}catch (SqlException ex){Console.WriteLine(ex.Message);}finally{conn.Close();}cityList.DataSource= citySet;DataBind();}}这时,浏览页面看效果,如图:如果把鼠标移动到超链接上,观察形成的链接,效果如图:给Gridview添加复选框点击Gridview右上角的三角按钮,选择【编辑列…】,添加一个TemplateField:然后单击向上的按钮,将这个TemplateField移动到最上面:这样,我们就为Gridview添加了一个TemplateField,并且将这个TemplateField排到第一列。
关于GridView的一些用法1.JS读写GridViewGridView解析成table有时间业务需要利用JS脚本来读写GridViewvar objGridViewTable = document.getElementById("GridViewTable");var value = objGridViewTable.rows[0].cells[0].children[0].value;或者 objGridViewT able.rows[0].cells[0].firstChild.value;rows(0)对应Table中的第一个tr,cells[0]对应Table中的第一个tdchildren[0]对应Table中的第一个子对象所以objGridViewT able.rows[0].cells[0].children[0].value 就是得到下面table中的“MyValue”<table><tr><td><span>MyValue</span><td><tr><table>Repeater解析成tr,在Repeater外面加上table用法就一样了2.JavaScript获取GridView选择的行内容一般GridView第一列是多选框CheckBox,负责标记当前行是否被选中,后面可以有文本框T extBox,下拉框DropDownList,标签Lable 这些东西的选取首先就要找出选择的是第几行,如下:var table = document.getElementById("<%=GridView1.ClientID %>");var rowIndex = 0 ;for(var i=1;i<table.rows.length;i++){var input = table.rows[i].cells[0].getElementsByTagName("input")[0].checked;if (input == true){rowIndex = i;return rowIndex ;}}取到TextBox中的值table.rows[rowIndex].cells[3].getElementsByTagName("input ")[0].value取到Lable中的值table.rows[rowIndex].cells[4].getElementsByTagName("span" )[0].innerHTML后面的.innerHTML可以换成.innerText,不过.innerHTML的浏览器兼容性好些。
qml的gridview用法QML中的GridView是用于显示多个项目的可滚动视图组件。
它以二维的方式排列项目,并支持项目的动态加载和回收。
在此回答中,我将详细介绍GridView的用法,并提供示例代码。
GridView的基本用法如下:1. 导入GridView组件:在QML文件的开头,使用`importQtQuick.Controls`导入GridView组件。
2. 创建GridView对象:使用GridView元素创建一个GridView对象。
可以通过设置`width`和`height`属性来指定视图的大小。
例如:```GridViewwidth: 400height: 400}```3. 设置模型:使用`model`属性设置GridView的模型。
你可以使用任何Qt支持的模型类,比如ListModel、ListModel的子类或者自定义的模型类。
4. 定义GridView的布局:使用`GridLayout`元素来定义GridView的布局。
设置`GridLayout.columns`和`GridLayout.rows`属性,以确定每行和每列的项目数。
例如:```GridViewwidth: 400height: 400model: myModelGridLayoutcolumns: 3rows: 3}}```5. 定义GridView的项目:在GridLayout元素内部,可以使用Repeater元素和GridView的模型来定义每个项目。
通过设置Repeater 的`model`属性为GridView的`model`属性,将模型中的数据绑定到每个项目。
例如:```GridViewwidth: 400height: 400model: myModelGridLayoutcolumns: 3rows: 3Repeatermodel: myModeldelegate: Itemwidth: 100height: 100}}}}```6. 自定义GridView的项目:可以在Item元素内部定义自定义的项目。
android gridview的用法Android GridView的用法在Android应用程序开发中,GridView是一个非常有用的组件,用于显示类似表格的数据,并提供了许多自定义选项。
本文将介绍GridView的用法,并逐步讲解如何使用它来创建一个基本的网格布局。
1. 创建一个新的Android项目首先,打开Android Studio并创建一个新的Android项目。
选择一个项目名称和位置,然后选择适当的API级别和设备配置。
2. 准备布局文件在res/layout目录下创建一个新的布局文件,命名为activity_main.xml。
在此文件中,使用GridLayout作为根布局,并添加一些必要的属性。
xml<GridLayoutxmlns:android="android:id="@+id/gridLayout"android:layout_width="match_parent"android:layout_height="match_parent"android:columnCount="3"android:rowCount="3"></GridLayout>在此布局中,我们使用GridLayout作为根布局,并指定了columnCount 和rowCount属性来定义网格的行数和列数。
3. 创建GridView适配器创建一个新的Java类文件,命名为GridAdapter。
在该类中,继承BaseAdapter并实现必要的方法。
javapublic class GridAdapter extends BaseAdapter {private Context context;private List<Integer> data;public GridAdapter(Context context, List<Integer> data) {this.context = context;this.data = data;}@Overridepublic int getCount() {return data.size();}@Overridepublic Integer getItem(int position) {return data.get(position);}@Overridepublic long getItemId(int position) {return position;}@Overridepublic View getView(int position, View convertView, ViewGroup parent) {ImageView imageView;if (convertView == null) {imageView = new ImageView(context);imageView.setLayoutParams(newyoutParams(150, 150));imageView.setScaleType(ImageView.ScaleType.CENTER_CROP);} else {imageView = (ImageView) convertView;}imageView.setImageResource(data.get(position));return imageView;}}在此适配器中,我们使用了一个ImageView作为网格中的单个项,通过设置布局参数和缩放模式来自定义它。
GridView无代码分页排序GridView选中,编辑,取消,删除GridView正反双向排序GridView和下拉菜单DropDownList结合GridView和CheckBox结合鼠标移到GridView某一行时改变该行的背景色方法一鼠标移到GridView某一行时改变该行的背景色方法二GridView实现删除时弹出确认对话框GridView实现自动编号GridView实现自定义时间货币等字符串格式GridView实现用“...”代替超长字符串GridView一般换行与强制换行GridView显示隐藏某一列GridView弹出新页面/弹出新窗口GridView固定表头(不用javascript只用CSS,2行代码,很好用) GridView合并表头多重表头无错完美版(以合并3列3行举例)GridView突出显示某一单元格(例如金额低于多少,分数不及格等)GridView加入自动求和求平均值小计GridView数据导入Excel/Excel数据读入GridView在对GridView编辑的时候实现自动计算实现类似winform的点击行选中功能GridView在编辑的时候控制编辑框的列宽。
给Gridview加入Tooltip的功能1.GridView无代码分页排序:1.AllowSorting设为True,aspx代码中是AllowSorting="True";2.默认1页10条,如果要修改每页条数,修改PageSize即可,在aspx代码中是PageSize="12"。
3.默认的是单向排序的,右击GridView弹出“属性”,选择AllowSorting为True即可。
2.GridView选中,编辑,取消,删除:效果图:后台代码:你可以使用sqlhelper,本文没用。
代码如下:using System;using System.Data;using System.Configuration;using System.Web;using System.Web.Security;using System.Web.UI;using System.Web.UI.WebControls;using System.Web.UI.WebControls.WebParts;using System.Web.UI.HtmlControls;using System.Data.SqlClient;public partial class _Default : System.Web.UI.Page{//清清月儿/21aspnetSqlConnection sqlcon;SqlCommand sqlcom;string strCon = "Data Source=(local);Database=数据库名;Uid=帐号;Pwd=密码";protected void Page_Load(object sender, EventArgs e){if (!IsPostBack){bind();}}protected void GridView1_RowEditing(object sender, GridViewEditEventArgs e) {GridView1.EditIndex = e.NewEditIndex;bind();}//删除protected void GridView1_RowDeleting(object sender, GridViewDeleteEventArgs e) {string sqlstr = "delete from 表where id='" +GridView1.DataKeys[e.RowIndex].Value.ToString() + "'";sqlcon = new SqlConnection(strCon);sqlcom = new SqlCommand(sqlstr,sqlcon);sqlcon.Open();sqlcom.ExecuteNonQuery();sqlcon.Close();bind();}//更新protected void GridView1_RowUpdating(object sender, GridViewUpdateEventArgs e) {sqlcon = new SqlConnection(strCon);string sqlstr = "update 表set 字段1='"+((TextBox)(GridView1.Rows[e.RowIndex].Cells[1].Controls[0])).Text.ToString().Trim() + "',字段2='"+((TextBox)(GridView1.Rows[e.RowIndex].Cells[2].Controls[0])).Text.ToString().Trim() + "',字段3='"+((TextBox)(GridView1.Rows[e.RowIndex].Cells[3].Controls[0])).Text.ToString().Trim() + "' where id='"+ GridView1.DataKeys[e.RowIndex].Value.ToString() + "'";sqlcom=new SqlCommand(sqlstr,sqlcon);sqlcon.Open();sqlcom.ExecuteNonQuery();sqlcon.Close();GridView1.EditIndex = -1;bind();}//取消protected void GridView1_RowCancelingEdit(object sender, GridViewCancelEditEventArgs e){GridView1.EditIndex = -1;bind();}//绑定public void bind(){string sqlstr = "select * from 表";sqlcon = new SqlConnection(strCon);SqlDataAdapter myda = new SqlDataAdapter(sqlstr, sqlcon);DataSet myds = new DataSet();sqlcon.Open();myda.Fill(myds, "表");GridView1.DataSource = myds;GridView1.DataKeyNames = new string[] { "id" };//主键GridView1.DataBind();sqlcon.Close();}}前台主要代码:... ...<asp:GridView ID="GridView1" runat="server" AutoGenerateColumns="False" CellPadding="4"ForeColor="#333333" GridLines="None"OnRowDeleting="GridView1_RowDeleting" OnRowEditing="GridView1_RowEditing"OnRowUpdating="GridView1_RowUpdating"OnRowCancelingEdit="GridView1_RowCancelingEdit"><FooterStyle BackColor="#990000" Font-Bold="True" ForeColor="White" /><Columns><asp:BoundField DataField="身份证号码" HeaderText="用户ID" ReadOnly="True" /><asp:BoundField DataField="姓名" HeaderText="用户姓名" /><asp:BoundField DataField="员工性别" HeaderText="性别" /><asp:BoundField DataField="家庭住址" HeaderText="家庭住址" /><asp:CommandField HeaderText="选择" ShowSelectButton="True" /><asp:CommandField HeaderText="编辑" ShowEditButton="True" /><asp:CommandField HeaderText="删除" ShowDeleteButton="True" /> </Columns><RowStyle ForeColor="#000066" /><SelectedRowStyle BackColor="#669999" Font-Bold="True"ForeColor="White" /><PagerStyle BackColor="White" ForeColor="#000066"HorizontalAlign="Left" /><HeaderStyle BackColor="#006699" Font-Bold="True" ForeColor="White" /></asp:GridView>3.GridView正反双向排序:(用到数据库视图DATAVIEW及GRIDVIEW的VIEWSTAT 类)效果图:点姓名各2次的排序,点其他也一样可以。