AT-95
- 格式:pdf
- 大小:67.01 KB
- 文档页数:1

小学上册英语第一单元自测题英语试题一、综合题(本题有100小题,每小题1分,共100分.每小题不选、错误,均不给分)1.How many colors are there in a rainbow?A. 5B. 6C. 7D. 82.The ancient Greeks practiced ________ (体育) during the Olympic Games.3. A _______ is a solution that cannot dissolve any more solute.4.My sister is a good ________.5.What is the capital of the United Arab Emirates?A. DubaiB. Abu DhabiC. SharjahD. AjmanB6.The _____ (青蛙) is an important part of the ecosystem.7.What is the capital of Uganda?A. KampalaB. NairobiC. KigaliD. Juba8.The chemical symbol for silver is _______.9.I like to _____ (swim) in summer.10.Many _______ have interesting facts and histories.11.How many hearts does an octopus have?A. OneB. TwoC. ThreeD. FourC12.The capital of Turkey is _____.13.The Earth's surface is composed of various geological ______ types.14.What is the term for a young female horse?A. FillyB. ColtC. FoalD. MareA15. A _____ (95) is a piece of land surrounded by water.16.The _____ (moon/star) shines at night.17.Which instrument is a string instrument?A. PianoB. FluteC. GuitarD. TrumpetC18.The ancient Romans used _______ to build their roads. (石头)19.She likes to swim in the ___. (lake)20. A ________ (植物适应性研究) can inform practices.21.What is the primary function of leaves?A. To absorb waterB. To make foodC. To support the plantD. To store nutrientsB22.My sister loves to __________ (帮助) with family projects.23.The chemical formula for calcium hydroxide is _______.24.The cake has ________ on top.25.I see a ___ in the sky. (plane)26.The trees in the _______ provide shade and shelter.27.The __________ (历史的完整性) is vital for accuracy.28.What is the capital of Peru?A. LimaB. SantiagoC. BogotaD. Quito29.The cake is _______ (用水果装饰的)。

95峰值计算公式95峰值计算公式是一种用于评估信号质量的公式,它可以帮助我们判断信号的峰值性能和信噪比。
本文将详细介绍95峰值计算公式的原理和应用。
我们来了解一下95峰值计算公式的定义。
95峰值是指在一段时间内,信号的峰值功率占总时间的95%以上。
峰值功率是指信号在一段时间内的最大功率值,它通常用来表示信号的强度。
而总时间则是指信号的持续时间。
那么,为什么要使用95峰值计算公式呢?这是因为,对于某些应用场景,我们更加关注信号的峰值性能,而不是平均性能。
例如,在无线通信中,我们更关注信号的最高峰值功率,因为它可以决定信号的传输距离和抗干扰能力。
因此,95峰值计算公式可以帮助我们评估信号的峰值性能,从而更好地设计和优化系统。
接下来,我们来看一下95峰值计算公式的具体表达式。
假设我们有一段时间内的信号功率数据,可以用P(t)表示,其中t表示时间。
那么95峰值可以通过以下公式计算得出:P95 = max(P(t)) * 0.95其中,max(P(t))表示信号功率数据的最大值。
通过这个公式,我们可以得到信号的95峰值功率。
在实际应用中,我们可以通过多种方式来获取信号功率数据。
例如,可以使用功率仪器进行测量,或者根据信号的电压值和阻抗来计算功率。
无论采用哪种方式,都需要保证数据的准确性和可靠性。
除了95峰值计算公式之外,还有其他一些与峰值性能相关的指标。
例如,峰均比(Peak-to-Average Power Ratio,简称PAPR)是用来描述信号峰值和平均功率之间的比值。
PAPR越高,表示信号的峰值性能越突出,这可能会导致系统在功率放大和传输过程中出现非线性失真。
在实际应用中,我们需要根据具体的需求来选择合适的指标。
如果我们更加关注信号的峰值性能,那么可以使用95峰值计算公式来评估信号的峰值功率。
而如果我们更加关注信号的动态范围和线性性能,那么可以使用PAPR等指标来评估信号的性能。
总结起来,95峰值计算公式是一种用于评估信号峰值性能的公式,它可以帮助我们判断信号的峰值功率和信噪比。
多功能助剂AMP-95产品简介:AMP-95是一种广为人知的多功能助剂,适用于所有类型的乳胶漆。
在配方中,AMP-95作为一种有效的共分散剂用来防止颜料的重聚集,同时,AMP-95可以有效地提高涂料的综合性能。
AMP-95(2-氨基-2-甲基-1-丙醇,含5%水)人们已广泛认识到AMP-95可以作为各种类型乳胶漆的多功能助剂。
在配方中用AMP-95作为强力共分散剂可以防止颜料再凝聚。
同时,AMP-95对漆层的所有性能贡献出显著的优越性。
作用原理:²静电斥力,当AMP分子中的亲水OH基团吸附在颜料表面(主要是无机颜料)时,在颜料表面形成NH3+电荷。
这种颜料的表面电荷,使颜料具有静电稳定作用。
²每一种颜料都有一个等电点,也称为(Zeta)电位。
在某一pH值时,电荷为0或中性。
提高PH值,即可偏离这等电点。
AMP能提高等电位,使颜料颗粒解絮凝。
氨水尽管也能起相同的作用,但是不稳定,主要原因是氨水十分易挥发。
时间越长,甚至引起颜料再次絮凝,使涂料质量下降。
²空间位阻稳定—AMP的分子量较低,空间位阻作用不十分显著。
但当和高分子量的表面活性剂拼用时,二者起到互补作用。
甚至在乳胶漆中的水挥发时,它还能有助于颜料的分散。
作用:研磨过程中加入AMP-95•与常用分散剂一同使用,减少分散剂的用量•使颜料的分散性达到最佳•减少气泡(通过减少分散剂的用量)•可以有效控制pH值•减低原材料成本混配过程中的AMP-95•提高增稠剂的性能•不需要氨水从而减小了涂料的气味•提高色浆的着色力AMP-95与涂料性能•提高耐擦拭性能和耐水性能•减少罐内腐蚀和瞬锈•有效减低涂料气味•挥发性有机化合物(VOC)的增加最少在研究乳胶漆配方时,需要综合考虑分散剂和表面活性剂的作用及其对油漆最终性能的影响。
正如所描述的,AMP-95可以减少许多常用涂料添加剂的用量,从而有效地减少原材料成本,同时又提高了涂料性能。
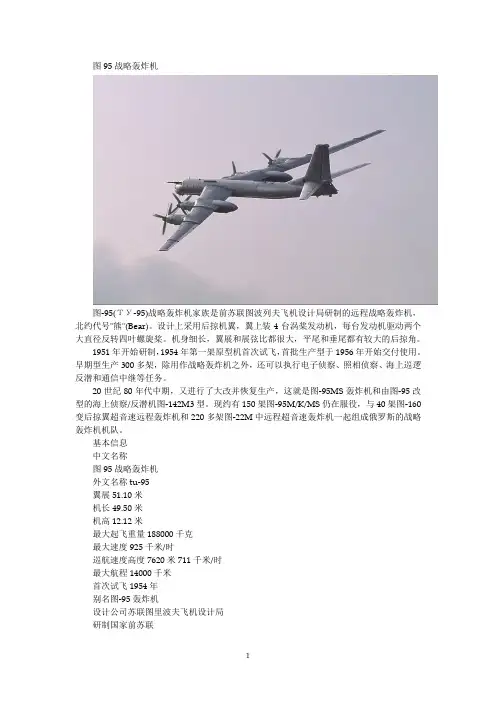
图95战略轰炸机图-95(ТУ-95)战略轰炸机家族是前苏联图波列夫飞机设计局研制的远程战略轰炸机,北约代号"熊"(Bear)。
设计上采用后掠机翼,翼上装4台涡桨发动机,每台发动机驱动两个大直径反转四叶螺旋桨。
机身细长,翼展和展弦比都很大,平尾和垂尾都有较大的后掠角。
1951年开始研制,1954年第一架原型机首次试飞,首批生产型于1956年开始交付使用。
早期型生产300多架,除用作战略轰炸机之外,还可以执行电子侦察、照相侦察、海上巡逻反潜和通信中继等任务。
20世纪80年代中期,又进行了大改并恢复生产,这就是图-95MS轰炸机和由图-95改型的海上侦察/反潜机图-142M3型。
现约有150架图-95M/K/MS仍在服役,与40架图-160变后掠翼超音速远程轰炸机和220多架图-22M中远程超音速轰炸机一起组成俄罗斯的战略轰炸机机队。
基本信息中文名称图95战略轰炸机外文名称tu-95翼展51.10米机长49.50米机高12.12米最大起飞重量188000千克最大速度925千米/时巡航速度高度7620米711千米/时最大航程14000千米首次试飞1954年别名图-95轰炸机设计公司苏联图里波夫飞机设计局研制国家前苏联最大载弹量25000千克平飞速度815千米/小时(最大)目录1发展沿革2技术数据3设计特点4主要型别5军事行动发展沿革.研发背景图95战略轰炸机图-95的研发始于1950年代,其原因是为了取代图-4,以及图-80(进化版的图-4),甚至更大型的图-85(图-4的精装版)。
因为它们均不足以符合轰炸任务的毁灭/杀伤要求,尤其图-85还无法与美国空军当时的全天候轰炸机相较长短,因此苏联空军高层在1950年对图波列夫设计局提出下列要求:轰炸机必须在不重复落地加油的情形下至少要具备8,000千米的航程;轰炸机必须至少能携载11,000千克的武器并且将它们倾倒在敌人的头上。
为了满足条件,图波列夫设计局改采用具有8片桨叶的库兹涅佐夫M型对转涡轮螺旋桨引擎,号称具备12,000轴马力(8948kW)。

ENGLISHMAGYARČeštinaHRVATSKISRPSKISIOVENČINAБЪЛГАРСКИМАКЕДОНСКИPOLSKIROMÂNÃOWNER’S MANUALNetwork Blu-ray Disc TM /DVD Home Cinema System MODELHB905PA (HB905PA, SB95PA-F/S/C/W)P/NO : MFL62863592Please read this manual carefully before operatingyour set and retain it for future reference.6Contents1Safety Information3 Cautions and Warnings2Preparation8 Introduction8 About the “” SymbolDisplay8 Symbols Used in thisManual9 Supplied Accessories9 Playable Discs11 File compatibility12 Regional Code12 AVCHD (Advanced VideoCodec High Defi nition)12 Certain SystemRequirements12 Compatibility Notes13 Remote control14 Front panel15 Rear panel 3Installation 16 Assemble the speakers 17 Speaker Connection 17 Attaching the speakers to the player 18 Positioning the system 19 Connecting to Your T V 19 HDMI Connection 20 What is SIMPLINK?21 Component Video Connection 21 Video Connection 22 Resolution Setting 23 Antenna connection 23 Connections with external device 23 AUX Connection 24 PORT . IN connection 24 OPTICAL IN 1/2 connection 25 HDMI IN 1/2 connection 26 Connecting to your Home Network 26 Wired network connection 27 Wired Network Setup 29 USB device connection 31 Settings 31 Adjust the Setup Settings 31 [DISPLAY] Menu 33 [LANGUAGE] Menu 33 [AUDI O ] Menu34 [L O CK] Menu35 [NETW O RK] Menu36 [O THERS] Menu37 Sound EffectRemote control (1)Use U/u to select [DISPLAY] option thenpress i to move to the second level.Use U/u to select the [Resolution] option then press ENTER () or i to move to the third level.5. Use U/u to select the desired resolutionthen press ENTER () to confi rm yourselection.You can enjoy the sound of your component with the analogue audio output jacks from the speakers of the system.You can enjoy the sound of your portable audio player from the speakers of the system. Connect the headphones (or line out ) jack of the portable audio player into the PORT. IN of this unit. And then select the [PORTABLE] option by pressing connectionYou can enjoy the sound of your component with the digital optical connection from theYou can enjoy the pictures and sound of your component with this connection.Connect the HDMI OUT jack of yourUse U/u/I/i to select the IP mode between [Dynamic] and [Static]. Normally, select [Dynamic] to allocate an IP address automatically.If you select [Test] and press ENTER ) at step 4 above, the network connection status is displayed on the screen.You can also test it on theFile loading may takes few minutes depending on the number of content stored in the USB storage device. Press ENTER () while [Cancel] is selected to stop loading.Select the other mode. And withdraw the USB device carefully.USB Connection - 2Use I/i to select the [Setup] and press ENTER (). The [Setup] menu appears. Use U/u to select a fi rst setup option, and press i to move to the second level.5. Use U/u to select a desired setting, andpress i or ENTER () to confi rm yourselection.[DISPLAY] MenuTV Aspect RatioSelect a TV aspect ratio option according to your TV type.[4:3 Letter Box]Select when a standard 4:3 TV is connected.[LANGUAGE] Menu [AUDIO] Menu[Speaker]Select a speaker that you want to adjust.[Volume]Adjust the output level of each speaker.[Distance]Adjust the distance between each speakerand the listening position.[Test/ Stop test tone]The speakers will emit a test tone.[OK]Confi rms the setting.[Cancel][LOCK] Menu The delay will vary depending on which digitalTV channel you are on. If you change channelyou may need to readjust the HD AV Sync.DRC (Dynamic Range Control)When a content encoded in Dolby Digital orDolby Digital Plus is playing back, you maywish to compress the dynamic range of theaudio output (the diff erence between theloudest sounds and the quietest ones). Thisallows you to listen to a movie at a lowervolume without losing clarity of sound. Set[DRC] to [On] for this eff ect.NOTE[NETWORK] Menu[OTHERS] MenuWhen you connect up to two devices, it appears as above.Select a fi le using U/u/I/i, and press B (PLAY) or ENTER () to play the fi le.NOTEPlayback functions described in this manual are not always available in every fi les and medium.2. Press u to highlight a marker number. UseI/i to select a marked scene that youwant to delete.2. Press I/i to skip the playback 15 secondsforward or backward. You can select apoint that you want to skip by pressing and holding I/i button.– Current title number/total number of titlesChapter – Current chapter number/total number of chaptersTime – Elapsed playing time/Total playback timeAudio – Selected audio language or channel/u/I/i to adjust the [Picture Mode] options.Select [Default] option then press ENTER ) to reset the all adjustments.Select [Movie] using I/i, and press ENTER ().Select the device using I/i, and press ENTER ().When you connect up to two devices, it appears as above.Select a fi le using U/u/I/i, and press PLAY or ENTER () to play the fi le.Press ENTER () again to deselect the subtitle fi le. Selected subtitle fi le will be displayed when you play the movie fi le.NOTEIf you press x (STOP) while playback, the subtitle selection is cancelled.This function may not work in the [Home Link] feature.Press RETURN(O) to exit the On-Screen display.Select [Photo] using I/i, and press ENTER ().Select the device using I/i, and press ENTER ().When you connect up to two devices, it appears as above.Select a fi le using U/u/I/i, and press ENTER () to view the photo.。
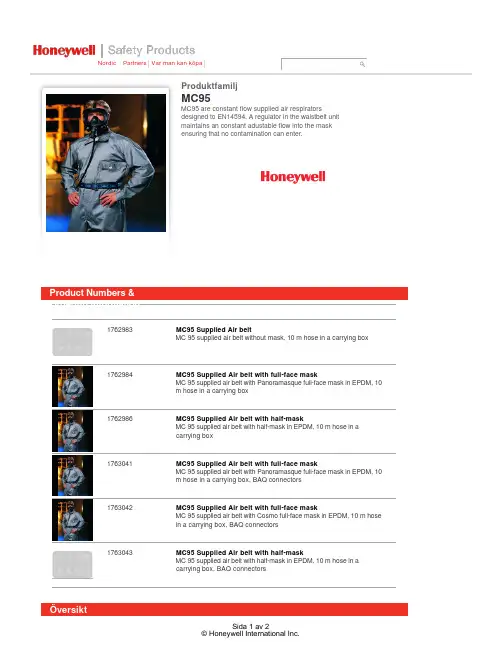
Nordic PartnersVar man kan köpa1762983MC95 Supplied Air beltMC 95 supplied air belt without mask, 10 m hose in a carrying box1762984MC95 Supplied Air belt with full-face maskMC 95 supplied air belt with Panoramasque full-face mask in EPDM, 10m hose in a carrying box1762986MC95 Supplied Air belt with half-maskMC 95 supplied air belt with half-mask in EPDM, 10 m hose in acarrying box1763041MC95 Supplied Air belt with full-face maskMC 95 supplied air belt with Panoramasque full-face mask in EPDM, 10m hose in a carrying box, BAQ connectors1763042MC95 Supplied Air belt with full-face maskMC 95 supplied air belt with Cosmo full-face mask in EPDM, 10 m hosein a carrying box, BAQ connectors1763043MC95 Supplied Air belt with half-maskMC 95 supplied air belt with half-mask in EPDM, 10 m hose in acarrying box, BAQ connectorsProduct Numbers &Ordering Information ÖversiktMC95ProduktfamiljMC95 are constant flow supplied air respiratorsdesigned to EN14594. A regulator in the waistbelt unitmaintains an constant adustable flow into the maskensuring that no contamination can enter.MC95 - EMEAViktigaste egenskapernaPressure regulator between 4 and 8 bars or 58-116 PSI for adaptation to different types of industrila air networks.Flow regulation in the mask for superior comfort.Rekommenderade branscher/rekommenderat användningsområdeKemi Olja och gas LäkemedelRiskerKontamineringFöreskrifterEN14594 - Respiratory protective devices - Continuous flow compressed air line breathing apparatusMaximum flow rate300 l/minOperating air pressure4 bars (58 psi) to 8 bars (116 psi)ConnectionsAQR06 or RBE6Head pieceHalf-mask or full-face masksRefer to user manual© Honeywell International Inc.。


俄罗斯T 95主战坦克俄罗斯正在研制中的下一代主战坦克T-95(Chiorny Oriol),将完全吸收现役T-90和T-80U型坦克的各种优点,并赋予更多特种性能。
T-95的重量为50吨级(和中国T-98相同),装备152MM超大口径火炮。
T-95是一型按全新概念设计的采用大量苏联最新技术制造的第四代坦克。
俄T-95主战坦克-研制背景及经过俄T-95主战坦克时间倒退到80年代中期,当时西方竭尽全力对刚服役的第三代主战坦克进行改进,企图在质量上赢得对苏联的优势。
苏联毫不示弱,各坦克设计局纷纷推出T-64、72和80三型主战坦克的改进型号。
军方分析后认为,上述改良型的总体性能仍不能对西方最新一代主战坦克构成绝对优势。
为此苏陆军高层决定发展全新一代的主战坦克。
1986年,设在莫斯科的装甲坦克总局奉命正式提出了新一代主战坦克的战技要求,莫洛佐夫、下塔吉尔等设计局立即闻风而动,投入到研制新一代主战坦克的工作中去。
位于下塔吉尔的车辆设计局当时因为成功研制了T-72,除大量装备苏军外,还远销十多个国家并在一些国家授权生产。
早在苏联正式下达研制第四代坦克之前,该设计局就在做着准备工作。
和另两家单位不同,车辆设计局野心更大一些,在研制方案中,甚至已有出口型的简化方案。
当时车辆设计局的方案被称作"195"方案(就是现在被称作T-95,并被俄国防部公开承认存在的型号),是无人炮塔的方案。
与其它设计局的设计相比,车辆设计局的似乎更简单些,车体居然是从T-72上改进来的,炮塔也是T-72炮塔的优化形。
乘员串列位于车体内部,其中驾驶员在车体前部中间,车长位于其后面。
火炮为一门145毫米的滑膛炮,动力系统也为传统的T-72柴油机的升级型。
很显然,这是一型用于取代国内外T-72的项目,成熟的技术加较为先进的技术,这样做可使项目更顺利些,也使研制费用和今后的生产与维护费降低不少。
1995年,也就在T-90公开出现的第二年,有人就在离莫斯科西南50千米的库宾卡试验场发现"黑鹰"主战坦克与T-95在进行各项试验。
HK94的土耳其远亲:MKE AT-94A2 9mm冲锋枪作者:暂无来源:《轻兵器》 2010年第21期聂春明MKE是土耳其机械化学工业公司的缩写,其前身可以追溯到15世纪奥斯曼土耳其帝国时的皇家兵工厂,当时负责为奥斯曼土耳其帝国炮兵军团提供火炮及弹药。
历经多次重组改制后,1950年改用现在的名称。
该公司是土耳其最大的国营军工企业,在全国共设12家分厂,主要为土耳其军队提供后勤物资及武器装备,产品包括枪械、火炮、火箭及各种弹药等。
由其生产制造、供给美国市场的AT-94A2 9mm冲锋枪由德国HK94冲锋枪改制而成,可说是HK94的土耳其远亲——从外观和功能上看,土耳其版MKEAT-94A2与德国HK公司MP5冲锋枪的民用版HK94区别不大,但美国战术进出口公司(ATI)为将其顺利引进至美国,在机械结构和功能上进行了一些改动。
A T - 9 4 A 2采用的枪托与传统的HK 9 4和MP 5相比有所不同,其枪托前端更细,是在0.223英寸HK93步枪(HK33民用版)所用枪托的基础上改进而来。
一眼看去,除枪托外,AT-94A2冲锋枪的外观与HK94相比并无特别之处。
与HK94一样,为保证符合美国联邦枪械法第一法案的规定,即具有抵肩射击功能的武器,枪管必须不短于16英寸(406mm),故该枪配置了长16.25英寸(413mm)的枪管,相形之下,护手略显纤细和短小。
尽管这款产自土耳其的改型枪在制造工艺上与正宗的德制同门相比略显粗糙,但对那些喜欢MP5冲锋枪却无法合法拥有的爱好者而言,AT-94A2是一个不错的替代品。
HK94“变形记”与HK94一样,AT-94A2只能进行单发发射,采用半自由枪机式自动方式,滚柱延迟开锁式闭锁方式,使用9×19mm手枪弹。
该枪弹膛开有纵向槽,使弹壳向后运动更顺畅,以减小抽壳阻力并提高后坐速度。
枪管内壁有6条导程为254mm的右旋膛线。
该枪同样采用转鼓式表尺,表尺上有4个觇孔式照门,可通过旋转表尺以装定不同的射程。
I S A95介绍1、什么事ISA95ISA 95 简称S95,国外也有称作SP95。
SP95是仪表、系统和自动化协会(ISA) 的一个委员会。
我们用SP95代表这个委员会,SP 标示标准项目(Standard Project),而95代表是ISA 的地95个标准项目,而且最巧合的是委员会的第一次会议在年召开。
委员会标准的通过过程是所有委员会的投票代表必须在标准通过前同意,而标准的开发过程是由ANSI(美国国家标准协会) 监督并保证其过程是正确的。
此委员会开发一系列标准称作SP-95“企业系统与控制系统集成Enterprise - Control System Integration”标准。
2、为什么要S95年由领先的MES 软件供货商组成的MESA International 则是非盈利性组织,旨在提供一个制造业技术的论坛,关注于现代制造业的MES 和相应产品及服务。
而年发起的委员会则负责批次控制部分的标准建立。
3、S95 模型概述S95 标准定义了企业商业系统和控制系统之间的集成,主要可以分成三个层次,即企业功能部分,信息流部分和控制功能部分。
企业功能基于Purdue 大学当初建立的CIM 功能模型;信息流部分基于Purdue 大学的数据流模型图和S88 批次标准,包括产品定义、生产能力、生产计划和生产性能 4 种信息流;而其控制功能则基于Purdue 和MESA 的功能模型。
SP95 的不同部分对不同的层次的功能分别定义,第一层企业级的控制域定义在S95 的第一部分,第二层次信息交换方面,4种信息流交换的分类和对象模型也定义在第一部分,而对象模型的属性定义在第二部分,而底层的生产制造和控制层的域也定义在第一部分。
而S95 的第三部分则对相应的生产活动做出定义。
S95 的第三部分定义了企业生产质量、生产和维护方面的常规活动,从高度上指出了各活动之间的数据流,同时定义了8种基本生产活动:定义管理,资源管理,生产详细计划,生产部署,生产执行,跟踪,分析和数据采集。
95C MULTIPLE DISC BRAKE SERVICE AND REPAIR MANUAL95C SERVICE MANUALSPRING-APPLIED, HYDRAULICALLY-RELEASED, MULTIPLE-DISC BRAKEThis manual will assist in disassembly and assembly of major components for all Model 95C Brakes. Item num b ers, in d i c at e d in paren-theses throughout this manual, refer to the Eskridge model 95C ex p lod e d parts break d own draw i ngs. In d i v id u a l customer speci fi cations (mounting case, output shaft, brake assembly, etc.) may vary from exploded drawing and standard part numbers shown. If applicable, refer to individual customer drawing for details.The Model 95C Series Eskridge brake is a spring applied, hydraulically released, multiple disc parking brake. The 95C is designed for "failsafe" type operations. Temperature, wear, and contamination of the friction surfaces will affect the per f or m ance of the brake and should be taken into consideration when specifying a required torque rating. Care should be taken to avoid damaging the splines or mounting surfaces during installation. The model 95C is not intended for use in dynamic applications. Please contact Eskridge Sales Dept. about any fl ow through applications. Brake operation should be tested during normal service operation. Brake inspection and service should be part of the normal service and maintenance schedule of the equipment or vehicle in which it is used. Any loss of holdng torque requires the removal, inspection and replacemnt of suspect components.SPECIFICATIONSMaximum release pressure 3,000 PSI* Maximum operating temperature 170° F Maximum continous pressure 3,000 PSI* Volume of oil to release brake .5 cu. in.Maximum speed at full release pressure 3,900 RPM Approximate weight 42 lbs.Shaft splines 30° involute, fl at root side fi t per ANSI B92.1 internal - class 7, external - class 5Breakaway torque may vary +/- 10% from specified ratings. Use only mineral base hydraulic oil to release brake.*5,000 PSI with ‘E’-Extra Pressure optionTorque ratings are based on standard friction material in ATF-F fluid media or dry bronze at (0) PSI back pres s ure. Break away torque may vary+/-10% from specified ratings. The “W” wet option applies to bronze friction discs only and is furnished with mineral base hy-draulic oil. Torque rating for wet bronze brakes will vary de p end i ng upon the type of oil used. Use only mineral base hydraulic oil for release of brake. For flow-thru option “F”, use only fluids that are com p at i b le with internal seals. Use of fluids other than specified above will alter torque values.WARNING: While working on this equipment, use safe lifting procedures, wear adequate clothing and wear hearing, eye and respiratory protection.!TORQUE CODE AND OPTIONS9 5 C 4 A 2 B 03 7 - WOptions= F=Flow-thru Ports in housing B=Bronze Friction Discs (Dry)Spring Color Code BW=Bronze Friction Discs (Wet) (Hyd. Oil) G=Green E=Extra System Pressure, Up to 5,000 PSI R=Red Quantity of Separator Plates Y=Gold Quantity of SpringsThread Size SAE Grade 5SAE Grade 8Dry Lubed Dry Lubed 3/8-16302345321/2-137555110805/8-111501102201703/4-10260200380280Torque in Ft-LbsGear Drive95C Brake MotorHydraulicGasketGas k et/O-ringInstallationNOTE: Before beginning in s tal l a t ion pro c e d ures, visually in-s pect brake mounting flang e s and shaft splines for damage during shipping.1) Position brake and motor for mounting and to orient the bleedand release ports as required. If mounted with shaft horizon-tal, the bleed port should be at top. It might be necessary to release brake before it can be rotated to align mounting holes. If so, follow in s truc t ions in steps 5 and 6 prior to apply-ing release pres s ure!2) Use only SAE grade 5 (or better) fas t en e rs for mount i ngbrake and motor.Disassembly1) Remove any plugs and fittings from the brake pres s ure andbleed ports. Drain, or blow out, as much hydraulic oil as possible from the brake into a suitable container for proper disposal.2) Place brake on stable work platform, shaft down. Support thebrake so it won't fall over.3) Remove the four socket head cap screws ( 8) from input endof brake. The capscrews and cover (2) are under spring load. The capscrews should be loos e ned grad u a l l y and uni-formly.4) Remove cover. This will expose the internal com p o n ents ofthe brake. The case seal o-ring (17) will be attached to the cover pilot. Inspect the o-ring and replace with a new one if worn or damaged.5) Remove thrust washer (4).6) Note the color, number, and spacing of the springs (10) thenremove them from piston (6). Inspect springs and replace with new ones if damaged, broken or dis c ol o red from heat.7) Support the brake, with shaft up, in such a way that the pistoncan be pushed out the bottom. Two pairs of stacked 2 x 6 wood blocks work well.8) Using a soft-faced hammer, drive the shaft (5) and pistondown out of the case.9) Note arrangement of friction discs (11), sep a r a t or plates (12),and spacer (3).10) Remove friction discs, separator plates and spacer. Fric t iondiscs should be replaced with new ones if oil soaked (dry brakes only). Any friction discs or sep a r a t or plates that are dam a ged, warped, or excessively worn should be re p laced with new ones.11) Minimum usable stack height, not including the spac e r, is1.650 inches. If the stack of friction discs and separatorplates is less than this they should be re p laced.12) Inspect brake shaft splines and bearing journals for ab n or m alwear or damage.13) Remove o-rings (15 & 16) and back-up rings ( 13 & 14) frompiston. Replace with new ones if worn or dam a ged.NOTE: Standard o-rings for 3,000 PSI are black nitrile. Option ‘E’ Extra Pressure o-rings for 5,000 PSI system presurre are light yellow or cream colored urethane.14) If damaged, the oil seal (18) and bearing (7) can be removedand replaced. Check for wear spots or nicks on the sealing lip of oil seal. Rotate inner race of bearing: rotation should be smooth and without ex c ess drag.AssemblyNOTE: Parts must be clean and dry before as s em b ly. Vi s u a l l y inspect components for damage and abnormal wear. Do not use damaged or worn parts.1) Place brake case ( 1) on a stable work platform, bearing sidedown. If the oil seal (18) and bearing ( 7) are not being re-placed skip to step number 4.2) Install seal from either side of case, pressing until top of sealis flush with case. Open side of seal should be facing inside of brake. A seal in s tal l a t ion tool is rec o m m end e d.3) Press in bearing ( 7) from outside. Press against the bearingouter race until the bearing is fully seated in the case. A bear-ing in s tal l a t ion tool is recommended.4) Support the case in such a way that allows room for the shaft( 5) to protrude out the bottom. Two pairs of stacked 2 x 6 wood blocks work well.5) Push the shaft downward through oil seal and bearing untilshaft shoulder is seated against bearing.6) Install spacer (3).7) Install separator plates (12) and friction discs (11) in exactlythe same order as they were removed. There should be a separator on the top and bottom of the stack. Do not placea friction disc next to the piston. Be careful not to con-t am i n ate the friction disc or sep a r a t or plate surfaces with dirt, grease, or fluid other than the brake was designed to use.8) If replacing piston o-rings (15 & 16) and piston back-up rings(13 & 14), be sure o-rings are nearest each other with back-up rings to the outside of the piston (6). Lightly lubricate pis-ton bores and o-rings. Take care not to get lubricant onto friction pack.9) Gently slide piston into case until larger o-ring touch e s case.Using a light to medium duty press, push piston com p lete l y into bore. This will squeeze the o-rings and back-up rings and set piston against friction pack.10) Place springs (10) into spring pockets in piston. Arrangesprings in a symmetrical pattern.11) Install thrustwasher (4).12) For optional double bearing brakes, install bearing into cover(2).13) Install case seal o-ring (17) onto pilot of cover.14) Set cover on top of piston, springs, and input end of shaft.15) Apply a non-hardening thread-locking compound to eachcover cap screw (8) and start each one into the case by hand. Tighten cover cap screws 1/2 turn at a time in a criss-cross pattern until cover is tight against the case. Tight e n to the torque shown in the chart on page 3. A light to medium duty press can be used to push the cover down on to the case so the cover bolts can be installed more easily. 16) The brake is now ready for testing of fit, function and releasepressure. Use only mineral based hydraulic oil to test and operate Eskridge multiple disc brakes. Bleed brake beforepres s ur i z i ng. To test release pressure, be sure one of the two hollow hex plugs (9) is installed. Connect a hydraulic power source (either a hand pump or port-a-power) to the other brake port. Bleed air from brake, then pressurize the brake slowly to the ad v er t ised release pressure, both initial and full. As you pressurize the brake, rotate the brake shaft.The brake shaft should be able to turn at the advertised ini-tial release pressure (+ or - 25 PSI). There will be drag on the shaft. Increase the pressure slowly until the shaft spins freely, this is the full release pressure. As you pressurize the brake, look for signs of leaks which would indicate that the o-rings or back-up rings may have been damaged during as-sembly.NOTE: Maximum operating pressure is 3,000 PSI with stan-dard nitrile o-rings on pistion and 5,000 PSI with ‘E’ option ure-thane o-rings. Op e r a t ion above this pressure is detrimental to the life of the brake and could be dangerous.THE BRAKE IS NOW READY FOR USE.95C Repair KitsDue to the many com b i n a t ions of torques and release pres s ures avail a ble for the 95C, it is im p os s i b le to de t ail each style and supply a re p air kit for each individual mod e l. The in f or m a t ion listed in this manual is rep r e s en t a t ive of all 95C brakes. The repair kits listed below will work with all com b i n a t ions of torque vs. release pres s ure, input mountings and friction plates. It is entirely possible to have "extra" parts left over from the repair kits after you have complete the repair or maintenance. If you are not sure about what is required for your brake and its confi guration, please contact Eskridge sales or en g i n eer i ng de p art m ent.Friction Disc Kit 95-016-249101-288-0072 Friction Disc, Bronze (8) Separator Plate Kit 95-016-250101-288-0082 Sep a r a t or Plate (9)Seal Kit - Standard 95-016-118101-400-0191 Back-up Ring, Piston (1)01-400-0201 Back-up Ring, Piston (1)01-402-0601 O-Ring, Piston (1)01-402-0611 O-Ring, Piston (1)01-402-0621 O-Ring, Case Seal (1)01-402-0010 O-Ring, Mtr.,"C" (1)01-402-0220 O-Ring, Mtr.,"B" (1)01-405-0561 Shaft Seal (1)90-004-1061 Gasket, SAE"A" (1)90-004-1091 Gasket, SAE"B"(2bolt) (1)90-004-1391 Gasket, SAE"C"(4bolt) (1) Master Rebuild Kit - Standard 95-015-324195-016-2491 Friction Disc Kit, 95C (1)95-016-1181 Seal Kit, 95C (1)01-100-0221 Bearing (1)95-004-1041 Thrust Washer (1) Master Rebuild Kit - Double Bearing Option 95-015-325195-016-2491 Friction Disc Kit, 95C (1)95-016-1181 Seal Kit 95C (1)01-100-0221 Bearing (1)01-100-0231 Bearing (1) Option ‘E’-Extra Pressure Option (5,000 PSI) KitsSeal Kit - High Pressure 95-016-1211 Same as standard seal kit but substitute:01-402-0870 for 01-402-060101-402-0880 for 01-402-0611Master Rebuild Kit - High Pressure 95-015-3291 Same as standard master rebuild kit but substitute:95-016-1211 for 95-016-1181Master Rebuild Kit - Double Bearings - High Pressure95-015-3301 Same as standard master rebuild kit - double bearingsbut substitute:95-016-1211 for 95-016-1181Eskridge Product WarrantyESKRIDGE, INC. (“Eskridge”) warrants to its original purchaser (“Customer”) that new component parts/units (“Units”) sold by Eskridge will be free of defects in material and workmanship and will conform to standard specifications set forth in Eskridge sales literature current at the time of sale or to any custom specifications acknowledged by written Customer approval of drawings, SUBJECT TO THE FOLLOW-ING QUALIFICATIONS AND LIMITATIONS:1. Prior to placing Units in service, the Customer shall provide proper storage such that foreign objects (e.g., rain or debris) cannotenter any Units via entry ports which are normally closed during operation.2. The Customer must notify Eskridge in writing of any claim for breach of this warranty promptly after discovery of a defect. The war-ranty period shall commence when a unit is placed in service and shall expire upon the earlier ofa. the expiration of twelve (12) months from the date of Commencement of Service (as defined in Paragraph 4)b. the completion of one thousand (1000) hours of service of the Unitsc. the expiration of six (6) months after the expiration of any express warranty relating to the first item of machinery or equipmentin which the Units are installed or on which it is mounted, ord. the installation or mounting of the Units in or on an item of machinery or equipment other than the first such item in which theUnits are installed or on which the Units are mounted.3. Units shall be deemed to have been placed in service (the “Commencement of Service”) at the time the machinery or equipmentmanufactured or assembled by the Customer and in which the Units are installed or on which the Units are mounted is delivered to the Customer’s dealer or the original end-user, which ever receives such machinery or equipment first.4. This warranty shall not apply with respect to Units which, upon inspection by Eskridge, show signs of disassembly, rework, modifica-tions, lack of lubrication or improper installation, mounting, use or maintenance.5. Eskridge makes no warranty in respect to hydraulic motors mounted on any Units. Failure of any such motor will be referred to themotor manufacturer.6. Claims under this warranty will be satisfied only by repair of any defect(s) or, if repair is determined by Eskridge in its sole, absoluteand uncontrolled discretion to be impossible or impractical, by replacement of the Units or any defective component thereof. No cash payment or credit will be made for defective materials, workmanship, labor or travel. IN NO EVENT SHALL ESKRIDGE BE LI-ABLE FOR INCIDENTAL OR CONSEQUENTIAL DAMAGES OF ANY KIND OR NATURE, FOR WHICH DAMAGES ARE HEREBY EXPRESSLY DISCLAIMED.7. From time to time, Eskridge may make design changes in the component Units manufactured by it without incorporating suchchanges in the component Units previously shipped. Such design changes shall not constitute an admission by Eskridge of any defects or problems in the design of previously manufactured component Units.8. All freight charges on Units returned for warranty service are the responsibility of the Customer.Warranty Return Policy1. Any part/Unit(s) returned to Eskridge must be authorized by Eskridge with an assigned return (CSR) number.2. All Units shall be returned freight prepaid.3. Any Units qualifying for warranty will be repaired with new parts free of charge (except for freight charges to Eskridge as providedabove).4. If Units are found to be operable, you have two options:a. The Units can be returned to you with a service charge for inspection, cleaning, and routine replacement ofall rubber components and any other Units that show wear;b. We can dispose of the Unit(s) at the factory if you do not wish it to be returned.NOTE: Any order of Units by customer shall only be accepted by Eskridge subject to the terms stated herein. Any purchase order forms used by Customer (to accept this offer to sell) which contain terms contrary to, different from, or in addition to the terms herein shall be without effect, and such terms shall constitute material alteration of the offer contained herein under K.S.A 84-2-207 (2)(b), and shall not become part of the contract regarding the sale of the Units.The foregoing warranty is the sole warranty made by Eskridge with respect to any Units and is in lieu of any and all other warranties, expressed or implied. There are no warranties which extend beyond the description on the face hereof without limiting the generality of the foregoing, Eskridge expressly disclaims any implied warranty of merchantability or fitness for any particular purpose, regardless of any knowledge Eskridge may have of any particular use or application intended by the purchaser. The suitability or fitness of the Units for the customer’s intended use, application or purpose and the proper method of installation or mounting must be determined by the customer.ESKRIDGE PRODUCTS Planetary Gear DrivesSERIES MODELS TORQUE RATING (IN-LB) MAX. INTERMITTENT2020B, 20P, 20LB, 20LP20,0002828B, 28P, 28M, 28LB, 28LP50,0005050K/L, 50LG, 50N50,0006560B, 60E, 60L60,000100100E100,000105105E100,000130130130,000150150150,000250250K/L, 251K/L, 252K/L, 253K/L250,000600600K/L600,0001000100K/L1,000,000Multiple Disc BrakesSERIES FEATURES TORQUE RATING (IN-LB) 90B SAE B TO 4,80090BA SAE B, ADJUSTABLE TORQUE TO 4,80092B SAE B, LOW PROFILE TO 2,80093FOR NICHOLS MOTORS TO 6,10095C SAE C TO 12,00095W SAE C WHEEL MOUNT TO 21,00098D SAE D TO 25,000Planetary Auger Drives, Anchor Drives & Diggers SERIES MODELS TORQUE RATING (FT-LB) D501500, 2500 & 50001,500 - 5,00076BA & BC, 2-SPEED8,000 - 12,50077BA, BC & BD6,000 - 12,5007835 & 48, 2-SPEED9,000 - 12,5007538 & 51, 2-SPEED16,500 - 20,000D600D60050,000D1000D100083,000P. O. Box 875 1900 Kansas City Road Olathe, KS 66051Phone (913) 782-1238 Fax (913) 782-4206 ********************* 。
My Exciting Adventure at the Theme Park Last summer, my family and I embarked on a thrilling escapade to the theme park. The moment we arrived, the vibrant colors, towering roller coasters, and cheerful music filled me with anticipation.Our first stop was the Ferris wheel, where we soared above the park, admiring the panoramic view below. The gentle rise and fall of the gondola gave us a bird's-eye perspective of the entire park, igniting my excitement for the rides ahead.Next, we ventured onto the roller coaster. The click-clack of the chain lift leading to the peak was both terrifying and exhilarating. As we plummeted down the first drop, my heart leaped into my throat, followed by a rush of wind and screams of delight.We also enjoyed the water rides, getting soaked on the log flume, laughing as we splashed down into the cool water. The carousel was a nostalgic pause in our action-packed day, a gentle sway amidst the whirlwind of thrills.A highlight of the day was the interactive 4D movie experience. With seats that vibrated and sprayed water, we felt like we were part of the adventure, dodging lasers and soaring through space alongside the characters on screen.Amidst the thrill rides and attractions, we relished the array of treats from cotton candy to ice cream, adding a sugary sweetness to our day.As the sun began to set, we gathered around the dazzling fireworks display. The bursts of light against the dark sky were a fitting finale to our extraordinary day at the theme park. Reflecting on the day, I realized that besides the fun and excitement, it was the shared laughter and memories with my family that made this experience truly unforgettable.。
上海红宇化工科技有限公司
PVC专用抗氧化剂Antioxidant95
Antioxidant95为白色结晶粉末主要用作PVC抗氧剂,可广泛用于各种耐高温PVC制品当中,改善抗氧化和老化性能。
产品粒度细、色泽洁白、聚合度高、分散性优良。
Antioxidant95以塑料袋包装,25KG/包,为防止日晒雨淋,应存放于通风、干燥库房内。
技术指标:
名称Antioxidant95
指标
外观白色粉末
纯度不小于99%
结晶温度不小于156℃
加热减量小于0.25%
灰份小于1%
以上信息就我们所知,是准确无误的。
但由于客户使用目的或操作条件可能超出我们所能控制的范围,因此,无论结果如何,本公司不对其承担任何责任。
本公司不对其所销售的产品以及其相关技术信息提供任
何担保,也不允许利用它们来侵犯他人知识产权。
上海红宇化工科技有限公司
电话:021-********传真:021-********
地址:上海市青浦区沪青平公路5646号3幢2层。