整合Flex和Java-配置篇
- 格式:pdf
- 大小:903.71 KB
- 文档页数:11


BlazeDS初始化时用于动态创建services, destinations, and adapters。
SpringRemotingDestinationBootstrapService扩展AbstractBootstrapService。
SpringRemotingDestinationBootstrapService 自动导出包含"@Service标注及以FlexService结尾"的Spring Bean为RemoteObject。
@SuppressWarnings("all")public class SpringRemotingDestinationBootstrapService extends AbstractBootstrapService {public static final String DEFAULT_INCLUDE_END_WITH_BEANS = "FlexService";private static Logger logger =LoggerFactory.getLogger(SpringRemotingDestinationBootstrapService.cla ss);private String destChannel;private String destSecurityConstraint;private String destScope;private String destAdapter;private String destFactory;private String serviceId;private String includeEndsWithBeans;@Override/***初始化入口*/public void initialize(String id, ConfigMap properties) { serviceId = properties.getPropertyAsString("service-id", "remoting-service");destFactory = properties.getPropertyAsString("dest-factory", "spring");destAdapter = properties.getProperty("dest-adapter");destScope = properties.getProperty("dest-scope");destSecurityConstraint =properties.getProperty("dest-security-constraint");destChannel = properties.getPropertyAsString("dest-channel", "my-amf");includeEndsWithBeans =properties.getPropertyAsString("includeEndsWithBeans",DEFAULT_INCLUDE_END_WITH_BEANS);Service remotingService = broker.getService(serviceId);if (remotingService == null)throw createServiceException("not found Service with serviceId:" + serviceId);createSpringDestinations(remotingService);}private ServiceException createServiceException(String message) {ServiceException ex = new ServiceException();ex.setMessage(message);return ex;}/***将Spring的Service Name自动定义为destination*/private void createSpringDestinations(Service remotingService) { WebApplicationContext wac = WebApplicationContextUtils.getWebApplicationContext(broker.getServletContext());List<String> addedBeanNames = new ArrayList();for (String beanName : wac.getBeanDefinitionNames()) {Class type = wac.getType(beanName);logger.debug("{}: {}", new Object[]{beanName,type.getName()});boolean isCreateSpringDestination = !type.isAnnotationPresent(com.grgbanking.platform.core.flex.NoneRemoti ngObject.class)|| beanName.endsWith(includeEndsWithBeans) || isCreateDestination(beanName, type);if (isCreateSpringDestination) {createSpringDestination(remotingService, beanName);addedBeanNames.add(beanName);}}("[Auto Export Spring toRemotingDestination],beanNames={}", addedBeanNames);}protected boolean isCreateDestination(String beanName, Class type) {return false;}/** <!-- 动态生成的配置内容 --> <destination id="sampleVerbose"><channels> <channel* ref="my-secure-amf" /> </channels> <adapter ref="java-object" /> * <security> <security-constraint ref="sample-users" /> </security> * <properties> <source>pany.SampleService</source>* <scope>session</scope> <factory>myJavaFactory</factory></properties>* </destination>*/protected void createSpringDestination(Service service, String destinationId) {flex.messaging.services.remoting.RemotingDestinationdestination = (flex.messaging.services.remoting.RemotingDestination) service.createDestination(destinationId);destination.setSource(destinationId);destination.setFactory(destFactory);if (destAdapter != null) {destination.createAdapter(destAdapter);}if (destScope != null) {destination.setScope(destScope);}if (destSecurityConstraint != null) {destination.setSecurityConstraint(destSecurityConstraint);}if (destChannel != null) {destination.addChannel(destChannel);}service.addDestination(destination);}2)修改SpringFactory并扩展FlexFactory根据destination的id,将Flex的destination映射为Spring的Beanpublic class SpringFactory implements FlexFactory {private static final String SOURCE = "source";/***This method can be used to initialize the factory itself.It is called*with configuration parameters from the factory tag which defines the id*of the factory.*/public void initialize(String id, ConfigMap configMap) {}/***This method is called when we initialize the definition of an instance*which will be looked up by this factory.It should validate that the*properties supplied are valid to define an instance.Any valid properties*used for this configuration must be accessed to avoid warnings about *unused configuration elements.If your factory is only used for *application scoped components,this method can simply return a factory*instance which delegates the creation of the component to the*FactoryInstance's lookup method.*/public FactoryInstance createFactoryInstance(String id, ConfigMap properties) {SpringFactoryInstance instance = new SpringFactoryInstance(this, id, properties);instance.setSource(properties.getPropertyAsString(SOURCE, instance.getId()));return instance;} // end method createFactoryInstance()/***Returns the instance specified by the source and properties arguments.*For the factory,this may mean constructing a new instance, optionally*registering it in some other name space such as the session or JNDI, and*then returning it or it may mean creating a new instance and returning *it.This method is called for each request to operate on the given item*by the system so it should be relatively efficient.*<p>*If your factory does not support the scope property,it report an error*if scope is supplied in the properties for this instance.*/public Object lookup(FactoryInstance inst) {SpringFactoryInstance factoryInstance = (SpringFactoryInstance) inst;return factoryInstance.lookup();}/***Spring工厂实例,执行实际的查找动作.**@author yrliang**/static class SpringFactoryInstance extends FactoryInstance { SpringFactoryInstance(SpringFactory factory, String id, ConfigMap properties) {super(factory, id, properties);}@Overridepublic String toString() {return"SpringFactory instance for id="+ getId() + " source=" + getSource() + " scope=" + getScope();}@Overridepublic Object lookup() {Logger logger =LoggerFactory.getLogger(SpringFactory.class);ApplicationContext appContext = WebApplicationContextUtils .getWebApplicationContext(flex.messaging.FlexContext.getServletCo nfig().getServletContext());String beanName = getSource();try {logger.debug("lookup(): bean id=" + beanName);//flex.messaging.FlexContext.getHttpRequest().getSession().getAttribute (arg0);return appContext.getBean(beanName);} catch (NoSuchBeanDefinitionException nexc) {ServiceException e = new ServiceException();String msg = "Spring service named '"+ beanName + "' does not exist.";e.setMessage(msg);e.setRootCause(nexc);e.setDetails(msg);e.setCode("Server.Processing");logger.error("",nexc);throw e;} catch (BeansException bexc) {ServiceException e = new ServiceException();String msg = "Unable to create Spring service named '" + beanName + "' ";e.setMessage(msg);e.setRootCause(bexc);e.setDetails(msg);e.setCode("Server.Processing");logger.error("",bexc);throw e;}}}}3)配置service-config.xml<?xml version="1.0" encoding="UTF-8"?><services-config><factories><factory id="spring"class="com.grgbanking.platform.core.flex.spring.SpringFactory"/> </factories><services><service-include file-path="remoting-config.xml" /><service-include file-path="proxy-config.xml" /><service-include file-path="messaging-config.xml" /><service id="spring-remoting-service"class="com.grgbanking.platform.core.flex.spring.SpringRemotingDestina tionBootstrapService"><!-- 其它生成的RemotingDestination默认属性<adapters><adapter-definition id="java-object"class="flex.messaging.services.remoting.adapters.JavaAdapter"default="true" /></adapters><default-channels><channel ref="my-amf" /></default-channels>--><properties><!--<service-id></service-id><dest-factory></dest-factory><dest-adapter></dest-adapter><dest-scope></dest-scope><dest-channel></dest-channel><dest-security-constraint></dest-security-constraint><includeEndsWithBeans></includeEndsWithBeans>--></properties></service></services>4)FLEX客户端调用this.blogFlexService = new RemoteObject("blogFlexService");//这里需要指定endpoint,因为是动态的RemotingDestination,而静态的RemotingDestination ,flex编译器会将endpoint编译进源代码.//这个也是flex编译器需要指定配置文件而导致使用flex经常会犯的错误之一.this.blogFlexService.endpoint = '../messagebroker/amf';3.公司应用案例这种整合最早是在2010年的FEEL View 5.0中使用,后台的统一平台,FEEL View5.1中都采用这种方法进行整合。


1.安装JDK点击下一步点击下一步,如果想更换安装路径可以点击更改开始安装点击下一步,如果需要修改安装路径点击更改开始安装安装结束,点击完成配置环境变量(都配置到系统变量中),JAVA_HOME为JDK安装路径,默认通常为C:\Program Files\Java\jdk1.6.0_29;CLASSPATH为.;% JAVA_HOME%\lib;% JAVA_HOME%\lib\ tools.jar;PATH后面追加; % JAVA_HOME %\bin;% JAVA_HOME %\jre\bin,注意路径应该和自己的安装情况相一致,不要直接copy上面的示例路径。
至此JDK环境配置完成,在命令行下输入java –version若出现版本信息,说明配置成功。
2.安装tomcat7只需要将tomcat7直接解压即可,运行bin目录下的startup.bat文件,若可正常启动,说明没有问题。
3.安装postgreSQL9.0点击next点击next,若需要修改安装目录点击后面的浏览按钮点击next,若需要修改安装目录点击后面的浏览按钮输入密码端口号使用默认的5432,点击next语言选择新加坡简体中文,点击next点击next开始安装安装完成,将安装stack builder的选项去掉,点击finish4.安装eclipse3.7根据自己的系统环境(32位或64位),选择对应版本的eclipse(64位系统可以选择32位或64位eclipse,而32位系统只能选择32位eclipse),解压即可。
5.安装Flex4插件首先要注意,不要把安装文件放置在包含汉语的文件路径下。
开始安装后弹出的第一个窗口,设置一个用来存放解压文件的临时目录,这个无关紧要,但是路径中不能包含汉语,像下图中的路径是典型导致Flex4插件安装失败的例子!Flex安装完成之后这些文件可以删除掉,设置好路径后,点击下一步点击确定点击下一步选中接受许可协议,点击下一步设置安装路径,点击下一步选择再插入一个eclipse,路径设置为eclipse的根目录,点击下一步点击安装点击完成,Flex4插件安装完毕安装完毕之后先打开eclipse,弹出下面的窗口,设置工作空间路径之后将下面的勾打上,然后点击OK然后关闭eclipse,再打开eclipse,这时就会弹出Flex的注册窗口运行flash builder 4keygen.exe,下面的软件名选择Adobe Flash Builder v4.x ,然后点击一下上面的Patch Hosts File按钮然后把生成的序列号粘贴到注册窗口中,点击继续Flex4插件激活完成6.配置eclipse环境打开eclipse,点击菜单栏的window->preferences-gerneral->editors-text editors,将右侧的show line numbers勾上,点击apply点击左侧的java->installed jres点击add按钮选择Standard VM然后点击Next,在弹出窗口中点击Directory设置jdk的路径,如下图所示:点击Finish按钮选中我们刚才添加的条目,然后点击OK再次打开window->preferences->webservice->cxf2.x preferences点击Add按钮,选择cxf的路径:点击Finish按钮将新出现的条目打上勾,然后点OK按钮。

基于Flex+J2EE技术的操作系统精品课程网的设计与实现摘要网站建设是Internets应用的重要组成部分。
因此教育部为大力发展信息化建设,提高教学质量,把精品课程建设定为《质量与工程》的先期启动项目。
而《计算机操作系统》课程是我校软件学院的专业核心课程。
因而开发一个操作系统精品课程网站是刻不容缓的。
系统是基于B/S的开发模式。
而客户端视图层采用最为流行的RIA富客户端技术Flex,具有面美观,人性化,交换性强等特点;在后台的业务逻辑层使用的是以Java语言为支持的J2EE技术,由于Java语言具有面向对象和良好的跨平台性等特点,使的系统的分析设计和后期维护更加简单;同时,后台数据库使用了SQL2000作为数据库管理软件,使系统数据的安全性得到了有效的保证。
系统主要实现的功能有,操作系统课程信息管理;教学资源管理,包括教师后台教学资源的上传,学生和游客资源的下载等;在线测试,包括管理题库的录入,和学生按照多种方式进行在线测试等。
本文简要介绍了操作系统精品课程网站系统所用到的主要的技术,如:MVC 的分层思想,Flex/Flash技术,Flex和后台Java的通信技术,面向对象分析设计技术等;同时,比较详细的介绍了使用UML统一建模语言对系统进行分析设计的过程;并对系统中的关键模块的实现进行了详细的描述;最后对这个系统的开发进行了总结。
【关键字】操作系统精品课程网、Flex、在线测试、面向对象AbstractSite construction is an important part of the application Internets. Therefore, the Ministry of Education to develop information technology to improve teaching quality, the fine course construction as the "quality and engineering," up-front to start the project. The "computer operating system" course is my school School Of Software professional core curriculum. Thus, development of a course Web site is operating fine without further delay.System is based on B / S of the development mode. The client-side view of layer of the most popular RIA rich-client technology, Flex, with a face beautiful, humane, and strong characteristics of the exchange; in the background of the business logic tier user Java language support based on J2EE technology, due to Java language with the object-oriented and a good cross-platform characteristics, etc., so that systems analysis and design and post-maintenance of a more simple; same time, the back-end database using SQL2000 as the database management software, allowing the system security of data has been effectively guaranteed. System is mainly to achieve the functions, operating systems courses information management; teaching resources management, including teachers, teaching resources and background of the upload, download resources, students and visitors, etc.; online testing, including the management of item bank of the entry, and students in a variety of ways in accordance with On-line testing.This paper briefly describes the operating system, network system used in fine course the main technology, such as: MVC hierarchical thinking, Flex / Flash technology, Flex, and Java background in communications technology, object-oriented analysis and design technology; next, it more detailedly introduces the use of UML Unified Modeling Language for systems analysis and design process; key modules and systems implementation of a detailed description; Finally, the development of this system are summarized.Key Words:The operated System Quality Course Website、Flex、Test Online、OO目录第一章绪论 (1)1.1 国内精品课程网站的发展趋势 (1)1.2 精品课程网站的特点 (1)1.3 精品课程网站的意义 (2)1.4 论文组织 (2)第二章系统开发相关技术概述 (4)2.1 B/S模式 (4)2.2Flex技术简介 (6)2.2.1 RIA 技术介绍 (6)2.2.2 Flex/Flash 技术 (6)2.3MVC模式 (9)2.4 JavaBean技术 (11)2.5 Servlet技术 (11)2.6FileUpload文件上传组件 (13)2.7 面向对象的分析与设计 (14)第三章系统分析与设计 (16)3.1功能分析 (16)3.2 系统业务类的分析与设计 (20)3.2.1系统的业务类 (20)3.2.2系统的数据结构表 (21)3.3 系统设计 (25)3.3.1 系统体系结构设计 (25)3.3.2系统网络结构设计 (27)3.3.3学生在线测试活动图 (28)第四章系统关键技术的实现 (30)4.1系统主体架构的实现 (30)4.1.1系统设计架构和工作机制 (30)4.1.2 系统服务器端包中的类和作用 (34)4.2系统主界面的实现 (36)4.3 系统中关键技术的实现 (37)4.3.1数据库的链接 (37)4.3.2系统分页技术的实现 (40)4.3.3自动组题测试的实现 (40)4.3.4 学生错题测试 (43)4.3.5错题统计 (44)4.3.6管理员添加题目 (48)4.3.7 文件上传技术的实现 (49)第五章总结 (51)5.1个人总结 (51)5.2 系统总结 (52)参考文献 (54)致谢 (56)第一章绪论1.1 国内精品课程网站的发展趋势为全面提高教育教学质量, 造就数以千万计的专门人才和一大批拔尖创新人才, 提升我国高等教育的综合实力和国际竞争能力, 教育部决定在全国高等学校中启动高等学校教学质量与教学改革工程精品课程建设工作(简称精品课程建设),并把它作为了《质量与工程》的先期启动项目。
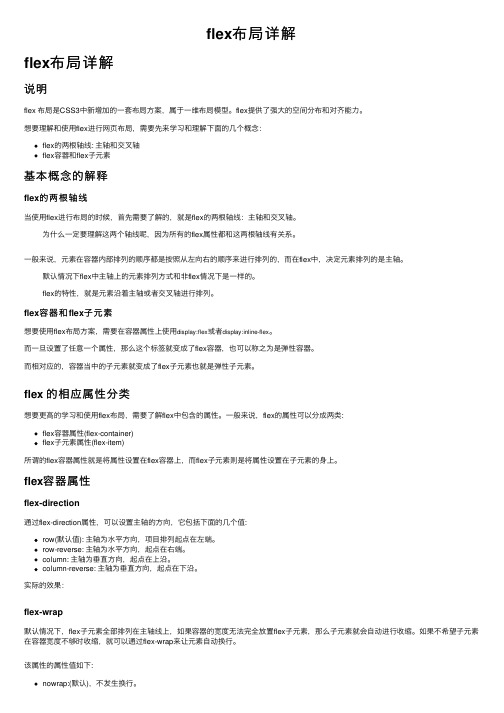
flex布局详解flex布局详解说明flex 布局是CSS3中新增加的⼀套布局⽅案,属于⼀维布局模型。
flex提供了强⼤的空间分布和对齐能⼒。
想要理解和使⽤flex进⾏⽹页布局,需要先来学习和理解下⾯的⼏个概念:flex的两根轴线: 主轴和交叉轴flex容器和flex⼦元素基本概念的解释flex的两根轴线当使⽤flex进⾏布局的时候,⾸先需要了解的,就是flex的两根轴线:主轴和交叉轴。
为什么⼀定要理解这两个轴线呢,因为所有的flex属性都和这两根轴线有关系。
⼀般来说,元素在容器内部排列的顺序都是按照从左向右的顺序来进⾏排列的,⽽在flex中,决定元素排列的是主轴。
默认情况下flex中主轴上的元素排列⽅式和⾮flex情况下是⼀样的。
flex的特性,就是元素沿着主轴或者交叉轴进⾏排列。
flex容器和flex⼦元素想要使⽤flex布局⽅案,需要在容器属性上使⽤display:flex或者display:inline-flex。
⽽⼀旦设置了任意⼀个属性,那么这个标签就变成了flex容器,也可以称之为是弹性容器。
⽽相对应的,容器当中的⼦元素就变成了flex⼦元素也就是弹性⼦元素。
flex 的相应属性分类想要更⾼的学习和使⽤flex布局,需要了解flex中包含的属性。
⼀般来说,flex的属性可以分成两类:flex容器属性(flex-container)flex⼦元素属性(flex-item)所谓的flex容器属性就是将属性设置在flex容器上,⽽flex⼦元素则是将属性设置在⼦元素的⾝上。
flex容器属性flex-direction通过flex-direction属性,可以设置主轴的⽅向,它包括下⾯的⼏个值:row(默认值): 主轴为⽔平⽅向,项⽬排列起点在左端。
row-reverse: 主轴为⽔平⽅向,起点在右端。
column: 主轴为垂直⽅向,起点在上沿。
column-reverse: 主轴为垂直⽅向,起点在下沿。

创建Flex 与Java 通信项目之Blazeds篇一、环境:1、blazeds_turnkey(内含tomcat)2、Flex Build3(Flex的eclipse插件)3、Eclipse二、搭建1、成立一个Web Project注意:创建项目完以后,将其部署到Tomcat中,为配置Flex类型做预备2、导入Blazeds导入方式有两种:一种是,打开下载到的blazeds_turnkey,找到紧缩包,copy里面的WEB-INF文件到web项目WebRoot 目录下,覆盖原先的WEB-INF目录;另一种,软件导入。
(1)右击项目”WebRoot”目录,选择”Import”->”File system”(2)在From directory选项当选择解压缩的途径(3)选中“blazeds”,点击”finish”(4)显现Question提示,点击”Yes to All”3、添加Flex项目类型1、创建Flex_src目录,用于,专门寄存flex的源代码文。
(为后面修改Flex配置做预备)如以下图:2、添加Flex项目类型(1)右击FlexBlazedsDemo项目,选择“Flex Projext Nature ”->”Add Flex Project Nature”(2)点击点击”Next”(3)配置属性:Root folder:指的是项目发布的目录location(选择刚部署到Tomcat中的FlexBlazedsDemo) Root URL:指定是项目的发布的根URL地址(访问途径)Context root:指定是项目名Output folder:Flex编译后HTML文件寄存位置然后点击Valdate Configuration按钮,没有任何错误提示点击Finish即完成项目创建,此flex项目中注意:若是Tomcat是启动状态,点击Valdate Configuration会显现:“The web root folder and root URl are valid”。

Flex布局做出⾃适应页⾯(语法和案例)Flex布局简介Flex英⽂为flexiable box,翻译为弹性盒⼦,Flex布局即弹性布局。
Flex布局为盒⼦模型提供了很⼤的灵活性,任何⼀个容器都可以指定为Flex布局,设置⽅法为:.box{display: flex;}⾏内元素使⽤Flex布局.box{display: inline-flex;}在webkit内核的浏览器上必须加上webkit前缀.box{display: flex;display: -webkit-flex;}注意:使⽤Flex布局之后,⾥⾯的float、clear、vertical-align属性将失效。
Flex布局中的基本概念采⽤ Flex 布局的元素,称为 Flex 容器(flex container),简称"容器"。
它的所有⼦元素⾃动成为容器成员,称为 Flex 项⽬(flex item),简称"项⽬"。
容器默认存在两根轴:⽔平的主轴(main axis)和垂直的侧轴(cross axis)。
主轴的开始位置(与边框的交叉点)叫做main start,结束位置叫做main end;侧轴的开始位置叫做cross start,结束位置叫做cross end。
项⽬默认沿主轴排列。
单个项⽬占据的主轴空间叫做main size,占据的侧轴空间叫做cross size。
容器的属性1、flex-driection2、flex-wrap3、flex-flow4、justify-content5、align-items6、align-content1、flex-driection设置项⽬的排列⽅向,默认为rowflex-driection: row | row-reverse | column | column-reverse当设置为flex-driection: row,效果:当设置为flex-driection: row-reverse,效果:当设置为flex-driection: column,效果:当设置为flex-driection: column-reverse,效果:如下代码直接复制保存为html⽂件即可以查看效果:<style type="text/css">.box{display: flex;display: -webkit-flex;/*⽔平⽅向,左端对齐*/flex-direction: row;/*⽔平⽅向,右端对齐*//*flex-direction: row-reverse;*//*垂直⽅向,顶部对齐*//*flex-direction: column;*//*垂直⽅向,底部对齐*//*flex-direction: column-reverse;*/background: #999;width: 100%;}.box span{margin: 10px 10px;padding: 10px;background: #ff0;width: 50px;}</style><div class="box"><span>你好1</span><span>你好2</span><span>你好3</span><span>你好4</span></div>2、flex-wrap设置项⽬是否在⼀条线上,默认为nowrapflex-wrap: wrap | nowrap | wrap-reverse当设置为flex-wrap: wrap,效果:当设置为flex-wrap: nowrap,效果(不换⾏,默认会缩放):当设置为flex-wrap: wrap-reverse,效果(第⼀⾏在下⽅):如下代码直接复制保存为html⽂件即可以查看效果:<style type="text/css">.box{display: flex;display: -webkit-flex;/*换⾏*//*flex-wrap: wrap;*//*不换⾏,默认*//*flex-wrap: nowrap;*//*换⾏,第⼀⾏在下⽅*//*flex-wrap: wrap-reverse;*/background: #999;width: 100%;}.box span{margin: 10px 10px;padding: 10px;background: #ff0;width: 50px;}</style><div class="box"><span>你好1</span><span>你好2</span><span>你好3</span><span>你好4</span><span>你好5</span><span>你好6</span><span>你好7</span></div>3、flex-flow属性是flex-direction属性和flex-wrap属性的简写形式,默认值为row nowrap4、justify-content属性定义项⽬在主轴上的对齐⽅式,默认值为flex-startjustify-content: flex-start | flex-end | center | space-between | space-around当设置为justify-content: flex-start,效果:当设置为justify-content: flex-end,效果:当设置为justify-content: center,效果:当设置为justify-content: space-between,效果:当设置为justify-content: space-around,效果:如下代码直接复制保存为html⽂件即可以查看效果:<style type="text/css">.box{display: flex;display: -webkit-flex;/*默认,项⽬左对齐*/justify-content: flex-start;/*项⽬右对齐*//*justify-content: flex-end;*//*项⽬居中对齐*//*justify-content: center;*//*项⽬两端对齐*//*justify-content: space-between;*//*每个项⽬两侧的间隔相等*//*justify-content: space-around;*/background: #999;width: 100%;}.box span{margin: 10px 10px;padding: 10px;background: #ff0;width: 50px;}</style><div class="box"><span>你好1</span><span>你好2</span><span>你好3</span><span>你好4</span><span>你好5</span><span>你好6</span><span>你好7</span></div>5、align-items属性定义项⽬在纵轴上的对齐⽅式,默认值为stretch,适⽤于项⽬在纵轴上⾼度不⼀样的情况,为了更好的看到效果,我为项⽬添加了⼀些样式align-items: flex-start | flex-end | center | baseline | stretch当设置为align-items: flex-start,效果:当设置为align-items: flex-end,效果:当设置为align-items: center,效果:当设置为align-items: baseline,效果:当设置为align-items: stretch,效果:如下代码直接复制保存为html⽂件即可以查看效果:<style type="text/css">.box{display: flex;display: -webkit-flex;/*纵轴的顶部对齐*//*align-items: flex-start;*//*纵轴的底部对齐*//*align-items: flex-end;*//*纵轴的中点对齐*//*align-items: center;*//*项⽬的第⼀⾏⽂字的基线对齐*//*align-items: baseline;*//*默认对齐⽅式,如果项⽬未设置⾼度或设为auto,将占满整个容器的⾼度*/align-items: stretch;background: #999;width: 100%;}.box span{margin: 10px 10px;padding: 10px;background: #ff0;width: 50px;}.box span:nth-of-type(2n){height: 80px;padding-top: 20px;}</style><div class="box"><span>你好1</span><span>你好2</span><span>你好3</span><span>你好4</span><span>你好5</span><span>你好6</span><span>你好7</span></div>6、align-content属性定义了多根轴线的对齐⽅式。

基于Flex和J2EE架构的数据发布系统的设计与实现摘要:提出了开发基于Flex和J2EE架构的数据发布系统,应用Flex作为展现层实现,应用Hibernate作为持久层实现,结合Spring技术作为业务层实现,进行框架整合,从而设计了一套松耦合、可扩展的RIA数据发布系统,初步解决了当前数据发布中存在的问题。
关键词:RIA;数据发布;Flex;Spring框架;Hibernate框架为了解决Web应用程序中人机界面单调、交互性弱、开发效率低、用户体验差等一系列问题,产生了富因特网(Rich Internet Applications)技术,RIA程序是将桌面应用程序的用户交互体验与传统的Web应用的部署灵活性和成本分析结合起来的网络应用程序。
RIA中提供可承载已编译客户端应用程序(以文件形式,用HTTP传递)的运行环境,客户端应用程序使用异步客户/服务器架构连接现有的后端应用服务器,这是一种安全、可升级、具有良好适应性的新的面向服务模型。
作为最完善的RIA系统开发技术,Adobe Flex提供了一整套的RIA组件框架和运行时数据处理服务来构建复杂的网络应用程序,利用它可以开发出具有良好的软件体系结构、很好的兼容性和更具吸引力的用户体验的软件。
本文根据Web应用的经典分层理论,应用Flex 作为展现层实现,应用Hibernate作为持久层实现,并结合Spring技术作为业务层实现,进行框架整合,设计出一套足够灵活、松散耦合、可扩展性强、高效的数据发布系统。
1系统需求分析系统需求分析是系统项目成功的基础,需要按照软件工程方法进行全面合理的需求分析。
数据发布系统有着自身的特点和需求,现进行分析设计。
1.1系统流程分析系统参与者有系统管理员、数据管理员、普通用户3种,图1为参与者进入系统后的活动图。
图1系统活动图1.2系统功能性需求数据发布系统主要由3个功能模块组成:数据发布模块、用户管理模块、系统管理模块。

三、Flex安装过程1.解压eclipse-jee-indigo-SR2-win32,作为应用程序开发环境.2.安装Adobe Flash Builder 4.6 Plug-in Utility.exe,如图3-1所示,在Eclipse文件夹路径中,选择刚才解压的eclipse-jee-indigo路径,下一步进行安装.图3-13. 解压tomcat安装文件。
然后打开eclipse,在eclipse中新建Dynamic Web Project,选择新建tomcat,选择tomcat的解压文件,如图3-2.图3-24. 导入demo中的相关文件,将demo中WebContent中所有文件,复制到project当中的WebContent,注意,需要全部复制替换,然后回到eclipse,刷新一下。
并在project目录下建立flex-src文件夹,清空flex-bin下的所有内容5. 右键单击project,选择属性,将缺省输出文件夹进行如图的更改,点击确定,如图3-3.图3-36. 项目文件部署,将project工程下的.setting及.project以及.classpath以及WebContent下的所有文件形成一个文件夹,名为project,扔到eclipse所依赖的tomcat服务器下的webapp 下7. 将web项目添加flex类型,右键单击project ,选择添加/更改项目类型-〉添加flex项目类型,会出现如图3-4所示内容:图3-48. 点击下一步,出现图3-5内容,按照以下内容,对文本框内容进行修改:(注意其中的跟文件夹要根据tomcat路径来写,输出文件夹要定位到workspace下的flex-bin)图3-59. 点击完成后会切换到flash视图,然后可能出现如图3-6错误。
右键选择错误并单机创建html模板可以解决。
图3-610.右键单击project,选择属性,选择flex构建路径.将主源文件夹改成flex-src。

本程序使用myeclipse8.6+flash builder 4 plug-in+blazeds开发Java端代码:连接oracle的Utilpublic class GetConnect {public static Connection getConnection(){Connection conn = null ;String USERNAME = "hr";String PASSWORD = "tiger";String DRIVER = "oracle.jdbc.driver.OracleDriver";String URL = "jdbc:oracle:thin:@localhost:1521:orcl";try{Class.forName(DRIVER);conn = DriverManager.getConnection(URL,USERNAME,PASSWORD);}catch(Exception e){e.printStackTrace();}return conn;}public static void closeConnection(Connection conn){try{if(conn!=null){conn.close();}}catch(Exception e){e.printStackTrace();}}public static void closeStatement(Statement st){try{if(st!=null){st.close();}}catch(Exception e){e.printStackTrace();}}public static void closeResultSet(ResultSet rs){try{if(rs!=null){rs.close();}}catch(Exception e){e.printStackTrace();}}}获取oracle数据public class GetData {Connection conn = null;Statement st = null;ResultSet rs = null;List<Student> list = null;Student stu = null;PrintWriter out = null;public List<Student> getStu(){String SQL = "select *from class";list = new ArrayList<Student>();try{conn = GetConnect.getConnection();st = conn.createStatement();rs = st.executeQuery(SQL);while(rs.next()){stu = new Student();list = new ArrayList<Student>();stu.setId(rs.getString("stuId"));stu.setZhuanye(rs.getString("zhuanye"));stu.setKecheng(rs.getString("kecheng"));list.add(stu);}}catch(Exception e){e.printStackTrace();}finally{GetConnect.closeResultSet(rs);GetConnect.closeStatement(st);GetConnect.closeConnection(conn);}return list;}}Student类public class Student {String id;String zhuanye;String kecheng;public String getZhuanye() {return zhuanye;}public void setZhuanye(String zhuanye) {this.zhuanye = zhuanye;}public String getKecheng() {return kecheng;}public void setKecheng(String kecheng) {this.kecheng = kecheng;}public String getId() {return id;}public void setId(String id) {this.id = id;}}配置remoting-config.xml文件在该文件中加入<destination id="connecFlex"><properties><source>com.hu.dao.GetData</source></properties></destination>Flex文件:<fx:Declarations><s:RadioButtonGroup id="studentsSex"/><s:RemoteObject id="remote" destination="connecFlex" showBusyCursor="true"><s:method name="getStu" result="getStuData(event)"/></s:RemoteObject></fx:Declarations>destination="connecFlex"必须与remoting-config.xml文件的id一致<s:method/>标签name为要执行的java类方法<fx:script/>部分public function getStuData(event:ResultEvent):void{//该方法处理返回结果var array:ArrayCollection = event.result as ArrayCollection;studentsId.text = array[0].id;dataGrid.dataProvider = array;}public function test():void{remote.getStu();}页面主体部分<s:Panel x="61" y="5" width="538" height="384" title="学生信息录入"><s:Label x="10" y="14" text="学号:" width="81" height="18"/><s:Button x="10" y="206" label="录入" click="test()"/><mx:DataGrid x="10" y="235" height="96" width="499" id="dataGrid"><mx:columns><mx:DataGridColumn headerText="学号" dataField="id"/><mx:DataGridColumn headerText="姓名" dataField="col2"/><mx:DataGridColumn headerText="性别" dataField="col3"/><mx:DataGridColumn headerText="出生日期"/><mx:DataGridColumn headerText="专业" dataField="zhuanye"/></mx:columns></mx:DataGrid><s:TextInput x="75" y="6" id="studentsId"/></s:Panel>。

FLEX学习笔记贵在坚持崔二宏零峰一一年二月十七一、配flex环境需要软件:1.j dk2.t omcat3.m yeclipse4.f lex builder 插件5.b lazeds.war其它的安装比较简单。
只是装flex builder时注意。
有一步要选myeclipse的安装路径才行。
然后把D:\Program Files\adobe\Adobe Flash Builder 4 Plug-in\eclipse下的features和plugins文件夹放在myeclipse的D:\Program Files\Genuitec\Common 下(myeclipse8以后就是这种路径。
7好像是单独有一个eclipse文件夹),然后还有一个AMT文件夹放到D:\Program Files\Genuitec\MyEclipse-8.6\AMT文件夹(这个不知道是为啥)(注:也有人不拷贝这些。
只是像上边那样直接安装。
行不行有待考证)二、建立采用flex的web工程因为flex只是做为表示层展示,flex只接收java返回数据,那怎么和java服务端通信呢?这时我们需要用到adobe公司开发的一个开源项目Blazeds。
Blazeds是一个基于服务器的Java 远程控制(remoting) 和Web 消息传递(messaging) 技术,以LGPL(Lesser GNU Public License)公共许可证书发布。
它能够使得后端的Java 应用程序和运行在浏览器上的Adobe Flex 应用程序相互通信。
在Java应用服务器上,它以servlet的形式存在,因此可以在任何标准Java 网络应用中运用它。
下载好核心包解压出来就发现一个文件名是Blazeds.war,我们只需要把Blazeds.war改成Blazeds.rar然后解压就会出现:1.打开Myeclise8.0新建一个javaweb工程,选择javaEE 5.0如图2.把blazeds解压后的2个文件夹覆盖到WebRoot下面,展开发现在WEB-INF 目录下面多了flex文件夹,这个很重要主要是通信的4个配置文件。


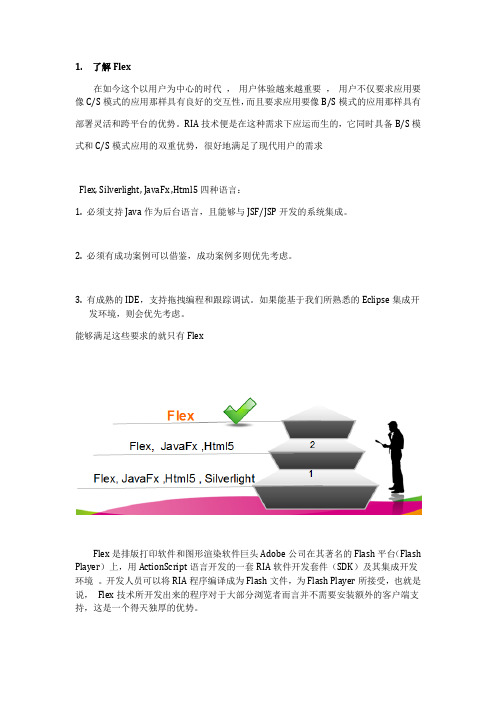
1.了解Flex在如今这个以用户为中心的时代,用户体验越来越重要,用户不仅要求应用要像C/S模式的应用那样具有良好的交互性,而且要求应用要像B/S模式的应用那样具有部署灵活和跨平台的优势。
RIA技术便是在这种需求下应运而生的,它同时具备B/S模式和C/S模式应用的双重优势,很好地满足了现代用户的需求Flex, Silverlight, JavaFx ,Html5四种语言:1. 必须支持Java作为后台语言,且能够与JSF/JSP开发的系统集成。
2. 必须有成功案例可以借鉴,成功案例多则优先考虑。
3. 有成熟的IDE,支持拖拽编程和跟踪调试。
如果能基于我们所熟悉的Eclipse集成开发环境,则会优先考虑。
能够满足这些要求的就只有FlexFlex是排版打印软件和图形渲染软件巨头Adobe公司在其著名的Flash平台(Flash Player)上,用ActionScript语言开发的一套RIA软件开发套件(SDK)及其集成开发环境。
开发人员可以将RIA程序编译成为Flash文件,为Flash Player所接受,也就是说,Flex技术所开发出来的程序对于大部分浏览者而言并不需要安装额外的客户端支持,这是一个得天独厚的优势。
2.语言及数据Flex程序以下三个文件组成:以css为后缀的样式表文件以mxml为后缀的程序文件以as为后缀的ActionScript文件2.1MxmlMXML语言是专门用于Flex程序中,描述界面表现的一种XML标记语言。
我们可以用它来管理程序的整体布局,控制组件的样式和外观,也可以构建非可视化的对象,比如XML数据,组件的数据源等。
MXML标签与ActionScript类或者类中的属性是相对应的。
当你编译你的Flex应用程序的时候,Flex解析你的MXML标签并且生成相应的ActionScript类。
然后这些ActionScript类会被编译成SWF字节码存储到一个SWF文件中。

Flex安装配置完全图解教程--------------------------------------------------------------------------------本教程涉及软件及下载地址:① JDK 1.5.0下载地址:进⼊后选择Download JDK,然后点Accept>Continue,接下来选择Windows Offline Installation, Multi-language (jdk-1_5_0_01-windows-i586-p.exe, 49.78 MB)下载。
② Tomcat 5.5.6下载地址:③ Flex 1.5下载地址:④ Flex Builder 1.5下载地址:---------------------------------------------------------------------------------1、安装JDK1.5.0①下载后双击安装即可,我这⾥装到D:\jdk1.5.0_01,安装时会⾃动安装JRE5.0,可以安装到其它的路径。
②接着设置环境变量,右击“我的电脑”>属性>⾼级>环境变量>系统变量>新建(如下图):变量名:JAVA_HOME变量值:D:\jdk1.5.0_012、安装Tomcat5.5.6①下载后双击安装,在安装的过程中记住选中"service"(如下图),这样Tomcat就可以以windows服务的形式启动。
我这⾥把Tomcat安装在D:\Flex\Tomcat 5.5\⽬录。
②接着会配置http端⼝号和管理密码,按需要输⼊即可,端⼝默认为8080。
③安装过程中会要求指定JRE的⽬录,它会⾃动检测,按默认即可。
如果没有检测到,请⼿动输⼊你的JRE安装⽬录。
④ Tomcat安装完成后会在状态栏⽣成⼀个⼩图标,如果是绿⾊的⼩三⾓表⽰Tomcat服务器已经启动成功,你可以双击这个图标进⼊Tomcat 服务控制台,⽤Start和Stop开始和停⽌服务。

So far, you know how to combine Flex and Java using HTTP and web services. The lastchapter surveyed a bunch of alternative mechanisms to achieve this. Most of thesemechani sms i nvolve loosely coupled text-based data i nterchange. Most of theminteract by pulling data. Only one of them, Hessian, transmits binary data. Only one,Hessi an agai n (wi th addi ti onal i nfrastructure powered by the new Java IO), allowsdata push.Now, we delve into more tightly coupled scenarios and efficient binary data transmis-si on usi ng AMF (Acti on Message Format). The AMF speci fi cati on can be accessedonline at . This chapter looks at both pull- and push-based interactions—using data services and media servers. Adobe offers two alterna-tives for data services—the commercial LifeCycle Data Services (LCDS) and the opensource BlazeDS—and it offers a suite of products for media servers: Flash Media Server(FMS) products. There are a few open source alternatives to these as well.In this chapter, I will analyze these products in the context of their applicability torich, engaging enterprise-grade applications. Functionally they can be divided intothe following three topics:Remoting and RPCMessaging and data push Media streaming 257INTEGRATING VIA DATA AND MEDIA SERVICESBy Shashank Tiwari Chapter 7At this point of the book, remoting and RPC should be familiar territory, so let’s start there.Remoting and RPCFlex applications can access the Java server side using data services. They can access Java objects and nvoke remote methods on them. The Flex framework ncludes a cl ent-s de component called RemoteObject . This object acts as a proxy for a data service destination on the server. When config-ured properly, this object handle can be used to invoke RPCs. Before we get into the nitty-gritty of this object and destination configuration, let’s step back and look at the data services architecture.Data services architecture Figure 7-1 is a pictorial summary of the data services architecture. The view is biased to highlight thefunctional elements. It includes technical aspects but skips the internal details in many places. As you look deeper into the nuts and bolts in this chapter, many of these details will emerge.As Figure 7-1 depicts, data services includes the following:Gateway to intercept server-bound callsParser to make sense of AMF messagesSerializer and deserializer to transform objects between ActionScript 3.0 (AS3) and JavaManager to coordinate with and delegate responsibility to server-side objectsMessaging service provider to send and receive messagesBy data services, I mean a class of products that enable remoting and messaging over AMF and proto-cols like Real Time Messaging Protocol (RTMP). RTMP is a proprietary protocol developed by Adobe Systems for streaming audio, video, and data over the Internet. More information on RTMP can be found on W i k i ped i a at /wiki/Real_Time_Messaging_Protocol and at /documentation/rtmp .As mentioned, there are two data services implementations from Adobe and a few open source alter-natives. Following are the most popular ones:LifeCycle Data Services (Adobe): /products/livecycle/dataservices/BlazeDS (open source from Adobe): /wiki/display/blazeds/Granite Data Services (GDS):/WebORB for Java : /weborb/java/OpenAMF :/projects/openamf/OpenAMF is not a very active project at the time of writing. The last release dates back to 2006. This project’s mission was to port AMFPHP to Java. AMF was a closed specification back then, and AMFPHP was a reverse-engineered open source option for PHP servers. OpenAMF is closer to Flash remoting than data services.This chapter sticks mostly to LCDS and BlazeDS, but the same concepts apply to the alternatives. LCDS and BlazeDS are quite similar in form and structure and share the same codebase. BlazeDS can be thought of as a marginally scaled-down version of LCDS.258CHAPTER 7Figure 7-1. Data services architecture: an overviewData services uses AMF3 (Action Message Format version 3) to transmit binary data between Flex and Java. The genesis of this product lies in the Flash remoting server, which used to support AMF0 as the binary protocol. Flash remoting still exists, in many forms, but data services replaces it as a better alternative.Whichever data service we choose, it is a web application from a Java server perspective. Let’s dig a bit deeper to see what this means. (Of course, we are talking only about data services for Java. There are remoting servers for other technologies,but that is beyond the scope of this book.)259INTEGRATING VIA DATA AND MEDIA SERVICESIt’s a web applicationWeb applications are applications built on the technology that powers the Web. The HTTP protocol and the associated programming paradigm are a prominent part of this technology set. In Java, the raw low-level HTTP and related infrastructure is abstracted out as a higher-level API and managed components. At the heart of this abstraction is the Servlet specification, which wraps HTTP methods and HTTP protocol handling in objects. Web applications written in Java are packaged with all assets,associated libraries, class files, and any other resources into a special archive file format: a web appli-cation archive (WAR). These WAR files are deployed on a servlet container or an application server (which contains a servlet container).Most data servi ces, especi ally LCDS and BlazeDS, are web appli cati ons and exi st as WAR fi les. The remoting gateway is a servlet, and data service elements are web components. A little later, in the sec-tion “Downloading and deploying the web application,” you will see how deploying LCDS or BlazeDS is identical to deploying any other web application distributed in a WAR file format.In both BlazeDS and LCDS, the primary communication responsibilities are handled by a message bro-ker, which is created on startup by a servlet called the MessageBrokerServlet . The application server’s standard class loader loads it like any other servlet. This message broker is extremely flexible, and all types of available services and endpoints can be configured for it fairly easily. All such configurations reside in an XML configuration file, which I talk about later in the section “Configuring data services.”Protocols, channels, destinations, and endpointsOne of the primary advantages of data services is their use of AMF to transmit data between Flex and Java. AMF is a binary protocol, and the Flash Player natively supports it. Therefore, transmission using AMF is fast and efficient. AMF is a high-level (application layer) protocol that uses HTTP for commu-nication. Almost all data services dialog happens over HTTP or its secure alternative, HTTPS. AMF spec-i f i cat i on i s now ava i lable under the open source l i cense and i s access ible for download at /pub/labs/amf/amf3_spec_121207.pdf . When remot ng, AMF s marshaled and unmarshaled at both ends (Java and Flex) for the data interchange to work.The data services messaging module and media server use RTMP. LCDS and FMS support RTMP, but BlazeDS does not. BlazeDS uses HTTP tunneling and AMF long pooling to achieve a push-based model.Red5 (/red5), an open source alternative to Flash Media Server, partially reverse-engineers RTMP and provides streaming capabilities over this derived protocol.Apart from AMF over HTTP and RTMP, the Flash Player also supports Transmission Control Protocol (TCP) over Sockets. TCP is a protocol from the Internet protocol suite that facilitates reliable ordered delivery of byte streams. Secure versions of the protocol, such as AMF and HTTP over Secure Sockets Layer (SSL) and RTMP over Transport Layer Security (TLS), can be used as well. Both SSL and TLS are cryptographic protocols that facilitate secure communication over the Internet. TLS is a newer gener-ation protocol compared to SSL. Although similar, SSL and TLS are not interchangeable. TLS 1.0 is a standard that emerged after SSL 3.0. These protocols nvolve endpo nt authent cat on, message ntegri ty, and key-based encrypti on. Both protocols support a bunch of cryptographi c algori thms including RSA. RSA is a popular cryptographic algorithm for public key cryptography, which involves two different keys, one to encrypt a message and another to decrypt it.260CHAPTER 7INTEGRATING VIA DATA AND MEDIA SERVICES The Flash Player does not support the entire repertoire of protocols and even misses the ubiquitousUser Datagram Protocol (UDP), whi ch i s very useful for multi casti ng.Multicasting i s a method ofi nformati on deli very to multi ple desti nati ons si multaneously whereby messages are deli vered overeach link of the network only once. Copies of the message are created only if the links to the destina-tions bifurcate.You will not be able to take advantage of protocols like UDP with data services.Protocols help make effecti ve and effi ci ent communi cati on possi ble, but hi gher-level abstracti onsincrease the usability of these protocols. These higher-level abstractions help you focus on businesslogi c and reduce the burden of deali ng wi th low-level communi cati on handli ng. One such usefulhigher-level construct in Flex is called destination.Destinations are one of the key abstractions available in the Flex framework and data services. Server-side entities are mapped to logical names and configured to be invoked using these logical names.These confi gured server-si de elements, or desti nati ons, have a handle (logi cal name) and exposeserver-side functionality to remote clients. Many Flex client components, especially those that facili-tate remoting—for example RemoteObject—map to a destination. The section “Configuring data serv-ices,” which comes a little later, illustrates the configuration files. In that section, you will learn how todefine, configure, and use a destination. Then, in the section “Extending data services for advancedremoti ng use cases,” you wi ll see how to use custom extensi ons as desti nati ons. In data servi ces,almost all server-side elements that facilitate remoting and messaging are configured as destinations.HTTPService and WebService, when routed through a data service proxy, also map to a destination.When you i nteract wi th a server-si de servi ce vi a a desti nati on, you use a messagi ng channel to communicate back and forth.A messaging channel is a bundle that defines a protocol and an end-point set. An endpoint set means a URI, a listening port number, and an endpoint type definition. Forexample, an AMF channel could be established with the help of the AMF channel implementationclass (mx.messaging.channels.AMFChannel) and an endpoint definition, which could be a combina-tion of an endpoint type (flex.messaging.endpoints.AmfEndpoint) and its availability via a URI (say/sampleapp/messagebroker/amf) over a certain listening port (which by default for AMF is 8100).Sometimes, services need special adapters to communicate with server-side elements. These adaptersmay translate the message and act as the classical conduit that helps different programming interfacescommunicate and interact with each other. (An adapter by definition is something that modifies anAPI to make i t adapt to the requi red i ntegrati on scenari o.) Data servi ces defi ne a set of bui lt-i nadapters and provide an API to create your own.That is enough theory; time now to roll our sleeves up and see data services in action. We first installdata services and then quickly create a small example application to see how it works.Installing a data serviceThe last section claimed data services to be a Java web application. You will see that claim reinforcedby deploying a data service like any other Java web application in a Java application server (with aservlet container). Once we have deployed it successfully, we will go ahead and configure it so that weare ready to build an example application.261Downloading and deploying the web application For the purposes of illustration, we will pick BlazeDS as the data service and choose JBoss Application Server (AS) as the Java application server. If the data service is LCDS and the application server is any other, such as Apache Tomcat, BEA WebLogic, IBM WebSphere, Apache Geronimo, Caucho Resin, or GlassFish, the situation is not very different. Each of these application servers has its own directory struc-ture and styles of deployment. Deploying BlazeDS or LCDS involves the same level of complexity as deploying any other Java web application packaged as a WAR. Adobe Labs has published some notes on the specific installation instructions for a few of the popular application servers. These notes are online at /wiki/index.php/BlazeDS:Release_Notes#Installing_BlazeDS .The first step is to get all the required software and to install it.Getting the software and installing it BlazeDS is available under the open source GNU LGPL license.Go to /wiki/display/blazeds/BlazeDS and download the latest stable release build. You will have a choice to download the binary or the source versions. The binary version is what you should choose unless you intend to make modifications to the code. The distribution is available as a ZIP file. When you unzip the archive file, you will find a file called blazeds.war . This is the WAR file that has everything in it needed to use BlazeDS. In addition, you may find the following files:blazeds-samples.war : A set of sample applications blazeds-console.war : Monitoring application for BlazeDS deployments If this is the first time you are deploying BlazeDS, it’s recommended you deploy blazeds-samples.war and verify that the sample applications run without a problem.The other piece of the puzzle is the Java application server. I will assume that you have downloaded and installed one for your use. In this example, we download the latest stable release of JBoss AS from the communi ty download page accessi ble at /projects/download/. At the time of writing, version 4.2.2.GA is the latest stable release. This may differ depending on when you download it. The JBoss AS download is an archive file that is ready to use as soon as it’s expanded in the file system. (It may at most require a few environment variable settings.) On the PC, we just unzip it within a directory on the main partition.The JBoss AS dshown in Figure 7-2.BlazeDS runs w i th any Java appl i cat i support these JDK versions.Deploying the WAR file application in JBoss versing down the server ➤default ➤folders and copy ng the WAR f the bin appli cati on. In our case, JBoss i 262CHAPTER 7INTEGRATING VIA DATA AND MEDIA SERVICES port 8080 for HTTP requests, and so the URL for samples looks like this: http://localhost:8080/ blazeds-samples/. If you are able to access the samples application, you are ready to move to thenext step of configuring data service.With LCDS, the deployment is no different. The WAR file in LCDS has a different name—flex.war as opposed to blazeds.war—and it has a few extra features compared to BlazeDS, but from a deploy-ment standpoint things don’t change.GDS, the open source alternative to LCDS, has a slightly different approach to software distribution. GDSis distributed as multiple bundles, each integrating with one Java server-side technology. Also, GDS is dis-tributed as source and not binary, which means you need to set up the development environment tobuild the software. If you are a Java developer who also writes Flex applications, you may already havethe development environment set up. The required pieces of software areEclipse 3.2+ (with JDK 5+)Flex 3 SDK (If you use Flex Builder, you already have it.)Flex 3 Ant tasks (/wiki/index.php/Flex_Ant_Tasks)Once the environment is set up, you could get hold of one of these bundles:graniteds-ejb3-1.0.0.zip: Hooks to EJBgraniteds-seam-1.0.0.zip: Integrates with Seam (stateful web beans)graniteds-spring-ejb3-1.0.0.zip: Provides Spring servicesgraniteds-guice-1.0.0.zip: Provides services for Google Guicegranite-pojo-1.0.0.zip: Interfaces with plain Javagranite-chat-1.0.0.zip: Includes Java New I/O (NIO) and Comet-based data pushThe choice of bundle depends on your requirements. Also, the bundle version numbers could vary depending on when you download the files. As of now, the release version is 1.0.0. Each of these bun-dles i s an Ecli pse project. Once you get the bundle you need, unzi p i t and i mport i t i nto Ecli pse. Subsequently, you build it using Ant tasks.Configuring data servicesIn BlazeDS and LCDS, there is more to configure than code. In both these cases, a message broker servlet is the central manager of all communication and service invocations. Configuring data servicesis equivalent to configuring this message broker. In the web.xml file where you set up this servlet, you define the configuration file it should read. The portion of web.xml where you define this is as follows: <servlet><servlet-name>MessageBrokerServlet</servlet-name><display-name>MessageBrokerServlet</display-name><servlet-class>flex.messaging.MessageBrokerServlet</servlet-class><init-param><param-name>services.configuration.file</param-name><param-value>/WEB-INF/flex/services-config.xml</param-value></init-param><load-on-startup>1</load-on-startup></servlet>263You may not i ce that the value for the services.configuration.file is /WEB-INF/flex/services-config.xml . This is the default configuration, and most often there is no need to change it.However, if you need the configuration file to be at a different location or have a different name, you know where to make the modifications so that the new values are picked up.All servi ce and endpoi nt confi gurati ons are speci fi ed i n thi s confi gurati on fi le, whi ch by default i s called services-config.xml . From a functi onal standpoi nt, a data servi ce tri es to accompli sh the following:Facilitate remote procedure calls to Java objects on the server and transmit data between AS3and Java classes.Provide proxy services, especially for HTTPService and WebService , where security restrictions (the lack of a cross-domain definition via crossdomain.xml ) disallow these services otherwise.Send/Receive messages between Flex and Java and between two different Flex clients.Manage data for the application. This topic is not discussed in this book at all. BlazeDS does not provide this off the shelf, but LCDS does.Therefore, Adobe partitions the configuration file into four different pieces, each corresponding to one of the functional responsibilities just listed. Each of these pieces resides in a separate file, and all are included in the original configuration file by reference. The default names for these four files, in the same order in which they correspond to the functional areas listed previously, are remoting-config.xml proxy-config.xml messaging-config.xml data-management-config.xml The portion of services-config.xml at /flex/WEB-INF from our BlazeDS installation, where three of these four files are included (BlazeDS does not have data management features), is as shown here:<?xml version="1.0" encoding="UTF-8"?><services-config><services><service-include file-path="remoting-config.xml" /><service-include file-path="proxy-config.xml" /><service-include file-path="messaging-config.xml" /></services>A few aspects like logging, security, and channel definitions are cross-cutting concerns and are used across services, so these are defined in services-config.xml itself. All other service configurations and definitions typically fall in one of the four files (or three if we are using BlazeDS) I spoke about.In this chapter, there is no intent to cover every single aspect of configuration. Only a few important ones are sampled and explained. For an exhaustive syntax-level account of each allowed configura-tion, it’s advisable to refer to the LiveDocs. For BlazeDS, you could refer specifically to a LiveDocs sec-t i on t i tled “About serv i ce conf i gurat i on f i les,” wh i ch can be found onl i ne at /blazeds/1/blazeds_devguide/help.html?content=services_config_2.html .Let’s survey a few configuration options to get a flavor of things.264CHAPTER 7INTEGRATING VIA DATA AND MEDIA SERVICES Common configuration Let’s start with logging. BlazeDS and LCDS use log4j for logging. Logging-related configurations reside in services-config.xml itself. The most important aspect of configura-tion is the logging level. The permissible values and their respective meanings are as follows: ALL: Logs every single message.DEBUG: Includes internal Flex activities. This is an appropriate level during development andtroubleshooting, and is an incremental expansion beyond INFO. Therefore, all errors, warningsand information messages are included.INFO: Logs additional information that may be pertinent to developers or administrators. Thislevel builds on top of the WARN level.WARN: Includes warnings as well as errors.ERROR: Logs only errors that cause service disruption.NONE: Logs nothing.If you are familiar with log4j logging levels, then you have seen this before.Next come channel definitions. In terms of importance, this rates above the logging-level definitions. Channels are the vital protocol and endpoint combination that make communication possible betweenthe Flex client and the server. In BlazeDS, the default AMF channel configurations look like this: <channels><channel-definition id="my-amf" class=➥"mx.messaging.channels.AMFChannel"><endpoint url="http://{}:{server.port}/➥{context.root}/messagebroker/amf"class="flex.messaging.endpoints.AMFEndpoint"/></channel-definition><channel-definition id="my-secure-amf"class="mx.messaging.channels.SecureAMFChannel"><endpoint url="https://{}:{server.port}/➥{context.root}/messagebroker/amfsecure"class="flex.messaging.endpoints.SecureAMFEndpoint"/><properties><add-no-cache-headers>false</add-no-cache-headers></properties></channel-definition><channel-definition id="my-polling-amf"class="mx.messaging.channels.AMFChannel"><endpoint url="http://{}:{server.port}/➥{context.root}/messagebroker/amfpolling"class="flex.messaging.endpoints.AMFEndpoint"/><properties><polling-enabled>true</polling-enabled><polling-interval-seconds>4</polling-interval-seconds></properties></channel-definition></channels>265Three di fferent AMF channels are defi ned usi ng the precedi ng confi gurati on. In each case, a fully qualified class name specifies the class that implements the channel. The channel is accessible via a configured endpoint. The endpoints include a set of tokens, namely , server.port , and context.root . When a SWF is loaded in a browser, as happens with all Flex applications, these tokens are replaced with the correct values, and the endpoints are configured properly. In AIR and even with RTMP channels (in RTMP, server.port needs a specific port number definition), these tokens are not resolved automatically, and so channels don’t work as expected, if configured using tokens.To test a channel, it may a good idea to try and access the endpoint URL with the browser and see whether you get a success message, such as 200 OK , or not. Where required, channels could accept additional properties. As an example, a polling AMF channel defines the polling interval using proper-ti es. An i nteresti ng fact i s that property setti ngs can create enti rely di fferent channels. AMF and polling AMF channels have the same class for implementing the channels, but they have different sets of properties and therefore different behavior.Using services-config.xml , the channel configurations are done at compile time. It’s also possible to configure channels and associate them with destinations at run time. More information about config-uration at run time is covered in the section “Configuring at run time” later in this chapter.The third important common configuration pertains to security. Exhaustive and complex security defini-tions are possible with data services, but we will go with the defaults for now. We shall deal with security configurations in data services in the section “Additional useful data services tips” later in this chapter.Although this chapter has not exhaustively covered the configuration options, you know the basics of configuration by now. You will learn more about configuration as you explore the other topics that relate to data services.Our new focus is to get data services into action. The three configuration files, remoting-config.xml ,proxy-config.xml , and messaging-config.xml , configure services, so we will look at these in the next few sections as we implement such services using BlazeDS or LCDS.Calling remote methods and serializing objectsYou know AMF is an efficient binary protocol and a data service lets you exchange data between Flex and Java. Let’s dig deeper so you can see what you need to do to leverage this mechanism in your Flex appli cati on. Because “seei ng i s beli evi ng” and, li ke pi ctures, worki ng code speaks louder than words, we will first create a simple example application that will establish RPC over AMF using a data service. In this example, our data service is BlazeDS.A simple example in actionThe example application is fairly simple.It displays a list of people and the country they come from. A person is identified by an ID, first name, and last name. A country is identified by a name. The initial list is populated from an XML data file that has four names in it. A user is allowed to add names to the list and delete existing ones.To demonstrate data services and remoting, the list and the methods to manipulate the list are kept on the server. These remote Java objects and their methods are accessed from a Flex client.We create this example using Flex Builder 3, but we could also do without it and compile directly using mxmlc , the command-l i ne comp i ler, or use Flex Ant tasks, ava i lable from w i th i n Ecl ipse. The 266command-line compiler and the Flex Ant tasks are available free of charge. The command-line com-piler comes bundled with the free Flex 3 SDK. The Flex Ant tasks software bundle can be downloadedfrom /wiki/index.php/Flex_Ant_Tasks.As a first step, we create a new Flex project, choose Web application as the application type and J2EEas the server technology. We name this project VerySimpleRemotingExample. Figure 7-3 shows these settings in the New Flex Project dialog.Figure 7-3. The initial screen for new Flex project creation in Flex Builder 3You will see that Flex Builder offers only two choices for a data service, namely LifeCycle Data Servicesand ColdFusion Flash Remoting. At first, this often causes confusion among developers, when using BlazeDS. Choose LifeCycle Data Services as the option in the current dialog box when using BlazeDS. Inthe next dialog box, you will have an opportunity to point to either the BlazeDS WAR or the BlazeDS directories, deployed on your application server.In the very first screen, a choice is offered to create a combined Java/Flex project using WTP. WTP,which stands for Web Tools Platform, is the set of tools available within Eclipse to create Java web applications. The WTP project is hosted at /webtools/. You can go to the project page to get more information on WTP.The “data services” software available for the Flex framework consists of web applications that run ina web container. Any custom logic you write with the data services either will be part of a web appli-cation or will be accessed from a web application. Therefore, if you are starting from scratch, choos-ing to create a joint project is often useful. If your Java-side application already exists, as in the case of267。

FLEX与C#、PHP、JAVA语言通信全面解析以下介绍几种最为常见和实用的FLEX与现有开发语言通信的方法:1.C#2.PHP3.JAVA1.Flex与C#通信(.net开发中常用)Flex端代码:public static function SendMessage(objXML:XML,objResultHandle:Function):void {var objHttpService:HTTPService = new HTTPService();objHttpService.url = "http://localhost:8085/upfiledata.aspx"; //发送到的C#页面objHttpService.resultFormat = "e4x";objHttpService.addEventListener(ResultEvent.RESULT,objResultHandle);objHttpService.method = "POST";objHttpService.contentType = "application/xml";objHttpService.send(objXML); //objXML 要发送的数据}public function objResultHandle(evt:ResultEvent):void{evt //接收到的数据}C#端:protected void Page_Load(object sender, EventArgs e){XmlDocument objProtocolDom = new XmlDocument();objProtocolDom.Load(Request.InputStream); //objProtocolDom接收来自Flex端所发送的数据流Response.ContentType = "text/xml";Response.Write(objResultDom.OuterXml); //向Flex端下发数据流}2.Flex与php通信Flex代码:<?xml version="1.0" encoding="utf-8"?><mx:Application xmlns:mx="/2006/mxml"creationComplete="onInit()" xmlns="*" layout="absolute"backgroundGradientColors="[#ffffff, #c0c0c0]"><mx:Script><![CDATA[public function onInit():void{userRequest.send();}]]></mx:Script><mx:HTTPService id="userRequest" url="request.php" useProxy="false"method="POST"><mx:request xmlns=""><username>{username.text}</username><emailaddress>{emailaddress.text}</emailaddr ess></mx:request></mx:HTTPService><mx:Form x="22" y="10" width="356"><mx:HBox><mx:Label text="Username"/><mx:T extInput id="username"/></mx:HBox><mx:HBox><mx:Label text="Email Address"/><mx:T extInput id="emailaddress"/></mx:HBox><mx:Button label="Submit" click="userRequest.send()"/></mx:Form><mx:DataGrid id="dgUserRequest" x="22" y="128"dataProvider="{er}"><mx:columns><mx:DataGridColumn headerText="User ID" dataField="userid"/><mx:DataGridColumn headerText="User Name" dataField="username"/> </mx:columns></mx:DataGrid><mx:T extInput x="22" y="292" id="selectedemailaddress"text="{dgUserRequest.selectedItem.emailaddress}"/></mx:Application>php代码:<?php/* Thanks to Pete Mackie for the code below */Define(’DATABASE_SERVER’, ’localhost’);Define(’DATABASE_USERNAME’, ’root’);Define(’DATABASE_PASSWORD’, ’root’);Define(’DATABASE_NAME’, ’flextest’);# Connect to the database$mysqli = new mysqli(DATABASE_SERVER, DATABASE_USERNAME, DATABASE_PASSWORD, DATABASE_NAME);# Check connectionif (mysqli_connect_errno()) {printf("MySQL connect failed: %s\n", mysqli_connect_error());exit();}# Quote variable to make safefunction quote_smart($value) {global $mysqli;# Stripslashesif (get_magic_quotes_gpc())$value = stripslashes($value);# Quote if not integerif (!is_numeric($value))$value = $mysqli->real_escape_string($value);return $value;}if (!empty($_POST) && $_SERVER[’REQUEST_METHOD’] == ’POST’) { if ($_POST[’emailaddress’] && $_POST[’username’]) {# Add the user$query = sprintf("Insert INTO users VALUES (’’, ’%s’, ’%s’)",quote_smart($_POST[’username’]), quote_smart($_POST[’emailaddress’]));if (!@$mysqli->query($query)) {printf("’flextest’ user database query insert error: %s\n", $mysqli->error);$mysqli->close();exit();}}}# Return a list of all the usersif (!$result=@$mysqli->query("Select * from users")) {printf("’flextest’ user database query select error: %s\n", $mysqli->error);$mysqli->close();exit();}$xml_return = "<users>";while ($user = mysqli_fetch_array($result, MYSQLI_ASSOC)) {$xml_return .="<user><userid>".$user[’userid’]."</userid><username>".$user[’username’]."</usernam e><emailaddress>".$user[’emailaddress’]."</emailaddress></user>\n";}$xml_return.= "</users>";$mysqli->close();echo $xml_return;?>3.FLEX与JAVA之间的通信这里介绍一种方法:使用BlazeDS实现Java和Flex通信BlazeDS 是一个基于服务器的Java 远程控制(remoting) 和Web 消息传递(messaging) 技术,它能够使得后端的Java 应用程序和运行在浏览器上的Adobe Flex 应用程序相互通信。

网上文字参考:二.Flex工程加入Java元素1.切换到Flex视图,新建Flex project:FlexProjectAddJ2ee说明:服务器选择J2EE勾选Create combined Java/Flex project using WTP2.点击Next,配置J2EE服务器说明:Target runtime:指定tomcat的安装目录即可Context root:项目名称FlexProjectAddJ2eeContent folder:WebRootFlex WAR file:D:\tomcat6.0.26\webapps\blazeds.warOutput folder:自定义输出路径,一般设置成根目录WebRoot3.点击下一步,采用默认的配置就可以,点击完成,该工程就建立完成4.让它变成web工程由MyEclipse发布吧右键项目-->MyEclipse-->Add Web Project Capabilities...勾掉Create Web.xml避免覆盖,选择J2EE5.0点击Finish,现在我们的工程的图标变成了J2EE Web工程了,这意味着,你可以用MyEclipse 来发布它或者添加更多容器比如hibernate、spring等5.工程建好以后,可以通过右键-->属性来进行更多的设置这样一个Flex+Java的工程就建立完成下面是实际创建的图片截图,自己测试的其中Flex War file:只是使用blazeds.war中的一些jar包和配置文件而已,也就是会把里面的jar包拷贝到项目的lib目录中使用的,把里面的flex\*.xml拷贝到flex目录中。
下面的output folder输出目录,就是输出编译好的swf文件,用当前目录的webRoot目录为好,可以用绝对路径,这样,flex文件一有修改,web那边就可以实时得到新的。