s商业智能1
- 格式:ppt
- 大小:3.00 MB
- 文档页数:83
关于visualization dashboards 你知道多少?在各个行业飞速发展的同时,数据可视化的需求正急剧增长。
一部分原因是更多的公司正在寻求通过对大数据分析让数据驱动团队来分析每一条线索,每一次成功案例和每一次潜在的机会,并相应的做出调整。
这就是visualization dashboards实时可见的至关重要性。
那么关于visualization dashboards你又有多少了解呢?通常情况下,visualization dashboards有以下几种展现形式:一、单纯的数字展示大数据的最终分析结果,其中有一种是关键指标的计算结果,其发展内容最简单来说就是一个数字或者百分比,展现形式可以是较为鲜艳的图片、突出数字的基础上增加小部分的文字描述。
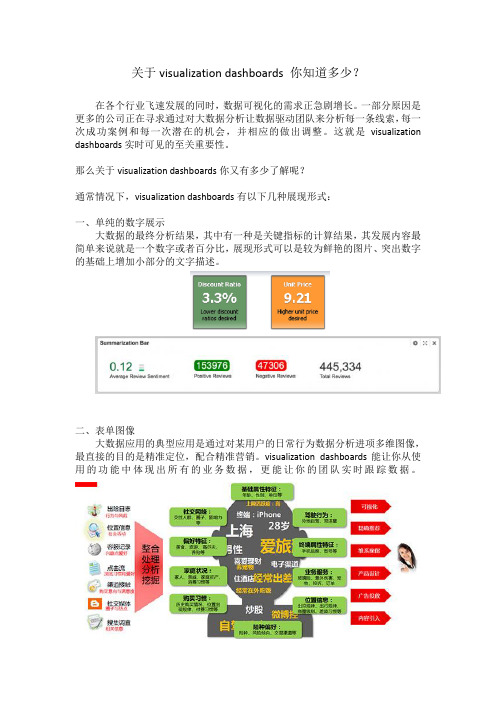
二、表单图像大数据应用的典型应用是通过对某用户的日常行为数据分析进项多维图像,最直接的目的是精准定位,配合精准营销。
visualization dashboards能让你从使用的功能中体现出所有的业务数据,更能让你的团队实时跟踪数据。
三、信息检索大数据+搜索引擎是大数据常见的高端应用模式,基于海量数据的存储和引索,通过底层的数据分布式计算,快速的获取搜索内容。
这不仅节省时间和金钱成本,还可以给出立即采取行动的信息。
四、关键词频率在日常文案记录型工作较多的行业,对非结构的文本自动匹配,通过文字增强功能。
在《大数据时代》一书中美国纽约作为典型案例进行了阐述。
五、其他OLAP典型展示仪表盘能让你的团队将这些技能全部融合在一起,并给人留下深刻的印象。
商业智能常见的展示和分析模式同样适用于处理加工后的大数据。
在数据可视化的趋势下,对图表的需求越来越旺盛。
但仪表盘上的可视化图表并不是越炫越好。
visualization dashboards的使命就是让数字营销的数据变得真正的简单易懂,将这些技能全部融合在一起,并给人留下深刻的印象。

sap 基础知识SAP 基础知识SAP(Systems, Applications, and Products in Data Processing)是一家全球领先的企业应用软件公司,其产品广泛应用于企业的各个领域,包括财务会计、物料管理、采购、销售、供应链管理等。
掌握SAP的基础知识对于企业管理人员和IT专业人士来说是非常重要的。
本文将介绍SAP的基础知识,包括SAP的发展历程、SAP的产品组合和SAP的应用场景。
一、SAP的发展历程SAP成立于1972年,最初是一家德国的软件公司,致力于开发企业资源规划(Enterprise Resource Planning,简称ERP)软件。
随着时间的推移,SAP逐渐发展壮大,并成为全球领先的企业应用软件公司。
目前,SAP已经发展成为一家全球性的公司,在全球拥有众多的客户和合作伙伴。
二、SAP的产品组合SAP的产品组合非常丰富,涵盖了企业的各个方面。
以下是SAP的主要产品:1. SAP ERP:SAP ERP是SAP最核心的产品,它包括财务会计、物料管理、采购、销售、供应链管理等模块,帮助企业实现全面的业务管理。
2. SAP S/4HANA:SAP S/4HANA是SAP最新推出的一款基于内存数据库的ERP系统,它具有更快的数据处理速度和更强大的分析能力,帮助企业实现实时决策和数字化转型。
3. SAP SuccessFactors:SAP SuccessFactors是一款人力资源管理软件,它涵盖了员工招聘、培训、绩效管理等方面,帮助企业优化人力资源管理。
4. SAP Ariba:SAP Ariba是一款采购管理软件,它通过电子化采购流程,帮助企业实现采购效率的提升和成本的降低。
5. SAP Hybris:SAP Hybris是一款客户关系管理软件,它帮助企业实现销售和市场营销的数字化转型,提升客户满意度和销售业绩。
6. SAP BusinessObjects:SAP BusinessObjects是一款商业智能软件,它提供了数据分析、报表制作、数据可视化等功能,帮助企业进行数据驱动的决策。

Version 1.3QR Read and RouteVersion 1.3Version 1.3 It is the reader's responsibility when discussing the information contained thisdocument to maintain a level of confidentiality that is in the best interest of RicohUSA INC and its member companies.NO PART OF THIS DOCUMENT MAY BE REPRODUCED IN ANY FASHION AND/OR DISTRIBUTED WITHOUT THE PRIOR PERMISSION OF RICOH USA INCAll product names, partner’s brands and their products, domain names or product illustrations, including desktop images used in this document are trademarks, registered trademarks or the property of their respective holders and should be noted as such.Any trademark or registered trademark found in this support manual is used inan informational or editorial fashion only and for the benefit of such companies.No such use, or the use of any trade name, or web site is intended to convey endorsement or other affiliation with Ricoh products.Copyright © 2018-2019 Ricoh USA INCVersion 1.3Table of ContentsTable of Contents (4)1Preface (6)2Introduction (7)3Cloud Service Connection (9)4Configuring default Values (10)Bar Code Type (12)Selecting Default Root Folders (12)File Name Formula (12)OCR 13Scan Settings (13)5Operation of QR Read and Route Application (14)Folder (17)Bar Code Type (18)OCR 19Scan Settings (20)6SharePoint QR Read and Route (23)Configuring Default Error Folders in User Site (25)7RICOH Content Manager Cover Sheet (27)Configuring Default Error Folders in User Site (28)RICOH Content Manager Indexing (30)8Limitations (33)QR Read and Route Limitations (33)User Site Limitations (33)General Limitations (34)OCR Limitations (35)9 Appendix (38)File Name Formula (38)Sample Formulas (38)How to Validate the Formula (38)Formula Functions (39)Version 1.3Version 1.3 1PrefaceThis guide provides the details on how to use the QR Read and route workflowAbout This GuideThis guide is divided into following primary sections:1. I ntroductionThis section lays the foundation for understanding the workflow specification2. C loud Service ConnectionThis section describes how to do service Coordination with external cloud Services like Box, Dropbox, Google Drive, OneDrive for Business, SharePoint Online, RICOH Content Manager3. Configuring Default ValuesThis section contains step-by-step instructions on how to configure default settings related to QR Read and Route application in User Site4. Operation of QR Read and Route ApplicationThis section contains step-by-step instructions on how to operate QR Read and Route application on MFP Operation panel5. LimitationsProduct Limitations6. AppendixThis section contains additional reference materialsNote:The operation panel screen shot images and User Site images provided in this document are for illustrative purposes only. These images may not reflect the exact image you experience on your multi-functional printer (MFP device).2IntroductionWhat is QR Read and Route workflow?QR Read and Route is a workflow application developed on Ricoh Smart Integration Platform.A typical use case for this workflow is displayed here:This use case is related to manufacturing, Manager creates a Work Order, which also has a QR Code or Datamatrix Code. QR Code/Datamatrix code has Work Order number and Employee number. Employee then prints this workorder, after completing the workorder, he or she completes filling the work order. Then Employee scans the document using Smart QR Code Scan and Route applicationWorkflow uploads the document to cloud service of choice (Box, Dropbox, Google Drive, OneDrive for Business or SharePoint online) into the folder named Employee number. Also filename is set as Workorder#_completed.Note: Document with QR Code is generated by Customer’s line of business application. Also make sure the data in QR Code matches the QR Code data format mentioned in the next page.Workflow SpecificationDefault values can be configured for Folder, Bar Code Type, OCR, File Name Formula and Scan Settings3Cloud Service ConnectionWhat is Cloud Service Connection?Before using QR Read and Route, user need to establish connection (authentication) with Cloud service of choice. As of now following Cloud Services are supported.1.Box2.Dropbox3.Google4.OneDrive for Business5.SharePoint online6.RICOH Content ManagerFor each Cloud Service there is a separate QR Read and Route application available On MFP Operation Panel.Refer to Smart Integration Cloud Service Coordination User Guide for step by step instructions.4Configuring default ValuesSmart Integration User Configuration Site URLhttps:///site/homeTo configure QR Read and Route, it is necessary to login to user site using user credentials.Click on ‘Set Personal application settings’Click on ‘Smart QR Read and Route’. This will display a page where all necessary parameters can be configured.Version 1.3Settings available for Smart QR Read and RouteVersion 1.3 Bar Code TypeBar Code Types supported: QR Code and DatamatrixSelecting Default Root FoldersClick on Select Folder to set default root folder for Scanned documents.Root FoldersFile Name FormulaDefault Formula:_[workorder_number] & “completed”Note: Refer to Appendix for Functions related to formula, samples and how to validate formula before saving in User Site.Note: There is no syntax checker in User Site, entering bad syntax will cause the workflow to fail. Please validate formula as mentioned in appendix before saving in User Site.Version 1.3 OCRDefault value for OCR can be configured.Scan SettingsDefault Scan settings can be configured hereNote: For a better QR Code/Datamatrix recognition, set the Manual Density to 3Version 1.35Operation of QR Read and Route ApplicationSmart Integration MFP BrowserNX URLhttps:///si-apps/pub/index.htmlRicoh Smart Integration Initial LoginAbove URL is available as Bookmark ICON on MFP. Very first time, administrator need to login to the site either using Tenant ID, User ID and Password or Email address and password.Option 1: Login with Tenant IDOption 2: Login with Email AddressAfter administrator login subscribed application will be displayedSelect ‘QR Read and Route’ application.End User is requested to Login. Press ‘Login’ Button to Login.User need to login to the site either using Tenant ID, User ID and Password or Email address and password.Option 1: Login with Tenant IDOption 2: Login with Email AddressAfter successful user login ‘QR Read and Route’ Application Screen is displayed Following Settings are available:A.Folder [Root Folder for Scanned Documents, a sub folder under the root folder iscreated based on the data in QR Code]B.Barcode Type: QR Code, DatamatrixC.OCR [Off, PDF, PDFA,WORD,EXCEL]FolderTouch on ‘All files’ to open folder browsing dialog and then select desired folderBar Code TypeTouching on Bar Code Type, selection field displays available Bar Code OptionsSelect the desired Barcode type which is available on the document to be scanned.Version 1.3 OCRTouch on OCR to select available optionsVersion 1.3 Scan SettingsTouch on ‘Scan Settings’ to display Scan Settings ScreenAvailable OptionsRange -3 to +36SharePoint QR Read and RouteNote: Box, Dropbox, GoogleDrive, OneDrive for Business services, have a root folder. So if user does not select folder, document gets scanned to root folder or default folder set in User Site. In the case of SharePoint, it is necessary to Select a Site and Library/Folder under the site, by browsing.Touch on ‘(unnamed Folder)The first level listed here are sites. Document cannot be uploaded to Site, users need to select a Library/folder under a site. If users select a site, following message is displayed.Please select a Folder listed under a site.Touch on one of the folders, then Touch on ‘OK’Configuring Default Error Folders in User SiteSince there is no root folder in SharePoint, it is mandatory to configure the Folders for documents, when they fail process due to invalid QR code data format or Missing/Bad QR Code. This is done in User Configuration Site.https:///site/homeClick on ‘Select Folder’ to open Folder Browsing Dialog. Click on Site and then a desired folder and Click ‘OK’ to select folder.Once Configured, Selected folder is displayed.7RICOH Content Manager Cover SheetNote:1.Box, Dropbox, Google Drive, OneDrive for Business services, have a root folder. So ifuser does not select folder, document gets scanned to root folder or default folder set in User Site. In the case of Ricoh Content Manager, it is necessary to Select aCabinet first by browsing.2.RICOH Content Manager Supports Indexing feature, User can select a DocumentType and also set index values, based on what is configured in RICOH ContentManagerTouch on ‘(unnamed Folder)The first level listed here are Cabinets. Users need to select Cabinet or a folder under Cabinet. Please touch on ‘Cabinet’ then touch on ‘OK’.Configuring Default Error Folders in User SiteSince there is no root folder in RICOH Content Manager, it is mandatory to configure the Folders for documents, when they fail process due to invalid QR code data format or Missing/Bad QR Code. This is done in User Configuration Site.https:///site/homeClick on ‘Select Folder’ to open Folder Browsing Dialog. Click on Site and then a desired folder and Click ‘OK’ to select folder.Once Configured, Selected folder is displayed.RICOH Content Manager IndexingDocument Type and Indexing settings are available in RICOH Content Manager. Administrator of RCM will configure Document Types and associated indexing values. QR Cover Read and Route displays available Document Type and associated indexing values. Users can select Document Type and indexing values before scanning.Touch on ‘Document Type’ this will display available Document TypesSelect desired ‘Document Type’Touch on ‘indexing’ this will display indexing values related to selected ‘Document Type’Depending on the type of values, different user input interface will be displayed.Details of indexing values are shown below.8LimitationsQR Read and Route LimitationsFollowing characters are not supported for folder and filename creation. Using these characters in employee number and work order number in QR code data is invalid.Since these values are used to create folder and filename.~"#%&*:<>?/\{|}If Scanned document is missing QR Code or QR code has invalid data, scanned document is uploaded to ‘temp’ folder.User Site LimitationsSupported Browsers for User Site are:o Internet Explorer: 11 or latero Edge: Latest Versiono Chrome: Latest Versiono Firefox: Latest VersionLimitations for Home Screen/Applicationso Home: Maximum 20 for each profile, Max 32 characters for the name.o Applications: Maximum 18 for each home screen, Max 32 characters for the nameUser Managemento Email address is unique in the system; same Email address cannot be used even if user belongs to different Tenantso Users belong to same tenant cannot set different time zoneso User cannot change their login Email address, need admins assistance to change email addressVersion 1.3 General LimitationsOnce Administrator has logged in to a Tenant on MFP, administrator from another tenant cannot login to same MFP. Refer to guide on ‘How to remove registereddevice’Back button inside application display screen must be used, instead for ‘Back’ button on the operation panel.Folder and File Search results varies from Cloud Service to Cloud Service, this depends on the Search API for each service.Version 1.3 OCR Limitations9 AppendixFile Name FormulaFormula functions are similar to Microsoft Excel Formulas. Not all Excel functions are relevant and supported.Following variables from the workflow application are available to use in the formula1.TenantId [Smart Integration Tenant ID]erId [Smart Integration User ID]3.employee_number [From QR Code]4.workorder_number [From QR Code]Data format in QR Code:employee_number:workorder_numberHow to Validate the FormulaOpen Microsoft Excel, enter the formula in an excel field add ‘=’in front of the formula. Note: Use only functions, but do not use variables from workflow mentioned above to validate in Excel.Formula FunctionsFormula Evaluation is based on Open Source, Apache POINote: Please see link below. All formulas listed may not be relevant to workflow application. Here is list of formulas./components/spreadsheet/eval-devguide.html。

SAP系统本词条由―科普中国‖百科科学词条编写与应用工作项目审核。
SAP 是全球企业管理软件与解决方案的技术领袖,同时也是市场领导者。
30余年,通过其应用软件、服务与支持,SAP持续不断向全球各行业企业提供全面的企业级管理软件解决方案。
随着以SAP为代表的新一代商业智能应用所受到企业用户的广泛青睐,SAP在中国用户的激增,具备最终用户或内部顾问应掌握的基本SAP技能的人才需求数量也相应增加。
中文名:SAP系统外文名:systems applications and products in data processing国家:德国类别:ERP软件别称:企业管理解决方案时间:1972年功能:用于ERP管理的软件目录1基本信息2产品介绍3优点4缺点5包含模块6功能特点.7产品种类8常用命令▪系统配置▪后台维护▪程序编辑▪表间维护▪用户权限.9产品比较▪成熟度▪功能比较▪软件特性▪复杂性回报.10系统管理11实施因素12范围管理13员工管理14系统要点基本信息SAP全称:systems applications and products in data processing 。
SAP的英文读音为:[英][sæp][美][sæp]SAP起源于Systems Applications and Products in Data Processing。
SAP既是公司名称,又是其产品——企业管理解决方案的软件名称。
SAP是全世界排名第一的ERP软件,SAP公司于1972年在德国创立。
五位创始人(Dietmar Hopp, Hans-Werner Hector, Hasso Plattner, Klaus Tschira, and Claus Wellenreuther)于德国曼海姆初创时的公司名为Systemalyse und Programmentwicklung,后根据Systeme, Anwendungen und Produkte in der Datenverarbeitung ("Systems, Applications and Products in Data Processing")将公司名称缩写为SAP。

SAPBO产品介绍SAP BusinessObjects(简称SAP BO)是德国SAP公司(Systems, Applications, and Products in Data Processing)生产的一套商业智能(Business Intelligence,BI)产品。
SAP BO是一个全面的业务智能套件,包含了一系列用于报告、查询和分析企业数据的工具和应用程序。
1. Crystal Reports:用于创建和生成高质量的交互式报告。
Crystal Reports提供了丰富的数据可视化功能,用户可以轻松地创建复杂的报表,并可以将其导出为多种格式,如PDF、Excel等。
2. Web Intelligence:能够将企业数据转化为可视化报表和仪表盘。
Web Intelligence具有分析和查询功能,用户可以通过简单的拖放操作创建自定义的报表,同时还可以通过Web界面共享和交互。
3. Dashboards:为企业提供了可视化的仪表盘功能,能够将关键指标以图表、图形、表格等方式展示。
Dashboards可以实时监测和分析数据,帮助用户及时作出决策。
4. Lumira:是一个自助式的数据可视化和分析工具。
用户可以通过Lumira将多个数据源的数据整合在一起,并通过图表、地图等方式展示数据,以更好地理解和分析企业数据。
5. Explorer:提供了一种直观的方式来进行数据挖掘和发现,用户可以通过可视化的方式探索数据,从而发现隐藏在数据中的趋势和模式。
6. Analysis for Office和Analysis for OLAP:提供了丰富的数据分析功能。
用户可以通过Excel或者Web界面连接到不同的数据源,对数据进行切片、钻取和过滤等操作,从而深入了解数据。
7. Mobile BI:为移动设备提供了报表和仪表盘的访问和分析功能。
用户可以通过手机或平板电脑随时随地查看和分析企业数据,从而更加灵活地进行决策。

系统集成项目管理工程师习题库与答案1、信息技术服务标准(ITSS)规定了IT服务的组成要素和生命周期,IT服务生命周期由规划设计、部署实施、服务运营、持续改进、()五个阶段组成。
A、客户满意度调查B、监督管理C、二次规划设计D、项目验收答案:B2、在项目验收时,建设方代表要对项目范围进行确认。
下列围绕范围确认的叙述正确的是()。
A、范围确认是确定交付物是否齐全,确认齐全后再进行质量验收B、范围确认时,承建方要向建设方提交项目成果文件如竣工图纸等C、范围确认只能在系统终验时进行D、范围确认和检查不同,不会用到诸如审查、产品评审、审计和走查等方法答案:B3、与组织日常的、例行的运营工作不同,项目具有些非常明显的特点。
“没有完全一样的项目”体现了项目的()A、临时性B、独特性C、差异性D、系统性答案:B4、合同内容是当事人订立合同时的各项合同条款。
合同的主要内容包括()。
①当事人各自的权利、义务;②项目费用及工程款的支付方式;③项目变更约定;④违约责任;⑤保密约定。
A、①②④B、①②③④⑤C、①②③⑤D、②③④答案:B5、关于项目管理环境中的冲突管理的叙述中,()是正确的。
A、通过建立团队基本规则及实施可行的项目管理经验,冲突是可以避免的B、解决冲突最理想方法是求同存异C、冲突管理的最终目的是消除意见分歧D、不管冲突对项目的影响是正面的还是负面的,项目经理都有责任处理它答案:D6、2015年国务院开发了《关于积极推进“互联网+”行动的指导意见》,其总体思路是顺应世界“互联网+”发展趋势,充分发挥我国互联网的规模优势和应用优势,推动互联网由()拓展,加速提升产业发展水平,增强各行业创新能力,构筑经济设计发展新优势和新动能。
A、实体经济向虚拟经济B、消费领域向生产领域C、第二产业向第三产业D、线上领域向线下领域答案:B7、在制订项目进度计划过程中,()可以根据有限的资源对项目进度进行调整,是一种结合了确定性与随机性的一种方法。
雅思口语successful business【释义】successful business成功的企业:指在市场竞争中取得优势,实现盈利和持续发展的企业。
【短语】1Start a successful business自己搞生意2Successful Business Negotiating Skills Workshop成功商务谈判技巧3The Successful Business Plan成功的企业计划4Successful Business Intelligence成功的商业智能5successful business woman profile成功的事业型女性的个人资料6Successful business negotiation skills成功商务谈判技巧7Successful Business Quotes成功的商业报价8Successful Business Models成功商业模式9Supporting successful business企业成功开展业务【例句】1She's built up a very successful business.她创办的生意很红火。
2He was content to watch from the sidelines as his wife built up a successful business empire.他满足于站在一旁,看妻子一步步地建立起一个成功的商业帝国。
3Apple doesn't want to be a successful business.苹果并不想打造一个成功的商业帝国。
4What does it take to start a successful business?如何成功地创业?5And that's how successful business is done,is it not?这就是成功做成生意的方式,不是吗?6To destroy a previously successful business model.破坏曾大获成功的商业模式。
商业分析的基本方法和工具商业分析是一项非常重要的工作,它为企业提供了必要的信息和数据,帮助企业更好地制定战略和决策。
它主要通过分析市场和竞争对手,来评估企业在行业中的地位和竞争优势,找到适合企业的发展方向。
本文将介绍商业分析的基本方法和工具,帮助读者更好地了解商业分析和如何发挥商业分析的重要作用。
1. SWOT 分析法SWOT 分析法是商业分析中最常用的方法之一。
SWOT 分析法能够帮助企业识别自身的优势和劣势,了解市场和竞争对手的机会和威胁。
SWOT 分析法是一种框架式的方法,它将商业分析分为四个方面:强项(Strengths)、弱项(Weaknesses)、机会(Opportunities)和威胁(Threats)。
强项和弱项是企业内部的因素,它们可以是企业的特有技术、品牌价值、管理团队等等。
机会和威胁则是企业外部因素,如市场发展趋势、竞争对手、政策法规等等。
通过对这四个方面的分析,企业可以了解自身的优劣势以及未来的发展方向。
2. PEST 分析法PEST 分析法是商业分析中的另一项常用方法。
PEST 分析法帮助企业了解外部环境因素,包括政治、经济、社会、技术等因素,以便制定战略和决策。
政治因素包括政策法规、政治稳定性、政治风险等,这些因素会影响企业的发展。
经济因素包括经济增长、通货膨胀等因素,这些因素对企业的销售和市场需求有着直接的影响。
社会因素包括人口结构、文化背景和生活方式等,这些因素会影响企业的定位和产品设计。
技术因素包括科技创新、信息技术等,这些因素会影响企业的生产效率和产品质量等。
3. Porter's Five Forces 模型Porter's Five Forces 模型是商业分析中另一项经典工具。
该模型是由商业分析专家麦克•波特提出的,它对企业的竞争环境进行了分析。
五种竞争力量包括:竞争态势、供应商、购买者、替代品和新进入者。
这些力量都会影响企业的市场定位和竞争优势。