cateye猫眼码表 设置说明书
- 格式:docx
- 大小:142.48 KB
- 文档页数:4
电动车加装路码表记[这个贴子最后由sdbbsdbb在 2006/10/05 09:11pm 第 1 次编辑][watermark]猫眼、马(码)表、电驴----电动车加装路码表记近日,发现买了一年的小电驴明显后劲不足,特别是在电量指示灯进入中间段后,上桥乏力、速度偏慢。
一来是为了知道我的电池是否需要更换,二来也为了玩一把DIY,某天突发奇想,产生了一个类似于“床上叠床”的念头---在电动车上加装路码表。
尽管如今电动车品种多多、琳琅满目,可有路程表的车型可说是廖廖无几(而且就算有,也是机械型的,易坏难修,不用也罢)。
有了构思,马上动手,先是上网,打开谷歌,搜索一下“路程表”、“码表”或“电动车码表”,会发现有N多的内容,可仔细一琢磨,发现适合我的只有自行车用码表。
原因何在?其实很简单,性/价比。
在网上其实有不少“电动车专用码表”,而且价格不贵,加上运费也不超过半百大洋,可一来呢用户评价一般般,二来做工实在太那个,体积大不说,而且显示表与底座还不能分离,而如果把这样的新奇东东放在公众停车场无疑是“开门辑盗”。
因此,最终放弃了便宜的国产货,而选择了质平价贵的“舶来品”(我敢保证,这些玩意儿绝对是大陆生产,不过那质量就是比那些自主品牌强得多)。
其实,选择自行车用码表比选择那些“电动车运用码表”要麻烦得多,一是安装麻烦,后者因为在设计时已经考虑了相关因素,比如信号线的长度、磁钢的形状等;二来么,就得拜广告与宣传所赐了,具体原因下面详述。
但我基于品质的考虑,再加上自己丰富的DIY 经验,最终还是选择了并非最佳选择的自行车用码表。
种类决定了,下来就是选品牌了。
苏州地方小,这些新奇特的玩意儿就更是乏人问津了,先去了我的电动车所在的专卖店与特约维修店(也是某名牌产品,而且质量也的确不错),一打听,米有;再去某大型电动车4S店、米有;最后来到了最精英的自行车品牌---捷安特的专卖店。
先去了人民路的那家,一看,有货,是猫眼(CATEYE),可一看我的车子,修配的师傅立马拒绝,说不是钢丝型的电动车米法装。
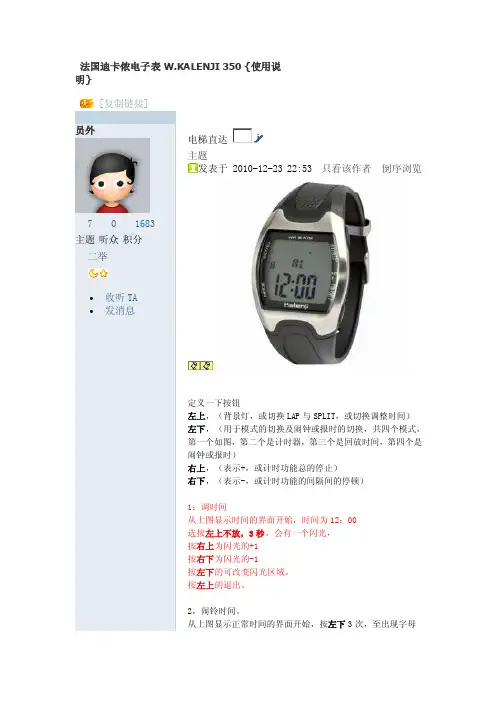
法国迪卡侬电子表W.KALENJI 350 {使用说明}[复制链接]员外7主题听众1683积分二举∙收听TA∙发消息电梯直达主题发表于 2010-12-23 22:53 |只看该作者|倒序浏览定义一下按钮左上,(背景灯,或切换LAP与SPLIT,或切换调整时间)左下,(用于模式的切换及闹钟或报时的切换,共四个模式,第一个如图,第二个是计时器,第三个是回放时间,第四个是闹钟或报时)右上,(表示+,或计时功能总的停止)右下,(表示-,或计时功能的间隔间的停顿)1:调时间从上图显示时间的界面开始,时间为12:00选按左上不放,3秒,会有一个闪光,按右上为闪光的+1按右下为闪光的-1按左下的可改变闪光区域。
按左上的退出。
2,闹铃时间。
从上图显示正常时间的界面开始,按左下3次,至出现字母再按左上出现分钟闪光,按右上,右下可调速闪光区域数值。
按左下可改变闪光区域再按左上退出调整,再按右上,可选择是闹铃还是定点报时。
再按左下可切换至正常时间。
备注:图标铃铛为报时,另一个为闹钟。
3,计时器,从上图显示正常时间的界面开始,按左下一次,切换至计时器。
可选择是每圈时间独立,还是每圈时间叠加。
LAP表示独立,(若第一圈跑3S,第二圈跑2S,第三圈跑1S, LAP计时方式为第一圈显示3S,第二圈显示2S,第三圈显示1S。
总时间显示在回放内)SPLIT表示叠加,(若第一圈跑3S,第二圈跑2S,第三圈跑1S, SPLIT计时方式为第一圈显示3S,第二圈显示5S,第三圈显示6S。
总时间显示在回放内)按左上3S不放,可在LAP与SPLIT之间切换。
若选LAP,计时开始按右上,若要计每圈时间,需要一次计时结束按右下,第二次计时结束再按右下,。
最后一个停止按右上。
需要看最近十圈的时间请先按下左下,再按右上,右上选择往前往后,如果需要将计时器清零,请按左下至LAP 或SPLIT 再按右下。
即清零。
SPLIT 操作与LAP相同。
教你如何用WORD文档(2012-06-27 192246)转载▼标签:杂谈1. 问:WORD 里边怎样设置每页不同的页眉?如何使不同的章节显示的页眉不同?答:分节,每节可以设置不同的页眉。
警告•磁鐵、感應器及固定座應安裝妥當,並應定期檢查裝置是否鬆脫。
•按照當地法規處理用過的電池。
當不小心吞食時,請儘速就醫。
•避免讓碼錶在烈日下曝曬過久。
•請勿任意拆卸碼錶。
•用柔軟的布沾附中性洗潔劑來清洗碼錶及其配件。
請勿使用稀釋劑、苯或酒精來擦拭碼錶。
無線感應器感應器的功能是在有限的範圍內接收訊號,以防止異常訊號干擾。
因此,感應器及碼錶必須裝置在相對接近的位置上。
當溫度或是電池電力過低時,這兩個裝置需要比正常情況下更為接近。
感應器必須安裝在前叉的上緣,而感應器和碼錶間的距離不要超過70cm 。
碼錶安裝於車手豎桿上,且碼錶底部面向感應器(需考慮豎桿的角度)。
碼錶在以下情況時可能會受干擾,導致偵測有誤:•靠近TV 、PC 、收音機、汽機車,或是在汽車及火車的車廂內。
•靠近鐵道交叉路口、鐵軌、TV 發射站或是雷達基地。
•靠近裝有無線感應器的第二台腳踏車。
目前速度感應器訊號接收圖示同時和感應器訊號閃爍次要測量圖示 配速箭號指示出是否目前的速度比平均速度快或慢( 較快 較慢)自動模式圖示 速度單位模式符號..........................................................................b 指示出目前所選的模式Tm (Tm 2)...............[已耗用時間]Dst (Dst 2)...............[行程距離]Av (Av 2)..................[平均速度]Mx ............................[最大速度]..........................[總距離]] 開始/停止測量此碼錶允許自動(自動模式)或是手動模式的測量。
在測量期間,速度單位圖示會閃爍。
最大速度及總距離將會根據測量自動更新。
•自動模式(自動測量)如果看到 圖示時,便是自動測量。
在自動模式下,無法使用“開始/停止"鍵來開始或是停止測量。
有关30131 23功能单车码表的设定任何按键打开本机画面,双手按住左右按键,直至全部画面变成88888,在按右键进入语言选择,再按右键选择【ENGL】按左键确认。
画面显示【SET-KM】按左确认。
画键面显示【SET-WS】即是车轮周长的设定,【请参照车轮周长表】按左确认。
画面显示【SET-ODO】,那是设定本码表的总里程,最高数字为99999,再按左确键认。
下一个画面显示【SERV/IC】设定维修里程提示,最大的数字999公路。
右键【MOOE】为数字增加,左键【SET】确认。
设定完毕后画面出现【BATT YSE CHANGE】即是以后在使用中,如出现这个画面就是更换电池的指示。
再按左键,画面出现【SET-KM】,确认后画面显示为【SET-KG】就是人体重量,此功能为骑行者运动后卡路里及消旨的计算的标准。
输入重量并确认。
下一个是12/24小时的时间格式。
左健确认后就是【CLOCK】时间设定,这是本机功能的最后一项。
接下来是怎样开启专业模式的功能。
按右健找出【CLOCK】或者【ODO】,再按住右健5秒画面出现【EXPERT】专业模式设定,再按一下右键,画面显示【OFF STW】按右键选择开,画面显示【NO STW】此项为秒表功能打开,按左键确认。
再出现的是【TEMOOoC】开启温度功能,确认后画面进入【MNTEMP】最低温度功能开关,同样右键选择,左键确认。
接下去是【MXTEMP】最高温度功能开关,开启后出现的是【CAL】,打开后下一个是千卡路里【KCAL】再打开后是[【FAT】消脂计算功能。
开启以后下一个是【KM+】前进里程,设定开启了出现的画面是【TIME+】行程时间功能,再把他打开。
画面就会进入【SCAN】这个是自动扫描功能,也就是说再骑行的时候,按出这个功能,码表的画面就会不断的自动转换画面,显示各种功能的运作。
再按一下左键,本机所有的功能全部开启及设置完毕。
有关30131 23功能单车码表的设定任何按键打开本机画面,双手按住左右按键,直至全部画面变成88888,在按右键进入语言选择,再按右键选择【ENGL】按左键确认。
自行车码表使用方法
嘿,朋友们!今天咱来聊聊自行车码表这玩意儿,它可是骑行爱好者的好帮手呢!
那自行车码表到底咋用呢?其实很简单啦!首先,你得把码表安装在自行车上合适的位置,要牢固哦,可别骑一半掉了!然后设置好各种参数,比如轮径啥的。
在骑行过程中,它就能实时显示你的速度、里程、时间这些重要信息啦!但要注意哦,设置参数一定要准确,不然数据就不准确啦,那可就白瞎了。
而且安装也要仔细,要是松松垮垮的,那可不行!
说到这,有人可能会担心在使用过程中会不会不安全或者不稳定呀。
嘿,别担心!只要你安装正确,它稳稳当当的,不会给你添乱。
它就像你的小跟班一样,默默地为你服务,让你安心享受骑行的乐趣。
而且它又不重,也不会影响你骑车的平衡啥的,安全得很呢!
那自行车码表都有啥应用场景和优势呀?那可多了去了!不管你是日常通勤,还是长途骑行,它都能派上大用场。
你想想看,你能随时知道自己骑了多远,速度有多快,多有意思呀!而且它还能帮助你制定合理的训练计划呢,就像你的私人教练一样。
它的优势也很明显呀,小巧轻便,携带方便,操作简单,简直太赞了!
我就给你说个实际案例吧。
我有个朋友,他特别喜欢骑行,每次出去都带着自行车码表。
有一次他参加一个骑行活动,就靠着码表的数据,合理分配体力,最后顺利完成了比赛,还取得了不错的成绩呢!你说这码表厉不厉害?
总之,自行车码表这东西真的超好用,超实用!它能让你的骑行变得更加有趣,更加科学,更加安全!还等啥,赶紧去给自己的自行车装上一个吧!。
“猫眼”码表(CATEYE VELO 8)使用说明码表初始化:按住MODE键,并按下SET键。
码表内记录和设置全部清空。
1、初始化后,屏幕闪烁“Km/h”(公式),按MODE键可以切换为“mph”(英式),按SET键选择所需制式。
2、确定制式后,屏幕闪烁“26”,默认的车轮尺寸。
按MODE键可以在各个尺寸切换,按SET键确定车轮尺寸。
基本设置完成。
时钟的设置:在时钟模式,按SET键,时位闪烁,按MODE键调整,再按SET键确定,分位闪烁,按MODE键调整,再按SET键,完成时钟设置;按MODE 键可以在各个功能间切换;屏幕上部为实时车速,左下部为功能标志,右下部为该功能数据,按MODE键可以在各个功能间切换。
“猫眼”码表(CATEYE VELO 8)功能:功能一:骑行时间(Tm)功能二:骑行距离(Dst)功能三:平均速度(Av)功能四:最高速度(Mx)功能五:消耗卡路里(Ca) [没有什么用不大准确,因为不知道爬坡、下坡、顺风、逆风],但是可以给减肥的人一点安慰。
功能六:总路程(Odo)功能七:时钟功能八:实时速度;长按MODE键,可以清空除总路程外的其他记录。
按住MODE模式键(码表下方最大的一个键)约5秒后,屏幕闪动3次则除了事先输入值和总里程不变,其他数据均归零。
700c刚开始是指车轮直径(算外胎)为700毫米。
但后来外胎更细了所以整体直径就小了。
车圈直径622毫米(约24.48寸) ,26寸一般直径(算外胎)在660毫米。
但后来山地外胎也是推出了型号众多外径的外胎。
车圈直径559毫米(约22寸)。
采用不同粗细外胎车轮直径不同。
常见尺寸中700*20c和26*2.00周长相同.都为2114毫米. 700*23c 和26*2.125相同.都为2133毫米,其中20c和2.125为外胎规格(即外胎宽度).轮周长(含外胎)=直径X圆周率轮圈的半径,找一段线绳,在轴心固定,沿着辐条拉直,直到外胎,做好标记,就是半径。

cateye猫眼码表设置说明书(Cateye's table settinginstructions)The use of CATEYE MITY3 and ENDURO2 description tableInitial settings for 1.MITY3 and ENDURO2(a): first set the table while holding the first microprocessor, the 3 keys to remove all settingsTip: put the table upside down, hold down ST. /STOP and MODE keys, and then stab the SET key with a pencil or other sharp object(b): the display on the LCD screen flashes and disappears, leaving only a flashing K. K stands for kilometers / hour, M stands for miles / hour, and uses the MODE key to select the speed you want. Note that the clock function of your selected system is 12 hours or 24 hours, K is 24 hours, and M is 12 hours.Press the ST./STOP button to determine the format you selected.(c): \ "210\" will be flashing, this is to adjust the 700*23C tire settings. Please refer to the wheel diameter parameter in your manual or our website. Please pay attention to this number. In fact, it is the rotation of your tire when you ride a bicycle. If you want to enter the most accurate parameters, please proceed with the measurement.(d): press the MODE key to increase the parameter, press the ST./STOP key to reduce the parameter. The parameters determinedby SET keytable behind.Now your table has been set up complete.2. button instructionsTable on the right side of the button is the MODE button, the button on the left is ST./STOP key. You can use the MODE key to complete the control by mode.When the screen display time consuming function (TM), press the MODE button to convert to the average speed function (AV), and then press the MODE button to change to mileage 1 function, which is standard riding mileage function. Press MODE to return to time function at this time.The function of time consuming function is clock function. Under the elapsed time function, hold down the MODE key for 2 seconds, then turn to the clock function, and press MODE again to return to the elapsed time function.The auxiliary function of the average speed function is the maximum speed function (MX), using the same as above.Mileage 1 has 2 subsidiary functions. Hold down the MODE key for 2 seconds, then turn to mileage 2.2 miles is a separate meter function, it can keep on other parameters in the case of single empty. Just hold the ST./STOP and MODE keys at the same time for one second.Under the mileage 2 function, hold down the MODE button for 2 seconds and change to the total mileage function (ODO).In the mileage 2 or total mileage function, press the MODE button to return to mileage 1 function.3 (1) set function and mileage functionHold down ST at the same time. The /STOP and MODE keys can be cleared in one second.In standard mode, you must press the ST./STOP (S) key to start recording the elapsed time and mileageIn the automatic mode (AT), when the microprocessor receives the signal of the sensor on the front fork is at the beginning or end of the table behind the record according to the SET button to open or close the automatic function of the elapsed time or mileage function. A small AT symbol indicates this function.(2) set the clock functionWhen using the function table must stop working, the speed of symbols (K or M) must stop flashing. Under the elapsed time function, hold down the MODE key for 2 seconds, then turn to the clock function.You will see a small clock symbol. Hour starts flashing, press MODE to increase the number. Press the ST./STOP button, from the hour to the minute. Finally, press the SET key to confirm.The clock is the standard clock function for 12 or 24 hours to select the command clock that you choose. K is 24 hour system, M is 12 hour system. (see B notes)(3) set consumption time, maximum speed and average speed function for higher displayPress ST when the computer is in auto function. The /STOP key takes time, and the maximum speed and average speed function will be converted to higher display. Press the ST./STOP button again. You can change the speed for higher display.In standard mode (automatic function shutdown), hold down the ST./STOP key for 2 seconds.(4) class A or class B tire setting;Table for two different types of tires for quick and easy conversion. There are 1.5 circular containing A or B symbol table screen. A Class A is a road car for 700*23C. The B class is a mountain bike for the 26*1.95, which is designed to be sensitive as well as specially arranged for low speed vehicles. If your code is installed in the car on the mountain, we recommend the use of B class.In addition to the functions in total length (ODO), according to the code behind the SET button to change the settings.(5) change wheel diameter setting;When you are in the function (ODO), at the same time, accordingto the ST./STOP and MODE keys you can check the diameter of the wheel set, or press the table behind the SET button to change the settings. Press the MODE key to increase the parameter, press the ST./STOP key to reduce the parameter. The parameters determined by SET keytable behind.6. Replacement total mileageThis function is used in battery replacement or read mileage from another block number on the table.Hold the ST./STOP and MODE keys at the same time. K flashes the speed system and uses the MODE button to select the speed system you need (see the B instructions).Continue to hold down the MODE key when adding the previous number. \ "0\" will flash. Press the MODE key to increase the number. Press the ST./STOP button to change the number, then press SET key code behind the determination. (the following steps are the same as C)CATEYE TOMO XC CC-ST200 bike manual operation guideThe main display A. (speed) G. (M mode) button 1. bracket B. sensor pulse symbol H. S/S (start / stop) button 2. wire mode C. symbol I. set button 3. D. speed sensor unit symbol J. battery cover 4. magnet E. automatic mode symbol K. connection terminal 5. rubber pad F. auxiliary display (selection function) 6. bar with 1. button M button (model selection) a graph according to the diagram a sequential change mode, data is displayed on the display on the side. Press for more than two seconds to displaythe 12 hour clock. The 2. S/S button starts and stops measuring mileage and time. A unit of speed symbol flashing during measurement. This button is not valid when auto function. The 3. SET button is used to set the wheel circumference and table time. Start or stop automatic measurement function. Clear current data and any errors. In thePress the mode stop state, you can modify the parameters as follows: l in ODO mode - wheel circumference L in clock mode - time to adjust L in TM, DST, AVS mode - open / close automatic reset operation function 4.: figure two to select any mode except ODO model, press M and S/S button at the same time MXS, AVS, DST, and TM is cleared.(in ODO mode, show the input wheel circumference) 5. erase all data operations: figure three, press the M button, the S/S button and the SET button at the same time, all the storage data (ODO, speed, unit, wheel circumference, and table)Time) erased, all displayed flashing, and then mile/h flashing. This operation should be after the replacement of the battery or due to static electricityCause a display error, etc.. After all the stored data is erased, to reset the parameters, see "primary unit ready"". Read the following carefully before the main unit is ready for operation. 1. how to measure your bicycle wheel circumference (L) in Figure four to make a mark in your front wheel of a bicycle tire, and then ride a car to the front of a turn, turn start point and the end point on the groundMark。
cateye猫眼码表设置说明书CATEYE MITY3 和 ENDURO2码表的使用说明1.MITY3和ENDURO2的初始设置(a):第一次设置码表的微处理器,首先同时按住3个键清除所有设置提示:把码表倒置,按住ST。
/STOP 和MODE键,然后用铅笔或其他尖锐物戳SET键(b):液晶屏上的显示会闪一下然后消失,只剩下一个闪动的K。
K表示公里/小时,M表示英里/小时,用MODE键选择您所需的速度制式。
注意您所选择的制式的指令时钟功能为12小时或24小时制,K 为24小时制,M为12小时制。
按ST./STOP键确定您选择的制式。
(c):\"210\"将会闪动,这是为了调整700*23C轮胎设置的。
请在您的手册或我们的网站中查询轮径参数。
请注意这个数字事实上是您骑车时的车胎旋转滚动一周的距离(厘米)。
如果您想输入最精确的参数请您动手测量。
(d):按MODE键增加参数,按ST./STOP键减少参数。
按码表背后的SET键确定参数。
现在您的码表已设置完备。
2.按键使用说明码表右边的按键是MODE键,左边的按键是ST./STOP键。
您可以用MODE键通过模式完成控制。
当屏幕显示耗用时间功能(TM)时,按MODE键转换到平均速度功能(AV),再次按MODE键转换到里程1功能,这是标准骑行里程功能。
此时按MODE键回到时间功能。
耗用时间功能的附属功能是时钟功能。
在耗用时间功能下按住MODE键2秒,即转为时钟功能,再次按MODE键则回到耗用时间功能。
平均速度功能的附属功能是最大时速功能(MX),使用方法同上。
里程1有2个附属功能。
按住MODE键2秒即转为里程2。
里程2是一个单独的计程功能,它能在别的参数保留的情况下单独清空。
只要同时按住ST./STOP和MODE键一秒即可。
在里程2功能下,按住MODE键2秒转为总里程功能(ODO)。
在里程2或总里程功能下按MODE键即可回到里程1功能。
3 (1) 设置功能和里程功能同时按住ST。
猫眼操作简易说明 - 利高拿科技猫眼操作说明高清百万摄像头,165度镜头不摄影喇叭门铃按钮网线接口充电器接口 TF卡槽图1:光盘图2:电子锁和电子猫眼图3:猫眼底部接口图4:充电器一、出厂设备:包括:电子锁、电子猫眼、电子猫眼软件光盘(手机端和电脑端)、DDNS设置信息(用户名和密码,唯一的) 电子猫眼电压:5V;WIFI功率:4DB;客户最大连接数:5。
二、电脑端使用1、电脑安装IPCamera软件打开光盘,安装;按提示完成安装。
安装好后,桌面出现图标。
或登陆中山市利高拿股份有限公司官网下载进行下载并安装。
2、连接猫眼(以笔记本为例)2.1 笔记本先搜索并连接WIFI,或通过网线连接到路由器的LAN端口。
2.2 猫眼插上网线:一端连接猫眼的后主机板底部的接口,另一端连接路由器LAN端口,插上猫眼充电器。
2.3 约45秒左右整个系统启动完毕,打开软件“IPCamera”,系统自动获取猫眼信息(不同的网络接入会弹出不同的IP地址)如下图:第 1 页共 7 页2.4双击该链接,输入用户名:admin,密码为空(出厂状态)。
(若“360杀毒软件”正在后台运行,请先完全退出“360杀毒软件”;若双击该链接后还是没有弹出界面的,请点击一下输入网址上右端的“兼容”)如图所示。
2.5首次登陆,提示下载插件,安装完毕后选择“插件模式”进入,可看到猫眼实时的图像。
(注:若弹出控件加载框应点击运行加载项)如图所示。
3、内网测试模式(注:供用户测试猫眼)3.1打开IPCamera——双击链接——点击一下界面外空白处(如图1)——点击插件模式——点击左上角的设备管理——网络设置——无线设置——无线网络模式选择AP——用笔记录SSID和共享密钥(此时可供手机安装了“高利智能”进行测试,若没有安装可以跳过以下步骤,如图2)——拔开网线。
图1第 2 页共 7 页图23.2打开手机上的WIFI搜索到与SSID一致的WIFI热点——输入步骤(3.1)的共享密钥——连接。
Design Pat. Pending Copyright©2005 CATEYE Co., Ltd.EL71RC-050822 066640045 2HL-EL710RCH-1H-2155962 39LOCK12 3497865○○○○○○○○○○○○○○○○○○○○H-11.2. 3.H-2ESMONTAR LA UNIDAD DE FARO EN EL CASCOInstalación de la montura del casco y la unidad de faroAcoplar la montura del casco al casco.1. Apriete firmemente la montura del casco a la parte delantera del casco, pasando la correa de velcro a través de los orificios de ventilación del casco.2. Montar la unidad de faro en la montura del casco.3.Fije el cable en la parte de atrás del casco utilizando la correa de cable de reserva.Póngase el casco y ajuste el ángulo del haz de luz. Para quitar la unidad de faro, tire de la unidad de faro hacia adelante al mismo tiempo que pulsa el botón de la base de la unidad de faro.¡PRECAUCIÓN!:Asegúrese de que la unidad de faro no esté caliente antes de tocarlapara retirarla.Conexión del cable alargadorConecte el cable alargador entre la unidad de faro y la unidad de batería.Alinee los extremos del cable macho y hembra y conéctelos. Gire los enchufes de forma que queden bloqueados firmemente.Precauciones al manipular la unidad de bateríaMientras monta en bicicleta, coloque la unidad de batería en el bolsillo de su maillot o bolsa de hidratación/ mochila.Antes de utilizar el faro, asegúrese de que la batería se encuentra correctamente almacenada en su bolsa de neopreno.¡PRECAUCIÓN!:Preste atención a la colocación del cable para que no interfiera con elmanejo de la bicicleta. No enrolle el cable, puesto que el hilo conductor que está en su interior podría dañarse.NOTA:Enrolle la correa de fijación alrededor del centro de la unidad de batería.BotónCorrea abrazaderaINTRODUCCIÓNAntes de utilizar el faro, lea detenidamente este manual y guárdelo para futuras consultas.Gracias por la adquisición de CATEYE DOUBLE SHOT HL-EL 710RC .El faro Double Shot utiliza LEDs blancos de alta potencia y tiene una vida en funcionamiento más larga que otros sistemas recargables de alta potencia.PARA UN FUNCIONAMIENTO SEGURO•Nunca cortocircuitar los terminales de la unidad de batería o del cargador, puesto que esto podría hacer que la unidad se sobrecaliente, dando como resultado un incendio o daño al componente.•Conecte firmemente el enchufe de forma que el cable no se suelte o entorpezca durante la marcha.•Nunca utilizar componentes dañados (p.e., cables, etc.). Envíe cualquier componente dañado a nuestro departamento de servicio al cliente para su reparación.•La unidad de faro puede que se caliente extremadamente cuando está encendida o inmediatamente después de que sea apagada. Utilizar con precaución.•Mantener fuera del alcance de los niños.•Recomendamos que lleve una linterna o una unidad de batería de repuesto en caso de que la batería principal se agote.•Cargar la unidad de la batería antes de utilizar, porque la batería se va descargando sola con el tiempo, disminuyendo su voltaje.•No dejar la batería demasiado descargada puesto que acorta la vida en su funcionamiento. Intente cargar la unidad de la batería después de cada uso. (“Demasiado descargada” se refiere al estado en el que se encuentra la batería cuando se haya utilizado durante un periodo de tiempo por debajo del voltaje especificado.)•Si la lámpara o alguna de sus partes se ensucia con barro, etc., limpiar con un paño suave humedecido y con jabón que no sea agresivo. Nunca aplicar diluyente de pintura, bencina o alcohol; podrían causarse daños.•Coloque la unidad de la batería a una distancia mínima de 10 cm de cualquier contador inalámbrico, puesto que podría afectar de forma adversa a la operación de transmisión y recepción.•Nunca desmontar la unidad de faro, la unidad de la batería o el cargador de batería.•Este producto es resistente al agua bajo unas condiciones de lluvia normales, etc. Sin embargo, no lo sumerja intencionadamente en agua ni permita que la lluvia entre en la bolsa de la batería.Antes de utilizar por primera vezLa batería viene un poco cargada de fábrica, pero se utiliza para realizar una prueba de la unidad en la fábrica. De forma que es necesario cargar la batería antes de utilizar por primera vez. (Remítase a la sección “Cómo cargar” en este manual).GARANTÍA LIMITADA2-años de garantía :Unidad de faro, unidad de la batería, cargador de batería (Excluyendo la degradación de la unidad de la batería)LíneaEn caso de presentarse fallos o roturas du-rante el uso normal de este producto, éste será reemplazado o reparado libre de gas-tos. Rellene el certificado de garantía con su nombre, dirección, fecha de compra y fallo ocurrido, y envíelo a su servicio técnico más cercano adjuntando el producto. Los gastos de envío y seguro de entrega corren por cuenta del remitente. Una vez reparado o reemplazado se devolverá al remitente.CO.,L TD.2-8-25, Kuwazu, Higashi Sumiyoshi-ku,Osaka 546-0041 JapanAttn: CATEYE Customer Service Section Phone : (06)6719-6863Fax : (06)6719-6033E-mail : support@cateye.co.jp URL : http://www.cateye.co.jpService & Research Address for USACATEYE Service and Research Center 1705 14th St. 115 Boulder, CO 80302Phone : 303.443.4595Toll Free: 800.5CATEYE Fax : 303.473.0006E-mail : service@ URL : COMPONENTES1Unidad de faro 2Unidad de batería 3Bolsa de la batería 4Cargador de batería 5 Montura del casco 6 Cable alargador7 / 8H31 para manillares oversize Abrazadera / H32 Abrazadera(Con 2 juntas, una gruesa y otra fina)9Correa de cable (x 2)0Correa de soporte○○○○○ABC○○○○○○○○○○○○○○○○○○○○○○○○○○1247 or 82LOCK192 37 or 82, 31.B-2B-32.B-11.or*H322.3.1#533-8825#534-1830#534-1706#534-1707UL #534-1708UK #534-1709EC #534-1710AS #534-1711#533-8880#534-1832#534-1831B-1B-2B-3Aprox. 3 horasTiempo de carga est ándar Estado del indicador decargaLuz naranja : Conectar a la fuente de alimentaci ón Parpadea la luz roja : Cargando Luz verde : Ha terminado de cargarAprox. 5 horasTiempo de duraci ón C ÓMO MONTAR A UNA BICICLETAInstalaci ón de la abrazadera/unidad de faroAcoplar la abrazadera H31 o H32 al manillar.NOTA:Seleccione H31 para los manillares oversize.1.Monte una almohadilla de goma y la abrazadera en el manillar. Se suministran almohadillas de goma de 2 grosores distintos; si fuera necesario, corte la almoha-dilla de goma para que encaje.2.Apriete y luego afloje la manecilla para fijar. Aseg úrese de que la abrazadera no gira en el manillar.¡PRECAUCI ÓN!:Aseg úrese de ajustar el ángulo del haz de luz remiti éndose a lasecci ón “C ómo ajustar el ángulo del haz de luz ” en este ma-nual antes de hacer funcionar al sistema de luz.3.Montar la unidad de faro en la abrazadera.Para retirar la unidad despu és de utilizarla, tire de ella hacia afuera mientras pre-siona el bot ón.¡PRECAUCI ÓN!:Aseg úrese de que la unidad de faro no est é caliente antes detocarla para retirarla.Instalaci ón de la unidad de la bater íaMonte la unidad de bater ía en el cuadro de la bicicleta.Antes de utilizar el faro, aseg úrese de que la bater ía se encuentra correctamente al-macenada en su bolsa de neopreno.¡PRECAUCI ÓN!:Al montar la unidad, aseg úrese de que la costura de la bolsa dela bater ía se encuentra mirando hacia abajo y de que la l ínea de pliegue se encuentra en la parte delantera. Enrolle la correa de fijaci ón alrededor del centro de la unidad de la bater ía.1.Enrolle la correa de fijaci ón alrededor del tubo superior para asegurar la unidad.¡PRECAUCI ÓN!:Enrolle la correa sobre el tubo superior pero por debajo de loscables de los cambios y el freno. Enrolle la correa por encima de los cables es peligroso puesto que podr ía interferir al frenar o al cambiar de marcha.2.Utilice la correa de soporte, para asegurar la unidad de la bater ía al tubo inferior y asi evitar que se enrolle.NOTA:Es posible tambi én instalar la bater ía en otras posiciones en la bicicleta. Sin em-bargo, aseg úrese de que la costura de la bolsa de la bater ía se encuentre boca a bajo, y que la l ínea de pliegue se encuentre en la parte delantera. Esto ayudar á a prevenir que entre agua en la bolsa.Conexi ón y fijaci ón de cablesAlinee los extremos del cable mancho y hembra y con éctelos. Gire los enchufes de forma que queden bloqueados de forma segura. Fije los cables al cuadro y/o v ástago para mantenerlos seguros.¡PRECAUCI ÓN!:Preste atenci ón a la colocaci ón del cable de forma que nointerfiera con el manejo de la bicicleta. No fije el cable a un ángulo agudo puesto que el hilo interior podr ía romperse.ManecillaTubo inferiorCorrea de fijaci ónCorrea de fijaci ónTubo superiorCables de loscambios y del frenoL íneaJunta de cauchoManillarBot ónC ÓMO UTILIZARA Enc ender/apagarPara encender/apagar el faro, pulse el bot ón que se encuentra justo detr ás de la unidad de faro.B C ómo ajustar el ángulo del haz de luzSi la unidad de faro est á montada en la bicicleta, ajuste el ángulo del haz de luz de forma que no moleste al tr áfico que viene en sentido contrario.C C ómo cargar la unidad de la bater ía¡Importante!•Aseg úrese de utilizar s ólo el cargador de bater ía suministrado. Este cargador puede aceptar 100-240 voltios.•No retire por completo la unidad de la bater ía de la bolsa de la bater ía.•Despu és de cargar, devuelva la bater ía a su estado de almacenado original. Evitar la entrada de agua en la bolsa de la bater ía.•El tiempo est ándar de carga y ejecuci ón son valores gu ía y dependen de las condiciones de funcionamiento.•Si la unidad de la bater ía no cumple el debido tiempo de ejecuci ón incluso cuando est é completamente cargada,puede que se encuentre al final de su vida en funcionamiento. Reemplace la unidad de la bater ía antigua por una nueva. La unidad de la bater ía utilizada deber ía de deshacerse de acuerdo con las regulaciones locales.1.Retire la correa de soporte de la bolsa de la bater ía y abra la bolsa.2.Conecte el conector al cargador de bater ía.3.Enchufe el cargador de bater ía a una salida de CA.NOTA:Cuando termine de cargarse, la luz indicadora cambia de roja parpadeante a verde.4.Cuando termine de cargarse, desenchufe el adaptador de carga. Rem ítase a las correspondientes figuras para volver a colocar el cable y utilizar la correa de cierre para cerrar bien la abertura.¡PRECAUCI ÓN!:Cuando vaya a fijar la bater ía al cuadro, aseg úrese de que la correa de fijaci ón se ajusta alcentro de la unidad de la bater ía.C ómo almacenar la unidad de la bater íaLa unidad de la bater ía se almacena en su bolsa como se muestra en la figura. En caso de que la unidad de la bater ía se encuentre fuera de la bolsa, aseg úrese de devolverla a su estado original. Si no se siguen estas instrucciones puede que entre lluvia en la bolsa de la bater ía, causando problemas en la unidad.Bot ónIndicador de cargaA salida de alimentaci ón de CAConector de cargaCorrea de cierreColocaci ón del cableCorrea de fijaci ónManecillaAflojar la manecillaCosturaEnchufeConector de cargaESPECIFICACIONESFuente de luz -------------------Dos LEDs blancos de altapotenciaUnidad de la bater ía -----------Bater ía de hidruro de n íquel(Ni-MH/12V 2700mAh)Cargador de bater ía -----------CHR-2700(AC100V-240V50/60Hz 0.5A)Tiempo de funcionamiento --Aprox. 5 horasTiempo establecido de carga --Aprox. 3 horasRango de temperatura ----------Operaci ón de carga:-10°C - 40°C Funcionamiento: -15°C - 45°CCargas/descargas estimadas --Alrededor de 300 veces(hasta que la capacidad de la bater ía disminuya al 50%)CosturaL ínea de pliegue SPARE PARTSUnidad de faroCargador de bater íaH32 para manillares m ás grandesH31 para manillares m ás grandesMontura del cascoUnidad de bater ía/Bolsa de la bater íaConjunto de la bolsa de la bater íaCable alargador* El modelo y especificaciones de estos faros est án sujetos a modificaciones sin previo aviso.。
11★因此款码表原说明书是德文,估计很多车友是看不懂。
安装可看下列翻译过来的中文说明
码表设置:
同时按SET键+MODE键(长按3-5秒),进行码表初始化
初始化后,首先进入3国语言选择,按MODE键转换为ENGL(英语)的模式
再按SET键,我们会看到KM模式,这个正常情况下不需要调节
再按SET键,进入设置轮径模式,按MODE键设置轮径(默认设置为2155MM)
再按SET键,进入总里程设置(一般第一次使用时不需要设置,当码表数据丢失时我们可以进入总里程设置)
再按SET?氡Q柚茫颐强梢陨柚靡欢ǖ男谐稻嗬攵园到幸淮伪Q?
再按SET键,进入关机模式,码表不使用的时候进入该模式进行关机,节省电池的消耗
再按SET键,设置体重单位公斤和磅
再按SET键,设置你个人的体重(默认65KG)
再按SET键,进入时间制设置(一般选择24小时制)
再按SET键,进入时间设置
提示:在任意模式,长按右键(MODE键)3秒启动背光,长按右键5秒进入拓展功能模式(EXPERT)
主要功能:
即时速度
时间显示(CLOCK)
路程显示(TRIP)
骑行时间(RIDETM)
平均速度(AVSPD)
最大速度(MAXSPD)
总路程显示(ODO)
拓展功能:
秒表功能(STW)
即时温度显示(TEMP)
最低温度(MNTEMP)
最高温度(MXTEMP)
即时卡路里消耗(CAL)
总卡路里消耗(KCAL)
脂肪燃烧(FAT)
目标路程向上设置(KM +)
骑行时间向上设置(TIME +)
开启扫描模式(SCAN路程,骑行时间,平均速度)。
CATEYE MITY3 和 ENDURO2码表的使用说明1.MITY3和ENDURO2的初始设置(a):第一次设置码表的微处理器,首先同时按住3个键清除所有设置提示:把码表倒置,按住ST。
/STOP 和MODE键,然后用铅笔或其他尖锐物戳SET键(b):液晶屏上的显示会闪一下然后消失,只剩下一个闪动的K。
K表示公里/小时,M表示英里/小时,用MODE 键选择您所需的速度制式。
注意您所选择的制式的指令时钟功能为12小时或24小时制,K为24小时制,M为12小时制。
按ST./STOP键确定您选择的制式。
(c):\"210\"将会闪动,这是为了调整700*23C轮胎设置的。
请在您的手册或我们的网站中查询轮径参数。
请注意这个数字事实上是您骑车时的车胎旋转滚动一周的距离(厘米)。
如果您想输入最精确的参数请您动手测量。
(d):按MODE键增加参数,按ST./STOP键减少参数。
按码表背后的SET键确定参数。
现在您的码表已设置完备。
2.按键使用说明码表右边的按键是MODE键,左边的按键是ST./STOP键。
您可以用MODE键通过模式完成控制。
当屏幕显示耗用时间功能(TM)时,按MODE键转换到平均速度功能(AV),再次按MODE键转换到里程1功能,这是标准骑行里程功能。
此时按MODE键回到时间功能。
耗用时间功能的附属功能是时钟功能。
在耗用时间功能下按住MODE键2秒,即转为时钟功能,再次按MODE键则回到耗用时间功能。
平均速度功能的附属功能是最大时速功能(MX),使用方法同上。
里程1有2个附属功能。
按住MODE键2秒即转为里程2。
里程2是一个单独的计程功能,它能在别的参数保留的情况下单独清空。
只要同时按住ST./STOP和MODE键一秒即可。
在里程2功能下,按住MODE键2秒转为总里程功能(ODO)。
在里程2或总里程功能下按MODE键即可回到里程1功能。
3 (1) 设置功能和里程功能同时按住ST。
/STOP和MODE键一秒即可清零。
在标准模式下,您必须按ST./STOP(S)键从而开始记录耗用时间和里程在自动模式(AT)下,当微处理器接收到前叉上传感器的信号则开始或结束记录按码表背后的SET键即可开启或关闭耗用时间或里程功能的自动功能。
一个小的AT符号指示该功能。
(2) 设置时钟功能当使用该功能时码表必须停止工作,速度符号(K或M)必须停止闪动。
在耗用时间功能下按住MODE 键2秒,即转为时钟功能。
您将看到一个小的时钟符号。
小时开始闪动,按MODE键增加数字。
按ST./STOP键将从小时该到分钟。
最后按SET键确认。
时钟是12小时或24小时制取决于您所选择的制式的指令时钟功能的制式。
K为24小时制,M为12小时制。
(参见 b 注释)(3)设置耗用时间,最大时速和平均速度功能为较高的显示当电脑处于自动功能时,按ST。
/STOP键则耗用时间,最大时速和平均速度功能将转换为较高的显示,再次按ST./STOP键你能更改速度为较高的显示。
在标准模式下(自动功能关闭)按住ST./STOP键2秒亦可。
(4)A类或B类轮胎设置码表为两种不同类型的车胎准备了快速方便的转换。
码表屏幕上有一个半圆形包含A或B的符号。
A 类胎是准备给700*23C的公路车的。
B类胎是准备给26*1.95的山地车的,为了灵敏,同时也特定的安排给低速行驶的车。
如果您的码表是安装在山地车上,我们推荐使用B类设置。
除了在总里程功能(ODO)下,按码表背后的SET键即可更改本设置。
(5)更改轮径设置当你在功能(ODO)下,同时按ST./STOP和MODE键您能检查轮径设置,或按码表背后的SET键即可更改本设置。
按MODE键增加参数,按ST./STOP键减少参数。
按码表背后的SET键确定参数。
本功能是用在替换电池或从另一块码表上读取里程数时。
先同时按住ST./STOP 和MODE键。
K闪动显示速度制式,用MODE键选择您所需的速度制式(参见 b 说明)。
添加早先的里数要持续按住MODE键。
\"0\"将闪动。
按MODE键增加数字。
按ST./STOP键将更改位数,最后按码表背后的SET键确定。
(以下步骤同 c)CATEYE TOMO XC CC-ST200 自行车码表说明书操作指导A. 主显示(速度) G. M(模式)按钮 1. 托座B. 传感器脉冲符号 H. S/S(开始/停止)按钮 2. 导线C. 模式符号 I. 设置按钮 3. 传感器D. 速度单位符号 J. 电池舱盖 4. 磁铁E. 自动模式符号 K. 连接端子 5.橡胶垫F. 副显示(选择功能) 6. 扎带按钮功能 1. M按钮(模式选择)图一按图一顺序改变模式显示,数据在副显示上显示。
按下超过两秒钟显示12小时制时钟。
2. S/S按钮开始和停止测量里程、用时。
在测量期间速度单位符号闪动。
在自动功能时,此按钮无效。
3. SET按钮用于设置车轮周长和表的时间。
开始或停止自动测量功能。
清除当前数据和任何错误。
在各模式停止状态时按下,可以修改参数如下: l 在ODO模式--------车轮的周长 l 在时钟模式---------调整时间 l 在TM、DST、AVS模式---打开/关闭自动功能 4. 复位操作:图二选择除了ODO模式以外的任何模式,同时按下M按钮和S/S按钮时,MXS,AVS,DST和TM被清零。
(在ODO模式时,显示输入车轮周长) 5. 清除所有数据操作:图三同时按下M按钮,S/S按钮和SET按钮时,所有的储存数据(ODO,速度单位,车轮周长和表的时间)被擦除,所有的显示闪亮然后mile/h闪动。
这个操作应该在更换电池以后或由于静电造成显示错误等情况下进行。
所有的储存数据被擦除后,要重新设置参数见“主单元预备”。
主单元预备操作之前,仔细阅读以下内容。
1. 如何测量你的自行车轮周长(L)图四在你自行车前轮外胎做一个记号,然后骑上车子让前轮转一圈,在地上开始转圈处和结束处做记号。
测量两个记号之间的长度就是车轮周长。
或者查阅本说明书上的轮胎尺寸表。
2. 设置速度单位进行一次清除所有数据操作,所有的显示闪亮,然后mile/h独自闪动如图五,按S/S按钮进行mile/h或Km/h选择。
按M按钮进行mile/h或Km/h确认。
显示如图六。
3. 设置车轮周长图六码表默认显示的车轮周长为216cm,27"车轮。
如果你的车轮周长为216cm,就不需要修改,按下M按钮,ODO显示216cm被设置。
如果要修改,按S/S按钮一次车轮周长数加1cm。
增加到最大数后,自动跳到最小数。
当你所需要的车轮周长数出现时,按下M按钮,ODO显示车轮周长被设置。
4. 重新设置或改变车轮周长用M按钮在主单元上选择ODO模式,按S/S按钮停止ODO功能。
然后按下SET按钮,储存的车轮周长数据会在副显上闪动。
用“3. 设置车轮周长”的方法调整到你所需的数值。
5. 设置时钟时间图七按M 按钮超过2秒钟,选择时钟功能。
用S/S按钮停止时钟,然后按SET按钮,显示“分”闪动,按一次S/S按钮,“分”增加1。
到59后变为0。
设置好时间或比当前时间快2分钟。
然后按M按钮,显示“小时”闪动,用S/S按钮做同上操作,设置小时。
按SET按钮完成时间设置。
*当按下SET按钮时若几秒钟没有显示。
将自动回零。
为了保证时钟准确,可用无线电台的时钟信号设置。
固定到自行车上使磁铁中心和传感器标记线在同一连线位置上,保持磁铁和传感器之间的间隙为2 mm。
暂时将传感器固定在前叉上。
图八-图十一试验将主单元滑入托座,按“如何将主单元装到托座上”(下面)操作。
转动前轮,检查速度指示是否出现。
(如果没有出现,调整磁铁和传感器之间的相对位置)。
试验后,将主单元取下。
用扎带将传感器固定在前叉上。
图十二注意:拉紧扎带。
用扎带将导线沿前叉扎紧,绕过闸线到车把。
图十三-图十四注意:留够足够长的导线,使车把可以来回活动。
从托座前将主单元滑动到托座上。
向下按压杆向反方向滑动主单元就可以拿下主单元。
图十五。
如何更换电池取下主单元,打开电池舱盖,换上新电池(型号:CR1620或CR1616) l 确认所有操作被清除之后再更换电池,并重新设置主单元.感应器安装的技术要求1、磁铁块中心与感应器下端凹槽对齐;2、磁铁块与感应器间隙<3mm。
码表上就2个按键。
12码表初始化:按住MODE键,并按下SET键。
码表内记录和设置全部清空。
1、初始化后,屏幕闪烁“Km/h”(公式),按MODE键可以切换为“mph”(英式),按SET键选择所需制式。
2、确定制式后,屏幕闪烁“26”,默认的车轮尺寸。
按MODE键可以在各个尺寸切换,按SET键确定车轮尺寸。
基本设置完成。
时钟的设置在时钟模式,按SET键,时位闪烁,按MODE键调整,再按SET键确定,分位闪烁,按MODE键调整,再按SET 键,完成时钟设置。
屏幕上部为实时车速,左下部为功能标志,右下部为该功能数据。
按MODE键可以在各个功能间切换。
“猫眼”码表(CATEYE VELO 8)功能功能一:骑行时间(Tm)功能二:骑行距离(Dst)功能三:平均速度(Av)功能四:最高速度(Mx)功能五:消耗卡路里(Ca) [没有什么用不大准确,因为不知道爬坡、下坡、顺风、逆风],但是可以给减肥的人一点安慰。
功能六:总路程(Odo)功能七:时钟功能八:实时速度。