Microsoft Word 2010 详细教程
- 格式:ppt
- 大小:1.12 MB
- 文档页数:57
Word 2010技巧与指南一.基本界面与个人设置 (3)1.Word 2010 基本界面 (3)✓快速访问工具栏 (3)✓选项卡 (4)✓功能组 (4)2.个人设置 (4)✓设置默认输入法 (4)✓输入法、标点及全角/半角切换 (5)✓设置文档属性 (5)✓选项设置 (7)✓自定义“快速访问工具栏” (9)二.菜单栏与选项卡 (11)1. “开始”选项卡 (11)✓“字体”功能区 (11)✓“段落”功能区 (11)✓显示/隐藏编辑标记 (11)✓“剪贴板”功能区 (11)✓“格式刷”功能 (11)✓“编辑”功能区 (12)2. “插入”选项卡 (12)✓页眉和页脚 (12)✓分页符 (15)3.“审阅”选项卡 (15)✓拼写和语法 (15)✓批注功能 (16)✓修订功能 (17)✓比较功能 (18)✓保护功能 (19)✓对文档加密 (20)4.“视图”选项卡 (21)✓并排查看(在Word 2010中同时查看几个窗口) (21)三.各类技巧 (23)四.常用快捷键 (23)1. 用于设置字符格式和段落格式的快捷键 (23)2. 用于处理文档的快捷键 (24)✓创建、查看和保存文档 (24)✓查找、替换和浏览文本 (24)✓撤消和恢复操作 (24)✓切换至其他视图 (24)✓用于审阅文档的快捷键 (24)3. 用于打印和预览文档的按键 (24)五.重要习惯 (25)一.基本界面与个人设置1.Word 2010 基本界面✓快速访问工具栏可点击右侧箭头进行自定义,点击“其他命令”添加其他按钮✓选项卡✓功能组2.个人设置✓设置默认输入法右键点击箭头点击设置点击设置默认输入法✓输入法、标点及全角/半角切换右键点击箭头点击设置点击“高级键设置”✓设置文档属性点击“文件→信息”按钮点击“属性 高级属性”填写相应内容✓选项设置点击“文件→选项”在“常规”中勾选“选择时显示浮动工具栏”和“启用实时预览”点击“显示”,勾选或清除标记点击“保存”,设置自动保存间隔✓自定义“快速访问工具栏”点击小箭头可添加或删除工具栏图标点击“其他命令”可增添其他工具栏图标二.菜单栏与选项卡1. “开始”选项卡✓“字体”功能区重要快捷键:Ctrl+B加粗Ctrl+I 斜体Ctrl+U 下划线✓“段落”功能区重要快捷键:Ctrl+E 段落居中Ctrl+L 段落居左Ctrl+R 段落居右✓显示/隐藏编辑标记✓“剪贴板”功能区重要快捷键:Ctrl+A 全选Ctrl+C 复制Ctrl+X 剪切Ctrl+V 粘贴✓“格式刷”功能双击“剪贴板→格式刷”,并选中要编辑的文字松开鼠标✓“编辑”功能区重要快捷键:Ctrl+F 查找Ctrl+H 替换2. “插入”选项卡✓页眉和页脚插入页眉插入页脚插入页码✓分页符快捷键:Ctrl+回车3.“审阅”选项卡✓拼写和语法✓批注功能新建批注编辑/删除批注✓修订功能显示/隐藏修订标记修订选项显示以供审阅显示标记接受/拒绝批注✓比较功能点击比较选定要进行比较的文档进行比较✓保护功能对文档格式设置或编辑等进行限制编辑限制✓对文档加密点击文件→保护文档→用密码进行加密输入密码或清除密码(加密文档在删去密码后即变成未加密文档)4.“视图”选项卡✓并排查看(在Word 2010中同时查看几个窗口)点击“视图”选项卡点击“并排查看”按钮点击“确定”并排滚动点击“全部重排”三.各类技巧1.F4键实现复写重叠字词2.Shift+Home键选定当前行光标位置之前的文字;Shift+End键选定当前行光标位置之后的文字;Shift+Pgup键选定当前光标位置之前所有的文字;Shift+PgDn键选定当前光标位置之后所有的文字;3.Ctrl+Z 撤销键入Ctrl+Y 重复键入/恢复键入4.键盘修改字号:选中文字,按Ctrl+Shift+〉或〈(Ctrl+[ 或])修改字号,但这两种方式有区别5.Alt唤出快捷键四.常用快捷键1. 用于设置字符格式和段落格式的快捷键Ctrl+Shift+F改变字体Ctrl+Shift+P改变字号Ctrl+D改变字符格式("格式"菜单中的"字体"命令)Shift+F3切换字母大小写Ctrl+Shift+A将所选字母设为大写Ctrl+Shift+W只给字、词加下划线,不给空格加下划线Ctrl+Shift+K将字母变为小型大写字母Ctrl+Shift+*(星号)显示非打印字符Ctrl+M左侧段落缩进Ctrl+Shift+T减小悬挂缩进量Ctrl+Q取消段落格式2. 用于处理文档的快捷键✓创建、查看和保存文档Ctrl+N创建与当前或最近使用过的文档类型相同的新文档Ctrl+O打开文档Ctrl+W关闭文档Alt+Ctrl+S拆分文档窗口Alt+Shift+C撤消拆分文档窗口✓查找、替换和浏览文本Ctrl+F查找文字、格式和特殊项Alt+Ctrl+Y在关闭"查找和替换"窗口之后重复查找Ctrl+H替换文字、特殊格式和特殊项Ctrl+G定位至页、书签、脚注、表格、注释、图形或其它位置Alt+Ctrl+Z返回至页、书签、脚注、表格、批注、图形或其他位置Alt+Ctrl+Home浏览文档✓撤消和恢复操作Esc取消操作Ctrl+Z撤消操作Ctrl+Y恢复或重复操作✓切换至其他视图Alt+Ctrl+O切换到大纲视图Alt+Ctrl+N切换到普通视图✓用于审阅文档的快捷键Alt+Ctrl+M插入批注Ctrl+Shift+E打开或关闭标记修订功能Home定位至批注开始End定位至批注结尾Ctrl+Home定位至一组批注的起始处Ctrl+End定位至一组批注的结尾处3. 用于打印和预览文档的按键Ctrl+P打印文档Alt+Ctrl+I切换至或退出打印预览箭头键在放大的预览页上移动Page Up或Page Down在缩小显示比例时逐页翻阅预览页五.重要习惯1.随时随地按Ctrl+S保存文档2.点击文档窗口右上角按钮可显示标尺3.Shift+回车实现人工换行4.擅用右Ctrl键5.统一字体、大小、行距6.为避免“排版后打印出现显示问题”或“排版在不同机器上显示不同效果”,可另存为pdf格式后再打印7.常用Tab键和标尺(相当于8个空格)8.逆序打印。

WORD2010基本操作及应用第1节常用操作1.1插入目录1)基本操作鼠标停留在待插入目录处,点击【引用】—【目录】—【插入目录】,选择相应的【格式】以及目录【显示级别】即可。
2)界面展示一、待插入目录状态二、插入目录三、设置目录格式1.2插入多级编号列表所谓多级列表是指Word文档中编号或项目符号列表的嵌套,以实现层次效果。
在Word2010文档中可以插入多级列表,操作步骤如下所述:第1步,打开Word2010文档窗口,在“开始”功能区的“段落”分组中单击“多级列表”按钮。
在打开的多级列表面板中选择多级列表的格式,如图所示。
第2步,按照插入常规编号的方法输入条目内容,然后选中需要更改编号级别的段落。
单击“多级列表”按钮,在打开的面板中指向“更改列表级别”选项,并在打开的下一级菜单中选择编号列表的级别,如图所示。
第3步,返回Word2010文档窗口,可以看到创建的多级列表,如图所示。
1.3定义新编号格式在Word2010的编号格式库中内置有多种编号,用户还可以根据实际需要定义新的编号格式。
在Word2010中定义新编号格式的步骤如下所述:第1步,打开Word2010文档窗口,在“开始”功能区的“段落”分组中单击“编号”下拉三角按钮,并在打开的下拉列表中选择“定义新编号格式”选项,如图所示。
第2步,在打开的“定义新编号格式”对话框中单击“编号样式”下拉三角按钮,在“编号样式”下拉列表中选择一种编号样式,并单击“字体”按钮,如图所示。
第3步,打开“字体”对话框,根据实际需要设置编号的字体、字号、字体颜色、下划线等项目(注意不要设置“效果”选项),并单击“确定”按钮,如图所示。
第4步,返回“定义新编号格式”对话框,在“编号格式”编辑框中保持灰色阴影编号代码不变,根据实际需要在代码前面或后面输入必要的字符。
例如,在前面输入“第”,在后面输入“项”,并将默认添加的小点删除。
然后在“对齐方式”下拉列表中选择合适的对齐方式,并单击“确定”按钮,如图所示。


About the T utorialMicrosoft Office Word 2010 allows you to create and edit personal and business documents, such as letters, reports, invoices, emails and books.By default, documents saved in Word 2010 are saved with the .docx extension. Microsoft Word can be used for the following purposes:∙To create business documents having various graphics including pictures, charts, and diagrams.∙To store and reuse readymade content and formatted elements such as cover pages and sidebars.∙To create letters and letterheads for personal and business purpose.∙To design different documents such as resumes or invitation cards etc.∙To create a range of correspondence from a simple office memo to legal copies and reference documents.AudienceThis tutorial has been designed for computer users who are willing to learn Microsoft Word in simple steps and they do not have much knowledge about computer usage and Microsoft applications. This tutorial will give you enough understanding on MS Word from where you can take yourself to higher levels of expertise.PrerequisitesBefore you begin with this tutorial, we assume you have a basic understanding of Computer peripherals like mouse, keyboard, monitor, screen, etc. and their basic operations.Copyright & Disclaimer© Copyright 2018 by Tutorials Point (I) Pvt. Ltd.All the content and graphics published in this e-book are the property of Tutorials Point (I) Pvt. Ltd. The user of this e-book is prohibited to reuse, retain, copy, distribute or republish any contents or a part of contents of this e-book in any manner without written consent of the publisher.We strive to update the contents of our website and tutorials as timely and as precisely as possible, however, the contents may contain inaccuracies or errors. Tutorials Point (I) Pvt. Ltd. provides no guarantee regarding the accuracy, timeliness or completeness of our website or its contents including this tutorial. If you discover any errors on our website or inthistutorial,******************************************T able of ContentsAbout the Tutorial (i)Audience (i)Prerequisites (i)Copyright & Disclaimer (i)Table of Contents (ii)MS WORD BASICS 0Word 2010 ─ Getting Started (1)Word 2010 ─ Ex plore Window (5)Word 2010 ─ Backstage View (8)Document Information (10)Document Properties (10)Exit Backstage View (10)Word 2010 ─ Entering Text (11)Word 2010 ─ Move .Around (13)Moving with Mouse (13)Moving with Scroll Bars (14)Moving with Keyboard (15)Moving with Go To Command (16)Word 2010 ─ Save Document (17)Saving New Document (17)Saving New Changes (18)Word 2010 ─ Opening a Do cument (20)Opening New Document (20)Opening Existing Document (22)Word 2010 ─ Closing a Document (25)Word 2010 ─ Context Help (28)Context Sensitive Help (28)Using F1 Key (28)Using Help Icon (30)Using Help Option (31)EDITING DOCUMENTS (32)Word 2010 ─ Insert Text (33)Insert and Add Text (33)Insert and Replace Text (35)Word 2010 ─ Select Text (40)Using the Selection Bar (41)Using the Keyboard (42)Word 2010 ─ Delete Text (43)Using Backspace & Delete Keys (43)Using Selection Method (44)Word 2010 ─ Move Text (46)Move within the same document (46)Move within different documents (47)Word 2010 ─ Copy & Paste (51)Copy & Paste Operation (51)Cut & Paste Operation (54)Copy, Cut & Paste in different documents (56)Word 2010 ─ Find & Replace (57)Find Command (57)Find & Replace Operation (61)Word 2010 ─ Spell Check (63)Check Spelling and Grammar using Review tab (64)Check Spelling and Grammar using Right Click (67)Word 2010 ─ Zoom In-Out (68)Zoom-in & Zoom-out using view tab (68)Zoom-in & Zoom-out using (+) and (-) Buttons (70)Word 2010 ─ Special Symbols (71)Insert Special Symbols (71)Assign Shortcut Key (74)Word 2010 ─ Undo Changes (76)How to use Undo & Repeat operations (76)Shortcuts to use Undo & Repeat operations (79)FORMATTING TEXT (80)Word 2010 ─ Setting Text Fonts (81)Change the Font Type & Size (81)Use Shrink and Grow Buttons (85)Clear Formatting Options (86)Word 2010 ─ Text Decoration (87)Making text bold (87)Making Text Italic (87)Underline the Text (89)Strikethrough the Text (90)Word 2010 ─ Change Text Case (91)Change Text to Sentence Case (91)Change Text to Lowercase (92)Change Text to Uppercase (93)Capitalize Text (94)Toggle the Text (95)Word 2010 ─ Change Text Color (96)Change Font Colors (96)Highlight Text with Colors (97)Apply Text Effects (97)Word 2010 ─ Text Alignments (99)Left-Aligned Text (99)Center Aligned Text (100)Right-Aligned Text (101)Justified Text (102)Word 2010 ─ Indent Paragraphs (103)Left Indentation (103)Right Indentation (104)First Line Indentation (104)Hanging Indentation (105)Word 2010 ─ Create Bullets (107)Create a List from Existing Text: (107)Create a List as You Type (108)Word 2010 ─ Set Line Spacing (111)Spacing between Lines (111)Spacing between Paragraphs (112)Word 2010 ─ Borders and Shades (113)Add Borders to Text (113)Add Borders to Page (115)Add Shades to Text (117)Word 2010 ─ Set Tabs (120)Setting a Tab (121)Moving a Tab (124)Word 2010 ─ Apply Formatting (126)Copy and Apply Text Formatting (126)Copy and Apply Text Formatting multiple times (127)FORMATTING PAGES (128)Word 2010 ─ Adjust Page Margins (129)Adjust Margins (129)Word 2010 ─ Header and Footer (132)Add Header and Footer (132)Edit Header and Footer (135)Word 2010 ─ Add Page Numbers (137)Add Page Numbers (137)Remove Page Numbers (140)Word 2010 ─ Insert Page Breaks (141)Insert Page Breaks (141)Delete a Page Break (142)Wo rd 2010 ─ Insert Blank Page (143)Insert Blank Pages (143)Delete Blank Pages (144)Word 2010 ─ Cover Pages (146)Add Cover Pages (146)Delete Cover Pages (148)Word 2010 ─ Page Orientation (149)WORKING WITH TABLES (152)Word 2010 ─ Create a Table (153)Create a Table (153)Delete a Table (157)Word 2010 ─ Rows & Columns (158)Add a Row (158)Delete a Row (160)Add a Column (162)Delete a Column (164)Word 2010 ─ Move a Table (166)Word 2010 ─ Resize a Table (168)Word 2010 ─ Merging Cells (170)Word 2010 ─ Split a Table (172)Word 2010 ─ Split Cells (174)Word 2010 ─ Add Formula (177)Word 2010 ─ Borders & Shades (181)Add Borders to Table (181)Using Border Options (182)Add Shades To Table (185)ADVANCED OPERATIONS (187)Word 2010 ─ Quick Styles (188)Apply Quick Styles (188)Change Styles (190)Word 2010 ─ Use Templates (193)Using Existing Template (193)Create New Template (196)Word 2010 ─ Use Graphics (198)Adding Picture in Document (198)Adding WordArt in Document (199)Word 2010 ─ Auto Correction (202)Word 2010 ─ Auto Formatting (205)Word 2010 ─ Table of Contents (209)Create Table of Contents (209)Update Table of Contents (212)Delete Table of Contents (214)Word 2010 ─ Preview Documents (215)Word 2010 ─ Printing D ocuments (217)Word 2010 ─ Email Documents (221)Word 2010 ─ Translate Document (223)Word 2010 ─ Compare Documents (227)Compare Two Documents (227)Word 2010 ─ Document Security (232)Set Document Password (232)Remove Document Password (234)Set Editing & Formatting Restrictions (237)Remove Editing & Formatting Restrictions (240)Word 2010 ─ Set Watermark (242)Set Standard Watermark (242)Set Custom Watermark (244)Remove Watermark (247)MS Word Basics1Word 2010 2In this chapter, we will discuss how to get started with Word 2010. We will understand how to start a Word 2010 application in simple steps. Assuming you have Microsoft Office 2010 installed in your PC, to start the Word application, follow these steps: Step 1: Click the Start button.Word 2010 ─ Getting StartedWord 20103Step 2: Click the All Programs option from the menu.4Step 3: Search for Microsoft Office from the submenu and click it.5Step 4: Search for Microsoft Word 2010 from the submenu and click it.This will launch the Microsoft Word 2010 application and you will see the following window.6Word 2010 7In this chapter, we will understand how to explore Window in Word 2010. Following is the basic window which you get when you start the Word application. Let us understand the various important parts of this window.File TabThe File tab replaces the Office button from Word 2007. You can click it to check the Backstage view . This is where you come when you need to open or save files, create new documents, print a document, and do other file-related operations.Word 2010 ─ Explore Window8Quick Access ToolbarThis you will find just above the File tab. This is a convenient resting place for the most-frequently used commands in Word. You can customize this toolbar based on your comfort. RibbonRibbon contains commands organized in three components:∙Tabs: These appear across the top of the Ribbon and contain groups of related commands. Home, Insert, Page Layout are examples of ribbon tabs.∙Groups: They organize related commands; each group name appears below the group on the Ribbon. For example, group of commands related to fonts or group of commands related to alignment, etc.∙Commands: Commands appear within each group as mentioned above.Title barThis lies in the middle and at the top of the window. Title bar shows the program and document titles.RulersWord has two rulers - a horizontal ruler and a vertical ruler. The horizontal ruler appears just beneath the Ribbon and is used to set margins and tab stops. The vertical ruler appears on the left edge of the Word window and is used to gauge the vertical position of elements on the page.HelpThe Help Icon can be used to get word related help anytime you like. This provides nice tutorial on various subjects related to word.Zoom ControlZoom control lets you zoom in for a closer look at your text. The zoom control consists of a slider that you can slide left or right to zoom in or out; you can click the + buttons to increase or decrease the zoom factor.View ButtonsThe group of five buttons located to the left of the Zoom control, near the bottom of the screen, lets you switch through the Word's various document views.9∙Print Layout view: This displays pages exactly as they will appear when printed.∙Full Screen Reading view: This gives a full screen view of the document.∙Web Layout view: This shows how a document appears when viewed by a Web browser, such as Internet Explorer.∙Outline view: This lets you work with outlines established using Word’s standard heading styles.∙Draft view: This formats text as it appears on the printed page with a few exceptions. For example, headers and footers aren't shown. Most people prefer this mode.Document AreaThis is the area where you type. The flashing vertical bar is called the insertion point and it represents the location where text will appear when you type.Status BarThis displays the document information as well as the insertion point location. From left to right, this bar contains the total number of pages and words in the document, language, etc.You can configure the status bar by right-clicking anywhere on it and by selecting or deselecting options from the provided list.Dialog Box LauncherThis appears as very small arrow in the lower-right corner of many groups on the Ribbon. Clicking this button opens a dialog box or task pane that provides more options about the group.Word 2010 10In this chapter, we will discuss the Backstage View in Word 2010. The Backstage view was introduced in Word 2010. This acts as the central place for managing your documents. The backstage view helps in creating new documents, saving and opening documents, printing and sharing documents, and so on.Getting to the Backstage View is easy: Just click the File tab , located in the upper-left corner of the Word Ribbon. If you already do not have any opened document, then you will see a window listing down all the recently opened documents as follows:If you already have an opened document, then it will display a window showing detail about the opened document as shown below. Backstage view shows three columns when you select most of the available options in the first column.Word 2010 ─ Backstage View11The first column of the backstage view will have following options:12Document InformationWhen you click the Info option available in the first column, it displays the following information in the second column of the backstage view:∙Compatibility Mode: If the document is not a native Word 2007/2010 document, a Convert button appears here, enabling you to easily update its format. Otherwise, this category does not appear.∙Permissions: You can use this option to protect your word document. You can seta password so that nobody can open your document, or you can lock the documentso that nobody can edit your document.∙Prepare for Sharing: This section highlights important information you should know about your document before you send it to others, such as a record of the edits you made as you developed the document.∙Versions: If the document has been saved several times, you may be able to access the previous versions of it from this section.Document PropertiesWhen you click the Info option available in the first column, it displays various properties in the third column of the backstage view. These properties include the document size, the number of pages in the document, the total number of words in the document, the name of the author etc.You can also edit various properties by clicking on the property value and if the property is editable, then it will display a text box where you can add your text like title, tags, comments, Author.13Exit Backstage ViewIt is simple to exit from the Backstage View. Either click on the File tab or press the Esc button on the keyboard to go back to the working mode of Word.Word 2010 14In this chapter, let us discuss how to enter text with Microsoft Word 2010. Let us see how easy it is to enter text in a Word document. We assume you know that when you start Word, it displays a new document by default as shown below:Document area is the area where you type your text. The flashing vertical bar is called the insertion point and it represents the location where the text will appear when you type. keep the cursor at the text insertion point and start typing the text. We typed only two words "Hello Word" as shown below. The text appears to the left of the insertion point as you type:Word 2010 ─ Entering TextWord 201015The following are the two important points that will help you while typing:∙You do not need to press Enter to start a new line. As the insertion point reaches the end of the line, Word automatically starts a new one. You will need to press Enter, to add a new paragraph.∙When you want to add more than one space between words, use the Tab key instead of the spacebar. This way you can properly align text by using the proportional fonts.Word 2010 16In this chapter, we will discuss how to move around in Word 2010. Word provides a number of ways to move around a document using the mouse and the keyboard.To begin with, let us create some sample text. To create a sample text, there is a short cut available. Open a new document and type =rand() and press Enter. Word will create the following content for you:Moving with MouseYou can easily move the insertion point by clicking in your text anywhere on the screen. There may be instances when a document is big and you cannot see a place where you want to move. Here, you will have to use the scroll bars, as shown in the following screenshot:Word 2010 ─ Move Around17You can scroll through your document by rolling your mouse wheel, which is equivalent to clicking the up-arrow or down-arrow buttons in the scroll bar.Moving with Scroll BarsAs shown in the above screenshot, there are two scroll bars: one for moving vertically within the document, and one for moving horizontally. Using the vertical scroll bar, you may:∙Move upward by one line by clicking the upward-pointing scroll arrow.∙Move downward by one line by clicking the downward-pointing scroll arrow.∙Move one next page, using the next page button (footnote).∙Move one previous page, using the previous page button (footnote).∙Use the Browse Object button to move through the document, going from one chosen object to the next.18Moving with KeyboardThe following keyboard commands, used for moving around your document, also move the insertion point:You can move word by word or paragraph by paragraph. You would have to hold down the Ctrl key while pressing an arrow key, which moves the insertion point as described here: Ctrl +Ctrl +Ctrl +19Ctrl +Moving with Go T o CommandPress the F5 key to use the Go To command. This will display a dialogue box where you will have various options to reach to a particular page.Normally, we use the page number, the line number or the section number to go directly to a particular page and finally press the Go To button.Word 2010 20In this chapter, we will discuss how to save a document in Word 2010.Saving New DocumentOnce you are done with typing in your new Word document, it is time to save your document to avoid losing work you have done on a Word document. Following are the steps to save an edited Word document:Step 1: Click the File tab and select the Save As option.Word 2010 ─ Save Document21Step 2: Select a folder where you will like to save the document, Enter the file name which you want to give to your document and Select the Save As option, by default it is the .docx format.Step 3: Finally, click on the Save button and your document will be saved with the entered name in the selected folder.Saving New ChangesThere may be an instance when you open an existing document and edit it partially or completely, or an instance where you may like to save the changes in between editing of the document. If you want to save this document with the same name, then you can useeither of the following simple options:22∙Just press the Ctrl + S keys to save the changes.∙Optionally you can click on the floppy icon available at the top left corner and just above the File tab. This option will also help you save the changes.∙You can also use the third method to save the changes, which is the Save option available just above the Save As option as shown in the above screenshot.If your document is new and it was never saved so far, then with either of the three options, Word will display a dialogue box to let you select a folder, and enter the document name as explained in case of saving new document.Word 2010 23In this chapter, we will discuss how to open a document in Word 2010.Opening New DocumentA new, blank document always opens when you start Microsoft Word. Suppose you want to start another new document while you are working on another document, or you closed an already opened document and want to start a new document. Here are the steps to open a new document:Step 1: Click the File tab and select the New option.Step 2: When you select the New option from the first column, it will display a list of templates in the second column. Double-click on the Blank document ; this is the firstWord 2010 ─ Opening a Document24option in the template list. We will discuss the other templates available in the list in the following chapters.You should have your blank document as shown below. The document is now ready for you to start typing your text.You can use a shortcut to open a blank document anytime. Try using the Ctrl + N keys and you will see a new blank document similar to the one in the above screenshot.25Opening Existing DocumentThere may be a situation when you open an existing document and edit it partially or completely. Follow the steps given below to open an existing document:Step 1: Click the File tab and select the Open option.26Step 2: This will display the following file Open dialog box. This lets you navigate through different folders and files, and also lets you select a file which you want to open.27Step 3: Finally, locate and select a file which you want to open and click the small triangle available on the Open button to open the file. You will have different options to open the file, but simply use the Open option.This will open your selected file. You can use the Open Read-Only option if you are willing just to read the file and you have no intention to modify, i.e., edit the file. Other options can be used for advanced usage.28End of ebook previewIf you liked what you saw…Buy it from our store @ https://。
在word2010中使用艺术字在word2010中,艺术字是一种包含特殊文本效果的绘图对象。
您可以利用这种修饰性文字,任意旋转角度、着色、拉伸或调整字间距,以达到最佳效果。
★插入艺术字将鼠标放在要插入艺术字的位置上,点击功能区的“插入”选项卡,在“文本”组,点击“艺术字”,然后选择一种用户喜欢的word2010内置的艺术字样式,文档中将自动插入含有默认文字“请在此放置您的文字”和所选样式的艺术字,并且功能区将显示“绘图工具”的上下文菜单。
★修改艺术字效果选择要修改的艺术字,单击功能区中“绘图工具”的的“格式”选项卡,功能将显示艺术字的各类操作按钮,如图●在“形状样式”分组里,可以修改整个艺术字的样式,并可以设置艺术字形状的填充、轮廓及形状效果;●在“艺术字样式”分组里,可以对艺术字中的文字设置填充、轮廓及文字效果;●在“文本”分组里,可以对艺术字文字设置链接、文字方向、对齐文本等;●在“排列”分组里,可以修改艺术字的排列次序、环绕方式、旋转及组合;●在“大小”分组里,可以设置艺术字的宽度和高度。
word2010中自选图形的使用自选图形是指一组现成的形状,包括如矩形和圆这样的基本形状,以及各种线条和连接符、箭头总汇、流程图符号、星与旗帜和标注等。
用户可以使用自选图形来绘制各类图形。
★添加自选图形在功能区上点击“插入”选项卡,然后找到“插图”组,点击“形状”,弹出含有多个类别多个形状的菜单,选择其中一种您要绘制的形状,这时鼠标指针会变成十字形,您在即可文档中绘制出此形状。
★更改自选图形选取要更改的形状,这时功能区会自动显示“绘图工具”。
在“绘图工具”中点击“格式”选项卡,在“形状样式”组中“更改形状”,然后选择其中一种形状即可更改。
★重调自选图形的形状1.选取自选图形,如果形状包含黄色的调整控点,则可重调该形状。
某些形状没有调整控点,因而只能调整大小。
2.将鼠标指针置于黄色的调整控点上,按住鼠标按键,然后拖动控点以更改形状。
第三部分:段落设置3.1对齐方式我们在使用Word2010编辑文档的过程中,经常需要为一个或多个段落设置该段文字在页面中的对齐方式。
本文就为大家介绍一下设置段落对齐方式。
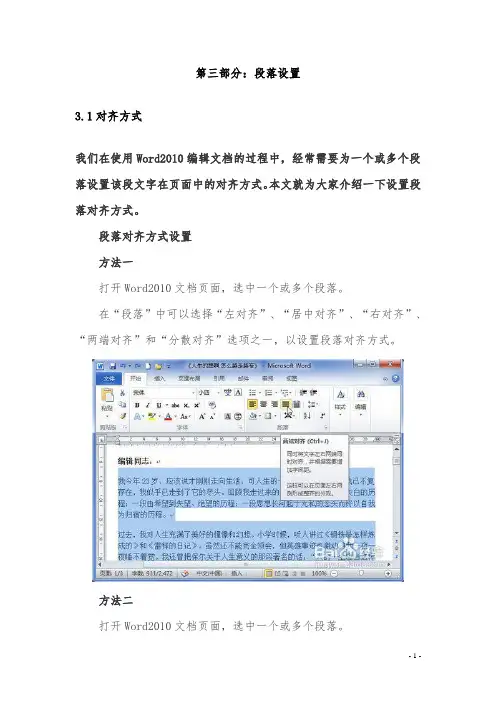
段落对齐方式设置方法一打开Word2010文档页面,选中一个或多个段落。
在“段落”中可以选择“左对齐”、“居中对齐”、“右对齐”、“两端对齐”和“分散对齐”选项之一,以设置段落对齐方式。
方法二打开Word2010文档页面,选中一个或多个段落。
在“段落”中单击“显示‘段落’对话框”按钮。
在“段落”对话框中单击“对齐方式”下三角按钮,在列表中选择符合我们实际需求的段落对齐方式,并单击“确定”按钮使设置生效。
3.2段落缩进核心提示:在Word 2010中,我们可以设置整个段落向左或者向右缩进一定的字符,这一技巧在排版时经常会使用到,例如我们可以在缩进的位置,通过插入文本框,来放置其他的内容,在Word中,我们可以通过两种方法设置段落缩进。
在Word 2010中,我们可以设置整个段落向左或者向右缩进一定的字符,这一技巧在排版时经常会使用到,例如我们可以在缩进的位置,通过插入文本框,来放置其他的内容,在Word中,我们可以通过两种方法设置段落缩进。
方法1:1、选中要设置缩进的段落,【右键】【段落】,打开段落选项卡。
2、在“缩进和间距”选项卡,设置段落缩进就可以了。
方法2:在水平标尺上,有四个段落缩进滑块:首行缩进、悬挂缩进、左缩进以及右缩进。
按住鼠标左键拖动它们即可完成相应的缩进,如果要精确缩进,可在拖动的同时按住Alt键,此时标尺上会出现刻度。
常见问题:1、Word里段落设置是首行缩进2字符,实际却缩进了4个英语字母的位置,这是怎么回事呢?答:缩进二个字符,是针对中文而言的,相当于英文的4个字符。
2、Word里的项目编号比段落要缩进两个字怎么操作?答:单击符号时会出现虚线吧,选中符号,然后把最上方的标尺向右移两个字就可以了,或者按照常规的方法,在【段落】中设置。

第一部分:新手入门1.1安装指南下载Office 2010后该如何安装了?下面Word联盟就一步一步的详细教大家安装方法。
勾选“我接受此协议的条款”,然后“继续”;“自定义”按钮;这里,可以看个人需求任意选择;等待安装完毕!1.2界面介绍今天小编为大家介绍一下word2010界面,希望对大家有帮助。
1、标题栏:显示正在编辑的文档的文件名以及所使用的软件名。
2、“文件”选项卡:基本命令(如“新建”、“打开”、“关闭”、“另存为...”和“打印”位于此处。
3、快速访问工具栏:常用命令位于此处,例如“保存”和“撤消”。
您也可以添加个人常用命令。
4、功能区:工作时需要用到的命令位于此处。
它与其他软件中的“菜单”或“工具栏”相同。
5、“编辑”窗口:显示正在编辑的文档。
6、“显示”按钮:可用于更改正在编辑的文档的显示模式以符合您的要求。
7、滚动条:可用于更改正在编辑的文档的显示位置。
8、缩放滑块:可用于更改正在编辑的文档的显示比例设置。
9、状态栏:显示正在编辑的文档的相关信息。
提示:什么是“功能区”?“功能区”是水平区域,就像一条带子,启动 Word 后分布在Office 软件的顶部。
您工作所需的命名将分组在一起,且位于选项卡中,如“开始”和“插入”。
您可以通过单击选项卡来切换显示的命令集。
1.3导航窗口用Word编辑文档,有时会遇到长达几十页,甚至上百页的超长文档,在以往的Word版本中,浏览这种超长的文档很麻烦,要查看特定的内容,必须双眼盯住屏幕,然后不断滚动鼠标滚轮,或者拖动编辑窗口上的垂直滚动条查阅,用关键字定位或用键盘上的翻页键查找,既不方便,也不精确,有时为了查找文档中的特定内容,会浪费了很多时间。
随着Word2010的到来,这一切都将得到改观,Word2010新增的“导航窗格”会为你精确“导航”。
打开“导航”窗格运行Word2010,打开一份超长文档,单击菜单栏上的“视图”按钮,切换到“视图”功能区,勾选“显示”栏中的“导航窗格”,即可在Word2010编辑窗口的左侧打开“导航窗格”文档轻松“导航”Word2010新增的文档导航功能的导航方式有四种:标题导航、页面导航、关键字(词)导航和特定对象导航,让你轻松查找、定位到想查阅的段落或特定的对象。
Word 2010基本教程一、Word 2010使用基础(一)启动和退出Word 2010(二)熟悉Word 2010工作界面◆快速访问工具栏:用于放置一些使用频率较高的工具。
默认情况下,该工具栏包含了“保存”、“撤销”和“恢复”按钮。
◆标题栏:标题栏位于窗口的最上方,其中显示了当前编辑的文档名、程序名和一些窗口控制按钮。
◆功能区:功能区用选项卡的方式分类存放着编排文档时所需要的工具。
单击功能区中的选项卡标签可切换到不同的选项卡,从而显示不同的工具;在每一个选项卡中,工具又被分类放置在不同的组中。
某些组的右下角有一个“对话框启动器”按钮,单击可打开相关对话框。
◆标尺:分为水平标尺和垂直标尺,主要用于确定文档内容在纸张上的位置和设置段落缩进等。
通过单击编辑区右上角的“标尺”按钮,可显示或隐藏标尺。
◆编辑区:编辑区是指水平标尺下方的空白区域,该区域是用户进行文本输入、编辑和排版的地方。
在编辑区左上角有一个不停闪烁的光标,用于定位当前的编辑位置。
在编辑区中,每输入一个字符,光标会自动向右移动一个位置。
◆滚动条:分为垂直滚动条和水平滚动条。
当文档内容不能完全显示在窗口中时,可通过拖动文档编辑区下方的水平滚动条或右侧的垂直滚动条查看隐藏的内容。
◆状态栏:状态栏位于Word文档窗口底部,其左侧显示了当前文档的状态和相关信息,右侧显示的是视图模式切换按钮和视图显示比例调整工具。
(三)Word文档的视图◆页面视图:“页面视图”是最常用的视图模式,它可以显示word2010文档的打印结果外观,主要包括页眉、页脚、图形对象、分栏设置、页面边距等元素,是最接近打印效果的页面视图。
◆阅读版式视图:以图书的分栏样式显示word2010文档,它主要用来供用户阅读文档,所以“文件”按钮、功能区等窗口元素被隐藏起来。
在该视图模式中,您还可以单击“工具”按钮选择各种阅读工具。
◆大纲视图:“大纲视图”主要用于word2010整体文档的设置和显示层级结构,并可以方便地折叠和展开各种层级的文档。
Word 2010基础操作培训教程1基本操作1.1启动和认识Word 2010工作界面法一:使用“开始”菜单启动Word 2010“开始”菜单——>所有程序——>Microsoft Office——> Microsoft Word 2010法二:通过桌面快捷方式启动Word 2010双击桌面上word 2010的快捷图标即可打开应用程序。
法三:通过打开原有文档方式启动Word 2010Word 2010工作窗口考点:①能够通过三种方式启动Word 2010②熟悉Word 2010工作窗口各部分的名称法一:“文件”选项卡——>新建——>空白文档——>创建法二:直接单击“自定义快速访问工具栏”考点:能够通过两种方式新建Word 2010文档(1) “文件”选项卡——>打开(2)以只读方式或副本方式打开文档(3)通过“最近所用文件”列表打开文档1.4保存文档法一:“文件”选项卡——>保存\另存为考点:①熟悉打开Word文档的方法②能够以只读或副本方式打开文档法二:单击快速访问工具栏中的“保存”按钮法三:快捷键Ctrl+S1.5关闭文档法一:”文件”选项卡——>关闭法二:单击“关闭”按钮关闭当前文档考点:能够通过三种方法保存Word文档2文本录入与编辑2.1文本的录入2.1.1中英文录入(1)组合键Ctrl+Shift切换输入法Ctrl+Space切换中英文输入法(2)插入与改写插入模式:在文本的左边输入时原有文本将右移。
改写模式:在文本的左边输入时原有文本将被替换。
法一:按键盘上的“Insert”键法二:单击状态栏的“插入”或“改写”按钮2.1.2插入符号“插入”选项卡——>符号——>其他符号考点:能够通过两种方法关闭Word文档考点:①在word中可以输入中英文文本②能够切换插入与改写模式③能够在word中插入各类符号2.2文本的编辑2.2.1选定文本(1)选择任意文本将光标置于要选择文本首字的左侧,按住鼠标左键,拖动光标至要选择文本尾字的右侧,然后释放鼠标,即可选择所需的文本内容。
Word2010教程第一节:Word2010简介与界面组成一、Word2010简介Word是由美国Microsoft公司推出的一款集文字录入、编辑、排版、图文混排、制作表格、表格计算、图表、公式、模板和打印为一体的高级办公软件。
二、启动Word2010开始——程序——Microsoft Office——Microsoft Word 2010三、Word2010界面组成1、快速工具栏2、功能面板3、标尺4、编辑区5、状态栏第二节:Word的五种视图一、Word的五种视图1、页面视图(最常用):特点是“所见即所得”2、阅读版式视图:方便阅读和浏览文章。
3、Web版式视图:显示文章内容发布到网页上的效果。
4、大纲视图:组织标题。
5、草稿视图:只显示一些文字信息,对于文件中图形或图片等内容在草稿视图下是无法显示的。
第三节:选定文字的技巧一、文章选定技巧1、选定单个文字或多个文字利用鼠标直接拖动2、选定一行(1)鼠标放在左边变成反向箭头单击。
(2)Shift+End:选定光标后面的文字(光标所在行后面的文字)。
3、选定一段(1)鼠标放在左边变成反向箭头双击。
(2)在段落文字内三击鼠标。
4、不连续文字的选定(1)按住Ctrl键单击选择不连续的文字。
(2)按住Alt键单击选择一列或多列。
5、全选(1)Ctrl+A:全选(2)鼠标放在左边变成反向箭头三击。
(3)Ctrl+单击(前提是没有选择任何文字)第四节:文字的格式化11、字体2、字号(大小介于1-1638之间)3、加粗5、下划线6、文字颜色……………..第五节:实例——上标和下标的应用第六节:文字的格式化2一、字体1、效果(1)删除线(2)双删除线(3)上标(4)下标(5)全部小型大写字母(6)全部大写字母(7)隐藏2、字符间距(1)缩放(2)间距(3)位置第七节:实例——弧形文字一、文件的加密1、文件——保护文档2、文件——另存为——工具——常规选项第八节:段落格式化11、缩进和间距(1)首行缩进:每一段的第一行缩进。
Word2010教程大全1最全面的讲述了Word2010的操作技技巧Word2010基础部分全面认识Word2010功能区Microsoft Word从Word2007升级到Word2010,其最显著的变化就是使用“文件”按钮代替了Word2007中的Office按钮,使用户更容易从Word2003和Word2000等旧版本中转移。
另外,Word2010同样取消了传统的菜单操作方式,而代之于各种功能区。
在Word2010窗口上方看起来像菜单的名称其实是功能区的名称,当单击这些名称时并不会打开菜单,而是切换到与之相对应的功能区面板。
每个功能区根据功能的不同又分为若干个组,每个功能区所拥有的功能如下所述:1.“开始”功能区“开始”功能区中包括剪贴板、字体、段落、样式和编辑五个组,对应Word2003的“编辑”和“段落”菜单部分命令。
该功能区主要用于帮助用户对Word2010文档进行文字编辑和格式设置,是用户最常用的功能区,如图2009112601所示。
图2009112601 “开始”功能区2.“插入”功能区“插入”功能区包括页、表格、插图、链接、页眉和页脚、文本、符号和特殊符号几个组,对应Word2003中“插入”菜单的部分命令,主要用于在Word2010文档中插入各种元素,如图2009112602所示。
图2009112602 “插入”功能区3.“页面布局”功能区“页面布局”功能区包括主题、页面设置、稿纸、页面背景、段落、排列几个组,对应Word2003的“页面设置”菜单命令和“段落”菜单中的部分命令,用于帮助用户设置Word2010文档页面样式,如图2009112603所示。
图2009112603 “页面布局”功能区4.“引用”功能区“引用”功能区包括目录、脚注、引文与书目、题注、索引和引文目录几个组,用于实现在Word2010文档中插入目录等比较高级的功能,如图2009112604所示。
图2009112604 “引用”功能区5.“邮件”功能区“邮件”功能区包括创建、开始邮件合并、编写和插入域、预览结果和完成几个组,该功能区的作用比较专一,专门用于在Word2010文档中进行邮件合并方面的操作,如图2009112605所示。
WORD综合操作(OFFICE2010)操作要求:操作步骤注意点:1)每次操作前一定要把光标停在要排版的正文前。
2)做错了不要乱删,用撤销按钮,做对一点保存一次,经常保存。
1.对正文进行排版(1)使用多级符号对章名、小节名进行自动编号,代替原始的编号。
要求:*章号的自动编号格式为:第X章,其中X为自动排序。
阿拉伯数字序号。
对应级别1。
居中显示。
*小节名自动编号格式为:X.Y。
X为章数字序号,Y为节数字序号(例:1.1)。
X、Y 均阿拉伯数字序号。
对应级别2。
左对齐显示。
操作步骤:(1)设置章名、小节名使用的编号。
步骤1准备:将光标置于第一章标题文字前;步骤1:选择【开始】→【样式】→【标题1】,多级列表设置选择菜单【开始】→【段落】→【多级列表】,点击【定义新的多级列表】按钮。
选择【级别】为1;【编号格式】为“第1章”(1由编号样式决定,在1前输入“第”,在1后输入“章”);点击【更多】→【将级别链接到样式】:【标题1】;(此时不要点击确定)选择【级别】:2,【编号格式】:1.1,点击【更多】→【将级别链接到样式】:【标题2】,点击【确定】。
步骤2:点击【样式】,修改【标题1】,单击“居中”按钮→【确定】。
修改【标题2】,单击“左对齐”按钮。
步骤3:首先选中各章标题(Ctrl+单击各章标题);在格式工具栏【样式】中选择【标题1】。
步骤4:首先选中各小节标题(Ctrl+单击各小节标题);在格式工具栏【样式】中选择【标题2】。
(如果样式表中没有出现标题2,按Ctrl+Alt+2显示)(2)新建样式,样式名为:“样式”+准考证号后5位;其中:*字体:中文字体为“楷体”,西文字体为“TimesNewRoman ”,字号为“小四”;*段落:首行缩进2字符,段前0.5行,段后0.5行,行距1.5倍;两端对齐。
其余格式,默认设置。
(8)将(2)中新建样式应用到正文中无编号的文字。
不包括章名、小节名、表文字、表和图的题注、脚注。