储水式电热水器安装指引
- 格式:pptx
- 大小:7.45 MB
- 文档页数:31
目录1整机概述 (3)1.1电热水器定义 (3)1.2电热水器分类 (3)1.3产品特色 (3)1.4规格与技术参数 (2)2部件名称 (3)3拆装程序 (8)4操作方法、电控功能 (13)4.1按键及功能概要表 (13)4.2电热水器基本组成 (13)4.3电热水器显示内容及主要功能模式 (13)4.3.1LED显示内容及系统配置功能主要包括 (13)4.3.2机身面板显示内容 (14)4.4基本参数及要求 (14)4.5、按键及显示屏具体功能要求 (15)4.6功能的详细说明 (16)4.7空壳机内容显示 (21)4.8内胆容量设置功能 (21)4.9、报警功能与故障自检(空壳机无此功能) (21)4.10、其他技术要求 (22)5故障代码表 (23)6零部件清单 (23)详细介绍1、全新异型造型;2、机身分为前后壳,均为HIPS塑料;白色●向外拉取出电源板安装盖电源板显示板遥控器图1:显示面板图遥控器对应按键位置:图1:遥控器面贴图4.4基本参数及要求1.额定工作电压:AC220V/50Hz2.整机额定功率3200W“开/关”键度,加热时“太阳花”图标循环点亮,保五、故障代码八、零部件清单(附有明细)F60-32EQ3(HEY)明细:结构级别编号名称代号(图号)数量112951000000841排水阀DT_245-01A1 116151000002322内销说明书F6030-LS3Y-131 112451000000501保温棉F60-32EQY-061 112151000000610标记套D30-20R-201 112151000000622标记套D30-20R-211 112151000000646水管DT-681 112151000002901定位座F60-30EQ1Y_02-032 112151000002902定位座F60-30EQ1Y_02-0111 112151000002903定位座F60-30EQ1Y_02-022 116351000000237说明书包装袋DT-441 117451000003441电源线DT.79F1 110502006000052标签纸DT-960.00106 116351000000701胆口泡F60-30EQ1Y-191 116351000001881上包装垫F6030-ES2Y-021 1113015120000911型六角螺母GBT61705 111301801000004T型螺栓MJ05-001125 116351000000704堵泡F60-30EQ1Y-221 112951000000421出水管组件F60-30EQ1Y_38121051030Y01242F60-32EQ3(HEY) 电热21051030Y01243F80-32EQ3(HEY) 电热21051030003387F60-32EQ3(HEY)电热水21051030003386F80-32EQ3(HEY) 电热。
储水式电热水器使用方法图解一、安装准备。
1.选择好安装位置,确保水器周围有足够的空间,并且有便利的排水和供水管道。
2.确认水器底部支撑牢固,避免晃动或倾斜。
3.将水器与电源连接好,并确保电源开关关闭。
二、开启水器。
1.打开水器的进水阀和出水阀,确保水流通畅。
2.打开电源开关,待水温达到设定温度后,水器会自动停止加热。
三、调节水温。
1.根据自己的需要,通过水器上的温度调节按钮,调节水温,一般建议设置在40-60摄氏度之间。
2.调节好水温后,等待一段时间,让水温稳定在设定温度。
四、使用热水。
1.当需要使用热水时,打开热水龙头,调节好水温,等待热水流出。
2.使用完毕后,关闭热水龙头,确保水流停止。
五、定期保养。
1.定期检查水器的进水管道和出水管道,确保畅通无阻。
2.定期清理水器内部的水垢,保持加热效率。
3.定期检查水器的安全阀和压力表,确保正常工作。
六、注意事项。
1.使用过程中,避免将水器周围堆放杂物,保持通风良好。
2.使用过程中,避免热水直接接触皮肤,以免烫伤。
3.使用过程中,如发现水器有异常情况,应及时关闭电源,并联系售后服务人员进行维修。
七、关闭水器。
1.当不需要使用热水时,可以关闭水器的电源开关,节约能源。
2.在长时间不使用水器时,建议关闭进水阀和出水阀,以免发生意外。
八、结束语。
通过本文档的图解,相信大家已经了解了储水式电热水器的使用方法。
希望大家在使用水器时,能够按照正确的方法进行操作,保证安全和节约能源。
如果有任何疑问或需要帮助,欢迎随时联系我们的售后服务人员。
祝大家生活愉快!。
电热水器的正确安装方法2023年的正确电热水器安装方法电热水器在我们生活中的作用越来越大,它可以为我们提供干净热水,做饭喝水等等。
但是正确安装电热水器可以延长使用寿命,保证家庭安全。
以下是电热水器正确安装方法:1. 选择合适的位置在安装电热水器之前,首先需要选择合适的位置来放置它。
最好选择一个平坦、通风、干燥、安全、可靠的位置。
不要将电热水器放在浴室内或易受潮的地方。
另外值得注意的是,家庭中的电热水器应该放置在人们不易摔倒的位置上,以避免发生不必要的事故。
2. 检查水管和电源线在安装电热水器之前,还需要检查家中的水管和电源线是否正常。
如果有漏水的现象,应及时修补。
电源线需要确定电源是否接地,最好找专业的电工安装。
3. 安装支架接下来就是安装支架。
首先需要根据电热水器的大小和重量来选择合适的支架,然后根据支架的型号和大小来准确地安装支架,支架的安装一定要合理。
4. 连接水管和电源线如果你在安装电热水器时想要更加自如,更加方便安装,则可以在安装之前买齐所需的配件。
在连接水管和电源线之前,请仔细阅读电热水器上附带的说明书。
使用螺丝将水管连接到电热水器颈口处,并与水龙头相连。
接线时一定要按照电热水器上的要求来连接。
5. 加水和调节水温接下来就是向电热水器中加水并调节水温。
必须等到水箱内充满水后,才可以将电源线插入电源插座中,并开启电热水器开关,调节水温,让它适合使用。
根据我们的使用需求来调整电热水器的水温。
6. 启动现在,您的电热水器已经完美的安装了。
您可以尝试打开水龙头试验电热水器是否正常工作。
7. 后续保养要注意定期的保养,清洗热水器内部结垢,避免堵塞,影响水流。
总之,在安装电热水器时,我们要非常小心和仔细,加强安全意识。
同时,还要遵循严格的安装程序和方法,选择正规厂家的电热水器,安装好之后,可以给我们的生活带来更多方便与舒适。
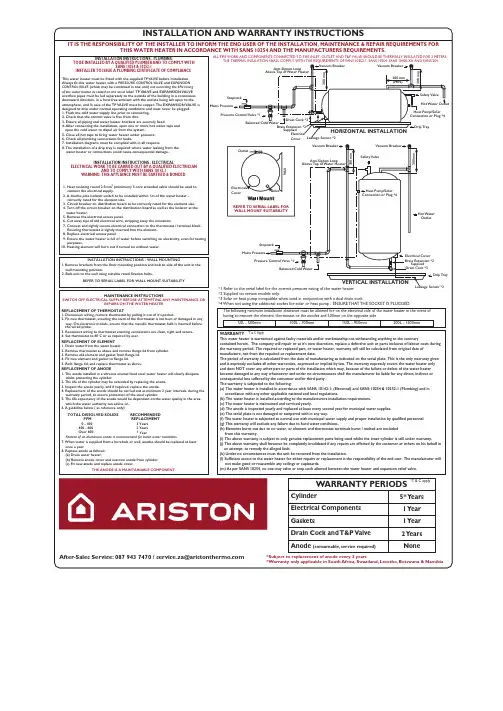
YearYears Years INSTALLATION INSTRUCTIONS - ELECTRICALELECTRICAL WORK TO BE CARRIED OUT BY A QUALIFIED ELECTRICIANAND TO COMPLY WITH SANS 10142-1WARNING: THIS APPLIANCE MUST BE EARTHED & BONDEDINSTALLATION INSTRUCTIONS - PLUMBINGTO BE INSTALLED BY A QUALIFIED PLUMBER AND TO COMPLY WITHSANS 10254 & 10252-1INSTALLER TO ISSUE A PLUMBING CERTIFICATE OF COMPLIANCETHIS WATER HEATER IN ACCORDANCE WITH SANS 10254 AND THE MANUFACTURERS REQUIREMENTS.IT IS THE RESPONSIBILITY OF THE INSTALLER TO INFORM THE END USER OF THE INSTALLATION, MAINTENANCE & REPAIR REQUIREMENTS FORINSTALLATION AND WARRANTY INSTRUCTIONSREFER TO SERIAL LABEL FOR OutletInletW a l lElectrical CoverBalanced Cold WaterPressure Control Valve *1Mains PressureStopcockHeat Pump/Solar Connection or Plug *4Heat Pump/SolarConnection or Plug *4Drain Cock *3Brass Extension *2Supplied Electrical Cover Drip TrayDrip TrayHot Water OutletHot Water OutletSafety ValveSafety ValveAnti-Siphon LoopAbove Top of Water HeaterVacuum BreakerVacuum BreakerVacuum Breaker Anti-Siphon LoopBalanced Cold WaterMains PressurePressure Control Valve *1Vacuum BreakerStopcock*Subject to replacement of anode every 2 years*Warranty only applicable in South Africa, Swaziland, Lesotho, Botswana & NamibiaALL PIPE WORK AND COMPONENTS CONNECTED TO THE INLET, OUTLET AND T&P VALVE SHOULD BE THERMALLY INSULATED FOR 2 METERS.THE THERMAL INSULATION SHALL COMPLY WITH THE REQUIREMENTS OF SANS 10252-1, SANS 10254, SANS 10400-XA AND SANS 204.1. Remove brackets from the floor mounting position and bolt to side of the unit in the wall mounting position.2. Bolt unit to the wall using suitable rated fixation bolts.REFER TO SERIAL LABEL FOR WALL MOUNT SUITABILITYINSTALLATION INSTRUCTIONS - WALL MOUNTING*1 Refer to the serial label for the correct pressure rating of the water heater.*2 Supplied on certain models only.*3 Solar or heat pump compatible when used in conjunction with a dual drain cock.*4 When not using the additional socket for solar or heat pump - ENSURE THAT THE SOCKET IS PLUGGED.300 m m300 m mWALL MOUNT SUITABILITYDrain Cock *3ElectricalCover200 mm 300 m m(MIN)300 m mHORIZONTAL INSTALLATION VERTICAL INSTALLATIONBrass Extension *2SuppliedThe following minimum installation clearance must be allowed for on the electrical side of the water heater in the event of having to remove the element, thermostat or the anodes and 500mm on the opposite side.WARRANTY This water heater is warrantied against faulty materials and/or workmanship not withstanding anything to the contrarycontained herein. The company will repair or at it’s own discretion, replace a defective unit or parts inclusive of labour costs during the warranty period. The repaired or replaced part, or water heater, warranty will still be calculated from original date of manufacture, not from the repaired or replacement date.The period of warranty is calculated from the date of manufacturing as indicated on the serial plate. This is the only warranty given and it expressly excludes all other warranties, expressed or implied by law. The warranty expressly covers the water heater only and does NOT cover any other part or parts of the installation which may, because of the failure or defect of the water heater become damaged in any way whatsoever and under no circumstances shall the manufacturer be liable for any direct, indirect or consequential loss suffered by the consumer and/or third party.The warranty is subjected to the following:(a) The water heater is installed in accordance with SANS 10142-1: (Electrical) and SANS 10254 & 10252-1 (Plumbing) and in accordance with any other applicable national and local regulations.(b) The water heater is installed according to the manufacturers installation requirements.(c) The water heater is maintained and serviced yearly.(d) The anode is inspected yearly and replaced at least every second year for municipal water supplies.(e) The serial plate is not damaged or tampered with in any way.(f) The water heater is subjected to normal use with municipal water supply and proper installation by qualified personnel.(g) This warranty will exclude any failure due to hard water conditions.(h) Elements burnt out due to no water, or element and thermostat terminals burnt / melted are excluded from this warranty.(i) The above warranty is subject to only genuine replacement parts being used whilst the inner cylinder is still under warranty.(j) The above warranty shall however be completely invalidated if any repairs are effected by the customer or others on his behalf in an attempt, to remedy the alleged fault.(k) Under no circumstances must the unit be removed from the installation.(l) Sufficient access to the water heater for either repairs or replacement is the responsibility of the end user. The manufacturer will not make good or reassemble any ceilings or cupboards.(m) As per SANS 10254, no one-way valve or stop cock allowed between the water heater and expansion relief valve.*T & C Apply1. The anode installed in a vitreous enamel lined steel water heater will slowly dissipate whilst protecting the cylinder.2. The life of the cylinder may be extended by replacing the anode.3. Inspect the anode yearly, and if required, replace the anode.4. Replacement of the anode should be carried out at minimum 2 year intervals, during the warranty period, to ensure protection of the steel cylinder.5. The life expectancy of the anode would be dependent on the water quality in the area, which the water authority can advise on.6. A guideline below ( as reference only):7. When water is supplied from a borehole or well, anodes should be replaced at least once a year.8. Replace anode as follows: (a) Drain water heater.(b) Remove anode cover and unscrew anode from cylinder. (c) Fit new anode and replace anode cover.MAINTENANCE INSTRUCTIONSSWITCH OFF ELECTRICAL SUPPLY BEFORE ATTEMPTING ANY MAINTENANCE ORREPAIRS ON THE WATER HEATER REPLACEMENT OF THERMOSTAT1. Disconnect wiring, remove thermostat by pulling it out of it’s pocket.2. Fit new thermostat, ensuring the stem of the thermostat is not bent or damaged in any way. On electronic models, ensure that the metallic thermostat bulb is inserted before3. Reconnect wiring to thermostat ensuring connections are clean, tight and secure.4. Set thermostat to 60˚C or as required by user.REPLACEMENT OF ELEMENT 1. Drain water from the water heater.2. Remove thermostat as above and remove flange lid from cylinder.3. Remove old element and gasket from flange lid.4. Fit new element and gasket to flange lid.5. Refit flange lid, and replace thermostat as above.REPLACEMENT OF ANODETOTAL DISSOLVED SOLIDS RECOMMENDEDPPM REPLACEMENT0 - 400 3 400 - 600 2 Over 600 1Fitment of an aluminium anode is recommended for harsh water conditions.THE ANODE IS A MAINTAINABLE COMPONENTThis water heater must be fitted with the supplied TP VALVE before installation.Always fit this water heater with a PRESSURE CONTROL VALVE and EXPANSION CONTROL VALVE (which may be combined in one unit) not exceeding the kPa rating of the water heater as stated on the serial label. TP VALVE and EXPANSION VALVE overflow pipes must be led separately to the outside of the building in a continuous downward direction, in a frost free ambient with the outlets being left open to the atmosphere, and in case of the TP VALVE must be copper. The EXPANSION VALVE is designed to drip under normal operating conditions and must never be plugged.1. Flush the cold water supply line prior to connecting.2. Check that the control valve is free from dirt.3. Ensure all piping and water heater brackets are securely fixed.4. After connecting the installation, open one or more hot water taps and open the cold water to dispel air from the system.5. Close all hot taps to bring water heater under pressure.6. Check all plumbing connections for leaks.7. Installation diagrams must be complied with in all respects.8. The installation of a drip tray is required where water leaking from the water heater or connections could cause consequential damage.WARRANTY PERIODS*T & C apply5* Y ears 1 Y ear 1 Y ear 2 Y ears NoneCylinderElectrical Components GasketsDrain Cock and T&P Valve Anode (consumable, service required)Above Top of Water Heaterthe wired probe.1. Heat resisting round2.5mm (minimum) 3 core stranded cable should be used to connect the electrical supply.2. A double pole isolator switch to be installed within 1m of the water heater - correctly rated for the element size.3. Circuit breaker on distribution board to be correctly rated for the element size.4. Turn off the circuit breaker on the distribution board as well as the isolator at the water heater.5. Remove the electrical access panel.6. Cut away tips of old electrical wire, stripping away the insulation.7. Connect and tightly secure electrical connection to the thermostat / terminal block. Ensuring thermostat is tightly inserted into the element. 8. Replace electrical access panel.9. Ensure the water heater is full of water before switching on electricity, even for testing purposes.10. Heating element will burn out if turned on without water.2After-Sales Service: 087 943 7470 / service.za@200L - 1500mm150L - 950mm100L - 700mm50L - 500mmLeakage Sensor *2Leakage Sensor *2。
电热水器的安装方法电热水器是我们家庭生活中常见的一种热水设备,它的安装对于日常生活的舒适度有着重要的影响。
正确的安装方法不仅可以确保热水器的正常运行,还可以避免安全隐患。
下面,我们将详细介绍电热水器的安装方法,希望能够对您有所帮助。
1.选择安装位置。
首先,要选择一个合适的安装位置。
一般来说,电热水器需要安装在通风良好、干燥、水源方便的地方。
同时,要确保安装位置能够承受热水器的重量,避免因为安装位置不稳导致热水器倾斜或者摇晃。
2.安装支架。
在确定好安装位置后,需要安装支架。
支架的选择要结实可靠,能够稳固地支撑热水器的重量。
在安装支架的过程中,要使用螺丝刀、螺丝扳手等工具,确保支架安装牢固。
3.连接水源和电源。
接下来,就是连接水源和电源。
首先,要根据热水器的进水口和出水口位置,连接好冷热水管道。
在连接水管的过程中,要注意密封性,避免漏水现象的发生。
另外,还需要连接好电源,确保热水器能够正常供电运行。
4.安装附件。
安装好水源和电源后,就是安装热水器的附件。
包括安装排水阀、安全阀等。
在安装附件的过程中,要按照说明书上的指示进行,确保每个附件安装正确。
5.调试。
最后,安装完成后需要进行调试。
首先要检查水管连接处是否漏水,然后打开热水器的电源,观察热水器是否正常工作。
在调试过程中,要注意安全,避免触电或者烫伤等意外发生。
总结。
以上就是电热水器的安装方法,正确的安装方法能够确保热水器的正常运行,延长其使用寿命。
在安装过程中,一定要仔细阅读说明书,按照说明进行操作,确保安装过程顺利进行。
希望本文对您有所帮助,谢谢阅读!。

储水式电热水器安装注意事项储水式电热水器是家庭中常见的热水供应设备之一,它通过加热储存的水来提供热水。
正确的安装对储水式电热水器的使用和安全非常重要。
以下是储水式电热水器安装的注意事项:1. 安装位置选择:储水式电热水器应安装在通风良好、温度适中、湿度较低的室内位置。
尽量避免阳光直射或靠近高温设备,也不宜安装在易燃物附近。
确保安装位置结实稳固,能够承受储水式电热水器的重量。
2. 电源选择:储水式电热水器需要接通电源才能正常工作。
在安装前,必须确保所选位置附近有适配的电源插座或电线,并且保证电源电压和额定功率符合储水式电热水器的要求。
3. 接水管路:安装前需要准备好冷热水进出口的管道。
冷水进口通常位于储水式电热水器底部,热水出口位于顶部。
连接管路时,应使用质量可靠的软管或金属管,确保连接牢固,并考虑到日后的维修和检修需要设置适当的阀门。
4. 排水管路:储水式电热水器需要有适当的排水管路,以便在使用过程中排出废水。
可以通过接通下部的排水管或将废水引导至室外。
排水管路应根据使用需要保持通畅,并定期清洗和检查,以免造成阻塞和漏水。
5. 安全保护:储水式电热水器应与地面保持适当的距离,并确保四周没有危险物品,以减少发生热水器倾倒或其他安全事故的风险。
同时,要保证有防漏电装置等安全保护装置,并确保装置有效、正常工作。
6. 使用和维护:安装完成后,需按照使用说明书正确使用储水式电热水器,并定期进行清洁和维护。
定期检查电源线、水管和阀门的状况,如发现异常应及时处理。
此外,要定期检查水箱和加热管的情况,清除结垢和水垢,以保证储水式电热水器的正常运行。
7. 专业安装:为了确保储水式电热水器能够正常工作并避免安全隐患,建议由专业人员进行安装。
专业安装人员具备相关知识和技能,能够根据实际情况进行安装,并确保储水式电热水器符合安全要求。
总之,储水式电热水器的安装要注意选择合适的位置、正确连接水管和电源,并保证安全保护装置的有效性。
热水器安装方法
热水器是我们日常生活中常用的家电之一,安装热水器需要一
定的技术和注意事项。
下面将为大家介绍热水器的安装方法,希望
能对大家有所帮助。
首先,选择好安装位置。
热水器的安装位置应选择在通风良好、排水方便的地方,同时要远离易燃易爆的物品,确保安全使用。
安
装位置的选择直接影响到后续的使用效果,因此需要慎重考虑。
其次,准备好安装工具。
在安装热水器之前,需要准备好必要
的安装工具,例如扳手、螺丝刀、水管等。
确保工具齐全,以便顺
利进行安装工作。
然后,进行管道连接。
在安装热水器时,需要连接好冷热水管
道和燃气管道。
在连接管道时,需要确保管道连接牢固,不漏水、
不漏气,以免造成安全隐患。
接着,进行电路连接。
对于电热水器来说,需要进行电路连接
工作。
在连接电路时,需要确保电源线路正确接入,接线牢固,避
免出现电路故障。
最后,进行试运行。
在安装完成后,需要进行试运行,检查热水器的工作状态是否正常,是否存在漏水、漏气等问题。
如果发现异常情况,需要及时进行排查和处理。
总之,热水器的安装需要注意安全、牢固、稳定。
在安装过程中,如果遇到不确定的情况,建议找专业人士进行安装,以确保安全使用。
希望以上内容能对大家在安装热水器时有所帮助,祝大家安装顺利,使用愉快!。
电热水器的安装方法
电热水器的安装方法如下:
1. 确定安装位置:选择一个离水源和电源较近的位置安装热水器。
确保地面平坦且能够承受热水器的重量。
2. 关闭电源和水源:在安装之前,务必关闭电源和水源,以免发生意外。
3. 安装水管接口:根据热水器的型号和要求,使用合适的工具将冷水管和热水管连接到热水器的进水口和出水口上。
确保连接牢固且无漏水现象。
4. 连接电源线:将电热水器的电源线正确接入电源插座。
若需要,可以选择使用专用的插座和电线保护装置,以增加安全性。
5. 安装安全阀:根据热水器的安装要求,将安全阀连接到热水器的出水管上,并确保其处于正常工作状态。
6. 安装壁挂支架:根据热水器的型号和要求,在墙壁上安装壁挂支架,并确保支架牢固可靠。
7. 安装热水器:将热水器放置在壁挂支架上,并调整好水平位置。
确保热水器与支架紧密连接,并固定好。
8. 连接水管和电源线:将之前安装的水管和电源线与热水器的接口连接好,确保连接牢固且无漏水现象。
9. 开启电源和水源:在确保一切安装正确且牢固后,打开电源开关和水源阀门,检查热水器是否正常工作。
10. 检查温度和压力:根据热水器的说明书,调整合适的温度
和压力,以满足使用需求。
注意事项:
- 安装过程中务必小心,避免发生烫伤、触电等意外事件。
- 严禁安装在易燃材料附近或防水性能不良的地方。
- 定期检查热水器的安全阀和水管连接,确保其正常工作。
- 若不具备相关的安装经验和技能,建议请专业人士进行安装。
巨浪储水式电热水器安装规范一、安装准备安装人员应做好如下安装准备:a)安装人员应备齐商用储水式电热水器安装的工具和必要的计量合格的检验仪器。
b)检查商用储水式电热水器是否完好,随机文件和附件是否齐全。
c)仔细阅读安装、使用说明书(产品说明书),了解待装商用储水式电热水器的功能、使用方法、安装要求及安装方法。
d)检查用户的电源、插座位置、水压、排水情况、接地情况、空间位置;了解电表、电线和插座容量等是否满足待装热水器的要求。
e)协助用户选定商用储水式电热水器的安装位置,询问用户是否需要进行多路供水安装(对封闭式热水器)。
f)对不能满足待装商用储水式电热水器安装要求的,安装人员应明确告知用户,建议整改安装;对不能整改的,应拒绝安装。
二、安装操作安装人员在进行安装操作时,应注意:a)商用储水式电热水器的安装应使用随机附件,安装人员不应随意更换、省略与改制;如需安装人员现场配置,则应按照本规范和安装说明书的要求制作,必须时需经专业技术人员审核批准,符合国家相关标准并经热水器生产厂家同意方可使用。
b)根据商用储水式电热水器的具体型号选择合理的安装方法,并将安装架(钩)与安装面牢固连接。
施工时应注意不得破坏建筑物的安全保证结构,必要时应采取相应的措施保证自身和他人不受危害。
c)给用户安装连接使用的管材、管件必须是符合国家相关标准并经过热水器厂家同意或指定的管材、管件。
d)巨浪商用储水式电热水器属于闭式热水器,应管道上增加单向阀门,在单向阀门的后面必须安装符合标准容积和压力的膨胀水箱。
e)安装完毕后将商用储水式电热水器容器注满水。
A、检查及运行商用储水式电热水器安装完毕后,应检查安装工作,特别注意:a)管路连接、走向应合理,各连接处无渗漏水现象;b)电气配置应安全、正确,热水器的电源插头与插座配合紧密;c)机械连接应牢固、可靠;d)使用功能应能良好实现,控制部件正常运行;e)商用储水式电热水器应按照本规范和使用说明书的要求进行试运行。
热水器安装方法热水器安装方法是很多家庭在装修或更换旧设备时需要面对的问题之一。
正确的热水器安装可以确保水温稳定、操作安全,并且延长热水器的使用寿命。
下面将为您介绍热水器安装的详细步骤和注意事项。
首先,我们需要准备一些工具和材料来进行热水器的安装。
常用的工具有:电钻、螺丝刀、钳子、扳手等。
同时,您还需要购买一根合适尺寸的不锈钢软管、水管接头、密封胶、阀门等。
1.准备工作在开展安装之前,需要确保所购买的热水器与安装的位置相适应,遵守相关的安全规定和法律要求。
另外,确保有足够的空间和插座来连接电源。
2.安装支架首先,选择一个安装点,确保地面水平且稳固。
然后,根据热水器的底部标记位置,在墙面上做好安装支架所需要的位置标记。
通过电钻在墙面钻孔,并使用螺丝固定安装支架。
3.连接供水管路通过阀门切断水源,并排空管路中的水。
使用扳手将水管接头连接至主管道,注意要使用合适的密封胶以确保连接口的密封性。
4.安装热水器将热水器放置在已安装的支架上并调整水平。
使用螺丝将热水器固定在支架上,确保牢固可靠。
5.连接热水出水管将一端连接至热水器的出水口,另一端连接至所需使用热水的水龙头。
在连接过程中,确保接头紧固,且使用密封胶进行包裹,避免漏水。
6.连接冷水进水管类似于连接热水出水管的步骤,将一端连接至热水器的冷水进水口,另一端连接至冷水管道。
同样,使用合适的密封胶保证连接的牢固性。
7.接通电源将热水器的电源线连接至墙面上的插座。
在接通电源之前,确保电压稳定,以避免电器损坏或其他安全问题。
8.调试和测试打开水源进水阀和燃气阀,确保热水器正常运转并供应热水。
调试过程中,需要检查热水器的工作状态、温度调节和水压情况是否正常。
在调试完成后,关闭进水阀和燃气阀。
9.安全检测在完成热水器安装后,进行一次全面的安全检测是非常重要的。
检查所有连接口是否紧固,确保没有漏水现象。
同时,确认燃气供应是否正常,避免出现燃气泄漏等隐患。
总之,在进行热水器的安装过程中,需要注意安全和质量。
美的密闭型储水式电热水器说明书
美的密闭型储水式电热水器为满足家庭多样需求,而设计而成,
可满足家庭的各种热水需求。
它的结构特点是,大型炉膛,有效降低能耗;单元结构,结构紧
凑节约空间,更加节能;体积较小;加热元件采用不锈钢材质,强度高,可靠性高;采用<304>不锈钢内胆,防腐蚀能力、耐磨损能力超强;独特的清洗模式可以减少污水的冲走,更加清洁。
这种水器的使用方法较为简单,首先打开水晶,需接通电源及上Merter表;调整热水量,只需调节好旋钮即可。
随即拉动电源开关,
旋转旋钮即可调节温度,将温度调节至要求温度即可使用;在使用结
束后,记得关闭电源开关即可。
尊敬的用户,在使用过程中注意事项有:不放入硬物,切勿使用
剧烈强冲涮洗水器;安装要求能和产品本身密封,严格按照要求进行
安装,确保产品和安装环境温度;平时水器表面污渍及锈迹清理需定
期开盖清洗,清理完毕以后,确保水表和连接头处上下完全位置无缝隙;若发现水器有异常现象,尽快停止使用,派人进行处理或检修;
如有技术问题,可致电客服人员求助。
使用正确,美的密闭型储水式电热水器可提供更加温和可靠的热
水环境,满足家庭多样需求,是您准备安装不可多得的智能选择。
新飞储水式电热水器使用方法新飞储水式电热水器是一种常见的家用热水设备,广泛应用于家庭和商业场所。
本文将为您详细介绍新飞储水式电热水器的使用方法。
一、安装准备1. 首先,确定电热水器的安装位置。
通常情况下,应选择干燥、通风良好的地方,避免潮湿环境和高温场所,离水源和电源较近的位置更为理想。
2. 清理安装位置,确保地面平整且干燥,并确保安装位置没有明火或易燃物品。
3. 确定热水器的进水管和出水管,确保与水源和热水供应处的管道连接无误。
4. 检查电源电压是否与热水器电压要求一致。
二、安装步骤1. 仔细阅读新飞储水式电热水器的安装说明书,并按照说明书上的指引进行安装,以确保操作正确。
2. 安装水管。
将进水管连接到热水器底部标有“进水”的接口,用扳手拧紧并确保不漏水。
然后将出水管连接到热水器底部标有“出水”的接口,同样用扳手拧紧并确保不漏水。
3. 接通电源。
将电热水器的电源线插入合适的电源插座,确保电源稳定并与电热水器的额定电压相匹配。
4. 确认供电指示灯亮起。
一般情况下,插上电源后,热水器的供电指示灯会亮起,表示热水器已接通电源。
三、使用方法1. 打开水龙头。
在使用新飞储水式电热水器之前,首先要打开热水龙头,排除水管中的冷水,直到热水流出为止。
2. 调节水温。
新飞储水式电热水器通常配有温控开关,可以根据需要选择合适的水温。
一般来说,我们可以将温控开关旋转至适宜温度的位置,然后等待一段时间,让热水器加热至设定水温。
3. 等待加热。
新飞储水式电热水器在开启电源后,会自动启动加热功能,并将水加热至设定水温。
在此过程中,需保持电热水器的电源供应稳定,确保正常加热。
4. 使用热水。
当水温达到设定水温后,即可使用热水。
打开热水龙头,调节水温和水流大小,即可获得所需的热水。
四、注意事项1. 使用前需确保水压稳定,水源清洁,以免影响正常使用。
2. 在使用热水器时,应遵循安全使用的原则,切勿将电热水器倒置、打开或进行改装。
电热水器安装操作流程电热水器是家庭生活中常见的设备之一,它能够提供温暖舒适的热水。
为了确保电热水器的正常运行和安全使用,正确的安装操作流程非常重要。
本文将介绍电热水器的安装步骤,以及相关的注意事项。
一、准备工作在开始安装电热水器之前,确保准备以下工具和材料:1. 所需工具:电钻、电锯、尺子、扳手、螺丝刀等。
2. 所需材料:电热水器、电源线、水管、管接头、密封胶等。
3. 检查电热水器的规格和参数是否符合安装要求。
二、安装位置选择选择合适的安装位置非常重要,需要考虑以下因素:1. 安装位置应离插座和水源较近,并且便于维修和保养。
2. 选择坚固的墙面或支撑架,以确保电热水器固定稳定。
3. 确保安装位置不会受潮、受阳光直射或受火源附近。
三、安装电热水器1. 第一步是将电热水器放置在选择好的位置,使用尺子测量好安装位置的高度和水平度。
2. 使用电钻和螺丝刀进行固定,确保电热水器不会晃动或移动。
3. 接下来,将电源线和水管连接到电热水器上。
注意按照正确的极性和通水方式进行连接。
4. 为了确保连接处不会漏水,使用管接头和密封胶进行处理。
5. 完成连接后,检查所有接头是否牢固,确保没有松动或漏水现象。
6. 最后,关闭电热水器的进水阀和电源开关,待水箱中的水充满后再打开电源。
四、注意事项1. 安装过程中,务必断开电源,以防止触电事故的发生。
2. 测量安装位置时,确保水平度和垂直度,以免电热水器安装不稳定。
3. 确保电热水器和电源线能够正常工作,没有损坏或老化现象。
4. 检查水管连接处是否牢固,并使用密封胶进行加固,以防止漏水。
5. 在打开电源开关之前,确保水箱内的水充满,以免电热水器运行时发生干烧。
6. 安装完成后,及时清理安装过程中产生的垃圾和杂物,保持工作环境整洁。
五、维护保养为了延长电热水器的使用寿命和保持正常运行,定期进行维护保养是必要的:1. 每隔一段时间,检查电热水器的电线和插座是否正常,确保没有损坏或松动。
密闭型储水式电热水器使用说明一、安全提示1. 将本产品安装在符合国家有关规定的正确位置和环境;2. 将本产品电源接线符合电源线的规定及类型;3. 未经授权不得更改产品的控制系统,任何未经授权的更改都可能会导致严重伤害。
4. 仅按步骤装配和使用本产品,否则可能造成产品受损或严重伤害。
5. 请严格按照说明书中的安装步骤,避免绝缘电器受损;6. 在使用前检查管路安装,以免释放温水导致烫伤等危害;7. 使用前请检查电源电压是否符合本产品的规定,以免电压过大;8. 不得让未成年人操作本产品,以防止误操作和烫伤;9. 请勿涉水拆卸本产品;10. 如发现新换或者清洗安装有出现失火、气味、响声、异物等异常现象时,切勿擅自拆卸检修,应停止使用,并及时联系本商家。
二、安装步骤1. 检查安装环境:在安装本产品前,请确认与电源相连的水路线路、电源线路和接线圈无损坏,同时本产品装置位置、环境及外观无任何缺陷和得当的安装;2. 清洗热水器表面:用清水将本产品清洗干净;3. 进行接线:将电源线与本产品连接后,进行电源线试压,确保本产品电气系统无缺陷;4. 装配散热罩:将散热罩装在热水器上;5. 装配室内机:室内机安装在离本产品适当距离的空气通道,可以防止温度过高而对本产品造成损害;6. 注水:将清水倒入排水盘,避免发生漏水情况;7. 开启水源:开启水源,确保水流入热水器中。
三、使用说明1. 打开保护门:将本产品的保护门打开,同时确认电源开关为开启状态;2. 设置温度:根据需要,将温度设置在65(℃)~75(℃)之间;3. 开启电源开关:开启电源开关,本产品会开始恒温加热;4. 关闭保护门:使用完毕后,将保护门关闭,以防止电热元件过热等;5. 关闭电源开关:使用完毕后,务必关闭电源开关,以防止过度耗电;6. 清洗:完成使用且冷却完毕后,应及时清洗室外机表面过的污垢,以防止生锈及假运行;7. 空气循环系统:使用前,要确保室内外本产品有良好的通风,以防止本产品受损。
储水式电热水器的使用方法使用储水式电热水器,就像跟朋友喝茶聊天,轻松又惬意。
不过,要想享受那温暖的热水,还是得知道一些使用的小窍门。
下面就给大家简单说说,怎么才能让这台“热水机”发挥出它的最佳水平。
1. 初见面,打招呼1.1 开箱过程首先,买回来的电热水器可别急着插电,先来个“开箱仪式”。
拆开外包装的时候,记得小心点,别让它受到委屈。
看一下说明书,虽然有些字看上去像天书,但仔细翻翻,总能找到点有用的信息。
接下来,检查一下有没有磕碰,确保一切都好好的,这可关系到你日后的洗澡体验哦!1.2 安装小技巧然后就是安装啦。
虽然不少朋友可能觉得这事儿太麻烦,但其实也没有想象中的那么复杂。
找个相对稳固的地方,把它固定好。
要是你手巧,还可以试着自己动手,当然如果心里没底,也可以请专业人士来帮忙。
记得确保水管和电源线都接好,这样才能顺顺利利地享受热水。
2. 使用技巧,轻松上手2.1 温度调节接下来,调节温度是个关键步骤。
储水式电热水器通常都有温度控制器,调节到适合自己的温度就好。
别太热,毕竟“烫手的汤总是难喝”,适中才是王道!一般来说,60度左右就非常舒服。
水温高了,泡澡时容易变成“蒸汽浴”,可别让自己变成了“人肉煮蛋”。
2.2 预热时间别急,调好温度后,耐心等一等。
储水式热水器需要时间来加热水,通常需要12小时,这个时间里你可以干点别的,打打游戏、刷刷剧,享受一下“等待的乐趣”。
等水烧好了,泡个热水澡,简直就是享受啊!3. 维护保养,细水长流3.1 定期清洁用得久了,热水器里难免会积累一些水垢。
这个时候,定期清洁就显得特别重要。
一般来说,半年清洗一次就好。
可以找专门的清洗服务,或者自己动手。
自个儿做的时候,记得先关掉电源和水源哦,安全第一,别让自己成为“意外的主角”。
3.2 检查漏水最后,记得时不时检查一下水管和接口,看看有没有漏水的情况。
要是发现什么异常,赶紧处理,毕竟“亡羊补牢,未为迟也”。
水电关系大,出了问题可就麻烦了,谁也不想在洗澡的时候遇到“突如其来的冷水”。