FuⅠlEⅠectYlc说明书
- 格式:docx
- 大小:37.58 KB
- 文档页数:3

注射用氟氯西林钠以下内容仅供参考,请以药品包装盒中的说明书为准。
注射用氟氯西林钠说明书请仔细阅读说明书并在医师指导下使用【药品名称】通用名称:注射用氟氯西林钠英文名称:FlucloxacillinSodium for Injection 汉语拼音:Zhusheyong FulÜxilinna【成份】本品的主要成份为氟氯西林钠。
处方中无辅料。
【性状】本品为白色或类白色结晶性粉末。
【适应症】适用于治疗敏感的革兰氏阳性菌引起的下述感染,包括产β-内酰胺酶的葡萄球菌和链球菌:1、皮肤及软粗织感染:如疖、痛、脓肿、蜂窝织炎、脓疱病、感染性烧伤、植皮保护、感染性皮肤状态,如:溃疡、湿疹和痤疮伤口感染;2、呼吸道感染:如肺炎、肺部脓肿、鼻窦炎、咽炎、扁桃体炎、肩桃体周脓肿、中、外耳炎积脓;3、其他感染:骨髓炎、尿道感染、肠炎、脑膜炎、心内膜炎、败血症;4、适当的时候也被推荐用于较大外科手术(例如心胸和矫形外科手术)的预防剂。
【规格】按C19H16CIFN3O5S计(1)0.25g(2)0.5g(3)1.0g【用法用量】成人:肌内注射:每次250mg,每日4次。
静脉滴注:每次250mg~1g,每日4次,加入100ml~250ml生理盐水或葡萄糖注射液中溶解,缓慢静脉滴注(每次滴注持续时间30~60分钟)。
在4小时内使用完。
儿童参考用量:据国外同类品种说明书及文献资料记载,2岁以下按成人剂量的1/4给药;2~10岁按成人剂量的1/2给药。
【不良反应】同使用其它青霉素—样,副作用少见,并且大多反应轻微,短暂。
1.过敏反应与其它β-内酰胺类抗生素一样有过敏反应的报道。
较常见的过敏反应有皮疹。
如有任何过敏反应发生,应中断治疗。
2.肝脏少数患者用药后可出现氨基转移酶暂时性升高,但当中断治疗后可逆转。
也有致急性肝脏胆汁淤积黄疸的报道。
3.肾脏偶有致急性间质性肾炎的报道。
4.胃肠道少数病人可出现恶心、呕吐、腹胀、腹泻、食欲减退等胃肠道症状,偶见假膜性结肠炎。
flupeco—k1使用指南与注意事项
哎呀呀,朋友们!flupeco—k1 可真是个厉害的家伙,但要想用得好,这使用指南与注意事项您可得瞧仔细啦!
首先说使用方法,那得像解开神秘宝箱的密码一样准确哟!您得按照正确的步骤来操作,不能随随便便瞎搞。
比如说,启动的时候要先检查各项设置,这就好比运动员上场前要做好热身,可不能马虎!还有使用过程中的各种功能切换,得心里有数,就像指挥一场精彩的音乐会一样有条不紊。
再来讲讲注意事项,嘿,这可太关键啦!千万别在不合适的环境里使用它,不然就像在沙漠里种水稻,白费力气!而且啊,使用的时候别过度依赖,得保持自己的判断力,这就跟走路不能光靠拐杖一样。
要是发现它有点小故障,千万别不当回事,赶紧处理,就像生病了要及时看医生,不能拖拖拉拉。
哎呀,总之啊,flupeco—k1 的使用指南与注意事项一定要牢记心间哦,别等出了问题才后悔。
要像呵护珍贵的宝贝一样对待它,这样您才能充分发挥它的作用,让它为您带来更多的便利和好处呀!。
目录一、产品概述 2二、工作流程图 3三、设备的系统说明 5四、设备的安装和运行 6五、设备安装示意图7六、流量型控制器调试步骤8七、时间型控制器调试步骤9八、故障排除11产品概述FLECK全自动控制器以闻名于世的FLECK公司软化水技术为基础,它是将软水器的运行及再生的每一个步骤实现全自动控制,并采用时间、流量或感应器等方式来启动再生。
调整FLECK系列全自动软水器采用时间同步电机控制全部的工作程序,在7天或12天范围内根据需要设定还原周期,二十四小时内任意选择还原时间,并可以对还原过程进行调整。
富来流量型全自动软水器采用流量控制全部工作程序,设备可连续(或间断)供水。
再生—由流量控制器自动启动再生装置,可根据需要自行设定再生程序。
由于FLECK系列全自动软水设备控制系统技术成熟、操作简便、采用了无铅黄铜阀体完全符合食品卫生要求,配以聚四氟乙烯(Teflon)涂层活塞减小了阻力,延长了使用寿命,运行可靠。
FLECK系列全自动阀门应用于工业锅炉、热交换器、大型中央空调、宾馆饭店、食品工业、洗衣印染、医疗卫生等行业,该产品具有自动化程度高、交换容量大、结构紧凑、能耗低、省人工、无需日常保养等特点。
进口压力:0.2Mpa—0.6Mpa工作温度:2℃--50℃出水硬度:≤0.03 mmoI/L使用电源:220V/50Hz AC布置形式:单罐或多罐并联再生方式:顺流再生或逆流再生操作程序:自动程序控制使用树脂:001×7强酸性阳离子交换树脂我公司将为用户提供完善的技术服务。
MODEL2510、2750、2850、3150、2900、3900工作流程图1、工作状态2、反洗状态3、再生状态4、慢速清洗状态硬水经过控制阀进入树脂罐,经树脂层处理的水通过底步的布水器,进入沿着中心升降管向上,再通过控制阀流出。
硬水进入控制阀后经过:控制阀 中心升降管向下 通过底部的布水器 经过树脂层向上 最后通过控制阀排水口排出硬水进入控制阀后,向上进入注水器,然后通过射流过程将盐罐中的还原剂吸入,带还原剂的水流向下经过树脂层进入布水器和升降管,再通过控制阀排水口排出。
© 2006 Velcon Filters, Inc.1933 04/04Pure Fuel: How to make sure that’s all you ever deliverEVERY TIME YOU RECEIVE FUEL:• B efore you accept it, take a sample from the lowest point in each compartment into a clean white bucket. If it’s clear, bright and free of water, it’s okay. If you’re not sure about “clear and bright,” see the section at the top right.EVERY DAY:• D rain the sump of each filter vessel and storage tank into a white bucket. Take filter samples with the pump on. Inspect samples for contamination particles and discolored water. Be sure all accumulated water is drained off.• C heck and record the pressure differential across each filter housing under normal flow conditions.ONCE A MONTH:• D o a membrane filter test downstream from each jet fuel filter vessel.• C heck nozzle screens for particles. If you find any, check out the refueling equipment to find out why.ONCE A YEAR:• Inspect your storage tanks and clean them if they need it.• C heck the water defense system in the filter/separator. Be sure the float control is buoyant and is still able to shut down the slug valve.• C hange your coalescer elements and any pleated paper separator elements. Y our Velcon representative can help you get the right element sets and conversion information to meet API/IP 1581.• C lean, inspect, and test any Teflon ® coated screen separators. (See Velcon data sheet 1242)• U se water-absorbent filter cartridges in your Avgassystem. We recommend Velcon’s Aquacon ® cartridges, but we’re prejudiced.® Teflon is a registered trademark of E.I. du Pont de Nemours & Co., Inc.1. “Clear and bright” doesn’t mean the color of jet fuel, which can range from colorless to straw color. It means no free water, no sediment and nothing clouding the fuel or floating in it.2. I f you’re not sure whether you’re looking at water or colorless jet fuel, pour in some coffee. It separates from the fuel, but it mixes with any water in the jar.3. F or water contamination control, don’t ever put your faith in an automatic water drain valve or a sightglass. Automatic drain valves won’t get out all the water and bacteria grows where the fuel and water surfaces meet. And sightglasses are useless unless they show you both fuel and water and the line between them. Otherwise, you don’t know whether you’re looking at pure fuel or pure water.4. D ifferential pressure is the difference between the pressure upstream and downstream of a filter/separator. Differential pressure increases whencontaminant is filtered by the first-stage cartridges and causes a flow restriction.5. A sudden decrease in pressure differential across a filter housing may mean trouble. The vessel should be opened immediately and inspected for ruptured elements, seals or mounting hardware. It’s also possible to get a decrease in pressure differential without any of these failures. It can happen if cartridges that have been separating water from the fuel now are exposed to dry fuel. The water is slowly pushed out of the coalescer, resulting in decreased differentialpressure.Five Simple things that tell you what you’re looking at:Follow these simple steps and you won’t start a fire when you fill a filter vessel:Fires start from sparks caused by electrostatic buildup. Here’s how you can prevent them.1. C lose the outlet valve and the drain valves.2. C rack open the inlet valve slightly so that the vessel will fill slowly to prevent charge buildup.3. S tart the pump.4. I f you have a manual air eliminator, open it completely.5. A llow about 10 minutes to fill the vessel. If it fills faster than that, you’re taking a chance.6. R emember to close the air eliminator when the vessel is full.7. I f the vessel has an automatic air eliminator with acheck valve, you had to remove the check valve before you could drain. Remember to put it back.Some simple ways to stay out of trouble when you change cartridges..• D rain the filter housing completely. Otherwise, the dirt can fall out of the cartridge and contaminate the fuel. If you open the air eliminator, the vessel drains faster. Remove the used cartridges.• D on’t touch the new coalescer and separator cartridges. Leave the polybags on the cartridges as you install them. And before you close the vessel, take the bags off slowly to avoid building up an electrostatic charge. If you have to handle the cartridges, wear clean cotton or rubber gloves. Don’t touch the separator’s T eflon ® screen. Handle it by the endcaps.• A lways use a torque wrench for installingcartridges. Read the manufacturer’s specified torque value in the installation instructions.• W hen you clean the inside of a filter vessel, use the product being filtered or diluted bleach. Do not use soap or another type of fuel.• C lose all the drain valves before you refill. Obvious, but easy to forget!Some Sound Information, Useful and Readily Available:The Manual of Aviation Fuel Quality Control Procedures, ASTM Manual Series MNL5, Available from ASTM, 100 Barr Harbor Drive, West Conshohocken, PA 19428-2959, Phone: (610) 832-9585.Standards for Jet Fuel Quality Control at Airports, A T A Specification No. 103, ATA Distribution Center, PO Box 511, Annapolis Junction, MD 20701 U.S.A., Phone: (800) 497-3326 / (301) 490-7951.。
车载冰箱使用说明及注意事项一.安放注意事项1.移动或搬动车载冰箱时,尽量避免用力挤压恒温箱体和门。
2.车载冰箱安放四周应留出相应的空间,上方有30厘米的空间,左右和后壁需要有至少20厘米的空间,以保证车载冰箱的正常通风和散热。
3.车载冰箱不得在潮湿度和温度过高(相对湿度:0%~95%,环境温度:-25℃~40℃)的地方,防止过度受潮或受热,影响其正常工作。
二.使用注意事项1.车载冰箱在通电使用时应检查电压是否稳定和匹配。
2.本车载冰箱通电后,请按第一个按钮set键,启动机器,之后方可调节温度,轻轻触摸上调和下调键,调节到所需温度后,闪烁三下,记忆温度,温度开始从室温降温或升温。
3.如需要搬动机器,或是断电,请先关机器,触摸第一个键5-10秒关机,重新通电后,再次按照上述步骤2操作即可。
4.严禁向车载冰箱撒水,防止漏电。
5.不得存放易燃易爆物品,如:酒精,汽油,液化幼体等。
6.存放物品很多时,尽量避免紧贴后壁冷凝管,防止结冰;如频繁打开门,或开门时间比较久,耗电越大,会暂时影响恒温效果,及时关闭箱门即可如需移动箱体时,应断电后在操作,如正常工作时,移动过激烈,易造成噪音,应平稳后5分钟后重新工作。
7.通电时,尽量避免过于频繁的打开箱门,或有水珠,应及时擦拭。
8.玻璃容器应避免靠近散热器,防止爆破。
三.保养注意事项1.清洁车载冰箱前,需先切断电源,用软布粘些中性洗涤剂轻轻擦拭,禁止使用去污粉,汽油,酸性或碱性带有腐蚀性的液体擦拭。
2.门封时间长,容易有污垢,应按时擦拭干净,以免关门封闭性下降,影响恒温效果。
3.车载冰箱长时间不使用时,应拔下电源插头,将箱体擦拭干净,带箱体内干燥后,关闭箱门即可。

感谢您对我们产品的信任和购买,我们真诚的建议您能仔细阅读我们的产品说明书。
它包含了产品所有必要的技术特性,以及正确安装和使用此温控器的有效信息。
由于技术和材料的不断提高,如果没有超前的意识,我们产品的规格和使用也会赶不上日新月异的变化。
警告!为了将来也能够参阅此书,请将说明书放置于干燥处,以防毁坏。
键:①数字时钟显示器②温度设置键(confort L1)③温度设置键(Risparmio L2)④盖⑤电池盒盖⑥自动/手动/关闭按钮⑦选择(推动选择)/编程输入温度值键confort L1⑧选择(滚动选择)/编程输入温度值键Risparmio L2⑨(推动)选择一天的编程键PROG DAY⑩提前编程(滚动)选择键⑾当前时间调节(滚动选择)键h(用笔摁住此键选择时间)⑿当前日期调节(推动选择)键d(用笔摁住此键选择日期)⒀供暖/温度调节操作开关⒁”Jolly”高级功能键⒂跨接线(I)= 推动选择(S)= 滚动选择安装和使用说明这种有着精美外观的温控器可以根据不同需求搭配各种各样颜色的门,使之显现出独特的个性。
它配备着一个电子温度调节装置。
这种电子温度调节装置由两个可调节温度杆和一个数字时钟组成。
有了这种时钟(精密的计时器)我们可以设置一周的周期,在这一周期间温控器将会通过操作COMFORT L1或SA VING L2来调节温度。
安装说明温控器必须由合格的安装人员安装。
在安装和做相关连接之前,必须关闭电路系统和锅炉。
墙上安装:①打开盖,把电池盒的盖掀开并且拧开里面的螺丝钉。
②用螺丝刀顶住小挂钩把温控器从紧扣的金属板上分开。
③把金属板放置离地面大约125厘米的墙上,用笔在墙上做个记号。
④(根据记号)在墙上弄两个5毫米的洞以便用墙塞。
⑤把电线从金属板的后面穿过并穿过长方形的洞。
⑥把接线板从主板上拆下来,用螺丝钉和墙塞把金属板固定在墙上。
⑦根据电路图把有用的电线连接到可移动的接线板上,注意把电线穿过接线板主板的逢时要与连接使用的数字相符。
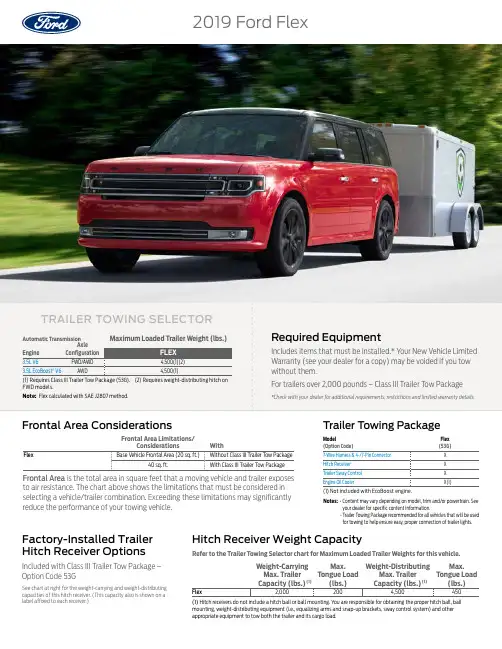
2019 Ford FlexTrailer Towing PackageModel Flex (Option Code) (53G) Frontal Area Limitations/ Considerations WithFrontal Area ConsiderationsFlex Base Vehicle Frontal Area (20 sq. ft.) Without Class III Trailer Tow Package 40 sq. ft. With Class III Trailer Tow PackageFrontal Area is the total area in square feet that a moving vehicle and trailer exposes to air resistance. The chart above shows the limitations that must be considered in (1) Not included with EcoBoost engine.selecting a vehicle/trailer combination. Exceeding these limitations may significantly Notes: • Content may vary depending on model, trim and/or powertrain. See reduce the performance of your towing vehicle. your dealer for specific content information.• Trailer Towing Package recommended for all vehicles that will be used for towing to help ensure easy, proper connection of trailer lights.Factory-Installed Trailer Hitch Receiver Weight CapacityHitch Receiver OptionsRefer to the Trailer Towing Selector chart for Maximum Loaded Trailer Weights for this vehicle.Included with Class III Trailer Tow Package – Weight-Carrying Max. Weight-Distributing Max. Option Code 53GMax. Trailer Tongue Load Max. Trailer Tongue LoadCapacity (lbs.)(1) (lbs.) Capacity (lbs.)(1)(lbs.)See chart at right for the weight-carrying and weight-distributing Flex 4,500 450capacities of this hitch receiver. (This capacity also is shown on a 2,000 200 label affixed to each receiver.)(1) Hitch receivers do not include a hitch ball or ball mounting. You are responsible for obtaining the proper hitch ball, ballmounting, weight-distributing equipment (i.e., equalizing arms and snap-up brackets, sway control system) and other appropriate equipment to tow both the trailer and its cargo load.7-Wire Harness & 4-/7-Pin Connector X Hitch Receiver X Trailer Sway Control X Engine Oil Cooler X(1)Photography, illustrations and information presented herein were correct when approved for publishing. Ford Motor Company reserves the right to discontinue or change at any time the specifications or designs without incurring obligation. Some features shown or described are optional at SAFE TOWING FOR ALL VEHICLESTowing a trailer is demanding on your vehicle, your trailer and your personal driving skills. Follow some basic rules that will help you tow safely and have a lot more fun.For the latest RV & Trailer Towing information, check out www.fleet.ford. com/towing-guides or go to esourcebook. .extra cost. Some options are required in combination with other options. Consult your dealer for the latest, most complete information on models, features, prices and availability.Many of the recreationalvehicles shown in this brochure are modified or manufactured by companies other than Ford Motor Company. Ford assumes no responsibility for such modifications or manufacturing.Weight DistributionFor optimum handling and braking, theload must be properly distributed Keep center of gravity low for best handlingApproximately 60% of the allowable cargo weight should be in the front half of the trailer and 40% in the rear (within limits of tongue load or king pin weight) Load should be balanced from side-to-side to optimize handling and tire wearLoad must be firmly secured to prevent shifting during cornering or braking, which could result in a sudden loss of controlBefore StartingBefore setting out on a trip, practice turning, stopping and backing up your trailer in an area away from heavy traffic Know clearance required for trailer roof Check equipment (make a checklist)Backing UpBack up slowly, with someone spotting near the rear of the trailer to guide you Place one hand at bottom of steering wheel and move it in the direction you want the trailer to goMake small steering inputs – slight movement of steering wheel results in much greater movement in rear of trailerTurningWhen turning, be sure to swing wide enough to allow trailer to avoid curbs and other obstructions.BrakingAllow considerably more distance for stopping with trailer attached Remember, the braking system of the tow vehicle is rated for operation at the GVWR, not GCWRIf your tow vehicle is an F-150, F-Series Super Duty ®, Transit or Expedition and your trailer has electric brakes, the optional Integrated Trailer Brake Controller (TBC) assists in smooth and effective trailer braking by powering the trailer’s electric or electric-over-hydraulic brakes with proportional output based on the towing vehicle’s brake pressure If you are experiencing trailer sway and your vehicle is equipped with electric brakes and a brake controller, activate the trailer brakes with the brake controller by hand. Do not apply the tow vehicle brakes as this can result in increased swayTowing On HillsDownshift the transmission to assist braking on steep downgrades and to increase power (reduce lugging) when climbing hillsWith TorqShift ® transmission, select tow/ haul mode to automatically eliminate unwanted gear search when going uphill and help control vehicle speed when going downhillParking With A TrailerWhenever possible, vehicles with trailers should not be parked on a grade. However, if it is necessary, place wheel chocks under the trailer’s wheels, following the instructions below. Apply the foot service brakes and hold Have another person place the wheel chocks under the trailer wheels on the downgrade sideOnce the chocks are in place, release brake pedal, making sure the chocks will hold the vehicle and trailer Apply the parking brakeShift automatic transmission into park, or manual transmission into reverse With 4-wheel drive, make sure the transfer case is not in neutral (if applicable)Starting Out Parked On A GradeApply the foot service brake and hold Start the engine with transmission in park (automatic) or neutral (manual) Shift the transmission into gear and release the parking brakeRelease the brake pedal and move the vehicle uphill to free the chocks Apply the brake pedal while another person retrieves the chocksAcceleration And PassingThe added weight of the trailer candramatically decrease the acceleration of the towing vehicle – exercise caution. When passing a slower vehicle, be sure to allow extra distance. Remember, the added length of the trailer must clear the other vehicle before you can pull back in Signal and make your pass on level terrain with plenty of clearance If necessary, downshift for improved accelerationDriving With An Automatic Overdrive TransmissionWith certain automatic overdrive transmissions, towing – especially in hilly areas – may cause excessive shifting between overdrive and the next lower gear.To eliminate this condition and achieve steadier performance, overdrive can be locked out (see vehicle Owner’s Manual) If excessive shifting does not occur, use overdrive to optimize fuel economyOverdrive may also be locked out to obtain engine braking on downgrades When available, select tow/haul mode to automatically eliminate unwanted gear search and help control vehicle speed when going downhillDriving With Cruise ControlTurn off the cruise control with heavy loads or in hilly terrain. The cruise control may turn off automatically when you are towing on long, steep grades. Use caution while driving on wet roads and avoid using cruise control in rainy or winter weather conditions.Tire PressureUnderinflated tires get hot and may fail,leading to possible loss of vehicle control Overinflated tires may wear unevenly and compromise traction and stopping capabilityTires should be checked often for conformance to recommended cold inflation pressuresSpare Tire UseA conventional, identical full-size sparetire is required for trailer towing (mini,compact and dissimilar full-size spare tires should not be used; always replace the spare tire with a new road tire as soon as possible).On The RoadAfter about 50 miles, stop in a protected location and double-check: Trailer hitch attachment Lights and electrical connections Trailer wheel lug nuts for tightness Engine oil – check regularly throughout tripHigh Altitude OperationGasoline engines lose power by 3-4% per 1,000 ft. elevation. To maintainperformance, reduce GVWs and GCWs by 2% per 1,000 ft. elevation starting at the 1,000 ft. elevation point.Powertrain/Frontal Area ConsiderationsThe charts in this Guide show theminimum engine size needed to move the GCW of tow vehicle and trailer. Under certain conditions, however, (e.g.,when the trailer has a large frontal area that adds substantial air drag or when trailering in hilly or mountainous terrain) it is wise to choose a larger engine Selecting a trailer with a low-drag,rounded front design will help optimize performance and fuel economyNote: For additional trailering information pertaining to your vehicle, refer to the vehicle Owner’s Manual.。
目录2目录1 皮肤安全性信息� � � 3安全使用本产品的建议. 32 设置� � � � � � � � � � � � � 11通知 . . . . . . .11零件 . . . . . . .12主机说明 . . . . .13 3 操作� � � � � � � � � � � � � 15综合模式 . . . . .15紧致专用模式 . . .21提拉专用模式 . . .23电池充电 . . . . .25充电. . . . . . .25充电状态检查. . .27电池状态检查. . .28如何使用本产品 . .29更改护理模式. . .29更改级别. . . . .31语音指导设置. . .32设置语言. . . . .324 故障排除 � � � � � � � � 33故障排除 . . . . .335 附录� � � � � � � � � � � � � 34规格 . . . . . . .34维护 . . . . . . .35处理设备. . . . .35 6 使用注意事项� � � � 36安全信息 . . . . .36设置11通知本手册中使用的符号,注指特殊注意事项和操作特征。
>注意指注意事项以防止滥用造成的潜在损害。
5 附录34附录规格电源(交流适配器):-型号:ADS-12BA-06Y 05010EPCN C-制造商:深圳欧陆通电子股份有限公司-输入:100 - 240 V ~ 50 / 60 Hz-输出:5 V 0 2 A尺寸(宽 x 高 x 深):-约 40 mm x 163.6 mm x 42 mm(设备)-约 71.8 mm x 25.4 mm x 71.8 mm(充电底座)运行温度:5 °C 至 35 °C运行湿度:0 % 至 90 %建议使用时间 : 每周两次※充电后,可使用 3 档皮肤护理模式约 2 小时。
※ 使用时间与电池种类、周围温度、使用条件有关。
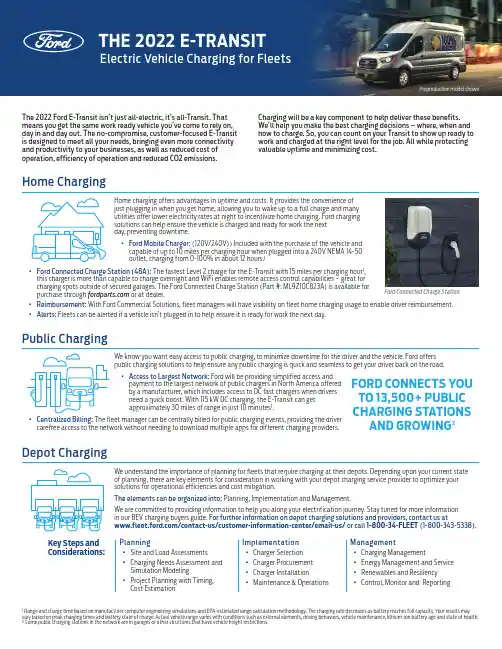
The 2022 Ford E-Transit isn’t just all-electric, it’s all-Transit. That means you get the same work ready vehicle you’ve come to rely on, day in and day out. The no-compromise, customer-focused E-Transit is designed to meet all your needs, bringing even more connectivity and productivity to your businesses, as well as reduced cost of operation, efficiency of operation and reduced CO2 emissions.Charging will be a key component to help deliver these benefits. We’ll help you make the best charging decisions – where, when and how to charge. So, you can count on your Transit to show up ready to work and charged at the right level for the job. All while protecting valuable uptime and minimizing cost.1 Range and charge time based on manufacturer computer engineering simulations and EPA-estimated range calculation methodology. The charging rate decreases as battery reaches full capacity. Your results may vary based on peak charging times and battery state of charge. Actual vehicle range varies with conditions such as external elements, driving behaviors, vehicle maintenance, lithium-ion battery age and state of health.2 Some public charging stations in the network are in garages or other structures that have vehicle height restrictions.Home charging offers advantages in uptime and costs. It provides the convenience of just plugging in when you get home, allowing you to wake up to a full charge and many utilities offer lower electricity rates at night to incentivize home charging. Ford charging solutions can help ensure the vehicle is charged and ready for work the next day, preventing downtime.·Ford Mobile Charger: (120V/240V)) Included with the purchase of the vehicle and capable of up to 10 miles per charging hour when plugged into a 240V NEMA 14-50 outlet, charging from 0-100% in about 12 hours.1Home Charging·Ford Connected Charge Station (48A): The fastest Level 2 charge for the E-Transit with 15 miles per charging hour 1, this charger is more than capable to charge overnight and WiFi enables remote access control capabilities – great for charging spots outside of secured garages. The Ford Connected Charge Station (Part #: ML9Z10C823A) is available forpurchase through or at dealer.·Reimbursement: With Ford Commercial Solutions, fleet managers will have visibility on fleet home charging usage to enable driver reimbursement. ·Alerts: Fleets can be alerted if a vehicle isn’t plugged in to help ensure it is ready for work the next day.Ford Connected Charge StationWe know you want easy access to public charging, to minimize downtime for the driver and the vehicle. Ford offers public charging solutions to help ensure any public charging is quick and seamless to get your driver back on the road. ·Access to Largest Network: Ford will be providing simplified access and payment to the largest network of public chargers in North America offered by a manufacturer, which includes access to DC fast chargers when drivers need a quick boost. With 115 kW DC charging, the E-Transit can get approximately 30 miles of range in just 10 minutes 1.Public ChargingFORD CONNECTS YOU TO 13,500+ PUBLIC CHARGING STATIONS AND GROWING 2·Centralized Billing: The fleet manager can be centrally billed for public charging events, providing the driver carefree access to the network without needing to download multiple apps for different charging providers.Preproduction model shownWe understand the importance of planning for fleets that require charging at their depots. Depending upon your current state of planning, there are key elements for consideration in working with your depot charging service provider to optimize your solutions for operational efficiencies and cost mitigation.The elements can be organized into: Planning, Implementation and Management.We are committed to providing information to help you along your electrification journey. Stay tuned for more information in our BEV charging buyers guide. For further information on depot charging solutions and providers, contact us at/contact-us/customer-information-center/email-us/ or call 1-800-34-FLEET (1-800-343-5338).Depot ChargingKey Steps and Considerations:·Site and Load Assessments·Charging Needs Assessment and Simulation Modeling·Project Planning with Timing, Cost Estimation·Charger Selection ·Charger Procurement ·Charger Installation·Maintenance & Operations·Charging Management·Energy Management and Service ·Renewables and Resiliency·Control, Monitor and ReportingPlanningImplementationManagementE-Transit – The Future in Fleets.Our charging solutions and information will be available to help you optimize your charging planning and experiences. For more information on BEV charging solutions, contact us at 1-800-34-FLEET (1-800-343-5338) or through /contact-us/customer-information-center/email-us/Service and repair – including cable installers, appliance repair, or utility companiesConsiderations Influencing Charging Solutions:Efficiency: They are always on a schedule, running from job to job with customers waiting.Uptime: When they aren’t on the road, they aren’t making money.Overnight Location: Vehicles often travel home with employees.Optimized Charging Solutions:A combination of Ford home charging solutions and our public charging network meet the charging demands for this use case. Including:Home Charging: Home Charging optimizes uptime as drivers charge at home overnight instead of during the work day.·Charge usage reports to enable easy energy reimbursement for drivers ·Alerts to notify you if the vehicle isn’t plugged in Public Charging:·Keep your vehicle running with easy access to the nation’s largest public charging network·Centralized billing for all drivers and vehicles in a fleetService ProvidersOverall transport of goods – including food, courier, or package deliveryConsiderations Influencing Charging Solutions:Regular Routes: Vehicles generally follow a regular route – short but intensive with lots of stopping and starting – often 200+ stops a day.Fleet Size: Usually vehicles are part of a large fleet based at a warehouse or distribution depot.Overnight Location: Vehicles are typically located at the depot overnight.Optimized Charging Solutions:A combination of services provided by a depot charging service provider and the Ford public charging network fit this scenario.Depot Charging: Depot Charging solutions can be optimized by consideration ofmany different elements along the planning, implementation and management of the charging systems.·Fleets can take advantage of central overnight vehicle storage and integratecharging into overnight parking. There are also customized solutions are available to optimize both charging scheduling and energy management while charging at the depot. Ford can help provide information for discussions with your depot charging services provider. Stay tuned for our BEV Charging Buyers Guide.Public Charging:·Keep your vehicle running with easy access to the nation’s largest public charging network·Centralized billing for all drivers and vehicles in a fleetDelivery BusinessesAs you plan to electrify your fleet, setting up your charginginfrastructure is key to optimizing uptime and improving efficiency. All-electric commercial vehicles unlock the opportunity to rethink the “filling process” – drivers no longer need gas stations – charging can now be integrated into parking lots, at your place of business, depot or even at home.There is an optimal charging solution for every use case – below are two examples that demonstrate how the work purposes for all-electric commercial vehicles will influence decisions for fleet customers on charging operations, including when and where to charge.Electric Vehicle Charging for FleetsTHE 2022 E-TRANSIT。
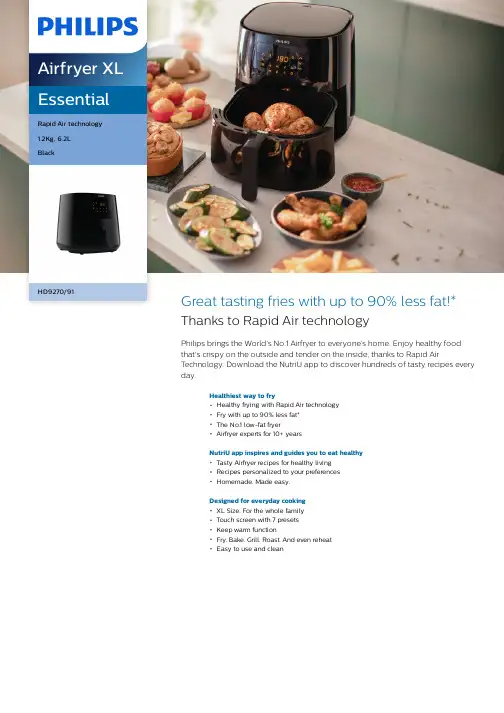
EssentialRapid Air technology1.2Kg, 6.2LBlackHD9270/91Great tasting fries with up to 90% less fat!*Thanks to Rapid Air technologyPhilips brings the World’s No.1 Airfryer to everyone’s home. Enjoy healthy foodthat's crispy on the outside and tender on the inside, thanks to Rapid AirTechnology. Download the NutriU app to discover hundreds of tasty recipes everyday.Healthiest way to fryHealthy frying with Rapid Air technologyFry with up to 90% less fat*The No.1 low-fat fryerAirfryer experts for 10+ yearsNutriU app inspires and guides you to eat healthyTasty Airfryer recipes for healthy livingRecipes personalized to your preferencesHomemade. Made easy.Designed for everyday cookingXL Size. For the whole familyTouch screen with 7 presetsKeep warm functionFry. Bake. Grill. Roast. And even reheatEasy to use and cleanHighlightsRapid Air technologyRapid Air Technology, with its unique “starfish”design, swirls hot air to create delicious foods that are crispy on the outside and tender on the inside, with little to no added oil.Air is the new oil The Philips Essential Airfryer uses hot air to cook your favorite foods to crispy perfection,with up to 90% less fat.*Tasty Airfryer recipesDiscover hundreds of mouthwatering Airfryer recipes that are tasty, healthy, and fast to make. The recipes in the NutriU app are curated by nutritional experts for everyday cooking.Personalized recipesReceive daily recipe recommendations that suit your family’s preferences. The more you use NutriU, the better it can tailor delicious recipe ideas to your needs. Get inspired by other cooks, and follow people with similar tastes***.XL Size. For the whole familyThe Philips Airfryer XL is designed with your family in mind. The 1.2Kg capacity basket,combined with the 6.2L pan, help you cook a variety of meals. Make up to 5 meal portions in one go for your family and friends.Touch screen with 7 presetsTouch a button and cook. Preset programs include frozen snacks, fresh fries, meat, fish,chicken drumsticks, cake and even grilled veggies.Keep warm functionEnjoy your meal whenever you're ready. Hit the Keep Warm mode, and your food will stay at the ideal temperature for up to 30 minutes.Bake. Grill. Roast. Or reheat.The new Philips Essential Airfryer opens up a world of possibilities: fry, bake, grill, roast and even reheat! Cook your food to perfection every time, no matter what you choose to make.The No.1 low-fat fryerPhilips is the world's leading low-fat fryer brand**SpecificationsCountry of originMade in: ChinaGeneral specificationsProduct features: Automatic shut-off, Cool wall exterior, Dishwasher safe, On/off switch, Ready signal, Temperature control, Power-on light, Quickclean, LED display, Patented Rapid Air, Time control Service2-year worldwide guaranteeSustainabilityPackaging: > 90% recycled materialsUser manual: 100% recycled paperTechnical specificationsCord length: 0.8 mPower: 2000 WWeight and dimensionsDimensions of product (LxWxH):403x315x307 mmWeight of product: 5.55 kgDesignColor: BlackDesign and finishingMaterial of main body: Plastic* Compared to fresh fries prepared in a Philipsconventional fryer* *Source: Euromonitor International Ltd. Low fat fryerscategory definition; retail volume sales in units, 2020data* **Available only in countries with a NutriU community© 2020 Koninklijke Philips N.V.All Rights reserved.Specifications are subject to change without notice. Trademarks are the property of Koninklijke Philips N.V. or their respective owners.Issue date 2020‑11‑22 Version: 7.1.1EAN: 08 71010 39521 90 。
Installation, Operation and Service Manual801 Church Lane • Easton, P A 18040, USA T oll free (877) 612-5086 • +1 (610) 252-7301Order parts online Service numbers above B50000Table of contentsWelcome to FollettFollett equipment enjoys a well-deserved reputation for excellent performance, long-term reliability and outstanding after-the-sale support. T o ensure that this dispenser delivers that same degree of service, we ask that you take a moment to review this manual before beginning the installation of the dispenser. Should you have any questions or require technical help at any point, please call our technical service group, (877) 612-5806 or+1 (610) 252-7301.Before you beginAfter uncrating and removing all packing material, inspect the equipment for concealed shipping damage. If damage is found, notify the shipper immediately and contact Follett Corporation so that we can help in the filing of a claim, if necessary.Check your paperwork to determine which model you have. Follett model numbers are designed to provide information about the type and capacity of Follett ice dispensing equipment. Following is an explanation of the different model numbers in the VU300 series.SpecificationsElectricalEach dispenser requires a separate circuit with electrical disconnect within 10 ft (6m). Equipment ground required. Standard electrical – 115V, 60Hz, 1 phase. Maximum dispenser fuse – 15 amps. For ice machine circuit requirements, refer to the ice machine specification sheet. Cord and plug provided with each dispenser.Model Dispensernumber amperageSingle-sided modelsVU300M series 6.0 ampsVU300B series 7.0 ampsDual-sided modelsVU300M20D series 8.0 ampsVU300M24D series 8.0 ampsPlumbingDispenser3/4" PVC pipe nipple for bin drain3/4" PVC pipe nipple for drain pan drain1/2" ID hose for beverage bath drainBeverage connectionsVU300 single sided units (10 and 12 beverage valves)Syrup lines - 1/4"Carbonated and non-carbonated water lines - 3/8"VU300 dual sided units (12, 20 and 24 beverage valves)Syrup lines - 3/8"Carbonated water lines - 1/2"Non-carbonated water lines - 3/8"Note: Drains must be hard-piped separately and insulated. Maintain at least 1/4" per foot (6mm per 304mm run) slope on drain line run.Water disconnect within 10 feet (3m) of dispenser is suggested for automatic load units.Follett recommends use of a Follett water filter (part# 00130229) on ice machines connectedto automatic fill dispensers.Ice machine Refer to detailed specifications in ice machine installation manual packed with ice machineDimensions and clearancesSingle-sided dispensersRequired clearances60" (1524mm) minimum above counter for installation if dispenser will be dropped into counter 49" (1245mm) minimum above counter for auger removal 12" (305mm) minimum on ice chute side for service12" (305mm) minimum on side opposite ice chute if ice transport tube enters this side 12" (305mm) minimum between dispenser side(s) and optional ice machine(s)40.875" (1039mm)46.875" (1191mm)12 beverage valvesDual-sided dispensersRequired clearances60" (1524mm) above counter for installation if dispenser will be dropped into counter 49" (1245mm) above counter for all units after installation for auger cleaning and servicing 12" (305mm) on dispense chute side of all models for connections12" (305mm) on side opposite dispense chute if ice transport tube enters side opposite chute 12" (305mm) on side opposite dispense chute on all dual-sided dispensers for connectionsField wiring diagramsNote: Field wiring diagrams are intended to aid electricians or technicians in understanding how equipment works. All field wiring must be installed in accordance with all local and NEC codes.Connecting beverage lines1. Connect syrup and water lines. Non-carbonated water line will be labeled “water”. Syrup lines are numbered and correspond to the valves as shown in drawing(s) below. Valve one is always next to ice tower.2. The center 4 valves are pre-plumbed to both carbonated and non-carbonated water lines with theQuickCARB ™beverage manifold. Valves can be individually changed from a carbonated to a non-carbonated flavor with the flip of a lever (see below).3. Clean and sanitize beverage lines according to cleaning instructions.Valve position #1 is always next to icetower. Left-hand unit shown.VU300B QuickCARB manifold (see dispenser for model specific QuickCARB configuration)Rear viewInstalling optional auto-fill ice machine kit(s)Correct installation of RIDE™ model ice machine(s) is critical to proper performance of ice machine. Referto installation manual packed with ice machine for important details on ice transport tube run, ventilation requirements and other installation requirements. Failure to comply with instructions may void warranty.To start and operate dispenser1. Follow detailed cleaning instructions in service manual before operating dispenser.2. On units with Follett integral ice water bath beverage cooling (“B” models) only, slowly pour water into icewater bath area to fill empty bath and submerge coils. Coils are submerged when water starts to flow out overflow drain. DO NOT SPLASH WA TER ON ELECTRICAL BOX. Once filled with water, add ice to bath until ice covers top of water bath.3. For manual load units, remove front drain pan or rear lid and fill storage area with approved ice.Note:Follett manual load dispensers can accommodate most cube/cubelet ices up to 1" square, or Follett compressed nugget ice. Crushed, flake, bagged, nugget or congealed ice cannot be used. Use of these ices can jam dispenser and void warranty. Separate any “waffle-like” sections of cubes before adding to dispenser. For ice compatibility questions, please call Follett customer service at (877) 612-5806 or+1 (610) 252-7301.4. Turn power switch located on dispenser control box to ON position.5. For automatic fill units, follow detailed instructions in ice machine installation section of installation manual,then turn ice machine (bin signal) switch(es) located on dispenser control box to ON position and begin to make ice.6. When dispenser has at least 6" (153mm) of ice in storage area, test operation.OperationHow the dispenser worksFollett’s dispensers may be fed by Follett RIDE model ice machines or manually loaded (using ice from another source).In all models, ice is stored below the counter in the dispenser storage area. When the dispense lever or button is pushed, the dispense motors are activated. This causes the wheel assembly in the storage area to turn, moving ice to the vertical auger assembly, which carries ice up to the dispense chute where it drops by gravity into the container.In units used with an optional ice machine accessory, ice is manufactured remotely and may be located up to 20 ft (6.1m) away from the dispenser for Maestro ice machines and 75 ft (23m) away from the dispenser for Horizon ice machines. Extruded ice is transported through a tube and pushed to the storage compartment of the dispenser. When the bin is filled, a bin thermostat shuts the ice machine off to avoid overfilling the bin. The ice machine will restart after 20 minutes if the bin is calling for ice.Units with integral ice water bath beverage cooling are equipped with a water bath timer circuit that activates the water bath pump for 35 minutes when ice lever or button is activated, or when the ice water bath warms up and calls for more ice.Ice movementCleaningUsing solutions below, clean and sanitize storage area and beverage lines before starting unit and on a routine basis as noted below.Note:Always disconnect power before cleaning dispenser.Do not run plastic parts through a dishwasher.Solution A:Combine 1 oz (30ml) bleach with 2 gal (8L) hot water.Solution B:Combine 1/4 oz (7ml) bleach with 2 gal (8L) hot water.Note:Cleaning solutions temperature must be at 75 F – 125 F (24 C to 52 C)Recommended cleaning prior to start upCleaning ice storage area before use1. Refer to disassembly instructions (see Service section) and remove dispense wheel from ice storage area.2. Remove auger, auger tube and dispense mechanism.3. Wipe all components and ice storage area with cleaning Solution A.4. Rinse all components and ice storage area thoroughly with clear, potable water.5. Wipe all components and ice storage area with sanitizing Solution B.Cleaning beverage linesPrepare 6 gallons (23L) of cleaning Solution A. Fill a clean product tank with cleaning solution. Fill a second clean product tank with potable rinse water.1. Disconnect all syrup lines from product containers.2. Connect syrup line #1 to cleaning solution tank, pressurize tank to 20-50 psi, and dispense 1/2gallon (2L) of solution into a suitable container from valve #1.3. Connect syrup line #1 to rinse tank, pressurize tank to 20-50 psi, and dispense 3 gallons (11L)into a suitable container from valve #1.4. Repeat this cleaning and rinsing for all syrup lines.5. Remove diffusers and nozzles from valves, soak in cleaning solution, rinse well and reinstall.Sanitizing beverage linesPrepare 6 gallons (23L) of sanitizing Solution B. Fill a clean product tank with this solution.1. Connect one tank to syrup line #1. Dispense 1/2 gallon (2L) from valve #1.2. Repeat for all remaining syrup lines, allowing sanitizing solution to remain in all circuit lines for15 minutes.3. Connect a clean, empty tank (pressurized to 50 psi) to each syrup line and blow out sanitizer byoperating each valve.4. Remove diffusers and nozzles from valves, soak in sanitizing solution for 15 minutes, rinse well andreinstall.5. Reconnect all lines and dispense product through valves to purge any remaining sanitizer.Recommended daily dispenser cleaning1. Remove all debris from drain pan.2. Pour 1 gallon (4L) hot water into drain pan to keep drain lines clear.Recommended weekly dispenser cleaning1. Remove drain pan and grille and wash with Solution A. Rinse thoroughly.2. Remove nozzles and diffusers from valves, soak for at least 10 minutes in cleaning Solution A, rinse,sanitize with Solution B and reinstall.3. Pour a solution of one cup (8oz/237ml) household bleach mixed with one gallon (3.8L) hot water intodrain pan to help prevent algae growth in drain lines.Recommended quarterly dispenser cleaning1. Remove top from dispenser and turn power switch to OFF position.2. Remove ice from storage area.3. Remove dispense chute cover, chute, auger motor assembly, auger and auger tube (see Service section).4. Remove drain pan, grille, dispense wheel, agitator rods, and drive shaft (see Service section).5. Clean all components and bin storage area with Solution A, rinse thoroughly with clear water and sanitizewith Solution B.6. Remove nozzles and diffusers from valves, soak for at least 10 minutes in cleaning Solution A, rinse,sanitize with Solution B and reinstall.For units with integral ice-water bath beverage cooling only:1. Remove side access panel next to ice tower with two upper screws and lift out.2. Disengage service drain tube (on utility connection side of dispenser) from mounting bracket and drainice water bath.3. Use a bottle brush to clean coils with Solution A, rinse and sanitize with Solution B.4. Reposition ice water bath drain line in up position so water does not drain out.5. Pour Solution A into ice water bath until it flows out overflow drain.6. Turn power ON to unit and dispense a small cup of ice to activate pump.7. Allow pump to run for two minutes to clean pump and pump lines.8. Turn power OFF.9. Drain bath and replace drain tube in mounting bracket in up position to avoid siphoning water bath water.Putting unit back in service after quarterly cleaning1. On units with integral beverage cooling, fill ice water bath with water until water spills out ofbath overflow drain.2. Reassemble components.3. For manual load units, fill unit with an approved ice (see important cautions on page 4).4. For automatic load units with R400A/W (R404A refrigerant) ice machines, turn bin signal switch(es) anddispenser power switch to ON position and allow storage area to fill.5. Push dispense button or lever to test that dispenser is functioning properly.Recommended quarterly cleaning of optional auto-fill ice machine kit(s).Units equipped with optional ice machines require cleaning of ice machine system at least every six months, and more often if local water conditions dictate. Failure to clean ice machine system will result in decreased performance and potential damage to ice machine. Refer to Ice machine Operation and Service Manual.ServiceDispense chute cover removal1. Remove top cover.2. Remove two screws from top cover and pull coverforward and down to remove.3. On push button units, disconnect plug on harness.Auger motor assembly removal 1. Remove drain pan.2. Remove thumbscrews from splash guard and remove.3. Remove thumbscrews from splash panel; lift and pullforward at base of panel and remove. 4. Unplug auger motor at connector.5. Remove two 1/4-20 bolts holding auger motor to hold-down bracket.6. Remove two thumbscrews from auger motor stabilizerbracket and set aside. 7. Lift auger motor off.Gate assembly removal1. Remove dispense chute cover and auger motorassembly.2. Remove thumbscrews on each side of clear focus chuteand remove.3. Remove quick release pin holding dispense gateassembly and chute.4. Lift gate up and over hinge tabs, then carefully pulland tilt to unhook from solenoid link.5. Pull ice chute toward you to unclip from dimples onchute mounting bracket.6. Pull ice chute and gate toward you and out throughpanel opening.7. Lift dispenser mechanism assembly off auger andauger tube.Auger and auger tube removal1. Remove dispense chute cover and auger-motorassembly.2. Remove side panel of tower.3. Remove screw holding top auger tube ring to lower ring.4. Lift auger out of auger tube.5. Lift out auger tube, turning as needed to clear rivnuts onside auger motor mounting bracket.Dispenser wheel removal1. Remove dispenser top and turn power switch OFF .2. Remove all ice from bin.3. Remove drain pan and ice bin access cover below it.4. Remove splash guard and wheel motor access cover.5. Unplug wheel motor at connector and remove groundwire.6. Remove wheel motor by pulling out two quick releasepins.7. Lift drive shaft up through hole in countertop.8. Lift dispense wheel out through drain pan opening.Dispenser cutaway – Front viewDispense chute assemblyWiring diagrams Single-sided modelsDispenser troubleshooting guideBefore calling for service1. Check that ice is in the dispenser and that congealed cubes are not causing a jam.2. Check that circuit breaker and switches are in ON position.3. Check that drain pan and top are on securely. If ajar, dispenser will not operate. When the top is off, augerdoes not operate, even though the solenoids do (page 18).4. Check that all drains are clear.Note: For units equipped with Follett Chewblet auto-fill ice machine kit(s), see Ice Machine Operation and Service Manual for service and troubleshooting information.If problems persist after following this basic troubleshooting guide, call Follett’s technical service department at (877) 612-5806 or +1 (610) 252-7301.Operational statusThe chart below shows the operational status of various parts when certain switches are turned off or accessories are removed.Replacement parts Order parts online HopperOrder parts online Electrical componentsOrder parts online Plan ViewDispenser exteriorOrder parts onlineSure-Fill is a registered trademark of Lancer Corporation, San Antonio, T exas.00119644R08QuickCARB and RIDE are trademarks of Follett Corporation.Follett and Chewblet are registered trademarks of Follett Corporation, registered in the US.。
核准日期:2006年12月31日修改日期:2007年05月26日伏立康唑片说明书请仔细阅读说明书并在医师指导下使用【药品名称】通用名称:伏立康唑片商品名称:威凡®(Vfend®)英文名称: V oriconazole Tablets汉语拼音: Fulikangzuo Pian【成份】本品主要成份:伏立康唑,其化学名称为:(2R,3S)-2-(2,4-二氟苯基)-3-(5-氟基-4-嘧啶)-1-(1H-1,2,4-三唑-1-基)-2-丁醇。
化学结构式:分子式:C16H14F3N5O分子量:349.3【性状】50mg片剂:白色至类白色薄膜衣片,除去薄膜衣后显白色或类白色。
圆形片剂,一面有“Pfizer ”字样刻痕,另一面有“VOR50”字样刻痕。
200mg 片剂:白色至类白色胶囊形片剂,一面有“Pfizer”字样刻痕,另一面有“VOR200”字样刻痕。
【适应症】本品是一种广谱的三唑类抗真菌药,其适应症如下:治疗侵袭性曲霉病。
治疗非中性粒细胞减少患者中的念珠菌血症。
治疗对氟康唑耐药的念珠菌引起的严重侵袭性感染(包括克柔念珠菌)。
治疗由足放线病菌属和镰刀菌属引起的严重感染。
本品应主要用于治疗患有进展性、可能威胁生命的感染的患者。
【规格】伏立康唑50mg 薄膜衣片,伏立康唑200mg 薄膜衣片【用法用量】伏立康唑薄膜衣片应至少在饭前1小时或者饭后1小时后服用。
使用伏立康唑治疗前或治疗期间应监测血电解质,如存在低钾血症、低镁血症和低钙血症等电解质紊乱应予以纠正(参见【注意事项】)。
本品另有规格为200mg注射用无菌粉末和40mg/ml干混悬剂。
成人用药静脉滴注和口服的互换用法无论是静脉滴注或口服给药,首次给药时第一天均应给予首次负荷剂量,以使其血药浓度在给药第一天即接近于稳态浓度。
由于口服片剂的生物利用度很高(96%),所以在有临床指征时静脉滴注和口服两种给药途径可以互换。
详细剂量见下表静脉滴注负荷剂量(适用于第1个24小时)每12小时给药1次,每次6mg/kg (适用于第1个24小时)维持剂量(开始用药24小时以后)每日给药2次,每次4mg/kg口服患者体重≥40kg 患者体重<40kg负荷剂量(适用于第1个24小时)每12小时给药1次,每次400mg(适用于第1个24小时)每12小时给药1次,每次200mg(适用于第1个24小时)维持剂量(开始用药24小时以后)每日给药2次,每次200mg 每日给药2次,每次100mg序贯疗法静脉滴注和口服给药尚可以进行序贯治疗,此时口服给药无需给予负荷剂量,因为此前静脉滴注给药已经使伏立康唑血药浓度达稳态。
FuⅠlEⅠectYlc说明书
富勒烯系列产品使用方法
富勒烯青春定格美肤水
面部表情自然放松,由上至上匀速移动均匀的喷全脸,自然吸收即可。
富勒烯焕颜紧肤原液
1、把富勒烯原液倒入喷瓶里面。
2、使用时面部表情自然放松,由上至上匀速移动均匀的喷全脸,3
分钟后自然吸收即可。
富勒烯焕颜紧肤面膜
前期一两个月,可以每隔3-4天使用一次,改善效果更好,后期可以
一个星期使用一次。
1、每次使用前可以使用富勒烯紧嫩肌底精华液打底,在敷上富勒烯
面膜,面膜没有覆盖到的地方抹上面膜液。
2、微晶笔按照面部轮廓走向操作3遍,每个地方不停留超过3秒,
第一遍不操作上眼皮,每操作完一遍都抹一遍面膜液。
3遍结束后抹上面
膜液大幅度提拉,最后将剩余面膜液抹在面膜上,敷5-10分钟后由下至
上取掉面膜,用清水洗净即可。
3、洗净后依次使用富勒烯原液、眼霜、精华、面霜,效果更佳。
富勒烯皙亮滋润霜
1、避免由上往下的方向涂面霜。
2、用中指或食指指腹取适量的面霜,分别点于下巴,两颊,额头,
鼻尖。
3、以打圈的方式从下巴缓缓向上,经过鼻子再到额头,再从嘴角两
边向上将脸颊上的面霜均匀涂抹开来。
富勒烯氨基酸洁面慕斯
1、卸妆步骤:手和脸部保持干燥,按压出适量洁面慕斯,然后置于
面部,涂抹要均匀,双手以打圈的方式轻轻按摩面部,使面部彩妆慢慢溶
解掉,最后用清水洗干净即可。
2、洁面步骤:没有卸妆这一步骤的,在洁面前先用水湿一下脸,按
压出适量洁面慕斯在左手心,右手加入一点水用指腹顺时针打圈打出丰富
而细腻的泡泡,然后用泡沫去按摩清洁肌肤,T区可按摩更充分。
清洁完
之后,用水冲洗干净。
富勒烯紧嫩肌底精华液
1、取适量精华液,夏天每次只需少量3滴左右即可,冬天较为干燥,可比夏天量多一半。
2、涂抹的过程中使用手指指腹轻拍面部,使其更充分的被面部吸收。
富勒烯弹润精华眼霜
1、使用前将前面的滚珠擦拭干净
2、轻轻按一下即可,产品会随着滚珠转动带出来,不可按太重,产
品过多吸收不了营养过剩给皮肤造成负担。
3、拿着产品滚珠绕着眼周逆时针打3-10圈,自然吸收即可,若有皱纹,用手指轻轻把眼角皱纹撑开,轻提眼角。
富勒烯cc霜
1、用指尖取适量CC霜,一般是黄豆大小,分别点在额头,两颊,鼻头,下巴。
2、以拍打的方式由内而外轻柔的晕开,用指腹从面部中央往外侧轻轻的拍打晕开,用中指轻轻拍妆容容易脱落的T字区,在眼部周围轻拍或进行按压,避免涂抹力度过大量容易出现皱纹。
3、重点区域,可以适当重复涂抹。
富勒烯修复原液
匀速涂抹全脸,自然吸收即可。