实验三PAP、chap认证
- 格式:ppt
- 大小:40.50 KB
- 文档页数:12
信息学院网络系统集成课程实践 实验报告实验名称 PPP 的PAP 和CHAP 认证 实验日期:2015年04月15日一、实验目的:掌握PPP PAP 认证和PPP CHAP 认证的过程及配置。
二、实验内容(1)在路由器上配置PPP PAP 认证; (2)在路由器上配置PPP CHAP 认证。
三、实验要求(1)写出在路由器上配置PPP PAP 认证的过程; (2)写出在路由器上配置PPP CHAP 认证的过程四、实验设备(1)路由器Router-2811两台; (2)DCE 串口线五、实验步骤(一)PPP PAP 认证(本实验要求配置路由器R1和路由器R2双向PAP 验证)实验网络拓补结构设计1、配置路由器R1姓名: 班级: 学号:年级: 12级 指导教师:成绩:Serial0/3/0 Using hostname from interface PAPSerial0/3/0 Using password from interface PAPSerial0/3/0 PAP: O AUTH-REQ id 17 len 15Serial0/3/0 PAP: Phase is FORWARDING, Attempting ForwardSerial0/3/0 PAP: I AUTH-REQ id 17 len 15Serial0/3/0 PAP: Authenticating peerSerial0/3/0 PAP: Phase is FORWARDING, Attempting ForwardSerial0/3/0 Using hostname from interface PAPSerial0/3/0 Using password from interface PAPSerial0/3/0 PAP: O AUTH-REQ id 17 len 15Serial0/3/0 PAP: Phase is FORWARDING, Attempting Forward%LINEPROTO-5-UPDOWN: Line protocol on Interface Serial0/3/0, changed state to upR1(config)#int s 0/3/0R1(config-if)#no ppp pap sent-username R1 password cisco//修改路由器R1上的密码,是路由器R1和R2的密码不一致,可以看到,认证将失败R1#debug ppp authenticationPPP authentication debugging is onR1#conf tEnter configuration commands, one per line. End with CNTL/Z.R1(config)#int s 0/3/0R1(config-if)#shutdownR1(config-if)#%LINK-5-CHANGED: Interface Serial0/3/0, changed state to administratively down%LINEPROTO-5-UPDOWN: Line protocol on Interface Serial0/3/0, changed state to down R1(config-if)#no shutdown当发出no shutdown命令时,出现了死循环,用Ctrl+c强制退出并用end结束。
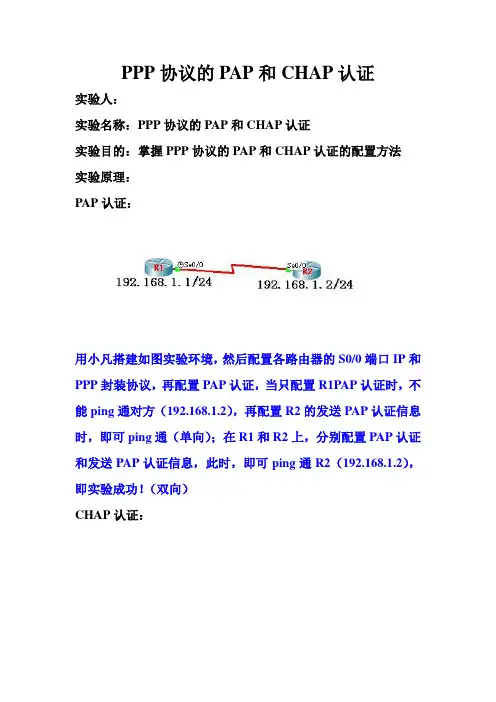
PPP协议的PAP和CHAP认证实验人:实验名称:PPP协议的PAP和CHAP认证实验目的:掌握PPP协议的PAP和CHAP认证的配置方法实验原理:PAP认证:用小凡搭建如图实验环境,然后配置各路由器的S0/0端口IP和PPP封装协议,再配置PAP认证,当只配置R1PAP认证时,不能ping通对方(192.168.1.2),再配置R2的发送PAP认证信息时,即可ping通(单向);在R1和R2上,分别配置PAP认证和发送PAP认证信息,此时,即可ping通R2(192.168.1.2),即实验成功!(双向)CHAP认证:用小凡搭建如图实验环境,然后配置各路由器的S0/0端口IP和PPP封装协议,再配置CHAP认证,当只配置R1 CHAP认证时,不能ping通对方(192.168.1.2),再配置R2的发送CHAP 认证信息时,即可ping通(单向);在R1和R2上,分别配置CHAP认证和发送CHAP认证信息,此时,即可ping通R2(192.168.1.2),即实验成功(双向认证)自动协商IP地址:在R1上,配置分配IP地址(端口下,命令peer default ip address 192.168.1.100),然后在R2上,配置自动协商IP地址(在端口下,命令ip add negotiated),此时在R2可以获得192.168.1.100的IP地址,即实验成功!头部压缩:在R1和R2上,配置头部压缩功能,再ping 192.168.1.2,使其用数据流,用show compress 命令查看压缩情况,即实验成功!实验过程:PAP单向认证:⑴用小凡搭建如图实验环境,如图示:⑵在R1的S0/0上,配置IP,如图示:⑶在R2的S0/0上,配置IP,如图示:⑷此时,即可ping通192.168.1.2 如图示:⑸在R1上,配置PPP协议,如图示:⑹在R2上,配置PPP协议,如图示:⑺此时,又可ping通192.168.1.2 如图示:⑻在R1上,配置PAP认证,如图示:⑼在R2上,配置发送PAP认证信息,如图示:⑽此时,又可以ping通192.168.1.2 如图示:PAP双向认证:⒈在R1上,配置PAP认证,如图示:⒉在R2上,配置发送PAP认证信息,如图示:⒊配置完后,即可ping通192.168.1.2,即单向认证,如图示:⒋在R2上,配置PAP认证,如图示:⒌此时,不能ping 通192.168.1.2 如图示:⒍在R1上,配置发送PAP认证信息,此时,可以又ping通192.168.1.2 如图示:CHAP单向认证:Ⅰ在R1上,配置CHAP认证,如图示:Ⅱ在R2上,配置发送CHAP认证信息,如图示:Ⅲ此时,即可ping通192.168.1.2 ,即CHAP 的单向认证成功!如图示:CHAP双向认证:①在R1上,配置CHAP认证,如图示:②在R2上,配置发送CHAP认证信息,如图示:③在R2上,配置CHAP认证,如图示:④此时,不能ping通192.168.1.2 原因为没有在R1上,配置发送CHAP认证信息,如图示:⑤在R1上,配置发送CHAP认证信息,此时,可以ping通192.168.1.2 ,即配置CHAP双向认证成功!如图示:自动协商IP地址:㈠在原有的实验环境下,去掉R2上的S0/0端口的IP地址,如图示:㈡在R1上的S0/0端口下,配置分配的IP地址为192.168.1.100 如图示:㈢在R2上的S0/0 端口上,配置自动协商IP地址,如图示:㈣此时,在R2上,分配到192.168.1.100的IP地址,即实验成功,如图示:头部压缩:①在R1上,开启头部压缩功能,如图示:②在R2上,开启头部压缩功能,如图示:③此时,ping 192.168.1.100 ,使其有数据通过,用命令即可查看到压缩的情况,(命令show compress)如图示:总结:在实验中,CHAP认证的步骤:处理CHAP挑战数据包(1、将序列号放入MD5散列生成器2、将随机数放入MD5散列生成器3、用访问服务器的认证名和数据库进行比较4、将密码放入MD5散列生成器);当显示串行接口时,常见以下状态: 1、Serial0/0 is up, line protocol is up //链路正常2、Serial0/0 is administratively down, line protocol is down //没有打开该接口,执行no sh 打开即可3、Serial0/0 is up, line protocol is down //物理层正常,数据链路层有问题,通常是没有配置时钟,两端封装不匹配或PPP认证错误4、Serial0/0 is down, line protocol is down //物理层故障,通常是连线问题;PAP 不支持密码的加密,压缩,link绑定,设定最大传输单元等,CHAP 支持以上内容;PAP和CHAP验证发送的信息内容为验证路由器数据库中的用户名和密码;在CHAP中,被验证方不明确定义发送主机名来验证时,默认发送该路由器的主机名;配置PAP双向认证时,用户名和密码都可以不一样,但配置CHAP双向认证时,要保证两台路由器的密码一致;。

PAP认证和CHAP认证概述一、PAP认证协议(PasswordAuthenticationProtocol,口令认证协议):PAP认证过程非常简单,二次握手机制。
使用明文格式发送用户名和密码。
发起方为被认证方,可以做无限次的尝试(暴力破解)。
只在链路建立的阶段进行PAP认证,一旦链路建立成功将不再进行认证检测。
目前在PPPOE拨号环境中用的比较常见。
PAP认证过程:PAP认证过程图首先被认证方向主认证方发送认证请求(包含用户名和密码),主认证方接到认证请求,再根据被认证方发送来的用户名去到自己的数据库认证用户名密码是否正确,如果密码正确,PAP认证通过,如果用户名密码错误,PAP认证未通过。
二、CHAP认证协议(ChallengeHandshakeAuthenticationProtocol,质询握手认证协议)CHAP认证过程比较复杂,三次握手机制。
使用密文格式发送CHAP认证信息。
由认证方发起CHAP认证,有效避免暴力破解。
在链路建立成功后具有再次认证检测机制。
目前在企业网的远程接入环境中用的比较常见。
CHAP认证过程:CHAP认证第一步:主认证方发送挑战信息【01(此报文为认证请求)、id(此认证的序列号)、随机数据、主认证方认证用户名】,被认证方接收到挑战信息,根据接收到主认证方的认证用户名到自己本地的数据库中查找对应的密码(如果没有设密码就用默认的密码),查到密码再结合主认证方发来的id和随机数据根据MD5算法算出一个Hash值。
CHAP认证过程图:CHAP认证第二步:被认证方回复认证请求,认证请求里面包括【02(此报文为CHAP认证响应报文)、id(与认证请求中的id相同)、Hash值、被认证方的认证用户名】,主认证方处理挑战的响应信息,根据被认证方发来的认证用户名,主认证方在本地数据库中查找被认证方对应的密码(口令)结合id找到先前保存的随机数据和id根据MD5算法算出一个Hash值,与被认证方得到的Hash值做比较,如果一致,则认证通过,如果不一致,则认证不通过。

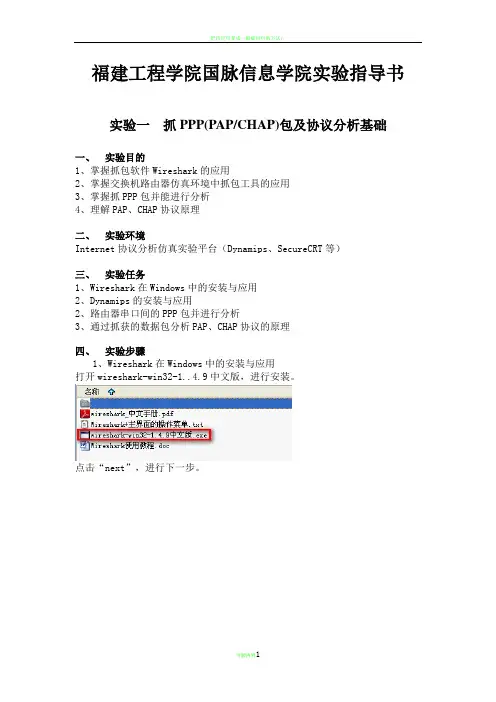
福建工程学院国脉信息学院实验指导书实验一抓PPP(PAP/CHAP)包及协议分析基础一、实验目的1、掌握抓包软件Wireshark的应用2、掌握交换机路由器仿真环境中抓包工具的应用3、掌握抓PPP包并能进行分析4、理解PAP、CHAP协议原理二、实验环境Internet协议分析仿真实验平台(Dynamips、SecureCRT等)三、实验任务1、Wireshark在Windows中的安装与应用2、Dynamips的安装与应用2、路由器串口间的PPP包并进行分析3、通过抓获的数据包分析PAP、CHAP协议的原理四、实验步骤1、Wireshark在Windows中的安装与应用打开wireshark-win32-1..4.9中文版,进行安装。
点击“next”,进行下一步。
点击“I Agree”,进行下一步。
点击“next”,进行下一步。
点击“Install”,进行安装。
点击“next”,进行下一步。
完成安装,运行程序。
3、Dynamips的安装与应用点击dynamic安装包,进入安装界面。
点击next,进入下一步。
同意安装协议,点击I Agree 进入下一步。
使用默认安装名Dynagen,点击instal选项进行安装。
安装已完成,点击Finish完成安装。
安装完成后可以在桌面上看到以下程序。
4.添加硬件1)打开“控制面板”,双击:添加硬件点击next,进入下一步。
点击next,进入下一步。
选择“添加新的硬件设备”,点击“下一步”。
选择手动安装,点击“下一步”。
选择“网络适配器”进行安装,点击“下一步”点击“完成”,添加硬件成功。
打开本地连接2,先“停用”,再“启用”以记事本方式打开1).将路由器的运行目录定位:按上图的标记1,2在D:\创建文件夹sikeVlab;在文件夹sikeVlab中创建两个文件夹temp,IOS;在文件夹temp中创建文件夹PPP;2).把放进文件夹PPP中。
打开Network device list,将“3”部分替代为下面内容。
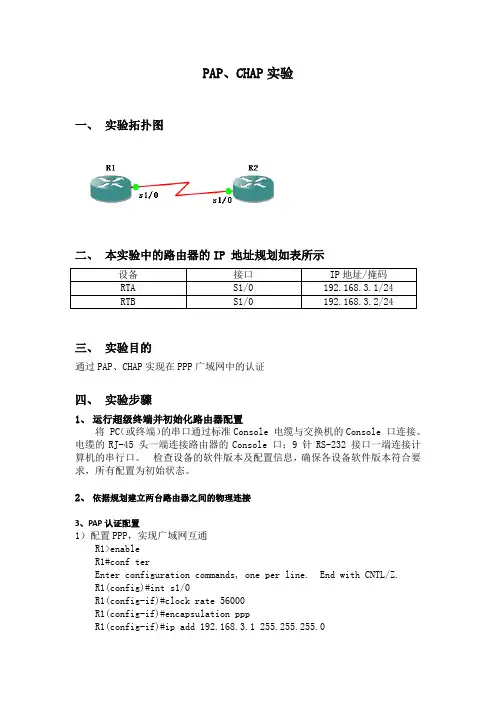
PAP、CHAP实验一、实验拓扑图二、本实验中的路由器的IP 地址规划如表所示三、实验目的通过PAP、CHAP实现在PPP广域网中的认证四、实验步骤1、运行超级终端并初始化路由器配置将 PC(或终端)的串口通过标准Console 电缆与交换机的Console 口连接。
电缆的RJ-45 头一端连接路由器的Console 口;9 针RS-232 接口一端连接计算机的串行口。
检查设备的软件版本及配置信息,确保各设备软件版本符合要求,所有配置为初始状态。
2、依据规划建立两台路由器之间的物理连接3、PAP认证配置1)配置PPP,实现广域网互通R1>enableR1#conf terEnter configuration commands, one per line. End with CNTL/Z.R1(config)#int s1/0R1(config-if)#clock rate 56000R1(config-if)#encapsulation pppR1(config-if)#ip add 192.168.3.1 255.255.255.0R1(config-if)#no shutdownR2>enableR2#conf terEnter configuration commands, one per line. End with CNTL/Z.R2(config)#inter s1/0R2(config-if)#encapsulation pppR2(config-if)#ip add 192.168.3.2 255.255.255.0R2(config-if)#no shutdownR2#ping 192.168.3.1Type escape sequence to abort.Sending 5, 100-byte ICMP Echos to 192.168.3.1, timeout is 2 seconds:!!!!!Success rate is 100 percent (5/5), round-trip min/avg/max = 28/46/68ms2)PAP单向认证通过在R2上设置R1的用户名和密码来实现PAP的单向认证R2#conf terEnter configuration commands, one per line. End with CNTL/Z.R2(config)#username r1 password ccnaR2(config)#inter s1/0R2(config-if)#ppp authentication papR1#conf terEnter configuration commands, one per line. End with CNTL/Z.R1(config)#inter s1/0R1(config-if)#ppp pap sent-username r1 password ccna在R1上关闭并开启S1/0端口,在R2上debug这个过程R1(config)#inter s1/0R1(config-if)#shutdownR2#debug ppp authenticationPPP authentication debugging is onR1(config-if)#no shutdownR2#*May 16 11:22:08.507: Se1/0 PAP: I AUTH-REQ id 1 len 12 from "r 1"*May 16 11:22:08.507: Se1/0 PAP: Authenticating peer r1*May 16 11:22:08.523: Se1/0 PPP: Sent PAP LOGIN Request*May 16 11:22:08.527: Se1/0 PPP: Received LOGIN Response PASS*May 16 11:22:08.603: Se1/0 PAP: O AUTH-ACK id 1 len 5R2#*May 16 11:22:08.619: %LINEPROTO-5-UPDOWN: Line protocol on Int erface Serial1/0, changed state to upR2#no debug all2)PAP双向认证通过在R1和R2上分别设置对方的用户名和密码来实现PAP的双向认证R1#conf terEnter configuration commands, one per line. End witR1(config)#username r2 password ccieR1(config)#inter s1/0R1(config-if)#ppp authentication papR1(config-if)#*May 16 11:29:46.075: %LINEPROTO-5-UPDOWN: Line prot changed state to downR2#conf terEnter configuration commands, one per line. End with CNTL/Z.R2(config)#inter s1/0R2(config-if)#ppp pap sent-username r2 password ccieR2(config-if)#*May 16 11:30:57.223: %LINEPROTO-5-UPDOWN: Line protocol onInterface Serial1/0, changed state to upR1#show runusername r2 password 0 ccieR2#show runusername r1 password 0 ccna4、CHAP认证配置R2(config)#username r1 password ccieR2(config)#inter s1/0R2(config-if)#ppp authentication chapR2(config-if)#ppp chap hostname r2R2(config-if)#ppp chap password ccieR1(config)#username r2 password ccieR1(config)#inter s1/0R1(config-if)#ppp authentication chapR1(config-if)#ppp chap hostname r1 R1(config-if)#ppp chap password ccie。
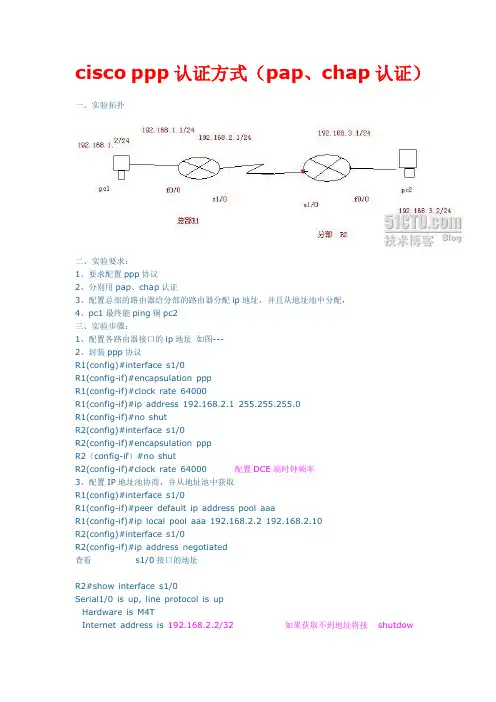
cisco ppp认证方式(pap、chap认证)一、实验拓扑二、实验要求:1、要求配置ppp协议2、分别用pap、chap认证3、配置总部的路由器给分部的路由器分配ip地址,并且从地址池中分配,4、pc1最终能ping铜pc2三、实验步骤:1、配置各路由器接口的ip地址如图---2、封装ppp协议R1(config)#interface s1/0R1(config-if)#encapsulation pppR1(config-if)#clock rate 64000R1(config-if)#ip address 192.168.2.1 255.255.255.0R1(config-if)#no shutR2(config)#interface s1/0R2(config-if)#encapsulation pppR2(config-if)#no shutR2(config-if)#clock rate 64000 配置DCE端时钟频率3、配置IP地址池协商,并从地址池中获取R1(config)#interface s1/0R1(config-if)#peer default ip address pool aaaR1(config-if)#ip local pool aaa 192.168.2.2 192.168.2.10R2(config)#interface s1/0R2(config-if)#ip address negotiated查看 s1/0接口的地址R2#show interface s1/0Serial1/0 is up, line protocol is upHardware is M4TInternet address is 192.168.2.2/32 如果获取不到地址将接shutdown 然后再 no shudownMTU 1500 bytes, BW 1544 Kbit, DLY 20000 usec,reliability 255/255, txload 1/255, rxload 1/255Encapsulation PPP, LCP OpenOpen: CDPCP, IPCP, crc 16, loopback not setKeepalive set (10 sec)4、启用rip协议并查看路由表R1(config)#router ripR1(config-router)#network 192.168.2.0R1(config-router)#network 192.168.1.0查看路由表R1#show ip routeCodes: C - connected, S - static, R - RIP, M - m obile, B - BGPD - EIGRP, EX - EIGRP external, O - OSPF, IA - OSPF inter arN1 - OSPF NSSA external type 1, N2 - OSPF NSSA external type E1 - OSPF external type 1, E2 - OSPF external type 2i - IS-IS, su - IS-IS summary, L1 - IS-IS level-1, L2 - IS-Iia - IS-IS inter area, * - candidate default, U - per-user so - ODR, P - periodic downloaded stati c routeGateway of last resort is not setC 192.168.1.0/24 is directly connected, FastEthernet0/0192.168.2.0/24 is variably subnetted, 2 subnets, 2 m asksC 192.168.2.2/32 is directly connected, Serial1/0C 192.168.2.0/24 is directly connected, Serial1/0R 192.168.3.0/24 [120/1] via 192.168.2.2, 00:00:47, Serial1/0R2(config)#router ripR2(config-router)#network 192.168.2.0R2(config-router)#network 192.168.3.0R2(config-router)#exit查看路由表R2#show ip routeCodes: C - connected, S - static, R - RIP, M - m obile, B - BGD - EIGRP, EX - EIGRP external, O - OSPF, IA - OSPF inN1 - OSPF NSSA external type 1, N2 - OSPF NSSA externaE1 - OSPF external type 1, E2 - OSPF external type 2i - IS-IS, su - IS-IS summary, L1 - IS-IS level-1, L2ia - IS-IS inter area, * - candidate default, U - per-o - ODR, P - periodic downloaded stati c routeGateway of last resort is not set192.168.2.0/32 is subnetted, 2 subnetsC 192.168.2.2 is directly connected, Serial1/0C 192.168.2.1 is directly connected, Serial1/0C 192.168.3.0/24 is directly connected, FastEthernet0/05、配置PAP认证R1(config)#username abc password 0 123R1(config)#interface s1/0R1(config-if)#ppp authentication papR2(config)#interface s1/0R2(config-if)#ppp pap sentR2(config-if)#ppp pap sent-usernam e abc password 0 123查看show runinterface Serial1/0ip address negotiatedencapsulation pppserial restart-delay 0clockrate 64000ppp pap sent-username abc password 0 1236、配置chap认证R1(config)#username abc password 0 123 以对方的主机名作为用户名,密码要和对方的路由器一致R1(config)#interface s1/0R1(config-if)#ppp authentication papR1(config-if)#exitR1(config)#username R2 password 0 123R1(config)#interface s1/0R1(config-if)#encapsulation pppR1(config-if)#ppp authentication chap chap 认证R2(config)#username R1 password 0 123R2(config)#interface s1/0R2(config-if)#encapsulation pppR2#debug ppp authenticationPPP authentication debugging is on 验证chap过程7、show run查看验证8、测试结果pc1 ping通pc2。
实验13 PAP 认证与CHAP 认证
一、实验目的:
1、掌握P A P 认证的配置与应用
2、掌握C H A P 认证的配置与应用
二、实验要求:
按照实验指导书完成实验
三、实验环境:
P C +P a c k e t T r a c e r 5.3
四、实验项目性质 验证性实验 五、实验要点
1、P A P 认证
2、C H A P 认证
六、实验内容
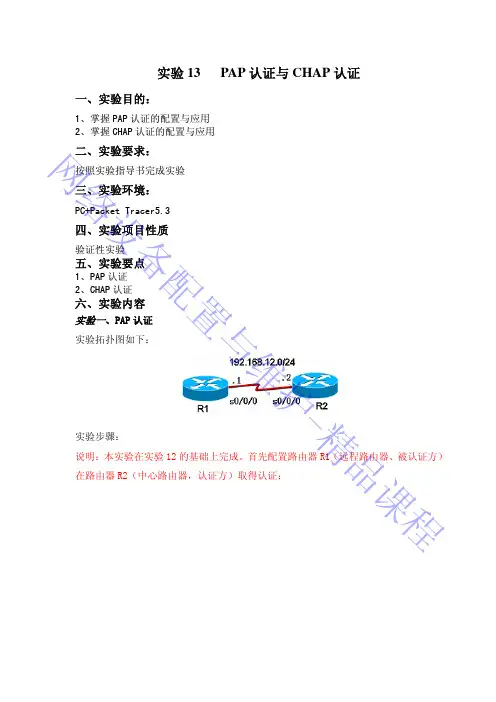
实验一、PAP 认证
实验拓扑图如下:
实验步骤:
说明:本实验在实验12的基础上完成。
首先配置路由器R1(远程路由器、被认证方)
在路由器R2(中心路由器,认证方)取得认证:
网
络
设备配置与维护-精
品课程
测试:
网
络
设备
配
置
与
维
护
-精
品
课
程
实验二、CHAP 认证
实验拓扑图如下:
实验过程:
说明:本实验在实验12的基础上完成。
网络设备配置与维护-精
品
课程
七、实验说明
1、思考题
2、实验报告要求:实验完毕后请按照要求填写实验报告
网络
设备配置与维护-精品课程。
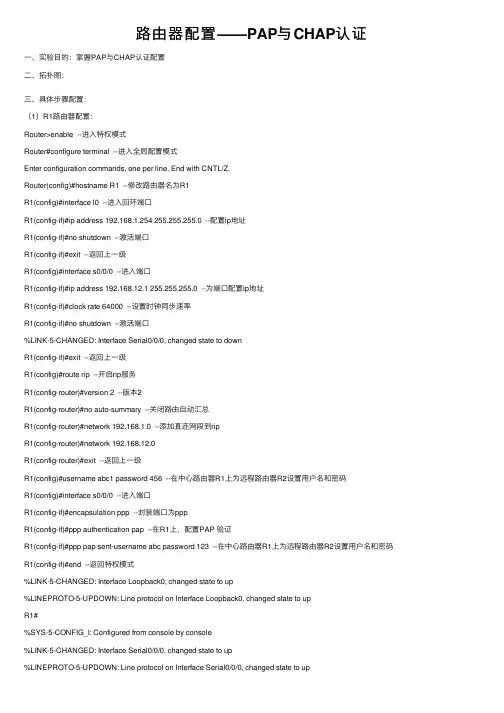
路由器配置——PAP与CHAP认证⼀、实验⽬的:掌握PAP与CHAP认证配置⼆、拓扑图:三、具体步骤配置:(1)R1路由器配置:Router>enable --进⼊特权模式Router#configure terminal --进⼊全局配置模式Enter configuration commands, one per line. End with CNTL/Z.Router(config)#hostname R1 --修改路由器名为R1R1(config)#interface l0 --进⼊回环端⼝R1(config-if)#ip address 192.168.1.254 255.255.255.0 --配置ip地址R1(config-if)#no shutdown --激活端⼝R1(config-if)#exit --返回上⼀级R1(config)#interface s0/0/0 --进⼊端⼝R1(config-if)#ip address 192.168.12.1 255.255.255.0 --为端⼝配置ip地址R1(config-if)#clock rate 64000 --设置时钟同步速率R1(config-if)#no shutdown --激活端⼝%LINK-5-CHANGED: Interface Serial0/0/0, changed state to downR1(config-if)#exit --返回上⼀级R1(config)#route rip --开启rip服务R1(config-router)#version 2 --版本2R1(config-router)#no auto-summary --关闭路由⾃动汇总R1(config-router)#network 192.168.1.0 --添加直连⽹段到ripR1(config-router)#network 192.168.12.0R1(config-router)#exit --返回上⼀级R1(config)#username abc1 password 456 --在中⼼路由器R1上为远程路由器R2设置⽤户名和密码R1(config)#interface s0/0/0 --进⼊端⼝R1(config-if)#encapsulation ppp --封装端⼝为pppR1(config-if)#ppp authentication pap --在R1上,配置PAP 验证R1(config-if)#ppp pap sent-username abc password 123 --在中⼼路由器R1上为远程路由器R2设置⽤户名和密码R1(config-if)#end --返回特权模式%LINK-5-CHANGED: Interface Loopback0, changed state to up%LINEPROTO-5-UPDOWN: Line protocol on Interface Loopback0, changed state to upR1#%SYS-5-CONFIG_I: Configured from console by console%LINK-5-CHANGED: Interface Serial0/0/0, changed state to up%LINEPROTO-5-UPDOWN: Line protocol on Interface Serial0/0/0, changed state to up(2)R2路由器配置:Router>enable --进⼊特权模式Router#configure terminal --进⼊全局配置模式Enter configuration commands, one per line. End with CNTL/Z.Router(config)#hostname R2 --修改路由器名为R2R2(config)#interface l0 --进⼊回环端⼝R2(config-if)#ip address 192.168.2.254 255.255.255.0 --配置ip地址R2(config-if)#no shutdown --激活端⼝R2(config-if)#exit --返回上⼀级R2(config)#interface s0/0/0 --进⼊端⼝R2(config-if)#ip address 192.168.12.2 255.255.255.0 --为端⼝配置ip地址R2(config-if)#no shutdown --激活端⼝R2(config-if)#interface s0/0/1 --进⼊端⼝R2(config-if)#ip address 192.168.24.2 255.255.255.0 --为端⼝配置ip地址R2(config-if)#clock rate 64000 --设置时钟同步速率R2(config-if)#no shutdown --激活端⼝%LINK-5-CHANGED: Interface Serial0/0/1, changed state to downR2(config-if)#exit --返回上⼀级R2(config)#route rip --开启rip协议R2(config-router)#version 2 --版本2R2(config-router)#no auto-summary --关闭路由⾃动汇总R2(config-router)#network 192.168.2.0 --添加直连⽹段到ripR2(config-router)#network 192.168.12.0R2(config-router)#network 192.168.24.0R2(config-router)#exit --返回上⼀级R2(config)#username abc password 123 --在R2上为R1设置⽤户名和密码R2(config)#username R3 password cisco --在R2上为R3设置⽤户名和密码(注意两端密码要相同)R2(config)#interface s0/0/0 --进⼊端⼝R2(config-if)#encapsulation ppp --封装端⼝为PPP协议R2(config-if)#ppp authentication pap --配置PAP验证R2(config-if)#ppp pap sent-username abc1 password 456 --在R2上为R1设置⽤户名和密码R2(config-if)#interface s0/0/1 --进⼊端⼝R2(config-if)#encapsulation ppp --封装端⼝为ppp协议R2(config-if)#ppp authentication chap --配置chap验证R2(config-if)#end --返回特权模式R2#%LINK-5-CHANGED: Interface Loopback0, changed state to up%LINEPROTO-5-UPDOWN: Line protocol on Interface Loopback0, changed state to up%LINK-5-CHANGED: Interface Serial0/0/0, changed state to up%SYS-5-CONFIG_I: Configured from console by console%LINEPROTO-5-UPDOWN: Line protocol on Interface Serial0/0/0, changed state to up R2#%LINK-5-CHANGED: Interface Serial0/0/1, changed state to up%LINEPROTO-5-UPDOWN: Line protocol on Interface Serial0/0/1, changed state to up(3)R3路由器配置:Router>enable --进特权模式Router#configure terminal --进⼊全局配置模式Enter configuration commands, one per line. End with CNTL/Z.Router(config)#hostname R3 --修改路由器名为R3R3(config)#interface l0 --进⼊回环端⼝R3(config-if)#ip address 192.168.3.254 255.255.255.0 --为端⼝配置ip地址R3(config-if)#no shutdown --激活端⼝R3(config-if)#exit --返回上⼀级R3(config)#interface S0/0/0 --进⼊端⼝R3(config-if)#ip address 192.168.24.1 255.255.255.0 --为端⼝配置ip地址R3(config-if)#no shutdown --激活端⼝R3(config-if)#exit --返回上⼀级R3(config)#route rip --开启rip协议R3(config-router)#version 2 --版本2R3(config-router)#no auto-summary --关闭路由⾃动汇总R3(config-router)#network 192.168.3.0 --添加直连⽹段到ripR3(config-router)#network 192.168.24.0R3(config-router)#exit --返回上⼀级R3(config)#username R2 password cisco --在R3上为R2设置⽤户名和密码R3(config)#interface s0/0/0 --进⼊端⼝R3(config-if)#encapsulation ppp --封装端⼝为ppp协议R3(config-if)#ppp authentication chap --配置chap验证R3(config-if)#end --返回特权模式%LINK-5-CHANGED: Interface Loopback0, changed state to up%LINEPROTO-5-UPDOWN: Line protocol on Interface Loopback0, changed state to up %LINK-5-CHANGED: Interface Serial0/0/0, changed state to up%LINEPROTO-5-UPDOWN: Line protocol on Interface Serial0/0/0, changed state to up R3#%SYS-5-CONFIG_I: Configured from console by console四、验证测试:1、测试是否开启ppp认证(1)R1:(2)R2:(3)R3:2、查看R1的S0/0/0端⼝信息如图,红⾊标记处表⽰是PPP认证3、测试全⽹是否互通:(1)R1与R2(2)R2与R3(3)R3与R1结果:全⽹互通成功。

p p p认证方式a p c h a p认证文件排版存档编号:[UYTR-OUPT28-KBNTL98-UYNN208]cisco ppp认证方式(pap、chap认证)一、实验拓扑二、实验要求:1、要求配置ppp协议2、分别用pap、chap认证3、配置总部的路由器给分部的路由器分配ip地址,并且从地址池中分配,4、pc1最终能ping铜pc2三、实验步骤:1、配置各路由器接口的ip地址如图---2、封装ppp协议R1(config)#interface s1/0R1(config-if)#encapsulation pppR1(config-if)#clock rate 64000R1(config-if)#ip addressR1(config-if)#no shutR2(config)#interface s1/0R2(config-if)#encapsulation pppR2(config-if)#no shutR2(config-if)#clock rate 64000 配置DCE端时钟频率3、配置IP地址池协商,并从地址池中获取R1(config)#interface s1/0R1(config-if)#peer default ip address pool aaaR1(config-if)#ip local pool aaaR2(config)#interface s1/0R2(config-if)#ip address negotiated?查看?s1/0接口的地址R2#show interface s1/0Serial1/0 is up, line protocol is upHardware is M4TInternet address is /32 如果获取不到地址将接 shutdown 然后再no shudownMTU 1500 bytes, BW 1544 Kbit, DLY 20000 usec,reliability 255/255, txload 1/255, rxload 1/255Encapsulation PPP, LCP OpenOpen: CDPCP, IPCP, crc 16, loopback not setKeepalive set (10 sec)4、启用rip协议并查看路由表R1(config)#router ripR1(config-router)#networkR1(config-router)#network查看路由表R1#show ip routeCodes: C - connected, S - static, R - RIP, M - mobile, B - BGP D - EIGRP, EX - EIGRP external, O - OSPF, IA - OSPF inter ar N1 - OSPF NSSA external type 1, N2 - OSPF NSSA external type E1 - OSPF external type 1, E2 - OSPF external type 2i - IS-IS, su - IS-IS summary, L1 - IS-IS level-1, L2 - IS-I ia - IS-IS inter area, * - candidate default, U - per-user s o - ODR, P - periodic downloaded static routeGateway of last resort is not setC /24 is directly connected, FastEthernet0/0/24 is variably subnetted, 2 subnets, 2 masksC/32 is directly connected, Serial1/0C/24 is directly connected, Serial1/0R/24 [120/1] via , 00:00:47, Serial1/0R2(config)#router ripR2(config-router)#networkR2(config-router)#networkR2(config-router)#exit?查看路由表?R2#show ip routeCodes: C - connected, S - static, R - RIP, M - mobile, B - BG D - EIGRP, EX - EIGRP external, O - OSPF, IA - OSPF inN1 - OSPF NSSA external type 1, N2 - OSPF NSSA externaE1 - OSPF external type 1, E2 - OSPF external type 2i - IS-IS, su - IS-IS summary, L1 - IS-IS level-1, L2ia - IS-IS inter area, * - candidate default, U - per-o - ODR, P - periodic downloaded static routeGateway of last resort is not set/32 is subnetted, 2 subnetsCis directly connected, Serial1/0Cis directly connected, Serial1/0C/24 is directly connected, FastEthernet0/05、配置PAP认证R1(config)#username abc password 0 123R1(config)#interface s1/0R1(config-if)#ppp authentication papR2(config)#interface s1/0R2(config-if)#ppp pap sentR2(config-if)#ppp pap sent-username abc password 0 123查看show runinterface Serial1/0ip address negotiatedencapsulation pppserial restart-delay 0clockrate 64000ppp pap sent-username abc password 0 1236、配置chap认证R1(config)#username abc password 0 123 以对方的主机名作为用户名,密码要和对方的路由器一致R1(config)#interface s1/0R1(config-if)#ppp authentication papR1(config-if)#exitR1(config)#username R2 password 0 123R1(config)#interface s1/0R1(config-if)#encapsulation pppR1(config-if)#ppp authentication chap chap 认证R2(config)#username R1 password 0 123 R2(config)#interface s1/0R2(config-if)#encapsulation pppR2#debug pppauthenticationPPP authentication debugging is on验证chap过程?7、 show run查看验证?8、测试结果 pc1 ping通pc2。
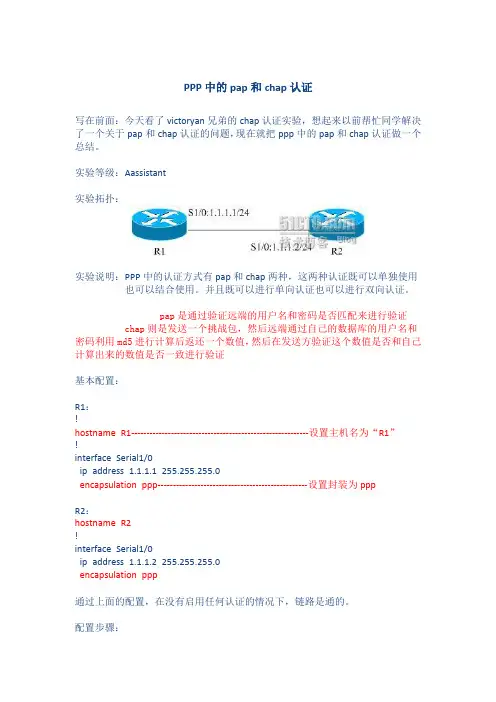
PPP中的pap和chap认证写在前面:今天看了victoryan兄弟的chap认证实验,想起来以前帮忙同学解决了一个关于pap和chap认证的问题,现在就把ppp中的pap和chap认证做一个总结。
实验等级:Aassistant实验拓扑:实验说明:PPP中的认证方式有pap和chap两种,这两种认证既可以单独使用也可以结合使用。
并且既可以进行单向认证也可以进行双向认证。
pap是通过验证远端的用户名和密码是否匹配来进行验证chap则是发送一个挑战包,然后远端通过自己的数据库的用户名和密码利用md5进行计算后返还一个数值,然后在发送方验证这个数值是否和自己计算出来的数值是否一致进行验证基本配置:R1:!hostname R1----------------------------------------------------------设置主机名为“R1”!interface Serial1/0ip address 1.1.1.1 255.255.255.0encapsulation ppp-------------------------------------------------设置封装为pppR2:hostname R2!interface Serial1/0ip address 1.1.1.2 255.255.255.0encapsulation ppp通过上面的配置,在没有启用任何认证的情况下,链路是通的。
配置步骤:1.在两台路由器上进行pap认证:如果我们进行单项认证的话配置应该如下R1为认证的服务器端,需要建立本地口令数据库,并且开始pap认证。
R1(config)#username R2 password gairuhe------------------------建立本地口令数据库R1(config)#int s1/0R1(config-if)#ppp authentication pap--------------------------------要求进行PAP认证在这样的配置下,我们可以看到链路已经down了:R1(config-if)#*Aug 23 16:45:12.639: %LINEPROTO-5-UPDOWN: Line protocol on Interface Ser ial1/0, changed state to downR2为认证的客户端,需要发送用户名和密码来匹配服务器端的口令数据库此时我们在R2上加上如下的配置:R2(config)#int s1/0R2(config-if)#ppp pap sent-username R2 password gairuhe------发送用户名和密码R2(config-if)#*Aug 23 16:47:48.635: %LINEPROTO-5-UPDOWN: Line protocol on Interface Ser ial1/0, changed state to up此时链路已经起来,我们仅在R1上做了认证,而在R2上没有进行认证。
PPP认证实验实验需求:如图路由器R1和R2,R1被认证方,R2为认证方,使用PAP认证与CHAP认证完成PPP实验1、基础配置ipv6interface Serial1/0/0link-protocol pppipv6 enableip address 12.1.1.1 255.255.255.0ipv6 address 2001::1 64R2:ipv6interface Serial1/0/0link-protocol pppipv6 enableip address 12.1.1.2 255.255.255.0ipv6 address 2001::2/642、抓包在s1/0/0端口验证R2的LCP和IPCP、IPV6CPLCP configure request配置请求LCP配置确认3、PAP认证R2配置:[R2]aaa[R2-aaa]local-user zhangsan password cipher Huawei@123 [R2-aaa]local-user zhangsan service-type ppp[R2-aaa]quit[R2]interface s1/0/0[R2-Serial1/0/0]ppp authentication-mode papR1配置:[R1]interface s1/0/0[R1-Serial1/0/0]ppp pap local-user zhangsan password cipher Huawei@123抓包验证PAP执行了两次握手能够抓到PAP认证中传递的明文用户名zhangsan和密码Huawei@1234、CHAP认证R2配置:[R2]aaa[R2-aaa]local-user zhangsan password cipher Huawei@123 [R2-aaa]local-user zhangsan service-type ppp[R2-aaa]quit[R2]interface s1/0/0[R2-Serial1/0/0]ppp authentication-mode chapinterface Serial1/0/0[R1-Serial1/0/0]ppp chap user zhangsan[R1-Serial1/0/0]ppp chap password cipher Huawei@123抓包验证CHAP执行了三次握手只能够抓到CHAP认证中传递的标识符和挑战值,传递进行哈希值传递了散列数值,根本抓不到密码,CHAP认证相比于PAP认证安全性更高。
实验二十三:PPP协议中的CHAP和PAP验证一、理论基础1. PPP协议PPP协议是在SLIP(Serial Line IP串行线IP协议)的基础上发展起来的。
由于SLIP 协议只支持异步传输方式、无协商过程(尤其不能协商如双方IP地址等网络层属性)等缺陷,在以后的发展过程中,逐步被PPP协议所代替。
人们创建了PPP协议以解决远程互连网的连接问题。
另外,需要采用PPP协议来解决动态分配IP地址以及多协议使用的问题。
PPP 可以在同步和异步电路中提供路由器到路由器以及主机到网络的连接。
PPP是目前使用最普遍、最流行的WAN协议,是一种标准的串行线路封装方式,这种协议在连接建立期间可以检查链路的质量。
2、PPP协议的特点(1)动态分配IP地址(例如拨号上网时)(2)支持多种网络层协议(3)误码检测(4)多链路绑定(Multilink)(5)数据的压缩(6)链路配置以及链路质量测试(7)回叫(Callback)(8)网络能力的协商选项,如:网络层地址协商和数据压缩协商等PPP定义了一整套的协议,包括链路控制协议(LCP)、网络层控制协议(NCP)和验证协议(PAP和CHAP)等。
其中,链路控制协议LCP(Link Control Protocol):用来协商链路的一些参数,负责创建并维护链路。
网络层控制协议NCP(Network Control Protocol):用来协商网络层协议的参数。
3、PPP建立一个点到点连接的四个阶段(1)链路的建立和配置协商(2)链路质量确定(3)网络层协议配置协商(4)链路拆除4、 PPP的验证方式PAP验证PAP(Password Authentication Protocol,口令鉴定协议)是一种两次握手验证协议,它在网络上采用明文方式传输用户名和口令。
PAP验证的过程如下:被验证方主动发起验证请求,将本端的用户名和口令发送到验证方;验证方接到被验证方的验证请求后,检查此用户名是否存在以及口令是否正确。
实验拓扑图:相关说明:在链路建立的第2个阶段进行用户验证,最常用的认证协议有口令验证协议PAP和挑战-握手协议CHAP。
口令验证协议PAP是一种简单的明文验证方式,这种验证方式的安全性较差,第三方可以很容易的获取被传送的用户名和口令;挑战-握手验证协议CHAP是一种加密的验证方式,能够避免建立连接时传送用户的真实密码。
初始:配置各路由器的IP地址。
Router(config)#host r1r1(config)#int s1/0r1(config-if)#clock rate 64000r1(config-if)#ip address 10.1.1r1(config-if)#no shRouter(config)#host r2r2(config)#int s1/0r2(config-if)#ip address 10.1.1r2(config-if)#clock rate 64000r2(config-if)#no shI:配置PAP单向身份验证r1(config)#username r2 password 123 /验证方建立数据库r1(config)#int s1/0r1(config-if)#encapsulation ppp /进行PPP封装r1(config-if)#ppp authentication pap /使用PAP实现PPP的验证r2(config)#int s1/0r2(config-if)#encapsulation pppr2(config-if)#ppp pap sent-username r2 password 123 /发送验证信息测试结果:r1#ping 10.1.1.2Type escape sequence to abort.Sending 5, 100-byte ICMP Echos to 10.1.1.2, timeout is 2 seconds:!!!!!Success rate is 100 percent (5/5), round-trip min/avg/max = 4/9/16 msII:配置PAP双向身份验证r1(config)#username r2 password 123r1(config)#int s1/0r1(config-if)#encapsulation pppr1(config-if)#ppp authentication papr1(config-if)#ppp pap sent-username r1 password 321 /注意此时发送的password r2(config)#username r1 password 321r2(config)#int s1/0r2(config-if)#encapsulation pppr2(config-if)#ppp authentication papr2(config-if)#ppp pap sent-username r2 password 123 /注意此时发送的password 测试结果:r1#ping 10.1.1.2Type escape sequence to abort.Sending 5, 100-byte ICMP Echos to 10.1.1.2, timeout is 2 seconds:!!!!!Success rate is 100 percent (5/5), round-trip min/avg/max = 8/10/16 msIII:配置CHAP单向的身份验证.r1(config)#username r2 password 123r1(config)#int s1/0r1(config-if)#encapsulation pppr1(config-if)#ppp authentication chapr2(config)#int s1/0r2(config-if)# encapsulation pppr2(config-if)#ppp chap hostname r2r2(config-if)#ppp chap password 123测试结果:r2#ping 10.1.1.1Type escape sequence to abort.Sending 5, 100-byte ICMP Echos to 10.1.1.1, timeout is 2 seconds:!!!!!Success rate is 100 percent (5/5), round-trip min/avg/max = 8/18/36 ms IV:配置CHAP双向的身份验证.r1(config)#username r2 password 123r1(config)#int s1/0r1(config-if)# encapsulation pppr1(config-if)# ppp authentication chapr2(config-if)#username r1 password 123r2(config)#int s1/0r2(config-if)# encapsulation pppr2(config-if)# ppp authentication chap测试结果:r2#ping 10.1.1.1Type escape sequence to abort.Sending 5, 100-byte ICMP Echos to 10.1.1.1, timeout is 2 seconds:!!!!!Success rate is 100 percent (5/5), round-trip min/avg/max = 8/18/36 ms OK,实验完成。
PPP协议的PAP和CHAP认证PPP(Point-to-Point Protocol)是一种常见的用于串行链路上的数据通信的协议,主要用于建立和管理点对点连接。
PPP协议的认证机制是保证通信双方身份安全和数据传输的完整性的重要手段。
PPP协议支持多种认证方式,其中最常见的是PAP(Password Authentication Protocol)和CHAP(Challenge Handshake Authentication Protocol)认证。
1. PAP认证(Password Authentication Protocol):PAP是一种最简单的认证协议,其主要思想是使用明文密码对用户进行认证。
在PAP认证中,PPP服务器首先向对端发送一个认证请求报文,要求对端提供用户名和密码。
接收到认证请求的对端回复一个应答报文,携带用户名和密码。
PPP服务器收到应答报文后,会对报文中提供的用户名和密码与本地保存的用户名和密码进行对比,如果一致,则认证成功,通信将继续进行;如果不一致,则认证失败,连接将被断开。
PAP认证的优点是简单易实现,适用于低要求的场景。
然而,PAP认证的缺点也显而易见:-PAP认证对用户名和密码的传输没有加密保护,存在明文传输的风险-PAP认证仅进行一次握手即可认证通过,对于未进行身份确认的对端,可能存在身份冒用的风险-PAP认证无法解决中间人攻击的问题,容易受到网络窃听和篡改的威胁2. CHAP认证(Challenge Handshake Authentication Protocol):CHAP认证是一种基于挑战响应的强大认证协议,其主要思想是通过令牌生成不可逆的散列值来验证用户名和密码的正确性。
在CHAP认证中,PPP服务器首先向对端发送一个随机生成的挑战值。
接收到挑战值的对端使用自己的密码和挑战值经过一定的散列算法(如MD5)生成一个响应报文,将响应报文发送回服务器。