
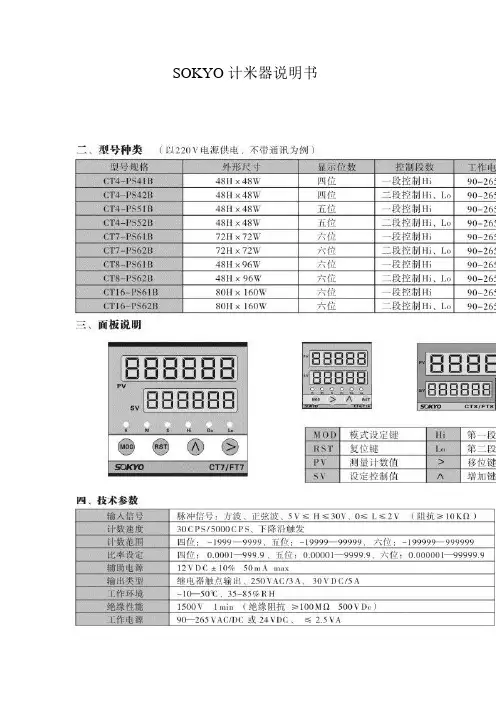
SOKYO计米器说明书
- 格式:doc
- 大小:817.50 KB
- 文档页数:5
目录一、GeoPluse浅地层剖面仪操作规程 (1)1、仪器简介 (1)1)功能简介 (1)2)系统配置 (1)2、GeoPluse浅地层剖面仪系统配置连接 (1)1)换能器安装 (1)2)5430A收发机与5210A接收机连接 (2)3)接通电源 (4)3、5210A与5430A收发机功能键简介 (4)1)5430A收发机功能键简介 (5)2)5210A接收机功能键简介 (5)4、数据采集后处理 (7)二、Knudsen 320Ms双频测深仪操作规程 (14)1、仪器简介 (14)1)工作原理 (14)2)功能简介 (14)2、系统配置连接 (15)1)换能器连接 (15)2)Knudsen 320Ms主机与电脑的连接 (15)3)接通电源 (16)3、Knudsen 320Ms菜单结构 (16)4、数据采集后处理 (21)三、TideMaster型潮位仪操作规程 (29)1、仪器硬件设置 (29)1)主要设备仪器 (29)2)操作及安装使用 (31)2、临时验潮站站址选择原则 (31)3、仪器的软件设置 (31)四、GPS操作规程 (41)1、工作原理 (41)2、基准站操作 (41)1)仪器架设 (41)2)用手簿启动基准站 (44)3、Trimble SPS461 GPS罗经设置及使用说明 (46)1)网络连接方法设置461 (46)2)SPS461 信标机定位定向仪液晶屏设置说明 (51)五、海底管线铺设导航、定位技术 (64)1、GPS定位原理 (64)2、海洋定位技术 (65)1)差分GPS技术 (65)2)信标差分技术 (65)3、GPS 控制网及基准站的设立解算 (66)1)基准站的选定和设立 (66)2)GPS控制网的布设、施测和解算 (67)3)测区的坐标七参数的解算 (68)4)利用转化参数转换坐标 (69)4、海底管道施工导航定位技术 (69)1)海底管线临时定位桩施工 (69)2)铺管船法海底管线铺设导航定位 (71)六、海底管线预、后调查方案 (75)1、概述 (75)1)项目概述 (75)2)海底管线状态简介 (75)2、使用检测仪器进行海底管线铺设后调查内容 (76)1)海底管线外观检查 (76)2)经处理后的完工调查 (77)3、后调查作业设备及选用原则 (77)1)测深设备 (77)2)旁侧声纳 (78)3)浅地层剖面仪 (78)4、调查作业施工 (79)1)作业准备 (79)2)计划线布设 (79)3)作业方法和步骤 (80)4)作业注意事项 (82)5、数据采集、记录以及报告 (83)1)数据采集 (83)2)数据处理 (84)6、组织机构与职责 (85)一、GeoPluse浅地层剖面仪操作规程1、仪器简介1)功能简介使用GeoPluse浅地层剖面,得到几十米深的纵断面工程地质图,探明海底泥层的构成、岩性、断层位置以及有无埋设其他管道等,然后将所取得的几条走向资料进行对比,以确定最优的路由。
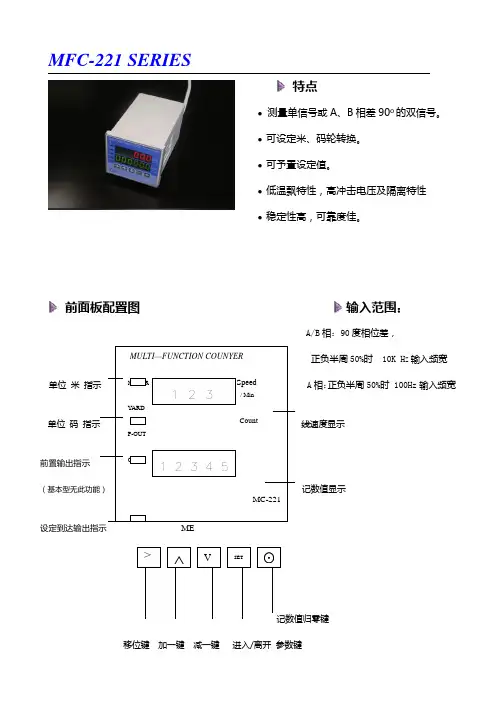
MFC-221 SERIES特点●测量单信号或A、B相差90o的双信号。
●可设定米、码轮转换。
●可予置设定值。
●低温飘特性,高冲击电压及隔离特性●稳定性高,可靠度佳。
前面板配置图输入范围:A/B相:90度相位差,正负半周50%时 10K H Z输入频宽单位米A相:正负半周50%时100Hz输入频宽单位码线速度显示前置输出指示记数值显示移位键加一键减一键进入/离开参数键接线配置(背视图):AC1:电源输入AC 220V 20%范围内AC2:电源输入AC OVR-B:设定输出RELAY B接点(N,C)R-C:设定输出RELAY COMMON 点R-A: 设定输出RELAY A接点(N,C)+12V:DC 12 V供应电源,最大80mACOM: DC OVA:ENCODER A 相或单相输入点B:ENCODER B 相输入点COM:输入接点COMMONRESET:外部计数器零输入点HOLD:计数暂停输入点代码说明:参数设定方式:1:按下“SET”键,面板进入参数选择模式中,上排显示参数代码,下排显示参数的内容2:要选择其他参数时,可按下“↑”或“↓”键来进行选择3:要修改参数内容时,按下“→”键,将进入参数修正模式。
下排参数值会在可设定的最高位数开始闪烁可按下“→”键来移动要更改的位数,再按下“↑”“↓”键来更改内容4:当设定好参数值后,可按下“SET”键来输入,若下排无闪烁的位数,表示回到参数选择模式中,若刚才输入的参数正确,下排显示为更新后的数值;若设定值不正确,下排参数将保留原来之数值5:若要结束输入参数的的操作,则再按一次“SET”键就可结束6. 参数“LOCK”用来保护参数内容不被误改,当参数被锁定值,将无法进入修正模式中,但仍可在参数选择中看到参数内容尺寸外型:开孔尺寸:。


This guide does not replace your Operators Manual. Always read your Operators Manual before operating equipment.Meter PerformanceOperating Vacuum (Vacuum Meters)• To purge the system of dirt and talc-graphic buildup, cleanthe system as directed in the operator manual.• For initial settings, use the operator manual or seed supplierrecommendations.Talc-Graphic Usage• With untreated seed and commercially treated seed(not farmer treated seed), apply these talc-graphic rates.• To coat all seeds with talc-graphic, but avoid talc-graphic accumulation in bottom of tanks and hoppers, adjust talc-graphic rates as necessary.• Double talc-graphic rates with very large or very small seeds,with heavy or sticky seed treatment, or in humid planting conditions.• With 35 or 50 bushel bulk tanks, meter the talc-graphic into the tanks while filling with seed. To ensure complete coverage, stir the seed.• To verify that all seeds are coated with talc-graphic, occasionally inspect seeds in the ground behind planter.• Ensure all meters are clean of any build-up.Wax-Based Lubricant Usage (Vacuum Meters)• Wax-based lubricant typically has lower levels of inert andseed treatment dust in the vacuum exhaust.• With untreated seed and commercially treated seed(not farmer treated seed), apply these rates.• To coat all seeds with lubricant, but avoid accumulation in bottom of tanks and hoppers, adjust lubricant rates as necessary.•Double lubricant rates with very large or very small seeds, with heavy or sticky seed treatment, or in humid planting conditions.• With 35 or 50 bushel bulk tanks, meter the lubricant into the tanks while filling with seed. To ensure complete coverage, stir the seed.• To verify that all seeds are coated with lubricant,occasionally inspect seeds in the ground behind planter.Seed Treatments • For best results, use of farmer applied seed treatment isnot recommended. If farmer applied treatments must beused, apply treatment to seed and allow to dry before filling planter.Vacuum Meters• Verify that the correct seed bowl is installed for the seedbeing planted.• Verify that the meter brushes, baffle, scraper, doubleeliminator, hub adjustment, and other factors are all adjusted according to the seed used. See the operator manual.• If new bowls are installed, apply graphite-lubricant sprayTY25797 to the outside of the seed bowl.Application Rate of Approved Fluency Agentin CCS™ TanksCCS™ Tank Size Quantity of Wax-Based Agent Quantity of Graphite Agent 1233 L (35 bu.) Bulk Tank 0.84 L (3-1/2 cups)0.21 L (3/4 cups)1762 L (50 bu.) Bulk Tank 1.2 L (4-3/4 cups)0.3 L (1-1/8 cups)Per 80 000 kernel seed unit24 mL (1/8 cup)6 mL (1 tsp.)READY TO PLANT Quick Reference GuideThis guide does not replace your Operators Manual. Always read your Operators Manual before operating equipment.Meter PerformanceOperating Vacuum (Vacuum Meters)• To purge the system of dirt and talc-graphic buildup, cleanthe system as directed in the operator manual.• For initial settings, use the operator manual or seed supplierrecommendations.Talc-Graphic Usage• With untreated seed and commercially treated seed(not farmer treated seed), apply these talc-graphic rates.• To coat all seeds with talc-graphic, but avoid talc-graphic accumulation in bottom of tanks and hoppers, adjust talc-graphic rates as necessary.• Double talc-graphic rates with very large or very small seeds,with heavy or sticky seed treatment, or in humid planting conditions.• With 35 or 50 bushel bulk tanks, meter the talc-graphic into the tanks while filling with seed. To ensure complete coverage, stir the seed.• To verify that all seeds are coated with talc-graphic, occasionally inspect seeds in the ground behind planter.• Ensure all meters are clean of any build-up.Wax-Based Lubricant Usage (Vacuum Meters)• Wax-based lubricant typically has lower levels of inert andseed treatment dust in the vacuum exhaust.• With untreated seed and commercially treated seed(not farmer treated seed), apply these rates.• To coat all seeds with lubricant, but avoid accumulation in bottom of tanks and hoppers, adjust lubricant rates as necessary.•Double lubricant rates with very large or very small seeds, with heavy or sticky seed treatment, or in humid planting conditions.• With 35 or 50 bushel bulk tanks, meter the lubricant into the tanks while filling with seed. To ensure complete coverage, stir the seed.• To verify that all seeds are coated with lubricant,occasionally inspect seeds in the ground behind planter.Seed Treatments• For best results, use of farmer applied seed treatment isnot recommended. If farmer applied treatments must be used, apply treatment to seed and allow to dry before filling planter.Vacuum Meters• Verify that the correct seed bowl is installed for the seedbeing planted.• Verify that the meter brushes, baffle, scraper, doubleeliminator, hub adjustment, and other factors are all adjusted according to the seed used. See the operator manual.• If new bowls are installed, apply graphite-lubricant sprayTY25797 to the outside of the seed bowl.Application Rate of Approved Fluency Agentin CCS™ TanksCCS™ Tank Size Quantity of Wax-Based Agent Quantity of Graphite Agent 1233 L (35 bu.) Bulk Tank 0.84 L (3-1/2 cups)0.21 L (3/4 cups)1762 L (50 bu.) Bulk Tank 1.2 L (4-3/4 cups)0.3 L (1-1/8 cups)Per 80 000 kernel seed unit24 mL (1/8 cup)6 mL (1 tsp.)READY TO PLANT Quick Reference GuideOptimizing Planter PerformanceFrame• Verify that the planter frame, parallel arms (A), andplanting units (B) are running parallel to the ground. Periodically perform checks.NOTE: Before adjusting planter frame, verify that all row units are set to equal down force.•If the parallel arms are not level or angled slightly upward,adjust frame height. If planting units are not level, adjust hitch height.• Side-to-side level is also important for improvedperformance.- Integral Planters: Verify that tractor hitch and planter-frame gauge wheels are adjusted properly.- Drawn Planters: To rephase the hydraulic system, lower frame and hold SCV in detent for 5-10 seconds. If rephasing does not correct the level, adjust frame wheel height.Row Unit• Tru-Vee™ Setting:- If blades are replaced, replace them in pairs to ensure consistent wear and a uniform seed furrow.- If beveled edge is worn away or blade diameter is less than 35 cm (14 in.), replace opener blades.- If blade damage from rocks or stumps creates irregular seed furrow, replace opener blades.- If blades are replaced, verify the correct amount of blade contact. Insert two business cards on each side of blade contact point and measure between cards. The correct blade contact is 3.8–6.4 cm (1.5–2.5 in.).• Gauge Wheel Setting:- To prevent material buildup between gauge wheels and opener blades, adjust gauge wheels to specified distance from blade.Specification - Slightly touch blade or no more than 1.5 mm (1/16 in.) from blade at closest point when wheel is rotated.•Row Unit Down Force:- To maintain proper seed depth, adjust down force to a proper level for field conditions. Excessive down force leads to increased wear.Fast StartFast Start immediately dispenses seed for up to 6 seconds after being activated. If no motion is detected in 6 seconds, Fast Start will time-out and all drives will stop.The control unit must detect the three following conditions before Fast Start activates:- Planter wheel motion must not be detected.- Planter frame height must indicate a lowered position.- Actual measured radar speed must be less than 2.4 km/h (1.5 mph).Tire PressuresMeasure all air pressures with planter in plant position.• Verify that all frame tires are inflated to specifications in the operator manual.- Correct frame-tire in flation maintains a level frame.Always verify population and spacingwith a field checkAnnual Meter Inspections are recommended to ensure properperformance. See your John Deere dealer to have your meters tested with your seed prior to planting.READY TO PLANT GUIDEREADY TO PLANT Quick Reference GuideABOptimizing Planter PerformanceFrame• Verify that the planter frame, parallel arms (A), andplanting units (B) are running parallel to the ground. Periodically perform checks.NOTE: Before adjusting planter frame, verify that all row units are set to equal down force.• If the parallel arms are not level or angled slightly upward,adjust frame height. If planting units are not level, adjust hitch height.• Side-to-side level is also important for improvedperformance.- Integral Planters: Verify that tractor hitch and planter-frame gauge wheels are adjusted properly.- Drawn Planters: To rephase the hydraulic system, lower frame and hold SCV in detent for 5-10 seconds. If rephasing does not correct the level, adjust frame wheel height.Row Unit• Tru-Vee™ Setting:- If blades are replaced, replace them in pairs to ensure consistent wear and a uniform seed furrow.- If beveled edge is worn away or blade diameter is less than 35 cm (14 in.), replace opener blades.- If blade damage from rocks or stumps creates irregular seed furrow, replace opener blades.- If blades are replaced, verify the correct amount of blade contact. Insert two business cards on each side of blade contact point and measure between cards. The correct blade contact is 3.8–6.4 cm (1.5–2.5 in.).• Gauge Wheel Setting:- To prevent material buildup between gauge wheels and opener blades, adjust gauge wheels to specified distance from blade.Specification - Slightly touch blade or no more than 1.5 mm (1/16 in.) from blade at closest point when wheel is rotated.• Row Unit Down Force:- To maintain proper seed depth, adjust down force to a proper level for field conditions. Excessive down force leads to increased wear.Fast StartFast Start immediately dispenses seed for up to 6 seconds after being activated. If no motion is detected in 6 seconds, Fast Start will time-out and all drives will stop.The control unit must detect the three following conditions before Fast Start activates:- Planter wheel motion must not be detected.- Planter frame height must indicate a lowered position.- Actual measured radar speed must be less than 2.4 km/h (1.5 mph).Tire PressuresMeasure all air pressures with planter in plant position.•Verify that all frame tires are inflated to specifications in the operator manual.- Correct frame-tire in flation maintains a level frame.Always verify population and spacingwith a field checkAnnual Meter Inspections are recommended to ensure properperformance. See your John Deere dealer to have your meters tested with your seed prior to planting.READY TO PLANT Quick Reference GuideAB。