Mapping the Galactic Halo III. Simulated Observations of Tidal Streams
- 格式:pdf
- 大小:858.55 KB
- 文档页数:50

IES-petromod学习教程PetroMod 2D基本操作介绍第一章你必须知道的一些东西1.1 本说明包括的内容2D中主要介绍以下几个功能模块:1.SeisStrat 2D2.Input 2D3.Well Editor4.Simulator5.Viewer 2D1.2各模块功能一览1.3 初学提示如果SeisStrat 2D, DepoMap, MapExtract, and MapUtil显示为灰色,表明其不可用。
这是由于还没有Global Version设置好。
请选择Open Global Version或New Global Version进行设置,然后在运行。
1.4 PetroMod 2D操作流程对于2D盆地模拟来讲,我们主要做以下工作:1.创建地层构造格架。
主要是输入地震剖面解译的地震界面数据,并加入相关断层。
这是进行下面所有模拟工作的基础。
2.填充地层、断层、界面、岩性、烃源岩、油气系统组分和沉积时间等属性。
这是为模拟工作添加原材料。
生成模拟所需数据(pre-process input)。
上面三项工作是在SeisStrat2D->sketch中完成的。
在input->input 2D中编辑模拟数据。
主要是编辑一些趋势参数(trends : HF、SWI、PWD)。
到simulation中进行模拟工作。
主要是设定好动力学参数(kinetic)和油气流体模型(petroflow),然后进行模拟。
在output->viewer 2D中显示模拟结果。
主要是显示2D沉降史(各个时期都有)、热史、生烃史、迁移史等。
第二章具体实例教你玩转PetroMod 2D 实例一:输入数据创建地层构造格架。
1.1数据准备要求有ASCII data 数据,文件类型为*.dat类型。
可以用写字板打开并编辑相关数据。
格式如下:(多个层位就接着来,见具体实例文件)建议:将每个horizon数据都做成一个.dat文件。

For example, we connect the Split 3 series to the UART 3 interface on the FlightController: connect the Flight Controller to the computer, then open the configurator software of the Flight Controller. (Open up the configurator that matches the firmware you are running, Betaflight Configurator for Betaflight, Cleanflight Configurator for Cleanflight). In the Peripherals column of the line UART3 (on the Ports tab), select RunCam Device and click Save And Reboot.In the Flight Controller Configurator, navigate to the Modes tab. There are new CAMERA WI-FI, CAMERA POWER and CAMERA CHANGE modesAssign any available channel to the function you need, for example:· CAMERA POWER: start/stop the video. When in the OSD of the camera, this is used to move to the next menu item.· CAMERA CHANGE MODE: switch among the two modes: video and OSD setting mode. When in the OSD of the camera, this will exit the menu · Assign the AUX2 to the CAMERA POWER, range 1900-2100· Assign the AUX3 to the CAMERA CHANGE MODE, range 1900-2100Please choose your Model on the controller, then access to the MIXER interface and assign the channel to the switch of the controller. Take opentx 2.2.0 for example, assign the channels CH5, CH6 and CH7 to SA, SB and SD respectivelyPower the Flight Controller and the Split 3 series· Set the SA to the bottom, the camera starts/stops the video· Set the SD to the bottom, the camera switches among the two modes: video and OSD setting modePlease visit: https://Please push the shield a little bit up with one hand like showed in above step 1 and then press the SD card(step 2) with another hand to let the card pop out.Mode Switch ButtonPower/Shutter ButtonAnti-drop Shield ·Instruction Diagram·Micro SD Card·Transmitter Connection Diagram·Flight Controller Set·Technical Support·ParameterSide ASide BPreparation· Firmware: BetaFlight Firmware (≥3.2.0),CleanFlight Firmware(≥2.1.0) , KISS Firmware (≥1.3-RC30) or INAV Firmware (≥1.7.3).· Any available UART interface on the Flight Controller1. Connect the Split 3 series with the UART interface of the Flight Controller2. Make the Flight Controller recognize the Split 3 series3. Instructions of the functions of the camera and assigning transmitter channels to them4. Assign the channel to the switch of the controller5. TestVCC +(5-20V)GND VideoTX RXMicrophone Sensor ConnectorMicroSD Card SlotWarning: Current Input ≥1A (Don't powered by VTx)·Lens Module Connection Diagram·Basic Camera Operation。

fi bus Concentrator. The3L) is the latest development in leading-edge fi cation is built-in reducing fi gure for pH or ORP via automatic recognition 3-2751.090 Rev. B 08/17*3-2751.090*Signet 2751 DryLoc ®pH/ORP Smart Sensor ElectronicsEnglishOperating Instructions112751-3, 2751-42751-22751-1• English • Deutsch • Français • Español22751 DryLoc pH/ORP Smart Sensor Electronics32751 DryLoc pH/ORP Smart Sensor Electronics42751 DryLoc pH/ORP Smart Sensor Electronics52751 DryLoc pH/ORP Smart Sensor Electronics62751 DryLoc pH/ORP Smart Sensor Electronics72751 DryLoc pH/ORP Smart Sensor Electronics82751 DryLoc pH/ORP Smart Sensor Electronics92751 DryLoc pH/ORP Smart Sensor ElectronicsAll 2751 pH/ORP Smart Sensor Electronics are factory-calibrated for maximum out-of-the-box accuracy. Periodic recalibration is required to compensate for electrode aging.The optional EasyCal feature allows calibration to be performed local at the sensor.EasyCal Procedure:The fi rst step (Reset) is recommended each time an electrode is replaced, but is NOT necessary upon initial installation or periodic calibration.In fact, for periodic calibration it is best for the electrode/sensor assembly to remain intact to minimize the possibility of moisture or other contamination entering the electrical interconnection area. The electrode/sensor connection must remain dry and clean at all times.1. Reset the 2751 pH/ORP Smart Sensor Electronics to factory calibration: With no electrode connected to the Sensor, press and holdSW1 until the LED (D1) comes on steady then goes off again (approx. 10 seconds). When the LED goes off, one blink will occur. This indicates the reset was successful. Release SW1; reset is complete.2. Connect an electrode to the 2751 pH/ORP Smart Sensor Electronics.3. If (S 3L) output is being used, place SW2 in the “Cal” position. If 4 to 20 mA output is being used, SW2 position is of noconsequence.4. Place the electrode/sensor assembly into a calibration solution as follows: (If the electrode is “healthy”, then the 2751 will automaticallyrecognize the solution. The order in which the solutions are used during the calibration procedure is of no consequence). The 2751 ORP EasyCal is a single point calibration.• For pH calibration, use any two of these international standards: pH 4.0, 7.0 or 10.0 buffer solutions. (Signet part number 3-0700.390 contains one capsule of each value)• To produce standards for ORP calibration, mix the chemical Quinhydrone into pH 7.0 and 4.0 buffers to saturation (1/8g per 50 ml).The 2751 can also use Light's Solution (469 mV), a commercial ORP calibration solution, for ORP calibration.The 2751 offers a one point ORP calibration, for this reason only a single buffer near your operating point is required for EasyCal.• Regardless of the size of the container used for calibration, one inch of solution is adequate to completely submerge the tip of theelectrode.• Allow at least 30 seconds for the electrode response to stabilize before calibration.5. Press and hold SW1 for approximately 8 to 10 seconds. During this time, the LED (D1) will come on steady then go back off.Release SW1 (If the LED blinks several times rapidly, the calibration was not successful. See the troubleshooting section.)6. Remove the electrode/sensor assembly from the fi rst calibration solution, rinse the electrode with clean water, andplace it in the second solution.NOTE: If using the 2751 Smart Sensor Electronics, only a single point is used to calibrate the 2751 and ORP electrode.• Allow at least 30 seconds for the electrode response to stabilize before calibration.7. Press and hold SW1 for approximately 8 to 10 seconds. During this time, the LED will come on steady then go back off. Release SW1.(If the LED blinks several times rapidly, the calibration was not successful. See the troubleshooting section.)8. For (S 3L) systems ONLY: Return SW2 to the RUN position.Calibration is complete. Return the system to service.SW1 EasyCal buttonSW2 RUN/CALIBRATE switch for (S 3L) system D1 EasyCal Indicator (green LED)SW1D1+S-SW2R u nC a l8052-28050-2SW1D1SW2RunCal1234+S-2751-2Required Equipment:• 2751-2 with built-in EasyCal or Any 2751 with 8050-2 or 8052-2 junction box with EasyCal• Standard pH buffers (pH 4, 7 or 10)• Quinhydrone saturated standard pH buffers (pH 4, or pH 7) or Light's Solution, 469 mV102751 DryLoc pH/ORP Smart Sensor Electronics112751 DryLoc pH/ORP Smart Sensor ElectronicsGeorg Fischer Signet LLC, 3401 Aero Jet Avenue, El Monte, CA 91731-2882 U.S.A. • Tel. (626) 571-2770 • Fax (626) 573-2057For Worldwide Sales and Service, visit our website: • Or call (in the U.S.): (800) 854-4090For the most up-to-date information, please refer to our website at 3-2751.090 Rev. B 08/17 English© Georg Fischer Signet LLC 20172751 DryLoc pH/ORP Smart Sensor ElectronicsMfr. Part No.CodeDescription3-2751-1159 001 804In-line Smart Sensor Electronics with 4.6 m (15 ft) cable (recommended for use with 9900 or 9950)3-2751-2159 001 805In-line Smart Sensor Electronics with Junction Box and EasyCal (recommended for current loop and 0486)3-2751-3159 001 806Submersible Smart Sensor Electronics with 4.6 m (15 ft) cable, ¾ in. NPT threads 3-2751-4159 001 807Submersible Smart Sensor Electronics with 4.6 m (15 ft) cable, ISO 7/1-R ¾ threadsDryLoc pH Electrodes 3-2724-00159 001 547Flat pH Electrode, DryLoc, PT1000, ¾ in. NPT or Signet fi ttings 3-2724-01159 001 548Flat pH Electrode, DryLoc, PT1000, ISO 7/1-R¾ or Signet fi ttings3-2724-HF-10159 001 771HF Resistant, Flat pH Electrode, DryLoc, 3K Balco, ¾ in. NPT or Signet fi ttings 3-2724-HF-11159 001 772HF Resistant, Flat pH Electrode, DryLoc, 3K Balco, ISO 7/1-R ¾ or Signet fi ttings 3-2726-00159 001 555Bulb pH Electrode, DryLoc, PT1000, ¾ in. NPT or Signet fi ttings 3-2726-01159 001 556Bulb pH Electrode, DryLoc, PT1000, ISO 7/1-R¾ or Signet fi ttings3-2726-HF-00159 001 551HF Resistant, Bulb pH Electrode, DryLoc, PT1000, ¾ in. NPT or Signet fi ttings 3-2726-HF-01159 001 552HF Resistant, Bulb pH Electrode, DryLoc, PT1000, ISO 7/1-R¾ or Signet fi ttings 3-2726-LC-00159 001 559Low Conductivity, Bulb pH Electrode, DryLoc, PT1000, ¾ in. NPT or Signet fi ttings 3-2726-LC-01159 001 560Low Conductivity, Bulb pH Electrode, DryLoc, PT1000, ISO 7/1-R¾ or Signet fi ttings 3-2734-00159 001 774Flat pH Electrode + Memory Chip, DryLoc, PT1000, ¾ in. NPT or Signet fi ttings 3-2734-01159 001 775Flat pH Electrode + Memory Chip, DryLoc, PT1000, ISO 7/1-R¾ or Signet fi ttings3-2734-HF-00159 001 776HF Resistant, Flat pH Electrode + Memory Chip, DryLoc, PT1000, ¾ in. NPT or Signet fi ttings 3-2734-HF-01159 001 777HF Resistant, Flat pH Electrode + Memory Chip, DryLoc, PT1000, ISO 7/1-R¾ or Signet fi ttings 3-2736-00159 001 778Bulb pH Electrode + Memory Chip, DryLoc, PT1000, ¾ in. NPT or Signet fi ttings 3-2736-01159 001 779Bulb pH Electrode + Memory Chip, DryLoc, PT1000, ISO 7/1-R¾ or Signet fi ttings3-2736-HF-00159 001 780HF Resistant, Bulb pH Electrode + Memory Chip, DryLoc, PT1000, ¾ in. NPT or Signet fi ttings 3-2736-HF-01159 001 781HF Resistant, Bulb pH Electrode + Memory Chip, DryLoc, PT1000, ISO 7/1-R¾ or Signet fi ttings 3-2756-WT 159 000 834Electrode, pH (glass body), DryLoc, bulb, PT1000, wet-tap 3-2756-WTP159 001 390Electrode, pH (plastic body), DryLoc, bulb, PT1000, wet-tap3-2764-2159 000 944Differential electrode, pH, DryLoc, fl at, PT1000, 1 in. NPT process connection 3-2766-2159 000 950Differential electrode, pH, DryLoc, bulb, PT1000, 1 in. NPT process connection 3-2774-1 159 000 956Electrode, pH, DryLoc, fl at, PT1000, ¾ in. NPT process connection 3-2776-1159 000 960Electrode, pH, DryLoc, bulb, PT1000, ¾ in. NPT process connection DryLoc ORP (Redox) Electrodes 3-2725-60159 001 561Flat ORP Electrode, DryLoc, 10K Ω ID, ¾ in. NPT or Signet fi ttings 3-2725-61159 001 562Flat ORP Electrode, DryLoc, 10K Ω ID, ISO 7/1-R¾ or Signet fi ttings 3-2735-60159 001 782Flat ORP Electrode, DryLoc, 10K Ω ID, ¾ in. NPT or Signet fi ttings 3-2735-61159 001 783Flat ORP Electrode, DryLoc, 10K Ω ID, ISO 7/1-R¾ or Signet fi ttings 3-2757-WT 159 000 835Electrode, ORP (glass body), DryLoc, bulb, 10K Ω ID, Wet-T ap 3-2757-WTP 159 001 391Electrode, ORP (plastic body), DryLoc, bulb, 10K Ω ID, Wet-T ap 3-2765-1159 000 946Differential electrode, ORP , DryLoc, fl at, 10K Ω ID, 1 in. NPT process connection 3-2767-1159 000 952Differential electrode, ORP , DryLoc, bulb, 10K Ω ID, 1 in. NPT process connection 3-2775159 000 957Electrode, ORP , DryLoc, fl at, 10K Ω ID, ¾ in. NPT process connection 3-2777159 000 961Electrode, ORP , DryLoc, bulb, 10 K Ω ID, ¾ in. NPT process connectionOrdering Information。

Rudolph Autopol III S2 PolarimeterUser’s GuideVersion 1.0Edited by Dr. Hartmut G. Hedderich4/20/2022The following guide describes the use of the Rudolph Autopol III Polarimeter. The guide is intended to assist instrument users after the initial training session.Rudolph Autopol III Polarimeter –User’s Guide, Ver.1.0edited by Dr. Hartmut G. HedderichThe Rudolph Autopol III Polarimeter measures:•Optical rotation of a compound (required input: pathlength in mm)•Specific rotation of a compound (required input: pathlength in mm and concentration in g/100ml)1. HardwareThe instrument is depicted above. It has a chamber for the polarimeter cell, which can take cells up to 200mm length. It can handle center fill and flow-through tubes. Steel rails position the cell accurately in the optical path. The instrument has a build-in temperature probe (range 10° to 100°C).The Autopol III has two light sources providing 589nm (sodium line) and 546nm (mercury line) wavelengths. The measurement range for optical rotation is ±89° with a resolution of 0.001° arc and ±999.99° arc for specific optical rotation (0-99.9% concentration). The accuracy is 0.002° arc up to 1° as well as 0.2% above 1°.The instrument is controlled via a touch screen (imbedded Windows 7 OS).The user provides a polarimeter cell for the measurements. RIC does not have cells for general use.2. PrinciplesThe polarimeter measures the optical activity of organic and inorganic compounds in solution. Plane-polarized light passes through a solution containing the compound of interest and the light rotation is measured. The degree of rotation depends on the structure and concentration of chiral molecules in solution.The specific rotation is defined as:[α]λT=αλT c · lwith [α] = specific rotationα = observed rotation in degree arcl = pathlength in dm (decimeter)c = concentration in g/100ml (or density for neat liquids)T = temperature in °Cand λ = wavelength of measurement3. StartupRemove dust cloth. Turn the instrument on and wait for 10 minutes to allow the instrument to warm up.The screen looks as follows:Optical Rotation: Specific Rotation:• Press Zero to zero the instrument• Select the desired wavelength by pressing the Wavelength key. The default is the589nm sodium D line, second option is the 546nm mercury line.• Press Scale to select the measurement mode:o Optical Rotation (input pathlength in mm)o Specific Rotation (input pathlength and concentration in g/100ml)• Fill a clean(!) cell with your solvent. Place cell in instrument and press Zero to removeany influence of your solvent to your measurement.• Remove and clean cell carefully. Dry cell.• Fill the cell with your sample solution and place in instrument. Make sure that you haveno bubbles in your solution!• Press Start and record the measurement.• Remove cell. Clean and dry cell for further measurements.•When finished with your measurements please turn the instrument off and put dust cloth over the instrument.4. Problems with measurementThere are two different kind of problems that you can observe:•Polarimetric Imbalance:o Physical or chemical changes within the sample (i.e.: reactions, T changes)o Voltage fluctuationso Changing wavelengths with cell in sample chambero Noise contribution from light source, PMT, sample absorption, sample scattering•Sample Errors:o Particulate mattero Air bubbles (!)o Incomplete mixing of sample in solvento Thermal gradients5. Notes。

VISUAL COMPONENTS [ APPS ] Visual Components Experience Guide Visual Components Experience 1.6 | Version: November, 2021Visual Components Experience is a standalone application that allows you to view 3D simulations and experience them in virtual reality. Simulations can be recorded as animations using any Visual Components 4.1.X or higher product. ContentsSupported Devices (2)Setup (3)Supported File Types (4)Controls (5)Virtual Reality (6)Experience 3D Viewing (10)Experience Virtual Reality (11)Interactive VR (12)Advanced Settings (12)Support****************************ForumSupported devicesWindows OS▪Any device running Windows 8.1 or 10 can be used for viewing 3D simulations▪Refer to the minimum requirements for a Visual Components 4.x producthttps:///system-requirements▪An alternative for viewing 3D simulations is the mobile version of Visual Components Experience. Compatible VR DevicesVisual Components Experience relies on SteamVR for virtual reality functionality. Any Head- mounted Display (HMD) that is supported by SteamVR should also support VC Experience. However, this is not guaranteed, and using one of the tested and verified devices listed below is recommended.Tested VR DevicesNote that if your computer has a Mini DisplayPort, you need to use a Mini DisplayPort cable. Based on field tests and feedback, adapters may not work.•HTC Vive and Vive Pro•Oculus Rift S•Samsung HMD Odysseyo Uses Microsoft Windows Mixed Realityo See section Using Samsung HMD Odyssey+ for more details.•Valve IndexSetupFor viewing 3D simulations, install Visual Components Experience on your device here: https:///products/downloadsFor virtual reality, this guide assumes that you are using HTC Vive. For all other devices, refer to t he manufacturer on how to install new apps, set up the device, and interact with VR objects.1.Set up your device according to the manufacturer’s instructions.2.Install Steam onto the device.For more information, see /about.3.Install SteamVR as follows:a.Run Steam.b.In Steam, go to Library > Tools and then search for SteamVR.c.Right-click SteamVR and click Install Game.Supported File TypesVisual Components Experience allows you to open and play VCAX files. A VCAX file is a container for a 3D simulation recorded as an animation using a Visual Components 4.x product.To create a VCAX file, see the Record a Simulation as Animation tutorial:▪To watch the tutorial from Visual Components Academy, go tohttps:///lessons/record-a-simulation-as-animation/▪To download the tutorial as video, go to http://bit.ly/2AezlWCYou can double-click a VCAX file on your device to automatically open it in Visual Components Experience.Otherwise, you need to add VCAX files to the following folder to list them in the app: C:\Users\%username%\Documents\Visual Components\ExperienceControls 3D Viewing1.Select animation allows you to select and open a VCAX file in the My Animations folder of your Visual Components documents.2.Viewport displays the 3D scene and animation.3.About displays app information.4.Quality Settings displays a dialog for controlling the level of detail (LOD) and quality level of the viewport. The frame rate (FPS) of the scene is also indicated based on the current settings.5.Slider and Thumb show the positionof animation and allow you to jump forward or backward in time.6.Reset returns animation to its initial state and time of zero.7.Play allows you to start or stop animation.8.Time shows the position (in seconds) of animation followed by its duration.9.Playback speed can be changed toplay the animation slower or faster.Virtual realityMain Menu1.Select animation allows you to select and open a VCAX file in the My Animationsfolder of your Visual Components documents.2.1:1 scales components to their original size.3.Reset returns animation to its initial state and time of zero.4.Slider and Thumb show the position of animation and allow you to jump forward orbackward in time.5.Time shows the position (in seconds) of animation followed by its duration..6.Ray is the pointer of a connected joystick that can be used for selecting objects andmenu items.7.1:10 scales components to 1/10th of their original size.8.On Table scales components to HTC Vive play area.9.Play alows you to start or stop animation.10.Quality Settings displays a dialog for controlling the level of detail (LOD) and qualitylevel of the viewport. The frame rate (FPS) of the scene is also indicated based on the current settings.11.About displays app information.12.Playback speed can be changed to play the animation slower or faster.HeadsetA headset allows you to look around in the scene. You must connect the headset to SteamVRbefore using Visual Components Experience in Virtual Reality mode.Default bindings of controlsThe following tables show what happens by default when you use the controllers in VC Experience. Note that you can also customize the bindings according to your needs.Some actions can send data from Visual Components Experience to the Visual Components 4.4 application, provided that you have the layout open in Visual Components 4.4. Note that sending data also requires setting up a Python script with vcVREvent statements.GripJoystickNote that you need to have your joystick connected to SteamVR to use the joystick for interacting with objects in the scene.Menu buttonMixed reality controllersLeft triggerRight triggerTrackpadUsing Samsung HMD Odyssey+ with Visual Components Experience To use the Samsung HMD Odyssey with VC Experience, you need to also install Windows Mixed Reality for SteamVR from the Steam store.When you want to use the device with VC Experience, launch the Windows Mixed Reality for SteamVR and then launch Visual Components Experience in VR mode.Viewing 3D simulations1.Run Visual Components Experience.2.Click 3D.3.Click Select animation and select an animation to load it in the scene.4.Do any of the following as needed:▪To remove the animation, in Select animation, click <Clear>.▪To return to the default view, in Select animation, click <Reset View>.▪To orbit the camera in the scene, press and hold the right mouse button.▪To pan the camera in the scene, press and hold the left and right mouse buttons.▪To zoom the camera in the scene, rotate the mouse wheel.| PAGE 10 OF 12 |ExPErIENCE 3d VIEwINGExPErIENCE VIrTUAL rEALITy | PAGE 11 OF 12 |Use the virtual reality mode1. Run SteamVR, and then connect your headset and joystick(s).2. Run Visual Components Experience.3. Click VR .4. With the joystick, press the Menu button, cast a ray, and use Select animationto load an animation in the scene. 5. Do any of the following as needed:▪ To scale components, use the main menu. Generally, you would use 1:10 to view a large scene or On Table to walk around and view a scene.▪ To remove the animation, in Select animation , click <Clear>.▪ To return to the default view, in Select animation , click <Reset View>.| PAGE 12 OF 12 |Interactive VRInteractive VR requires Visual Components Premium 4.2 or higher product. Animation streaming is required to interact with components in VR. See the Academy lesson Streaming Simulation to VR on how to enable animation streaming.For details on using interactive VR, check out the Academy tutorials. Components that enable interactive VR are found in eCatalog directory VR Interaction.Advanced users should see the Python API documentation for vcVREvents. Advanced SettingsOn the launcher, you have the option to specify Advanced Settings related to animation streaming and Anti-Aliasing.Streaming Host is the IP address of the computer where the VC Premium application is running. If VC Premium and VC Experience are running on the same machine, then IP-address 127.0.0.1. Streaming Port must match the port defined in VC Premium.Anti-aliasing settings can be changed by modifying the Antialiasing mode and Antialiasing FXAA (Fast Approximate Anti-Aliasing) options.。
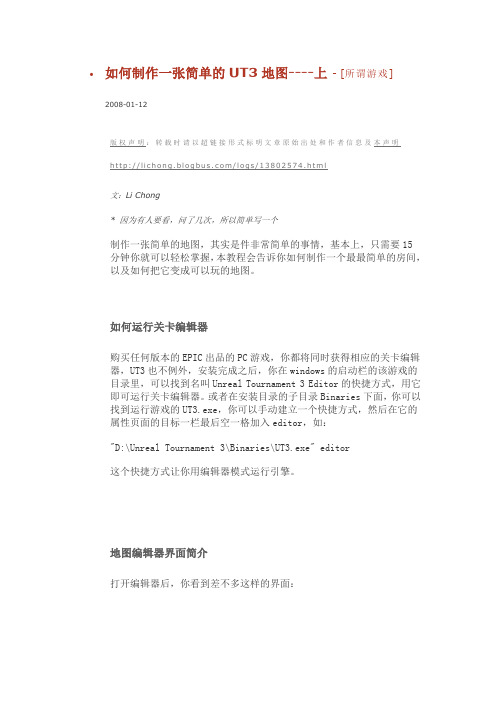
如何制作一张简单的UT3地图----上- [所谓游戏] 2008-01-12版权声明:转载时请以超链接形式标明文章原始出处和作者信息及本声明h t t p://l i c h o n g.b l o g b u s.c o m/l o g s/13802574.h t m l文:Li Chong* 因为有人要看,问了几次,所以简单写一个制作一张简单的地图,其实是件非常简单的事情,基本上,只需要15分钟你就可以轻松掌握,本教程会告诉你如何制作一个最最简单的房间,以及如何把它变成可以玩的地图。
如何运行关卡编辑器购买任何版本的EPIC出品的PC游戏,你都将同时获得相应的关卡编辑器,UT3也不例外,安装完成之后,你在windows的启动栏的该游戏的目录里,可以找到名叫Unreal Tournament 3 Editor的快捷方式,用它即可运行关卡编辑器。
或者在安装目录的子目录Binaries下面,你可以找到运行游戏的UT3.exe,你可以手动建立一个快捷方式,然后在它的属性页面的目标一栏最后空一格加入editor,如:"D:\Unreal Tournament 3\Binaries\UT3.exe" editor这个快捷方式让你用编辑器模式运行引擎。
地图编辑器界面简介打开编辑器后,你看到差不多这样的界面:标题栏下面是菜单栏,基本上所有的可视化操作,在菜单里都有对应的选项。
菜单栏下面一行,是一系列重要菜单命令的对应按钮。
整个编辑器最左边的两竖列按钮,是关卡地理场景对应的操作,包括镜头,对BSP的操作等等。
中间四个小窗口,是显示关卡场景的窗口,叫做Viewport,分别对应顶视图、前视图、侧视图和透视图,这个和很多三维软件是一样的。
建立和保存地图在打开编辑器的同时,其实就已经新建了一个空白地图,在UE3的编辑器UED4中,默认的地图世界是一片虚无,你需要往里面添加东西,比如说地板墙壁,才能构建出场景。
Bluetooth® mesh SDK 3.0.6.0 GAGecko SDK Suite 4.1September 13, 2023Bluetooth mesh is a new topology available for Bluetooth Low Energy (LE) devices that Array enables many-to-many (m:m) communication. It's optimized for creating large-scale de-vice networks, and is ideally suited for building automation, sensor networks, and assettracking. Our software and SDK for Bluetooth development supports Bluetooth Mesh andBluetooth 5.3 functionality. Developers can add mesh networking communication to LEdevices such as connected lights, home automation, and asset tracking systems. Thesoftware also supports Bluetooth beaconing, beacon scanning, and GATT connections soBluetooth mesh can connect to smart phones, tablets, and other Bluetooth LE devices.These release notes cover SDK versions:3.0.6.0 released September 13, 2023 (underlying platform changes only)3.0.5.0 released June 28, 2023 (support for EFR32xG21, Revision C and later)3.0.4.0 released January 18, 20233.0.3.0 released October 19, 2022 (early access part support)3.0.2.0 released September 28, 20223.0.1.0 released August 17, 20223.0.0.0 released June 8, 2022Compatibility and Use NoticesFor more information about security updates and notices, see the Security chapter of the Gecko Platform Release notes installed with this SDK or on the Silicon Labs Release Notes page. Silicon Labs also strongly recommends that you subscribe to Security Advisories for up-to-date information. For instructions, or if you are new to the Silicon Labs Bluetooth mesh SDK, see Using This Release. Compatible Compilers:IAR Embedded Workbench for ARM (IAR-EWARM) version 9.20.4•Using wine to build with the IarBuild.exe command line utility or IAR Embedded Workbench GUI on macOS or Linux could result inincorrect files being used due to collisions in wine’s hashing algorithm for generating short file names.•Customers on macOS or Linux are advised not to build with IAR outside of Simplicity Studio. Customers who do should carefully verify that the correct files are being used.GCC (The GNU Compiler Collection) version 10.3-2021.10, provided with Simplicity Studio.•Link-time optimization feature of GCC has been disabled, resulting in a slight increase of image size.Contents Contents1New Items (2)1.1New Features (2)1.2New APIs (2)2Improvements (3)3Fixed Issues (4)4Known Issues in the Current Release (5)5Deprecated Items (6)6Removed Items (7)7Using This Release (8)7.1Installation and Use (8)7.2Security Information (8)7.3Support (9)New Items 1 New Items1.1 New FeaturesAdded in release 3.0.0.0New Development ToolsMore user-friendly filtering for Software Examples in Simplicity StudioNew Hardware SupportSupport was added for xGM240P PCB Modules and BG22/BGM220 Explorer Kits.1.2 New APIsNoneImprovements 2 ImprovementsThe supported complier versions have been updated. GCC version 10.3-2021.10 and IAR version 9.20.4 are now supported.The flash footprint of the Mesh stack implementation has been reduced by optimization of structures and removal of unnecessary de-pendencies between components. Exact reduction depends on the features used by the project.Fixed Issues 3 Fixed IssuesFixed in release 3.0.4.01064324 Fixed an issue with factory reset on embedded provisioner with Series 1 devices.1081419 Fixed transport layer segmentation timing calculations.Fixed in release 3.0.2.0465318 Fixed the issue with periodic publishing and publish retransmissions not working simultaneously.1015385 Fixed GATT proxy server advertisement restart after proxy client disconnection.1017565, 650825 Publish retransmissions issue fixed for generic models and lighting models, as well as Time Server model. 1024154 Perform a full reset of Series 2 device when Config Reset message is processed and the device is reset. 1024849 Fixed an issue with Scheduler actions not triggering after a power cycle.1024851 Fixed an issue with Scheduler repeated events being one hour late.1032627 Discard broken advertisement indications before attempting to decrypt instead of after.Fixed in release 3.0.1.0818000 Corrected an issue with Light LC model PTS tests where reported lightness values were off by a small amount.844593, 846010, 846598, 849377 Increased call stack of all applications to avoid running out of call stack when GATT proxy or GATT provisioning is in use.Fixed in release 3.0.0.0764197 Set the default friend queue size to be a power of two.818395 Fixed a potential crash in a situation where persistent storage contains more data than the project is configured to handle (e.g., after a firmware update without a factory reset).818523 Corrected the check that the key used for publication is bound to the model to include virtual address publication as well.831921 Fixed a regression with cleaning up the provisioning session after link failure.833535 Updated the list of property IDs to contain the full current list of properties.Known Issues in the Current Release 4 Known Issues in the Current ReleaseIssues in bold were added since the previous release.401550 No BGAPI event for segmented message handlingfailure Application needs to deduce failure from timeout / lack of application layer response; for vendor models an API has been provided454059 A large number of key refresh state change eventsare generated at the end of KR process, and that mayflood NCP queueIncrease NCP queue length in the project454061 Slight performance degradation compared to 1.5 inround-trip latency tests was observed624514 Issue with re-establishing connectable advertising ifall connections have been active and GATT proxy isin useAllocate one more connection than is needed841360 Poor performance of segmented messagetransmission over GATT bearer Ensure that the underlying BLE connection’s Connection interval is short; ensure that ATT MTU is large enough to fit a full Mesh PDU; tune the minimum connection event length to allow multiple LL packets to be transmitted per connection event.1013958Mesh stack and BLE API that specifically used legacy,extended, or periodic advertisements cannot be usedtogether Write the BLE application so that it uses the old BGAPI for advertisements.Deprecated Items 5 Deprecated ItemsNoneRemoved Items 6 Removed ItemsRemoved in release 3.0.0.0The deprecated BGAPI command sl_btmesh_node_erase_mesh_nvm() has been removed. Use sl_btmesh_node_reset() instead.7 Using This ReleaseThis release contains the following•Silicon Labs Bluetooth mesh stack library•Bluetooth mesh sample applicationsIf you are a first time user, see QSG176: Silicon Labs Bluetooth Mesh SDK v2.x Quick-Start Guide.7.1 Installation and UseThe Bluetooth mesh SDK is provided as part of the Gecko SDK (GSDK), the suite of Silicon Labs SDKs. To quickly get started with the GSDK, install Simplicity Studio 5, which will set up your development environment and walk you through GSDK installation. Simplicity Studio 5 includes everything needed for IoT product development with Silicon Labs devices, including a resource and project launcher, software configuration tools, full IDE with GNU toolchain, and analysis tools. Installation instructions are provided in the online Simplicity Studio 5 User’s Guide.Alternatively, Gecko SDK may be installed manually by downloading or cloning the latest from GitHub. See https:///Sili-conLabs/gecko_sdk for more information.The GSDK default install location has changed beginning with Simplicity Studio 5.3.•Windows: C:\Users\<NAME>\SimplicityStudio\SDKs\gecko_sdk•MacOS: /Users/<NAME>/SimplicityStudio/SDKs/gecko_sdkDocumentation specific to the SDK version is installed with the SDK. Additional information can often be found in the knowledge base articles (KBAs). API references and other information about this and earlier releases is available on https:///.7.2 Security InformationSecure Vault IntegrationThis version of the stack is integrated with Secure Vault Key Management. When deployed to Secure Vault High devices, mesh encryption keys are protected using the Secure Vault Key Management functionality. The table below shows the protected keys and their storage protection characteristics.Network key Exportable Exportable Derivations of the network key exist only in RAM while network keys are stored on flashApplication key Non-exportable ExportableDevice key Non-exportable Exportable In Provisioner’s case, applied to Provisionerr’s own device key as well as other devices’ keysKeys that are marked as “Non-Exportable” can be used but cannot be viewed or shared at runtime.Keys that are marked as “Exportable” can be used or shared at runtime but remain encrypted while stored in flash. For more information on Secure Vault Key Management functionality, see AN1271: Secure Key StorageSecurity AdvisoriesTo subscribe to Security Advisories, log in to the Silicon Labs customer portal, then select Account Home. Click HOME to go to the portal home page and then click the Manage Notifications tile. Make sure that ‘Software/Security Advisory Notices & Product Change Notices (PCNs)’ is checked, and that you are subscribed at minimum for your platform and protocol. Click Save to save any changes.7.3 SupportDevelopment Kit customers are eligible for training and technical support. Use the Silicon Labs Bluetooth mesh web page to obtain information about all Silicon Labs Bluetooth products and services, and to sign up for product support.Contact Silicon Laboratories support at /support.Silicon Laboratories Inc.400 West Cesar Chavez Austin, TX 78701USA IoT Portfolio /IoT SW/HW /simplicity Quality /quality Support & Community /communityDisclaimerSilicon Labs intends to provide customers with the latest, accurate, and in-depth documentation of all peripherals and modules available for system and software imple-menters using or intending to use the Silicon Labs products. Characterization data, available modules and peripherals, memory sizes and memory addresses refer to each specific device, and “Typical” parameters provided can and do vary in different applications. Application examples described herein are for illustrative purposes only. Silicon Labs reserves the right to make changes without further notice to the product information, specifications, and descriptions herein, and does not give warranties as to the accuracy or completeness of the included information. Without prior notification, Silicon Labs may update product firmware during the manufacturing process for security or reliability reasons. Such changes will not alter the specifications or the performance of the product. Silicon Labs shall have no liability for the consequences of use of the infor -mation supplied in this document. This document does not imply or expressly grant any license to design or fabricate any integrated circuits. The products are not designed or authorized to be used within any FDA Class III devices, applications for which FDA premarket approval is required or Life Support Systems without the specific written consent of Silicon Labs. A “Life Support System” is any product or system intended to support or sustain life and/or health, which, if it fails, can be reasonably expected to result in significant personal injury or death. Silicon Labs products are not designed or authorized for military applications. Silicon Labs products shall under no circumstances be used in weapons of mass destruction including (but not limited to) nuclear, biological or chemical weapons, or missiles capable of delivering such weapons. Silicon Labs disclaims all express and implied warranties and shall not be responsible or liable for any injuries or damages related to use of a Silicon Labs product in such unauthorized applications. Note: This content may contain offensive terminology that is now obsolete. Silicon Labs is replacing these terms with inclusive language wherever possible. For more information, visit /about-us/inclusive-lexicon-projectTrademark InformationSilicon Laboratories Inc.®, Silicon Laboratories ®, Silicon Labs ®, SiLabs ® and the Silicon Labs logo ®, Bluegiga ®, Bluegiga Logo ®, EFM ®, EFM32®, EFR, Ember ®, Energy Micro, Energy Micro logo and combinations thereof, “the world’s most energy friendly microcontrollers”, Redpine Signals ®, WiSeConnect , n-Link, ThreadArch ®, EZLink ®, EZRadio ®, EZRadioPRO ®, Gecko ®, Gecko OS, Gecko OS Studio, Precision32®, Simplicity Studio ®, Telegesis, the Telegesis Logo ®, USBXpress ® , Zentri, the Zentri logo and Zentri DMS, Z-Wave ®, and others are trademarks or registered trademarks of Silicon Labs. ARM, CORTEX, Cortex-M3 and THUMB are trademarks or registered trademarks of ARM Holdings. Keil is a registered trademark of ARM Limited. Wi-Fi is a registered trademark of the Wi-Fi Alliance. All other products or brand names mentioned herein are trademarks of their respective holders.。
DIRECTIVE NUMBER: CPL 02-00-150 EFFECTIVE DATE: April 22, 2011 SUBJECT: Field Operations Manual (FOM)ABSTRACTPurpose: This instruction cancels and replaces OSHA Instruction CPL 02-00-148,Field Operations Manual (FOM), issued November 9, 2009, whichreplaced the September 26, 1994 Instruction that implemented the FieldInspection Reference Manual (FIRM). The FOM is a revision of OSHA’senforcement policies and procedures manual that provides the field officesa reference document for identifying the responsibilities associated withthe majority of their inspection duties. This Instruction also cancels OSHAInstruction FAP 01-00-003 Federal Agency Safety and Health Programs,May 17, 1996 and Chapter 13 of OSHA Instruction CPL 02-00-045,Revised Field Operations Manual, June 15, 1989.Scope: OSHA-wide.References: Title 29 Code of Federal Regulations §1903.6, Advance Notice ofInspections; 29 Code of Federal Regulations §1903.14, Policy RegardingEmployee Rescue Activities; 29 Code of Federal Regulations §1903.19,Abatement Verification; 29 Code of Federal Regulations §1904.39,Reporting Fatalities and Multiple Hospitalizations to OSHA; and Housingfor Agricultural Workers: Final Rule, Federal Register, March 4, 1980 (45FR 14180).Cancellations: OSHA Instruction CPL 02-00-148, Field Operations Manual, November9, 2009.OSHA Instruction FAP 01-00-003, Federal Agency Safety and HealthPrograms, May 17, 1996.Chapter 13 of OSHA Instruction CPL 02-00-045, Revised FieldOperations Manual, June 15, 1989.State Impact: Notice of Intent and Adoption required. See paragraph VI.Action Offices: National, Regional, and Area OfficesOriginating Office: Directorate of Enforcement Programs Contact: Directorate of Enforcement ProgramsOffice of General Industry Enforcement200 Constitution Avenue, NW, N3 119Washington, DC 20210202-693-1850By and Under the Authority ofDavid Michaels, PhD, MPHAssistant SecretaryExecutive SummaryThis instruction cancels and replaces OSHA Instruction CPL 02-00-148, Field Operations Manual (FOM), issued November 9, 2009. The one remaining part of the prior Field Operations Manual, the chapter on Disclosure, will be added at a later date. This Instruction also cancels OSHA Instruction FAP 01-00-003 Federal Agency Safety and Health Programs, May 17, 1996 and Chapter 13 of OSHA Instruction CPL 02-00-045, Revised Field Operations Manual, June 15, 1989. This Instruction constitutes OSHA’s general enforcement policies and procedures manual for use by the field offices in conducting inspections, issuing citations and proposing penalties.Significant Changes∙A new Table of Contents for the entire FOM is added.∙ A new References section for the entire FOM is added∙ A new Cancellations section for the entire FOM is added.∙Adds a Maritime Industry Sector to Section III of Chapter 10, Industry Sectors.∙Revises sections referring to the Enhanced Enforcement Program (EEP) replacing the information with the Severe Violator Enforcement Program (SVEP).∙Adds Chapter 13, Federal Agency Field Activities.∙Cancels OSHA Instruction FAP 01-00-003, Federal Agency Safety and Health Programs, May 17, 1996.DisclaimerThis manual is intended to provide instruction regarding some of the internal operations of the Occupational Safety and Health Administration (OSHA), and is solely for the benefit of the Government. No duties, rights, or benefits, substantive or procedural, are created or implied by this manual. The contents of this manual are not enforceable by any person or entity against the Department of Labor or the United States. Statements which reflect current Occupational Safety and Health Review Commission or court precedents do not necessarily indicate acquiescence with those precedents.Table of ContentsCHAPTER 1INTRODUCTIONI.PURPOSE. ........................................................................................................... 1-1 II.SCOPE. ................................................................................................................ 1-1 III.REFERENCES .................................................................................................... 1-1 IV.CANCELLATIONS............................................................................................. 1-8 V. ACTION INFORMATION ................................................................................. 1-8A.R ESPONSIBLE O FFICE.......................................................................................................................................... 1-8B.A CTION O FFICES. .................................................................................................................... 1-8C. I NFORMATION O FFICES............................................................................................................ 1-8 VI. STATE IMPACT. ................................................................................................ 1-8 VII.SIGNIFICANT CHANGES. ............................................................................... 1-9 VIII.BACKGROUND. ................................................................................................. 1-9 IX. DEFINITIONS AND TERMINOLOGY. ........................................................ 1-10A.T HE A CT................................................................................................................................................................. 1-10B. C OMPLIANCE S AFETY AND H EALTH O FFICER (CSHO). ...........................................................1-10B.H E/S HE AND H IS/H ERS ..................................................................................................................................... 1-10C.P ROFESSIONAL J UDGMENT............................................................................................................................... 1-10E. W ORKPLACE AND W ORKSITE ......................................................................................................................... 1-10CHAPTER 2PROGRAM PLANNINGI.INTRODUCTION ............................................................................................... 2-1 II.AREA OFFICE RESPONSIBILITIES. .............................................................. 2-1A.P ROVIDING A SSISTANCE TO S MALL E MPLOYERS. ...................................................................................... 2-1B.A REA O FFICE O UTREACH P ROGRAM. ............................................................................................................. 2-1C. R ESPONDING TO R EQUESTS FOR A SSISTANCE. ............................................................................................ 2-2 III. OSHA COOPERATIVE PROGRAMS OVERVIEW. ...................................... 2-2A.V OLUNTARY P ROTECTION P ROGRAM (VPP). ........................................................................... 2-2B.O NSITE C ONSULTATION P ROGRAM. ................................................................................................................ 2-2C.S TRATEGIC P ARTNERSHIPS................................................................................................................................. 2-3D.A LLIANCE P ROGRAM ........................................................................................................................................... 2-3 IV. ENFORCEMENT PROGRAM SCHEDULING. ................................................ 2-4A.G ENERAL ................................................................................................................................................................. 2-4B.I NSPECTION P RIORITY C RITERIA. ..................................................................................................................... 2-4C.E FFECT OF C ONTEST ............................................................................................................................................ 2-5D.E NFORCEMENT E XEMPTIONS AND L IMITATIONS. ....................................................................................... 2-6E.P REEMPTION BY A NOTHER F EDERAL A GENCY ........................................................................................... 2-6F.U NITED S TATES P OSTAL S ERVICE. .................................................................................................................. 2-7G.H OME-B ASED W ORKSITES. ................................................................................................................................ 2-8H.I NSPECTION/I NVESTIGATION T YPES. ............................................................................................................... 2-8 V.UNPROGRAMMED ACTIVITY – HAZARD EVALUATION AND INSPECTION SCHEDULING ............................................................................ 2-9 VI.PROGRAMMED INSPECTIONS. ................................................................... 2-10A.S ITE-S PECIFIC T ARGETING (SST) P ROGRAM. ............................................................................................. 2-10B.S CHEDULING FOR C ONSTRUCTION I NSPECTIONS. ..................................................................................... 2-10C.S CHEDULING FOR M ARITIME I NSPECTIONS. ............................................................................. 2-11D.S PECIAL E MPHASIS P ROGRAMS (SEP S). ................................................................................... 2-12E.N ATIONAL E MPHASIS P ROGRAMS (NEP S) ............................................................................... 2-13F.L OCAL E MPHASIS P ROGRAMS (LEP S) AND R EGIONAL E MPHASIS P ROGRAMS (REP S) ............ 2-13G.O THER S PECIAL P ROGRAMS. ............................................................................................................................ 2-13H.I NSPECTION S CHEDULING AND I NTERFACE WITH C OOPERATIVE P ROGRAM P ARTICIPANTS ....... 2-13CHAPTER 3INSPECTION PROCEDURESI.INSPECTION PREPARATION. .......................................................................... 3-1 II.INSPECTION PLANNING. .................................................................................. 3-1A.R EVIEW OF I NSPECTION H ISTORY .................................................................................................................... 3-1B.R EVIEW OF C OOPERATIVE P ROGRAM P ARTICIPATION .............................................................................. 3-1C.OSHA D ATA I NITIATIVE (ODI) D ATA R EVIEW .......................................................................................... 3-2D.S AFETY AND H EALTH I SSUES R ELATING TO CSHO S.................................................................. 3-2E.A DVANCE N OTICE. ................................................................................................................................................ 3-3F.P RE-I NSPECTION C OMPULSORY P ROCESS ...................................................................................................... 3-5G.P ERSONAL S ECURITY C LEARANCE. ................................................................................................................. 3-5H.E XPERT A SSISTANCE. ........................................................................................................................................... 3-5 III. INSPECTION SCOPE. ......................................................................................... 3-6A.C OMPREHENSIVE ................................................................................................................................................... 3-6B.P ARTIAL. ................................................................................................................................................................... 3-6 IV. CONDUCT OF INSPECTION .............................................................................. 3-6A.T IME OF I NSPECTION............................................................................................................................................. 3-6B.P RESENTING C REDENTIALS. ............................................................................................................................... 3-6C.R EFUSAL TO P ERMIT I NSPECTION AND I NTERFERENCE ............................................................................. 3-7D.E MPLOYEE P ARTICIPATION. ............................................................................................................................... 3-9E.R ELEASE FOR E NTRY ............................................................................................................................................ 3-9F.B ANKRUPT OR O UT OF B USINESS. .................................................................................................................... 3-9G.E MPLOYEE R ESPONSIBILITIES. ................................................................................................. 3-10H.S TRIKE OR L ABOR D ISPUTE ............................................................................................................................. 3-10I. V ARIANCES. .......................................................................................................................................................... 3-11 V. OPENING CONFERENCE. ................................................................................ 3-11A.G ENERAL ................................................................................................................................................................ 3-11B.R EVIEW OF A PPROPRIATION A CT E XEMPTIONS AND L IMITATION. ..................................................... 3-13C.R EVIEW S CREENING FOR P ROCESS S AFETY M ANAGEMENT (PSM) C OVERAGE............................. 3-13D.R EVIEW OF V OLUNTARY C OMPLIANCE P ROGRAMS. ................................................................................ 3-14E.D ISRUPTIVE C ONDUCT. ...................................................................................................................................... 3-15F.C LASSIFIED A REAS ............................................................................................................................................. 3-16VI. REVIEW OF RECORDS. ................................................................................... 3-16A.I NJURY AND I LLNESS R ECORDS...................................................................................................................... 3-16B.R ECORDING C RITERIA. ...................................................................................................................................... 3-18C. R ECORDKEEPING D EFICIENCIES. .................................................................................................................. 3-18 VII. WALKAROUND INSPECTION. ....................................................................... 3-19A.W ALKAROUND R EPRESENTATIVES ............................................................................................................... 3-19B.E VALUATION OF S AFETY AND H EALTH M ANAGEMENT S YSTEM. ....................................................... 3-20C.R ECORD A LL F ACTS P ERTINENT TO A V IOLATION. ................................................................................. 3-20D.T ESTIFYING IN H EARINGS ................................................................................................................................ 3-21E.T RADE S ECRETS. ................................................................................................................................................. 3-21F.C OLLECTING S AMPLES. ..................................................................................................................................... 3-22G.P HOTOGRAPHS AND V IDEOTAPES.................................................................................................................. 3-22H.V IOLATIONS OF O THER L AWS. ....................................................................................................................... 3-23I.I NTERVIEWS OF N ON-M ANAGERIAL E MPLOYEES .................................................................................... 3-23J.M ULTI-E MPLOYER W ORKSITES ..................................................................................................................... 3-27 K.A DMINISTRATIVE S UBPOENA.......................................................................................................................... 3-27 L.E MPLOYER A BATEMENT A SSISTANCE. ........................................................................................................ 3-27 VIII. CLOSING CONFERENCE. .............................................................................. 3-28A.P ARTICIPANTS. ..................................................................................................................................................... 3-28B.D ISCUSSION I TEMS. ............................................................................................................................................ 3-28C.A DVICE TO A TTENDEES .................................................................................................................................... 3-29D.P ENALTIES............................................................................................................................................................. 3-30E.F EASIBLE A DMINISTRATIVE, W ORK P RACTICE AND E NGINEERING C ONTROLS. ............................ 3-30F.R EDUCING E MPLOYEE E XPOSURE. ................................................................................................................ 3-32G.A BATEMENT V ERIFICATION. ........................................................................................................................... 3-32H.E MPLOYEE D ISCRIMINATION .......................................................................................................................... 3-33 IX. SPECIAL INSPECTION PROCEDURES. ...................................................... 3-33A.F OLLOW-UP AND M ONITORING I NSPECTIONS............................................................................................ 3-33B.C ONSTRUCTION I NSPECTIONS ......................................................................................................................... 3-34C. F EDERAL A GENCY I NSPECTIONS. ................................................................................................................. 3-35CHAPTER 4VIOLATIONSI. BASIS OF VIOLATIONS ..................................................................................... 4-1A.S TANDARDS AND R EGULATIONS. .................................................................................................................... 4-1B.E MPLOYEE E XPOSURE. ........................................................................................................................................ 4-3C.R EGULATORY R EQUIREMENTS. ........................................................................................................................ 4-6D.H AZARD C OMMUNICATION. .............................................................................................................................. 4-6E. E MPLOYER/E MPLOYEE R ESPONSIBILITIES ................................................................................................... 4-6 II. SERIOUS VIOLATIONS. .................................................................................... 4-8A.S ECTION 17(K). ......................................................................................................................... 4-8B.E STABLISHING S ERIOUS V IOLATIONS ............................................................................................................ 4-8C. F OUR S TEPS TO BE D OCUMENTED. ................................................................................................................... 4-8 III. GENERAL DUTY REQUIREMENTS ............................................................. 4-14A.E VALUATION OF G ENERAL D UTY R EQUIREMENTS ................................................................................. 4-14B.E LEMENTS OF A G ENERAL D UTY R EQUIREMENT V IOLATION.............................................................. 4-14C. U SE OF THE G ENERAL D UTY C LAUSE ........................................................................................................ 4-23D.L IMITATIONS OF U SE OF THE G ENERAL D UTY C LAUSE. ..............................................................E.C LASSIFICATION OF V IOLATIONS C ITED U NDER THE G ENERAL D UTY C LAUSE. ..................F. P ROCEDURES FOR I MPLEMENTATION OF S ECTION 5(A)(1) E NFORCEMENT ............................ 4-25 4-27 4-27IV.OTHER-THAN-SERIOUS VIOLATIONS ............................................... 4-28 V.WILLFUL VIOLATIONS. ......................................................................... 4-28A.I NTENTIONAL D ISREGARD V IOLATIONS. ..........................................................................................4-28B.P LAIN I NDIFFERENCE V IOLATIONS. ...................................................................................................4-29 VI. CRIMINAL/WILLFUL VIOLATIONS. ................................................... 4-30A.A REA D IRECTOR C OORDINATION ....................................................................................................... 4-31B.C RITERIA FOR I NVESTIGATING P OSSIBLE C RIMINAL/W ILLFUL V IOLATIONS ........................ 4-31C. W ILLFUL V IOLATIONS R ELATED TO A F ATALITY .......................................................................... 4-32 VII. REPEATED VIOLATIONS. ...................................................................... 4-32A.F EDERAL AND S TATE P LAN V IOLATIONS. ........................................................................................4-32B.I DENTICAL S TANDARDS. .......................................................................................................................4-32C.D IFFERENT S TANDARDS. .......................................................................................................................4-33D.O BTAINING I NSPECTION H ISTORY. .....................................................................................................4-33E.T IME L IMITATIONS..................................................................................................................................4-34F.R EPEATED V. F AILURE TO A BATE....................................................................................................... 4-34G. A REA D IRECTOR R ESPONSIBILITIES. .............................................................................. 4-35 VIII. DE MINIMIS CONDITIONS. ................................................................... 4-36A.C RITERIA ................................................................................................................................................... 4-36B.P ROFESSIONAL J UDGMENT. ..................................................................................................................4-37C. A REA D IRECTOR R ESPONSIBILITIES. .............................................................................. 4-37 IX. CITING IN THE ALTERNATIVE ............................................................ 4-37 X. COMBINING AND GROUPING VIOLATIONS. ................................... 4-37A.C OMBINING. ..............................................................................................................................................4-37B.G ROUPING. ................................................................................................................................................4-38C. W HEN N OT TO G ROUP OR C OMBINE. ................................................................................................4-38 XI. HEALTH STANDARD VIOLATIONS ....................................................... 4-39A.C ITATION OF V ENTILATION S TANDARDS ......................................................................................... 4-39B.V IOLATIONS OF THE N OISE S TANDARD. ...........................................................................................4-40 XII. VIOLATIONS OF THE RESPIRATORY PROTECTION STANDARD(§1910.134). ....................................................................................................... XIII. VIOLATIONS OF AIR CONTAMINANT STANDARDS (§1910.1000) ... 4-43 4-43A.R EQUIREMENTS UNDER THE STANDARD: .................................................................................................. 4-43B.C LASSIFICATION OF V IOLATIONS OF A IR C ONTAMINANT S TANDARDS. ......................................... 4-43 XIV. CITING IMPROPER PERSONAL HYGIENE PRACTICES. ................... 4-45A.I NGESTION H AZARDS. .................................................................................................................................... 4-45B.A BSORPTION H AZARDS. ................................................................................................................................ 4-46C.W IPE S AMPLING. ............................................................................................................................................. 4-46D.C ITATION P OLICY ............................................................................................................................................ 4-46 XV. BIOLOGICAL MONITORING. ...................................................................... 4-47CHAPTER 5CASE FILE PREPARATION AND DOCUMENTATIONI.INTRODUCTION ............................................................................................... 5-1 II.INSPECTION CONDUCTED, CITATIONS BEING ISSUED. .................... 5-1A.OSHA-1 ................................................................................................................................... 5-1B.OSHA-1A. ............................................................................................................................... 5-1C. OSHA-1B. ................................................................................................................................ 5-2 III.INSPECTION CONDUCTED BUT NO CITATIONS ISSUED .................... 5-5 IV.NO INSPECTION ............................................................................................... 5-5 V. HEALTH INSPECTIONS. ................................................................................. 5-6A.D OCUMENT P OTENTIAL E XPOSURE. ............................................................................................................... 5-6B.E MPLOYER’S O CCUPATIONAL S AFETY AND H EALTH S YSTEM. ............................................................. 5-6 VI. AFFIRMATIVE DEFENSES............................................................................. 5-8A.B URDEN OF P ROOF. .............................................................................................................................................. 5-8B.E XPLANATIONS. ..................................................................................................................................................... 5-8 VII. INTERVIEW STATEMENTS. ........................................................................ 5-10A.G ENERALLY. ......................................................................................................................................................... 5-10B.CSHO S SHALL OBTAIN WRITTEN STATEMENTS WHEN: .......................................................................... 5-10C.L ANGUAGE AND W ORDING OF S TATEMENT. ............................................................................................. 5-11D.R EFUSAL TO S IGN S TATEMENT ...................................................................................................................... 5-11E.V IDEO AND A UDIOTAPED S TATEMENTS. ..................................................................................................... 5-11F.A DMINISTRATIVE D EPOSITIONS. .............................................................................................5-11 VIII. PAPERWORK AND WRITTEN PROGRAM REQUIREMENTS. .......... 5-12 IX.GUIDELINES FOR CASE FILE DOCUMENTATION FOR USE WITH VIDEOTAPES AND AUDIOTAPES .............................................................. 5-12 X.CASE FILE ACTIVITY DIARY SHEET. ..................................................... 5-12 XI. CITATIONS. ..................................................................................................... 5-12A.S TATUTE OF L IMITATIONS. .............................................................................................................................. 5-13B.I SSUING C ITATIONS. ........................................................................................................................................... 5-13C.A MENDING/W ITHDRAWING C ITATIONS AND N OTIFICATION OF P ENALTIES. .................................. 5-13D.P ROCEDURES FOR A MENDING OR W ITHDRAWING C ITATIONS ............................................................ 5-14 XII. INSPECTION RECORDS. ............................................................................... 5-15A.G ENERALLY. ......................................................................................................................................................... 5-15B.R ELEASE OF I NSPECTION I NFORMATION ..................................................................................................... 5-15C. C LASSIFIED AND T RADE S ECRET I NFORMATION ...................................................................................... 5-16。
AX100G Quick GuideThis AX100G quick guide will help you learn all about this great new pedal in a short period of time, plus the facts on why it’s so cool for live, stage, direct recording, practicing, teaching and just plain music therapy fun.Key Features and Performance Specifics•Korg’s REMS (R esonant structure and E lectric circuit Modeling S ystem) modeling technology, provides complex and exacting detail in modeledamps, and effects. Korg’s leadership in signal processing technologygives the guitarist the tone and feel that they’ve been searching for.•Within each program, using the footswitch’s (“FX SEL”) effects select mode, the user can footswitch between 2 different drive sounds (a.k.a.channel switching), plus turn the Mod/Amb effects on/off.•80 programs, 40 user/ 40 factory, 63 modeling effect variations, and up to 7 effects and rhythm sounds can be used simultaneously.•Well backlit LCD display, for easy visibility and editing even in dark locations.•Auto chromatic tuner, with effects bypass and tuner mute modes, (Great for silent on stage tuning).•Expression pedal, controls 23 different effects in real time and has a new 7-point LED indicator that gives a visual display of expression pedal values.•Tap tempo, lets you instantly tap in delay time.•Virtual feed backer, infinite sustain at any volume or tone, also generates controlled feedback and vibrato.•Intelligent pitch shifting, lets you create harmony guitar lines, choose the scale and key, the AX100 will adjust the intervals. (Cool ProFeature).•10 different drive modes, which including an acoustic simulator, Marshalls, Voxs and some really cool classic stomp box models, similar to the tremendously successful Korg AX1000G, wah-wah, envelope filter,ring modulator, 16 modulation, 7 ambient effects including up to 2seconds of delay, 6 accurate cabinet emulations. (But wait there’smore).•Phrase trainer mode, lets you record your guitar or external auxiliary audio source (CD) up to 8 seconds then slow it down to as slow as 25%without changing pitch. (Auxiliary audio In jack provided) Also therecorded phrase will Loop, this is very helpful when learning difficultchord changes or solos.•Sample & Play, lets you use the expression pedal to control your own loops and samples in real-time with up to 6 seconds of phrase sampling.•Slow Attack, automatic volume swells, controlled by how hard you pick the strings.•50 high quality PCM sample rhythm patterns. (Makes practicing a lot more fun)•10’s hold, lets you lock into a bank so you can scroll through you favorite4 programs without accidentally recalling an unwanted program.(Excellent for Live use)•Cable guide, helps keeps your cable out of your expression controller.Getting Started1.Route guitar cable under AX100 through cable guide2.Set input level (H= hum bucking, L= single coil),3.Plugging guitar in will turn AX100 on and off if you are using batteries, ifusing a power supply unit will stay on (9volt DC, 500 ma).4.Master volume is located next to output jack, for instant rotary access.5.Change programs Up and Down, using program up and down buttons, orpress and hold “FX SELECT” switch down for 2 seconds to enter the bank select mode.6.Programs are organized in 10 banks (0-9) with 4 programs in each bank.User banks are indicated by a period in bottom left of screen. (A periodbetween the bank # and program # indicates the 10’s hold feature is onand may be turned ON/OFF by pressing both the “Exit” and “Tap”buttons simultaneously).Bypass Tuner Mode1.Press and Hold down the program “Up” and “Down” switchessimultaneously for 1 second, this will bypass the effects and turnon the tuner.2.Hold the “Up” and Down” switches simultaneously for 2 secondsto turn on the Tuner Mute Mode. (Great for silent tuning onstage).3.To return to program play, press either switch Up, Down or both.FX Select ModeEach program has 2 drive channels and an effect that may be turned on/off.1.Tap the smaller third footswitch labeled “PROG/FX SELECT” (left side)2.The LCD display now reads “FX SEL” in this mode the program downbutton will toggle your drive channels between “GREEN” and “RED”, the program up switch will turn ON/ OFF, Modulation, Ambient or bothModulation and Ambient effects.3. Tap the “PROG/FX SELECT” switch to return to program play modeEdit Mode1.You may adjust your gain and tone settings instantly, by simply adjustingthe labeled knobs; (L-R) Drive Amp (knob is set aside, to preventunintentional editing), Gain, Treble, Middle, Bass, Level (these 5 knobswill serve as our data controls as well)2.You can tap in the delay tempo instantly any time (if the program hasdelay)!For an example lets use an existing program, and make some edits to it (at this point you should turn unit on), #01 “STATIC” lets change thereverb into a delay,1.Reverb and Delay are ambient effects, so press the edit button to theleft of AMB on control panel (just left of the expression pedal).2.“ROOM 2” is displayed, directly below it- the EDIT light is flashing, tothe right above master an envelope reads -ORIG (for original) this means this program has the 2nd room reverb variation already programmed in. If you want to know the mix level of effect, turn the reverb mix knob(LEVEL) till the “ORIG” light comes on (6.0).3.“GAIN” knob will now adjust the ambient type (turn it, yes both ways),find delay (full counterclockwise)4.Take this time to look at the control panel, reading from left to rightfind the line labeled AMB (same line with the flashing red light) TYPE= fx variation, TIME= length of delay, TONE= EQ of delay effect, FEEDBACK=number of delays, MIX= adjusts the level of effect.5.Now, if you don’t like the delay tempo, you can tap in the rhythm on thetap button or you can readjust it on the 2nd (Treble) knob.Go up 2 lines and experiment with the “MOD” or modulation line. Remember to press the MOD edit button.Expression Pedal1.The expression pedal has an ON/OFF button located on the toe end.2.If the selected program has an expression-controlled effect it may beturned ON/OFF with this button.3.If the toe button is in the off position when you call up the nextprogram, you will need to turn the toe switch back on for effect.4.To edit the effect of the Expression Pedal, please push the Pedal buttonlocated on the editing control panel (to the left of the pedal). Phrase Trainer1.Press the phrase trainer edit button2.Choose aux in for external audio, (first data knob “GAIN”).3.Audio signal will pass through.4.Press the FX SELECT button to begin recording, if less than 8 secondspress the same button and your music will now loop, otherwise it willstart looping automatically when 8 seconds is reached.5.Slow down the track by using your second data knob (treble).6.Start and stop track by using down switch.7.Hold a note or pitch by using the up switch.8.Reverse or back-up by using both up and down at the same timeSample and Play1.Program #642.Press expression pedal forward till pedal indicator LED begins flashing3.Play for 6 seconds, (LED should stop flashing and turn red while itrecords).4.After recording is done, move pedal forwards- sample plays5.Move pedal back, sample plays in reverseSample Loop1.Program #632.Repeat the above steps 2 & 33.Now your phrase is looping and you can control the loop volume.Rhythm patterns1.Push the Rhythm button on panel.2.Knob 1 does the rhythm patterns.3.Knob 2 adjusts tempo.4.Knob 5 adjusts rhythm pattern volume.Virtual Feed backerGo to program #54- Play a single note for best results.1.Pedal in full down position adds vibrato to sustaining note.2.Back off half way for infinite sustain.3.Back off more to control the effect mix level. DEMONSTRATIONTurn on the rhythm patterns and jam along.Examples; 16shuffl2 @104 tempo, play Stevie Wonder’s “Superstition”Motown @122 tempo,Diana Ross’ “Stop in the Name of Love”.Choose from Blues, Rock, Thrash, Reggae, Country, etc.There is a cool assortment of artist programs as well.#02 “Filter” the green channel is the acoustic simulator-red channel is a fat distortion.#24 Satch is 2 wicked distortions with delay and wah (turn wah on/off with toe).#31 demonstrates real time tape echo FX (use expression pedal to change tape speed.).#32 whip out a Santana lick (auto-wah, ON/OFF in “FX SEL” mode).#34 Ring Modulator (program on an echo, show how easy it is to edit).#43 “Surf” tremolo (speed controlled by pedal).#51, 52, 53 (really fine straight ahead amp and reverb tones).#54 Feed backer#61, 62, Intelligent Pitch Shifter#63 Loop (Phrase Looping)#64 Fwd/Bk (forward & reverse phrase sampling)#70’s & 80’s highlight individual FXReset Factory Programs1.Disconnect power supply (Warning: turn amp volume down first)2.Simultaneously hold the “FX SEL” and “EXIT” buttons down, and thenplug in the power supply or last Battery.3.LCD reads “RELOAD”4.Press “WRITE” to reset factory programs, all edited user programs willbe erased, or press “EXIT” to abort Reset.。
矿产资源开发利用方案编写内容要求及审查大纲
矿产资源开发利用方案编写内容要求及《矿产资源开发利用方案》审查大纲一、概述
㈠矿区位置、隶属关系和企业性质。
如为改扩建矿山, 应说明矿山现状、
特点及存在的主要问题。
㈡编制依据
(1简述项目前期工作进展情况及与有关方面对项目的意向性协议情况。
(2 列出开发利用方案编制所依据的主要基础性资料的名称。
如经储量管理部门认定的矿区地质勘探报告、选矿试验报告、加工利用试验报告、工程地质初评资料、矿区水文资料和供水资料等。
对改、扩建矿山应有生产实际资料, 如矿山总平面现状图、矿床开拓系统图、采场现状图和主要采选设备清单等。
二、矿产品需求现状和预测
㈠该矿产在国内需求情况和市场供应情况
1、矿产品现状及加工利用趋向。
2、国内近、远期的需求量及主要销向预测。
㈡产品价格分析
1、国内矿产品价格现状。
2、矿产品价格稳定性及变化趋势。
三、矿产资源概况
㈠矿区总体概况
1、矿区总体规划情况。
2、矿区矿产资源概况。
3、该设计与矿区总体开发的关系。
㈡该设计项目的资源概况
1、矿床地质及构造特征。
2、矿床开采技术条件及水文地质条件。