耶鲁 Yale 4109电子门锁中文说明书
- 格式:pdf
- 大小:6.66 MB
- 文档页数:30

第1篇一、概述智能锁是一种集成了现代电子技术、机械技术和网络通信技术的安全锁具,具有远程控制、指纹识别、密码解锁等功能。
为确保用户能够正确、安全地使用智能锁,特制定本操作规程。
二、使用前准备1. 确保智能锁已经安装到位,电源正常。
2. 将手机下载并安装智能锁配套的APP。
3. 打开手机蓝牙功能,确保手机与智能锁处于同一蓝牙范围内。
4. 首次使用时,请按照APP提示完成设备绑定。
三、解锁操作1. 指纹解锁:将手指放在指纹识别区,等待识别成功后,即可解锁。
2. 密码解锁:在APP中输入预设的密码,确认无误后点击“解锁”,等待解锁成功。
3. 遥控解锁:通过手机APP远程发送解锁指令,等待解锁成功。
4. 磁卡解锁:将磁卡靠近智能锁的读卡区,等待解锁成功。
四、设置与修改1. 设置指纹:在APP中点击“添加指纹”,按照提示完成指纹录入。
2. 设置密码:在APP中点击“设置密码”,按照提示完成密码设置。
3. 修改密码:在APP中点击“修改密码”,按照提示完成密码修改。
4. 删除指纹/密码:在APP中点击“删除指纹/密码”,按照提示完成删除操作。
五、注意事项1. 确保智能锁处于正常工作状态,避免因设备故障导致无法解锁。
2. 不要将指纹、密码等重要信息泄露给他人,以防被恶意解锁。
3. 定期检查智能锁的电池电量,及时更换电池,确保设备正常运行。
4. 不要使用尖锐物品刮擦指纹识别区、键盘按键等部位,以免损坏设备。
5. 如遇设备故障,请及时联系售后服务人员,切勿自行拆卸、维修。
六、故障排除1. 指纹识别失败:请确保指纹清晰、干净,重新录入指纹。
2. 密码错误:请确认密码输入正确,如多次输入错误,请等待一段时间后重试。
3. 蓝牙连接失败:请确保手机蓝牙功能开启,并与智能锁处于同一蓝牙范围内。
4. 设备无法解锁:请检查电池电量,确保设备正常工作。
本操作规程适用于所有智能锁用户,如有未尽事宜,请参照智能锁产品说明书或咨询售后服务人员。

耶鲁YALE YMH70指纹锁智能锁使用说明整理版因为纸质说明书逻辑性不强,不易记忆,特作此整理,以作备忘。
一、图例说明操作指南的所有步骤,都是以下面代号的形式列出二、一般模式、使用者模式此模式是任何人都可以使用的模式,出厂时即为此模式。
适用于一家人正常生活时。
可见,在登记卡和指纹这种实物时,只要按登记键就行了;而登记访问密码一次性密码和蓝牙时,是要先输入使用者密码的。
在一般模式下还可以设置是否自动锁定,以及提示音量三、保安模式、安全模式、管理者模式此模式下仅管理者可设置电子锁各功能。
适用于一个房东管理多个房客。
所以所有操作前,都需要管理者,也就是房东先输入密码才行。
四、各个模式对比及切换1、可以设置的用户类型数目不一样。
使用者密码访问者密码一次性密码指纹门卡一般模式 1 1 1 40 40管理模式30 0 1 40 402、切换方法3、特别注意:在模式切换时,会删除所有的密码,包括卡跟指纹。
五、其它使用技巧电池种类选用:碳性电池,为于第一代一次性电池,其容量一般在200mAh左右,智能门锁的电池需使用一年左右,含电量较低的碳性电池并不适合,而且碳性电池的成分容易对环境造成严重污染;碱性电池容量较高,可以达到900mAh,适用于放电量大的设备及长时间使用,价格也比较适中。
一旦使用时间过长,容易造成漏液,损坏锁体,因此建议至少每隔六个月检查一次。
此外,碱性电池低温性能较差,在零下10℃时只能放出15%的电量;锂铁电池支持大、小电流放电,防漏性能良好,可贮存长达10年之久,还能扛住低温,但价格略贵。
如遇指纹锁电池没电了,如何应急充电?可以去附近的便利店购买一节9V干电池,然后用干电池与指纹锁面板上的应急电源插口接触供电(注意,要让电池正负极和指纹锁接口一直接触直到开锁为止,经打电话和售后确认,连接时不分正负级)。
等指纹锁重新上电后用密码或指纹就能进门了,然后再更换一下指纹锁电池。

Set screwsx2Hex keyx1M4 x 25.4mm pan head machinescrewsx2#7 wood & #8-32machine x 20mm Combination screwsx4M4 x 8mm pan head machinescrewsx4FAILURE TO FOLLOW THESE INSTRUCTIONS COULD RESULT IN DAMAGEPreparing to InstallLeft HandHinges Left.Open Inward.“LH”Left Hand ReverseHinges Left.Open Outward“LHR”The hand of a door is determined from the secure side of the door. The term "secure" means the side from which you initially unlock and enter.The hand of a door is determined from the secure side of the door. The term "secure" means the side from which you initiallyunlock and enter.Right Hand Hinges Right.Open Inward.“RH”Right Hand Reverse Hinges Right.Open Outward “RHR”x4Installing Latch & Strike PlateLeft Hand Installation ShownDo not remove clip until Step 6Installing Exterior Keypad Escutcheon Left Hand Installation Shownx2Loosen screw toInstalling Interior Mounting Plate Left Hand Installation ShownAttaching the Cable Assembly Left Hand Installation Shownx4Installing Interior Escutcheon Left Hand Installation Shownx1Installing Exterior LeverTesting OperationInside of DoorLeft Hand Door Shown Right Hand Door ShownAlmost done! Turn sheet over to finish installation and customize your product with Programming Instructions.Installing Interior Leverx1Installing Interior Lever con'tInstalling Optional Radio ModuleInside ofLeft Hand DoorInstalling Batteries & CoverCongratulations, you've installed the Yale Real Living™ Push Button Lever!Continue with Programming Instructions to customize your product.Resetting Lock to Factory DefaultInterior EscutcheonFCC:Class B EquipmentThis equipment has been tested and found to comply with the limits for a Class B digital device, pursuant to Part 15 of the FCC Rules. These limits are designed to provide reasonable protection against harmful interference in a residential installation. This equipment generates, uses, and can radiate radio frequency energy and, if not installed and used in accordance with theinstructions, may cause harmful interference to radio communications. However, there is no guarantee that interference will not occur in a particular installation. If this equipment does cause harmful Interference to radio or television reception, which can be determined by turning the equipment off and on, the user is encouraged to try to correct the interference by one or more of the following measures:• Reorient or relocate the receiving antenna.• Increase the separation between the equipment and receiver.• Connect the equipment into an outlet on a circuit different from that to which the receiver is connected.• Consult the dealer or an experienced radio/TV technician for help.Industry Canada:This Class A digital apparatus meets all requirements of the Canadian Interference Causing Equipment Regulations.Cet appareillage numérique de la classe A répond à toutes les exigences de l'interférence canadienne causant des règlements d'équipement.Warning: Changes or modifications to this device, not expressly approved by Yale Security Inc. could void the user's authority to operate the equipment.When lock is reset to factory defaults all user codes (including the Master PIN code*) are deleted and all programming features are reset to original default settings (see below).1. Remove the battery cover and batteries.2. Remove the interior escutcheon to access the reset button.3. The reset button (see image at right) is located above the PCB cable connector.4. While pressing the reset button (minimum of 3 seconds) reinstall batteries. Release reset button.5. Replace battery cover.Upon reset, Master PIN Code creation is the only option available and must be performed prior to any other programming of the lock.Hardware TroubleshootingCycle lock in both the locked and unlocked positions. If problems are found:Door is bindinga. Check that door and frame are properly aligned and door is free swinging.b. Check hinges: They should not be loose or have excessive wear on knuckles.Latch will not deadlocka. Check for sufficient clearance of the latch within the strike-side jamb. Correct this byincreasing the depth of the pocket for the latch.b. Check for misalignment of latch and/or strike which may be preventing latch fromproperly entering the strike. With the door open, extend and retract the latch; if it issmooth, check the strike alignment.Latch does not extend or retract smoothlya. Latch and strike are misaligned, see above.b. Check the backset of door relative to adjustments already made to latchc. Verify proper door preparation and re-bore holes that are too small or misaligned.d. Verify keypad wire harness is routed under the latch (see Fig. A).e. Verify latch is installed with correct side up (Fig. A).Interior of DoorFigure AChanging Lock: Replacing Cylinder1. To Remove cylinder:See installation Step 6 "Installing Exterior Lever" and reverse appropriateactions to remove the exterior lever handle and cylinder.2. To install new cylinder:A. Follow appropriate actions of installation Step 6 "Installing Exterior Lever"to replace the cylinder and exterior lever handle.B. Test operation of new cylinder and key by following "Testing Operation".Product Support T el 800.810.WIRE (9473) • Y ale Locks & Hardware is a division of Y ale Security Inc., an ASSA ABLOY Group company.Y ale® is a registered trademark of Y ale Security Inc., an ASSA ABLOY Group company.Y ale Real Living™ is a trademark of Y ale Security Inc., an ASSA ABLOY Group company.Copyright © 2014, Y ale Security Inc., an ASSA ABLOY Group company.All rights reserved. Reproduction in whole or in part without the express written permission of Y ale Security Inc. is prohibited.YALE, with its unique global reach and range of products, is the world's favorite lock– the preferred solution for securing your home, family and personal belongings.ASSA ABLOY is the global leader in door opening solutions,dedicated to satisfying end-user needs for security, safety and convenience.Programming InstructionsMaster PIN Code must be created before any further programming.Max User Codes = 250 with Network Module. Max User Codes = 25 without.1Creating Master PIN Code2Creating User PIN CodesMaster PIN code must be created first.*Max user codes = 250 with Network Module. Max user codes = 25 without.3Unlocking Door with PIN CodeFactory Settings*The Master PIN code must be registered prior to any other programming of the lock.PIN Code Management (With Network Module - Up to 250 Users)MasterUser ___User ___User ___User Name User TypePIN CodeUser #DefinitionsAll Code Lockout Mode: This feature is enabled by the Master code. When enabled, it restricts all user (except Master) PIN code access. When attempting to enter a code while the unit is in Lockout, the keypad flashes 8 times and the lock beeps 3 times as well.Audio Mode: Choosing Disable (3) in Audio mode shuts off the code confirmation tone play-back for use in quiet areas. Audio mode is enabled or disabled through feature programming by the Master code.Automatic Re-lock Time: After a successful unlock, the unit will automatically re-lock after thirty (30) seconds. Low Battery: When battery power is low, the Status Indicator flashes RED. If battery power is completely lost, use the key override.Master PIN Code: The Master PIN code is used for programming and for feature settings. It must be created prior to programming the lock. The Master code will also operate (unlock/lock) the lock.Network Setting: This setting is available thru the main Menu (7) and allows the lock to connect with a network controller. It is also available through the wireless button on the interior escutcheon.One Touch Locking: When the latch is retracted, activating the keypad will extend the latch (during Automatic Re-lock duration or when Automatic Re-lock is disabled).Shutdown Time: The unit will shut down (flashing keypad) for sixty (60) seconds and not allow operation after the wrong code entry limit has been met.Tamper Alert: Audible alarm sounds if attempting to forcibly remove outside lock from door.User PIN Code: The User code operates the lock. Maximum number of user codes is 250 with Network Module; without Network Module, maximum is 25 user codes.Wrong Code Entry Limit: After five (5) unsuccessful attempts at entering a valid PIN code, the unit will shut down and not allow operation.Feature Programming Through Menu ModeUsing Master PIN code*M User Number (UN)*The Master PIN code must be registered prior to any other programming of the lock.Programming Troubleshootingis recommended to verify correct date and time particularly those locks operating under Daylight Saving Time (DST).。

目录第一部份技术说明 (1)一、技术背景 (1)二、性能指示 (1)三、规格特性 (3)第二部份安装说明 (7)一、装箱清单 (7)二、安装条件 (7)三、安装步骤 (8)第三部份操作、维护说明 (14)一、门锁设置 (14)二、钥匙卡的使用和管理 (15)三、门锁维护及故障排除 (18)四、注意事项 (20)五、故障及处理 (21)第一部份技术说明一:技术背景IC卡是一种新型智能性标识卡(包括感应卡、IC卡、TM卡等),它采用硅片存储信息,因此,与传统标识卡(磁卡、条码卡、光电卡等)相比,存储容量大、防伪性好、可靠性高,目前已广泛应用于通讯、金融、交通、安防等众多领域。
IC卡是现代信息技术、微电子技术和计算机技术的最新成果,是现代文明的标志之一。
纳宇系列IC卡智能门锁采用IC卡作为开锁的钥匙,它包含了IC卡技术、精密制造技术及机电一体化技术,是现代智能化门锁的典范,适用于高级酒店、涉外宾馆、旅游度假村、智能化写字楼、智能化小区、酒店式公寓等众多场合。
纳宇系列IC卡门锁采用的卡包括以下两种类型:接触式IC卡和非接触式IC卡。
二:性能指标1、接触式IC卡①·选用SLE4442卡及符合ISO7816标准的其他IC卡。
·数据保存:10年以上。
·重复使用次数:10万次以上。
·信息容量:256字节,门锁只用了50个字节,剩余可用作一卡多用。
·密码位数:24位十六进制数。
·工作电压:直流5V±10%·重量:3~4KG·体积:典型尺寸:240×78×17(mm)·工作电源:直流9V,六节七号碱性电池,可开锁一万次以上。
·耗电:平时:≤3微安(µA)开锁:300毫安(mA)左右,(只持续100毫秒)·工作温度:0~+70℃(特殊要求可达-25℃~+85℃)·抗静电:大于15000V·开锁记录:250条(卡号、时间)·欠压指示:<7.2V时,插卡时鸣叫叁声红灯亮,然后绿灯亮,此时仍可开锁50次以上。

®Installing the Z-WaveModuleTo Enroll the Module:•••To Unenroll the Module:• • • IMPORTANT: the batteries must be removed priorto removing and/or inserting the network module:• Remove battery cover.• Remove batteries.• Remove and/or insert network module.• Reinstall batteries.• Replace cover.P/N AYR200-ZW-INSTAL-FUL Rev BChanges or modifications to this device, not expressly approved by Yale Security Inc. FCC:FCC ID: UA4-YRHCPZW0LMModel: YRMZW1This equipment has been tested and found to comply with the limits for a Class B digital device, pursuant to Part 15 of the FCC Rules. These limits are designed to provide reasonable protection against harmful interference in a residential installation. This equipment generates, uses, and can radiate radio frequency energy and, if not installed and used in accordance with the instructions, may cause harmful interference to radio communications. However, there is no guarantee that interference will not occur in a particular installation. If this equipment does cause harmful Interference to radio or television reception, which can be determined by turning the equipment off and on, the user is encouraged to try to correct the interference by one or more of the following measures:• Reorient or relocate the receiving antenna.• Increase the separation between the equipment and receiver.• Connect the equipment into an outlet on a circuit different from that to which the receiver is connected.• Consult the dealer or an experienced radio/TV technician for help.THIS DEVICE COMPLIES WITH PART 15 OF THE FCC RULES. OPERATION IS SUBJECT TO THE FOLLOWING TWO CONDITIONS.(1) THIS DEVICE MAY NOT CAUSE HARMFUL INTERFERENCE, AND (2) THIS DEVICE MUST ACCEPT ANY INTERFERENCE RECEIVED, INCLUDING INTERFERENCE THAT MAY CAUSE UNDESIRED OPERATION.Industry Canada:IC: 6982A-YRHCPZW0LMModel: YRMZW1Section 7.1.2 of RSS-GEN Under Industry Canada regulations, this radio transmitter may only operate using an antenna of a type and maximum (or lesser) gain approved for the transmitter by Industry Canada. To reduce potential radio interference to other users, the antenna type and its gain should be so chosen that the equivalent isotropically radiated power (e.i.r.p.) is not more than that necessary for successful communication.En vertu des règlements d'Industrie Canada, cet émetteur radio ne peut fonctionner avec une antenne d'un type et un maximum (ou moins) approuvés pour gagner de l'émetteur par Industrie Canada. Pour réduire le risque d'interférence aux autres utilisateurs, le type d'antenne et son gain doivent être choisies de façon que la puissance isotrope rayonnée équivalente (PIRE) ne dépasse pas ce qui est nécessaire pour une communication réussie.Section 7.1.3 of RSS-GEN This Device complies with Industry Canada License-exempt RSS standard(s). Operation is subject to the following two conditions: 1) this device may not cause interference, and 2) this device must accept any interference, including interference that may cause undesired operation of the device.Cet appareil est conforme avec Industrie Canada RSS standard exemptes de licence(s). Son fonctionnement est soumis aux deux conditions suivantes: 1) ce dispositif ne peut causer des interférences, et 2) cet appareil doit accepter toute interférence, y compris les interférences qui peuvent causer un mauvais fonctionnement du dispositif.Product Support T el 800.810.WIRE (9473) • Y ale Locks & Hardware is a division of Y ale Security Inc., an ASSA ABLOY Group company.Y ale® is a registered trademark of Y ale Security Inc., an ASSA ABLOY Group company.Y ale Real Living™ is a trademark of Y ale Security Inc., an ASSA ABLOY Group company.Copyright © 2014, Y ale Security Inc., an ASSA ABLOY Group company.All rights reserved. Reproduction in whole or in part without the express written permission ofY ale Security Inc. is prohibited.YALE, with its unique global reach and range of products, is the world's favorite lock– the preferred solution for securing your home, family and personal belongings.ASSA ABLOY is the global leader in door opening solutions,dedicated to satisfying end-user needs for security, safety and convenience.。
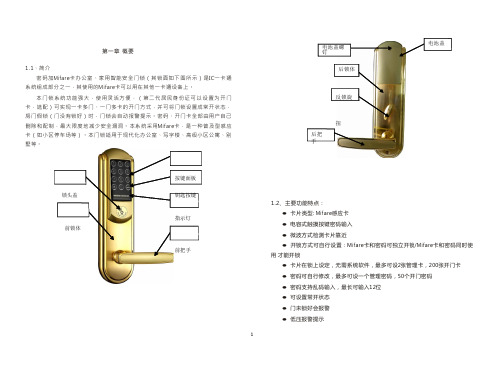
第一章概要电池盖螺钉电池盖1.1、简介密码加Mif a r e卡办公室、家用智能安全门锁(其锁面如下图所示)是I C一卡通系统组成部分之一,其使用的M if a r e卡可以用在其他一卡通设备上。
本门锁系统功能强大,使用灵活方便,(第二代居民身份证可以设置为开门卡,选配)可实现一卡多门、一门多卡的开门方式,并可将门锁设置成常开状态,房门假锁(门没有锁好)时,门锁会自动报警提示。
密码、开门卡全部由用户自己删除和配制,最大限度地减少安全漏洞。
本系统采用M i f a r e卡,是一种普及型感应卡(如小区停车场等)。
本门锁适用于现代化办公室、写字楼、高级小区公寓、别墅等。
后把手后锁体反锁旋扭锁头盖按键面板钥匙按键1.2、主要功能特点:前锁体指示灯前把手●卡片类型: M i f a r e感应卡●电容式触摸按键密码输入●微波方式检测卡片靠近●开锁方式可自行设置:M i f a r e卡和密码可独立开锁/M i f a r e卡和密码同时使用才能开锁●卡片在锁上设定,无需系统软件,最多可设2张管理卡,200张开门卡●密码可自行修改,最多可设一个管理密码,50个开门密码●密码支持乱码输入,最长可输入12位●可设置常开状态●门未锁好会报警●低压报警提示●电池供电,可外接应急电源1.3、主要技术指标●工作电压: 6.0V(4节5号碱性电池)●静态功耗: <50uA●动态功耗: <200mA●电池寿命: 12个月以上●低电压提示: 4.8V●读卡距离: <30mm●工作温度: -25℃-70℃●工作湿度: ≤80%●控制板尺寸: 40mmx60mm●按键板尺寸:50mm x90mm1.4、开门方式M i f a r e卡密码办公室、家用门锁系统有以下两种开门模式:⑴、独立式:单独使用M i f a r e卡或密码可以开门。
⑵、组合式:M i f a r e卡和密码同时使用才可以开门。
注:1.本系统的门锁出厂初始化后的管理密码为12345678,开门模式为独立式。
智能锁使用说明书使用前请仔细阅读使用说明书,并妥善保管一.技术参数1.技术参数启动方式指纹/密码/卡/机械钥匙指纹传感器半导体供电方式5号碱性电池4节应急电源5V应急电源接口·MiroUSB待机功耗60uA动态功耗小于5A显示OLED键盘背光独立LED指纹容量100枚指纹识别速度小于1S指纹拒真率小于0.01%指纹认假率0.0001%密码输入防窥视密码长度6-12位用户总量300卡类型Mifare 1 高频卡工作温度-30℃ ~ 70℃开锁记录250组初始管理员密码12345623二.用户构成三.功能说明1.用户构成1.功能说明用户类型数量权限管理用户5开锁、进入管理普通开锁用户295开锁1.默认管理员密码:123456,按 + # +管理员密码进入操作系统。
2.系统初始化:初始化系统有两种方式,软件初始化和硬件初始化,软件初始化是进入系统设置后选择初始化菜单,硬件初始化是在后锁面的电池盖里面有个复位按键孔,按住复位按键5秒,屏幕提示初始化系统,按#号键确认初始化。
3.用户容量:用户总量为300个,对应300个用户编号。
每一个用户编号只可以对应一个指纹或者密码或者卡。
编号1~5为管理员用户,6~300为普通开锁用户。
指纹用户量受限于指纹模组。
比如指纹模组的指纹容量为100,则最大指纹用户量为100。
四.操作设置1.按键功能触摸唤醒屏幕指示灯亮起,按 + # 键进入功能菜单验证入口注意:所有的设置和更改都需要进入功能菜单设置。
2号键是上翻,8号键是下翻,#号键是确认, 号键是返回。
***42.设置管理员指纹/密码/智能卡3.删除开锁信息按 + # 号键,进入功能菜单验证入口;输入管理员密码,输入初始密码123456 + # 号键;进入设置界面。
进入设置界面,如图所示;先择录入开锁信息,按#号键确认。
录入管理员信息,按#号键确认;输入密码、指纹、IC 卡;管理员可以设置5位(包括指纹、卡片、密码)编号位001-005。
目录1 指纹锁介绍 (4)1.1 产品特征 (4)1.1.1 产品介绍 (5)1.1.2 产品功能介绍 (5)1.2 尺寸 (5)1.3 技术参数 (6)2 操作使用 (7)2.1 放置手指的方式 (7)2.2 操作说明 (8)2.3 警示 (8)2.4 安装/更换电池 (9)3 安装步骤图 (10)3.1 侧条和锁体尺寸图 (10)3.2 确认开门方向 (14)3.3 门板开孔图 (15)3.4 门扣盒开孔图 (15)3.5 安装步骤 (15)3.5.1 安装锁芯 (15)3.5.2 安装前后面板 (16)3.5.3 安装门框盒和扣板 (17)4 锁的维护及保养 (19)4.1 日常维护及保养 (19)4.2 使用须知 (19)5 售后服务 (20)5.1 售后服务相关说明 (21)5.2 装箱清单 (24)5.3 配件表……………………………………………………………24A/1(2016年5月)重要提示1指纹锁作为高科技产品,安装的好坏直接影响到门锁的正常操作及使用寿命,建议您聘请对锁具有相当经验的师傅进行安装,并根据产品附件中门板开孔图样板进行开孔,凿支承窝,锁扣板及锁扣盒孔;确认所开凿的孔准确无误,然后严格按照产品说明书中的步聚进行操作,如果安装后发现锁开关不灵活或不能开启,请及时和当地的经销商或本公司的售后服务部门联系,以便问题快速得以解决。
2如果您的房间正在装修中,我们建议您在产品安装及经检查没问题后将产品卸下,待装修完成后再把产品重新装上,这样做的目的是:1.避免装修过程中出现腐蚀性物质粘在锁体上,影响外观,如果门的油漆未干会影响传动不灵活;2.装修时会使用酒精、油漆等化学物质,这些化学物质在未干透时会向空气中散发腐蚀性气体或灰尘,加速产品表面处理生变,影响外观及降低产品使用寿命。
3在门锁安装前,请您先接通所有连接线并装好电池后,按门锁线路板上的初始化按钮,第一时间对门锁进行初始化,恢复到出厂状态。