NI-USRP-2小时上手教程
- 格式:docx
- 大小:444.29 KB
- 文档页数:8


usrp使用手册【实用版】目录RP 简介RP 的安装与配置RP 的基本使用方法RP 的高级功能与应用RP 的维护与升级正文【USRP 简介】USRP(Universal Software Radio Peripheral)是一款由美国 Ettus Research 公司开发的通用软件无线电外设。
它具有高度的可编程性,可以支持多种无线电通信标准和协议。
USRP 广泛应用于无线电通信研究、实验教学、军事通信等领域,为无线电通信技术的发展做出了重要贡献。
【USRP 的安装与配置】USRP 的安装主要包括硬件安装和软件安装两个方面。
硬件安装相对简单,只需将 USRP 设备连接到计算机的 USB 接口即可。
软件安装则需要根据计算机操作系统的不同,下载相应的驱动程序和 API 软件包。
配置 USRP 主要是通过其自带的图形界面工具 GUI 或者命令行方式进行的。
用户可以根据需要对 USRP 进行各种配置,如设置中心频率、调制解调方式、采样率等。
【USRP 的基本使用方法】USRP 的基本使用方法包括以下几个步骤:1.启动 USRP:在计算机上运行 USRP GUI 或者在命令行中输入相关命令启动 USRP。
2.配置 USRP:通过 USRP GUI 或命令行方式对 USRP 进行配置。
3.接收和发送数据:通过编写程序或使用 GUI 工具,接收和发送无线电信号。
4.数据处理:对接收到的数据进行分析和处理,如解调、解码等。
【USRP 的高级功能与应用】USRP 的高级功能主要包括:1.频率扫描:USRP 可以快速扫描指定频率范围内的无线电信号,便于用户发现和分析新的信号。
2.自动检测:USRP 可以自动检测并解调接收到的信号,便于用户实时了解信号内容。
3.数字信号处理:USRP 支持数字信号处理功能,可以对信号进行各种数字滤波、调制解调等处理。
USRP 在实际应用中可以用于无线电监测、通信信号拦截、无线电频谱分析等领域。

ContentsUSRP RIO device Getting Started Guide. . . . . . . . . . . . . . . . . . . . . . . . . . . . . . . . . . . . . . . . . . . 4 Verifying the System Requirements. . . . . . . . . . . . . . . . . . . . . . . . . . . . . . . . . . . . . . . . . . . . 4 Unpacking the Kit. . . . . . . . . . . . . . . . . . . . . . . . . . . . . . . . . . . . . . . . . . . . . . . . . . . . . . . . . . . . 4 Verifying the Kit Contents. . . . . . . . . . . . . . . . . . . . . . . . . . . . . . . . . . . . . . . . . . . . . . . . 5 Environmental Guidelines. . . . . . . . . . . . . . . . . . . . . . . . . . . . . . . . . . . . . . . . . . . . . . . . . . . . 6 Environmental Characteristics. . . . . . . . . . . . . . . . . . . . . . . . . . . . . . . . . . . . . . . . . . . 7 Installing the Software. . . . . . . . . . . . . . . . . . . . . . . . . . . . . . . . . . . . . . . . . . . . . . . . . . . . . . . 7 Installing the Software Using NI Package Manager. . . . . . . . . . . . . . . . . . . . . . . . . . 7Installing the Software Using the Driver Download Page. . . . . . . . . . . . . . . . . . . . 8 Installing the Device. . . . . . . . . . . . . . . . . . . . . . . . . . . . . . . . . . . . . . . . . . . . . . . . . . . . . . . . . . 8 Connecting the Device. . . . . . . . . . . . . . . . . . . . . . . . . . . . . . . . . . . . . . . . . . . . . . . . . . . 8Powering on the Device. . . . . . . . . . . . . . . . . . . . . . . . . . . . . . . . . . . . . . . . . . . . . . . . 10Synchronizing Multiple Devices (Optional). . . . . . . . . . . . . . . . . . . . . . . . . . . . . . . 10Preparing the USRP-2945 for LO Sharing (Optional). . . . . . . . . . . . . . . . . . . . . . . 11Preparing the USRP-2945 for LO Re-Import (Optional). . . . . . . . . . . . . . . . . . . . . 12 Programming the Device. . . . . . . . . . . . . . . . . . . . . . . . . . . . . . . . . . . . . . . . . . . . . . . . . . . . 13 NI-USRP Instrument Driver. . . . . . . . . . . . . . . . . . . . . . . . . . . . . . . . . . . . . . . . . . . . . 13Verifying the Device Connection (Optional). . . . . . . . . . . . . . . . . . . . . . . . . . . . . . . 16 Troubleshooting. . . . . . . . . . . . . . . . . . . . . . . . . . . . . . . . . . . . . . . . . . . . . . . . . . . . . . . . . . . . 17 Why Doesn't the Device Power On?. . . . . . . . . . . . . . . . . . . . . . . . . . . . . . . . . . . . . . 17Why Doesn't the USRP Device Appear in the NI-USRP Configuration Utility?. . 18Why Does USRP2 Appear Instead of the USRP Device in the NI-USRPConfiguration Utility?. . . . . . . . . . . . . . . . . . . . . . . . . . . . . . . . . . . . . . . . . . . . . . . . . . 18Should I Update Device Firmware and FPGA Images?. . . . . . . . . . . . . . . . . . . . . . 18Why Do I Receive an Enumeration Error?. . . . . . . . . . . . . . . . . . . . . . . . . . . . . . . . . 18Why Don't NI-USRP Examples Appear in the NI Example Finder in LabVIEW?. 19 Front Panels, Back Panels, and Connectors. . . . . . . . . . . . . . . . . . . . . . . . . . . . . . . . . . . . 19 Direct Connections to the Device. . . . . . . . . . . . . . . . . . . . . . . . . . . . . . . . . . . . . . . . 19USRP-2940 Front Panel, Back Panel, and LEDs. . . . . . . . . . . . . . . . . . . . . . . . . . . . 20USRP-2942 Front Panel, Back Panel, and LEDs. . . . . . . . . . . . . . . . . . . . . . . . . . . . 23USRP-2943 Front Panel, Back Panel, and LEDs. . . . . . . . . . . . . . . . . . . . . . . . . . . . 26USRP-2944 Front Panel, Back Panel, and LEDs. . . . . . . . . . . . . . . . . . . . . . . . . . . . 29USRP-2945 Front Panel, Back Panel, and LEDs. . . . . . . . . . . . . . . . . . . . . . . . . . . . 322GPIO Connector. . . . . . . . . . . . . . . . . . . . . . . . . . . . . . . . . . . . . . . . . . . . . . . . . . . . . . . 35 Where to Go Next. . . . . . . . . . . . . . . . . . . . . . . . . . . . . . . . . . . . . . . . . . . . . . . . . . . . . . . . . . . 35 NI Services. . . . . . . . . . . . . . . . . . . . . . . . . . . . . . . . . . . . . . . . . . . . . . . . . . . . . . . . . . . . . . . . . 36© National Instruments3USRP RIO device Getting Started GuideThis document explains how to install, configure, and test the following USRP RIO devices:■ USRP-2940 Software Defined Radio Reconfigurable Device■ USRP-2942 Software Defined Radio Reconfigurable Device■ USRP-2943 Software Defined Radio Reconfigurable Device■ USRP-2944 Software Defined Radio Reconfigurable Device■ USRP-2945 Software Defined Radio Reconfigurable DeviceThe USRP RIO device can send and/or receive signals for use in various communications applications. The device ships with the NI-USRP instrument driver, which you can use to program the device.Verifying the System RequirementsTo use the NI-USRP instrument driver, your system must meet certain requirements. Refer to the product readme, which is available online on the driver software download page or at /manuals, for more information about minimum system requirements, recommended system, and supported application development environments (ADEs).Unpacking the Kit1.Touch the antistatic package to a metal part of the computer chassis.2.Remove the device from the package and inspect the device for loosecomponents or any other sign of damage.43.Unpack any other items and documentation from the kit.Store the device in the antistatic package when the device is not in use.Verifying the Kit ContentsFigure 1. Kit ContentsRP RIO Device2.SMA Driver Bit (USRP-2945 Only)3.Getting Started Guide (This Document) and Safety, Environmental, and Regulatory Information Document4.SMA (m)-to-SMA (m) Cable5.30 dB SMA Attenuator (Not Included with USRP-2945)© National Instruments 5Other Required Item(s)In addition to the kit contents, you must provide the following additional item(s):■An MXI Express interface card. You can purchase an MXI Express interface kitfor your USRP RIO device, which contains an MXI Express interface card, at.Optional Items■ LabVIEW Modulation Toolkit (MT), available for download at /downloads and included in LabVIEW Communications System Design Suite,which includes MT VIs and functions, examples, and documentation■ LabVIEW Digital Filter Design Toolkit, available for download at /downloads and included in LabVIEW Communications System Design Suite■ LabVIEW MathScript RT Module, available for download at /downloads■Additional SMA (m)-to-SMA (m) cables to use the REF IN and PPS IN signals■ PCIe - MXI Express Interface Kit for USRP RIO to connect to a desktopcomputer■ ExpressCard Slot - MXI Express Interface Kit for USRP RIO to connect to alaptop computer■ PXIe - MXI Express Interface Kit for USRP RIO to connect to a PXI Expresschassis■ CDA-2990 Clock Distribution Device for synchronizing multiple devices■ CPS-8910 Switch Device for PCI Express for large multiple-input, multiple-output (MIMO) expansion configurations■ PXI-5691 RF Amplifier for local oscillator (LO) re-import with the USRP-29456Environmental GuidelinesEnvironmental CharacteristicsOperating temperature0 °C to 45 °COperating humidity10% to 90% relative humidity, noncondensingPollution Degree2Maximum altitude2,000 m (800 mbar) (at 25 °C ambient temperature) Installing the SoftwareYou must be an Administrator to install NI software on your computer.1.Install an application development environment (ADE), such as LabVIEW orLabVIEW Communications System Design Suite.2.Follow the instructions below that correspond with the ADE that you installed. Installing the Software Using NI Package ManagerEnsure that you have installed the latest version of NI Package Manager. To accessthe download page for NI Package Manager, go to /info and enter info code NIPMDownload.1.To install the latest NI-USRP instrument driver, open NI Package Manager.2.On the BROWSE PRODUCTS tab, click Drivers to display all available drivers.© National Instruments73.Select NI-USRP and click INSTALL.4.Follow the instructions in the installation prompts.Related information■Install NXGInstalling the Software Using the Driver Download Page1.Visit /info and enter the Info Code usrpdriver to access the driverdownload page for all versions of NI-USRP software.2.Download a version of NI-USRP driver software.3.Follow the instructions in the installation prompts.4.When the installer completes, select Shut Down in the dialog box thatprompts you to restart, shut down, or restart later.Installing the DeviceInstall all the software you plan to use before you install the hardware. Ensure that the USRP RIO device and computer are off before installing.Connect any additional attachments required for your project to the front panel terminals of the USRP RIO device.8Connecting the DeviceThe USRP RIO device must be connected either to a desktop computer or a laptop computer.Connecting to a Desktop ComputerConnect the USRP RIO device to a desktop computer using an MXI Express interface kit.1.Insert the MXI card into your computer according to the installationinstructions in the Hardware Installation section of the Set Up Your MXI™Express ×4 System document included in your MXI Express interface kit.2.Connect the MXI device to the USRP RIO device using the PCIe cable includedin your MXI Express interface kit.Connecting to a Laptop ComputerConnect the USRP RIO device to a laptop computer using the ExpressCard-8360 for USRP Device for PXI Remote Control.1.Touch the ExpressCard-8360 for USRP and outer metal case of the USRP RIOdevice simultaneously.2.Connect the included cable to the to the ExpressCard-8360 for USRP.3.Plug the ExpressCard-8360 for USRP into an available ExpressCard slot.The completed hardware setup is shown in the following figure.© National Instruments9Figure 2. Connecting the Device with a Laptop Connectivity Kit1.Cable Included with ExpressCard Interface Kit2.ExpressCard-8360 for USRP3.ExpressCard Slotptop ComputerPowering on the Device1.Connect the power supply to the USRP RIO device.2.Plug the power supply into a wall outlet. Press the power button on the frontof your device.3.Power on the chassis and network switch.Synchronizing Multiple Devices (Optional)To set up a higher channel-count system, you can synchronize two or more USRP RIO devices so that they share clock and pulse per second (PPS) signals.10Ensure that all hardware is set up as previously described.1.Connect the REF IN port of the USRP RIO device to the first 10 MHz OUT port ofthe CDA-2990 using a standard SMA (m)-to-SMA (m) cable.2.Connect the PPS TRIG IN port of the USRP RIO device to the PPS OUT port ofthe CDA-2990 using a standard SMA (m)-to-SMA (m) cable.3.Repeat steps 1 and 2 to synchronize additional USRP RIO devices using theadditional ports on the CDA-2990 (optional).The completed hardware setup for two USRP RIO devices is shown in thefollowing figure.Figure 3. USRP Device Synchronization Configuration1.SMA (m)-to-SMA (m) Cables2.SMA (m)-to-SMA (m) CablesPreparing the USRP-2945 for LO Sharing (Optional)Complete the following steps to prepare a single USRP-2945 device to share LOsamong all four of the device's channels.1.Connect the LO OUT 1 IF2 connector of the USRP-2945 back panel to theLO IN 0 IF2 connector of the same USRP-2945 back panel using an SMA (m)-to-SMA (m) cable.2.Connect the LO OUT 1 IF1 connector of the USRP-2945 back panel to theLO IN 0 IF1 connector of the same USRP-2945 back panel using an SMA (m)-to-SMA (m) cable.The completed hardware setup is shown in the following figure.Figure 4. USRP-2945 Single Device LO Sharing1.SMA(m)-to-SMA(m) CablesPreparing the USRP-2945 for LO Re-Import (Optional)Complete the following steps to prepare a single USRP-2945 device to exportLO OUT 1 and re-import to LO IN 1 and LO IN 0.1.Connect the LO OUT 1 IF2 connector of the USRP-2945 back panel to the INconnector of an RF power amplifier front panel using an SMA (m)-to-SMA (m) cable.2.Connect the OUT connector of the RF power amplifier to the input port of atwo-way RF power splitter using an SMA (m)-to-SMA (m) cable.3.Connect the two output ports of the RF power splitter front panel to theLO IN 0 IF2 and LO IN 1 IF2 connectors of the USRP-2945 back panel using SMA (m)-to-SMA (m) cables.4.Repeat steps 1 through 3 using a second splitter and additional cables to re-import and share the IF1 signal.The completed hardware setup is shown in the following figure.Figure 5. LO Re-Import Configuration1.RF Power AmplifierRP RIO Device3.RF Power Splitters4.SMA (m)-to-SMA (m) CablesProgramming the DeviceYou can use the NI-USRP instrument driver to create communications applications for the USRP RIO device.USRP RIO devices are LabVIEW FPGA targets, which support creating custom FPGAs and configuring the device using Instrument Design Libraries (IDLs).NI-USRP Instrument DriverThe NI-USRP instrument driver features a set of functions and properties that exercise the capabilities of the USRP RIO device, including configuration, control, and other device-specific functions.Related concepts■Refer to the NI-USRP Manual for information about using the instrument driver in your applications.Software OptionsNI provides two software options for programming the USRP RIO device: the NI-USRP API and the USRP RIO IDL.Table 1. Software OptionsNI-USRP Examples, Lessons, and Sample ProjectsNI-USRP includes several examples, lessons, and sample projects for LabVIEW, LabVIEW NXG, and LabVIEW Communications System Design Suite. They can be used individually or as components of other applications.NI-USRP examples, lessons, and sample projects are available in the following locations.Verifying the Device Connection (Optional)Complete the steps appropriate for your installed ADE to verify the device connection.Verifying the Device Connection Using LabVIEW NXG or LabVIEW Communications System Design Suite 2.1 to CurrentUse USRP Rx Continuous Async to confirm that the device receives signals and isconnected correctly to the host computer.1.Navigate to Learning » Examples » Hardware Input and Output » NI-USRP » NI-USRP.2.Select Rx Continuous Async. Click Create.3.Run USRP Rx Continuous Async.If the device is receiving signals you will see data on the front panel graphs. 4.Click STOP to conclude the test.Verifying the Device Connection Using LabVIEWRun a VI to confirm that the device transmits and/or receives signals and is connected correctly to the host computer.1.Create a sample project in LabVIEW by selecting File » Create Project »NI-USRP.2.Select the NI-USRP Simple Streaming sample project template and click Next.3.Run the appropriate streaming VI according to your USRP RIO device.display waveform data.4.Click STOP to conclude the test.TroubleshootingIf an issue persists after you complete a troubleshooting procedure, search our KnowledgeBase for additional information our technical support engineers create as they answer common user questions and resolve unexpected issues.Why Doesn't the Device Power On?If you cannot power on the device, complete the following steps.■Verify that the device is connected to the power supply.■Verify that the power supply is functional.■Verify that the power switch on the front of the device is engaged.Why Doesn't the USRP Device Appear in the NI-USRP Configuration Utility?Check the connection between the USRP RIO device and the computer. Ensure that the USRP RIO device is powered on and connected to a computer before you power on the computer.Why Does USRP2 Appear Instead of the USRP Device in the NI-USRP Configuration Utility?■An incorrect IP address on the computer may cause this error. Check the IP address and run the NI-USRP Configuration Utility again.■An old FPGA or firmware image on the device may also cause this error.Upgrade the FPGA and firmware using the NI-USRP Configuration Utility. Should I Update Device Firmware and FPGA Images?Your device ships with firmware and FPGA images compatible with the NI-USRP driver software. You may need to update the device for compatibility with the latest version of the software.The driver software media also includes the NI-USRP Configuration Utility, which you can use to update the devices.Why Do I Receive an Enumeration Error?If you are using a desktop computer with the NI-USRP instrument driver installed, it is possible that there is a compatibility issue between your computer and the PCIe card. Complete the following steps to confirm this issue and resolve it.1.Navigate to Start » Device Manager to confirm the issue by verifying that PCIData Acquisition and Signal Processing Device/Controller appears in Device Manager and that your USRP RIO device does not.If you cannot confirm this, then the issue is not likely caused by acompatibility problem between your computer and the PCIe card. Contact NI or visit /support2.Install the latest BIOS Compatibility software.3.Restart your computer.plete the steps appropriate for your installed ADE in Verifying the DeviceConnection. Repeat step 1 and observe if the outcome has changed. If youstill receive an Enumeration Error, continue to step 5.5.Power off your computer and remove the MXI card.6.Toggle switch 1.7.Reinstall the MXI card and power on your computer.8.Repeat step 4. If nothing has changed, continue to step 7.9.Uninstall the BIOS Compatibility software. Restart your computer.10.Repeat step 4.If trouble persists, contact NI or visit /support.Why Don't NI-USRP Examples Appear in the NI Example Finder in LabVIEW?NI-USRP does not install examples into the NI Example Finder.Related concepts■NI-USRP Examples, Lessons, and Sample ProjectsDirect Connections to the DeviceThe USRP RIO device is a precision RF instrument that is sensitive to ESD and transients. Ensure you take the following precautions when making direct connections to the USRP RIO device to avoid damaging the device.■ Ensure you are properly grounded when manipulating cables or antennas connected to the USRP RIO device TX 1 RX 1, RX 1, or RX 2 connector.■ If you are using nonisolated devices, such as a nonisolated RF antenna,ensure the devices are maintained in a static-free environment.■If you are using an active device, such as a preamplifier or switch routed to the USRP RIO device TX 1 RX 1, RX 1, or RX 2 connector, ensure that the device cannot generate signal transients greater than the RF and DC specifications of the USRP RIO device TX 1 RX 1, RX 1, or RX 2 connector.USRP-2940 Front Panel, Back Panel, and LEDsFront PanelTable 8. Connector DescriptionsTable 9. LED Descriptions The LED indications described in the following table occur only when you use the NI-USRP API with the default FPGA image. When you use LabVIEW FPGA, you customize the LED indications.Back PanelTable 10. Connector DescriptionsUSRP-2942 Front Panel, Back Panel, and LEDs Front PanelTable 8. Connector DescriptionsTable 9. LED Descriptions Back PanelTable 10. Connector DescriptionsUSRP-2943 Front Panel, Back Panel, and LEDs Front PanelTable 8. Connector DescriptionsTable 9. LED Descriptions The LED indications described in the following table occur only when you use the NI-USRP API with the default FPGA image. When you use LabVIEW FPGA, you customize the LED indications.Back Panel.Table 10. Connector DescriptionsUSRP-2944 Front Panel, Back Panel, and LEDs Front PanelTable 11. Connector DescriptionsTable 12. LED IndicatorsBack PanelTable 13. Connector Descriptions© National Instruments31USRP-2945 Front Panel, Back Panel, and LEDs Front PanelTable 14. Connector Descriptions32Table 15. LED IndicatorsBack Panel© National Instruments3334Table 16. Connector DescriptionsGPIO ConnectorTable 17. GPIO Connector Pin Assignments© National Instruments35Where to Go NextRefer to the following figure for information about other product tasks andNI ServicesVisit /support to find support resources including documentation,downloads, and troubleshooting and application development self-help such as tutorials and examples.Visit /services to learn about NI service offerings such as calibration options, repair, and replacement.Visit /register to register your NI product. Product registration facilitatestechnical support and ensures that you receive important information updates from NI.NI corporate headquarters is located at 11500 N Mopac Expwy, Austin, TX,78759-3504, USA.36© 2022 National Instruments Corporation.。
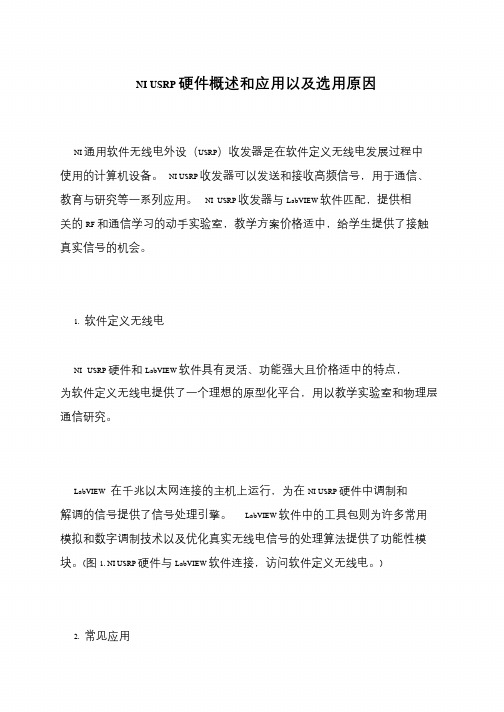
NI USRP 硬件概述和应用以及选用原因
NI 通用软件无线电外设(USRP)收发器是在软件定义无线电发展过程中使用的计算机设备。
NI USRP 收发器可以发送和接收高频信号,用于通信、教育与研究等一系列应用。
NI USRP 收发器与LabVIEW 软件匹配,提供相关的RF 和通信学习的动手实验室,教学方案价格适中,给学生提供了接触真实信号的机会。
1. 软件定义无线电
NI USRP 硬件和LabVIEW 软件具有灵活、功能强大且价格适中的特点,为软件定义无线电提供了一个理想的原型化平台,用以教学实验室和物理层通信研究。
LabVIEW 在千兆以太网连接的主机上运行,为在NI USRP 硬件中调制和解调的信号提供了信号处理引擎。
LabVIEW 软件中的工具包则为许多常用模拟和数字调制技术以及优化真实无线电信号的处理算法提供了功能性模块。
(图1. NI USRP 硬件与LabVIEW 软件连接,访问软件定义无线电。
)
2. 常见应用。

ettus usrp 使用手册一、引言ettus usrp是一款高性能的软件定义无线电设备,广泛应用于无线通信、电子侦察、信号处理等领域。
本手册旨在为用户提供详细的设备使用方法,以便充分发挥usrp的性能优势。
本文档适用于usrp的所有型号,包括usrp mini、usrp x3、usrp n200等。
二、设备安装与设置1.硬件安装将usrp设备连接到计算机,确保连接稳定。
根据用户需求,可以选择内置天线或外接天线。
2.软件安装与配置使用提供的软件安装向导,安装相应的驱动程序和开发工具。
配置软件以匹配usrp设备的硬件参数。
三、基本操作与使用1.发射器操作利用软件控制usrp发射器,实现信号的调制、发射和功率控制。
2.接收器操作利用软件控制usrp接收器,实现信号的接收、解调和解码。
3.信号处理与分析使用usrp设备进行信号处理,如滤波、放大、频谱分析等。
根据需求,可使用第三方工具进行信号分析。
四、高级功能与应用1.频谱分析利用usrp设备进行实时频谱分析,监测无线环境的变化。
2.信号生成与调制usrp设备可生成各种信号,如正弦波、方波、三角波等,并实现信号调制。
3.通信协议测试usrp支持多种通信协议,如Wi-Fi、蓝牙、LoRa等。
用户可利用usrp进行通信协议的测试与验证。
五、性能优化与调试1.信号质量改善调整usrp设备的参数,如带宽、采样率等,以提高信号质量。
2.参数调整与优化根据实际应用需求,调整usrp设备的发射功率、频率等参数,实现性能优化。
六、安全与合规1.安全措施采取必要的安全措施,防止未经授权的访问和使用。
2.法规遵守确保usrp设备的使用符合当地法规,避免违法行为。
七、故障排除与维护1.常见问题解决针对usrp设备在使用过程中遇到的问题,提供相应的解决方法。
2.硬件故障处理发现硬件故障时,按照故障处理流程进行维修或更换。
3.软件更新与升级定期查看ettus官网,下载最新版本的软件,并进行升级。

NI Online Training Quick Start Guide132441.Start at /training2.Select one of the courses in the featured course listOR3.Browse the course catalog where you can set filters and search by keywords4.Click the course title or icon to open a course overview page to review course details and requirements3121.Click the Access Course button to launch a courseIf you are not logged in or not entitled to the course, you will not see the Access Course button. Follow theinformation provided in that case to verify or purchase course access.2.You will be prompted to accept terms when you add your first course3.The course will open in a new tab.41231.On the course page you will see each module in the course represented by an icon in a grid2.Click on a module to launch the learning content3.Navigate through the module using the Table of Contents or the play/forward/reverse buttons at the bottom.4.When you get to the end of a module, click Back to Course to return to the course page.1.Module tiles will show status in the top right corner for in progress (orange) or complete (green). Continue working through the modules until you complete the course.2.Clicking Courses in the menu bar will open your personal course library. These are courses that you have previously launched.3.When you complete a course, you will receive a certificate. These certificates are emailed and always available by clicking My Certificates 4.When you finish a course, just click on Find More Courses to go back to /training2314123If you close out the course window you can always access your course library to start where you left off:1.Click the Access My Courses menu option on /training/resources or any course overview page2.From your Course Library, you can open the courseOR3.Click Access Course from the course overview page for the specific course that you want to continue to open the course directly.Course EntitlementsI do not see the Access Course button for the course I want to launch. Why not?▪To access NI Online Training Courses you must be logged into and have an active service contract or relevant access code associated with your user profile.▪If you believe that you already have a service contract or course access code, verify, register, or renew your current access here▪Make sure to refresh the course overview page if it’s the first time you have accessed the new site or after activating new a ccess codes.▪It may take up to 24 hours for new entitlements to be available on .Learning HistoryI was working on completing a course in the old platform. How can I resume where I left off in the new platform?▪Course and module completion data for all users from 2013 -2018 has been migrated into the new platform.▪Exceptions to this include:1.Course completion certificates will be migrated by April 15th.2.Course and module completions for 2019 will be migrated by April 15th.3.Individual course modules that were in progress but not completed will have to be restarted.4.Only the newest version of each course was migrated into the new platform.ers that have changed their email address on since the last time they accessed their online training courses may not see their prior coursecompletions.▪To see what courses were migrated for your account:1.Navigate to /training/resources2.Click the Access My Courses menu option3.All courses that were fully or partially complete should already be included in your course library.Localized CoursesI want to take a course in a different language. How can I do that?▪Course overview pages, such as LabVIEW Core 1, will initially display the course language option that best matches your preferred country selection.▪If the course is not offered in the language matching your country, English will be shown as the default option.▪You can chose to take any of the available language options by changing the language selector just above the course description.▪Clicking the Access Course or Download Solutions and Exercises buttons will initiate those actions for the course instance that matches the language shown in the language selector▪The course description text will always match the course language. The information in the course details tab and requirements tab sections has not been fully translated yet. That effort is in progress.▪Additionally, localization of the button text, menu items, dialog messages, etc is also in process. These portions of the page will ultimately match the preferred language setting on Course LibraryWhat is the difference between a course overview page and the course library?▪Each course has it’s own overview page on /training. Those pages will provide the specific information on the intendended audience, course objectives, requirements, related badges, etc.▪Once you decide to launch a course by clicking the Access Course button, that course is added to your course library in our online learning platform, Thinkscape.▪When you look at your courses page in Thinkscape, it will only have the courses that you specifically chose to launch.▪From the course library page in Thinkscape, you can launch courses, track your completion progress, and review your course certificates.Login IssuesWhat happens if I bookmark a course using its Thinkscape URL?▪It is strongly suggested that you always access courses by starting at .1.Log into 2.Navigate to a specific course page 3.Click the Access Course buttonOR 1.Log into 2.Navigate to /training/resources3.Click Access My Courses in the menu ▪When opening a bookmark linking to the Thinkscape URL for a course, there are some login details to remember.1.The Thinkscape system will detect that the bookmarked URL is related to an NI course. 2.If you are not currently logged in to Thinkscape through an initiated single sign-on process,you will be prompted to log into Thinkscape.3.The login page will provide the option to use your NI Credentials. Please use this option to login to Thinkscape.4.If you try to login without using the NI Credentials button you will get an error. This is because you will not have a password defined in the Thinkscapeplatform. The single sign on process creates a Thinkscape account for you with your user name and an NI ID, but due to privacy rules your password is never sent to another system outside of .These two workflows initiate the single sign-on integration between and the learning platform.More Questions?This Quick Start Guide is meant to give you a general overview of how to find and interact with NI Online Training courses.Please contact us with any questions or issues you have that haven’t been answered in this document.*********************。
usrp使用手册【最新版】目录rp 简介rp 的功能3.安装 usrp4.使用 usrp5.常见问题正文【usrp 简介】usrp(Universal Software Radio Peripheral)是一款通用软件无线电外设,由美国 Ettus Research 公司开发。
usrp 具有高度的可编程性和灵活性,支持多种无线电标准和调制解调技术。
它广泛应用于无线电通信、信号处理、频谱监测等领域的研究和开发工作。
【usrp 的功能】usrp 的功能主要包括以下几个方面:1.频率范围:usrp 支持的频率范围广泛,覆盖了从 30MHz 到 6GHz 的无线电频段。
2.调制解调技术:usrp 支持多种调制解调技术,如 AM、FM、PM、PSK、QPSK 等。
3.数据传输速率:usrp 支持高速数据传输,最高可达 20Mbps。
4.信号处理:usrp 具有强大的信号处理能力,可以进行各种信号处理操作,如滤波、放大、衰减等。
5.控制功能:usrp 可以通过计算机程序进行控制,支持多种编程语言,如 Python、C++等。
【安装 usrp】安装 usrp 的步骤如下:1.准备工作:确保计算机具备 USB 接口,并安装好 Python 编程环境。
2.下载 usrp 驱动程序:从 Ettus Research 公司官网下载 usrp 驱动程序。
3.安装 usrp 驱动程序:按照提示安装 usrp 驱动程序。
4.连接 usrp 设备:将 usrp 设备通过 USB 接口连接到计算机。
5.验证安装:运行 usrp 控制台程序,查看设备是否正常连接。
【使用 usrp】使用 usrp 进行无线电通信或信号处理的步骤如下:1.编写程序:使用 Python 或其他支持的编程语言编写程序,实现所需的无线电功能。
2.上传程序:将编写好的程序通过 USB 接口上传到 usrp 设备。
3.执行程序:在 usrp 设备上执行程序,进行无线电通信或信号处理。
USRP配置问题1.打开终端输入uhd_find_devices(下面称find命令)显示No UHD Devices Found 的问题?解决方法:usrp设备上电,等待大概5-6s直到只有指示灯D、F 亮,同时网线端口的左侧绿色指示灯一直亮。
在重新输入find命令时,看是否能够找到设备。
如果终端仍然显示No UHD Devices Found ,则把usrp网络断开连接,然后输入find命令试试。
如果还是显示未找到设备,断开电源,打开usrp设备的铁盒子找到进入安全模式的靠近FPGA芯片的蓝色S2按键。
找到后按着它然后接上电源直到指示灯不再闪烁,同时网线端口左侧的绿色灯亮,然后再松开按键。
正常情况下,再次输入find 命令时就能够找到设备,并且输出相关信息了。
最后,可以在终端用uhd_usrp_probe命令,打印出子板的详细信息。
2.终端运行sudo usrp_n2xx_simple_net_burner ,显示images write failed, FPGA 固件烧写失败的问题?解决方法:烧写失败的主要原因是设备与主机通信不稳定,导致FPGA擦写失败。
在解决问题1的基础上出现这种问题我们解决方法是:A.重复多次尝试,可能会偶尔成功(我没成功过);B.重新回到问题一,当输入find命令,直到不会出现Error 为止(虽然能够找到设备,但会输出Error,这是实验过不行的)。
C.到装有虚拟机ubuntu 终端的电脑上重新烧写(经验证这种方法很可靠),具体安装虚拟机和配置网卡见参考文献下的PDF文档[3]。
3.FPGA 固件烧写成功后,运行find 命令又无法找到设备的问题?解决方法:这个问题我也是不是很清楚,为什么固件烧进去后设备的地址就变了。
也就是说引起这个问题的原因是主机的IP地址与设备的IP地址不符,如果你知道设备现在的IP地址是什么就好办了,就可以直接在主机的网络连接—编辑—usrp—编辑中把IP地址改为和设备相同的地址。
基于NI USRP与RTL-SDR的无线通信收发系统的实现王晓丽;鲁旭涛;孙运强;解殿君
【期刊名称】《国外电子测量技术》
【年(卷),期】2017(36)10
【摘要】介绍了一种基于NI USRP与RTL-SDR的无线通信收发系统。
分析了该系统的软件特性和硬件构架,以FM调制与解调方式来发送与接收音频信号为例,介绍了FM信号的正交调制解调算法,以NI USRP当作发射端,RTL-SDR当作接收端,通过搭建Simulink框图在射频段与PC端对信号进行处理并发送与接收,并给出了详细的实现过程和测试结果。
从实验结果得出,此系统可以较好地发送并接收音频信号。
【总页数】5页(P81-85)
【关键词】软件无线电;NI;USRP;RTL-SDR;Simulink;调制解调
【作者】王晓丽;鲁旭涛;孙运强;解殿君
【作者单位】中北大学信息与通信工程学院
【正文语种】中文
【中图分类】TN2
【相关文献】
1.基于NI USRP的多模式自适应无线通信实验平台 [J], 孟梅梅;李晓辉;刘乃安;徐征
2.基于USRP的802.11a OFDM收发信机的设计与实现 [J], 李昊洋;刘海涛;李冬
霞
3.基于USRP的信号收发设计及实现 [J], 吴沁;李焕
4.基于LabVIEW和NI USRP的远程人脸识别系统设计与实现 [J], 谢轩
5.基于嵌入式USRP的无线通信实现 [J], 葛熠;陈为刚
因版权原因,仅展示原文概要,查看原文内容请购买。
基于USRP的调频收音机和遥控车钥匙
目标
采用Ni的软件无线电(USRP)平台,结合LabVIEW调制工具包,实现调频收音机、遥控车钥匙的有趣应用。
调频收音机的实现有两种方法,一种为反正切方法,一种为FM解调方法。
两种方法都可以接收到指定频段的广播。
遥控车钥匙功能:按下配套的无线车钥匙某个按钮,USRP接收到脉冲信号,程序中对其进行解调并且判断,可以自动识别你按下的是哪个键并显示出来。
软件安装:
bVIEW 2011
2.NI-USRP
3.Modulation Toolkit
4.3.2 (更低的版本不可用)
硬件连接:
1.用网线将USRP设备与PC机连接。
由于调频收音机有音频输出,所以要求
计算机有声卡,并且有声音播放器。
2.在控制面板中将PC机的IP设定为192.168.10.1,网关为255.255.255.0
3.连接USRP的电源、天线。
4.在windows的开始菜单中All Programs\\National Instruments\\NI-USRP目录下
面找到NI-USRP Configuration Utility,在Change IP Address 选项卡中应该能够看到设备(包括Device ID, IP Address, Type/revision)。
如果看不到设备,请点击Find Devices来寻找设备。
如果需要,可以选定一个设备并且在右边New IP Address栏中输入新IP地址,点击Change IP Address来修改USRP设备的IP地址。
操作流程
一、基于反正切(Arctangent)方法的调频收音机
1.该Demo只能使用USRP 2920(或者USRP N210)。
2.找到Demos中的FM Radio - Arctangent Method文件夹,打开NI USRP FM
Demo - ArcTan Method_LV2011.VI,会看到如下图所示的“基于软件无线电的调频收音机”前面板。
RP参数配置:USRP IP地址设为当前设备的IP,“正交采样率”设定为
某适合的值(例如200k,具体参阅该频段广播的说明),“载波频率”设定
为某个调频收音机的频段(例如94.7M,或者101.7M,103.7M),“有效天线”设定为RX1,“增益”设定为25左右。
“采样数设为20000。
4.声卡参数配置:“声卡采样率”必须设为44100,
5.运行VI,能够听到调频收音机接收到的信号声音(PC机要求带有声卡),
可以根据个人喜好调节音量(右下角)。
6.程序框图解释。
整体程序框图如下图所示。
包含USRP编程,反正切处理,
以及声卡编程三部分。
USRP编程部分在下图红色框出,包括打开USRP接收通道,参数配置,开始采集,连续获取下变频后的基带波形数据,将读出的波形数据存入右边框出的基带IQ移位寄存器中,While循环左边对移位寄存器初始化。
最后停止并关闭USRP,释放资源。
基带波形的反正切处理在下图中间红色框出,首先将基带复数波形向极坐标转化,然后展开相位,对相位求导。
求导后的波形存入右边的移位寄存器,左边小框中对移位寄存器初始化。
声卡的编程在下图红色框出,包括声卡参数配置,音量调节,连续向声卡缓存写入声音数据,最后对声音输出清零。
二、基于Modulation Toolkit的调频收音机
1.该Demo只能使用USRP 2920(或者USRP N210)。
2.找到Demos中的FM Radio - Modulation Toolkit文件夹,打开FM Radio -
Modulation Toolkit.vi,可以看到如下图所示的“基于软件无线电的调频收音机”的前面板。
3.声卡参数配置:“声卡ID”为0,“采样率”必须为44100S/s,“通道数”为
2,“每采样比特数”为16。
RP参数配置:“设备IP地址”为当前USRP 2920(或者USRP N210)
的IP地址,“正交采样率”设定为200kS/s,“载波频率”设定为某个FM收音机的频段(例如94.7M,或者101.7M,103.7M),“有效天线”设定为RX1,“增益”设定为25dB左右, “采样数”为200000。
5.FM解调配置:布尔控件可以选择是否进行载波修正,“FM偏频”设为30KHz,
“载波偏频”显示接收到的载波频率和估计的载波频率之间的偏差。
6.运行VI,能够听到FM收音机接收到的信号声音。
7.程序框图解释。
整体程序框图如下图所示。
USRP编程部分在下图顶部红色框出,包括USRP接收机打开,参数配置,开始接收,连续读取下变频后的基带波形数据,将读出的波形数据存入右边红框中的基带IQ移位寄存器中,左边的小红框是对移位寄存器的初始化。
最后停止
并关闭USRP,释放资源。
下图中间的大红框中是对基带波形的FM解调、重采样和快速FFT变换。
解调后的波形存入右边小红框的移位寄存器,左边小红框中对移位寄存器初始化。
下图底部大红框中是声卡的编程,包括声卡参数配置,初始化,连续向声卡缓存写入解调后的声音数据,最后对声音输出清零。
三、基于软件无线电的遥控车钥匙(Key Fob Decoder – OOK)
1.该Demo只能使用USRP 2920(或者USRP N210)。
2.找到Demos中的Key Fob Decoder - OOK文件夹。
这里有两个VI,其中
keyfob_decoder.vi执行OOK的解调算法,acquire_315mhz_keyfob.vi使用USRP采集315M信号、显示波形,并调用keyfob_decoder.vi进行解调和判断,将结果进行显示。
打开acquire_315mhz_keyfob.vi,会看到如下图所示的前面板。
RP参数配置:“设备名称”中输入USRP设备的IP地址,“正交采样率”
为200kHz,“载波频率”设为315M(与所使用的无线发射器相匹配),“有效天线”为RX1或者RX2,”增益”设为合适的数值(1或者10),”刷新时间间隔”推荐为0.25s。
4.运行程序,按下无线发射器的按钮,在前面板”按下的按钮”中将显示所按下
的是哪个按钮。
5.程序框图解释。
整体程序框图如下图所示,包括USRP编程和基带解调判断
两部分。
USRP编程部分在下图中红线大框中,包括USRP接收机打开,参数配置,开始采集,连续读取下变频后的基带波形数据,将读出的波形数据存入右边红框中的基带IQ移位寄存器中,左边的小红框是对移位寄存器的初始化。
最后停止并关闭USRP,释放资源。
基带解调和判断编程在keyfob_decoder.vi的子VI中完成,位于下图红色框中。
该子VI执行OOK的解调算法,并判断当前按键的位置。
注: 本实验采用的无线发射器为Digi-Key 提供的315 MHz 无线车钥匙
(Digi-Key P/N: CMD-KEY5-315-ND),该无线发射器产生一个带有同步信号、使用PWM调制的OOK信号,一长一短代表0,两短代表1。
)
总结
利用NI提供的软件无线电USRP平台及调制工
具包,结合LabVIEW强大的图形化编程和信号运算
处理能力,我们可以轻松快捷的实现基于各种通信
协议的应用。