ORBINOX三杆阀上使用的S-839 流量控制阀
- 格式:pdf
- 大小:75.18 KB
- 文档页数:3


FLUID CONTROL DIVISIONParker Hannifin Corporation95 Edgewood AvenueNew Britain, CT 06051Telephone (860) 827-2300IOM 304Fax (860) 827-2384 (Rev B)INSTALLATION, OPERATING & MAINTENANCE INSTRUCTIONS3-WAY NORMALLY CLOSED, 3-WAY NORMALLY OPENAND 3-WAY UNIVERSALDIRECT ACTING VALVESSERIES 304GENERAL SAFETY INSTRUCTIONS BEFORE INSTALLATIONFAILURE OR IMPROPER SELECTION OR IMPROPER USE OF THE PRODUCTS AND/OR SYSTEMS DESCRIBED HEREIN OR RELATED ITEMS CAN CAUSE DEATH, PERSONAL INJURY AND PROPERTY DAMAGE.Both the conduit coil and leaded one-piece coil contain a green “grounding” wire that must be secured to a proper ground location.DO NOT cut off the green ground wire. Doing so could negate a proper ground path and leave the valve assembly unprotected or “hot”.This document and other information from Parker Hannifin Corporation, its subsidiaries and authorized distributors provide product and/or system options for further investigation by users having technical expertise. It is important that you analyze all aspects of your application, including consequences of any failure, and review the information concerning the product or system in the current product catalog. Due to the variety of operating conditions and applications for these products or systems, the user, through its own analysis and testing, is solely responsible for making the final selection of the products and systems and assuring that all performance, safety and warning requirements of the application are met.The products described herein, including without limitation, product features, specifications, designs, availability and pricing, are subject to change by Parker Hannifin Corporation and its subsidiaries at any time without notice.Carefully read installation, operation and maintenance procedures prior to installing or servicing valve.Do not use valve as a safety shut-off valve when making repairs. Do not install a valve before depressurizing system down to atmospheric pressure.Care must be taken to ensure that the valve materials selected are suitable for the media being handled. Parker assumes no liability for damage caused by improper material selection.Caution: Do not, at any time, make any alteration or modifications to any valve without the express and written approval of Parker’s Fluid Control Division.DESCRIPTIONThese valves are 3-way direct operated valves. The 304 series valve product line are available as Normally Closed (N.C.), Normally Open (N.O.), or universal (U) valves. The direct acting valves operate with zero pressure differential.Valves may be ordered with either NEMA 2, 4, 4X integrated coils for ordinary locations. Additional solenoid coils and enclosures are offered as described in our catalog.FLUID CODESListed below are the common fluid codes. The codes for the approved fluids for use with each valve are printed on the outside of the individual packaging.CODE FLUIDA - Air or nontoxic, nonflammable gasesAC - AcetyleneG - City gas supplied by public utilieisGA - GasolineHO - Petroleum based oils having viscosities up to 400SSU at 38°F02 No1 and No 2 fuel oils with viscosities lessthan 40SSU at 38°COX - OxygenW Water or other aqueous nonflammable liquidsFor the maximum fluid temperatures, as well asvalve ambientlimitations, check the valve part number on the nameplate and refer to the catalog.TORQUE CHARTINSTALLATION INSTRUCTIONS Installation must be done according to all applicable Safety Codes and Standards and by qualified personnel.Inspect valve prior to installation. Damaged valves oractuators must not be installed.Mounting position and pressure limits: Valves can bemounted directly on piping or by using the two #8-32 UNF threaded holes in the bottom of the valve body for the 1/8” NPT valves. Two #10-32 UNF threaded holes for the 1/4” NPT valves. The valves are designed to operate in any position. The valve may be installed in any line regardless of the direction in which the line runs. However, for optimum life and performance, the valve should be mounted vertically upright so as to minimize wear and reduce the possibility of foreign matter accumulating inside the sleeve area. Line pressure, voltage and frequency must conform to nameplate rating. Allow adequate clearance above valve for removal of coil. WARNING: Do not install a valve whose permitted pressure / temperature ratings are inadequate to meet the operating conditions. Piping: Remove protective closures from the ports. Connect line pressure to the inlet port and apparatus piping to the outlet port. Use of Teflon™ tape, threaded coumpounds or sealants is permissible but should be applied sparingly to male pipe threads only. CAUTION : Do not allow foreign particles, Teflon tape, or thread compound to enter valve. Only the wrench flats provided on the body ports should be used in applying the torque. Ports should not be subjected to excessive torque by use of an oversized wrench, wrench extension or by impacting the wrench handle. Do not use the valve to “stretch” or “align” the pipe. Tightening torque should not exceed 100 in-lbs for 1/8” NPT valves and 175 in-lbs [20,0 Nm] for 1/4” NPT valves. Do not use sleeve or enclosure as a lever when applying torque.Media filtration: For protection of the valve, install a suitable strainer or filter in the inlet side as close to the valve as possible. Dirt or foreign material in the media may cause excessive leakage, wear, or in exceptionalcases, malfunction. Clean periodically depending on service conditions. Lubrication: Lubrication is not required although air linelubrication will substantially increase valve life. Electrical connection: Electrical supply must conform to nameplate rating. Connect coil leads or terminals to the electrical circuit using standard electrical practices in compliance with local authorities and the National Electrical Code. Do not power coil until it has been fitted over sleeve and the retaining nut has been installed to prevent possible coil damage from overheating. WARNING : Turn off electrical power before connecting the valve to the power source. If the coil assembly is located in an inconvenient orientation, it may be reoriented to facilitate installation. Loosen coil assembly nut, rotate coil assembly to desired position, then retighten the retaining nut with an input torque per chart. COIL ASSEMBLY Position coil (as described below) on the sleeve, position and tighten retaining nut into the top of the sleeve assembly using a 5/32” or 5mm hex wrench with an input torque per chart. If the coil orientation needs to be repositioned to meet installation wiring needs, simple loosen the retaining nut usi ng a 5/32” or 5mm hex wrench , then rotate the coil to the required position and tighten the retaining nut. NOTE : The one-piece integrated coil assembly contains top and bottom o-ring seals to prevent moisture ingressioninto the sleeve area. The o-ring seals must be installed correctly for proper functionality. PORT MARKING ARRANGEMENTDe-Energized Energized11 33333One-Piece Integrated Coil. The conduit coil meets NEMA 2, 4, 4X classification for ordinary location requirements. Use suitable electrical cabling and conduit materials and components meeting applicable NEMA recommendations.For both the conduit and leaded one-piece coils, slide one o-ring over and down the sleeve assembly until the o-ring rests on the valve body., Slide the coil over the valve sleeve. Place the second o-ring into the recess located on top of the coil. Affix retaining nut to sleeve and tighten per torque chart. Use suitable electrical cabling for wiring connection.WARNING: Both the conduit coil and leaded one-piece coil contain a green “grounding” wire that must be secured to a proper ground location. The grounding wire is welded to the internal coil frame providing the approved ground path for the total valve assembly.DO NOT cut off the green ground wire. Doing so could negate a proper ground path and leave the valve assembly unprotected or “hot”.One-Piece DIN Coil and various cable option terminations:Loosen cable screw and remove plastic housing from DIN coil. Do not remove the gasket from the DIN spades on the coil. Separate the plastic block from the housing with a small screwdriver to expose the elecctrical terminations. Feed the lead wires through the conduit hub and attach them to the appropriate screw terminal. For electrical connection within the terminal box, use field wire that is rated for 90o C or greater. Snap the plastic block back into place inside the metal enclosure. Replace the cover and hand-tighten the cover screws. Place the gasket over the DIN spades on the coil and press the terminal box and coil together. Secure the terminal box to the coil using the mounting screw provided.Slide one o-ring over and down the sleeve assembly until the o-ring rests on the valve body. Slide the DIN coil over the valve sleeve. Place the second o-ring into the recess located on top of the coil. Affix retaining nut to sleeve and tighten per torque chart.Two-Piece Yoke & Spade Coil with 1/4” tabs: With coil inserted inside of U-shaped metal yoke, slide coil over sleeve. Affix retaining nut to sleeve and tighten per torque chart. Connect spade termination connector to spade tabs on coil.Two Piece Yoke & Molded Leaded 2-Wire Coil: With coil inserted inside of U-shaped metal yoke, slide coil over sleeve. Affix retaining nut to sleeve and tighten per torque chart. Use suitable electrical cabling for wiring connection. Two Piece Grommet Housing & Taped 2 Wire Coil: With the taped coil inserted inside the metallic housing, slide coil over sleeve. Affix retaining nut to sleeve and tighten per torque chart. Use suitable electrical cabling for wiring connection.Coil/enclosure temperature:The direct acting valves are supplied with coils designed for continuous duty service. Normal free space must be provided for proper ventilation. When the coil is energized continuously for long periods of time, the coil assembly will become hot. The coil is designed to operate permanently under these conditions. Any excessive heating will be indicated by smoking and/or odor of burning coil insulation.For the maximum valve ambient conditions, as well as the fluid temperatures, check the valve part number on the nameplate and refer to the product catalog to determine the maximum temperatures.MAINTENANCENote: While the valves are design to operate over millions of cycles, depending on service conditions, fluid being used, filtration, and lubrication, it may be required to periodically clean and/or replace worn components to ensure optimum quality performance. See Disassembly Instructions.CAUTION:Do not expose plastic or elastomeric materials to any type of commercial cleaning fluid. Parts should be cleaned with a mild soap and water solution.If a valve is to be removed from a pipeline carrying hazardous media, the parts of the valve in contact with the hazardous media must be properly cleaned and decontaminated before repairs are performed.DISASSEMBLY INSTRUCTIONSWARNING:Depressurize system and turn off electrical power to the valve before attempting repair. The coil must not be energized unless it is installed on the valve. Otherwise, the coil will overheat and burn out.The valve body need not be removed from the line.CAUTION:When removing or replacing the sleeve assembly, it may be necessary to provide proper support to prevent the valve from rotating thereby causing damage to piping.To remove the coil assembly:Using a 5/32” or 5mm hex wrench, unscrew the top retaining nut of the coil assembly. The coil assembly can be lifted off the sleeve tube.To disassemble the pressure vessel:Use the same 5/32” or 5mm hex wrench turning counterclockwise to remove the sleeve tube. The plunger assembly, return spring and o-ring seal may be removed. Replacement Parts: When ordering replacement parts kits, specify valve number and voltage from nameplate. Parts kits are available for each valve. Parts included in each kit are marked with an asterisk (X). See exploded views.PRESSEURE VESSEL REASSEMBLY INSTRUCTIONSTo reassemble the pressure vessel, refer to exploded view drawings. Parts must be replaced in the order shown.Lubricate o-ring with a mineral oil or equivalent and replace the o-ring into the valve body. Install the plunger and spring into the sleeve. Carefully align threads while installing the sleeve into the body.Tighten the sleeve assembly in the body using the 5/32” or 5mm hex wrench turning clockwise with an input torque per torque chart.COIL REASSEMBLY INSTRUCTIONSWith coil assembly repositioned on the sleeve, position the retaining nut into the top of the sleeve assembly and tighten using a 5/32” or 5mm hex wrench with an input torque of of 25-35 in-lbs [2,9 to 4,0 Nm].LABELINGMODULAR LABELINGFor valves sold modularly, a 2-piece label system is used consisting of a base valve identification label and a coil identification overlay label. The base label is affixed to the coil and the overlay label is placed over the base label provide the complete valve identification.VALVE IDENTIFICATIONAll Parker pressure vessels are identified with a valve label. The label indicates the valve part number, maximum operating pressure differential (MOPD), orifice size and date code.FLUID CONTROL DIV NEW BRITAIN, CT USADATE CODE ORIFICE 1207O 7/64 PRESSURE VESSEL30CC02MV4WATTS 10AC 8.5DCAC 50 PSIDC 50 PSICOIL IDENTIFICATIONAll Parker coil enclosures are identified with a label. The label indicates the coil part number, voltage and frequency.FLUID CONTROL DIV NEW BRITAIN, CT USAVOLTS/HZ24VDCENCL & B4BCOILFULLY ASSEMBLED VALVE LABELINGAll Parker valves are identified with a valve label. The label indicates the valve type and size, maximumoperating pressure differential (MOPD), orifice size and applicable agency approval designations. In addition, the label also specifies the appropriate electrical specifications for agency compliance.FLUID CONTROL DIV NEW BRITAIN, CT USAVALVE NUMBER30CC02MV4B2BVOLTS/HZ 24VDCWATTS 8.5 ORIFICE 7/64 3/32PSI50BAR3CODE0907OPARTS LIST AND COMPONENT DRAWINGRetaining NutComplete Portfolio of Available CoilsDECLARATIONParker’s Fluid Control Division certifies its valve appliance products complies wit h the essential requirements of the applicable European Community Directives. We hereby confirm that the appliance has been manufactured in compliance with the applicable standards and is intended for installation in a machine or application where commissioning is prohibited until evidence has been provided that the machine or application is also in compliance with EC directives.The data supplied in the Parker valve catalogs and general Installation, Operating & Maintenance Instructions are to be consulted and pertinent accident prevention regulations followed during product installation and use. Any unauthorized work performed on the product by the purchaser or by third parties can impair its function and relieves Parker Hannifin of all warranty claims and liability for any misuse and resulting damage.A separate Declaration of Conformity or Manufacturer’s declaration is available upon request. Please provide valve identifica tion numbers and order serial numbers of products concerned.。

F13F100 RegO Dr. Elon, NC 27244 USA +1 (336) 449-7707ApplicationDesigned for mounting in threaded full or half couplings in container installations. They may be used for filling, withdrawal or vapor equalizing applications. The exceptionally low pressure drop makes them ideal for pump suction lines. If a riser pipe to the vapor space is used with these valves, the minimum inside diameter of the riser pipe must be at least two times the valve thread size in order not to restrict flow to the side inlet ports.Features• Precision machined.• Generous flow channels provide low pressure drop minimizing cavitation in pump suction lines.• Cotter pin prevents loss of spring retainer due to vibration in service.• Stainless steel spring provides consistent closing flow and long service life.• Separate models for installation in either half or full couplings.Ordering InformationMaterialsBody ............................................................. Cadmium Plated Steel Body (A7539 Series Only) ............................................. Ductile Iron Seat Disc ...................................................... Cadmium Plated Steel Stem ......................................................................... Stainless Steel Spring ....................................................................... Stainless Steel Guide ............................................................ Cadmium Plated SteelTypical InstallationHalf Coupling Full Coupling*Based on horizontal installation of excess flow valve. Flows are slightly more when valves are installed with outlet up; slightly less when installed with outlet down.Part Number For Use With This Type Coupling AInlet Connection M. NPTB Outlet ConnectionNPT C Wrench Hex Flats DEffective Length(Approx.)Approximate Closing Flow*Liquid (GPM Propane)Vapor SCFH (Propane)25 PSIG Inlet 100 PSIG InletA8523Half¾”¾” Male 1⅛”1¾”155,1708,800A8525Half 1¼”1¼” Male1¾”2⅛”3512,54021,560A7537L4Half 2”2” Male and 1¼” Female2⅝“2½”7513,00025,600A7537L4F Full A7537N4Half 12525,00042,500A7537N4F Full A7537P4 Half 15030,50052,000A7537P4F Full A7539R6 Half 3”3” Male and 2” Female3¾”3⅛”15032,10055,500 A7539R6F Full A7539T6Half 20039,40068,300A7539T6F Full A7539V6 Half 25051,10088,700A7539V6FFullNOTE: Multiply flow rate by .94 to determine liquid butane flow andby .90 to determine liquid anhydrous ammonia flow.A7537N410R EG OP R O D U C T S10YE AR W A R R AN TY。
CONTENTS PAGE0.- Description (2)1.- Handling (2)2.- Installation (3)3.- Actuators (5)4.- Maintenance .............................................................................. 6 4.1.- Replacement of the packing kit ...................................... .... 6 4.2.- Replacement of the seal ..................................................... 7 4.3.- Replacement of the cylinder................................................ 7 4.4.- Replacement of accesories..................... (8)4.5.- Greasing.............................................................................. 8 5.- Storage. (8)6.- Components list (9)0.- DESCRIPTIONThe MP model is a general-purpose, uni-directional flanged valve for gaseous clean fluids such as atmospheric air, nitrogen, oxygen etc. and gaseous dirty fluids carrying suspended solids. For the latter application the valve has a register for both the build-up of solids and cleaning.This is a valve which, due to its mechanical system of movement, offers several advantages compared to other butterfly valves. These advantages include the elimination of friction between the disc and the seat thus lengthening the valve’s service life.This model is mainly divided into 2 types; low pressure with values equivalent to 6Kg/cm2and high pressure, with pressure up to 40Kg/cm2.Likewise, as far as tightness is concerned, these valves are mainly constructed in 2 versions. The first of these with graphite-based braiding providing BO class 3 tightness according to standard DIN 3230 and the second providing relative tightness with metal-metal contact.1.- HANDLINGPay special attention to the following points when handling an Orbinox valve:Use the lifting lugs which all valves of this type have for moving and handling purposes:SEE DRAWING 8260A2 (LIFTING LUGS)- Do not lift the valve by holding it by the stem or the actuator support plate.The valve would go totally off balance, possibly be damaged and injure the personnel handling it.- Do not lift the valve by holding it by the bore or port.This can cause damage to the surface of the seat, seals and the flange raised face.SAFETY WARNING:- Ensure that the crane, as well as the belts or slings used, are correctly set for lifting the weight of the valve.- These valves have support legs to prevent them from rolling while being tested or handled.These legs cannot be used to support the valve weight when being installed, nor can they be used for supporting the weight of the pipes.2.- INSTALLATIONIt is important to observe the following warnings to avoid personal injuries or damage to property when handling and installing the valve:- Qualified and trained personnel must carry out the handling and maintenance of the valve.- Use suitable Individual Protection Equipment (IPE) (gloves, safety footwear...).- Disconnect all lines affecting the valve and put up a notice notifying that work is being carried out on the valve.- Isolate the valve Completely from the process.- Release process pressure.- Drain the fluid from the valve.Before installing the valve, inspect it to check that it has not suffered any damage during transit or storage.Ensure that the body inside is clean, taking special care with the seat area. Also ensure that the neighbouring areas where the valve is to be installed are clean (flanges, pipes…).As a uni-directional valve, it has to be installed in such a way that the PRESSURE pushes the disc towards the SEAT. These valves have an arrow riveted in the valve body indicating the direction of pressure. It is the user’s responsibility to correctly install and direct the valve in relation to the direction of pressure.It is useful to remember that the direction of flow does not necessarily coincide with the direction of pressure: SEE DRAWING MP8260A2 (DETAIL K)Special consideration should be given to keeping the correct distance between connection flanges and to ensuring that they are perfectly aligned and parallel.The incorrect positioning of counter-flanges will cause strain on the valve body which could lead to operating problems.The valve can be mounted in any position: horizontal, vertical or slanting, depending on the requirements of the installation. The operating shaft MUST be mounted in a horizontal position. In horizontal or slanting lines try to ensure that the shaft remains, not only horizontal, but also in the upper area.If the valve has electrical accessories such as electric-actuator, solenoid valves, limit switches, electropneumatic positioners, etc. the corresponding earthing connections must be made before putting it in to operation.In big valves (Diameters of 1000 mm or larger) ensure before handling the valve that the mechanical stop on the outside has left its seat and is positioned on the support plate.In order to check its operation and tightness, operate the valve with no load and then with load.It is worth remembering that during transit / storage of the valve, the packing might have settled thus causing a small leak. Once there is pressure inside the valve this leak could be checked by applying soapy water to the packing gland area. This can be remedied by gently tightening the packing gland until the aforementioned leak is eliminated.3.- ACTUATORS3.1.- Bevel GearThis consists of a worm gear mechanism and the valve is shut off by making the wheel turn towards the right.The degree of the valve opening is shown on an indicator located in the gear casing cover.3.2. PneumaticThere are two possible types:A) A double-acting rotary cylinder or with a ¼ turn whose rotating shaft directly drives thevalve stem.B) A pneumatic double-acting linear cylinder which operates an adjustable lever fastened tothe valve stem. These cylinders are designed for working at a minimum instrument air pressure of 4 bar. In tight valves, these cylinders are sized to open the valve at a differential pressure equivalent to 0.1 bar and 0.3 bar in metal-metal valves. They are not intended for operating the valve when it is submitted to line operating pressure (for example 6 bar). In order to do so, the lever driven by the pneumatic cylinder has a regulating screw.REGULATING SCREW IN THE LEVER (Drawing MP8260A2, section F):This screw (32) is intended for providing the pneumatic cylinder with greater or lesser force depending on how it’s operated.It is factory set ensuring that the cylinder with 4 bar of instrument air pressure is able to open the valve at a differential pressure of 0.1 bar or less in tight valves and at a pressure of 0.3 bar or less in metal-metal valves. As such, this screw should not be adjusted unless the aforementioned set points change or the valve is disassembled at some time in the future.Handling the regulating screw: firstly, the locknut that fastens the screw is loosened and secondly the abovementioned screw is moved so that by turning it anticlockwise the cylinder is supplied with more force or, with the same result, the cylinder shaft is moved further away from the main shaft and vice versa.It is recommended to have a replacement cylinder of each diameter or at least to have sets of replacement cylinder seals. Please refer to the pneumatic cylinder supplier’s maintenance manual for changing the aforementioned seals.3.3. Electric actuatorSpecific supplier operating instructions will be enclosed in accordance with the type or make of electric actuator delivered.4.- MAINTENANCEIt is important to observe the following warnings to avoid personal injuries or damage to property when handling and installing the valve:- Qualified and trained personnel must carry out the handling and maintenance of the valve.- Use suitable Individual Protection Equipment (IPE) (gloves, safety footwear...).- Disconnect all lines affecting the valve and put up a notice notifying that work is being carried out on the valve.- Isolate the valve Completely from the process.- Release process pressure.- Drain the fluid from the valve.The MP valves do not require any maintenance other than the replacement of the packing (21) and seals (2) in the tight valves.The service life of these watertight elements depends on the valve’s operating conditions such as pressure, temperature, abrasion and the number of operations.4.1. Replacement packing kit (21) Drawing MP8260A2:The packing kit includes 2 lines of synthetic packing made of 98% pure carbon filaments (MG-420), at the head and bottom which are wrapped around pre-formed pure mineral graphite rings (grafoil).SEE DETAIL JThe circuit has to be depressurised before beginning any type of maintenance work.1) Loosen the indication for the detectors or limit switches (46).2) Loosen the guards on the support plate (49 and 50).3) Take out the stud bolt (54) fastening the main lever (27) to the valve stem (7). If the nuthas a welding point remove it in order to be able to remove the stud bolt easily.4) Loosen the bolts and nuts (53) joining the main support plate (26) to the intermediate valveextension cover (20).5) Due to its weight use a crane to remove the whole assembly, composed of the supportplate, cylinder and main lever.6) Remove the packing gland (22 and 23) completely and take out the packing using ascrewdriver and / or a packing extractor.Ensure that nothing is left behind inside the groove.7) Position the new packing fitting the bottom line (MG-420) and all the grafoil rings withoutfitting the head line.Position the packing gland (22 and 23) and tighten the abovementioned assembly with a torque of 2 kg.m.8) Remove the packing gland (22 and 23) and fit the head line (MG-420).Put the packinggland back (22 and 23) and tighten until the whole assembly is tightened.9) Position the assembly composed of the support plate, cylinder and main lever. Proceed inreverse order from the disassembly for the assembly of the aforementioned assembly. 10) Carry out some operations with a loaded circuit and retighten the packing gland (22 and23), only enough to prevent leaks. This check can be carried out using soapy water.4.2. Replacement of the seal (2) (only for tight valves):The seal with reference HECKER AK-2749 is composed of aramid fibres impregnated with rubber on both sides and covered with a special material called centellen.This whole assembly is completed with a graphite coating. This seal is supplied as a closed ring.1) Remove the valve from the pipe.2) Open the valve and hold the disc open ensuring that it doesn’t close.3) Remove the old seal using a screwdriver and thoroughly clean the groove where the newseal is to be positioned. This groove has a dovetail-like design.4) Position the new seal in the groove whilst supporting it over its entire perimeter.5) Carry out several operations since the disc, when moving, will end up homogeneouslytightening the seal in its housing.4.3. Replacement of the cylinder: Drawing MP8260A2The replacement of the cylinder in an MP valve can be carried out when the circuit is in operation.T he time available for carrying out the replacement has to be kept in mind for proceeding before the next operation.1) Shut off the air instruments valve to the pneumatic circuit.2) Loosen the support plate (49 and 50) guards.3) With the valve in the closed position, move screw 32 (section F) towards the outlet hole(detail I) so that the fork pin (52) can be seen through this hole.4) Remove the cylinder fork pin (52).5) Dismount the pneumatic cylinder flow regulators (38).6) See detail H (greasing boxes) and dismount covers 35 and 33 with bearing 34.7) Move the cylinder fork towards the main valve stem and remove the cylinder from itshousing.8) Once the cylinder is dismounted remove its fork in order to position it in the new cylinder.When mounting the fork in the cylinder ensure that its machined part is kept towards theinside and not the outside, see detail E.4.4.- Replacement of accessories:These valves are supplied with an air filter and pressure regulator. This pressure regulator is generally set to 4 bar.Likewise, they include one-way flow regulators with a pneumatic pipe made of high-pressure flexible armoured rubber.The supply includes double coil solenoid valves as well as proximity switches.It is recommended having spare parts for all these elements. Refer to the manufacturer’s manual for maintenance advice regarding these items.No specific instructions are required for replacing the accessories.Generally speaking, the air instruments valve to the pneumatic circuit is shut off before being able to change the accessories.4.5.- Greasing:Since 2001, these valves have been supplied with greasing boxes in the intermediate cylinder connection; see detail H of drawing MP8260A2.In some valves this greasing is carried out directly in the intermediatecylinder connection rods (See figure 1). In both cases, grease thesepoints every 6 months using calcic grease with the followingcharacteristics: insoluble in water, low ash content and excellentadhesion.It is recommended including greasing boxes in valves which do nothave any of these greasing systems.5.- STORAGEWith the exception of the small sizes, these valves are individually packed.After unloading, the valves have to be stored in a well-aired location under shelter to protect them from dust, dirt and dampness.If storage outside is unavoidable, keep the valve away from heat, direct sunlight or protect from the effects of rain by using a coating.Keep well-aired to avoid dampness.。
3-point rotary actuator with fail-safe for ballvalves• Torque motor 10 Nm• Nominal voltage AC 100...240 V• Control 3-point• Deenergised open (NO)• with 2 integrated auxiliary switchesTechnical dataElectrical data Nominal voltage AC 100...240 VNominal voltage frequency50/60 HzNominal voltage range AC 85...265 VPower consumption in operation 4 WPower consumption in rest position 3 WPower consumption for wire sizing15 VAAuxiliary switch 2 x SPDT, 1 x 10% / 1 x 11...100%Switching capacity auxiliary switch 1 mA...3 A (0.5 A inductive), DC 5 V...AC 250 VConnection supply / control Cable 1 m, 4 x 0.75 mm²Connection auxiliary switch Cable 1 m, 6 x 0.75 mm²Parallel operation Yes (note the performance data)Functional data Torque motor10 NmTorque fail-safe10 NmDirection of motion motor Y = 0 (A – AB = 0%)Direction of motion fail-safe Deenergised NO, valve open (A – AB = 100%)Manual override by means of hand crank and locking switchRunning time motor90 s / 90°Running time fail-safe<20 s @ -20...50°C / <60 s @ -30°CSound power level, motor45 dB(A)Position indication MechanicalService life Min. 60'000 fail-safe positionsSafety data Protection class IEC/EN II, reinforced insulationProtection class UL II, reinforced insulationProtection class auxiliary switch IEC/EN II, reinforced insulationDegree of protection IEC/EN IP54Degree of protection NEMA/UL NEMA 2Enclosure UL Enclosure Type 2EMC CE according to 2014/30/EULow voltage directive CE according to 2014/35/EUCertification IEC/EN IEC/EN 60730-1 and IEC/EN 60730-2-14UL Approval cULus according to UL60730-1A, UL60730-2-14and CAN/CSA E60730-1The UL marking on the actuator depends onthe production site, the device is UL-compliantin any caseType of action Type 1.AA.BRated impulse voltage supply / control 2.5 kVRated impulse voltage auxiliary switch 2.5 kVPollution degree3Ambient humidity Max. 95% RH, non-condensing••••••••Mode of operationSimple direct mountingManual overrideAdjustable angle of rotation High functional reliabilityFlexible signallingSafety dataAmbient temperature -30...50°C [-22...122°F]Storage temperature -40...80°C [-40...176°F]Servicingmaintenance-free WeightWeight 2.3 kgSafety notesThis device has been designed for use in stationary heating, ventilation and air-conditioning systems and must not be used outside the specified field of application, especially in aircraft or in any other airborne means of transport.Outdoor application: only possible in case that no (sea) water, snow, ice, insolation or aggressive gases interfere directly with the device and that it is ensured that the ambient conditions remain within the thresholds according to the data sheet at any time.Caution: Power supply voltage!Only authorised specialists may carry out installation. All applicable legal or institutional installation regulations must be complied during installation.The device may only be opened at the manufacturer's site. It does not contain any parts that can be replaced or repaired by the user.Cables must not be removed from the device.The device contains electrical and electronic components and must not be disposed of as household refuse. All locally valid regulations and requirements must be observed.The two switches integrated in the actuator are to be operated either on power supply voltage or at safety extra-low voltage. The combination power supply voltage/safety extra-low voltage is not permitted.Product featuresThe actuator moves the valve to the operating position at the same time as tensioning thereturn spring. The valve is turned back to the fail-safe position by spring force when the supply voltage is interrupted.Simple direct mounting on the ball valve with only one screw. The mounting orientation in relation to the ball valve can be selected in 90° steps.By using the hand crank the valve can be operated manually and engaged with the locking switch at any position. Unlocking is carried out manually or automatically by applying the operating voltage.Adjustable angle of rotation with mechanical end stops.The actuator is overload protected, requires no limit switches and automatically stops when the end stop is reached.The actuator has one auxiliary switch with a fixed setting and one adjustable auxiliary switch. They permit a 10% or 11...100% angle of rotation to be signaled.Electrical installationCaution: Power supply voltage!Parallel connection of other actuators possible. Observe the performance data.Wire colours:1 = blue 2 = brown 3 = white 4 = white S1 = violet S2 = red S3 = white S4 = orange S5 = pinkS6 = grey Wiring diagrams AC 230 V, 3-pointAuxiliary switchOperating controls and indicatorsAuxiliary switch settingsNote: Perform settings on the actuator only in deenergised state.For the auxiliary switch position settings, carry out points to successively.17Manual overrideTurn the hand crank until the desired switching position is set.Shaft clampEdge line displays the desired switching position of the actuator on the scale.Fasten the locking deviceTurn the locking switch to the …Locked padlock“ symbol.Auxiliary switchTurn rotary knob until the notch points to the arrow symbol.Unlock the locking deviceTurn the locking switch to the …Unlocked padlock“ symbol or unlock with the hand crank.CableConnect continuity tester to S4 + S5 or to S4 + S6.Manual overrideTurn the hand crank until the desired switching position is set and check whether the continuity tester shows the switching point.12A 34567DimensionsFurther documentation• The complete product range for water applications• Data sheets for ball valves• Installation instructions for actuators and/or ball valves• General notes for project planning。
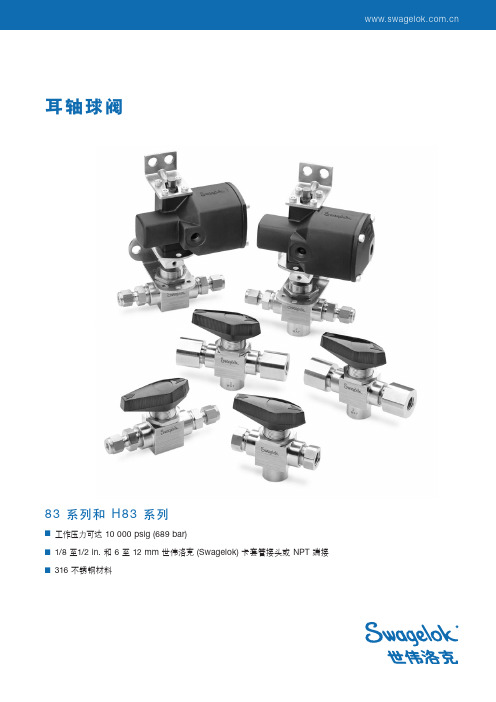
球 阀实用型球閥 (26XX 系列)注: 国家卫生基金会生饮水认证,单一 O 形环,安全 - T 型设计中心柱。
注: 国家卫生基金会生饮水认证,单一 O 形环,安全 - T 型设计中心柱。
工业用双油令球阀 (18XX 系列)注: 国家卫生基金会生饮水认证,两条 O 形环,安全 - T 型设计中心柱,有锁扣的“T”形把手,PTFE 垫座,可与 TU 2000 系列阀门互换。
注: 国家卫生基金会生饮水认证,单一 O 形环,安全 - T 型设计中心柱,标准“T”形把手,HDPE 垫座(有 PTFE 垫座选择),可与 TU 2000 系列阀门互换。
工业用三通双油令球阀 (47XX 及 50XX 系列)注: 国家卫生基金会生饮水认证,双条 O 形环,安全 - T 型设计中心柱,没有分支截流注: 国家卫生基金会生饮水认证,单一 O 形环,安全 - T 型设计中心柱,无阻挡密封垫座架阀门。
逆 止 阀工业用球形逆止阀 (45XX 系列)注: 国家卫生基金会生饮水认证,垂直分流或水平分流应用,必须在泵浦或转向分流前直管管径 10 倍远距离安装之,可与 TU 2000 系列阀门互换。
蝶式逆止阀 (54XX 系列)注: 小体积設計,垂直分流或水平分流应用,對逆流有快速反應但不重甩關閉,必须在泵浦或转向分流前直管管径 5 倍远距离安装之。
工业用摆动式逆止阀 (44XX 系列)注: 為大流量小波動,垂直或水平流向的應用設計,必须在泵浦或转向分流前直管管径 10 倍远距离安装之。
注: 国家卫生基金会生饮水认证,多重档次把柄,适合缓慢开关,不必移除阀体即可检修,4" 闸阀附带快速查看位置指示器。
注: 小体积設計,多重档次把柄适合缓慢开关,不必移除阀体即可检修,6" 阀附带快速查看位置指示器。
其他種類的閥門蝶阀 (72XXXX 系列)注: 干燥中心柱设计,316L 型不绣钢中心柱,O 形密封圈在全压下有紧密的密封性,偏位盘片降低磨损及减少工作扭矩,套件或锁孔内镶金属设计可选。
N/AL 5.9.051.01
Our policy is one of continuous research and development. We therefore reserve the right
to amend, without notice, the specifications given in this document.
07/97q Line mounted general purpose regulators q Captive regulating needle will not blow out when unscrewed q Calibrated adjusting knob, can be locked q Suitable for wall mounting q High operating pressure
Technical Data Medium:
Compressed air, filtered, lubricated and non-lubricated Operation:
Uni-directional Mounting:
Line mounted, concentrically Port Size:
BSPP NPT G 1⁄8S/8361⁄8 NPT C/836G 1⁄4M/8371⁄4 NPT C/837G 1⁄2M/8391⁄2 NPT C/839G 3⁄4M/8403⁄4 NPT C/840G1M/855 1 NPT C/855Operating Pressure:0,3 - 16 bar
Operating Temperature:
-20°C* to +80°C (Alternative models to 150°C)
* Consult our Technical Service for use below +2°C.
Ordering Information
To order, quote model number from table overleaf,e.g. M/837 for the G1/4 model
Alternative models
M/600 range of heavy duty panel mounting Flow Regulators (air & hydraulic), see page 5.9.041.01S/518 precision Flow Regulators (air & hydraulic),see page 5.9.031.01
T1000 range of Block Form Flow Regulators, see page 5.9.001.01
TM, TC/800 High Temperature version (150°C max.)
Materials
Brass body, adjusting knob, and locking ring (S/836, M/837,M/839), aluminium body, adjusting knob and locking ring
(M/840, M/855), nitrile rubber seals.
Heavy Duty Flow Regulator
M/800, C/800 Series
In Line Flow Regulator 1⁄8",1⁄4",1⁄2",3⁄4",
1"
12
N/AL 5.9.051.02
07/97
Our policy is one of continuous research and development. We therefore reserve the right
to amend, without notice, the specifications given in this document.
BSPP =According to BS2779 and ISO - 228/1
NPT =
Products are finished with National Pipe Straight Threads for Couplings,which are specifically designed to mate with NPT male threads
General Information
Flow Regulator
ØA Model Number: S/836
G 1⁄8
C/836
1⁄8 NPT
Type: Uni-directional
Free flow is from ‘2’ to ‘1’, indicated by arrow
07/97N/AL 5.9.
051.03
Our policy is one of continuous research and development. We therefore reserve the right
to amend, without notice, the specifications given in this document.
ØA Model Number: M/839
G 1⁄2
C/839
1⁄2NPT
Type: Uni-directional
Free flow is from ‘2’ to ‘1’, indicated by arrow
ØA Model Number: M/840
G 3⁄4
C/840
3⁄4NPT
Type: Uni-directional
Free flow is from ‘2’ to ‘1’, indicated by arrow
ØA Model Number: M/855
G1C/855
1 NPT
Type: Uni-directional
Free flow is from ‘2’ to ‘1’, indicated by arrow
Warning
These products are intended for use in industrial compressed air systems only. Do not use these products where pressures and temperatures can exceed those listed under ‘Technical Data’.
Before using these products with fluids other than those specified, for non-industrial applications, life-support systems, or other applications not within published specifications, consult Norgren.
Through misuse, age, or malfunction, components used in fluid power systems can fail in various modes. The system designer is warned to
consider the failure modes of all component parts used in fluid power systems and to provide adequate safeguards to prevent personal injury or damage to equipment in the event of such failure.
System designers must provide a warning to end users in the system instructional manual if protection against a failure mode cannot be adequately provided.
System designers and end users are cautioned to review specific warnings found in instruction sheets packed and shipped with these products where applicable.。