
ABB第五代机器人控制器IRC5手册
- 格式:pptx
- 大小:2.46 MB
- 文档页数:33

-/
第2章 欢迎使用 FlexPendant
2.1 关于本章
概述
本章概述了 FlexPendant、IRC5 控制器和 RobotStudio。
基本的 IRC5 机器人系统由机器人控制器、FlexPendant、RobotStudio 和一个或几个机器人或其它机械单元组成。 可能还有过程设备和其它的软件选项。
2.2. FlexPendant 简介
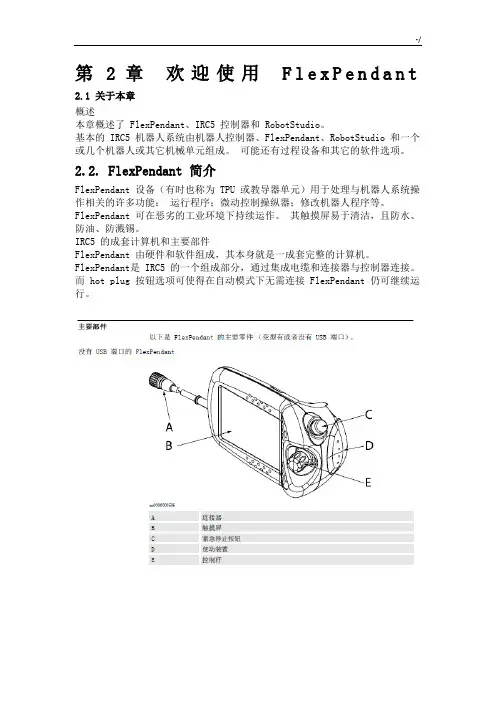
FlexPendant 设备(有时也称为 TPU 或教导器单元)用于处理与机器人系统操作相关的许多功能: 运行程序;微动控制操纵器;修改机器人程序等。
FlexPendant 可在恶劣的工业环境下持续运作。 其触摸屏易于清洁,且防水、防油、防溅锡。
IRC5 的成套计算机和主要部件
FlexPendant 由硬件和软件组成,其本身就是一成套完整的计算机。
FlexPendant是 IRC5 的一个组成部分,通过集成电缆和连接器与控制器连接。
而 hot plug 按钮选项可使得在自动模式下无需连接 FlexPendant 仍可继续运行。
-/
使用控制杆移动操纵器。 它称为微动控制机器人。 控制杆移动操纵器的设置有几种。
USB 端口 将 USB 存储器连接到 USB 端口以读取或保存文件。USB 存储器在对话和
FlexPendant 资源管理器中显示为驱动器/USB: 可移动。
注意!在不使用时盖上 USB 端口的保护盖。
触摸笔 触摸笔是 FlexPendant 附带的,放在 FlexPendant 的背后。 拉小手柄松开笔。
在使用 FlexPendant 是使用触摸笔触摸屏幕。 不要使用螺丝刀或者其他尖锐的物品。
重置按钮 重置按钮重置 FlexPendant,而不是控制器上的系统。
附注 USB 端口和重置按钮对使用 RobotWare 5.12 或更高版本的系统有效。
对于较旧的系统,这些按钮无效。
硬按钮 FlexPendant 上有专用的硬件按钮。 您可以将您自己的功能指定给其中四个按钮。没有 USB 端口的 FlexPendant -/

Manual Connecting ArtiMinds RPS to an ABB Robot Client Setup Instructions Version 1.1 Date: 21 Jan 2022 Contact Support: ********************* Sales: ******************* ArtiMinds Robotics GmbH Albert-Nestler-Str. 11 D-76131 Karlsruhe Managing Directors: Dr.-Ing. Sven R. Schmidt-Rohr, Dr.-Ing. Rainer Jäkel Registration Court: Amtsgericht Mannheim Commercial Register Number: HRB 717563 VAT Number under § 27a UStG: DE290656974
Manual – Connecting Fanuc with ArtiMinds RPS
2
© ArtiMinds Robotics GmbH 2021 Content Content ...................................................................................................... 2 1 Setup ......................................................................................................... 3 1.1 Robot ......................................................................................................... 3 1.1.1 Supported Controllers ................................................................................ 3 1.1.2 Required software packages...................................................................... 3 1.2 ArtiMinds RPS ............................................................................................ 3 1.2.1 Setup in ArtiMinds RPS ............................................................................. 3 1.2.2 One-Click Installation of the required components and controller settings . 4 1.2.3 Update an existing ArtiMinds Installation on the ABB IRC5 controller ....... 5 1.2.4 Downgrading an existing ArtiMinds Installation on the ABB IRC5 controller5 1.2.5 Uninstalling an ArtiMinds RPS Installation from the ABB IRC5 controller .. 5 2 Operation ................................................................................................... 6 2.1 General Communication ............................................................................ 6 2.2 Moving the robot ........................................................................................ 6 2.2.1 Manual Mode ............................................................................................. 6 2.2.2 Auto Mode.................................................................................................. 6 3 Trouble-shooting ........................................................................................ 7 4 Vision ......................................................................................................... 8 5 Force .......................................................................................................... 9 6 Error reporting .......................................................................................... 10 Notes ....................................................................................................... 11 Changelog................................................................................................ 12
Copyright 2007-2010 ABB. All rights reserved
.Emergency safety information
Robotics Products
M2004
Document ID: 3HAC027098-001
Revision: E Copyright 2007-2010 ABB. All rights reserved.The information in this manual is subject to change without notice and should not be
construed as a commitment by ABB. ABB assumes no responsibility for any errors that
may appear in this manual.
Except as may be expressly stated anywhere in this manual, nothing herein shall be
construed as any kind of guarantee or warranty by ABB for losses, damages to persons
or property, fitness for a specific purpose or the like.
In no event shall ABB be liable for incidental or consequential damages arising from
use of this manual and products described herein.
This manual and parts thereof must not be reproduced or copied without ABB's written

施教日期 2019 年 12 月 20 日 星期 五
章节与课题 4. 工业机器IRC5控制柜的安装(1)
课 型 理实一体化 教 时 2
教学目标
认知目标
1. 会正确使用各种拆装工具
2. 掌握IRC5控制柜的组装方法及过程
3. 了解IRC5安装过程中的注意事项
4. 能力目标
情感目标
1. 培养学生的团队合作能力
2. 培养学生观察、思考和扩展思维能力
教学重点:
IRC5控制柜的安装方法及过程
教学难点:
IRC5控制柜的安装方法及过程
教具(工量具)准备:
PPT, 教案、拆装控制柜工具一套、控制台器件每组一套
浙江信息工程学校教案纸(2)
板书设计:
板书设计:
教学后思:
学生动手操作的时间比较紧张,为按照规定的时间完成控制柜的安装、检测与调试。
整体效果不佳,有待提高。
幻 灯
展示区域 板书区域
工业机器IRC5控制柜的安装
1 IRC5控制柜的组装步骤
2操纵器连接方法
3.IRC5主要参数
4.测试步骤
浙江信息工程学校教案纸(3)
步骤 教学内容及过程 学生活动 备注
组织
教学 1、检查学生课前准备情况;
2、上课起立,师生互致问候;
3、检查学生出勤情况,使学生注意力集中。
新课讲解
项目教学:IRC5控制柜的安装
一、任务描述:三人一组在规定时间内完成工业机器人控制柜的组装和测试
本子任务主要涉及ABB机器人IRC5控制柜的基础安装和内部主要构造。下面以IRC5紧凑型控制柜的安装为例,此类紧凑型控制柜主要在IRB120机型上使用:
1.老师结合PPT进行任务描述
2.学生聆听并做笔
任务描述
二、任务实施
1.工具清单
名称 数量 名称 数量
螺丝刀 1把 导线 三米
剥线钳 1把 烙铁 一组
老虎钳 1把 斜口钳 1把
2.工业机器人控制柜(一组一套)
3.材料明细表