映泰TA880G HD说明书
- 格式:pdf
- 大小:2.57 MB
- 文档页数:89
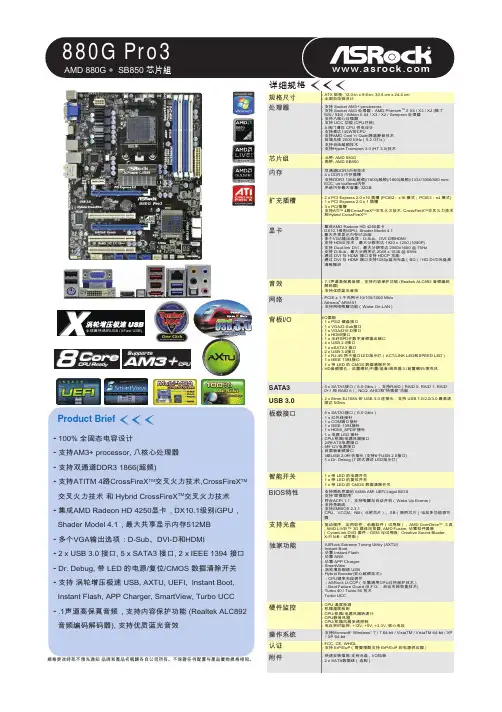
Product Brief内存扩充插槽音效显卡网络背板I/O板载接口SATA3USB 3.0BIOS特性智能开关規格更改時恕不預先通知 品牌和產品名稱歸各自公司所有。
不保證任何配置与產品實物規格相同。
芯片组- 100% 全固态电容设计- 支持AM3+ processor, 八核心处理器- 支持双通道DDR3 1866(超频)- 支持ATITM 4路CrossFireX TM 交叉火力技术,CrossFireX TM 交叉火力技术 和 Hybrid CrossFireX TM 交叉火力技术- 集成AMD Radeon HD 4250显卡,DX10.1级别iGPU, Shader Model 4.1,最大共享显示内存512MB-多个VGA输出选项:D-Sub、DVI-D和HDMI-2 x USB 3.0 接口, 5 x SATA3 接口, 2 x IEEE 1394 接口-Dr. Debug, 带 LED 的电源/复位/CMOS 数据清除开关- 支持 涡轮增压极速 USB, AXTU, UEFI, Instant Boot,Instant Flash, APP Charger, SmartView, Turbo UCC-.1声道高保真音频,支持内容保护功能 (Realtek ALC892音频编码解码器), 支持优质蓝光音效- 支持 Socket AM3+ processors- 支持 Socket AM3 处理器:AMD Phenom II X4 / X3 / X2 (除了 920 / 940) / Athlon II X4 / X3 / X2 / Sempron 处理器 - 支持八核心处理器- 支持 UCC 功能 (CPU开核)- 4 阀门增压 CPU 供电设计- 支持高达140W的CPU- 支持AMD Cool 'n' Quiet降温静音技术- 前端总线 2600 MHz(5.2 GT/s)- 支持自由超频技术- 支持Hyper-Transport 3.0 (HT 3.0)技术- 北桥: AMD 880G - 南桥: AMD SB850- 双通道DDR3内存技术- 4 x DDR3 内存插槽- 支持DDR3 1866(超频)/1800(超频)/1600(超频)/1333/1066/800 non- ECC, un-buffered内存 - 系统内存最大容量: 32GB- 2 x PCI Express 2.0 x16 插槽 (PCIE2:x16 模式;PCIE3:x4 模式) - 1 x PCI Express 2.0 x 1 插槽- 3 x PCI插槽- 支持ATI 4路CrossFireX 交叉火力技术, CrossFireX交叉火力技术 和Hybrid CrossFireX - 集成AMD Radeon HD 4250显卡- DX10.1级别iGPU, Shader Model 4.1- 最大共享显示内存512MB- 多个VGA输出选项:D-Sub、DVI-D和HDMI- 支持 HDMI 技术,最大分辨率达 1920 x 1200 (1080P) - 支持 Dual-link DVI,最大分辨率达 2560x1600 @ 75Hz - 支持 D-Sub,最大分辨率达 2048 x 1536 @ 85Hz - 通过 DVI 与 HDMI 端口支持 HDCP 功能- 通过 DVI 与 HDMI 端口支持1080p蓝光光盘(BD)/ HD-DVD光盘高 清晰播放-7.1声道高保真音频,支持内容保护功能 (Realtek ALC892 音频编码 解码器)- 支持优质蓝光音效- PCIE x 1 千兆网卡10/100/1000 Mb/s - Atheros AR8151-支持网络唤醒功能(Wake-On-LAN)I/O面板- 1 x PS/2 键盘接口- 1 x VGA/D-Sub接口- 1 x VGA/DVI-D接口- 1 x HDMI接口- 1 x 光纤SPDIF数字音频输出端口- 4 x USB 2.0接口- 1 x eSATA3 接口- 2 x USB 3.0接口- 1 x RJ-45 网卡接口LED指示灯(ACT/LINK LED和SPEED LED)- 1 x IEEE 1394接口- 1 x 带 LED 的 CMOS 数据清除开关- HD音频插孔:后置喇叭/中置/低音/线性输入/前置喇叭/麦克风- 5 x SATA3接口(6.0 Gb/s)- 1 x 红外线接针- 1 x COM端口接针- 1 x IEEE 1394接针- 1 x HDMI_SPDIF接针- 1 x 电源 LED 接针- CPU/机箱/电源风扇接口- 24针ATX电源接口- 8针12V电源接口- 前面板音频接口- 3组USB 2.0针状接头 (支持6个USB 2.0接口)- 1 x Dr. Debug (7 段式调试 LED指示灯)- 支持图形界面的 64Mb AMI UEFI Legal BIOS - 支持“即插即用”- 符合ACPI 1.1,支持唤醒与自动开机(Wake Up Events)- 1 x 带 LED 的电源开关- 1 x 带 LED 的复位开关- 1 x 带 LED 的 CMOS 数据清除开关- 5 x SATA3接口(6.0 Gb/s),支持RAID(RAID 0, RAID 1, RAID0+1 和 RAID 5), NCQ, AHCI和“热插拔”功能- 2 x Etron EJ168A 的 USB 3.0 连接头,支持 USB 1.0/2.0/3.0 最高速 度达 5Gb/s全球最快速的USB (XFast USB)涡轮增压极速 USB 3.0全球最快速的USB(XFast USB 3.0)华擎涡轮增压极速USB 重新定义了高性能运算的新标准。

A880GU3/A880GB BIOS Manual设置BIOS Setup (1)1 Main Menu (3)2 Advanced Menu (6)3 PCIPnP Menu (17)4 Boot Menu (21)5 Chips et Men u (24)6 Performance Menu (30)7 Exit Menu (38)iA880GU3/A880GB BIOS ManualBIOS Setup简介此手册介绍如何使用主板AMI BIOS 中各项设置程序。
此设置程序允许用户修改基本系统设置。
设置信息被存储至由电池供电的 RAM(随机存取存储器)中。
这样,断电后设置仍可被保存。
无需磁盘导入程序,BIOS 仍可使电脑正常运行。
此系统控制许多输入和输出装置,比如:键盘,鼠标,串行接口和磁盘驱动器。
BIOS 将在第一时间导入程序,装载和执行操作系统。
另外,BIOS 也增加许多功能,如防病毒与密码保护及提供给控制整个系统的芯片组的详尽功能的特殊支持。
这部手册的余下部分将在您设定使用系统时对您提供帮助。
即插即用支持此AMI BIOS 支持即插即用1.0A 版本规格。
支持EPA绿色环保支持EPA 绿色环保计算机的1.03 版本。
APM 支持支持高级计算机电源管理(APM)功能的1.1&1.2 版本。
电源管理功能由系统管理中断(SMI)执行操作,也支持休眠和挂机电源管理模式。
同时也管理硬盘驱动器与影象监测器。
ACPI 支持此AMI ACPI BIOS 支持高级配置和电源管理(ACPI)功能的1.0/2.0 版本,并为在ACPI 中定义的电源管理和装置配置提供ASL 语言,ACPI 是由Microsoft、Intel和Toshiba 发展定义的新一代电源,组态控制接口标准。
PCI 总线支持支持Intel PCI 局域总线2.3 版。
1A880GU3/A880GB BIOS Manual2DRA M SupportSupported CPUsUsing Setupzz z Navigation Keys为保证主板性能最佳,大部分情形下都可运用默认BIOS设置。
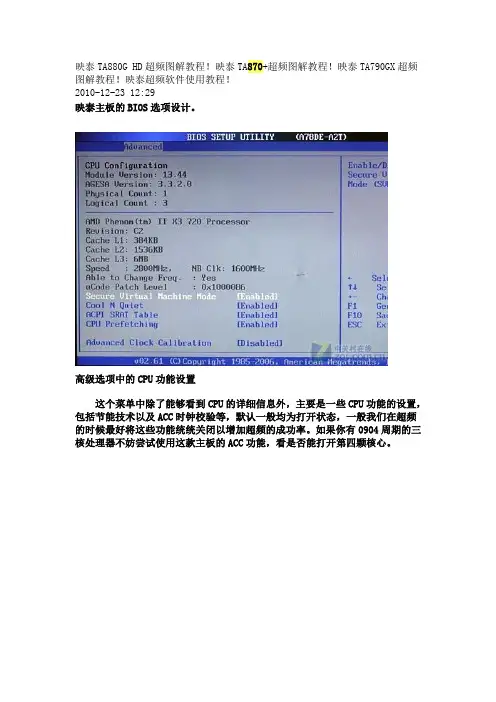
映泰TA880G HD超频图解教程!映泰TA870+超频图解教程!映泰TA790GX超频图解教程!映泰超频软件使用教程!2010-12-23 12:29映泰主板的BIOS选项设计。
高级选项中的CPU功能设置这个菜单中除了能够看到CPU的详细信息外,主要是一些CPU功能的设置,包括节能技术以及ACC时钟校验等,默认一般均为打开状态,一般我们在超频的时候最好将这些功能统统关闭以增加超频的成功率。
如果你有0904周期的三核处理器不妨尝试使用这款主板的ACC功能,看是否能打开第四颗核心。
芯片组菜单显存设置这个菜单里我们可以设置显存的使用模式,共享显存的大小以及显存的频率等等。
共享显存最大可以设置为512MB映泰T系列超频设置菜单超频模式选择映泰T系列超频设置菜单需要首先通过打开第一个选项来选择模式,分为正常模式、自动超频模式以及手动超频模式。
自动超频模式自动超频模式适合入门级的超频用户使用,在这个模式下我们可以选择不同级别的超频幅度,V12是获得最高的超频性能。
当然自动超频不会提高太多的频率,基本建立在不加电压的情况下,一般在选择V12后大概主频提升300MHz 左右。
后面我们将配合随机附带的超频软件介绍这项自动超频功能。
手动超频设置手动超频设置则适合具备了一定超频经验的玩家使用,打开这个模式后,我们将能够自动调节CPU的外频,倍频,各部分电压以及内存频率等等。
电压设置选项电压设置选项中我们可以更改CPU电压,内存电压,芯片组电压,HT电压和显存电压,增加电压对于大幅超频非常重要,但同时也比较危险。
内存频率调节除了电压设置外,我们还能改变内存的频率,我们使用的是DDR2 1066的内存,因此我们将内存首先设置在800HMz的频率下,超频的时候再恢复默认1066MHz频率。
软件超频方法映泰这款主板的驱动光盘里就提供了较为丰富的信息,包括Over Clock III Utility for T Utility超频软件、主板硬件监控、AMD OverDrive、以及杀毒软件等等,下面我们来一起详细的了解一下。

TA880G HD超频终极教程一,前言超频——DIYer永恒的话题。
超频对于每个玩家来说都有着巨大的诱惑力,不花一分钱就可以获取更强劲的性能,如此划算的事情谁不愿意呢?不过对于入门级玩家而言还是有一段很长的路要走!我们知道主机中处理器可以超频、显卡可以超频、内存也可以超频!但是如何来进行超频这就难为晋级玩家了不过没事接下来鄙人就借此TA880G HD主板讲解下AMD主板如何超频!想要超个好成绩首先得选择一款体制优良的处理器其次就是挑选一块做工精良的主板,在保证电源供电充足的情况下我们使劲的超频吧!映泰T-service主板是以超频优势在板卡界享誉盛名,前不久旗下的TA890FXE主板再次发飙破世界三大记录!T-service主板在处理器供电上做工扎实,用料讲究。
日系X.D.C固态电容是其标配产物,个性张扬的镜面铝挤散热器也是Tfans的钟情之物。
就鄙人手中的这款主板在超频性能上还是有着不错的成绩!一拿到手就可以以1.52v成绩勇破4G门槛!也算是一个良好的试用开端!二,手把手教你来超频现在我们就来细说AMD平台如何超频1,我们知道处理器有主频、倍频、外频三个主要因素。
三者之间的关系:处理器的主频=倍频*外频,超频中遇见黑盒处理器直接提升倍频获得更高的主频,而锁了倍频的中低端处理器应该如何超频呢?看了上面的公式我们知道在倍频设置最大的限度下要想获得更大的主频就必须超外频!▲超频关键词2.在超频的时候还有一点你绝对不能忽视那就是HT总线频率与NB频率:HT总线频率=HT系数*外频,NB频率=NB系数*外频。
在AMD处理器超频的时候要把NB频率与HT频率控制在2000以内,否则会出现运行不稳定的情况,在bios中较为人性化的设计就是会直接写出x7、 x8、x9、x10字样,而有些bios 则是写出1400MHz(7*200)、1600MHz(8*200)、1800MHz(9*200)、 2000MHz(10*200),映泰TA880G HD的bios设计就是采用后者样式!▲TA880G HD HT频率设置3.内存频率设置,在AMD主板中DDR3分频为四个选项分别是800/1066/1333/1600。

![[vip专享]TA880G HD超频终极教程](https://uimg.taocdn.com/f81ba8fc25c52cc58bd6befe.webp)
TA880G HD超频终极教程一,前言超频——DIYer永恒的话题。
超频对于每个玩家来说都有着巨大的诱惑力,不花一分钱就可以获取更强劲的性能,如此划算的事情谁不愿意呢?不过对于入门级玩家而言还是有一段很长的路要走!我们知道主机中处理器可以超频、显卡可以超频、内存也可以超频!但是如何来进行超频这就难为晋级玩家了不过没事接下来鄙人就借此TA880G HD主板讲解下AMD主板如何超频!想要超个好成绩首先得选择一款体制优良的处理器其次就是挑选一块做工精良的主板,在保证电源供电充足的情况下我们使劲的超频吧!映泰T-service主板是以超频优势在板卡界享誉盛名,前不久旗下的TA890FXE主板再次发飙破世界三大记录!T-service主板在处理器供电上做工扎实,用料讲究。
日系X.D.C固态电容是其标配产物,个性张扬的镜面铝挤散热器也是Tfans的钟情之物。
就鄙人手中的这款主板在超频性能上还是有着不错的成绩!一拿到手就可以以1.52v成绩勇破4G门槛!也算是一个良好的试用开端!二,手把手教你来超频现在我们就来细说AMD平台如何超频1,我们知道处理器有主频、倍频、外频三个主要因素。
三者之间的关系:处理器的主频=倍频*外频,超频中遇见黑盒处理器直接提升倍频获得更高的主频,而锁了倍频的中低端处理器应该如何超频呢?看了上面的公式我们知道在倍频设置最大的限度下要想获得更大的主频就必须超外频!▲超频关键词2.在超频的时候还有一点你绝对不能忽视那就是HT总线频率与NB频率:HT总线频率=HT系数*外频,NB频率=NB系数*外频。
在AMD处理器超频的时候要把NB频率与HT频率控制在2000以内,否则会出现运行不稳定的情况,在bios中较为人性化的设计就是会直接写出x7、 x8、x9、x10字样,而有些bios则是写出1400MHz(7*200)、1600MHz(8*200)、1800MHz(9*200)、 2000MHz(10*200),映泰TA880G HD的bios设计就是采用后者样式!▲TA880G HD HT频率设置3.内存频率设置,在AMD主板中DDR3分频为四个选项分别是800/1066/1333/1600。


80%能开核21款主流880G主板年度横评(二)作者:中关村在线毛俊霆责任编辑:向中【原创】CBSi中国·ZOL2010年08月13日[评论196条]很多人容易忽视产品的附加价值,当我们不断对于产品性能进行对比的时候,有没有考虑到那张毫不起眼的光盘中有为用户提供什么呢?在华硕的驱动光盘中除了有基本的硬件驱动程序之外,华硕Express Gate快速开机软件,华硕EPU节能程序,TurboV自动超频软件等等丰富实用的工具全部融汇在光盘之中。
而这些看似简单的小软件和工具却能让我们在使用产品的过程中更加方便,快捷。
驱动光盘首先会提示我们安装Express Gate软件Express Gate是华硕专门为笔记本所设计的一套独立架构的Linux操作系统,它的最大特点就是启动迅速、标配软件实用,能够帮助用户应付各种突发状况下的“急救”需求。
它的系统进入时间仅为8秒,当用户需要紧急使用电脑的时候,可以直接进入Express Gate系统。
系统内部标配了实用的软件完全可以满足用户日常的需要。
如今这样方便快捷的功能已经能够在DIY产品上使用,急不可待的你难道不想试试吗?驱动软件安装菜单工具软件安装菜单用户手册查看界面由于篇幅的关系,对于光盘中的软件我们就不一一展示了,华硕在不断提升产品性价比的同时,在附加价值这块也做的越来越好。
驱动光盘不仅包含有基本的驱动程序,还有丰富实用的工具软件,每当我们将鼠标移至软件名称上,右侧就会弹出相应的介绍说明,足见华硕在产品细节上的精益求精。
产品:映泰TA880G HD主板映泰880G主板BIOS及附带软件介绍映泰移至以来都以超频作为产品的卖点,而这款TA880G HD主板却在继承超频特色的基础上与实际应用贴的更加紧密。
在BIOS设计方面映泰提供了较为丰富的频率以及电压设置选项,而多阶自动超频菜单也让入门级用户能够轻松提升平台的整体性能。
显存频率最高可调至1700MHz映泰BIO-unlocKING选项设置部分电压设置显示核心频率设置电压设置菜单G.P.U节能菜单在驱动光盘中,映泰为用户提供了几款实用的工具程序,包括更换开机界面的“千机变”软件,超频利器Toverclocker软件以及G.P.U节能软件。

TA890GXE/TA880GXE设置手册FCC条款依照FCC条款第15部分的规定,本装置已经通过测试并且符合Class B级数字装置的限制。
此条款限制了在安装过程中可能造成的有害射频干扰并提供了合理的防范措施。
本装置在使用时会产生无线射频辐射,如果没有依照本手册的指示安装和使用,可能会与无线通讯装置产生干扰。
然而,并不保证在特定的安装下不会发生任何干扰。
如果关闭和重新开启本设备后,仍确定本装置造成接收广播或电视的干扰,用户可以使用以下列表中的一种或多种方法来减少干扰:●重新安装或调整接收天线。
●增加本设备与接收设备之间的距离。
●连接设备连接到不同的插座以便于两个设备使用不同的回路。
●咨询经销商或富有经验的无线电工程师,以获得更多资讯。
本用户手册内容的变更,恕不另行通知,制造商没有解释的义务。
本用户手册的所有内容若有任何错误,制造商没有义务为其承担任何责任。
所有商标和产品名称均有其各自所有权。
未经过书面许可,不得以任何形式(部分或全部)复制此手册信息。
免责说明本手册内容系BIOSTAR ®知识产权,版权归BIOSTAR®所有。
我们本着对用户负责的态度,精心地编写该手册,但不保证本手册的内容完全准确无误。
BIOSTAR®有权在不知会用户的前提下对产品不断地进行改良、升级及对手册内容进行修正,实际状况请以产品实物为准。
本手册为纯技术文档,无任何暗示及影射第三方之内容,且不承担排版错误导致的用户理解歧义。
本手册中所涉及的第三方注册商标所有权归其制造商或品牌所有人。
TA890GXE/TA880GXE设置手册防静电操作规则静电可能严重损坏您的设备,在处理主板以及其它的系统设备的时候要特别注意,避免和主板上的系统组件的不必要接触,保证在抗静电的环境下工作,避免静电放电可能对主板造成损坏,当在您的机箱中插入或者移除设备时,请保证电源处于断开状态,厂商对于不遵照本操作规则或者不遵守安全规范而对主板造成的损坏不负责。
A880G+/A785G3+ BIOS ManualBIOS Setup (1)1 Main Menu (3)2 Advanced Menu (6)3 PCIPnP Menu (17)4 Boot Menu (21)5 Chips et Men u (24)6 Performance Menu (30)7 Exit Menu (38)iA880G+/A785G3+ BIOS Manual1BIOS SetupIntroductionThe purpose of this manual is to desc ribe the settings in the AMI BIOS Setup progr am on this mothe rboard. The Setup program allows users to modif y the basic syste m conf iguration a nd save these settings to CMOS RAM. The power of CMOS RAM is supplied by a battery so that it r etains the Setup inf ormation when the power is tur ned off .Basic Input-Output System (BIOS) determines what a c omputer can do without accessing programs from a disk. This system controls most of the input and output devic es such a s keyboa rd, mouse, serial ports and disk drives. BIOS activates at the f irst stage of the booting process, loading and executing the operating system. Some additional fea tures, such as virus and password prot ection or chipset f ine -tuning options are also include d in BIOS.The rest of this manua l will to guide you through the options and settings in BIOS Setup.Plug and Pla y SupportThis AMI BIOS supports the Plug and Play Version 1.0A specif ication.EPA Green PC SupportThis AMI BIOS supports Version 1.03 of the EPA Green PC specif ication.APM SupportThis AMI BI OS supports Ver sion 1.1&1.2 of the Adva nced Power Management (APM) speci f ication. Power ma nagement f eature s are implemented via the System Mana gement Int errupt (SMI). Sleep and Suspend power manage ment modes are supported. Power to the hard disk drives and vide o monitors can also be managed by this AMI BIOS.ACPI SupportAMI ACPI BIOS support Version 1.0/2.0 of Advanced Conf iguration and Power interf ace specif i cation (ACPI). It provides ASL code f or power management and devic e conf iguration ca pabilities as def ined in the ACPI specif ication, deve loped by Microsof t, Intel and Toshiba.A880G+/A785G3+ BIOS Manual2PCI Bus SupportThis AMI BIOS also supports Version 2.3 of the Intel PCI (Peripheral Component Interc onnect) local bus speci f ica tion.DRA M SupportDDR3 SDRAM (Double Data Rate III Synchronous DRAM) is supported.Supported CPUsThis AMI BIOS supports the AMD CPU .Using SetupWhen starting up the computer, press <Del> during the Power-On Self-Te st (POST) to enter the BI OS setup utility. In the BIOS setup utility, you will se e Gene ral Help description at the top right corner, and this is providing a brief descr iption of the selecte d item. Navigation Keys f or that partic ular menu are at the bottom right corner, and you ca n use these keys to selec t item a nd change the se ttings.Noticez The def ault BI OS settings apply f or most conditions to ensure optimum perf ormanceof the mother board. If the system bec omes unstable af ter changing any settings, please load the def ault settings to ensure system’s compatibility and stability. Use Load Setup Default under the Exit Menu. z For better system perf orm ance, the BIOS f irmware is be ing continuously updated.The BIOS inf ormation described in this manual is f or your reference only. The actual BIOS inf orma tion and settings on board may be slightly dif ferent from this manual. z The c ontent of this manual is subject to be change d without notice. We will not beresponsible f or any mistakes f ound in this user’s manual and any system damage that may be caused by wrong-settings.General HelpNavigation KeysA880G+/A785G3+ BIOS Manual31 Main MenuOnce you ente r AMI BIOS Setup Utility, the Ma in Menu will appear on the screen providing an overview of the basic system inf orm a tion.AMI BIOSShows system inf ormation including BIOS version and built date.System MemoryShows system memory size, VGA shard memory will be excluded..System TimeSet the system internal clock.System DateSet the system date. Note that the ‘Day’ automatically c hanges when you set the date.Floppy ASelec t the type of f loppy disk dr ive installed in your system.Options: 360K, 5.25 in / 1.2M, 5.25 in / 720K, 3.5 in / 1.44M, 3.5 in /2.88M,3.5 in / NoneA880G+/A785G3+ BIOS ManualIDE/SATA ConfigurationThe BIOS will automa tically de tect the presence of IDE/SATA devices. There is a sub-menu f or each IDE/SATA device. Select a device a nd press <Enter> to enter the sub-menu of detaile d options.Primary IDE Master/Slav e ; SATA 1/2/3/4 DeviceThe BIOS de tects the inf orma tion and values of respe ctive de vices, and these inf ormation and values are shown below to the na me of the sub-menu.4A880G+/A785G3+ BIOS Manual5TypeSelec t the type of the IDE/SATA drive.Options: Auto (Def ault) / CDROM / ARMD / Not InstalledLBA/Large ModeEnable or disa ble the LBA mode. Options: Auto (Def ault) / Disa bledBlock (Multi-Sector Transfer)Enable or disa ble multi-sector tr ans f er. Options: Auto (Def ault) / Disa bledPIO ModeSelec t the PIO mode.Options: Auto (Def ault) / 0 / 1 / 2 / 3 / 4DMA ModeSelec t the DMA mode.Options: Auto (Def ault) / SWDMA0 ~ 2 / MWDMA0 ~ 2 / UDMA0 ~ 5S.M.A.R.TSet the Smart Monitoring, Analysis, and Reporting Technology. Options: Auto (Def ault) / Disa bled / Enabled32Bit Data TransferEnable or disa ble 32-bit data tra nsfer. Options: Enabled (Default) / DisabledHard Disk W rite ProtectDisable or ena ble device write protection. This will be e ffective only if the device is acc essed thr ough BIOS.Options: Disabled (Default) / EnabledIDE Detect T ime Out (Sec)Selec t the time out value f or detecting IDE/SATA devices. Options: 35 (Def ault) / 30 / 25 / 20 / 15 / 10 / 5 / 0A880G+/A785G3+ BIOS Manual62 Advanced MenuThe Advanced Menu a llows you to conf igure the settings of CPU, Super I/O, Power Mana gement, and other system devices.Noticez Beware of that se tting ina ppropriate values in items of this menu ma y causesystem to malf unction.CPU ConfigurationA880G+/A785G3+ BIOS Manual7Secure Virtual Machine ModeVirtualization Technology can virtually separate your system resource into several parts, thus e nhance the perf ormance when running virtual ma chines or multi interf ace syste ms.Options: Enabled (Default) / DisabledPowerNowThis item allows you to enable or disable the PowerNow power saving technology. Options: Enabled (Default) / DisabledACPI SRAT TableThe operating system scans the ACPI SRAT at boot time a nd uses the inf ormation to better allocate memory and schedule sof tware threads f or maximum perf orm ance. This item controls whether the SRAT is made a vailable to the operating system at boot up, or not.Options: Enabled (Default) / DisabledProbe FilterThis item allows you to set initialization mode f or Probe Filter. Options: Auto (Def ault) / Disa bled / MP ModeCore Performance BoostIf this item is enabled, Revision E CPU a utomatic ally transition to pop-down p-state Options: Enabled (Default) / DisabledAdvanced Clock CalibrationAdva nced Clock Calibration (ACC) is an enhanced technology f or overc locking, needing support f rom both chipset and CPU. When ena bled, it will improve the stability of advanced overclocking greatly.Options: Disabled (Default) / Auto / All Cores / Per CoreCore LevelingThis item allows you to activate Core Leveling f unction.Options: Auto(Default) / Forc e Single Core / Force Dua l Core / Force Tri Core /Enable all CoresA880G+/A785G3+ BIOS Manual8SuperIO C onfigurationOnboard Floppy ControllerSelec t enabled if your system has a f loppy disk controller (FDC) installe d on the syste m board and you wish to use it. If you installed another FDC or the system uses no f loppy drive, select disabled in this f ie ld. Options: Enabled (Default) / DisabledSerial Port1 Addres sSelec t an addr ess and c orresponding inter rupt f or the f irst a nd second seri al ports. Options: 3F8/IRQ4 (Default) / 2F8/IRQ3 / 3E8/IRQ4 / 2E8/IRQ3 / Disable dPara llel Port Addres sThis item allows you to determine access onboard parallel port controller with which I/O Address.Options: Disabled (Default) / 378 / 278 / 3BCPara llel Port ModeThis item allows you to determine how the paralle l port should f unction. Options: Normal (Default) Using Par allel port as Standard Printer Port. EPP Using Par allel Por t as Enha nced Para llel Port. ECP Using Par allel port as Extended Capabilities Port. ECP+EPP Using Par allel port as ECP & EPP mode .A880G+/A785G3+ BIOS Manual9ECP Mode DMA ChannelThis item allows you to select parallel port ECP DMA. Options: DMA3 (Def ault) / DMA0 / DMA1Para llel Port IRQThis item allows you to select the IRQ f or the onboard para llel port. Options: IRQ7 (Def a ult) / IRQ5 / DisabledOnBoard CIR PortThis item allows you to select c onsumer IR port. Options: Disabled (Def ault) / EnabledCIR Port IRQThis item allows you to select c onsumer IR port I RQ. Options: IRQ10 (Def ault) /IRQ3 / IRQ4 / IRQ11Keyboard Pow erOnThis item allows you to control the keyboard power on f unction. Options: Disabled (Default) / Specif ic Key / Str oke Key / Any Ke ySpecific Key EnterThis item will show only when Keyboard PowerOn is set “Specif ic Key.”Stroke Keys SelectedThis item will show only when Keyboard PowerOn is set “Stroke Key.”Options: Ctr l+F1 (Def ault) / Wake Key / Power Key / Ctrl+F2 / C trl+F3 /Ctr l +F4 / C trl+F5 / Ctrl+F6Mouse PowerOnThis item allows you to control the mouse power on f unction. Options: Disabled (Default) / EnabledA880G+/A785G3+ BIOS Manual10Rest ore on AC Power LossThis setting specif ies how your system should behave af ter a power f ail or interrupts occur s. By choosing Disabled will le ave the computer in the power off state. Choosing Ena bled will restore the system to the status bef ore power f a ilure or interr upt occur s.Options: Power Off (Default) / Last Sta teSmart Fan ConfigurationCPU Smart FanThis item allows you to control the CPU Smart Fa n f unction. Options: Disabled (Default) / Auto / 4Pin / 3Pin Smart Fan C alibrationChoose this item and then the BIOS wi ll auto te st and detect the CPU/System f an f unctions and show CPU/System f an spee d.Cont rol ModeThis item provides several opera tion modes of the fan. Options: Quiet / Perf ormance / ManualA880G+/A785G3+ BIOS Manual11Fan Ctrl OFF (℃)If the CPU/System Temperature is lower than the set value , FAN will turn of f . Options: 0~127 (℃) (With the interval of 1℃)Fan Ctrl On (℃)CPU/System f an starts to work under smart f an f unction when arrive this set value. Options: 0~127 (℃) (With the interval of 1℃)Fan Ctrl Start ValueWhen CPU/System te mperature arrives to the se t value, the CPU/System f an will work under Smart Fan Function mode. Options: 0~127 (With the inte rval of 1)Fan Ctrl Sen sitiveIncre asing the value will raise the speed of CPU/System f an. Options: 1~127 (With the inte rval of 1)Hardware Health ConfigurationH/W Health FunctionIf with a monitor ing system, the system will show PC health sta tus during POST sta ge. Options: Enabled (Default) / DisabledA880G+/A785G3+ BIOS Manual12Shut dow n T emperatureThis item allows you to set up the CPU shutdown Temperature. This item is only effective unde r Windows 98 ACPI mode .Options: Disabled (Default) / 60℃/140℉ / 65℃/149℉ / 70℃/158℉ / 75℃/167℉/ 80℃/176℉ / 85℃/185℉ / 90℃/194℉Power ConfigurationSuspend modeThe item allows you to select the suspend type under the ACPI oper ating system. Options: S1 (POS) (Def ault) Power on Suspend S3 (STR) Suspend to RAM S1 & S3 POS+STRACPI Version FeaturesThe item allows you to select the version of ACPI .Options: ACPI v1.0 (Def ault) / ACPI v2.0 / ACPI v3.0ACPI APIC supportThis item is used to enable or disa ble the motherboard's APIC (Advanced Progr ammable Interrupt Controller). The APIC provides multipr ocessor support, more IRQs and f aster interrupt handling. Options: Enabled (Default) / DisabledA880G+/A785G3+ BIOS Manual13AMI OEMB t ableSet this value to allow the ACPI BIOS to add a pointer to a n OEMB table in the Root Syste m Descr iption Ta ble (RSD T) table. Options: Enabled (Default) / DisabledHeadless modeThis is a server-speci f ic f eature . A hea dless ser ver is one that operates without a keyboard, monitor or mouse. To run in headless mode, both BIOS and operating syste m (e.g. Windows Server 2003) must support headless operation. Options: Disabled (Default) / EnabledRTC ResumeWhen “Enabled”, you can set the date a nd time a t which the RTC (real-time clock) alarm awakens the system f rom Suspend mode. Options: Disabled (Default) / EnabledRTC Alarm Date (Days)You can choose which date the system will boot up.RTC Alarm T imeYou can choose the system boot up time, input hour, minute and sec ond to specif y.USB Wakeup from S 3/S4This item allows you to enable or disable d the US B resume f rom S3/S4 f unction. Options: Disabled (Default) / EnabledPower On by PCIE/Onboard LANThis item allows you c ontrol the wake on LAN (WOL) f unction. Options: Disabled (Default) / EnabledWake Up by PCIEnable / Disable PCI to generate a wake event. Options: Disabled (Default) / EnabledWakeup on RingThis item allows you c ontrol the wake on ring f unction. Options: Disabled (Default) / EnabledA880G+/A785G3+ BIOS Manual14USB ConfigurationLegacy USB SupportThis item determines if the BIOS should provide legacy support f or USB devices like the keyboard, mouse, and USB drive. This is a usef ul f eature when using such USB devices with operating systems that do not natively support USB (e.g. Microsof t DOS or Windows NT).Options: Enabled (Default) / DisabledUSB 2.0 Controller ModeThis item allows you to select the operation mode of the USB 2.0 controller. Options: HiSpeed (Default) USB 2.0-480Mbps FullSpeed USB 1.1-12MbpsBIOS EHCI Hand-OffThis item allows you to enable suppor t f or ope rating systems without a n EHCI hand-off feature.Options: Enabled (Default) / DisabledLegacy USB1.1 HC SupportThis item allows you to enable to suppor t USB1.1 HC. Options: Enabled (Default) / DisabledA880G+/A785G3+ BIOS Manual15USB Mass Storage Dev ice ConfigurationUSB Mass Storage Re set DelayThis item allows you to set the r eset delay f or USB mass storage device. Options:20 Sec (Def ault) / 10 Sec / 30 Sec / 40 SecEmulation Ty peThis item allows you to select the emulation type of the USB mass storage de vice. Options: Auto (Def ault) / Floppy / Forc ed FDD / Hard Disk / CDROMAUD IO ConfigurationA880G+/A785G3+ BIOS Manual16AMD 880 HD AudioThis item allows you to control AMD 880 HD audio f unction. Options: Enabled (Default) / DisabledHD Audio Azalia De viceThis item allows you to control the HD a udio device. Options: Enabled (Default) / Auto / DisabledOnboard LAN ConfigurationMAC ID InformationThis area shows the MAC ID.Realtek PCIE NICThis option allows you to control the onboard LAN controller. Options: Enable (Def ault) / DisableRealtek Opt ion ROMThis item allows you to enable or disable the Onboard LAN Boot ROM. Options: Disabled (Default) / EnabledA880G+/A785G3+ BIOS Manual173 PCIPnP MenuThis section describes conf iguring the PCI bus system. PCI, or Pe rsonal Computer Interc onnect, is a syste m which allows I /O devic es to ope rate at speeds nea ring the speed of the CPU itself uses whe n communicating with its own spec ial components.Noticez Beware of that se tting ina ppropriate values in items of this menu ma y causesystem to malf unction.Clear NVR AMThis item allows you to clear the data in the NVRAM (CMOS) by selecting “Yes”. Options: No (Def ault) / YesPlug & Play OSWhen set to YES, BIOS will only initialize the PnP cards used f or the boot sequence (VGA, IDE, SCSI). The rest of the cards will be initialized by the PnP operating syste m like Window™ 95. When set to NO, BIOS will initialize a ll the PnP cards. For non-PnP operating systems (DOS, Netware™), this option must set to NO. Options: No (Def ault) / YesA880G+/A785G3+ BIOS Manual18PCI Latency TimerThis item controls how long a PCI devic e can hold the PCI bus bef ore another takes over. The longer the la tency, the longer the PCI device ca n retain c ontrol of the bus bef ore handing it over to anothe r PCI device. Options: 64 (Def ault) / 0-255Allocate IR Q to PCI VGAThis item allows BIOS to choose a IRQ to assign f or the PCI VGA c ard. Options: Ye s (Default) / NoPalette SnoopingSome old graphic controllers ne ed to “snoop” on the VGA palette a nd then map it to their display a s a way to provide boot inf ormation and VGA compatibility. This item allows such snooping to take place. Options: Disabled (Default) / EnabledPCI IDE BusMasterThis item is a toggle f or the built-in driver that allows the onboard IDE controller to perf orm DMA (Direct Memory Access) trans fers. Options: Enabled (Default) / DisabledPCI ResourceA880G+/A785G3+ BIOS ManualIRQ3/4/5/7/9/10/11/14/15These items will allow you to a ssign eac h system interrupt a type, depending on the type of device using the interrupt. The option “Available” means the IRQ is going to assign automatically.Options: Available (Default) / ReservedDMA Channel 0/1/3/5/6/7These items will allow you to assign ea ch DMA channel a type, depending on the type of device using the channel. The option “Available” means the channel is going to assign automa tically.Options: Available (Default) / ReservedReserved Memory S izeThis item allows BIOS to reserve cert ain memory size f or speci f ic PCI device. Options: Disabled (Default) / 16K / 32K / 64KPCI Express ConfigurationRelaxed Ord eringThis item enables/disables PCI Express Device Re laxed Or dering.Options: Auto (Def ault) / Disa bled / Enabled19A880G+/A785G3+ BIOS ManualMaximum P ayload S izeThis item sets Maximum Payload of Pci Express Device or allows System BIOS to select the value.Options: Auto (Def ault) / 128 Bytes / 256 Byte s / 512 Bytes / 1024 Byte s / 2048 Bytes / 4096 BytesExtended Tag FieldIf this item is enabled, it will allow the system to use 8-bit TAG f iled as a requester. Options: Auto (Def ault) / Disa bled / EnabledNo SnoopThis item enables/disables Pci Express Device No Snoop option.Options: Auto (Def ault) / Disa bled / EnabledMaximum Read Request SizeThis item sets Maximum Read Request S ize of Pc i Express Devi ce or allows System BIOS to select the value.Options: Auto (Def ault) / 128 Bytes / 256 Byte s / 512 Bytes / 1024 Byte s / 2048 Bytes / 4096 BytesActive State Power-Manage mentThis item sets the ASPM conf iguration f or the PCI Express de vices bef ore the opera ting system boots. This f unction is f or OS which does not support AS PM. Options: Disabled (Default) / EnabledExtended Sy nchIf this item is enabled, it will allow gener ation of Extended Synchronization patterns. Options: Auto (Def ault) / Disa bled / Enabled20A880G+/A785G3+ BIOS Manual214 Boot MenuThis menu allows you to setup the system boot options.Boot De vice PriorityItems in this sub-menu specif y the boot device priority se quence f r om the a vailable devic es. The number of devic e items that appe ars on the screen depends on the number of devi ces insta lled in the system.Options: Re movable / Hard Disk / CDROM / Le gacy LAN / DisabledHard Disk DrivesThe BIOS will attempt to arrange the ha rd disk boot sequence automatically. You can a lso change the booting sequence. The number of device items that appears on the sc reen depends on the number of devices insta lled in the system.Options: Pri. Master / Pri. Slave / Sec. Master / Sec. Slave / USB HDD0 /USB HDD1 / USB HDD2 / Bootable Add-in Ca rdsRemovable DrivesThe BIOS will attempt to arrange the removable drive boot sequence automatically. You can also change the boo ting sequence. The number of device ite ms that appears on the screen depends on the number of de vices installed in the syste m.Options: Floppy Disks / Zip100 / USB-FDD0 / USB-FDD1 / USB-ZIP0 /USB-ZIP1 / LS120A880G+/A785G3+ BIOS ManualCD/DVD D rivesThe BIOS will attempt to arrange the CD/DVD drive boot sequence automatically. You can also change the boo ting sequence. The number of device ite ms that appears on the screen depends on the number of de vices installed in the syste m. Options: Pri. Master / Pri. Slave / Sec. Master / Sec. Slave / USB CDROM0 / USB CDROM 1Quick BootEnabling this option will cause an abr idged version of the Power On Sel f-Test (POST) to exe cute af ter you power up the computer.Options: Enabled (Default) / DisabledFull Screen LOG O ShowThis item allows you to enable/disable Full Screen LOGO Show f unction. Options: Enabled (Default) / DisabledAddOn ROM Display ModeThis item sets the display mode f or option ROM.Options: Force BIOS (Def ault) / Keep CurrentBootup Num-LockSelec ts the NumLock State af ter the syste m switched on.Options: ON (Default) / OFFInterrupt 19 CaptureWhen set to Enabled, this item a llows the option ROMs to trap inter rupt 19. Options: Disabled (Default) / EnabledIgnore Memory E rror MessagesWhen set to Enabled, the POST will ignore memory error messages.Options: Disabled (Default) / EnabledSmart Multi-CoreOptions: Auto (Def ault) / Disa bled22A880G+/A785G3+ BIOS ManualBOOT SUCCESS BEEPWhen this item is set to Enabled, BIOS will let user know boot succ ess with beep. Options: Enabled (Default) / Disabled23A880G+/A785G3+ BIOS Manual245 Chipset MenuThis submenu allows you to conf igure the speci f ic features of the chipset installed on your system. This chipset manage bus speeds and ac cess to system memory resources, suc h as DRAM. It also coordinates communications with the PCI bus.NorthBridge ConfigurationA880G+/A785G3+ BIOS Manual25Internal Graphics ConfigurationInternal Graphics ModeThis item allows you to select the memor y mode used f or internal gr aphi cs de vice. Options: UMA (Defa ult) / DisableUMA Frame Buffer SizeThis item allows you to choose the UMA f rame buffer size f or internal graphics. Options: Auto (Def ault) / 32MB / 64MB / 128MB / 256MB / 512MBGFX Engine Clock Ov errideThis item allows you to control the internal GFX e ngine clock overr ide f unction. Options: Disabled (Default) / EnabledGFX Engine ClockThis item allows you to set the internal GFX engine clock. Options: 500 (Def ault) / Min: 150, Max: 1200Surround Vie wThis item allows you to control the Surround View Function. Options: Disabled / Enabled / Auto (Def ault)FB LocationThis item allows you to set the FB-DIMM location. Options: Above 4G (Default) / Under 4GA880G+/A785G3+ BIOS Manual PCI Express ConfigurationGe n2 High Speed ModeOptions: Disabled (Default) / AutoLink ASPMOptions: Disabled (Default) / L0s / L1 / L0x & L126A880G+/A785G3+ BIOS Manual27Link Width (Only for Port #02)Options: Auto (Def ault) / x1 / x2 / x4 / x8 / x16Slot Power Limit, W (Only for Port #02) Options: 75 (Def ault) / 0-255NB-SB Link ASPMOptions: L1(Default) / Disa bledNP NB-SB VC1 Traffic SupportOptions: Disabled (Default) / Enable dLink WidthOptions: Auto (Def ault) / x1 / x2 / x4Primary Video Cont rollerThis option allows you to select the video controller in cha rge.Options: PCI-GFX0-GPP-IGFX (Def ault) / GFX0-GPP-I GFX-PCI /GPP-GFX0-IGFX-PCI / IGFX-GFX0-GPP-PCINB Power Management FeaturesThis option controls the NB power mana gement f unction. Options: Auto (Def ault) / Disa bledA880G+/A785G3+ BIOS Manual28SouthBridge ConfigurationOHCI HC(Bus 0 Dev 18/19/20 Fn 0/1/5)This item allows you to control OHCI host controller. (USB 1.1 Device) Options: Enabled (Default) / DisabledEHCI HC(Bus 0 Dev 18/19 Fn 2)This item allows you to control EHCI ho st controller. (USB 2.0 Device) Options: Enabled (Default) / DisabledOnChip SAT A ChannelThis option allows you to enable the on-c hip Seria l ATA. Options: Enabled (Default) / DisabledOnChip SAT A TypeThis option allows you to select the on-c hip Serial ATA operation mode. Options: Na tive IDE (Default) / RAID / AHCI / Legacy I DE / IDE ÆAHCIOption ROM POST DelayOptions: Disabled (Default) / 1 Second / 2 ~ 7 SecondsA880G+/A785G3+ BIOS Manual29SATA IDE Combined ModeThis option controls the SATA/PATA combined mode. Options: Enabled (Default) / DisabledPower Saving FeaturesThis item allows you to enable or disable power saving f eatures in SB. As general rule, this f eature should be disa bled f or desktop and enabled f or mobile. Se e AMD SB710 Power Saving document f or more details. Options: Disabled (Default) / EnabledA880G+/A785G3+ BIOS Manual306 Performance MenuThis submenu allows you to cha nge volta ge and c lock of various de vices.(However, we suggest you use the default setting. Changing the voltage and clock improperly ma y damage the device.)Noticez Beware of that se tting ina ppropriate values in items of this menu ma y causesystem to malf unction.CPU VcoreThis item allows you to select C PU Volta ge Contr ol.CPU NB Over VoltageThis item allows you to select C PU NB Voltage Control.Chipset Over VoltageThis item allows you to select Chipset Voltage Control.HT Over V oltageThis item allows you to select HT Voltage Control.A880G+/A785G3+ BIOS Manual31Memory Over VoltageThis item allows you to select DDR Voltage Control.CPU FrequencyThis item allows you to select the CPU Frequency. Options: 200 (MHz) (Default) / 200-600CPU FID/VID ControlCust om P-StatesThis item allows you to select the P-State s controlling. Options: Disabled (Default) / EnabledCore VIDThis f unction allows you to adjust the vo ltage of CPU.Core FIDThis item allows you to select the Ratio/Frequency of CPU. Options: x8.0 1600MHz ~ x16.5 3300MHzA880G+/A785G3+ BIOS ManualCore DIDThis is the Core Divide r.Options: Divided by 1 (Def ault) / Divided by 2 / Divided by 4 / Divide d by 8 / Divided by 16NB VIDThis f unction allows you to adjust the vo ltage of NB chip.NB FIDThis item allows you to select the Freque ncy of NB chip.Options: 800MHz ~ 2000MHz (Di ff ere d by CPU)DRA M Timing ConfigurationMemory Clock ModeThis item allows you to control the Memory Clock.Options: Auto (Def ault) / Limit / ManualMem clock V alueThis item allows you to set the Memory Clock.Options: DDR3-800 (Default) / DDR3-1066 / DDR3-1333 / DDR3-160032A880G+/A785G3+ BIOS Manual33DRAM Timing ModeThis item allows you to choose to manually or automatically regul ate the DRAM Timing.Options: Auto (Def ault) / DCT0 / DCT1 / BothCAS Latency (CL)Options: Auto (Default) / 4~12 CLK2T CommandOptions: Auto (Def ault) / 1T / 2TTRCDOptions: Auto (Def ault) / 5~12 CLKTRPOptions: Auto (Def ault) / 5~12 CLKtRTPOptions: Auto (Def ault) / 4~7 CLKTRASOptions: Auto (Def ault) / 15~30 CLKTRCOptions: Auto (Def ault) / 11~42 CLKtWROptions: Auto (Def ault) / 5~8 / 10 / 12 CLKTRRDOptions: Auto (Def ault) / 4~7 CLKtWTROptions: Auto (Def ault) / 4~7 CLKtRFC0 / tRFC1 / tRFC2 / tRFC3Options: Auto (Default) / 90ns / 110ns / 160ns / 300ns / 350ns。
谁才是性价比之王?18款880G全面评测泡泡网主板频道7月10日从AMD发布8系列芯片组开始,880G就已其优秀的性价比成为了8系列芯片组中耀眼的明星。
而在AMD发布8系列芯片组之后的这一个季度内,主板厂商的反应速度也是非常的迅速,都纷纷推出了相应的产品来抢占市场。
面对“性价比”这三个字,主板芯片组和主板产品在这三个字的考量上是不一样的——AMD 880G芯片组性价比体现在集显性能、高清硬解等方面,而880G主板更是要体现除性能之外的各种附加价值,比如开核。
那么,谁才是“性价比芯片组”中的“性价比之王”?这就是我们今天880G横评的主题。
本次我们收到了来自18家主板厂商的18款产品,它们代表了目前AMD中端市场上的骨干力量,同时又代表了各自东家的最好的产品素质。
这18款产品分别是:翔升金刚R880G-U华擎880G Extreme3华硕M4A88TD-V EVO/USB3映泰TA880G HD七彩虹战旗C.A880G X5精英A885GM-M2富士康A88GM Deluxe技嘉GA-880GMA-UD2H捷波悍马HZ03铭瑄M3A880G微星880GMA-E45昂达A88GT/128M魔固版梅捷SY-A88G-GR斯巴达克BA218顶星F-A880G双敏UR880GT全固态网吧特供版盈通A880GT索泰ZT-880GD3-M1DH同时,通过本次横评您还将了解到如下信息:都叫RS880?880G与同门师兄弟之间的区别有关UVD 2.0的那些事完美支持——HDMI 1.3极具实用价值的视频应用SB850还是SB810?这是个问题…SB850还是SB710?这也个问题!主板Bios对TurboCore支持程度有区别影响GPU超频能力:北桥电压和散热的问题Black Edition和高频内存有了用武之地SB850破核分两种:软破和硬破神奇的880G创造499元神话?与往常一样,在介绍产品之前我们先来回顾一下880G芯片组的背景资料以及我们在之前文章中所陈述的一些观点。
一、CPU分为AMD和INTEL 两大厂商小(一)、AMD分为AM2和AM3 AM2针数为940(也有939和754针) AM3针数为938 AM2的CPU型号为:Athlon 64 X2 3600+ 缓存1MB,功耗65W Athlon 64 X2 3800+ (缓存512Kx2,功耗65W Athlon 64 X2 4000+ 缓存1MB,功耗65W Athlon 64 X2 4200+ 缓存512Kx2,功耗65W Athlon 64 X2 4200+ 缓存512Kx2,功耗65W Athlon 64 X2 4400+ 缓存1MB,功耗65W Athlon 64 X2 4400+ 缓存1MB,功耗65W Athlon 64 X2 4400+ 缓存1MB,功耗65W Athlon 64 X2 4600+ 缓存1MB,功耗65W Athlon 64 X2 4800+ 缓存1MB,功耗65W Athlon 64 X2 4800+ 缓存1MB,功耗65W Athlon 64 X2 5000+ 缓存1MB,功耗65W Athlon 64 X2 5000+ 缓存1MB,功耗65W Athlon 64 X2 5000+ 缓存1MB,功耗65W Athlon 64 X2 5200+ 缓存1MB,功耗65W Athlon 64 X2 5200+ 缓存1MB,功耗65W Athlon 64 X2 5400+ 缓存1MB,功耗65W Athlon 64 X2 5400+ 缓存1MB,功耗65W Athlon 64 X2 5600+ 缓存2MB,功耗89W Athlon 64 X2 5600+ 缓存1MB,功耗65W Athlon 64 X2 5600+ 缓存2MB,功耗89W Athlon 64 X2 5800+ 缓存2MB,功耗89W Athlon 64 X2 6000+ 缓存2MB,功耗89W Athlon 64 X2 6000+ 缓存1MB,功耗89W Athlon 64 X2 6500+ 缓存1MB,功耗95WAM3 CPU型号为:Athlon IIX2 215 频率2.7GHz,功耗65W Athlon IIX2 235e频率2.7GHz,功耗45W, Athlon IIX2 240 频率2.8GHz,功耗65W, Athlon IIX2 240e频率2.8GHz,功耗45W Athlon IIX2 240e频率2.8GHz,功耗45W Athlon IIX2 245频率2.9GHz,功耗65W Athlon IIX2 245频率2.9GHz功耗65W Athlon IIX2 245e频率2.9GHz,功耗45W Athlon IIX2 250频率3.0GHz,功耗65W Athlon IIX2 250(频率3.0GHz,功耗65W, Athlon IIX2 250e频率3.0GHz,功耗45W, Athlon IIX2 255频率3.1GHz,功耗65W, Athlon IIX2 255频率3.1GHz,功耗65W, Athlon IIX2 260频率3.2GHz,功耗65WAthlon IIX3 400e频率2.2GHz,功耗45W, Athlon IIX3 405e频率2.3GHz,功耗,45W, Athlon IIX3 405e频率2.3GHz,功耗45W Athlon IIX3 425频率2.7GHz,功耗95W Athlon IIX3 435频率2.9GHz,功耗,95W Athlon IIX3 435频率2.9GHz,功耗95W Athlon IIX3 440频率3.0GHz,功耗95W Athlon IIX3 440频率3.0GHz,功耗95W Athlon IIX3 445频率3.1GHz,功耗95W Athlon IIX4 600e频率2.2GHz,功耗45W Athlon IIX4 605e频率2.3GHz,功耗45W Athlon IIX4 605e频率2.3GHz功耗45W Athlon IIX4 610e频率2.4GHz,功耗,45W Athlon IIX4 620频率2.6GHz,功耗,95W Athlon IIX4 630频率2.8GHz,功耗,95W Athlon IIX4 630频率2.8GHz,功耗,95W Athlon IIX4 635频率2.9GHz,功耗95W Athlon IIX4 635频率2.9GHz,功耗95W, Athlon IIX4 640频率3.0GHz,功耗95WPhenom IIX2 545 频率3.0GHz,功耗80W Phenom IIX2 545频率3.0GHz,功耗80W Phenom IIX2 550频率3.1GHz,功耗80W Phenom IIX2 550频率3.1GHz,功耗80W Phenom IIX2 555频率3.2GHz,功耗80W Phenom IIX3 700e 频率2.4GHz,功耗65W, Phenom IIX3 705e 频率2.5GHz,功耗65W Phenom IIX3 710 频率2.6GHz,功耗95W Phenom IIX3 715频率2.8GHz,功耗95W Phenom IIX3 720频率2.8GHz,功耗95W Phenom IIX3 720 频率2.8GHz,功耗95W Phenom IIX3 740 频率3.0GHz,功耗95W Phenom IIX4 805频率2.5GHz,功耗95W Phenom IIX4 810 频率2.6GHz,功耗95W Phenom IIX4 820 频率2.8GHz,功耗95W Phenom IIX4 900e 频率2.4GHz,功耗65WPhenom IIX4 905e 频率2.5GHz,功耗65W Phenom IIX4 910频率2.6GHz,功耗95W Phenom IIX4 910E频率2.6GHz,功耗65W Phenom IIX4 925 频率2.8GHz,功耗95W Phenom IIX4 925 频率2.8GHz,功耗95W Phenom IIX4 945 频率3.0GHz功耗95W, Phenom IIX4 945 频率3.0GHz 功耗95W Phenom IIX4 955 频率3.2GHz,功耗95W Phenom IIX6 1035T频率2.6GHz,功耗95W Phenom IIX6 1055T频率2.8GHz功耗,95W小(二)、INTEL CPU分为Celeron(R)赛扬、Celeron(R)赛扬D、Pentium(R)奔腾4 (奔腾D为老式双核心)、Pentium(R) Dual-Core奔腾酷睿双核、Pentium(R) Dual-Core 2奔腾酷睿2、 Core I 酷睿I系列。
880G主板BIOS设置详解AMD高调发布8系列的中端产品——880G之后,近期大规模基于880G芯片组的主板产品纷纷露出水面。
虽然这款芯片组是在7系列芯片组的基础上升级而来,但并不代表它们在设置和使用上完全一样,再加上南桥SB850加入之后,让很多BIOS中的选项和设置都发生了变化。
本文仅以微星880GMA-E45主板为例,向大家介绍一下目前市面上880G主板的BIOS设置详解,希望对已经购买或者还没购买880G主板的朋友起到指导的作用。
BIOS界面、主菜单及快捷键设置首先我们从最基本的层面开始介绍——BIOS界面、主菜单及快捷键设置。
BIOS设置快捷键BIOS主菜单1、Standard CMOS Features标准CMOS属性2、Advanced BIOS Features 高级BIOS 属性3、Integrated Peripherals整合周边设备4、Power Management Setup电源管理设置5、H/W Monitor硬件监测6、Green Power 绿色节能7、BIOS Setting Password 开机密码设置8、Cell Menu 核心菜单9、M-Flash U盘刷新BIOS10、Over Clocking Profile超频预置文件11、Load Fail-Safe Defaults加载安全缺省值12、Load Optimized Defaults加载优化值13、Save & Exit Setup保存设置并退出14、Exit Without Saving退出而不保存Standard CMOS Features/标准CMOS属性标准CMOS可以设置的有4项:日期、时间,自检错误。
其他都不能设置。
可以及查看存储设备和系统信息。
1、日期和时间设置用小键盘的“+”和“-”键,或者Page Up/Page Down键修改数值。
用4个方向键移动光标。
2、硬盘光驱配置信息2-1、IDE Primary Master/IDE Primary Slave:主IDE通道的主/从设备(硬盘或光驱)。
IntroductionApplications•Complete system applicationsThe HDVS-200-TX-WP and OME-RX21 or HDVS-200-RX together provide a compact, yet comprehensive and cost-effective system integration solution with automatic input selection, HDBaseT extension, display control capabilities, room control, and essential audio processing.•Larger system applicationsThe HDVS-200-TX-WP is ideal for extending AV connectivity from a central equipment rack to lecterns as well asremote wall and floor box locations, where presenters can easily access the system.The terms HDMI, HDMI High-Definition Multimedia Interface, and the HDMI Logo are trademarks or registered trademarks of HDMI licensing Administrator, Inc.The AT-HDVS-200-TX-WP is a 2×1 wall plate switcher for HDMI and VGA inputs with HDBaseT output. It features a US, two-gang, Decora form factor with one HDMI and one VGA input with an always-on 3.5mm audio connector. HDMI signals up to 4K/UHD @ 60Hz (YUV 4:2:0 color sub-sampling), VGA input signals up to 1920×1200, embedded audio, and control signals can be extended up to 330 feet (100 meters). The switcher receives power from the AT-HDVS-200-RX scaler via Power over Ethernet and together they create a standalone AV switching and control system with scaling for classrooms and huddle rooms. Display control and volume commands are transmitted via CEC, IP , or RS-232 to any display, control system, switcher or other controllable device.The AT-HDVS-200-TX-WP can be the central component of a small, automated AV system. Automatic displaycontrol turns-on the display automatically whenever a source is connected. When the source is removed, the display is turned off. Volume is controlled by using the front panel or other control signals. Automatic input selection on the AT-HDVS-200-TX-WP works by sensing the presence of any video signal. With automatic input selection, manual control systems can be eliminated.Using the AT-PS-POE, it can connect directly to Atlona HDBaseT receivers such as the AT-UHD-EX-100CE-RX or projectors with HDBaseT inputs, enabling simplified control and adding legacy VGA inputs at the HDVS.Key FeaturesUS two-gang enclosure for Decora-style wallplate openings• Allows inconspicuous installation on a wall, in furniture, or in a floor box.• Includes white wallplate.• Ships with Ethernet port concealed – interchangeable faceplate included with port opening.• Also available in black – AT-HDVS-200-TX-WP-BLK.2×1 HDBaseT switcher• Features an HDMI input plus a VGA input with audio.• Allows advanced HDMI display devices to be used with legacy VGA sources.• Audio input can be assigned to either video input.• Audio-only playback available without video signal present.Remotely powered via PoE (Power over Ethernet)• IEEE 802.3af PoE Powered Device (PD).• Power for transmitter is supplied by the AT-OME-RX21, AT-HDVS-200-RX, or other Atlona device over HDBaseT.• Saves time and integration costs.Automatic display control• Automatically changes display power state based on active or standby mode of the switcher. Controlsignals to display are transmitted via IP, RS-232, orCEC.• Enables display and volume control. CEC enables control of consumer displays.• Eliminates the need for a complex AV control system.Automatic input selection using hot plug detect and video detection technology• Selects active input when sources are connected or if there is a change in source power status.• Enables simplified, automatic system operation with no user intervention necessary.TCP/IP and RS-232 control of switcher• Flexible control options for compatibility with third-party control systems.• Reduces integration time and costs.4K/UHD capability @ 60 Hz with 4:2:0 chroma subsampling• Compatible with sources up to 4K/60 4:2:0 and 4K/30 4:4:4.• Allows 4K/UHD transmission when used with a compatible HDBaseT-equipped display or HDBaseT receiver.Front panel volume control• Remotely controls audio volume; provides ‘Mute’ mode.• Eliminates need for manual operation of display or use of IR remote control.HDCP 2.2 & 1.4 compliant• HDCP 1.4 compliant when used with the AT-HDVS-200-RX.• HDCP 2.2 compliant when used with an HDCP 2.2 compliant receiver or switcher, such as the AT-OME-RX21 or AT-HDVS-SC-RX.• Allows protected content stream to pass between authenticated devices.Extended distance HDBaseT extension• Transmits AV, control, and Ethernet up to 330 feet (100 meters) @ 1080p with CAT5e/6 or 4K/UHDusing CAT6a/7 cable.• Uses easy-to-integrate category cable for low-cost, reliable system installation.EDID management• Manages EDID communications between source and switcher; allows integrators to force a source to apreferred resolution.• Ensures desired audio formats and video resolutions are provided to the AV system.HDCP management• HDCP compliance can be disengaged through AMS or a control system.• Allows non-protected material from PCs to pass to non-compliant displays, streaming devices, andteleconference systems; protected content is nottransmitted.Key Features (continued)Front panel input select button• Overrides auto-switching when more than one active source is present.• Simple manual operation allows presenter to maintain control of AV system.Front panel display on/off control• Remotely controls display power state.• Alternate mode available to mute video output and send display into standby.• Eliminates need for manual operation of display or use of IR remote control.Front panel volume control• Remotely controls a display’s internal audio volume using TCP/IP or RS-232.• Muting also available via AMS or third-party control system.• Eliminates need for manual operation of display or use of IR remote control.Integrated HDBaseT link status monitoring• Continuously monitors integrity of the HDBaseT cable link between the transmitter and the receiver.• Web GUI provides real-time link status, plus detailed HDBaseT and HDMI signal information.• Quick, easy verification or troubleshooting of RJ-45 termination or twisted pair cable quality.Configured and managed by AMS (Atlona Management System)• This IP-controllable product is remotely managed by the Atlona Management System software.• Integrates product configuration, management, and updates to reduce installation time and enableremote support.Field-updatable firmware• USB port provides an easy means for device updates.• Ensures long-term system return on investment.Front panel power and input selection status LEDs • LED indicators provide power and input selection status information.• Provides easy setup and troubleshooting.Included accessories• User guide, white wallplate, and interchangeable faceplate with Ethernet port opening.Award-winning 10 year limited product warranty • Ensures long-term product reliability andperformance in commercial and residential systems.• Specify, purchase, and install with confidence.SpecificationsAccessoriesFootnotes(1) 4096×2160@50/60Hz & 3840×2160@50/60Hz supported @ chroma subsampling 4:2:0 8-bit only.© 2020 Atlona Inc. All rights reserved. “Atlona” and the Atlona logo are registered trademarks of Atlona Inc. All other brand names and trademarks or registered trademarks are the property of their respective owners. Pricing, specifications and availability subject to change without notice. Actual products, product images, and online product images may vary from images shown here.。
映泰b250gt3说明书
首先还是了解一下机箱上前置USB各个接线的定义。
通常情况下,红线:电源正极(接线上的标识为:+5V或vCC)、白线:负电压数据线(标识为:Data-或uSBPort-)、绿线:正电压数据线(标识为:Datat或USBPort+)、黑线:接地(标识为:GROUND或GND)。
某些机箱厂商基于其本身的工艺设计要求,信号线的颜色会与上面介绍的不尽相同,而且考虑到与主板接线的方便性、准确性、通用性,有的机箱厂商将USB线做到一个模块上(诸如银河
5GNO1、5GNO2、B01机箱,Lite-OnG525E机箱,嘉田5208机箱等),有的机箱厂商考虑到USB线与主板连接时的通用性,则将信号线进行分散并对每一根信号线作以标识(诸如爱特立机箱、富士康机箱、永阳YY5601机箱等),这样为了适应很多类型的USB接口(以下介绍)。
但无论机箱的USB线如何定义,只要明白主板上前置uSB接口的每一根针是如何定义的,就不会将USB线接错!
映泰b250gt3主板的各项BIOS设置此篇是原汁原味的映泰b250gt3主板的各项BIOS设置.其中和性能有关,需要重新设置的我做了详细的介绍.其它默认的请大家参考一下说明书.TF系列都可以参照此帖.不过先说明一下:此篇并非为超频所设!。